Introduction:
With Innovation of new technology and introduction of new tools by different Cloud Providers, I am trying to create a Blog on one of the most critical testing requirement for any SAP Landscape which is System Refresh or System Copy with minimum (zero) downtime with no Business Impact, by using AWS own native tool CloudEndure, which can be used for DR solutioning as well.
This Blog can also be taken as an entry point for all who is willing to plan for DR setup by utilizing this AWS CloudEndure tool in there AWS Cloud Account.
Pre-Requisite:
These are the following points which needs to be done before you proceed for adapting the process defined in this document:
- You have AWS account setup
- You have your SAP landscape either migrated to AWS Cloud or you are planning to migrate from on-premise datacenter to AWS cloud. One can use this document as reference too in planning there migration to cloud as on the same logic AWS SMS tool also working and can be utilize to migrate your landscape to AWS Cloud.
- In AWS you have already defined your VPC, Subnets, Routes, NACL, Security Groups, NatGateway, Internet Gateway and Transit Gateway. These will help you in accessing your system from outside.
- Also you have Admin user (access key ID and secret access key) detail available of your AWS account. In case of Multi account setup you need Admin user detail for your Source and Target account.
- Admin User ID has been created and proper authorization/policy has been assigned in AWS cloud. Here in my case I have assigned “AdministratorAccess” policy to my user ID.
Note: On all the above points I am not going to provide any detail in this blog.
CloudEndure Architecture:
As per AWS the following figure will represent the architecture of CloudEndure

It supports all the AWS region. In the above screen shot i have shown specific region because in my example I have selected the above two regions.
Assumptions:
Here I have taken one SAP application (WebDispatcher) which was installed in AWS US East 2 (Ohio) reason and I have used AWS CloudEndure and migrate the Entire Server to AWS EU Frankfurt Reason and rename the System, with no impact on the availability of my source system in AWS US East 2 region. All replication happened in the Background.
Some more details are as follows:
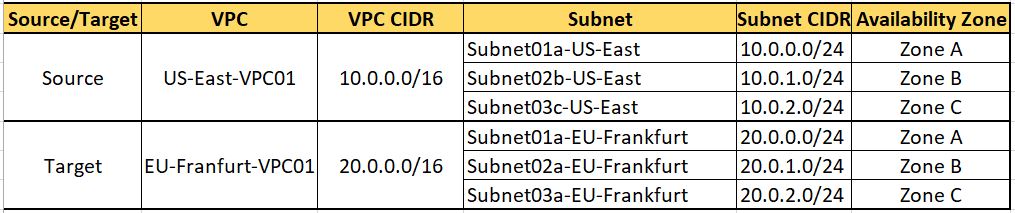
Note: Don’t worry if you won’t able to understand the above details. The above details are just meant to show that in my case the Source and Target Network CIDR is entirely different for Source and Target region, But one can have the same CIDR as well at both the places.
CloudEndure Setup:
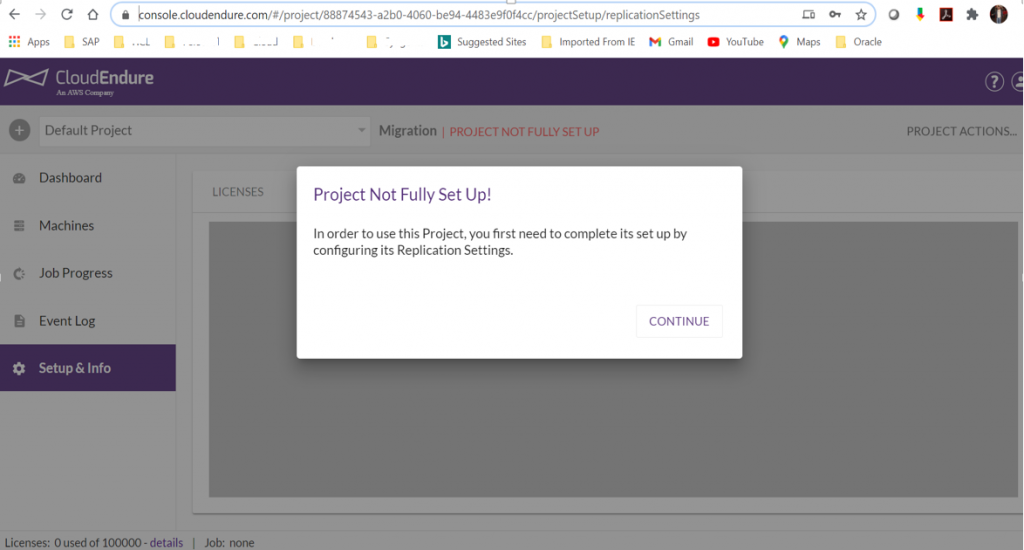
Before one can proceed one need to setup a Project in CloudEndure.
Create your account by login to the following link:
https://console.cloudendure.com/#/signIn
Setting up the Project steps are as follows:
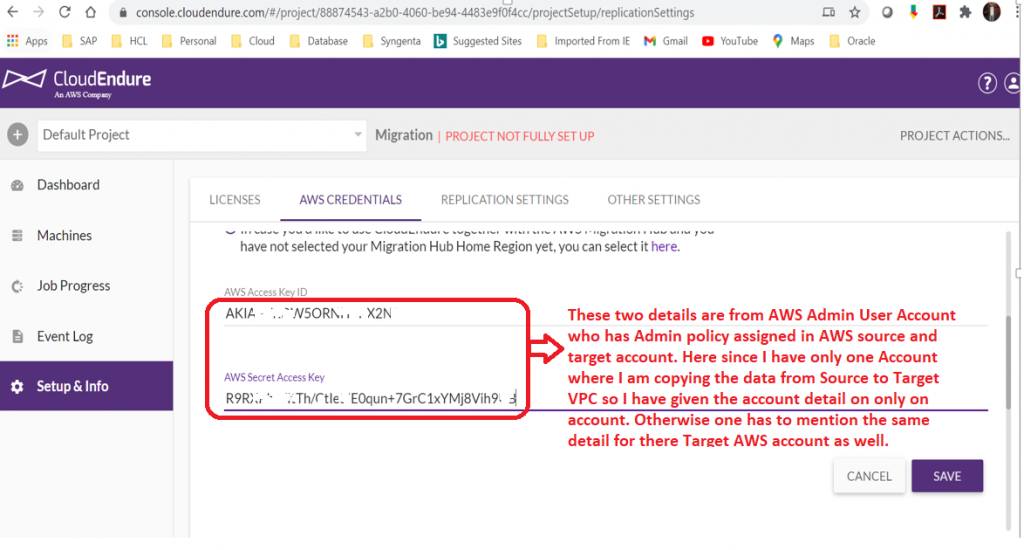
Provide the “Access Key D” and “Secret Access Key” in the screen for your “Admin” account user and click on “SAVE”.
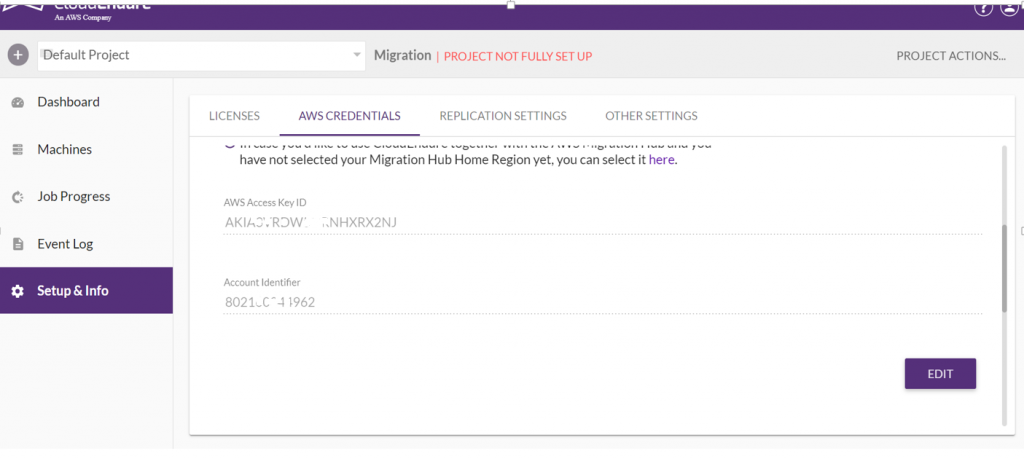
Once CloudEndure connect with your AWS account then it will start showing up your AWS account number as shown above in the screen shot.
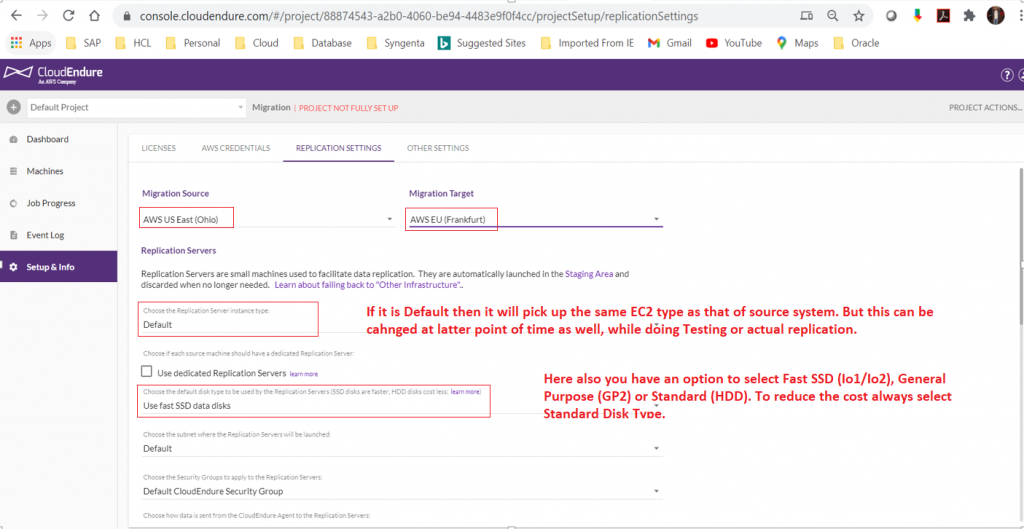
Now as per your requirement Provide detail in the Replication Settings tab. Recommendations for the above details are as follows:
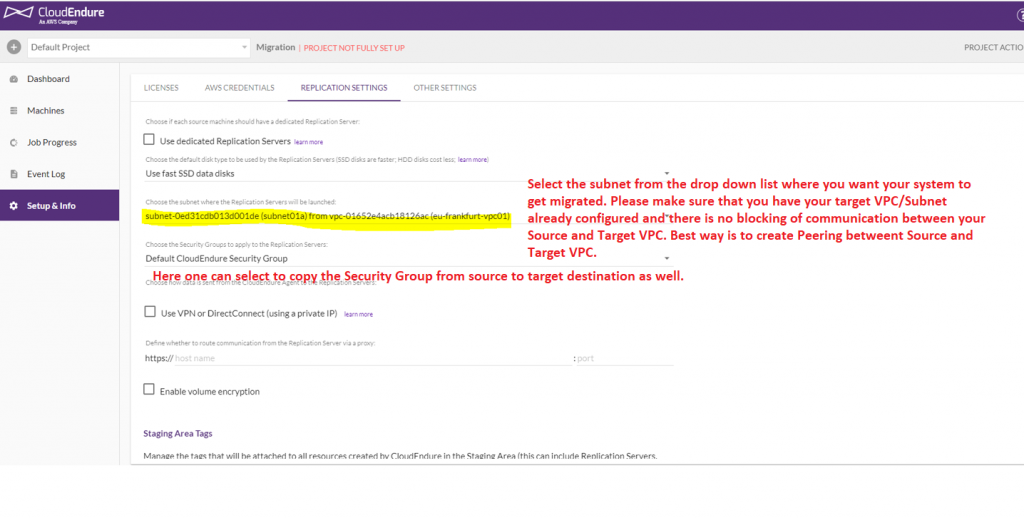
- Make sure that VPC and Subnet has been identified in Target AWS destination/account.
- For Replication Server Type, I prefer the Default as this will result in selection of EC2 type according to your Source System EC2 Type.
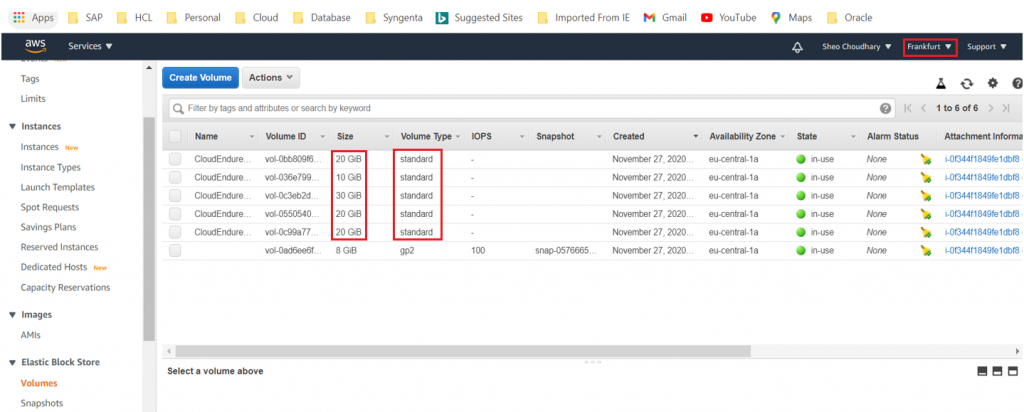
- Always select “Standard” Data disk for your Replication server. In the above screen shot it is shown as “Fast SSD Data Disk”, but at the time of actual replication I have changed it to “Standard”.
- Choose the Subnet from the drop down for relevant section shown below.
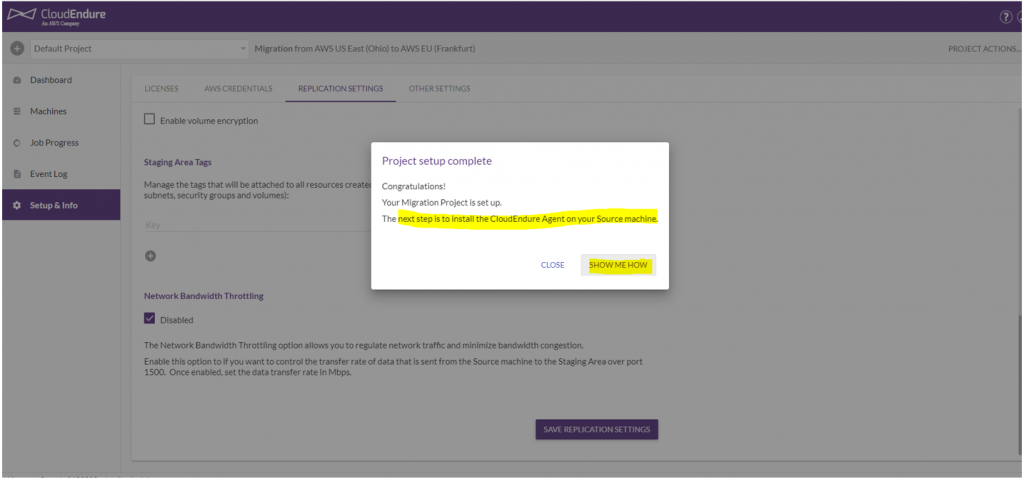
Now the next screen will show the process on how to register your Target Ec2 server with CloudEndure.
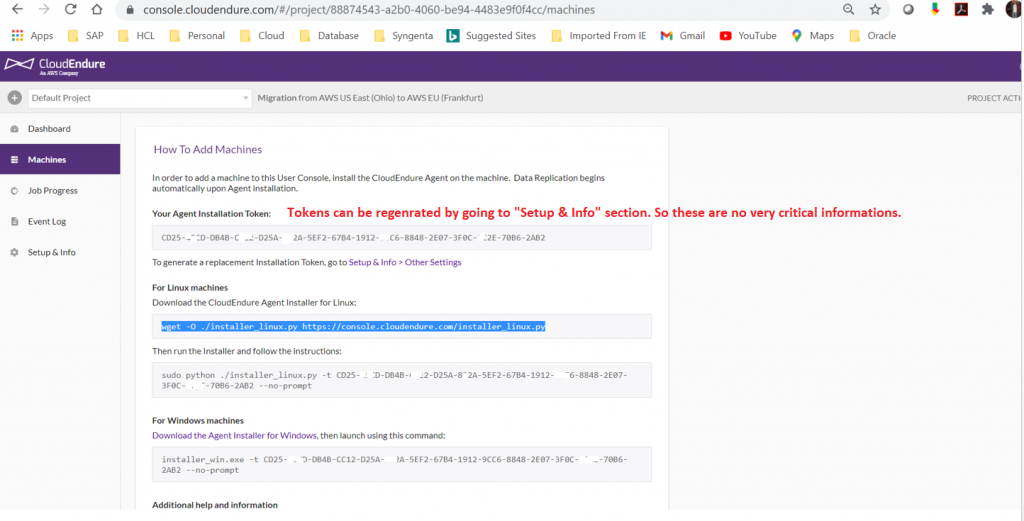
Login your Source EC2 server as “root” user and perform the following tasks:
#wget -O ./installer_linux.py https://console.cloudendure.com/installer_linux.py
#sudo python ./installer_linux.py -t <Agent Installation Token> –no-prompt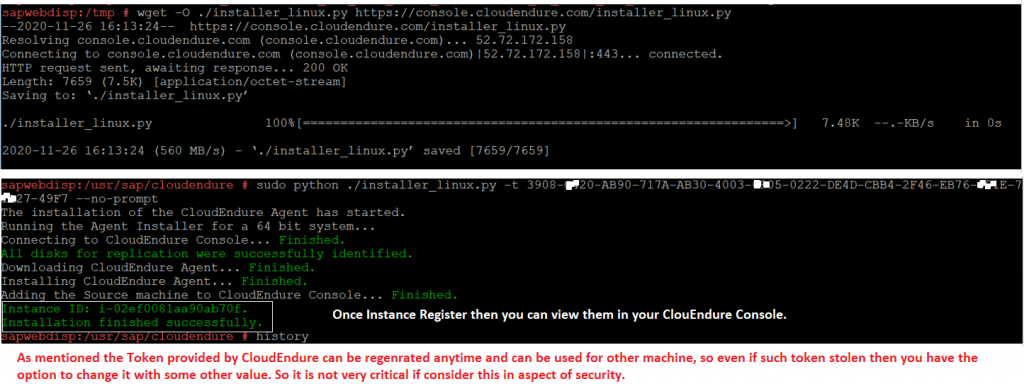
Once registration complete one can see the following details in CloudEndure account.
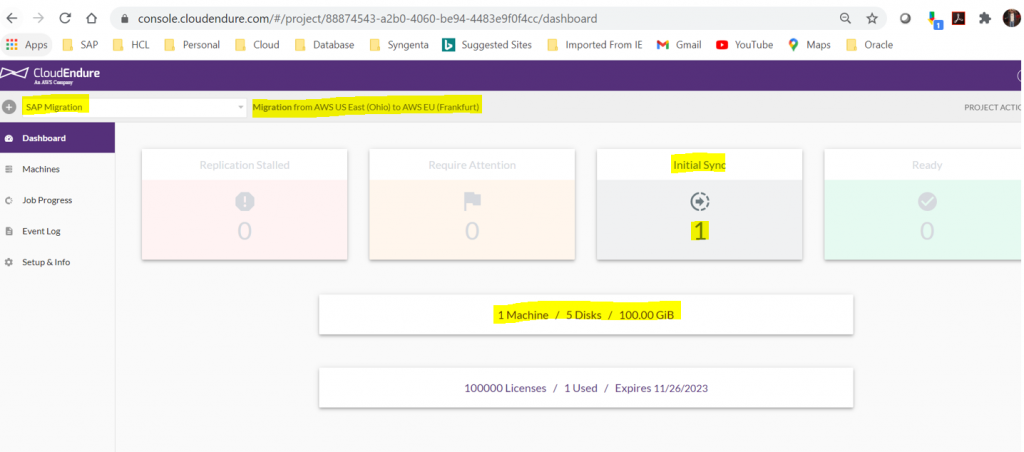
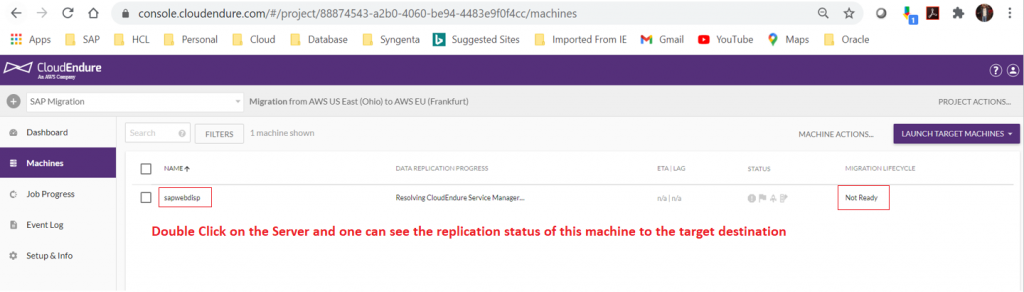
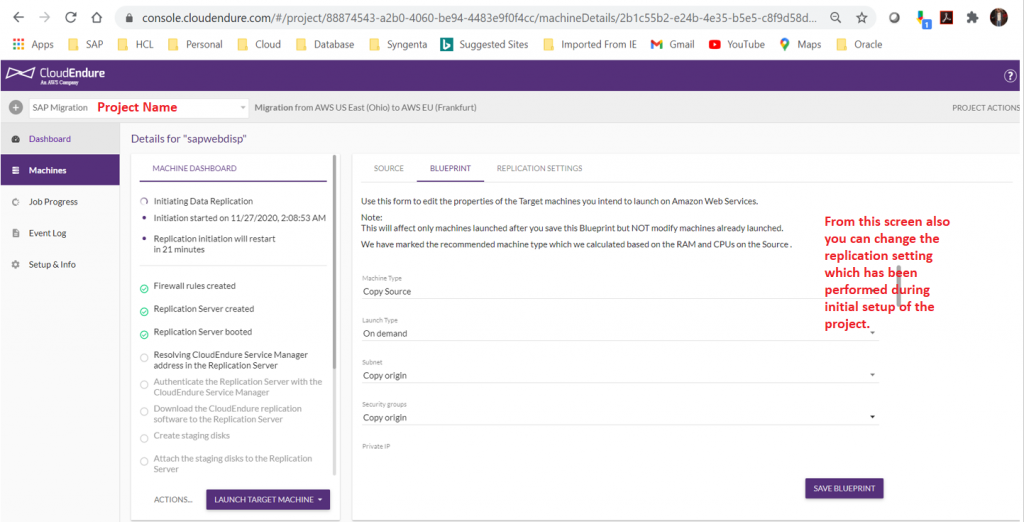
Once the EC2 server on which SAP systems installed registered with CloudEndure, it will first fetch all the Metadata of the servers. One can see the process by double clicking on the Server registered above.
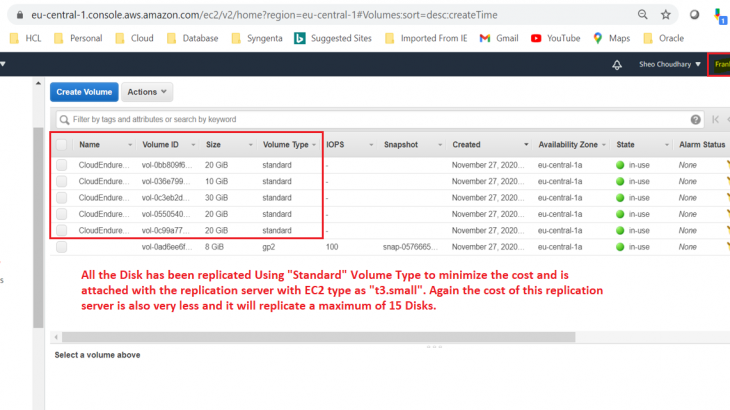
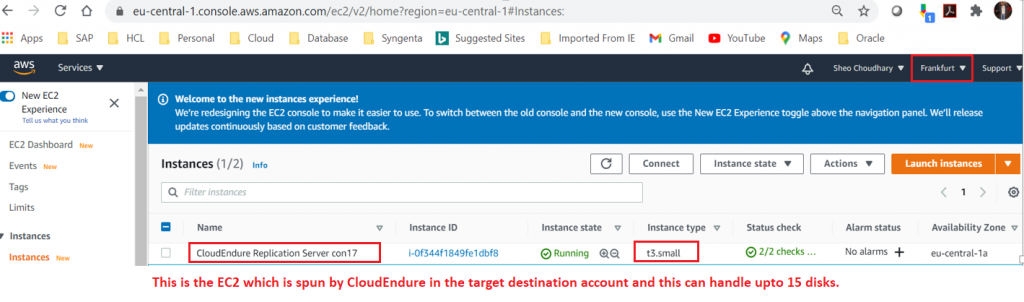
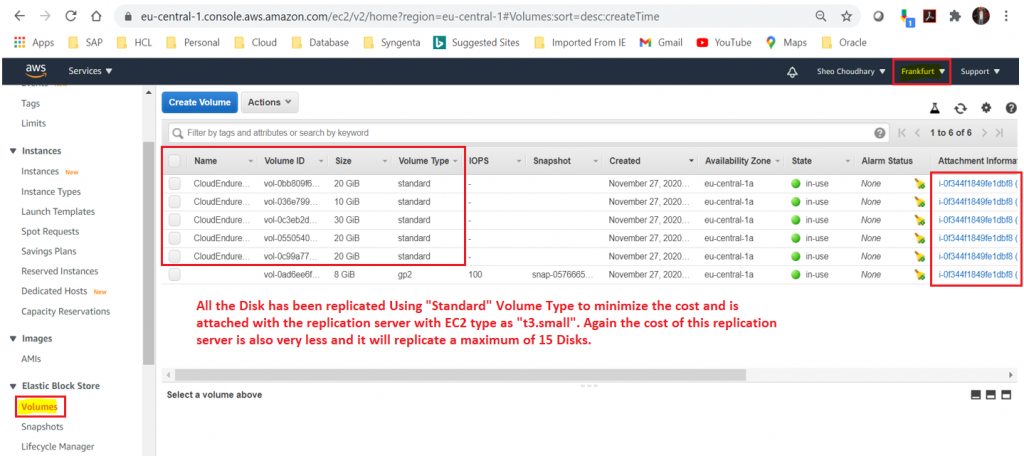
After the Metadata replicated to CloudEndure the actual replication of the Storage (EBS/EFS) volumes are getting started to the target AWS account through a very small EC2 server (t3.small), which can handle upto 15 EBS volumes. If more than 15 EBS is attached or the cumulative number of EBS volumes is more than 15 then an addition EC2 server (t3.small) will get started by CloudEndure.
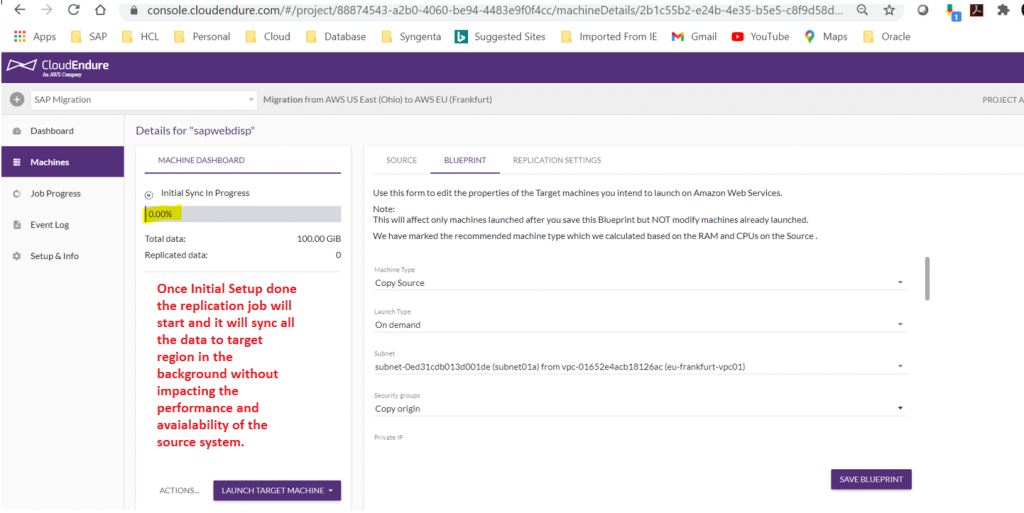

The throughput and IOPS are quite fine as it has taken only 25 minutes for 100GB of data getting replicated to Target AWS account. If Business is critical about the performance of there Source systems due to such additional IOPS and Throughput, then one can suspend the replication and start it as per Business workload.
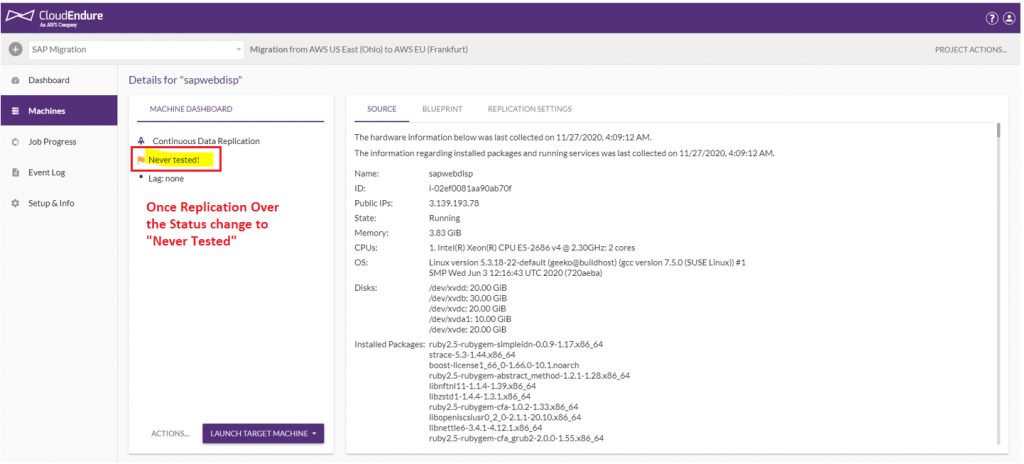
Once Initial Sync and replication is over the status will change to “Never Tested”.
As one can see from the above screen shot that all the replicated EBS volumes (Disk) attached with the Replicating server (spun by the CloudEndure automatically). These are the EBS volume which are getting used for taking the snapshot when actual Target System Provisioning is being done.
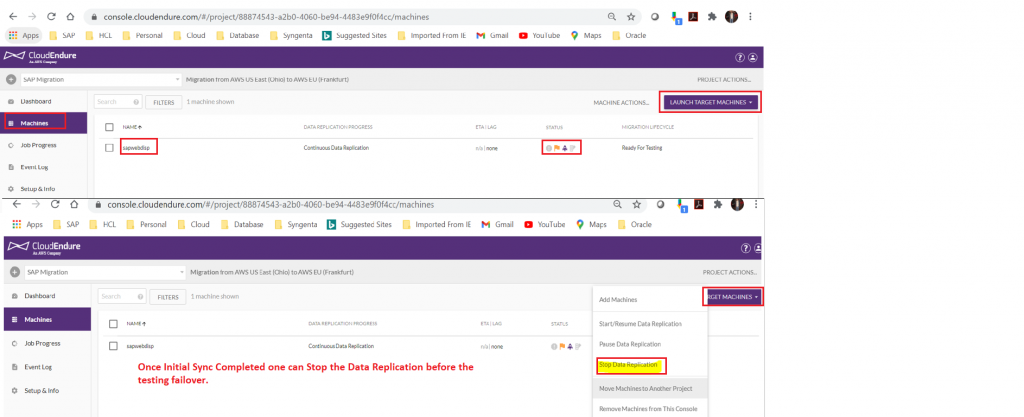
Before actual DR or System Refresh/copy or Testing of DR the replication needs to be stopped as shown above.
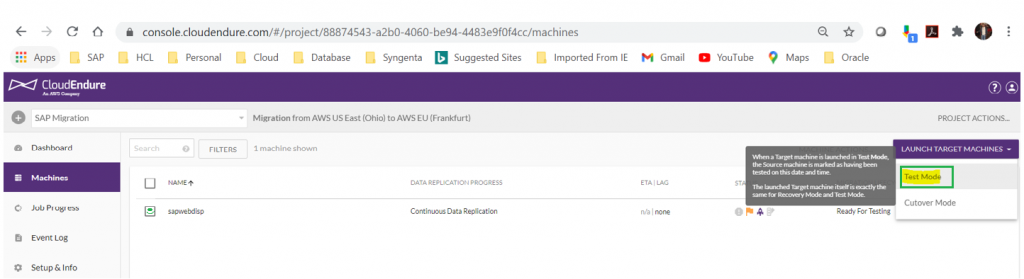
Now use “Test Mode” to spun the Target SAP system in Target AWS account.
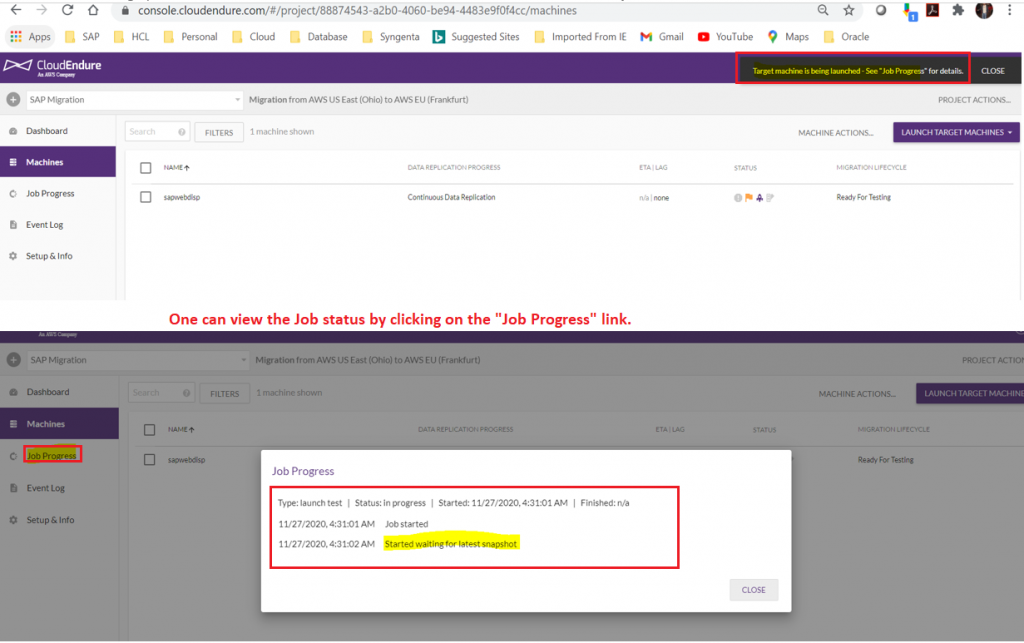
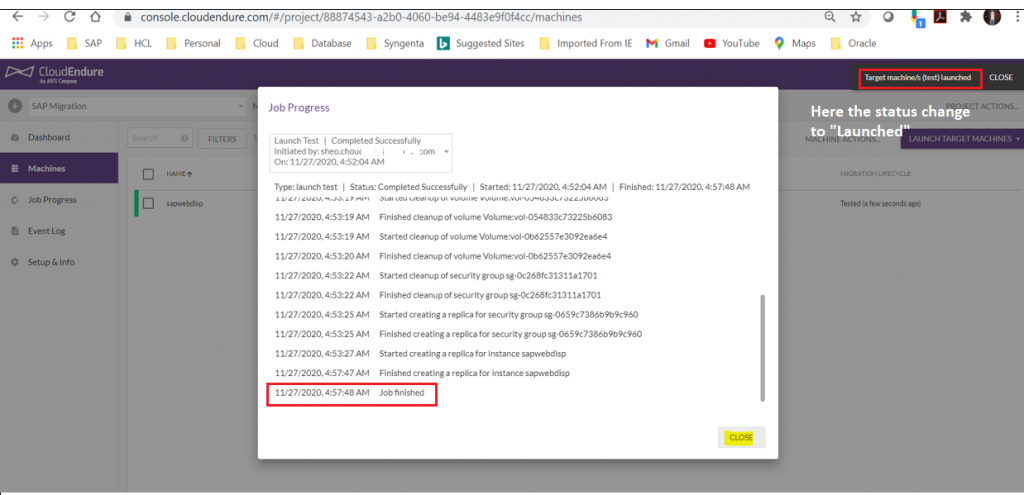
Keep monitoring the Job completion. It will take anywhere between 20-40 Min to complete.
After completion of the job verify the Server detail by login to your AWS console.
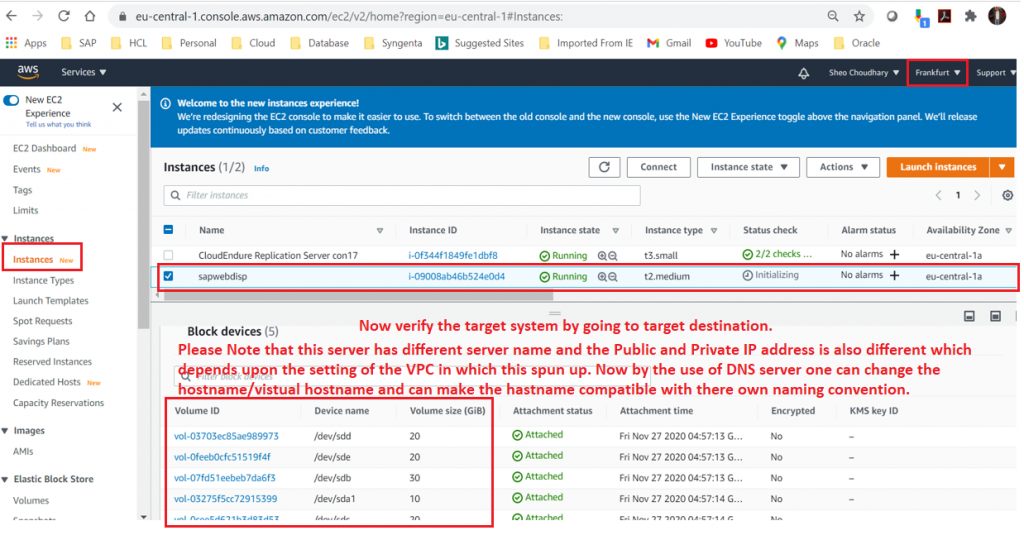
Every client has certain naming convention for there SAP Application servers. Once The server is available then adopt the server name accordingly and update this detail into the DNS server used for the entire AWS account. Sometimes customer using the virtual hostname and they update this virtual hostname in DNS against the actual hostname of the AWS servers. There are many ways to achieve this.
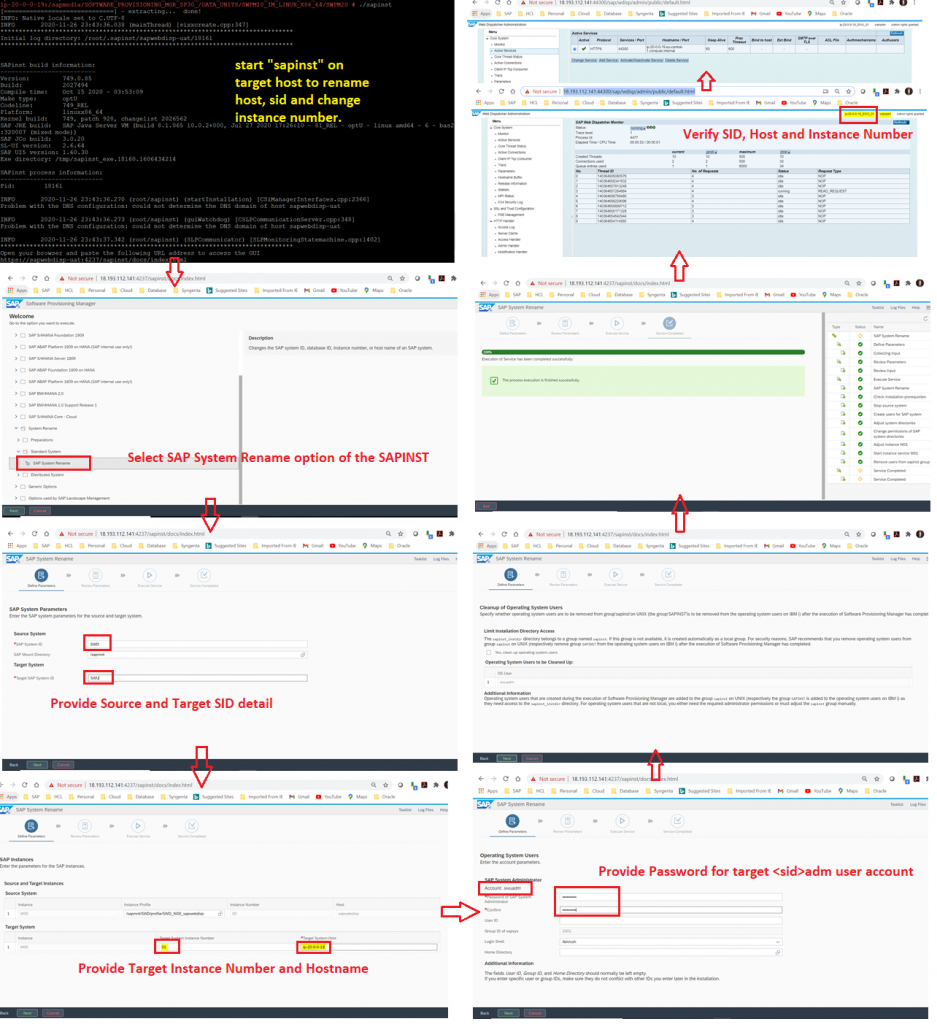
After server detail updated in HOST file and DNS, reboot the server and then proceed with SAP System Rename through “SAPINST”. Few of the steps has been covered in the following screen shot where since I have choosen “SAP Webdispatcher” so no DB SID renaming screen is present. One can go to following link which talks specifically about System Rename through SAPINST.
In this blog I am not touching upon the Post Activities which needs to be carried out after System Rename. Few of them may be as follows:
- Logical system rename and update it’s details everywhere
- Check all RFC connection
- Modify Inbound and Outbound QRFCS
- Take care about all the mount points and folder structures
- Modify the parameters
- Update in SLD and integration with Solution Manager and rest of the systems
- Task related to security
- Update of Transport route
- Release it to functional team to perform purging and masking of sensitive data.
- Once testing done by Functional team and got a go ahead then release it to developers and testers.
Note: Might be some more post activities would be there but that is not I want to cover in this blog.
Cleansing of CloudEndure Setup:
In this activity we need to perform the following three tasks:
- Delete the CloudEndure Project through console
- Terminate the CloudEndure EC2 server provisioned automatically to replicate all EBS volumes at target AWS destination/account
- After termination of EC2 (t3.small) make sure that all the EBS volume attached also got deleted. If it is not then delete them manually
Please see the following screen shot for more detail.

CloudEndure Costing:
Some of the costing and important information of resource requirement is shown below:


Issues Faced and references:
- During Installation of CloudEndure agent I was getting the error “gcc was not found and could not be automatically fetched”.

Solution: Execute the following command at OS level:
#wget http://software.opensuse.org/package/gcc48

#zypper install gcc48

#cd /usr/bin

#ln -s gcc-4.8 gcc

#type gcc
Also I have looked into the Kernel Mismatch issue. But according to me if your OS is licensed then such issue will not appear and it’s a straight forward task.


