1) About This blog
This blog describes the detailed technical step by step in S/4HANA 1909 SP01 for Implementing SAP Best Practices solutions (US and Canada) in a merged client.
2) System Details
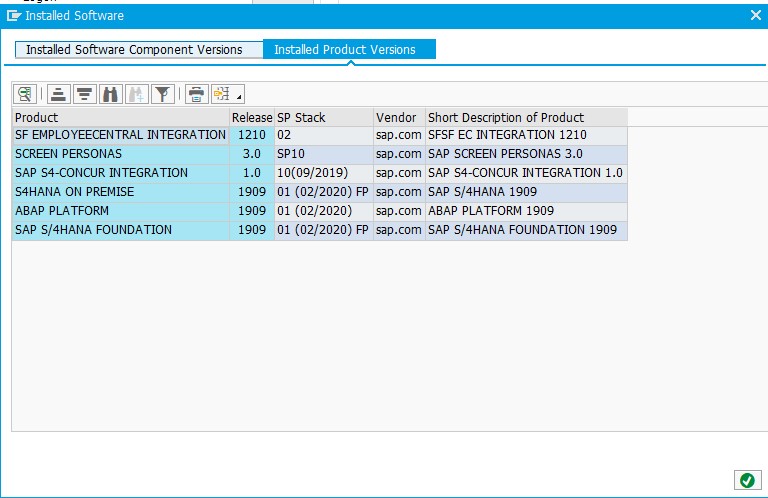
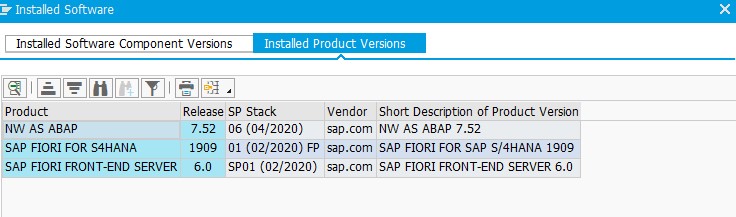
SAP S/4 HANA system as shown with below components is already installed and basic configuration and task list are all executed.
Also Read: What is SAP S/4HANA Management Accounting Certification?
Note – All the products are not mandatory as shown below, only S4HANA ON PREMISE, ABAP PLATFORM and SAP S/4 HANA FOUNDATION are required. Rest all are add-ons.

3) Pre-requisites settings
1. SAP GUI Settings
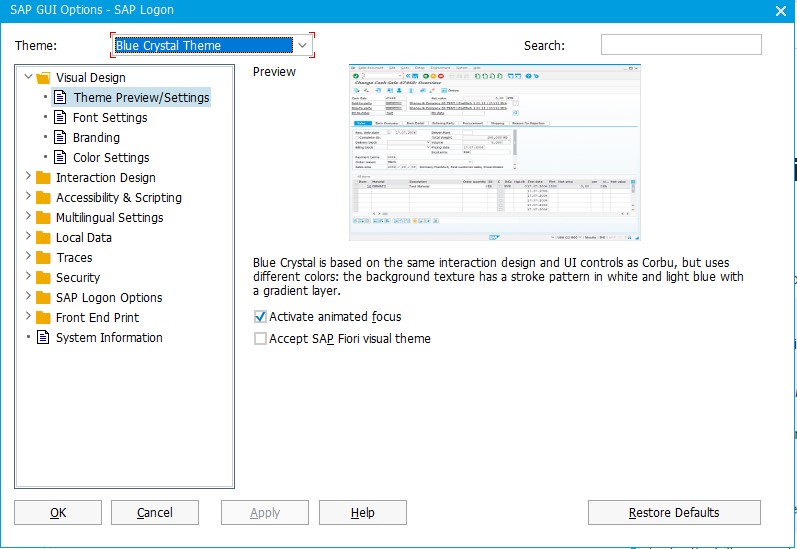
If you are using SAP GUI 7.50, carry out the following procedure (the MM01 eCATT currently fails with the default theme):
1. In the SAP GUI 7.50 Logon, expand Visual Design and choose Theme Preview/Settings.
2. The Blue Crystal Theme appears by default in the Theme drop-down box. To proceed with this theme, continue with step
3. To choose any other theme, skip step 3 and continue with step 4.
3. Deselect Accept SAP_Fiori visual theme.
4.Choose OK.
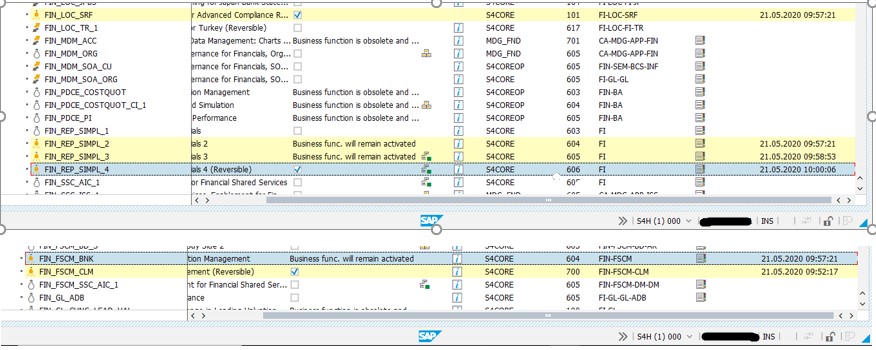
2. Required Enterprise Business Functions
Activate the Business Functions in the table below after installing SAP S/4HANA, but before activating the SAP Best Practices for SAP S/4HANA package.
NOTE: Do not activate additional Enterprise Extensions or Business Functions (in addition to the required BF mentioned for SAP BP deployment) before content activation. This can result in errors during activation of SAP Best Practices content. Additional Business Functions can be activated any time after content activation, but this requires regression testing of the business processes as it is usually part of any system maintenance activities.
| Product | Business Function | Relevance |
| S4CORE | FIN_FSCM_CLM | Required for scope items J77, J78, 2O0, and 3L5 (building blocks BFD, BFE, BFF, and 3TF). – Note Requires an additional license. all FPSs |
| S4CORE | FIN_FSCM_BNK | Required for scope item J78 (building blocks J83, BF4). – Note Requires an additional license. all FPSs |
| S4CORE | FIN_LOC_SRF | Required for scope item 1J2 (building block BRS). – Note Requires an additional license. all FPSs 1J2 is only relevant for specific countries. |
| S4CORE | FIN_REP_SIMPL_2 | Required for Financials Reporting / all FPSs |
| S4CORE | FIN_REP_SIMPL_3 | Required for Financials Reporting / all FPSs |
| S4CORE | FIN_REP_SIMPL_4 | Required for Financials Reporting / all FPSs |
| S4CORE | LOG_EAM_SIMPLICITY | Required for scope items BH1, BH2 and BJ2 (building blocks BFI, BFJ, BFM and BFN) |
| S4CORE | LOG_EAM_SIMPLICITY_2 | Required for scope items BH1, BH2 and BJ2 (building blocks BFI, BFJ, BFM and BFN) |
| S4CORE | LOG_EAM_SIMPLICITY_3 | Required for scope items BH1, BH2 and BJ2 (building blocks BFI, BFJ, BFM and BFN) |
| S4CORE | LOG_EAM_SIMPLICITY_4 | Required for scope items BH1, BH2 and BJ2 (building blocks BFI, BFJ, BFM and BFN) |
| S4CORE | LOG_EAM_SIMPLICITY_5 | Required for scope items BH1, BH2 and BJ2 (building blocks BFI, BFJ, BFM and BFN) |
| S4CORE | LOG_EAM_SIMPLICITY_6 | Required for scope items BH1, BH2 and BJ2 (building blocks BFI, BFJ, BFM and BFN) |
| S4CORE | LOG_EAM_SIMPLICITY_7 | Required for scope items BH1, BH2 and BJ2 (building blocks BFI, BFJ, BFM and BFN) |
| S4CORE | LOG_EAM_SIMPLICITY_8 | Required for scope items BH1, BH2 and BJ2 (building blocks BFI, BFJ, BFM and BFN) |
| S4CORE | LOG_EAM_CI_8 | Required for scope items BH1, BH2 and BJ2 (building blocks BFI, BFJ, BFM and BFN) |
| S4CORE | JVA_ON_ACDOCA | Required for scope item 3F7 Joint Venture Accounting – Restriction This Business Function can only be used for new implementation projects of SAP S/4HANA. Customers upgrading to SAP S/4HANA 1909 in a system where Joint Venture Accounting is already active cannot use this Business Function. |
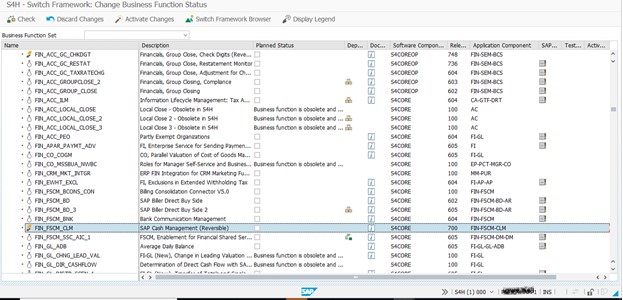
3. Activating Enterprise Business Functions
Prerequisites
You are authorized to make changes in transaction SFW5.
Procedure
1. Start transaction SFW5.
2. On the Switch Framework: Change Business Function Status screen, select each of the entries listed above (by selecting the Planned Status column).
3. Choose the Activate Changes button.
4. The system displays an informational dialog box. Choose Continue.

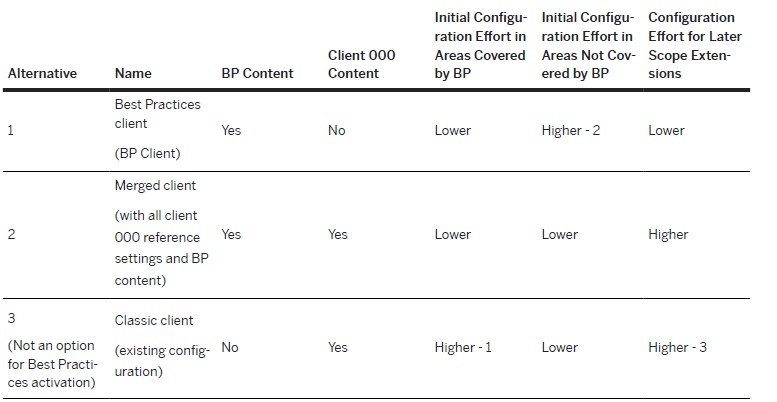
4. New Best Practices Client – MERGED CLIENT
1: In a BP client, the configuration tables that aren’t covered by the Best Practices content are empty. In this case, it requires more effort to fill in the configuration. In addition, even for experienced consultants, this unused scenario can cause project delays.
2: Best Practices content is a ready-to-run model company with documented processes. The effort to make a ready-to-run configuration from the client 000 content (shipment configuration) is considerably higher.
3: Most of the client 000 content isn’t required for your company. Because it isn’t clear which content is required and which content isn’t required, additional design and test efforts are necessary in later scope extensions.
To make the correct choice for the tenant setup, consider the following:
- If your scope is large and isn’t covered by Best Practices content: choose a merged client
- If the Best Practices content covers all or nearly all of your requirements (based on a review of the delivered process flows): choose a Best Practices client
- If you use configuration from another template or existing system: choose a classic client
CLIENT Alternatives
5. Setting Up a Merged Client
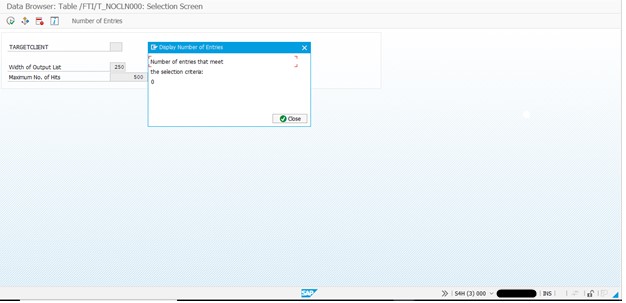
Prerequisites
Check table /FTI/T_NOCLN000 and make sure that the client number doesn’t exist in the table.z
6. Best Practice client creation
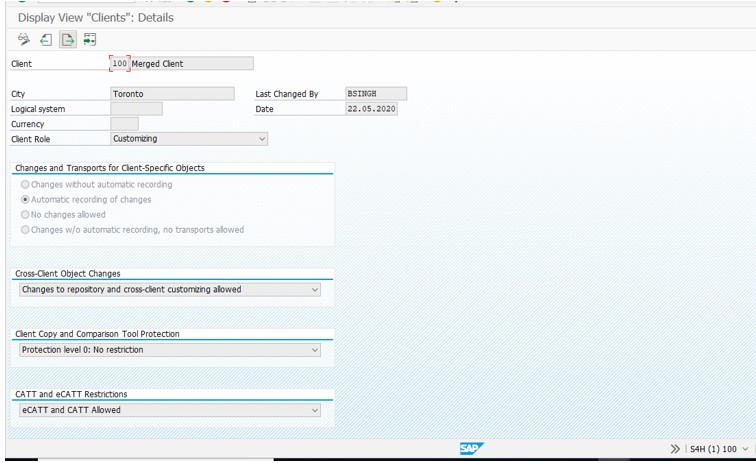
Create a client using tcode SCC4 with below details.
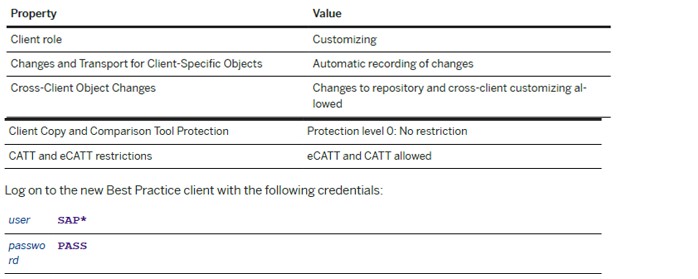
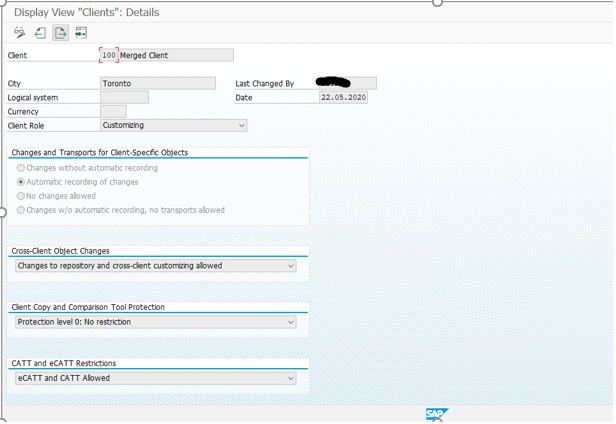
Now change the parameter Set login/no_automatic_user_sapstar = 0 and restart the instance.
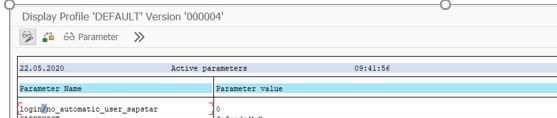
Login to the newly created client with user sap* and password PASS.
Implement 2071826 – Client copy for integrated SAP HANA livecache before starting client copy. This note resolved DDIC error messages appear for some tables after starting the client copy.However this not cannot be implemented in our version.

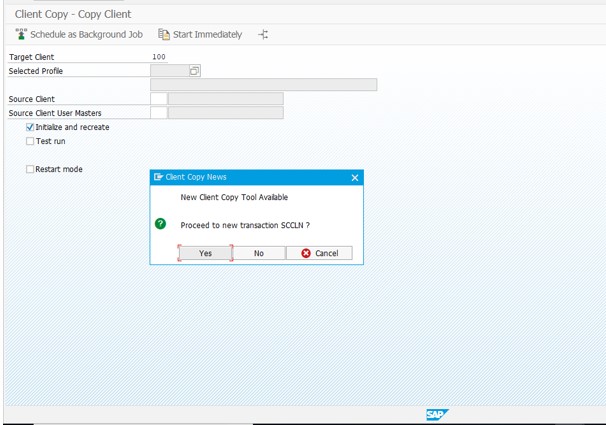
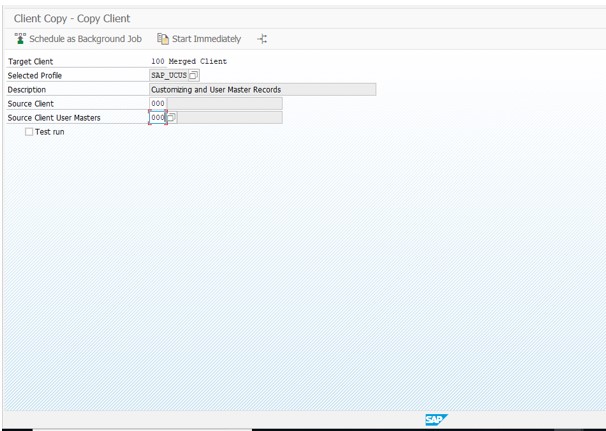
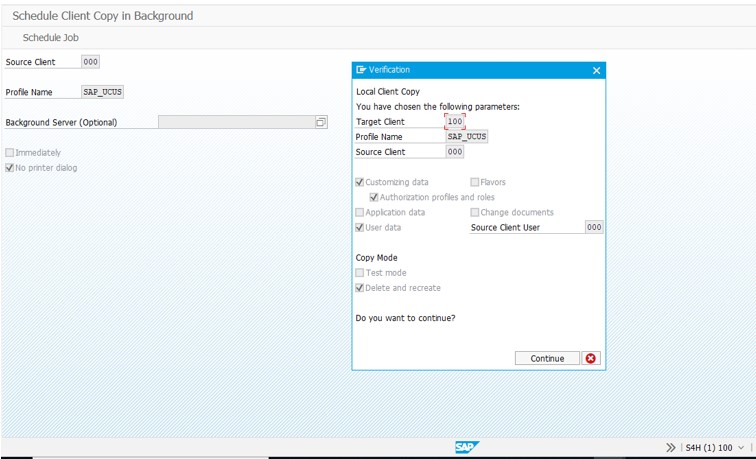
7. Start Client Copy – using SAP_UCUS profile.
As per guide – In the client copy program, you can use the copy profiles SAP_UCUS, SAP_CUST, SAP_CUSV, or SAP_UCSV.
Now start the client copy

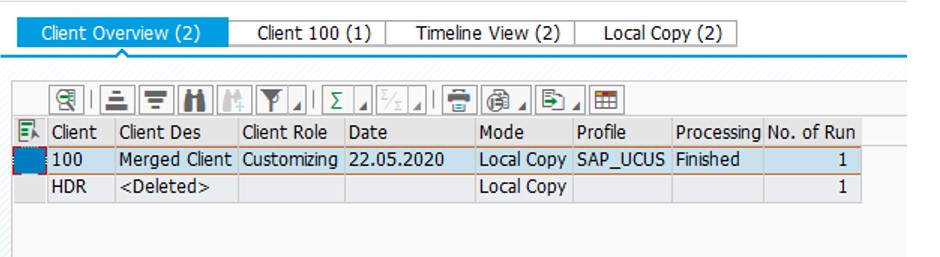
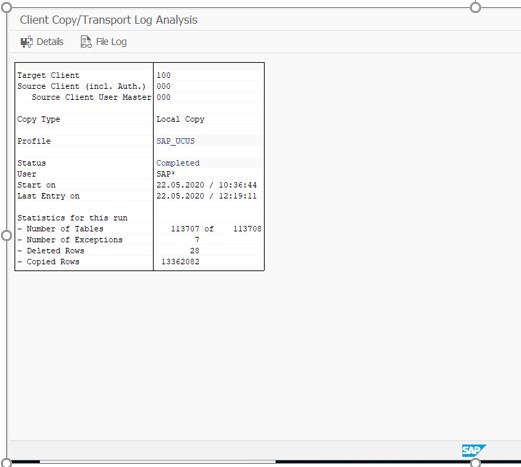
CHECK client copy Logs using SCC3
8. Editing Client Currency Setting
The client currency setting is created during content activation. Make sure that the client currency has not been maintained before the content activation.
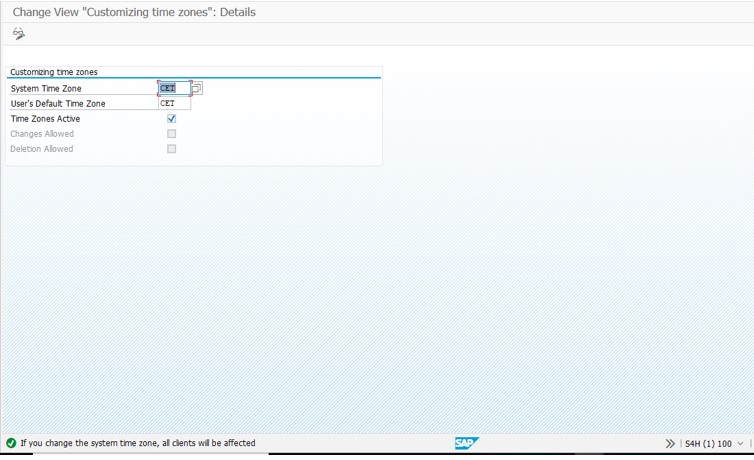
9. Time Zone Settings
Set the time zone for the newly created client.
4) Carrying Out Technical Setup
For content activation, it is mandatory to have installed the appropriate SAP front-end components. In our case we had hub configuration and below are the components installed in out front-end system
10. Apply SAP notes
Below notes need to read and applied accordingly.
- 2776611 – SAP S/4HANA 1909 collective note for content activation
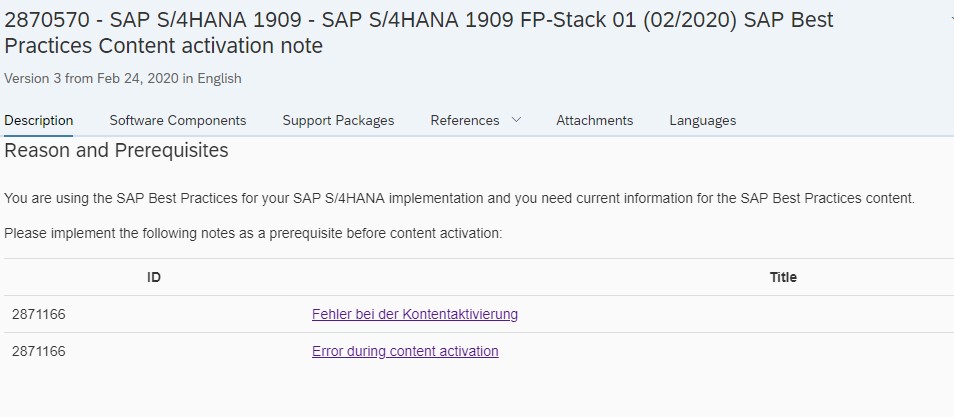
- 2870570 – SAP S/4HANA 1909 – SAP S/4HANA 1909 FP-Stack 01 (02/2020) SAP Best Practices Content activation note
- 2871166 – Error during content activation
- 2773898 – SAP Best Practices for S/4HANA (on premise) (U.S.A) (USV6)
- 2785828 – SAP Best Practices for SAP S/4HANA (on premise) (Canada) (CAV6)
- 2289865 – Configuration steps for SAP S/4HANA Analytics
- 2238757 – Error message “Master data read class &1 not actively available” (R7B355) although read class is active
- Implement 2871166
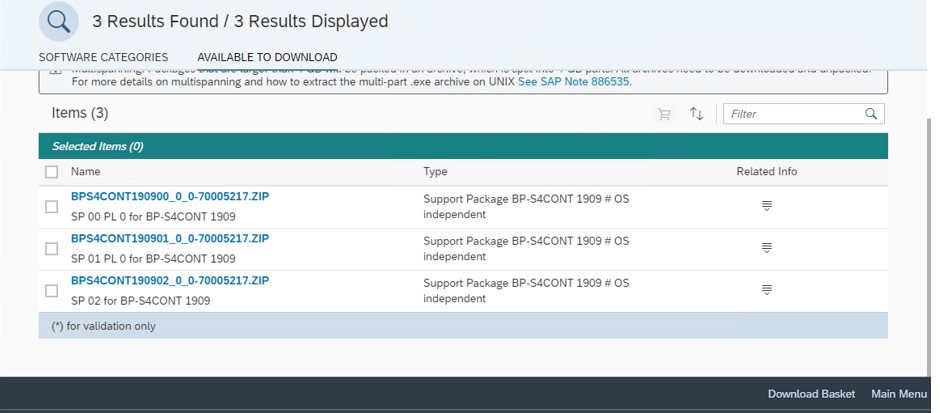
- Download BP content from SAP MARKET PLACE.
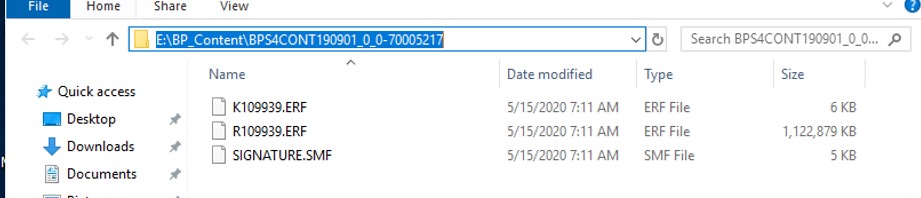
Import the latest reference content before content activation into your system. and unzip it ia directory
BP-S4CONT 190901 (download from software center) –> BPS4CONT190901_0_0-70005217.ZIP
- Fix activation issue for the following error in 1909 OP FPS1 Best Practices activation
41T (XX) SIMG_CFMENUOLSDVOV8.docx as per SAP note – 2870570
Please follow the steps below to fix activation issue for the following error in 1909 OP FPS1 Best Practices activation.
BB: 41T (XX)
IMG Activity: SIMG_CFMENUOLSDVOV8 Define Sales Document Type
Issue: Number range 50 is an internal number range
To correct the issue, follow the steps below:
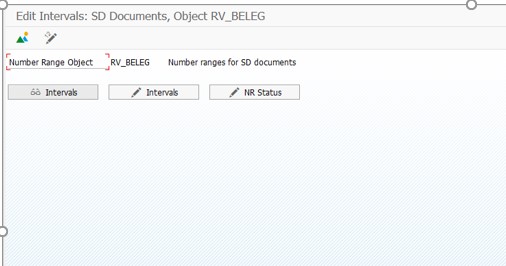
- Go to IMG activity: SPRO: Sales and Distribution -> Sales -> Sales Documents ->Sales Document Header -> Define Number Ranges For Sales Documents (transaction code VN01)
- On the Edit Intervals: SD Documents, Object RV_BELEG screen, choose button Change intervals
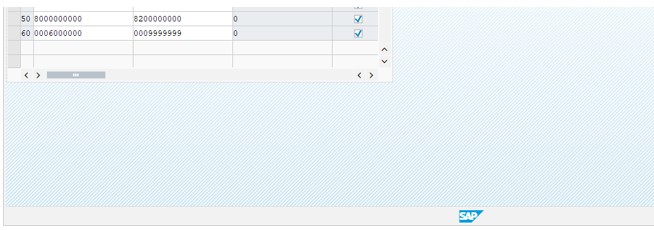
- In the line for Number Range interval 60, change From Number from 6000000 to 0006000000, change To Number from 9999999 to 0009999999
- In the line for Number Range interval 50 enter From Number as 8000000000 and To Number as 8200000000. Select the check box in field
- Choose Save.
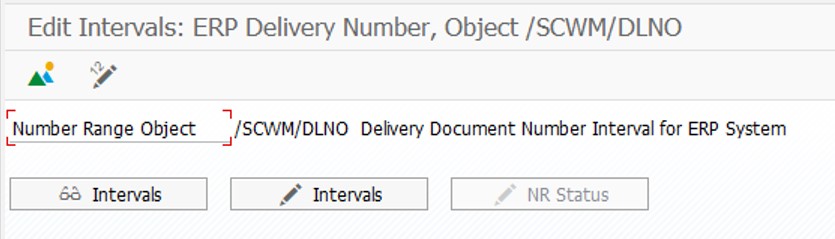
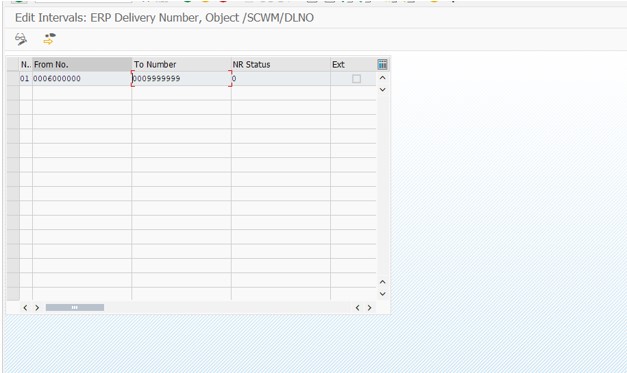
- Go to IMG activity: SPRO: SCM Extended Warehouse Management -> Extended Warehouse Management -> Interfaces -> ERP Integration -> Delivery Processing -> Define Number Ranges for ERP Deliveries (Transaction code: /n/SCWM/ERPDOCNO)
- On the Edit Intervals: ERP Delivery Number, Object /SCWM/DLNO screen, choose button Change intervals
- In the line for Number Range interval 01, change From number from 6000000 to 0006000000, change To number from 9999999 to 0009999999
- Choose Save.
- You can then continue to activate the building block 41T (XX), the error should be gone.
/n/SCWM/ERPDOCNO
- Apply 2839315 – Implementation of SAP S/4HANA SAP Best Practices 1909 (on premise) – Activation in a merged client
All the steps listed in attachment of sap note 2839315 needs to be performed before starting the content activation.
- Mandatory : Apply all SAP notes provided in the content activation Note 2870570
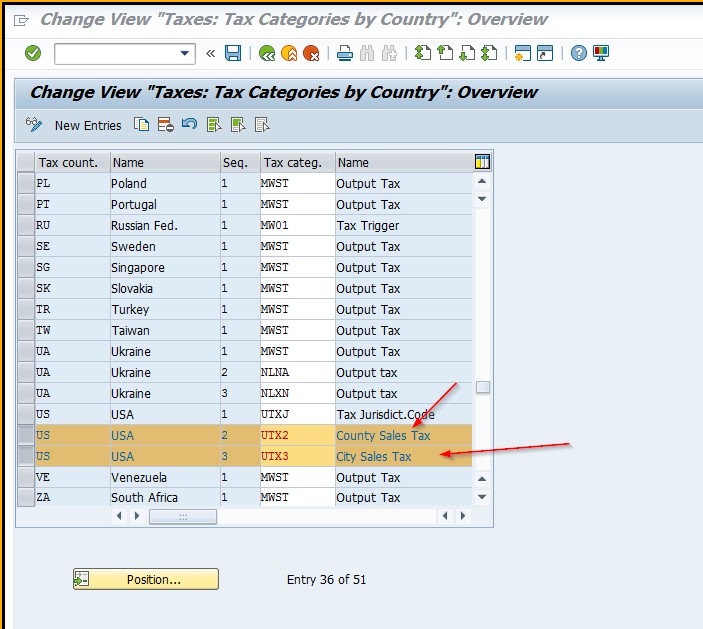
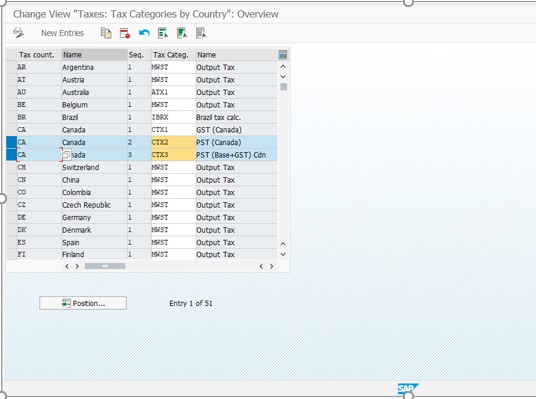
- When using the client copy from client 000, 3 tax codes appear for US. We need only UTXJ. Therefore, delete UTX2 and UTX3 in Transaction OVK1.
NOTE: The same applies for Canada – delete CTX2 and CTX3
Choose Save and select or create customizing transport.
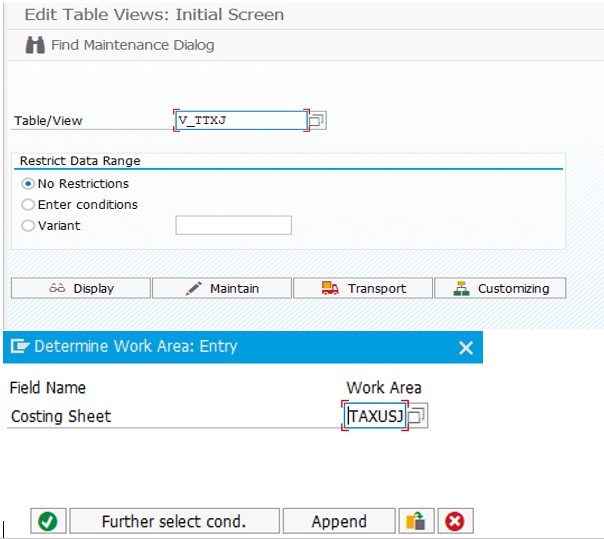
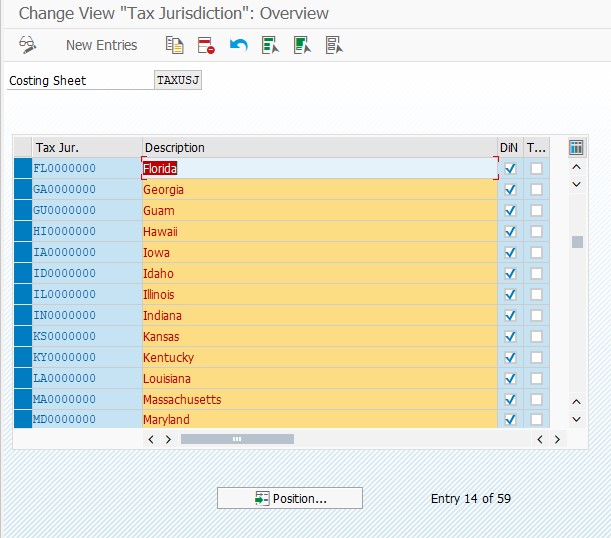
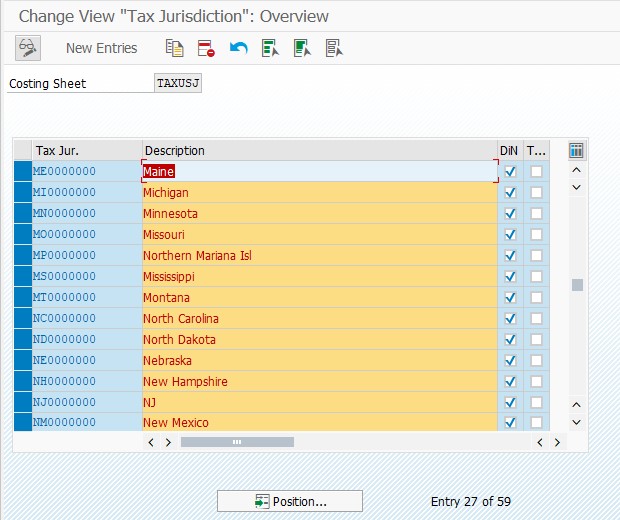
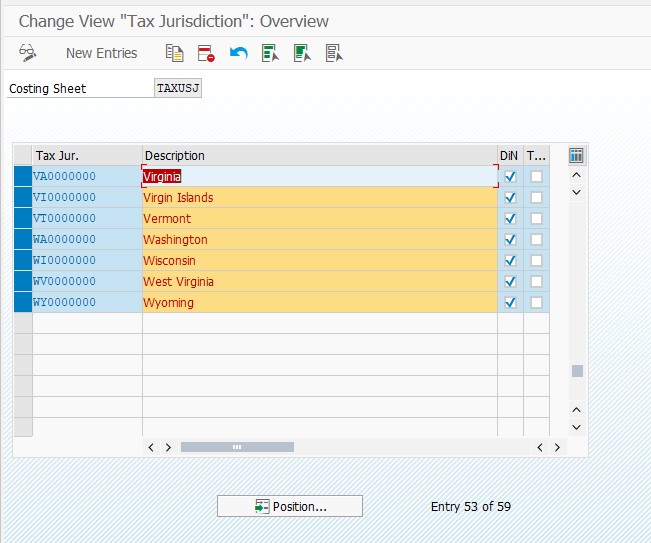
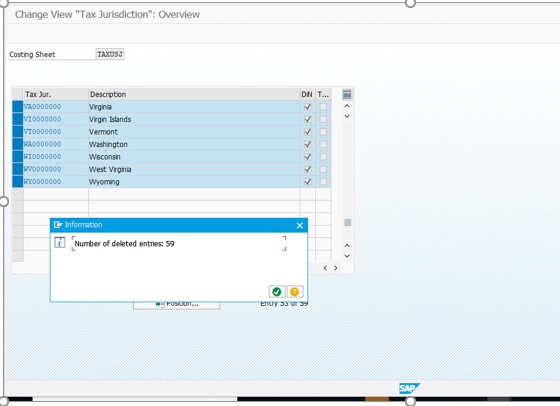
3. Delete all client 000 reference Tax Jurisdiction codes from the activation client:
The client 000 reference sample Tax Jurisdiction codes are not required as the Best practices activation creates the tax Jurisdiction codes during the activation. If the client 000 reference settings are left undeleted, you will not be able to create any further jurisdiction codes. Please follow the below procedure to delete the default Tax Jurisdictions (mandatory step before you start the activation)
- In transaction SM30 enter the Table/view V_TTXJ and choose Maintain.
- On the Determine Work Area: Entry dialog, enter TAXUSJ
- On the Change View “TAX Jurisdiction”: Overview screen, from the application tool bar, choose Select All button (F7) and then choose the Delete
- Choose Save and then create a transport to save the change request. Please do not release this transport to your Q or P system.

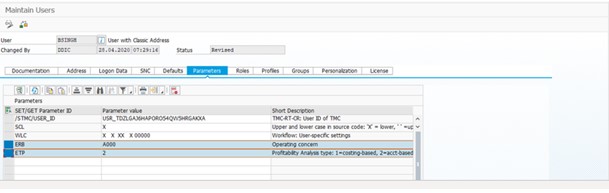
4. Pre-selecting the best practices Operating concern:
When the activation client has all client 000 settings, there are some sample operating concerns present. During the BP activation, the ECATT cannot decide which operating concern to select. Therefore, parametrizing a fixed value in your user settings (SU01) enables the ECATT to select only the best practices defined operating concern. Enter parameter enter ERB value as A000 and ETP as 2.
Note: If you have any other existing parameters, do not delete them.
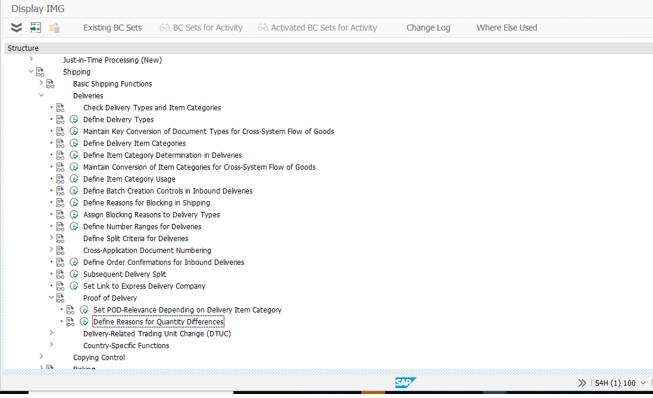
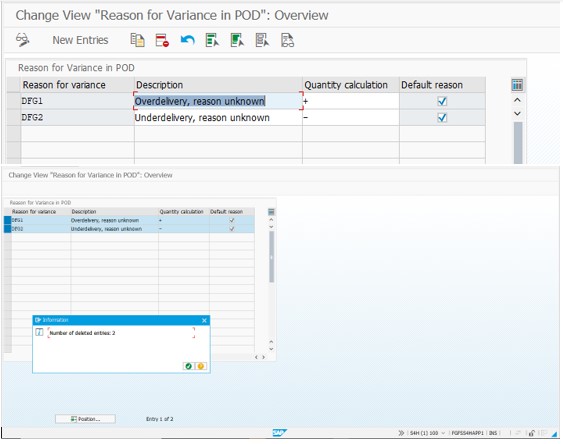
5. Define Reasons for Quantity Differences deletion:
In SPRO, navigate to the
Logistics Execution –> Shipping –> Deliveries -> Proof of Delivery -> Define Reasons for Quantity Differences
Delete the two existing entries (There can be only two entries for Quantity calculation. The best practice entries cannot be populated if the client 000 settings exist, an exceptional situation)
6. Business Partner – Customer/Vendor settings: Due to conflicts between the number ranges from client 000 reference settings and the Best practices content, adjustments are needed before the start of the activation. “Business_Partners_Number_Range_Setting_Adjustment” attached to the Note 2839315 explains the background of the required changes.
Step by step procedure
This section describes in detail the configuration updates you must execute as described in the prior section.
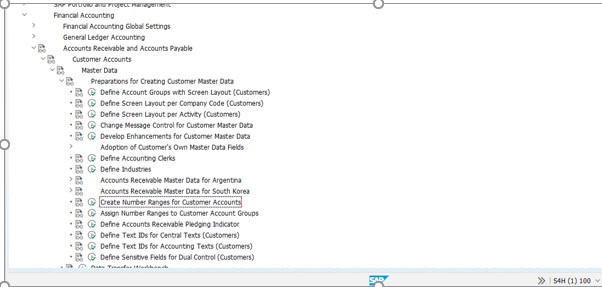
- Deleting Number Range Intervals for Debitor Number Range Object
- In SAP GUI, in the Command field, enter /nspro and press Enter.
Choose SAP Reference IMG. - From the menu, choose Financial Accounting –> Accounts Receivable and Payable –> Customer Accounts –> Master Data –> Preparations for Creating Customer Master Data –> Create Number Ranges for Customer Accounts.
- Go to the Change Intervals
- Delete all intervals (for example, interval IDs 01, 02, MM, VD, XX).
- Choose Save.
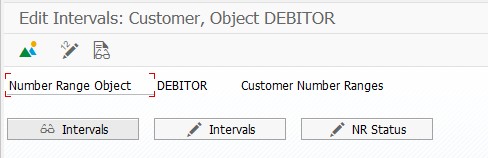

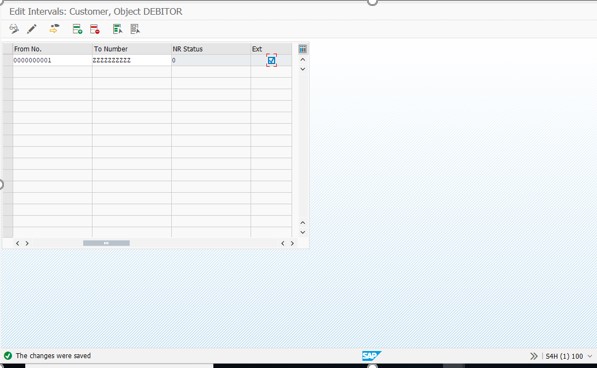
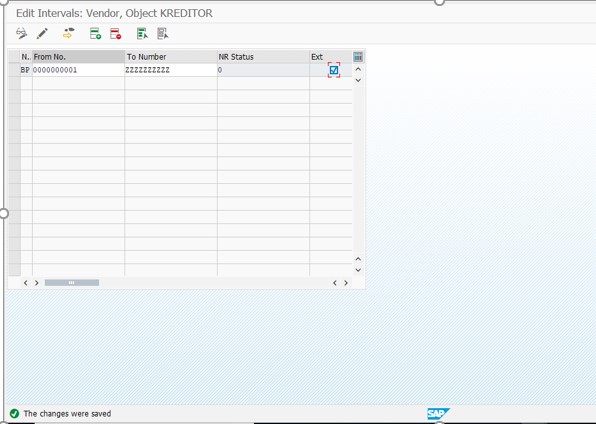
- Create BP Interval for DEBITOR Number Range Object
- In the number range configuration environment for number range object DEBITOR , go to the Change Intervals
- Choose Insert Line.
- Make the following entries:
| Field | User Action or Values | Comments |
| NR | BP | |
| From No. | 0000000001 | 10-digit interval limits |
| To Number | ZZZZZZZZZZ | 10-digit interval limits |
| NR Status | 0 | |
| External | Selected |
- Choose Save.
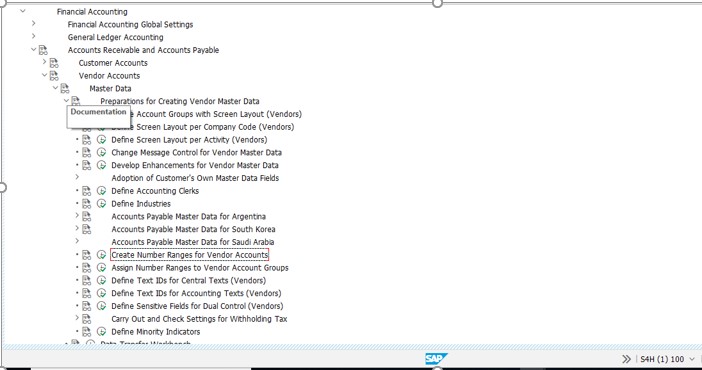
- Deleting Number Range Intervals for KREDITOR Number Range Object
- In SAP GUI, in the Command field, enter /nspro and press Enter.
- Choose SAP Reference IMG.
- From the menu, choose Financial Accounting –> Accounts Receivable and Payable –> Vendor Accounts –> Master Data –> Preparations for Creating Vendor Master Data –> Create Number Ranges for Vendor Accounts.
- Go to the Change Intervals
- Delete all intervals (such as 01, 02, MM, XX).
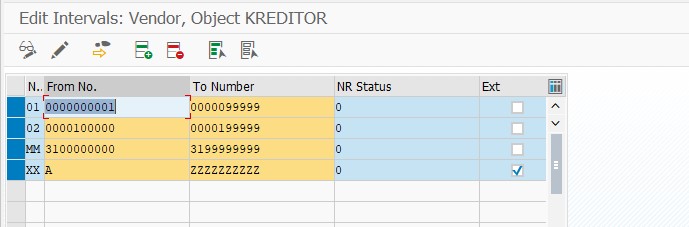
- Create BP Interval for KREDITOR Number Range Object
- In the number range configuration environment for number range object KREDITOR, go to the Change Intervals
- Choose Insert Line.
- Make the following entries:
| Field | User Action or Values | Comments |
| NR | BP | |
| From No. | 0000000001 | 10-digit interval limits |
| To Number | ZZZZZZZZZZ | 10-digit interval limits |
| NR Status | 0 | |
| External | Selected |
- Choose Save.
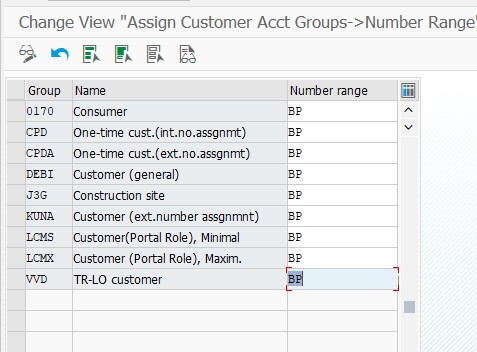
- Assigning the BP Number Range Interval to All Customer Account Groups
- In SAP GUI, in the Command field, enter /nspro and press Enter.
- Choose SAP Reference IMG.
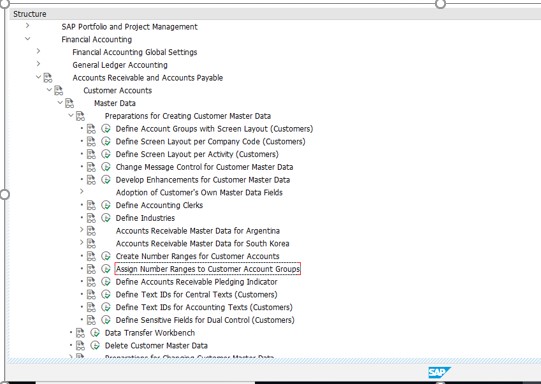
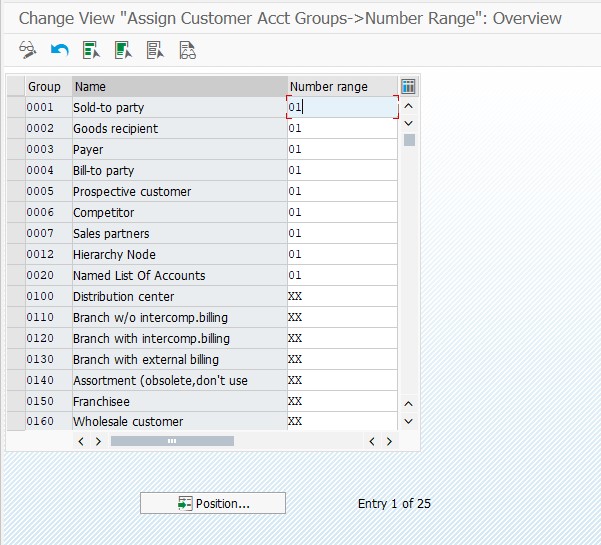
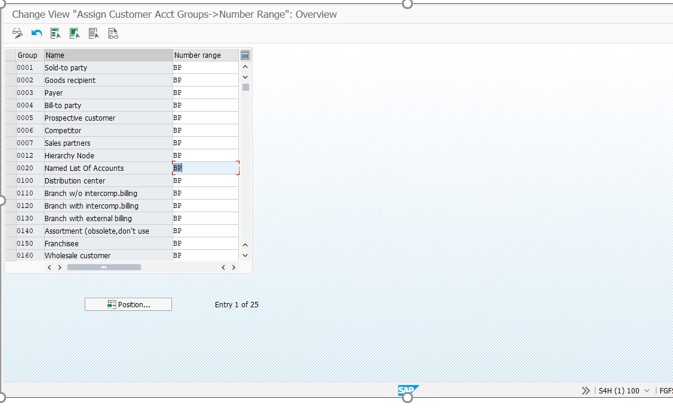
- From the menu, choose Financial Accounting –> Accounts Receivable and Payable –> Customer Accounts –> Master Data –> Preparations for Creating Customer Master Data –> Assign Number Ranges to Customer Account Groups.
- For all listed account groups, update the Number range (interval key) from the displayed value (for example, 01, 02, and so on) to the new value BP.
- Do this for all account groups
- Choose Save.
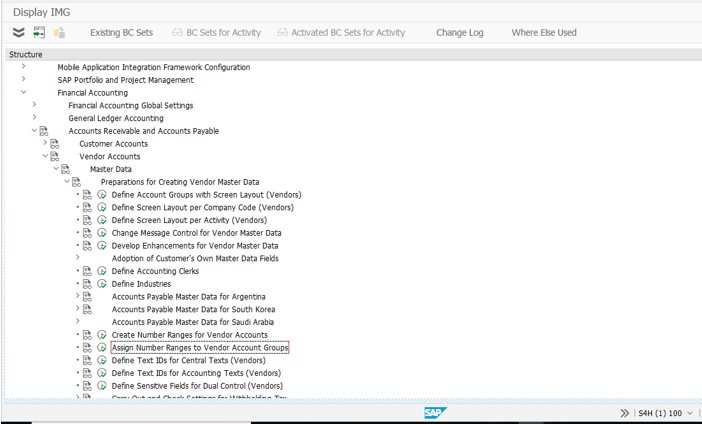
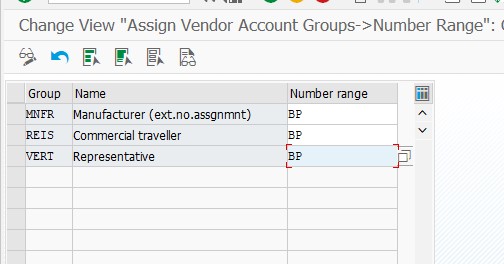
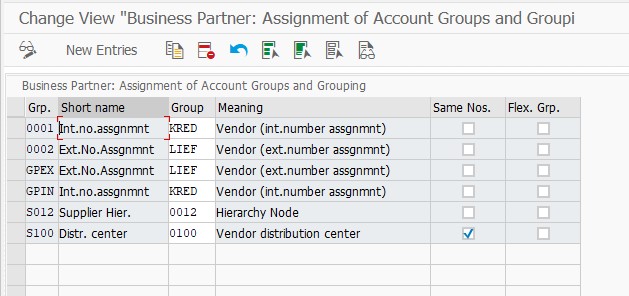
- Assigning the BP Number Range Interval to All Vendor Account Groups
- In SAP GUI, in the Command field, enter /nspro and press Enter.
- Choose SAP Reference IMG.
- From the menu, choose Financial Accounting –> Accounts Receivable and Payable –> Vendor Accounts –> Master Data –> Preparations for Creating Vendor Master Data –> Assign Number Ranges to Vendor Account Groups.
- For all listed account groups, update the Number range (interval key) from the displayed value (for example, 01, 02, and so on) to the new value BP.
- Do this for all account groups
- Choose Save.

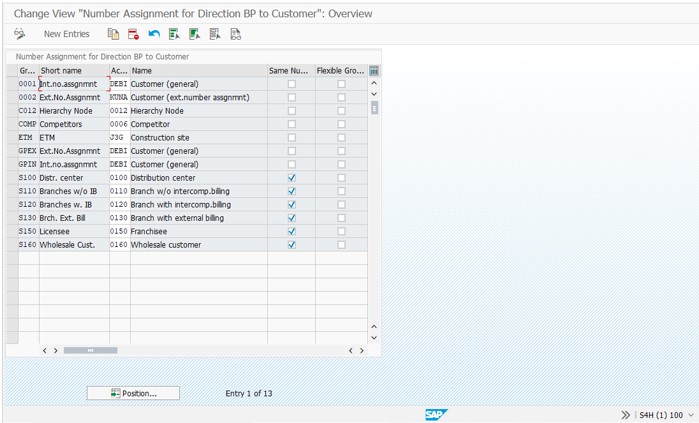
- Adapt Numbering Logic in the CVI – for Customers
- In SAP GUI, in the Command field, enter /nspro and press Enter.
- Choose SAP Reference IMG.
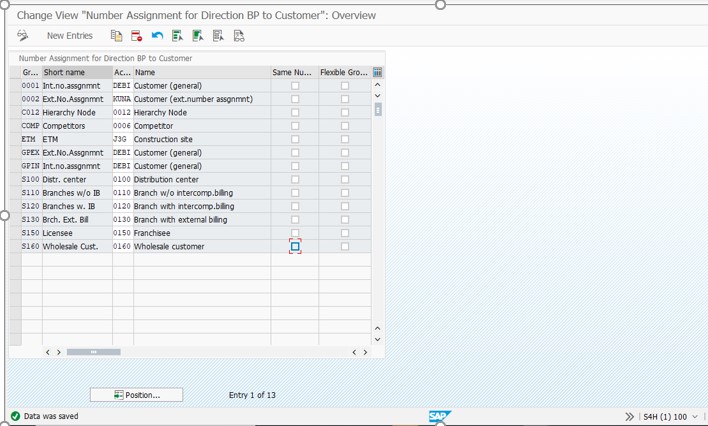
- From the menu, choose Cross Application Components –> Master Data Synchronization –> Customer/Vendor Integration –> Business Partner Settings –> Settings for Customer Integration–> Field Assignment for Customer Integration –> Assign Keys –> Define Number Assignment for Direction BP to Customer.
- For all listed records, de-select the Same Number
- Save your entries.

- Adapt Numbering Logic in the CVI – for Vendors
- In SAP GUI, in the Command field, enter /nspro and press Enter.
- Choose SAP Reference IMG.
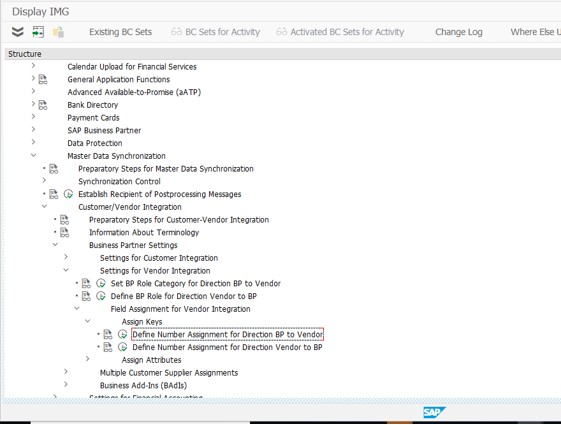
- From the menu, choose Cross Application Components –> Master Data Synchronization –> Customer/Vendor Integration –> Business Partner Settings –> Settings for Vendor Integration–> Field Assignment for Vendor Integration –> Assign Keys –> Define Number Assignment for Direction BP to Vendor.
- For all listed records, de-select the Same Nos.
Save your entries.

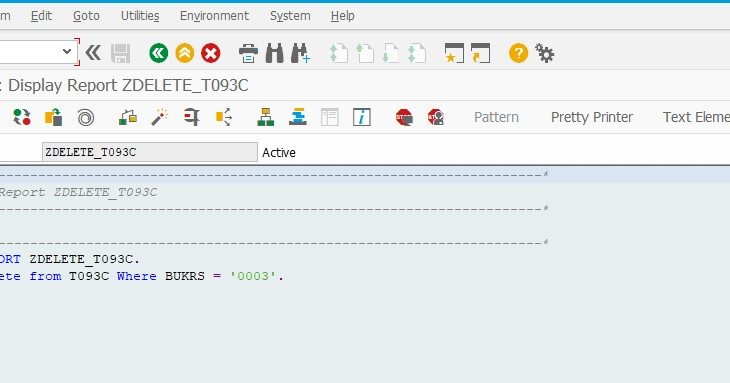
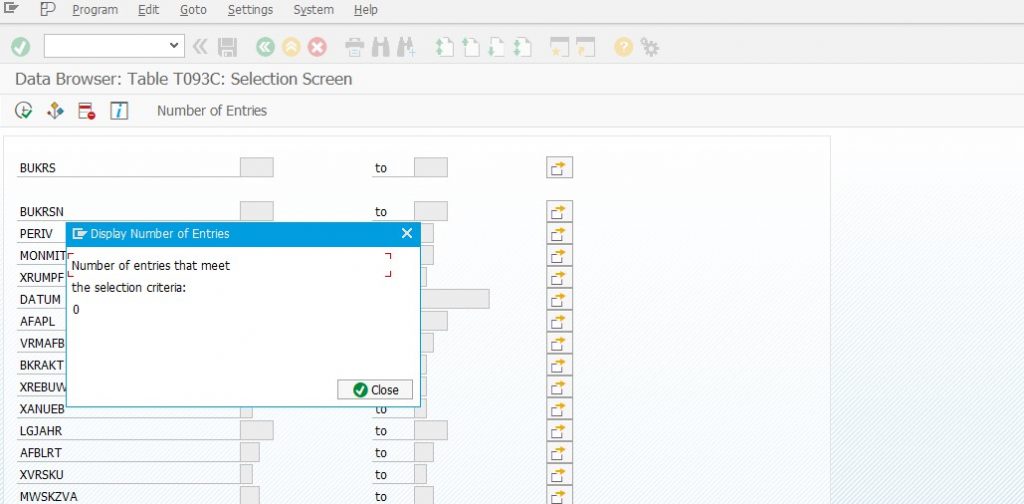
7. Delete wrong delivered default client 000 settings: There are two wrong entries in table T093C, which will prevent the activation of Asset accounting (New) in J48. A SAP note is expected to be released soon, but till then please follow the below workaround.
Create an executable program with the following code:
REPORT ZDELETE_T093C.
Delete from T093C Where BUKRS = ‘0003’.
Execute the Report ZDELETE_T093C. When you execute the report you may not get any message but when you go to SE16n and check in T093C, there should be no entries.
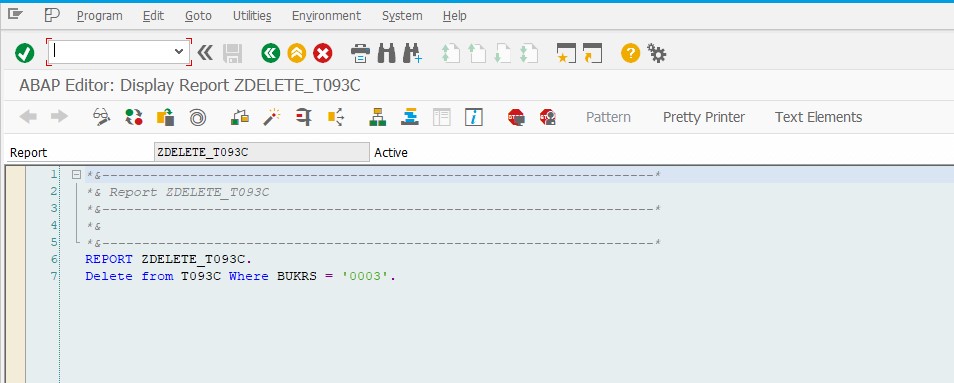
Entry deleted , previously there was one entry.
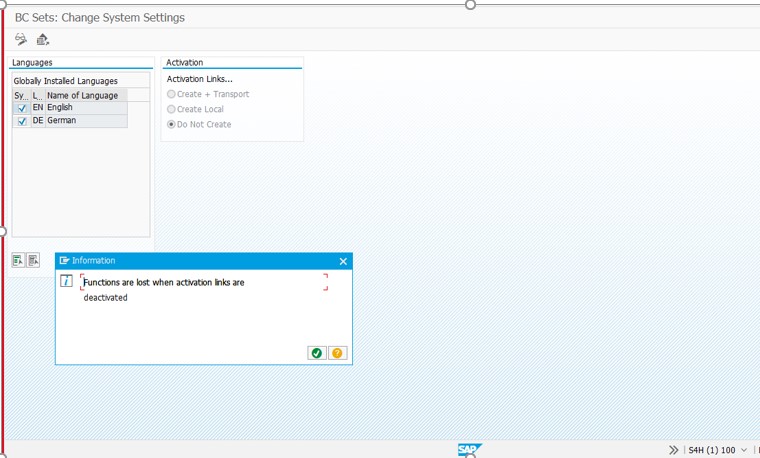
11. Create basic settings in the SAP S/4HANA back end system
- Deselecting Activation Links in BC Sets
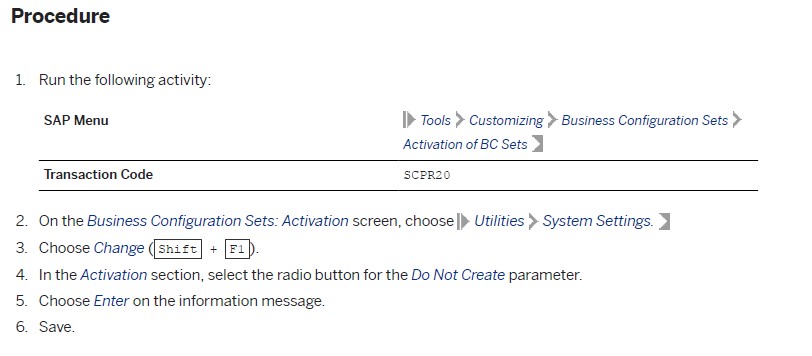
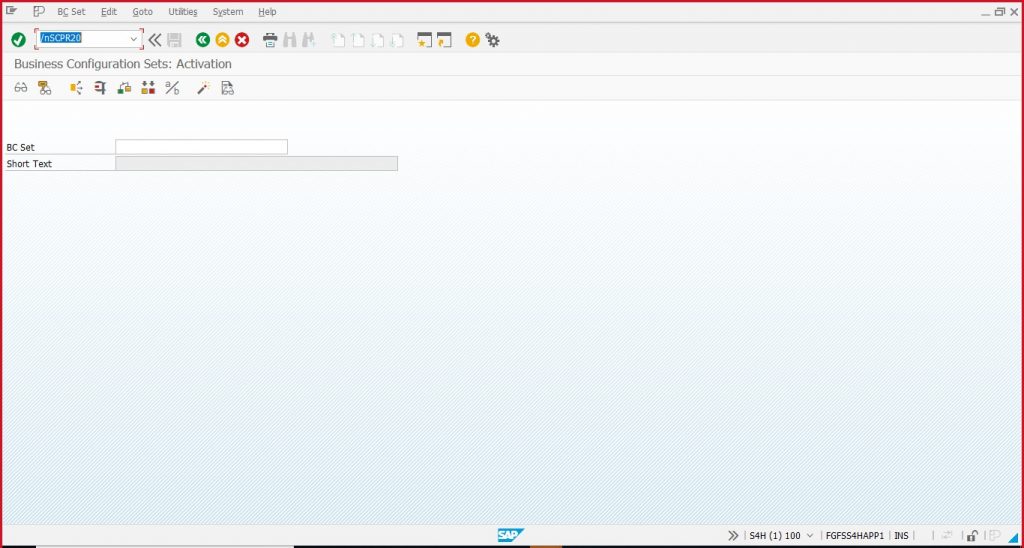
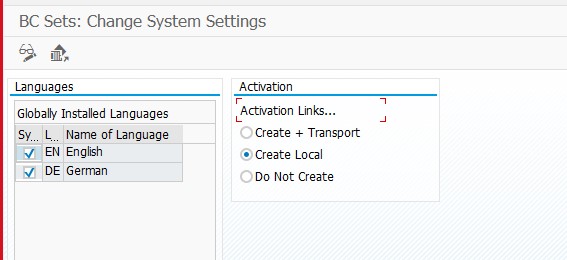
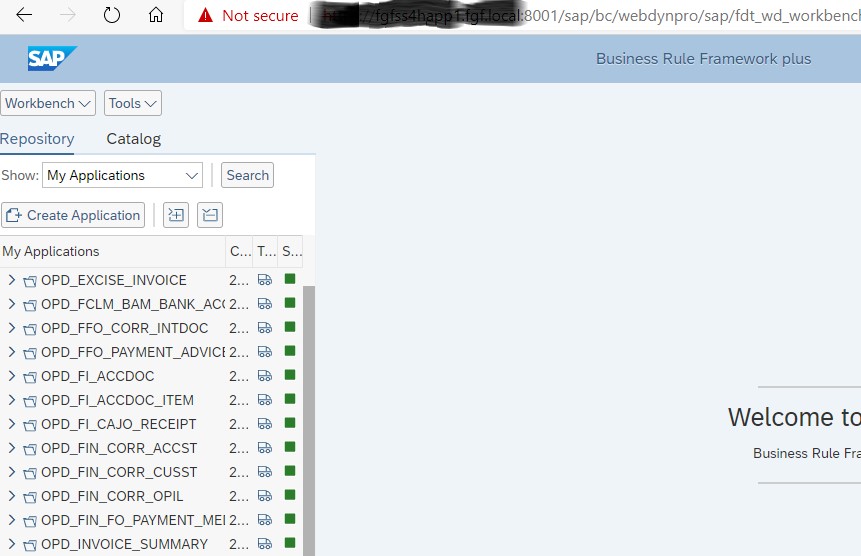
- Output Management
Download the BRFplus application files from SAP Note 2248229.
BRF+ activation using SAP Note 2248229 – SAP S/4HANA output management – BRFplus files
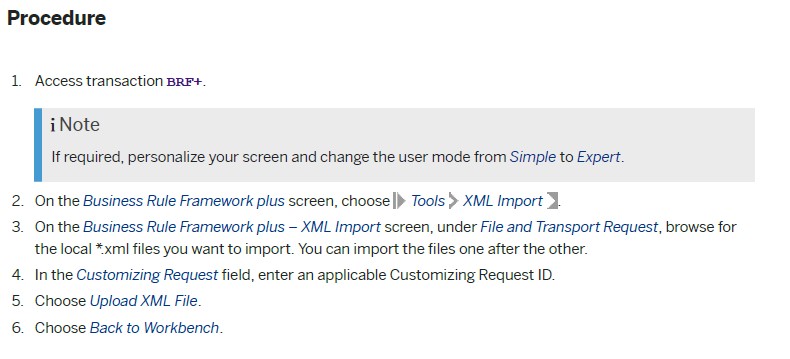
NOTE :Switch to expert mode in BRF plus screen then the option to import will show
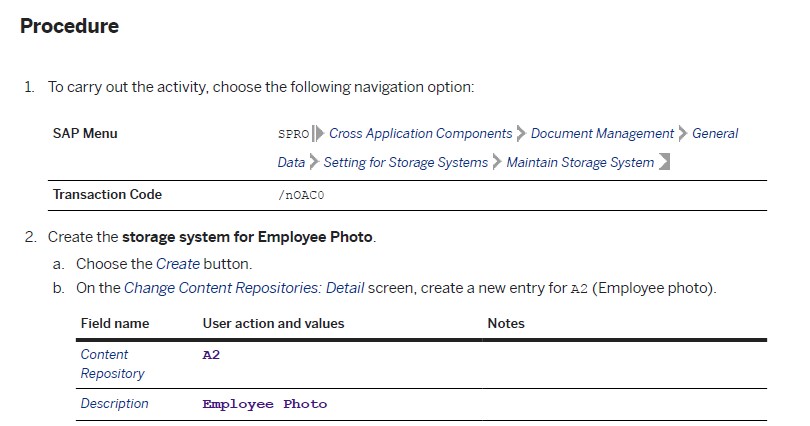
12. Set up SAP S/4HANA attachment services (back end system)
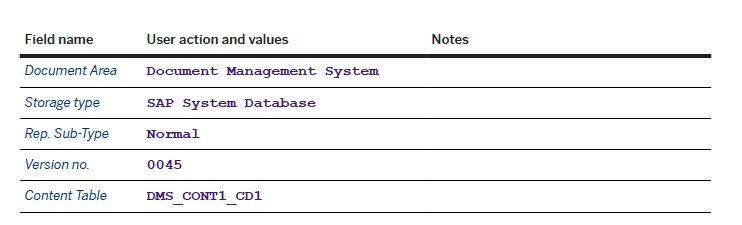
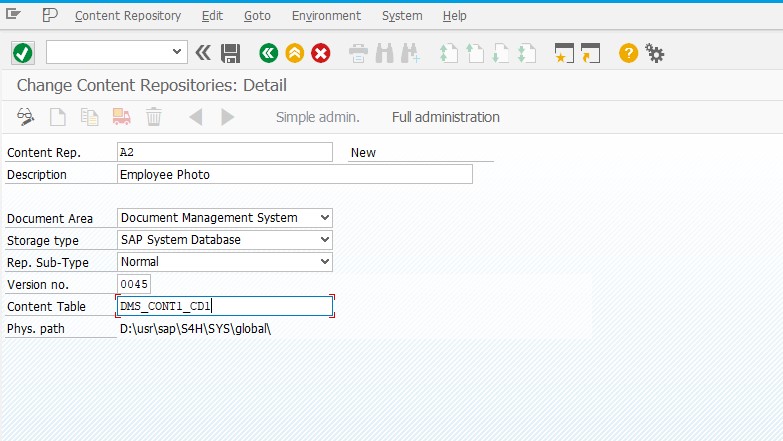
- Maintaining Settings for Storage Systems
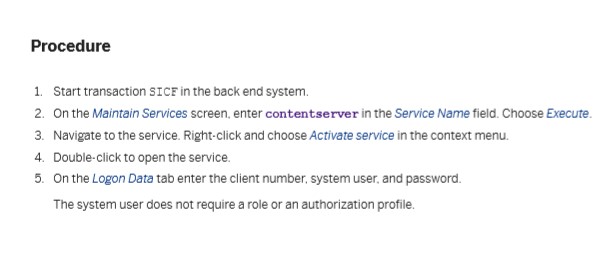
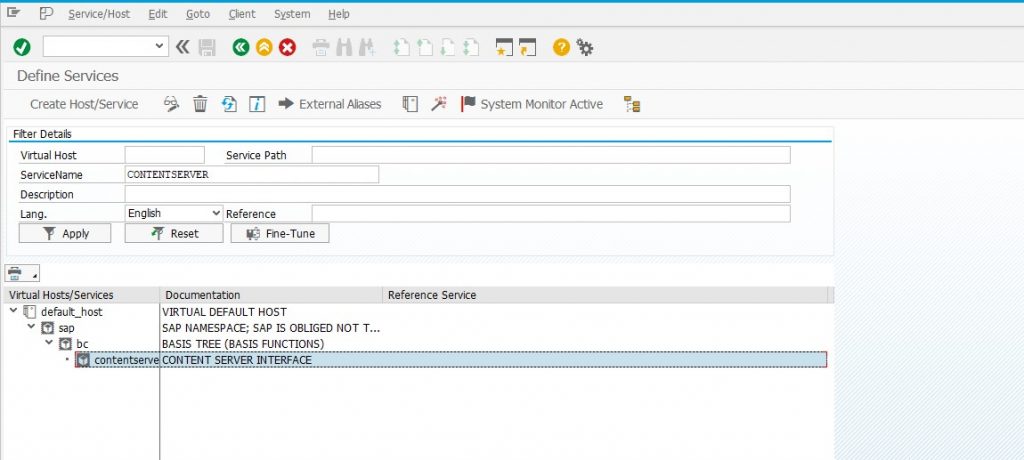
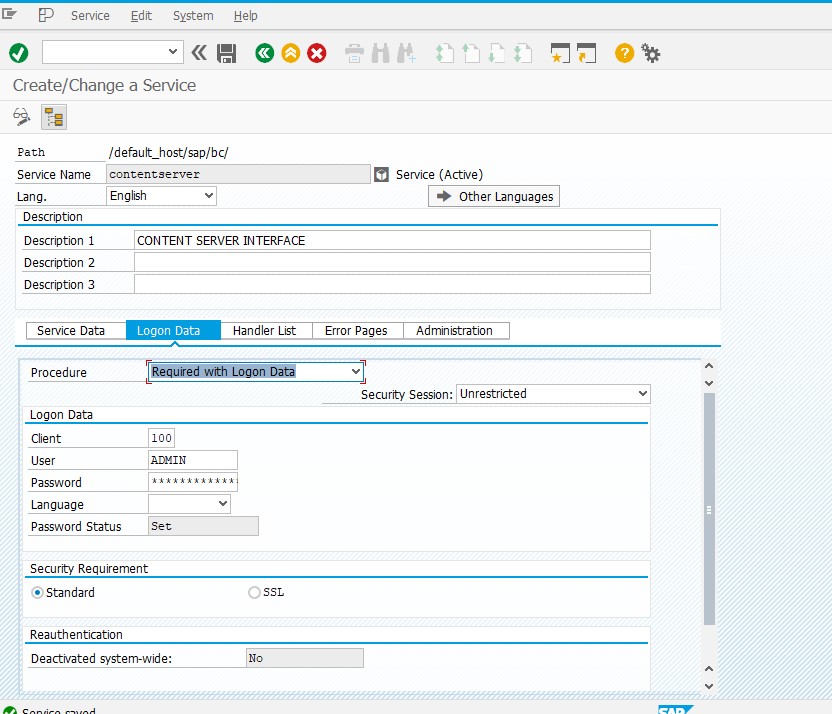
- Maintain SICF nodes
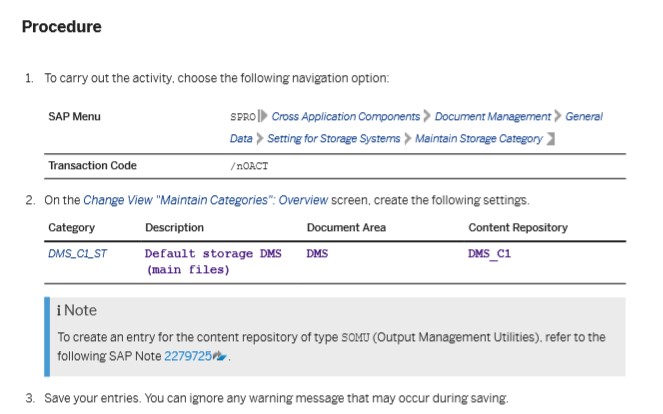
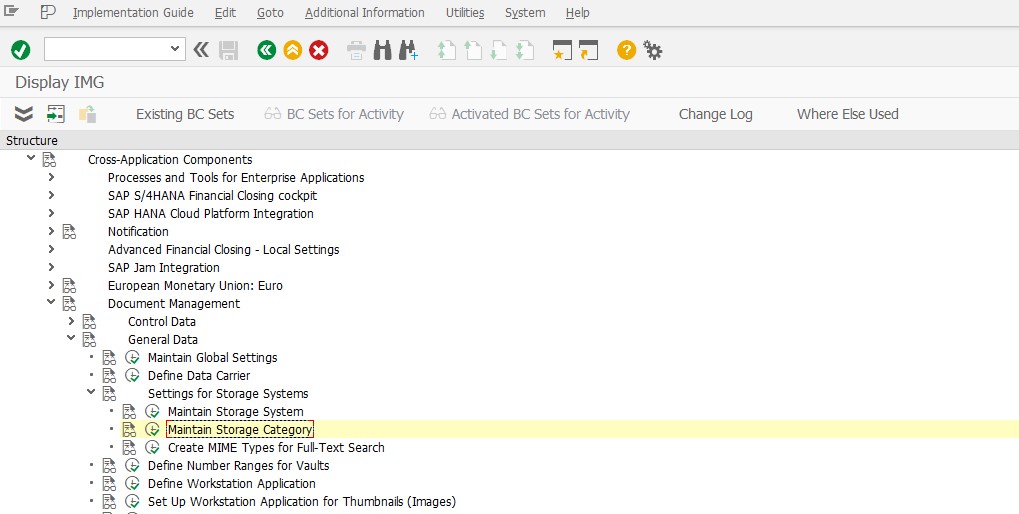
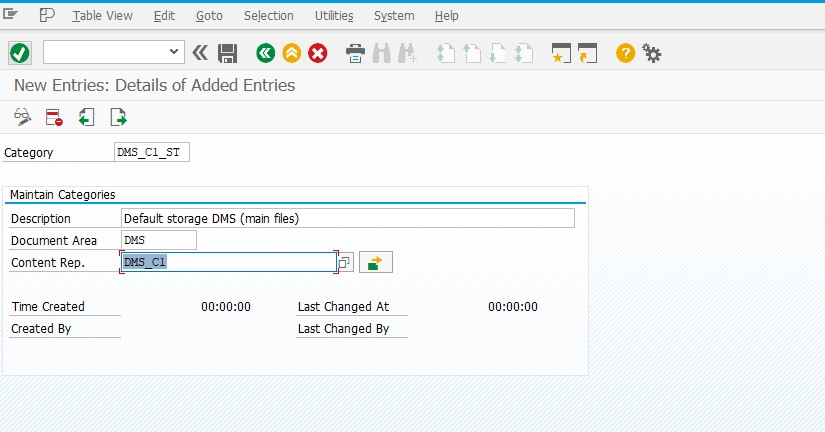
- Maintaining Categories for SOMU and DMS_C1_ST
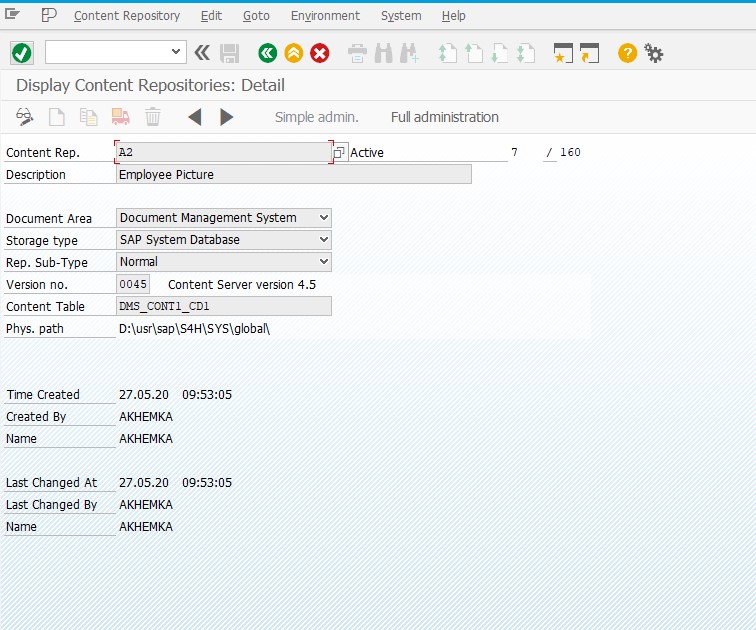
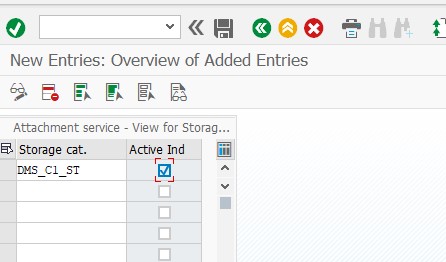
- Activating Storage Repository


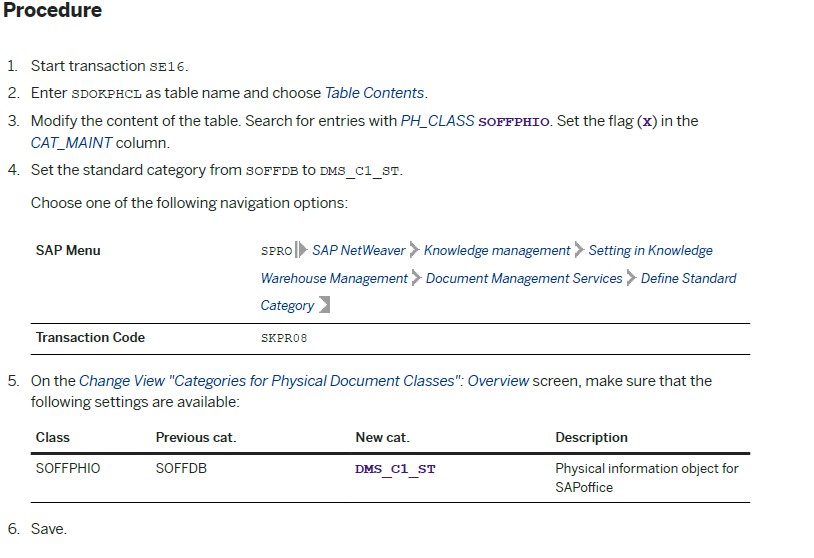
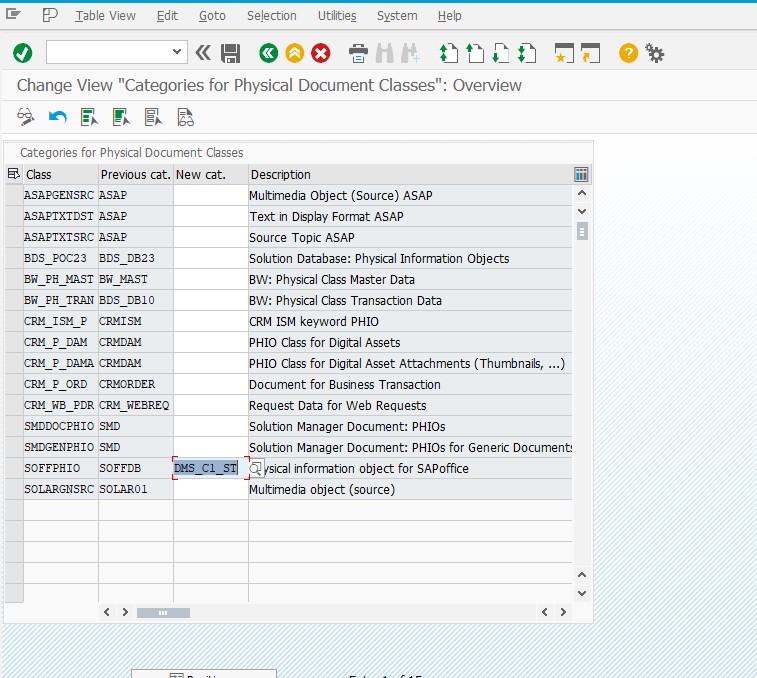
- Maintaining Standard Category for SOFFDB

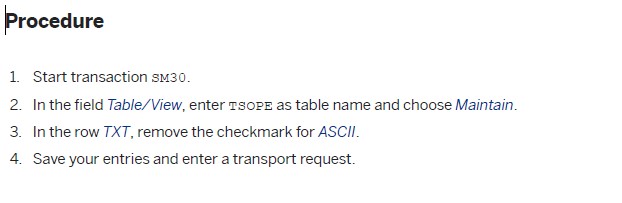
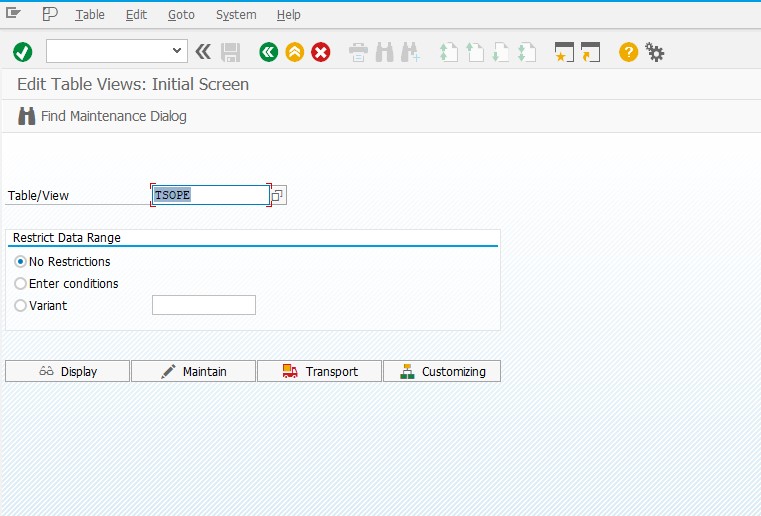
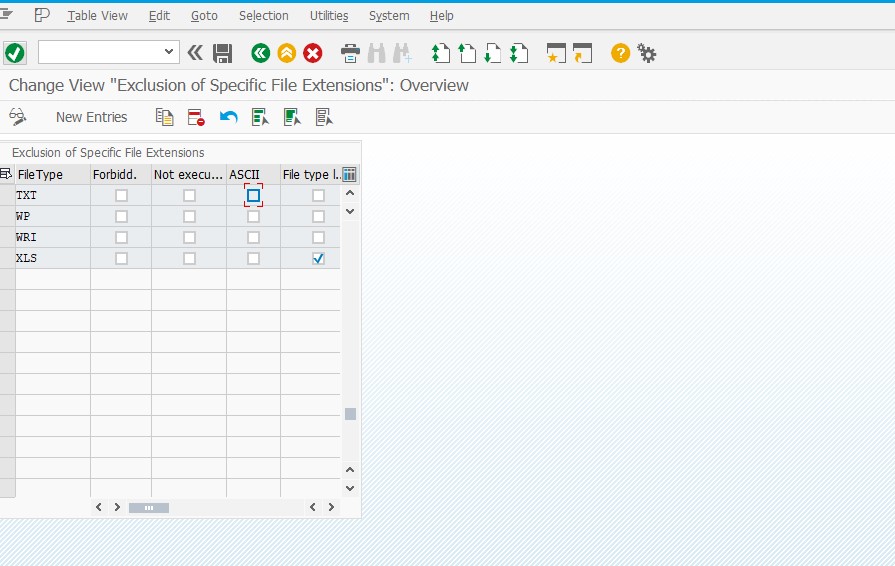
- Adjusting the Customizing in Table TSOPE
to be continued…next part SAP S/4HANA 1909 SP01 Best Practice Content Activation in a Merged Client Part-2


