In this Blog I am going to explain the minimal steps required to setup App router, HTML5 Deployer for the UI5 application to be able to develop and deploy the application to Cloud Foundry Space. We are going to setup destination and consume the same in the UI5 application using App Router. Before Getting started Let’s understand the architecture to access the application from Cloud Foundry Space –
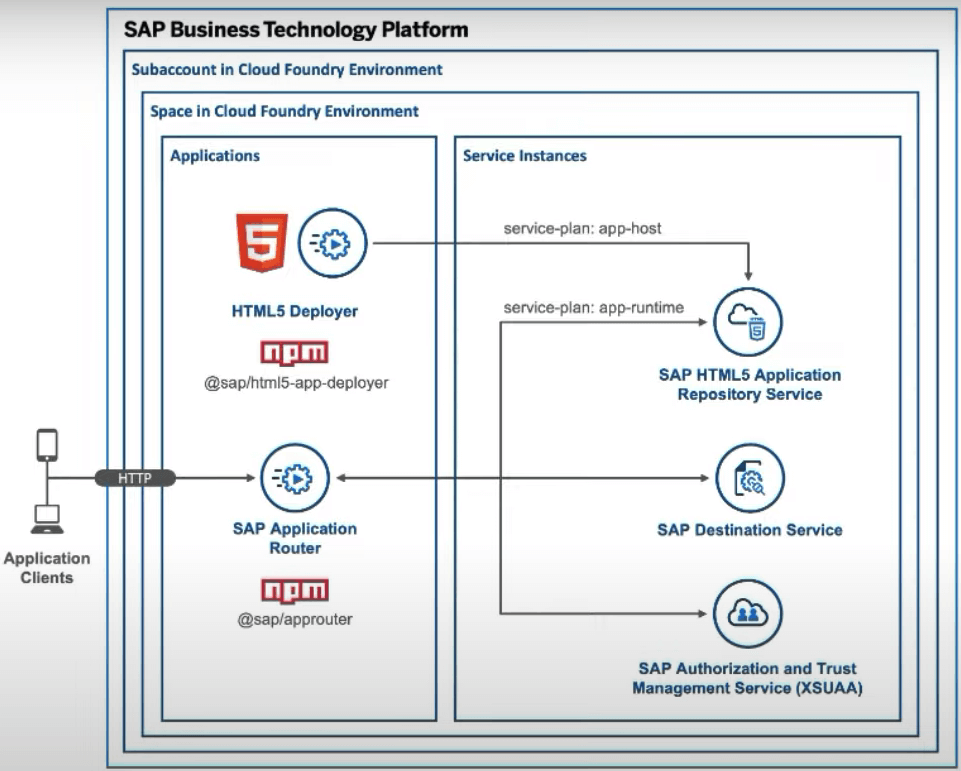
As you can see in the image attached above, to access the “SAP HTML5 Application Repository Service” we need SAP App Router to be able to fetch the application details and the same is the case for “SAP Destination Service” as well and so on.
The other way is to subscribe to SAP Work-Zone and use the Managed App Router to access the HTML5 application repository and further the Tile can be created for the deployed application to access the same from the Launchpad.
But in this Blog we will not use Work-Zone subscription to access the application instead we will create our own App Router application and deploy the same to the CF Space.
Before proceeding to the development part we will have a quick look into the Pre-Requisites –
- Cloud Foundry Space
- Northwind Destination in BTP Account
- Business Application Studio
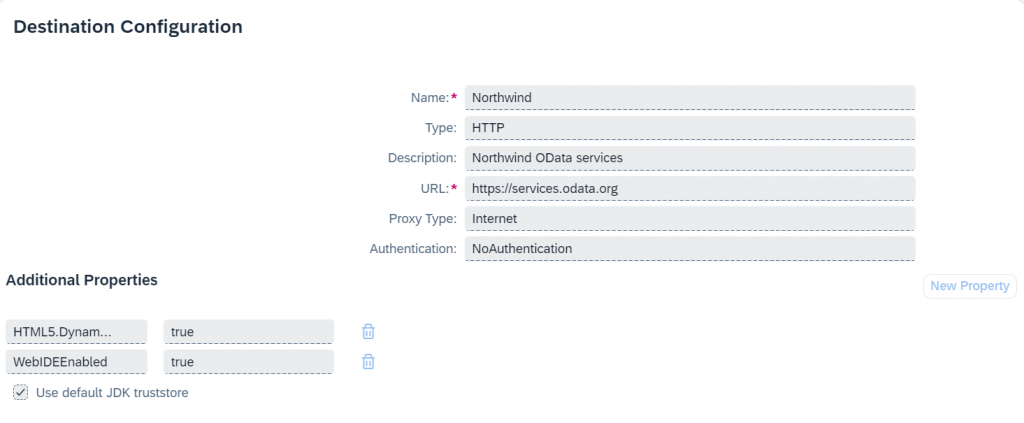
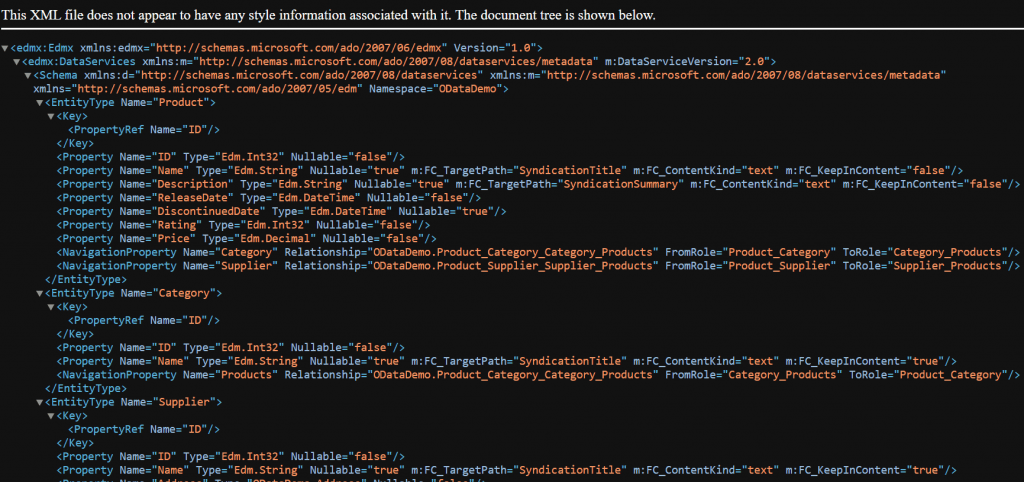
Northwind destination details –
As we have the destination in place we can proceed to BAS to start developing our application.
Create a blank folder in the BAS workspace named ui5cfsample. Inside this folder we will create Approuter, HTML5 Deployer and the UI5 application.
Configuring Approuter :-
1. create a new folder approuter inside ui5cfsample project folder.
2. create new file package.json and paste the below code
{
    "name": "ui5cfsample-approuter",
    "scripts": {
        "start": "node node_modules/@sap/approuter/approuter.js"
    },
    "dependencies": {
        "@sap/approuter": "^9"
    }
}
3. create a new file xs-app.json and paste the below code
{
  "welcomeFile": "ui5cfsample/index.html",
  "authenticationMethod": "route",
  "routes":[{
    "source":"^/user-api(.*)",
    "target":"$1",
    "service":"sap-approuter-userapi"
  },{
    "source": "^/abap(.*)",
    "target": "$1",
    "destination": "Northwind",
    "authenticationType": "xsuaa"
  }]
}
**ui5cfsample/index.html – Whereas ui5cfsample is the application namespace which we will create in later steps.
**destination – Northwind as we have created the destination in the same name.
4. create a new file xs-security.json and paste the below code
{
    "xsappname": "ui5cfsample-xsuaa",
    "tenant-mode": "dedicated",
    "oauth2-configuration": {
        "redirect-uris": [
            "https://ui5cfsample-approuter-*cfapps.us10-001.hana.ondemand.com/login/callback",
            "http://localhost:5001"
        ]
    }
}
**login/callback – will redirect the non-logged in user to enter their BTP credentials to continue using the application.
5. create a new file manifest.yaml and paste the below code
---
applications:
- name: ui5cfsample-approuter
  buildpacks:
  - https://github.com/cloudfoundry/nodejs-buildpack
  memory: 1GB
  disk_quota: 1GB
  random-route: true
  path:
  services:
  - ui5cfsample-xsuaa
  - ui5cfsample-destination
  - ui5cfsample-html5-runtime
6. Now in the above manifest.yaml sample code we have 3 services listed which we need to create before deploying the approuter to CF space. Execute the below commands inside approuter folder.
cf create-service xsuaa application ui5cfsample-xsuaa -c xs-security.json
cf create-service destination lite ui5cfsample-destination
cf create-service html5-apps-repo app-runtime ui5cfsample-html5-runtime
once the services are created you can check those services in Cloud Foundry space –
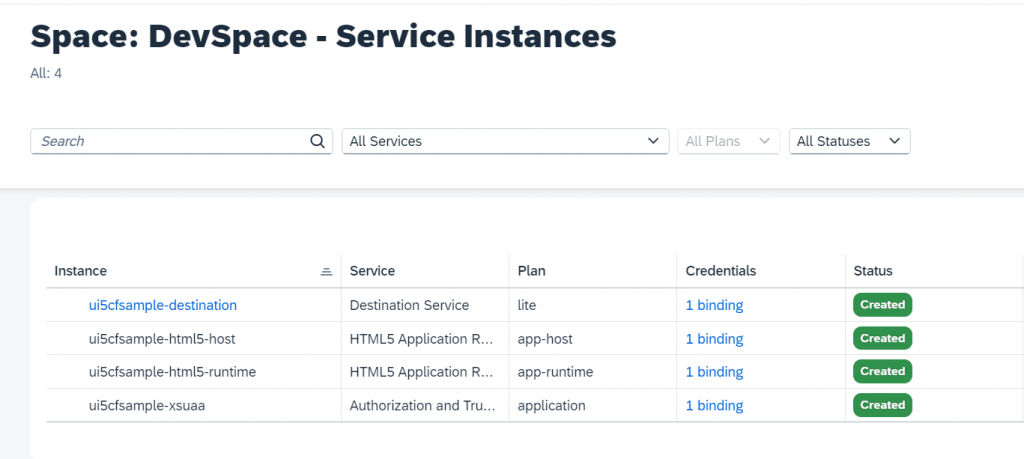
**ui5cfsample-html5-host service will be created in the later steps.
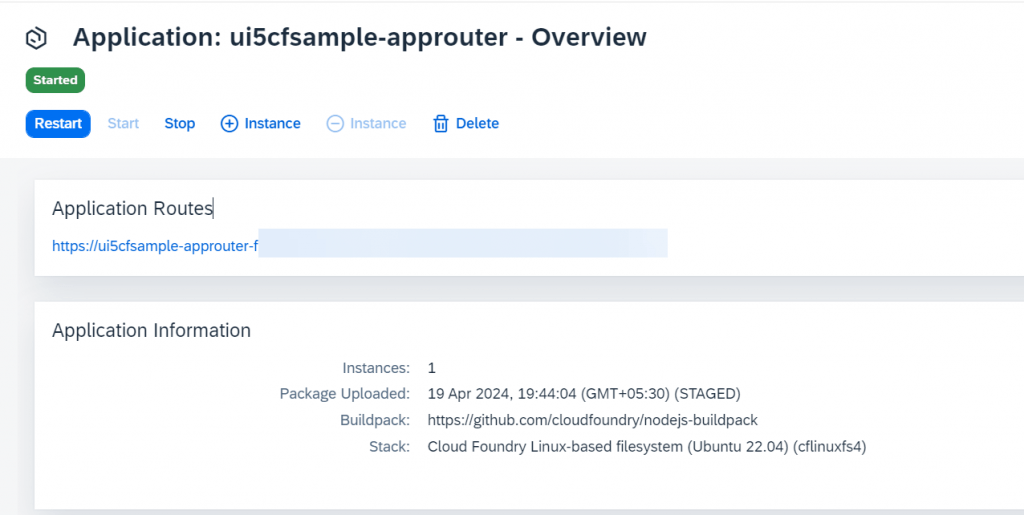
7. Now we have all the listed services in place we can deploy the approuter application to cloud foundry space
cf push
Once the application is deployed and running, try launching the approuter application from the Application Route link –
**When the browser will load the page will come as “Not Found” as the application with namespace ui5cfsample is not yet deployed to Cloud Foundry which we will be doing in the next steps.
**Now we will check If the metadata is loading from the destination which is maintained. Replace the URL (/ui5cfsample/index.html) with (/abap/V2/OData/OData.svc/$metadata)
URL – https://<hostname>/abap/V2/OData/OData.svc/$metadata
Finally, our Approuter application is deployed successfully and working as expected.
Configuring HTML5 Deployer :-
1. create a new folder html5-deployer inside ui5cfsample project folder.
2. create a new file package.json and paste the below code
{
    "name": "ui5cfsample-html5-deployer",
    "dependencies": {
        "@sap/html5-app-deployer": "6.2.0"
    },
    "scripts": {
        "start": "node node_modules/@sap/html5-app-deployer/index.js"
    }
}
3. create a new file manifest.yaml and paste the below code
---
applications:
- name: ui5cfsample-html5-deployer
  buildpacks:
  - https://github.com/cloudfoundry/nodejs-buildpack
  memory: 256MB
  disk_quota: 256MB
  random-route: true
  path:
  services:
  - ui5cfsample-html5-host
4. As we have one service which is listed and required in the above manifest.yaml file so we will create the service
cf create-service html5-apps-repo app-host ui5cfsample-html5-host **Now, the setup for html5-deployer is done and we will deploy the application once our UI5 app is ready and the final build of application is copied inside html5-deployer folder.
Configuring UI5 App :-
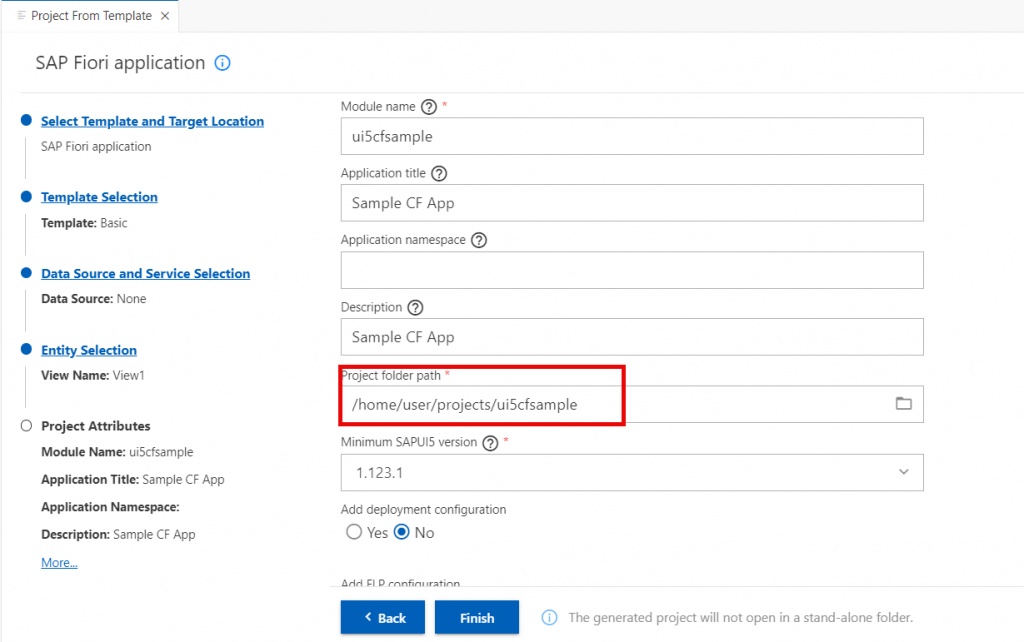
1. We will use the template generator to create a sample freestyle application.
2. Menu > File > New project from template and fill in the details required and choose the folder location to current ui5cfsample project folder
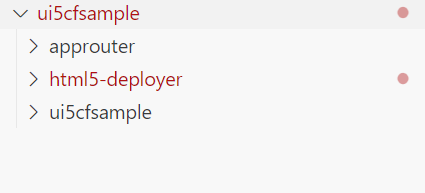
3. After the application is generated the folder structure should look like this
4. create a new file inside webapp folder as xs-app.json and paste the below code
{
  "welcomeFile": "index.html",
  "authenticationMethod": "route",
  "routes":[{
    "source":"^(.*)",
    "target":"$1",
    "service":"html5-apps-repo-rt"
  },{
    "source": "^/abap(.*)",
    "target": "$1",
    "destination": "Northwind",
    "authenticationType": "xsuaa"
  }]
}
5. Define the data source & default model in the manifest.json file
"dataSources": {
   "mainService": {
      "uri": "/abap/V2/OData/OData.svc/",
      "type": "OData"
  }
}

"": {
    "dataSource": "mainService",
    "preload": true
}
6. change the source (src) in the index.html with the CDN value
src=”https://sapui5.hana.ondemand.com/resources/sap-ui-core.js”
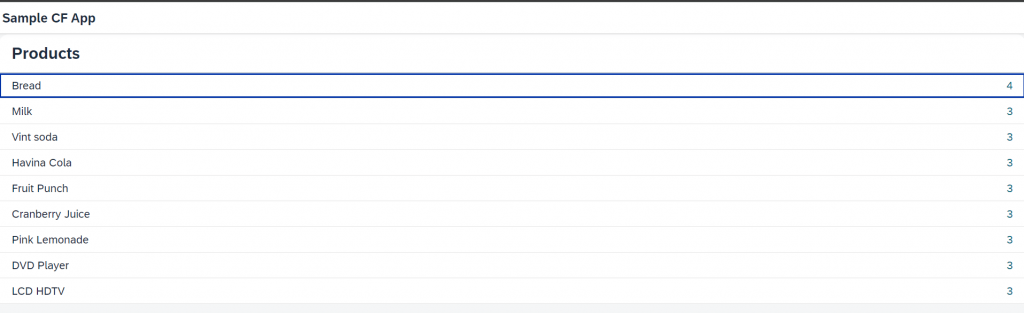
7. Put a List widget and bind the item with Products Entityset to see the data coming from the destination. Open View and paste the below code
<List
                headerText="Products"
                headerLevel="H2"
                items="{
                    path: '/Products'
                }" >
                <StandardListItem
                    title="{Name}"
                    counter="{Rating}"/>
            </List>
8. To build the application and put the changes inside html5-deployer folder we need to add a script in package.json file of UI5 app
"build:ui": "ui5 build --config=ui5.yaml --clean-dest --dest ../html5-deployer/resources/dist"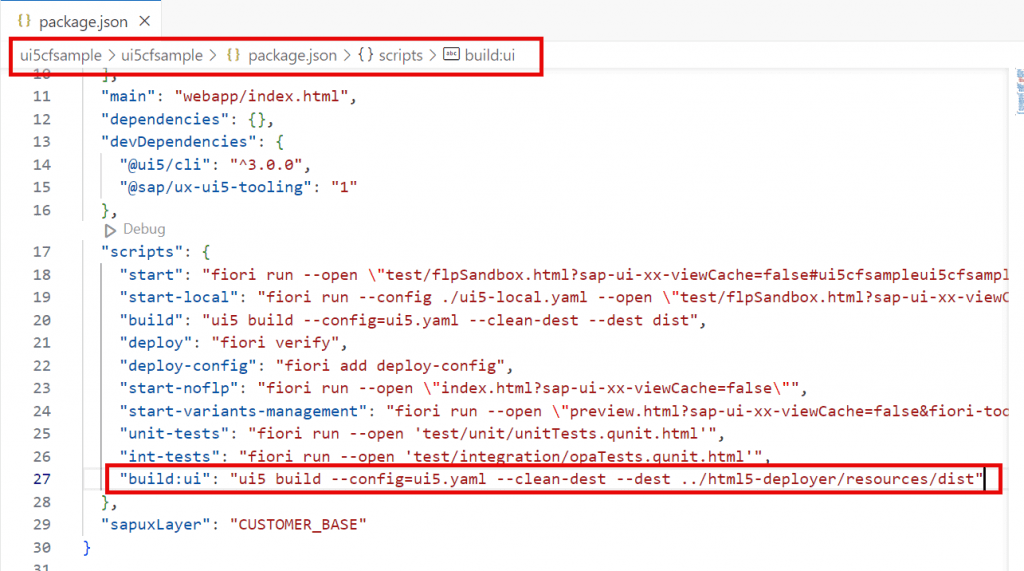
9. To build the application execute the below command
npm run build:ui
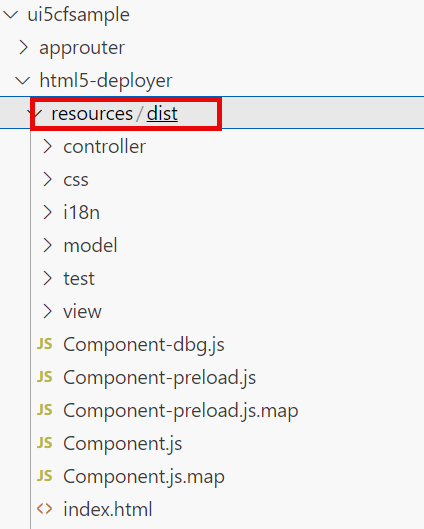
**This command will put the final build inside html5-deployer folder (resources/dist)
Deploying UI Application :-
1. We have the final build of the application in the html5-deployer folder (/resources/dist)
2. Open terminal at html5-deployer location and execute the below command
cf push
3. Once the html5-deployer application is successfully deployed to the Cloud Foundry space, the UI5 application will be deployed.
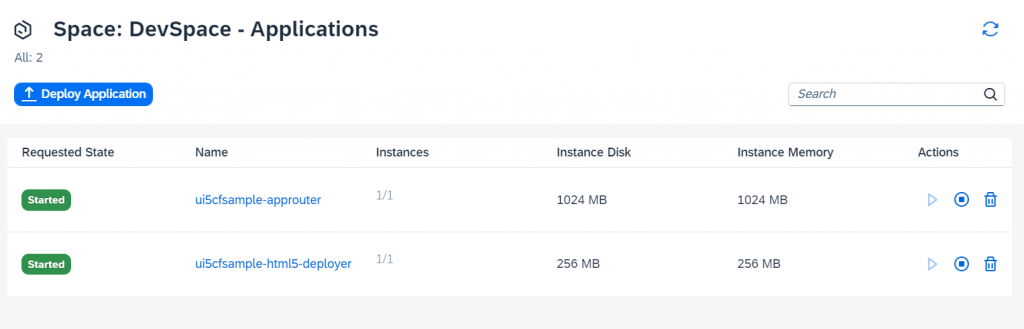
4. As the application is deployed, Now open the approuter application and access the link, UI5 application should be loading and data should be populated to the List.
Now the development & deployment is completed with OData service binding.


