This blog post describes how to set up integration between SAP Self-Billing Cockpit and an SAP S/4HANA system.
The entire setup procedure involves the following tasks:
- Create a communication user for SAP S/4HANA.
- Check the availability of OData services.
- Configure the Cloud Connector.
- Subscribe to SAP Self-Billing Cockpit.
- Assign role collections to users.
- Configure data replication for units of measurement and plants.
- Configure services for updating journal entries.
- Configure services for billing integratioin.
- Define additional properties for the destination.
Prerequisites
- You have set up your global account and subaccount.
- You are assigned the Administrator role for the global account.
- You are assigned the Security Administrator role for the subaccount to configure authorizations using role collections.
Creating a Communication User
- Log on to the SAP GUI in the SAP S/4HANA system.
- Run the transaction SU01.
- Specify a user name and choose Technical User.
- On the Logon Data tab, set User Type to Service.
- Enter a password, and record the user name and password for future use.
- Note: They are required when you create destinations to SAP S/4HANA via the SAP BTP cockpit.
- On the Roles tab, add the following standard user roles:
• SAP_QAP_BW
• SAP_QAP_CUST_DEPEND
• SAP_QAP_ESH
• SAP_QAP_PPOMA
• SAP_QAP_S_CFC_AUTH
• SAP_QAP_TESTER_AUTH_TEST
• SAP_QAP_TESTER_NEW
• SAP_QAP_TESTER_COMP
Checking the Availability of OData Services
1. Log on to the SAP S/4HANA system, and start the transaction Activate and Maintain Services by running the transaction code /n/IWFND/MAINT_SERVICE.
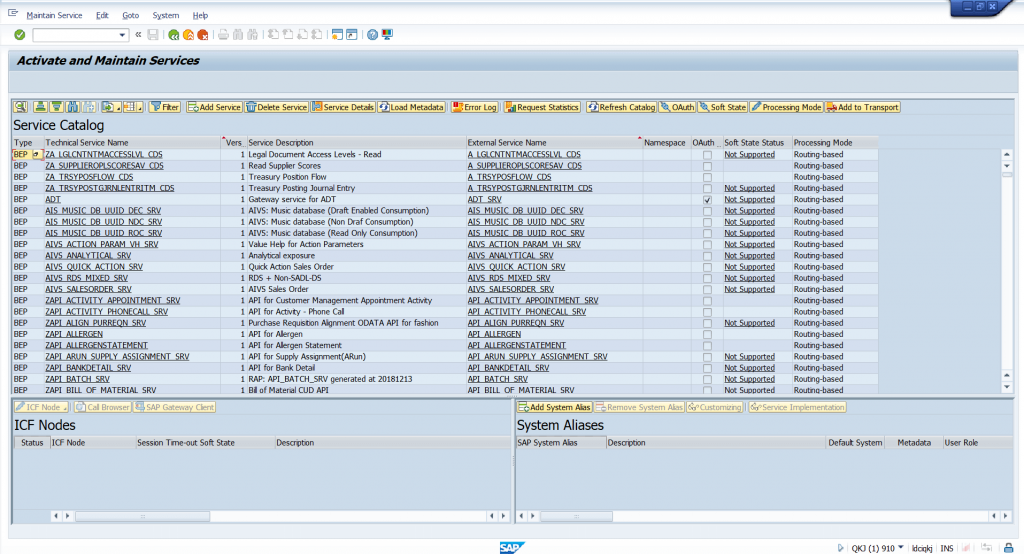
2. Check whether the following OData services are working properly by choosing SAP Gateway Client > Execute for each of them.
• API_BUSINESS_PARTNER
• API_SD_SA_SOLDTOPARTYDETN
• API_OUTBOUND_DELIVERY_SRV
• API_BILLING_DOCUMENT_SRV
• API_SUBSQNT_BILLG_DOC_SBI_SRV
• API_PRODUCT_SRV
• API_SALESORGANIZATION_SRV
• API_SALES_DOCUMENT_REASON_SRV
If the system returns the status code 200 in the response, the corresponding service is working properly. Otherwise, choose the Add Service button on the toolbar, then search the External Service Name with the corresponding service, select the service and Choose the Add Selected Services button.
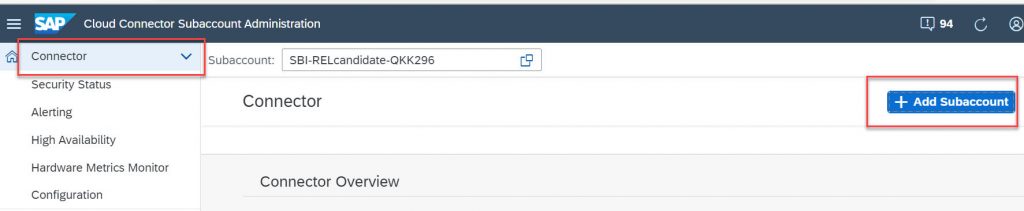
Configure the Cloud Connector
Before configure the cloud connector, you need to download the Cloud Connector in https://tools.hana.ondemand.com/#cloud and install it in one server which would not be shut down. Otherwise the connection between SAP Self-Billing Cockpit and SAP S/4HANA would disconnect when service down. https://help.sap.com/viewer/cca91383641e40ffbe03bdc78f00f681/Cloud/en-US/57ae3d62f63440f7952e57bfcef948d3.html.
1. Add subaccount
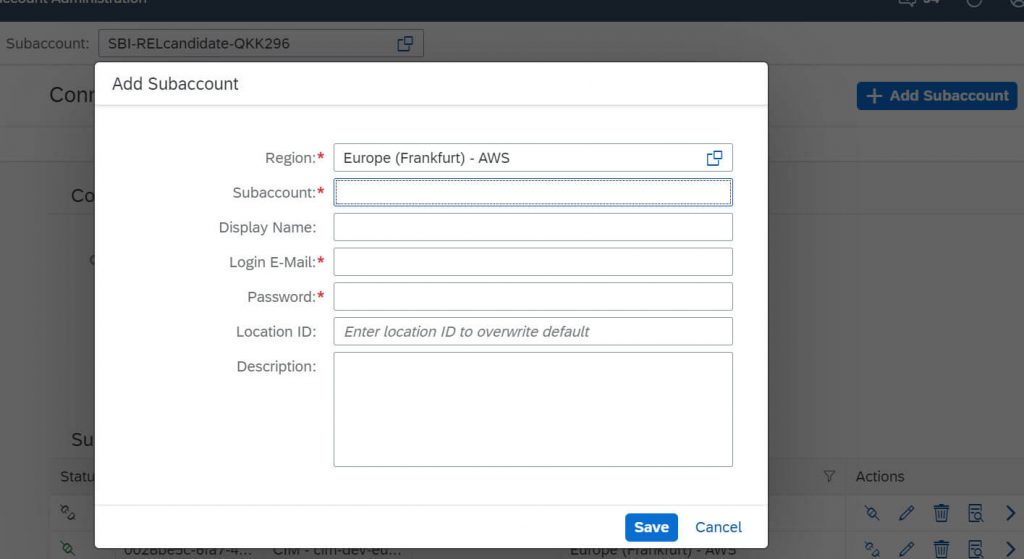
| Region | Europe(Frankfurt) – AWS cf.eu10.hana.ondemand.com |
| Subaccount | <Your subaccount ID> |
| Display Name | By yourself |
| Login E-Mail | <Your subaccount user> |
| Password | <Your subaccount user password> |
| Location ID | Don’t need to maintain |
| Description | By yourself |
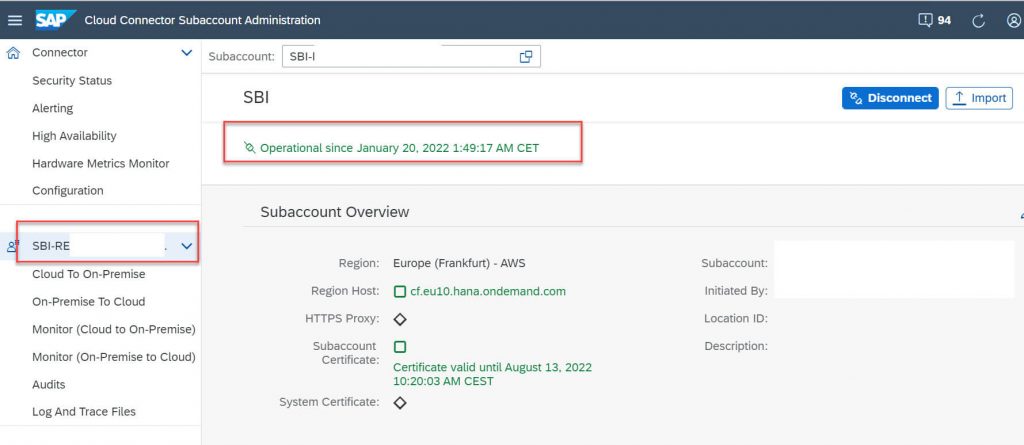
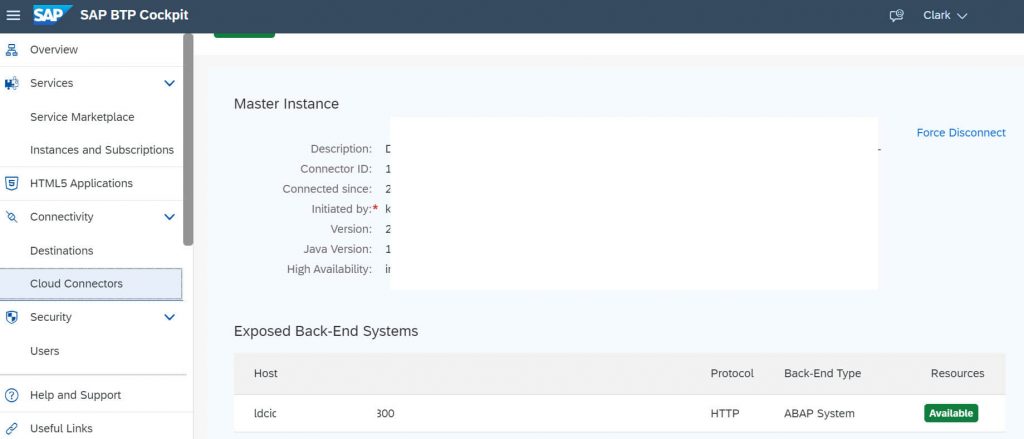
Choose the subaccount you created and check the connection status. If success, the status shall be green.
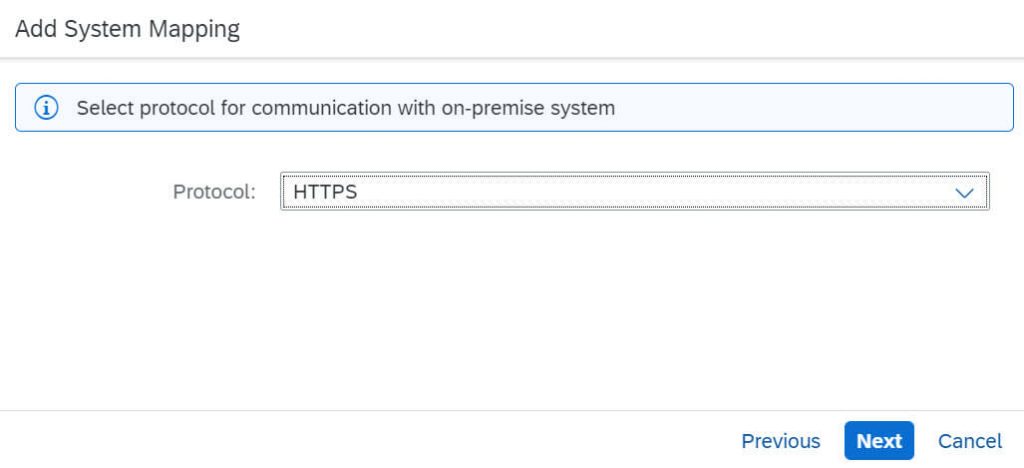
2. Configure the subaccount.Choose the “Cloud To On-Premise” tab and Click add button in access control.
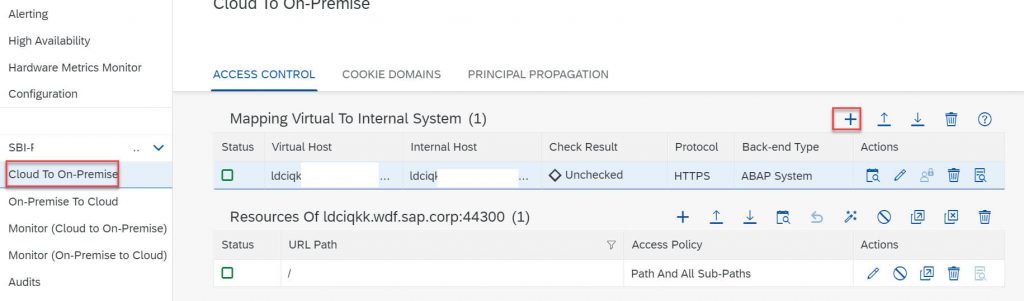

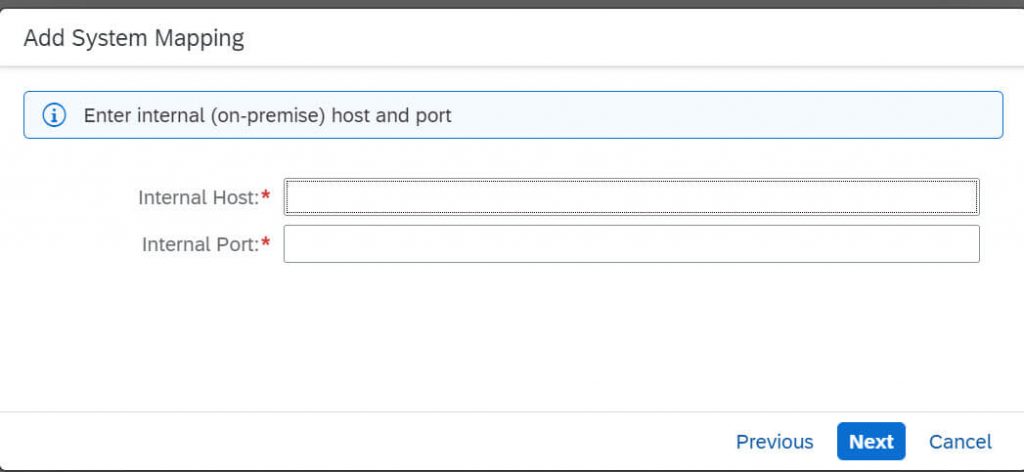
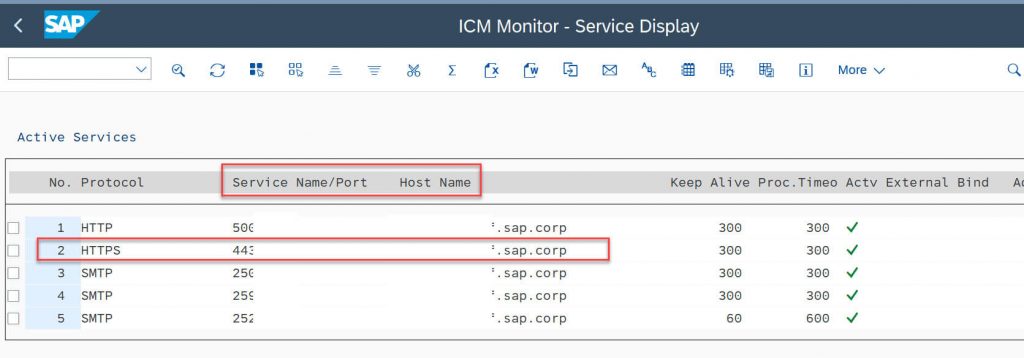
SAP S/4HANA ports: Go to the Transaction SMICM. Choose from the menu “GOTO -> Services”. You can find the ports and host information.
3. Click the check button to check the connection avalability
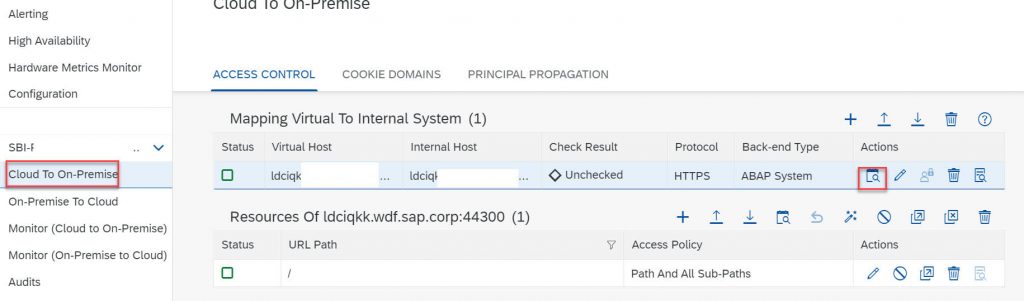
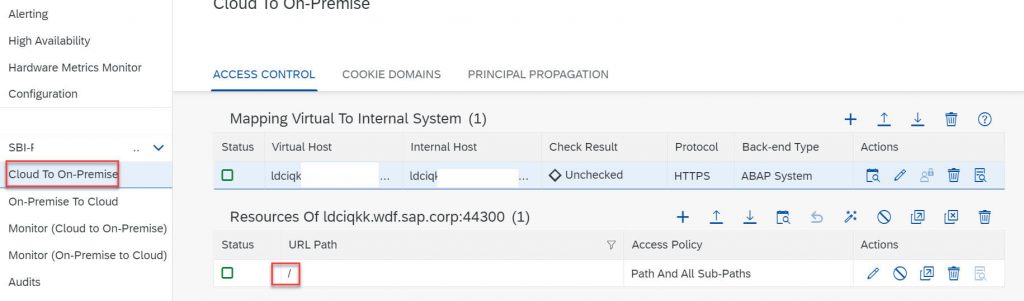
Configure the resources of SAP S/4HANA. Usually add the “/” which means all the resources could be access from SAP BTP. But you can define your own rule by yourself.
Check the cloud connectors in SAP BTP subaccount.
Subscribing to SAP Self-Billing Cockpit
1. Log on to the SAP BTP cockpit (Cloud Foundry environment) with your registered subaccount.
2. Choose Connectivity > Destinations > New Destination to create a destination for mobile services.

3. In the Destination Configuration wizard, enter the following:
• Name: SELFB_DEST_S4HANA
• Type: HTTP
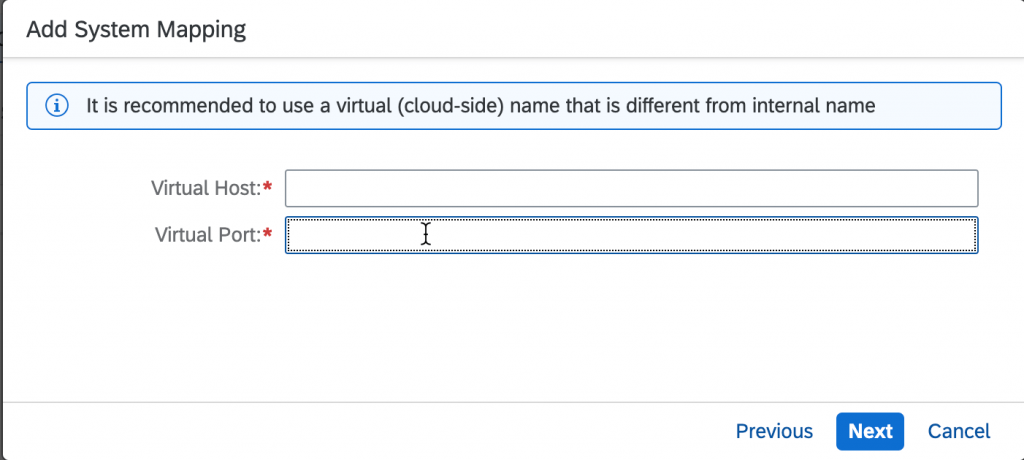
• URL: it is composed of the virtual host and virtual port configured in the cloud connector. that is, http://<virtual host>:<virtual port>.
• Proxy type: OnPremise
• Authentication: Basic Authentication
• User: Username for accessing the SAP S/4HANA system. That is, the communication user you have created in “Creating a Communication User”.
• Password: The password of the communication user you have created earlier.
4. Choose New Property to add the following additional properties:
• SAP_CLIENT: Your client ID
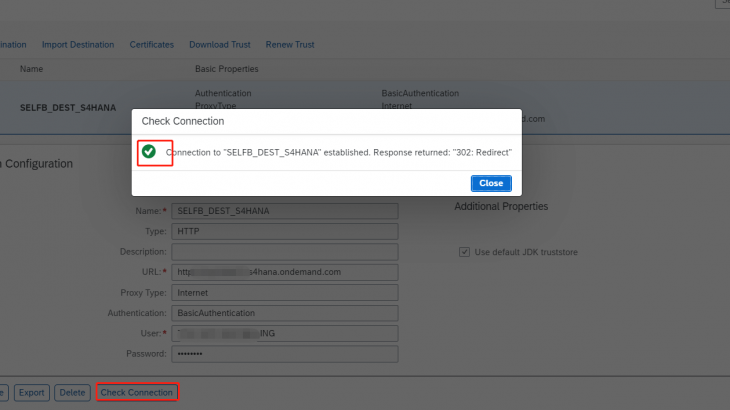
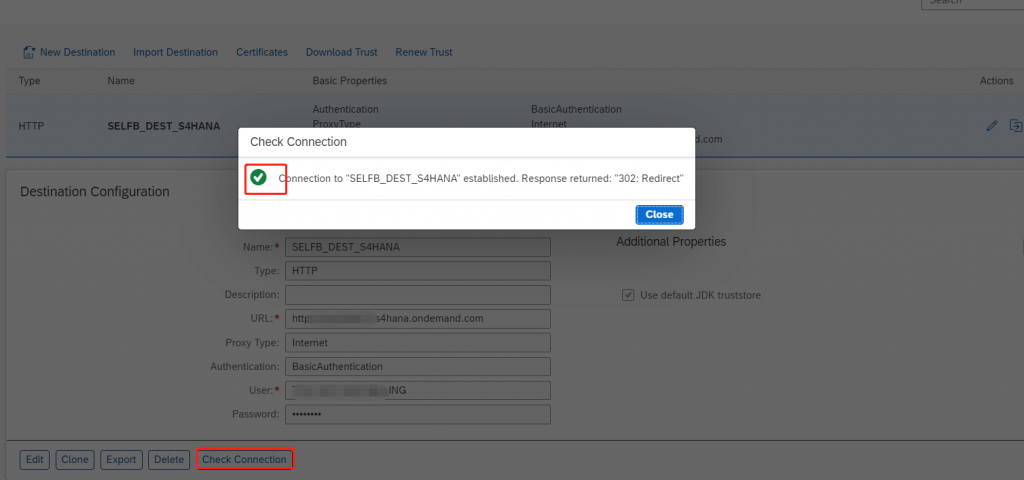
5. Save your settings and choose Check Connection to check whether the connection has been securely set up.
6. Choose Service Marketplace in the navigation tree, navigate to the SAP Self-Billing Cockpit tile, and open it.
i. Choose Create.
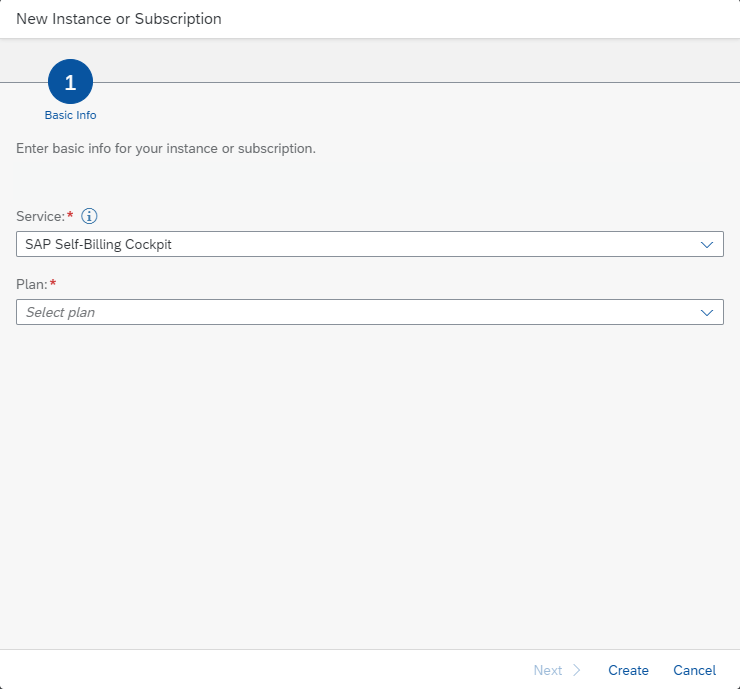
ii. In the displayed screen, choose an application plan (for example, default) and proceed as instructed.
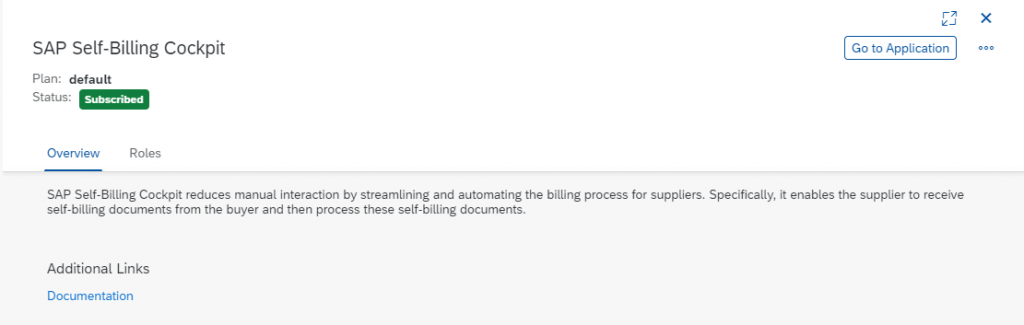
After the subscription is complete, the status changes to Subscribed.
7. Create an inbound service.
a. Log on to your SAP S/4HANA system, and run the transaction SOAMANAGER to start the SOA Manager.
b. Choose Service Administration Web Service Configuration.
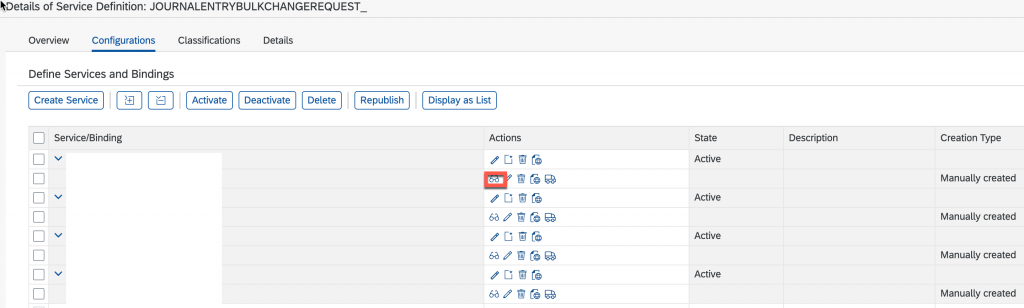
c. Search for the object with the name JOURNALENTRYBULKCHANGEREQUEST_ and choose the search result.
d. Choose Create Service to create a binding.
e. On the Provider Security tab, set Transport Level Security to SSL (https) and Transport Channel Authentication to User ID/Password, and then activate the binding.
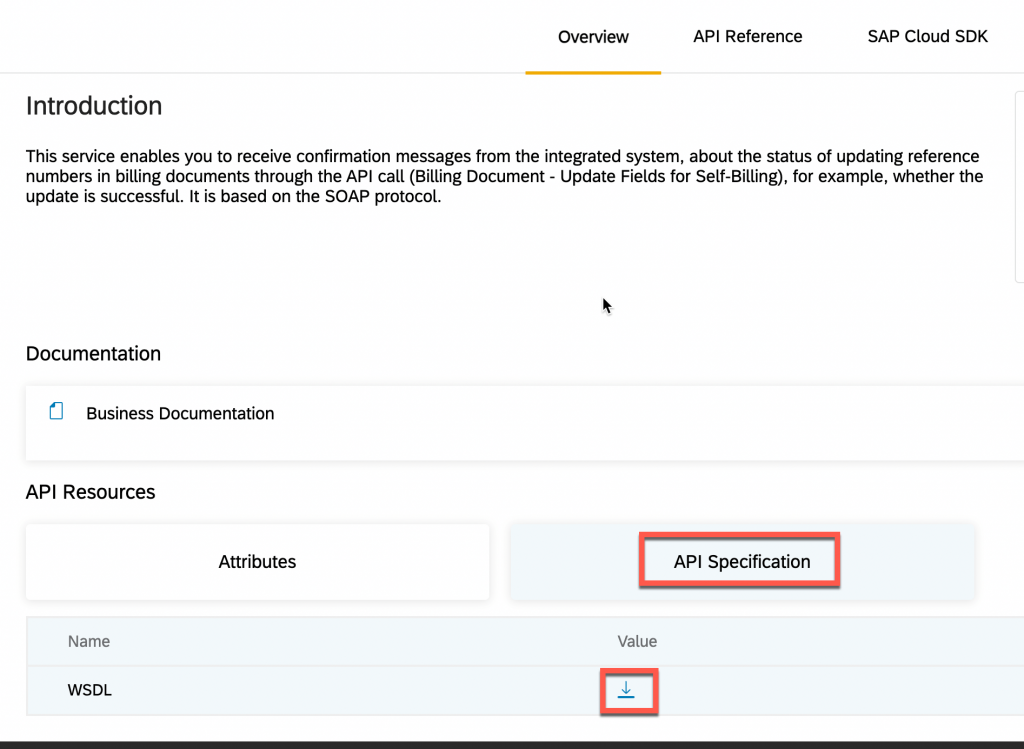
You can download the WSDL specifications by choosing Open Binding WSDL Generation after the binding.
8. Create an inbound service.
a. Log on to your SAP S/4HANA system, and run the transaction SOAMANAGER to start the SOA Manager.
b. Choose Service Administration Web Service Configuration.
c. Search for the object with the name JOURNALENTRYBULKCHANGEREQUEST_ and choose the search result.
d. Choose Create Service to create a binding.
e. On the Provider Security tab, set Transport Level Security to SSL (https) and Transport Channel Authentication to User ID/Password, and then activate the binding.
You can download the WSDL specifications by choosing Open Binding WSDL Generation after the binding.
9. Create an inbound service.
a. Log on to your SAP S/4HANA system, and run the transaction SOAMANAGER to start the SOA Manager.
b. Choose Service Administration Web Service Configuration.
c. Search for the object with the name JOURNALENTRYBULKCHANGEREQUEST_ and choose the search result.
d. Choose Create Service to create a binding.
e. On the Provider Security tab, set Transport Level Security to SSL (https) and Transport Channel Authentication to User ID/Password, and then activate the binding.
You can download the WSDL specifications by choosing Open Binding WSDL Generation after the binding.
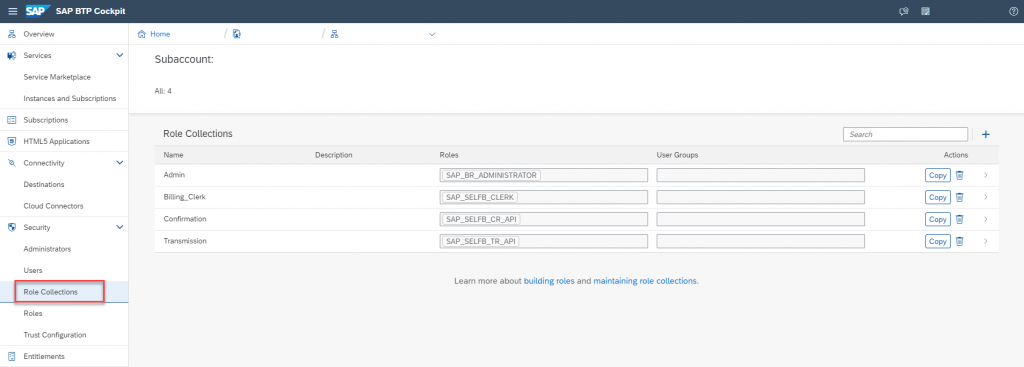
Assigning Role Collections to Users
You can manage role collections as needed. The following table lists the recommended role collections.
| Collection | Role | User | Remarks |
| Admin | SAP_BR_ADMINISTRATOR | A technical user on BTP | This role grants the technical user rights to replicate units of measurement and plants data, as well as to export data. |
| Billing_Clerk | SAP_SELFB_CLERK | Billing clerk | This role allows the billing clerk to log on to self-billing apps, make configurations, check document status, and perform processing tasks. |
| Confirmation | SAP_SELFB_CR_API | A technical user on BTP | This role allows the technical user to receive confirmation messages from SAP S/4HANA. |
| Transmission | SAP_SELFB_TR_API | A technical user on BTP | This role allows the technical user to send transmissions to SAP Self-Billing Cockpit. |
- Create a technical user in your own IDP service.
- Log on to the SAP BTP cockpit (Cloud Foundry environment) with your registered subaccount.
- Choose Security > Role Collections.
- Create a role collection, enter a name and a description, and save the settings.
- Choose the newly created role collection, and edit it by adding the corresponding roles.
Configuring Data Replication for Units of Measurement
1. Set up the endpoint for receiving units of measurement.
a. Log on to your SAP S/4HANA system, and run the transaction SOAMANAGER to start the SOA Manager.
b. From Service Administration, choose Web Service Configuration.
c. Search for the object with the name UNITOFMEASUREMENTMASTERDATAREPLICATIONBUNDLEREQUEST_OUT and choose the search result.
d. From the Create drop-down list, choose Manual Configuration.
e. Enter a logical port name with a description. Mark the logical port as the default one and choose Next.
f. On the Consumer Security tab, choose User ID / Password as Authentication Settings, set User Name and Password based on the information of the technical user you have created on SAP BTP, and then choose Next.
g. On the HTTP Settings tab, choose URL components, set Protocol to HTTPS, Host to a value in the format of <subdomain>.eu10.selfbilling.cloud.sap, Port to 443, Path to /api-password/selfbilling-core-service/v1/erpintegration/data/UnitOfMeasurementMasterDataReplicationBundleRequest_In, and retain default values for other fields, and then choose Next.
Note:
If you use a custom identity service as an alternative to the SAP ID service, add ?login_hint=%7B%22origin%22%3A%22sap.custom%22%7D to the end of the service path.
h. On the SOAP Protocol tab, set RM Protocol to SAP RM, Message ID Protocol to SAP Message ID, Data transfer scope to Minimal Data Transfer, Transfer protocol to Transfer via HTTP header, and then choose Next.
i. Activate this logical port and save it as the default port.
2. Define the data replication model.
a. Log on to your SAP S/4HANA system and run transaction DRFIMG.
b. Choose Data Replication Define Custom Settings for Data Replication Define Replication Models.
c. Choose Define Replication Models and then choose New Entries.
d. Enter a replication model (such as UOM_999) and a description, and save the settings.
e. Choose the newly created replication model and then choose Assign Outbound Implementation.
f. Choose New Entries, and choose ARIBA_999 under Outbound Implementation.
g. Choose this outbound implementation and then choose Assign Target Systems for Repl.Model /Outb.Impl.
h. Choose New Entries and specify your business system name.
i. Choose the business system and then choose Assign Outbound Parameter.
j. Choose New Entries, specify the outbound parameter and save your settings.
k. Navigate back to Define Replication Model and activate your replication model.
3. Execute data replication.
a. In your SAP S/4HANA system, run transaction DRFOUT.
b. Choose the replication model and outbound implementation that you have created in the previous step, and set Replication Mode to Manual.
c. Execute data replication.
Note:
• Before starting data replication, ensure that you have already subscribed to the SAP Self-Billing Cockpit service and that the technical user you created on SAP BTP has been assigned the role SAP_BR_ADMINISTRATOR.
• Trigger data replication manually if there are updates to units of measurement before the scheduled replication time arrives. Otherwise, the system reports an error indicating that the unit of measurement is invalid.
d. Navigate back to Execute Data Replication and save the data replication settings as a variant.
e. Specify the variant name and description, and then save your settings.
4. (Optional) Schedule data replication.
a. In your SAP S/4HANA system, run transaction SM36.
b. Choose Job wizard and follow its guidance to create a scheduling task. During this process, specify the job name, set ABAP Program Name to RDRF_MESSAGE_OUT, enter the name of the variant you have created in the previous step, and specify the scheduling period as required. For other fields, retain their default values.
You can choose Own jobs to check the job status.
Configuring Data Replication for Plants
1. Set up the endpoint for receiving plants.
a. Log on to your SAP S/4HANA system, and run the transaction SOAMANAGER to start the SOA Manager.
b. From Service Administration, choose Web Service Configuration.
c. Search for the object with the name PLANTMASTERDATAREPLICATIONBUNDLEREQUEST_OUT and choose the search result.
d. From the Create dropdown list, choose Manual Configuration.
e. Enter a logical port name with a description. Mark the logical port as default and choose Next.
f. On the Consumer Security tab, choose User ID / Password as Authentication Settings, set User Name and Password based on the information of the technical user you have created on SAP BTP, and then choose Next.
g. On the HTTP Settings tab, choose URL components, set Protocol to HTTPS, Host to a value in the format of <subdomain>.eu10.selfbilling.cloud.sap, Port to 443, Path to /api-password/selfbilling-core-service/v1/erpintegration/data/plantsSync, and retain default values for other fields.
Note:
If you use a custom identity service as an alternative to the SAP ID service, add ?login_hint=%7B%22origin%22%3A%22sap.custom%22%7D to the end of the service path.
h. On the SOAP Protocol tab, set RM Protocol to SAP RM, Message ID Protocol to SAP Message ID, Data transfer scope to Minimal Data Transfer, and Transfer protocol to Transfer via HTTP header, and then choose Next.
i. Activate this logical port and save it as the default port.
2. Define the data replication model.
a. Log on to your SAP S/4HANA system and run transaction DRFIMG.
b. Choose Data Replication Define Custom Settings for Data Replication Define Replication Models.
c. Choose Define Replication Models and then choose New Entries.
d. Enter a replication model (such as PLANT_999) and a description, and save the settings.
e. Choose the newly created replication model and choose Assign Outbound Implementation.
f. Choose New Entries, and choose LMDR_PLANT under Outbound Implementation.
g. Choose this outbound implementation and choose Assign Target Systems for Repl.Model /Outb.Impl.
h. Choose New Entries, specify your business system name, and save your settings.
i. Navigate back to Define Replication Model, and activate your replication model.
3. Execute data replication.
a. In your SAP S/4HANA system, run transaction DRFOUT.
b. Choose the replication model and outbound implementation that you have created in the previous step, and set Replication Mode to Manual.
c. Execute data replication.
Note:
Before starting data replication, ensure that you have already subscribed to the SAP Self-Billing Cockpit service and that the technical user you created on SAP BTP have been assigned the role SAP_BR_ADMINISTRATOR.
d. Save the data replication settings as a variant.
e. Specify the variant name and description, and then save your settings.
4. Schedule data replication.
a. In your SAP S/4HANA system, run transaction SM36.
b. Choose Job wizard and follow its guidance to create a scheduling task. During this process, specify the job name, set ABAP Program Name to RDRF_MESSAGE_OUT, enter the name of the variant you have created in the previous step, and specify the scheduling period as required. For other fields, retain their default values.
You can choose Own jobs to check the job status.
Configuring the Service for Updating Journal Entries
1. Create an inbound service.
a. Log on to your SAP S/4HANA system, and run the transaction SOAMANAGER to start the SOA Manager.
b. Choose Service Administration Web Service Configuration.
c. Search for the object with the name JOURNALENTRYBULKCHANGEREQUEST_ and choose the search result.
d. Choose Create Service to create a binding.
e. On the Provider Security tab, set Transport Level Security to SSL (https) and Transport Channel Authentication to User ID/Password, and then activate the binding.
2. Create an outbound service by defining a logical port.
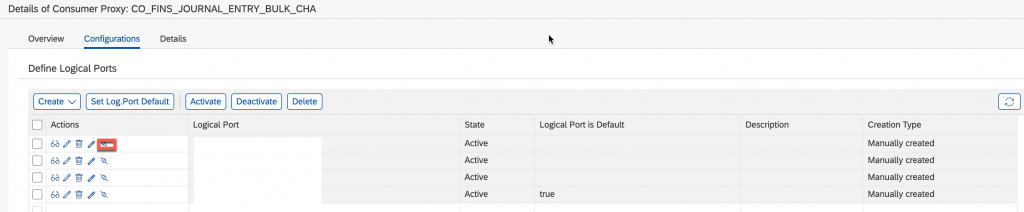
a. Log on to your SAP S/4HANA system, and run the transaction SOAMANAGER to start the SOA Manager.
b. Choose Service Administration Web Service Configuration.
c. Search for the object with the name of CO_FINS_JOURNAL_ENTRY_BULK_CHA and choose the search result.
d. Under Create, choose Manual Configuration.
e. Enter a logical port name with a description, and mark it as the default logical port. Note the port name for later use.
f. On the Consumer Security tab, choose User ID / Password as Authentication Settings, set User Name and Password based on the information of the technical user you have created on SAP BTP, and then choose Next.
g. On the HTTP Settings tab, set Protocol to HTTPS, Host to a value in the format of <subdomain>.eu10.selfbilling.cloud.sap, Port to 443, Path to /api-password/selfbilling-confirmation-service/v1/api/JournalEntryBulkChangeConfirmation_In, and retain default values for other fields.
Note:
If you use a custom identity service as an alternative to the SAP ID service, add ?login_hint=%7B%22origin%22%3A%22sap.custom%22%7D to the end of the service path.
h. On the SOAP Protocol tab, set RM Protocol to SAP RM, Message ID Protocol to Suppress ID Transfer, Data transfer scope to Minimal Data Transfer, and Transfer protocol to Transfer via HTTP header. Then choose Next.
3. Set up mapping between the inbound and outbound services.
a. Log on to your SAP S/4HANA system.
b. Run transaction spro and navigate to SAP Reference IMG > Financial Accounting > Financial Accounting > Global Settings > API Settings for API Monitoring > Map External System and Logical Port.
c. Choose New Entries to set up mapping between an external system and a logical port. In this step, set External System ID to your tenant ID, and set Logical Port to the outbound port you created earlier.
4. Check that Application Interface Framework (AIF) content has been extracted in deployment scenario SAP_COM_0002. If not, run transaction /AIF/CONTENT_EXTRACT to extract it.
Configuring the Service for Billing Integration
1. Create a profile for defining common security settings.
a. Log on to your SAP S/4HANA system, and run the transaction SOAMANAGER to start the SOA Manager.
b. Choose Technical Administration Profile, and then choose Create Profile.
c. On the General tab, enter the profile name, and then choose Next.
d. On the Security tab, choose SSL (https) under Transport Level Security, choose User ID/Password under Transport Channel Authentication, and then choose Next and Finish.
e. Activate this profile.
2. Activate pending tasks generated by the previous configuration.
a. Log on to your SAP S/4HANA system, and run the transaction SOAMANAGER to start the SOA Manager.
b. Choose Service Administration Pending Tasks to open the list of pending tasks.
a. Choose Switch to expert mode.
b. Choose Filter by Profile and Version, choose the profile you defined earlier, and set its version to 1.
c. Choose Rebuild List.
d. Choose Process List to check the status of generated tasks. Ensure that all tasks are successfully executed.
3. Define a provider system for usage in business scenario configuration.
a. In the SOA Manager, choose Technical Administration > Provider Systems.
b. Choose Create Special > Create Third Party System.
c. On the General tab, enter a system name (that is, the tenant ID) and the name of the profile you created earlier, and then choose Next.
d. On the Services Search Settings tab, specify the username and password (that is, your credentials for logging on to the SAP S/4HANA system) for WSIL, and then choose Check to verify the authentication.
e. Navigate back to the list of provider systems, choose the provider system you defined earlier, and edit it.
f. On the WSDL assignments tab, choose Upload and upload the WSDL files specifying outbound communication.
You can download the WSDL files in the API hub. Before uploading the files, update the subdomain name based on actual conditions. When you use a custom identity service as an alternative to the SAP ID service, add ?login_hint=%7B%22origin%22%3A%22sap.custom%22%7D to the end of each service path involved. The table shows the APIs.
| Service Name | SBINV | SBWAP | Remarks |
| CreditDebitMemoConfirmation_Out | Yes | Yes | versions earlier than S/4HANA 2020 FPS02 |
| CreditDebitMemoConfirmation_Out_V2 | Yes | Yes | SAP S/4HANA 2020 FPS02 or later |
| BD_Update_SBI_Confirmation_Out | No | Yes | |
| BDSimulatePricingConfirmation_Out | Yes | Yes | |
| BDCreateSelfBillingConfirmation_Out | Yes | No |
g. Continue as instructed and finally activate the provider system.
4. Create a technical user for sending confirmation messages and complete logon data assignment.
a. In the SOA Manager, choose Service Administration Logon Data Management.
b. Create logon data with its Authentication Method set to User/Password or X.509 and the authentication credentials filled, and save your settings.
c. Open the Assignments tab page, and choose Create.
d. Choose the provider system you have chosen earlier for the Provider IBC Reference field, choose Restrict to Service Group / Consumer Factory and enter the service group SDBIL_SBI_BD_UPD_API_OUT.
e. Choose Next, choose the logon data you have created earlier, and choose Finish.
f. Repeat steps c, d and e to complete logon data assignment for the service groups SDBIL_SBI_CDM_API_OUT, SDBIL_SBI_SMLTE_API_OUT, and SDBIL_SBI_BD_CREATE_API_OUT.
5. Create an integration scenario.
a. In the SOA Manager, choose Service Administration Local Integration Scenario Configuration, and create an integration scenario.
b. On the Service Definitions tab, add inbound services BD_UPDATE_SBI_REQUEST_IN, CREDITDEBITMEMOREQUEST_IN, BDSIMULATEPRICINGREQUEST_IN, and BDCREATESELFBILLINGREQUEST_IN, and assign the profile you created earlier. Then, choose Next.
c. Add service groups SDBIL_SBI_BD_UPD_API_OUT, SDBIL_SBI_CDM_API_OUT, SDBIL_SBI_SMLTE_API_OUT, and SDBIL_SBI_BD_CREATE_API_OUT. For the provider IBC reference, choose the provider system that you created earlier.
d. For the logon data, choose the one that you created earlier.
e. Confirm and activate your entries.
6. Run pending tasks.
a. In the SOA Manager, choose Service Administration Pending Tasks, and choose Switch to expert mode.
b. Choose Filter by Business Scenario and enter the name of the integration scenario you created earlier.
c. Choose Process List to create logical ports for all services in the service group.
7. Check that Application Interface Framework (AIF) content has been extracted in deployment scenario SAP_COM_0564. If not, run transaction /AIF/CONTENT_EXTRACT to extract it.
8. Check that point-to-point communication has been activated for asynchronous services.
a. Log on to your SAP S/4HANA system and run transaction spro.
b. Choose SAP Reference IMG > Cross-Application Components > Processes and Tools for Enterprise Applications > Enterprise Services > Point-to-Point Enablement for Asynchronous Enterprise Services > Activate Support for Point2Point Communication, and activate it if it is not.
Define additional properties for the destination
Open the destination configured in “Subscribing to SAP Self-Billing Cockpit”, and edit it by adding the following additional properties:
| Name | Value | Remark |
| CREATE_BILLING_URL_PATH | Path of the API for creating credit memos or debit memos in your SAP S/4HANA system | |
| UPDATE_JE_URL_PATH | Path of the API for updating journal entries in your SAP S/4HANA system | |
| UPDATE_BILLING_URL_PATH | Path of the API for updating billing documents in your SAP S/4HANA system | |
| CREATE_INVOICE_URL_PATH | Path of the API for creating invoices in your SAP S/4HANA system | Only for SBINV |
| UI_BILLING_PATH | It is in the format of https://<host>/sap/bc/ui5_ui5/ui2/ushell/shells/abap/FioriLaunchpad.html#BillingDocument-displayFactSheet&/C_BillingDocumentFs(‘%s’), where <host> is your host name. | |
| UI_DELIVERY_PATH | It is in the format of https://<host>/sap/bc/ui5_ui5/ui2/ushell/shells/abap/FioriLaunchpad.html#OutboundDelivery-displayFactSheet&/C_OutboundDeliveryFs(‘%s’), where <host> is your host name. | |
| SAP_CLIENT | Client number of your SAP S/4HANA system. |
Below uses the service for updating journal entries as an example to describe how to obtain the service path so that you can define additional properties.
1. Log on to your SAP S/4HANA system, and run the transaction SOAMANAGER to start the SOA Manager.
2. From Service Administration, choose Web Service Configuration.
3. Search for the object with the name JOURNALENTRYBULKCHANGEREQUEST_ and choose the search result.
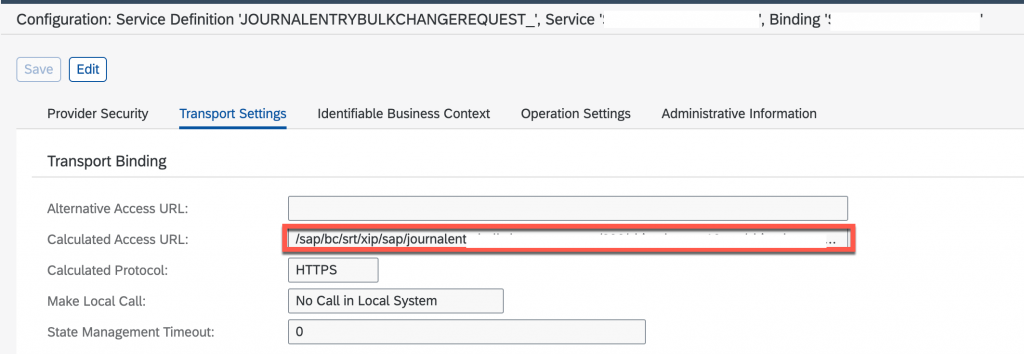
4. Choose the service you created for updating journal entries and proceed to display binding.
5. Choose Transport Settings and record the path in the field Calculated Access URL. It is the path of the API for updating journal entries.
6. Similarly, obtain the paths of the following services in your SAP S/4HANA system:
Service for updating billing documents (object name: BD_UPDATE_SBI_REQUEST_IN)
Service for creating billing documents (object name: CREDITDEBITMEMOREQUEST_IN)
Service for simulating prices (object name: BDSIMULATEPRICINGREQUEST_IN)
Service for invoice creation (obejct name: BDCREATESELFBILLINGREQUEST_IN)
Verify the Setup
This part uses the service for updating journal entries as an example to describe how to verify the integration setup. Below uses the service for updating journal entries as an example.
1. Log on to your SAP S/4HANA system, and run the transaction SOAMANAGER to start the SOA Manager.
2. From Service Administration, choose Web Service Configuration.
3. Search for the object with the name CO_FINS_JOURNAL_ENTRY_BULK_CHA and choose the search result.
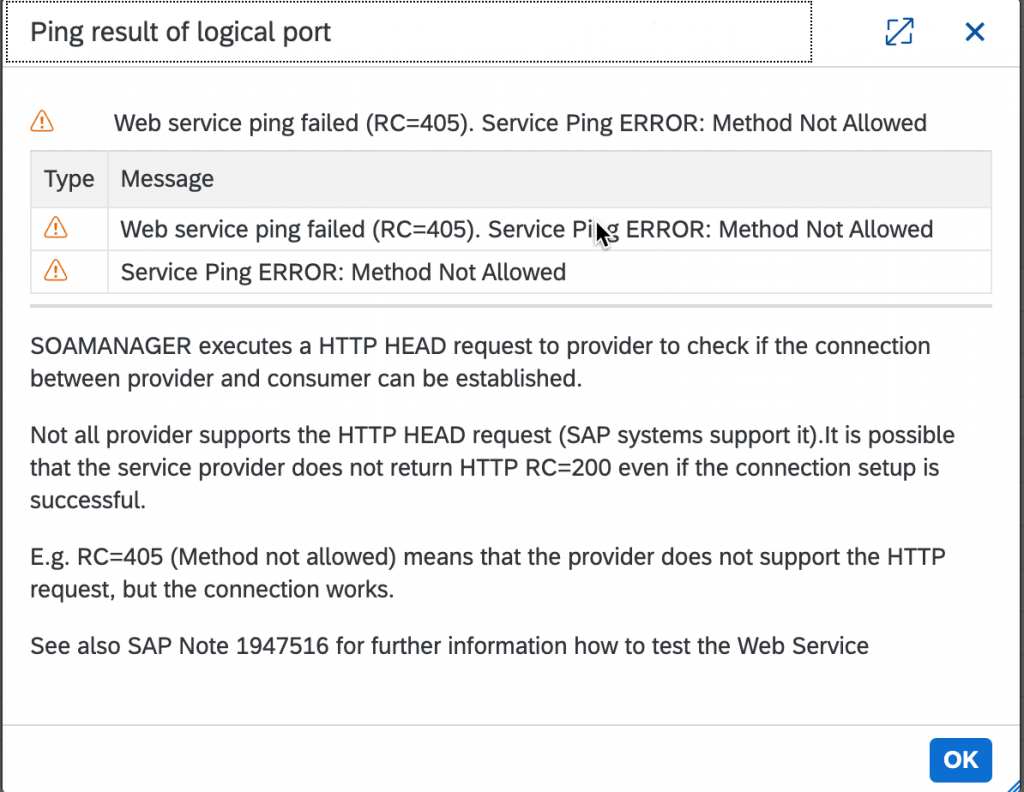
4. Choose the service you created for updating journal entries and proceed to ping web service.
5. If it shows 405, the integration setup is correct.
6. Similarly, verify the following services in your SAP S/4HANA system:
Service for updating billing documents (object name: SDBIL_SBI_BD_UPD_API_OUT)
Service for creating billing documents (object name: SDBIL_SBI_CDM_API_OUT)
Service for simulating prices (object name: SDBIL_SBI_SMLTE_API_OUT)
Service for invoice creation (obejct name: SDBIL_SBI_BD_CREATE_API_OUT)


