In this blog post, we would like to show you how you can access CDS view entities in an ABAP system using SQL via ODBC. Open Database Connectivity (ODBC) is a standard API for accessing databases.
Why an ODBC Driver for ABAP?
There are situations where you would like to have external SQL read access to CDS objects owned by the ABAP system. Direct SQL read access to the underlying SAP HANA database of an ABAP system is not a good choice. Some of the problems are listed in SAP Note 2511210. Names and internal structures in the ABAP database might not be stable because the lifecycle is managed by the ABAP system. Typecasts might not be performed as expected, for example, NUMC data types might not be correctly padded, or currency data might not be correctly shifted. Database session variables are only set correctly if a view is accessed from the ABAP system. ABAP-level security concepts are bypassed.
All those problems go away when you treat the ABAP system itself as a database by accessing the ABAP system directly using ODBC. In this case, authentication and authorization is done using an ABAP user. Full ABAP SQL semantics apply and even application-server-level buffering can be used as well as ABAP-level access control and read access logging .
Compared to the ODATA interface, the ODBC interface has the advantage that it allows unrestricted SQL access to all exposed ABAP CDS view entities. Data from different entities can be joined in an ad-hoc fashion and data can be aggregated for analytical queries.
In its current version, the “ODBC driver for ABAP” supports the use of a technical user in the ABAP system, with privileged access (no DCLs) only. Only read access to the exposed ABAP CDS objects is allowed.
Overview of Steps and Prerequisites
To access CDS view entities in an ABAP system via ODBC, these entities first need to be properly exposed in the back-end system before accessing them via the “ODBC driver for ABAP” in an ODBC-based client tool
This blog post provides a step-by-step description containing the following steps:
- Create and fill some test tables
- Create CDS view entities for your tables
- Create a service definition and an SQL-typed service binding
- Create a communication scenario with object privileges
- Create a communication system, a communication user, and a communication arrangement
- Install the ODBC driver on Windows
- Create an ODBC data source
- Open an ODBC connection in Microsoft Excel and access data
The following prerequisites are needed when you want to follow this blog post:
- An SAP BTP ABAP Environment system (aka “Steampunk”)
- A Developer user in the system
- The ABAP Development Tools (ADT) installed
- An ABAP Cloud project configured in ADT and connected to the ABAP system
- A 64bit Excel version since the “ODBC driver for ABAP” is a 64bit driver.
Create and fill some test tables
As an example, we have chosen two demo table entities ZORDERS and ZORDERITEMS. The definition in ADT looks as follows:
@EndUserText.label : 'ORDERS'
@AbapCatalog.enhancement.category : #NOT_EXTENSIBLE
@AbapCatalog.tableCategory : #TRANSPARENT
@AbapCatalog.deliveryClass : #A
@AbapCatalog.dataMaintenance : #RESTRICTED
define table zorders {
  key id       : abap.numc(10) not null;
  creationdate : abap.datn;

}
@EndUserText.label : 'ORDER ITEMS'
@AbapCatalog.enhancement.category : #NOT_EXTENSIBLE
@AbapCatalog.tableCategory : #TRANSPARENT
@AbapCatalog.deliveryClass : #A
@AbapCatalog.dataMaintenance : #RESTRICTED
define table zorderitems {
  key orderid : abap.numc(10) not null;
  key pos     : abap.int4 not null;
  item        : abap.char(100) not null;
  amount      : abap.int4 not null;

}
We have also created some test data in the tables with the following ABAP sample code:
class zcl_fill_orders definition

  public
  final
  create public.

  public section.
    interfaces if_oo_adt_classrun.
  protected section.
  private section.

endclass.

class zcl_fill_orders implementation.

  method if_oo_adt_classrun~main.

    data: lt_orders type table of zorders.
    delete from zorders.
    lt_orders = value #(
      ( id = '1' creationdate = '20210801' )
      ( id = '2' creationdate = '20210802'  )
      ( id = '3' creationdate = '20210803' )
    ).
    insert zorders from table @lt_orders.
    out->write( sy-dbcnt ).

    data: lt_orderitems type table of zorderitems.
    delete from zorderitems.
    lt_orderitems = value #(
      ( orderid = '1' pos = '1' item = 'Apple' amount = '5' )
      ( orderid = '1' pos = '2' item = 'Banana' amount = '5' )
      ( orderid = '1' pos = '3' item = 'Orange Juice' amount = '2' )

      ( orderid = '2' pos = '1' item = 'Orange' amount = '10' )
      ( orderid = '2' pos = '2' item = 'Apple' amount = '5' )

      ( orderid = '3' pos = '1' item = 'Bottle Water' amount = '5' )
    ).
    insert zorderitems from table @lt_orderitems.
    out->write( sy-dbcnt ).

  endmethod.

endclass.
Create CDS view entities for your tables
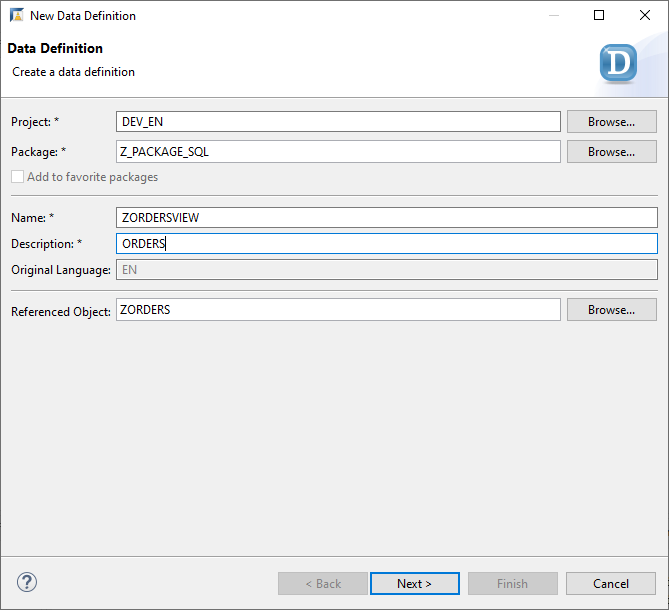
We first created a package Z_PACKAGE_SQL, where we place our new objects and then create CDS view entities for the two tables, using the ADT wizard. The new CDS view entities will be called ZORDERSVIEW and ZORDERITEMSVIEW.
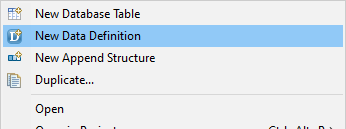
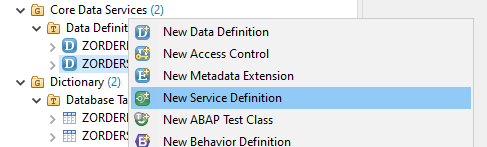
To do this, right click on the tables in the project explorer in ADT, then select “New Data Definition” and fill out the data requested in the following pop up.
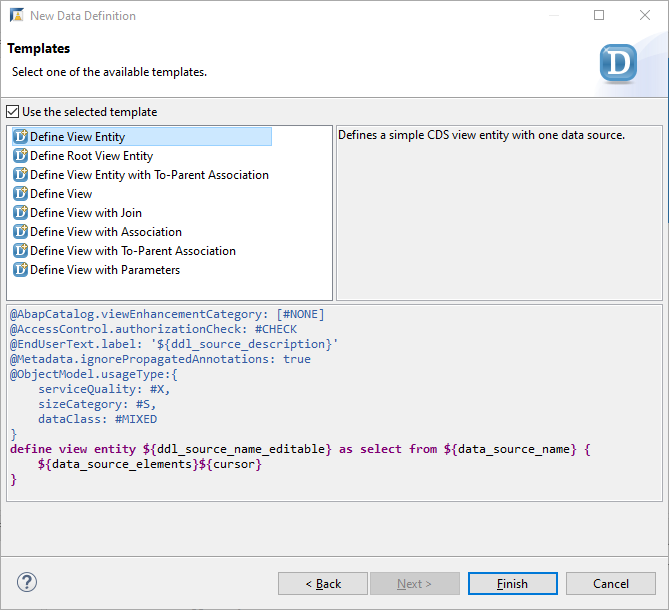
On the next screen, select “Define View Entity” and click “Finish”. Currently, only CDS view entities can be exposed to ODBC consumers.
After defining the new CDS view entities, the definition may look as follows. Note that we have renamed the original table columns to use mixed-case names.
@AccessControl.authorizationCheck: #NOT_REQUIRED
@EndUserText.label: 'ORDERS'
define view entity ZORDERSVIEW as select from zorders {
  key id as Id,
  creationdate as CreationDate
}

@AccessControl.authorizationCheck: #NOT_REQUIRED
@EndUserText.label: 'ORDER ITEMS'
define view entity ZORDERITEMSVIEW as select from zorderitems {
  key orderid as OrderId,
  key pos as Pos,
  item as Item,
  amount as Amount
}
Create a service definition and an SQL-typed service binding
Now we need a service definition and a corresponding SQL-typed service binding to define that the new CDS view entities are exposed in a SQL service. To define a new service definition, right-click on one of the ZORDERSVIEW or ZORDERITEMSVIEW views in the project explorer, then select “New Service Definition” and give the service definition a name, for example, Z_SERVICE_DEF_SQL.
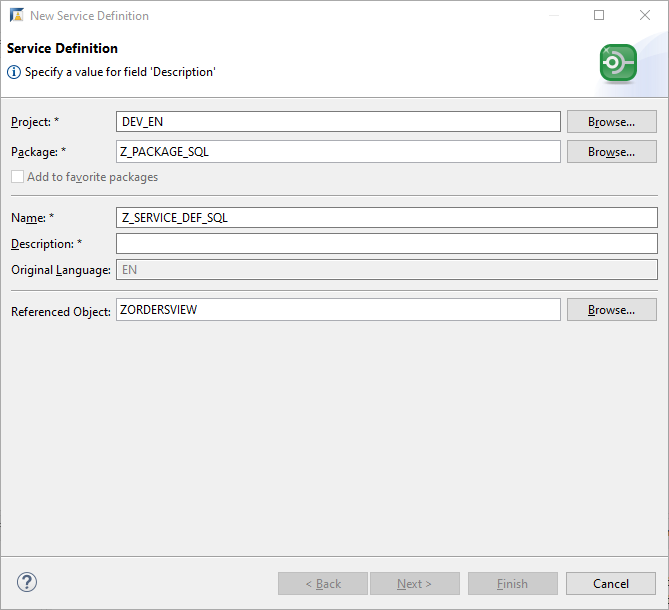
After defining the new service definition Z_SERVICE_DEF_SQL, open it, add the second view, and add alias names for both view entities. The service definition may look as follows. Note that we have chosen again mixed-case names for the alias names.
@EndUserText.label: 'SERVICE DEF'
define service Z_SERVICE_DEF_SQL {
expose ZORDERSVIEW as Orders;
expose ZORDERITEMSVIEW as OrderItems;
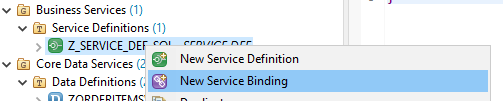
}The newly created service definition can now be used in a service binding. We need a service binding of type SQL1 to access the objects using ODBC later. Right-click on the service definition, and select “New Service Binding”:
Select “SQL1” as binding type and activate it.
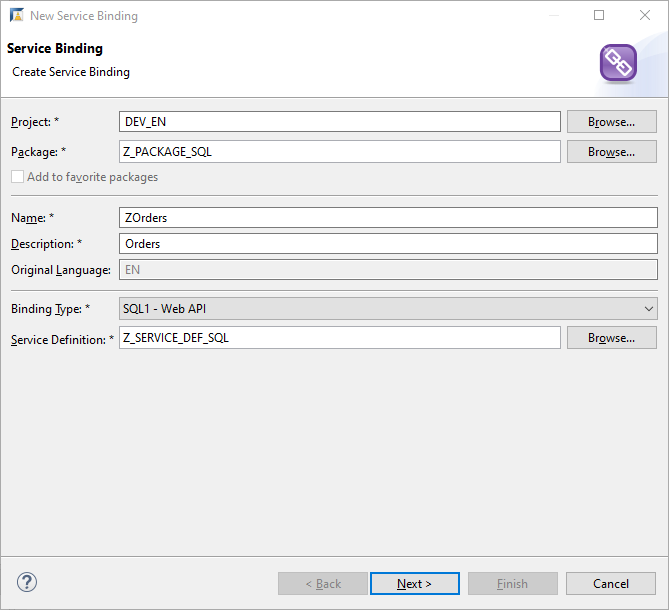
You can use a mixed-case name for the service binding. As we will see later, the service binding name will act as the schema name for external ODBC consumers.
Create a communication scenario with object privileges
Since we want to use a technical user in the ABAP system to access the service binding, we now need to create a communication scenario and a communication arrangement in the SAP BTP ABAP Environment system.
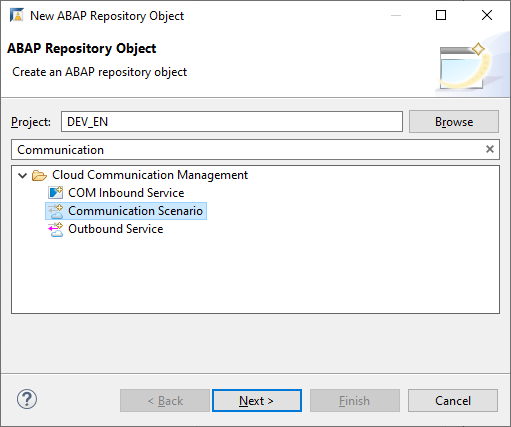
To create a communication scenario choose New -> Other ABAP Repository Object- > Search for “Communication”, then select “Communication Scenario”:
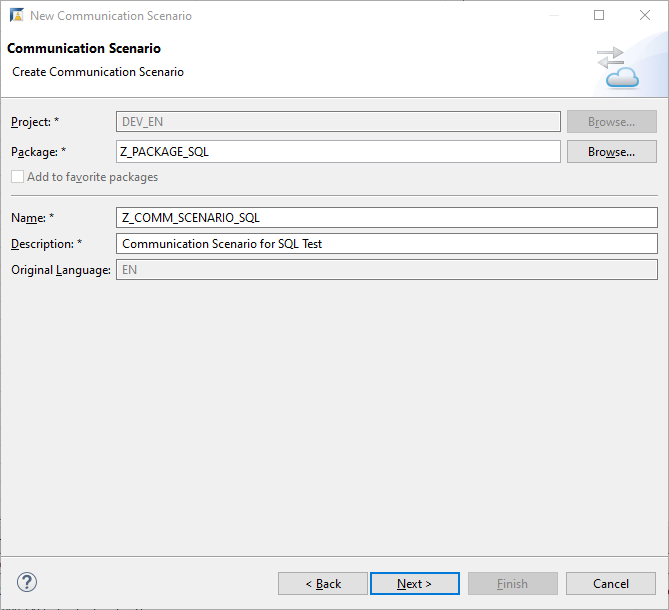
In our case, we called the new communication scenario Z_COMM_SCENARIO_SQL. Since we want to use user/password authentication in our Windows Excel test case, select “Basic” as supported authentication methods.

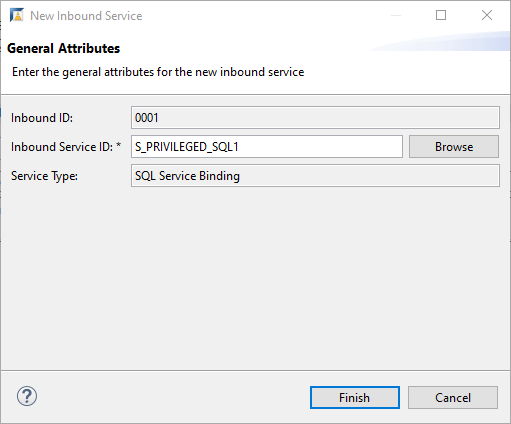
Now go to tab “Inbound”. In section “Inbound Services”, click on the “Add…” button, and enter the “S_PRIVILEGED_SQL1” service and click “Finish”. The “S_PRIVILEGED_SQL1” inbound service is a pre-configured service for the privileged access to CDS view entities, that is, no are applied. (DCL stands for Data Control Language. It provides an access control mechanism to restrict the results returned by the CDS view from the database according to conditions)
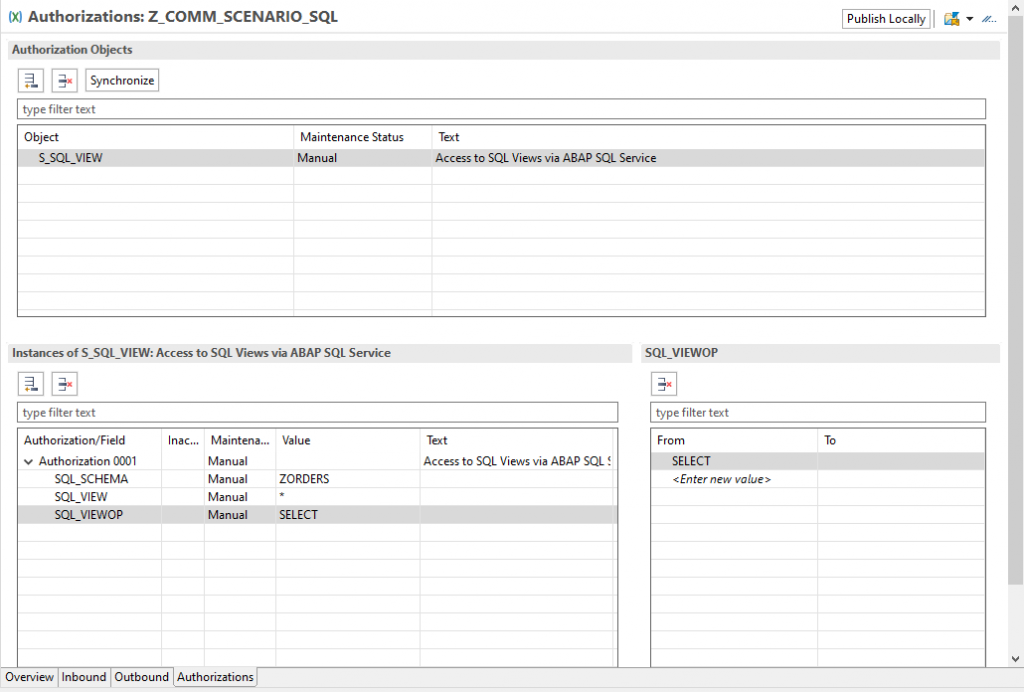
Now, we need to add additional authorizations to enable access to our service binding. Go to the tab “Authorizations”. Below “Authorization Objects”, press the “Insert” button and add the “S_SQL_VIEW” authorization object:
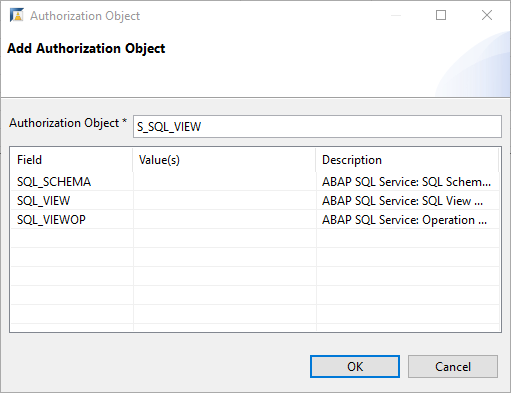
To fill in values for SQL_SCHEMA, SQL_VIEW, and SQL_VIEWOP, first choose “OK” and then select the added authorization object and fill out the authorizations in the details:
SQL_SCHEMA -> ZORDERS
SQL_VIEW -> *
SQL_VIEWOP -> SELECT
SQL_SCHEMA must contain the name of the service binding that we want to grant access to. In this case, upper-case notation is ok. The value “*” for SQL_VIEW means that we allow access to all views in the service definition that is attached to the service binding ZORDERS.
Effectively, we grant the SELECT privilege on all views in the schema ZORDERS to the users of the communication scenario, just like we would issue a GRANT statement in a database.
After you have finished, save your entries and choose the “Publish Locally” button to publish it in the current development system. After publishing we can create a communication arrangement.
Create a Communication System, a Communication User, and a Communication Arrangement
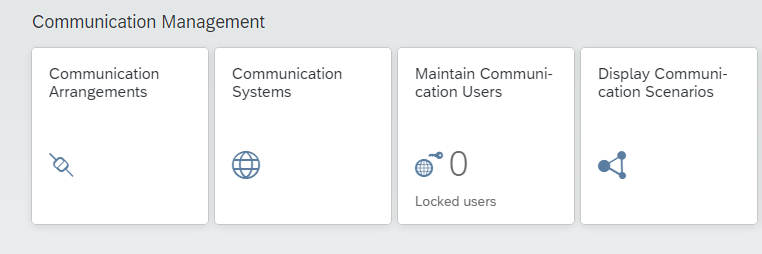
The final preparation tasks in the ABAP system cannot be performed in ADT and need to be done in the administration UI of the system. In this UI you will find the relevant tiles in the section “Communication Management”.
We need to create a communication system first. So, click on “Communication Systems” and click on “New”:
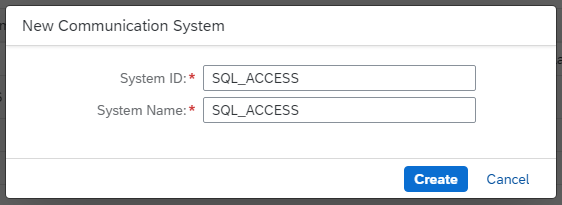
Choose a name for the communication system, for example, SQL_ACCESS, and choose “Create”. After this, mark it as “Inbound Only”.
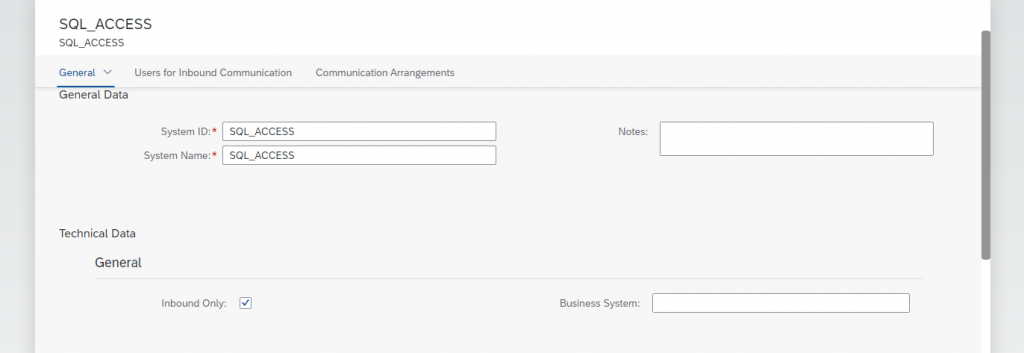
Then, go to “Users for Inbound Communication” and choose the “+” button.

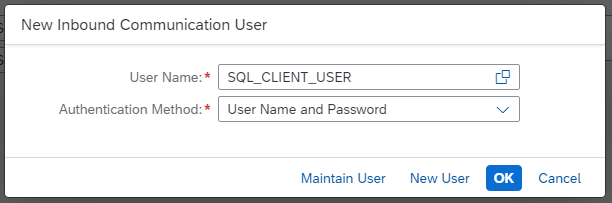
There, select “New User”
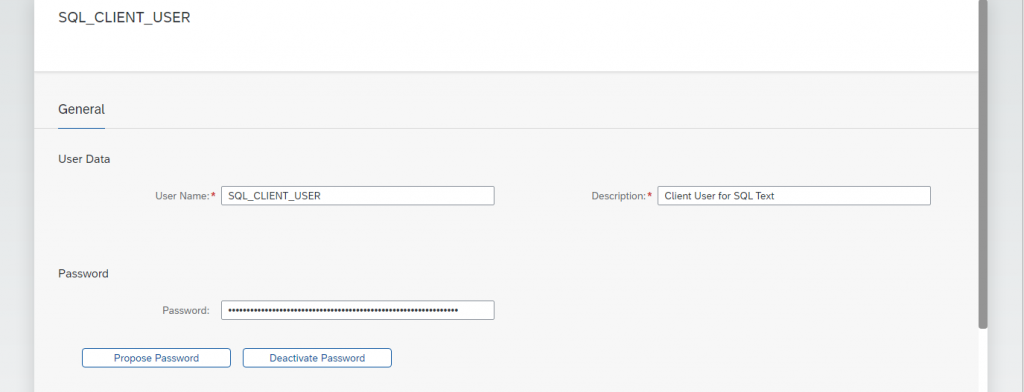
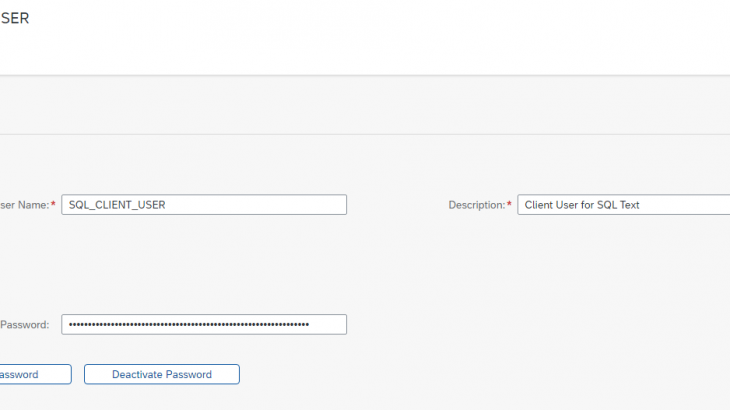
We name the new user “SQL_CLIENT_USER” and assign a password. Remember the password and choose “Create”. Then add it to the communication system by choosing “OK” in the dialog.
The user is now listed in the section “Users for Inbound Communication”.

choose “Save” to finish the creation of the communication system.
The last thing we need to do is to create a communication arrangement. The arrangement links the communication scenario that we created in ADT before to the communication system and user.
Go back to the administration UI launchpad home and select “Communication Arrangements”.
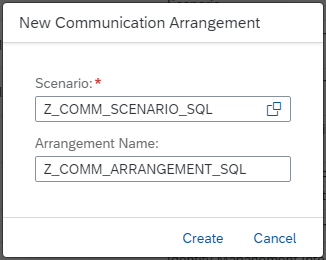
Choose “New” and select our communication scenario with name “Z_COMM_SCENARIO_SQL”.
To complete the link between communication scenario and communication system, we add our communication system SQL_ACCESS, and the system will automatically add the user SQL_CLIENT_USER.
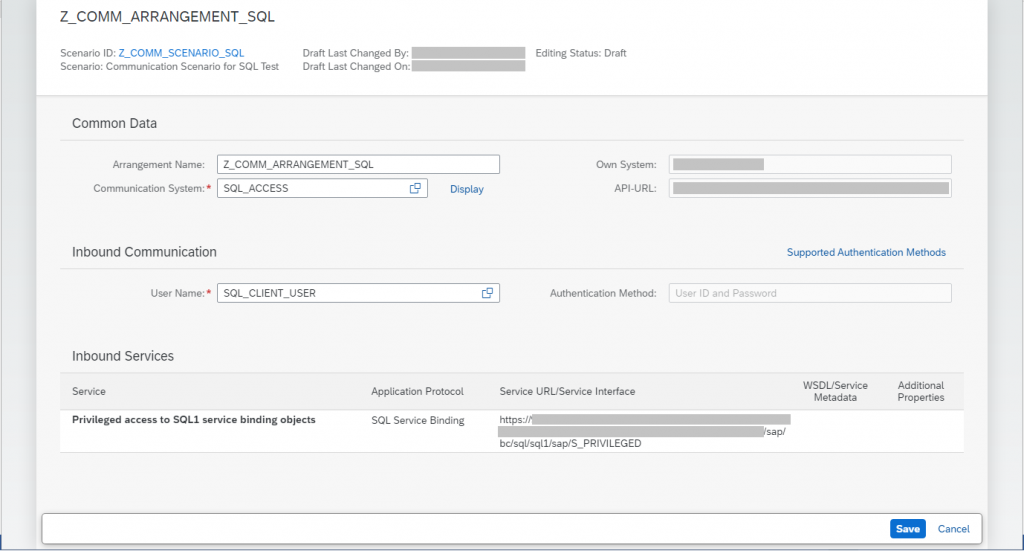
At this point it is important to note down the service URL. It’s something like https://<hostname>/sap/bc/sql/sql1/sap/S_PRIVILEGED.Finally, choose“Save”. We have now finished all preparation tasks in the ABAP system and can now access our exposed objects via ODBC.
Install the ODBC driver on Windows
To install the “ODBC driver for ABAP”, you must download the ODBC DRIVER FOR ABAP 1.0 and the SAPCRYPTOLIB SAR files from the SAP Support Portal. Make sure that you choose the packages for the Windows operating system. In addition, you need SAPCAR to unpack the SAR files.
Choose a directory as your ODBC driver location (for example, C:\ODBCTEST) and unpack the SAR files. After this, you will see at least the following files in your ODBC driver directory:
ODBC_driver_for_ABAP_x64u.msi
sapcrypto.dll
Start the Windows installer file to install the ODBC driver for ABAP:
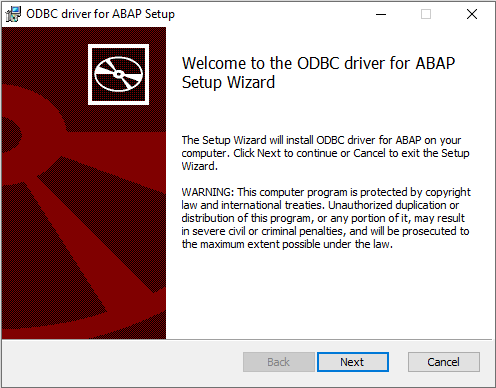
Click “Next” and accept the license agreement. On the next screen, you can choose “Typical” as installation type and complete the installation.
In the Windows registry, the installer has now created the keys for HKEY_LOCAL_MACHINE -> SOFTWARE -> ODBC -> ODBCINST.INI -> ODBC driver for ABAP. The installed files are in “<SystemDrive>:\Program Files\SAP\ODBC driver for ABAP” .
The ODBC driver is now ready to be used in ODBC data sources.
Create an ODBC data source
Launch the Windows ODBC data source administrator tool. The “ODBC Data Sources (64bit)” tool is part of a standard Windows installation.
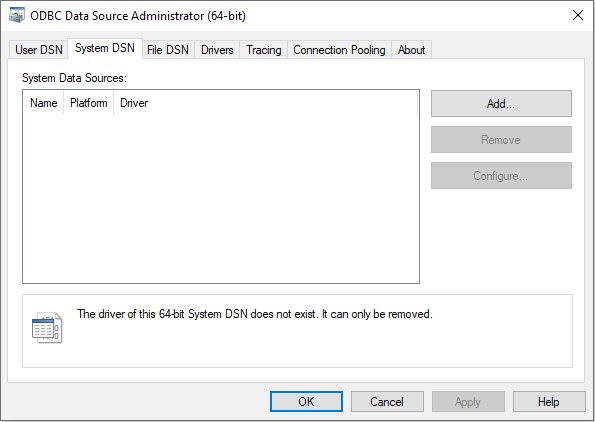
In this tool, you can create ODBC data sources and assign a data source name (DSN) to a newly created data source. Either choose the “User DSN” or “System DSN” tab, choose “Add”, choose the ODBC driver for ABAP as ODBC driver and choose “Finish”. This will start the DSN setup dialog of the ODBC driver for ABAP.
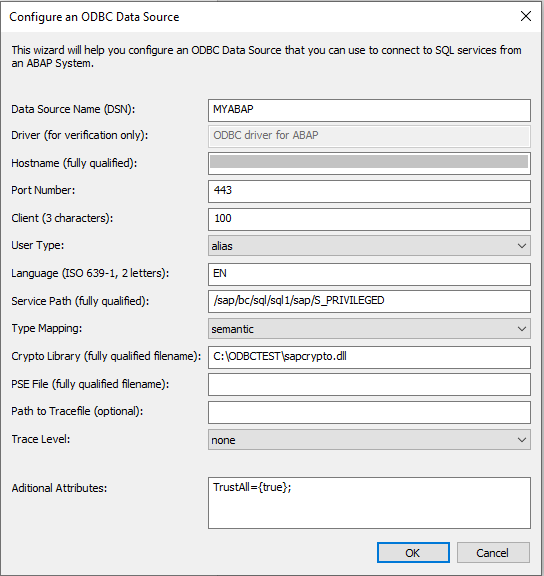
We have chosen a “MYABAP” as DSN. The default port number that needs to be used for an SAP BTP ABAP Environment system is 443. The hostname and the service path can be derived from the service URL that we noted down when creating the communication arrangement.
Just for testing we did not bother to create a PSE for the trust of the server certificate and used “TrustAll=true;” as additional parameter instead.
The user name SQL_CLIENT_USER that we created in the communication system is automatically an alias name for a generated ABAP user name. Therefore, we need to switch user type to alias.
Open an ODBC connection in Microsoft Excel
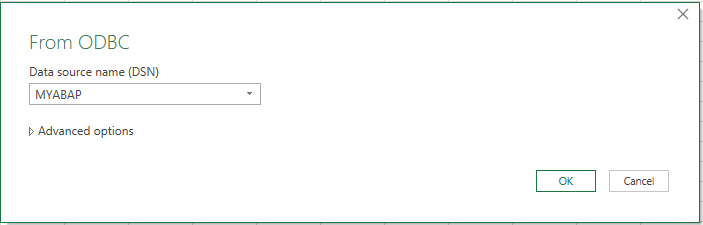
After creating a DSN, you can use this in an ODBC client tool of your choice. For simplicity reasons, we have chosen Microsoft Excel as an example for this blog post.
Start Excel and go to “Data” -> “Get Data” -> “From Other Sources” -> “From ODBC”. In the following popup, enter our newly defined DSN “MYABAP”.
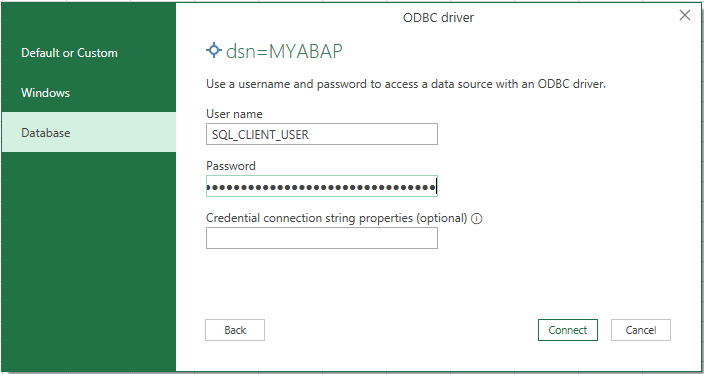
In the Database section, Excel will now ask for the user and password to log on to the ABAP system. We use the password that we noted down when creating the communication system.
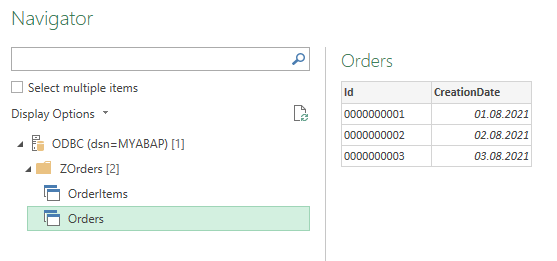
After choosing “Connect”, the navigator appears and shows all exposed objects in our SQL schema ZOrders. We can click on one of the CDS entities and Excel will show a preview of the data content.
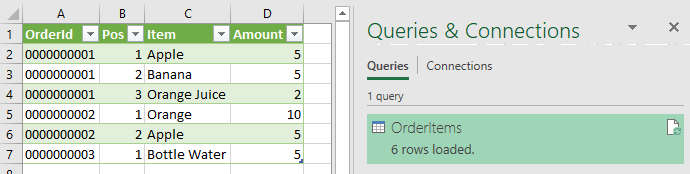
After this, you choose either “LOAD” to load the data into an Excel sheet or you can choose “TRANSFORM DATA” to switch to the power query tool. When you load the data into an Excel sheet, you can always refresh the data if needed.
As a last step, we just want to show that it is possible to execute a free style SQL query on the exposed entities. The simplest way to do this is to choose “Data” -> “Get Data” -> “From Other Sources” -> “From ODBC” again in Excel and then click on “Advanced Options”. A new control is opened that allows you to enter a SELECT statement directly.
In the SELECT statement, you must prefix all view names by our schema name “ZOrders”. Apart from this, you can use ANSI-like SQL syntax.
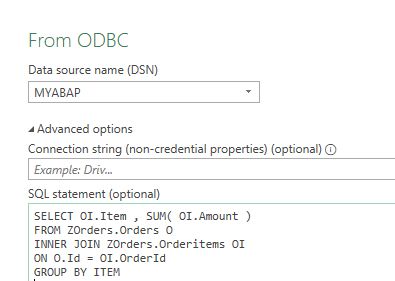
The result set will directly show up in an Excel preview window.


