With the latest major release 3.0 of SAP S/4HANA Cloud for advanced financial closing (AFC) on January 19th, 2023, the new feature System for Cross-domain Identity Management (SCIM V2) was introduced.
Background of this feature
In previous releases of SAP S/4HANA Cloud for advanced financial closing (AFC), it was only possible to introduce users and user groups into the system via CSV upload or UI. Although CSV upload is very useful for mass maintenance of users, user groups and user group/role assignments, still the automatic provisioning requirement was not fulfilled, as it always requires manual system interaction and because deprovisioning is not supported with that approach.
To get around this limitation, SAP S/4HANA Cloud for advanced financial closing (AFC) now supports the SCIM V2 protocol, which can be leveraged to automatically provision and deprovision identities into the system. The following maintenance scenarios are supported:
SCIM V2 Standard:
- Users
- Groups
- Group Memberships (members)
SCIM V2 Extension:
- Roles (read-only)
- Role Memberships (members)
In the following blog, I want to guide you through the main pillars of this new feature, such as getting started with the AFC Public API, including SCIM V2 protocol, and the integration of AFC into SAP Cloud Identity Services – Identity Provisioning.
Getting Started with SCIM
The System for Cross-domain Identity Management (SCIM) protocol is a proposed standard according to the Request For Comments (RFC) 7664 and 7643.
The specification is an HTTP-based protocol that makes managing identities in multi-domain scenarios easier to support via a standardized service. AFC now provides a public API exposing the SCIM V2 protocol for external consumption.
Subscribe to AFC Public API
To use the AFC Public API, we need to subscribe to it in the SAP BTP Cockpit. To do so, we switch to the subaccount that holds the SAP S/4HANA Cloud for advanced financial closing (AFC) subscription. In the Service Marketplace we search for “SAP S/4HANA Cloud for advanced financial closing” and open the respective tile. We switch to section “Service Plans”.
Using the “Create” button, we create a new service instance for service plan “standard” by providing a CLI-friendly name. We finish the creation by confirming the dialog with “Create” again (no parameters need to be provided).

Please make sure, that Cloud Foundry environment is enabled for subaccount, if Cloud Foundry environment shall be used. Option “Others” is not valid and will result in an error.
Create Service Key
After the creation of the service instance we create a new service key via the “Create” button in the “Service Keys” section of the newly created service instance of “AFC Public API“. We just provide again a CLI-friendly name and finish the creation by confirming the dialog with “Create” again (no parameters need to be provided).
Afterwards we see our newly created service key listed and can display the content by clicking on it. A dialog opens showing all necessary information to connect to the AFC Public API:
- Endpoints (scim2): SCIM V2 API endpoint
- OAuth Credentials
- clientid / clientsecret
- url (= authorization-url)
- clientid / clientsecret
The service key exposes the endpoints of the public API that can be called via HTTP. The endpoints are protected and a valid OAuth token has to be fetched to perform authenticated calls. The procedure is explained in the next section.
OAuth2 Flow
To perform the OAuth client credential flow with AFC Public API, a GET request needs to be executed against the authentication url of the service key appended by “/oauth/token?grant_type=client_credentials“. The request is called with basic authorization using clientid and clientsecret from service key as follows:
GET https://<authorization-url>/oauth/token?grant_type=client_credentialsAs a result of the request execution, the response contains an OAuth access token in the access_token section. This OAuth token can be used as Bearer authorization token for the calls against the AFC Public API SCIM V2 endpoint, as described in the next section.
SCIM endpoint
The SCIM V2 endpoint exposes the main resources Users, Groups and Roles, providing access to the corresponding AFC Users, User Groups and User Roles. The resources can be used to retrieve or to maintain system data.
SCIM Standard: Users, Groups
With a valid OAuth access token, we can perform calls against the SCIM V2 endpoint. The following sections show the usage of the SCIM V2 API by some examples.
Example: Fetch Users
The SCIM V2 API can be used to fetch the users of the AFC system. Calling a GET request against /Users resource will return a list of the AFC users:
GET https://<api-url>/api/scim/v2/UsersThe result is paged and only the top ten users are returned (according to sorting criteria if specified). To access the next page of users, the startIndex can be passed to skip the first ten records and get the next ten records as follows:
GET https://<api-url>/api/scim/v2/Users?startIndex=10
Example: Create Group
The SCIM V2 API can be also be used to create a resource, for example, a group. To do so, we call a POST request to the /Groups resources to create a new group with a member providing the request body as JSON as follows:
POST https://<api-url>/api/scim/v2/Groups
{
  "displayName": "SCIM Test",
  "members": [
    {
      "value": "601b465f-fa2a-45f5-b911-b82048e80b4e"
    }
  ]
}
The user group assignment is established by maintaining the user id in the members sections.
The user id (value) must exist so that the user group assignment is created, otherwise it is ignored.
SCIM Extension: Roles
The SCIM V2 API implemented in AFC was extended by the additional resource /Roles. This gives access to all Scoped User Roles in the AFC system. The role configuration itself is read-only and cannot be modified via the API, but the API allows to modify the role membership by adding and removing role assignments.
Example: Add Role Member
A role member can be added by updating the members sections of a role. This can be achieved for example by executing the following PUT request:
PUT https://<api-url>/api/scim/v2/Roles/96134805-6652-4301-82ea-8d5d2cc6a85c
{
  "members": [
    {
      "value": "601b465f-fa2a-45f5-b911-b82048e80b4e"
    }
  ]
}
The user role assignment is established by maintaining the user id in the members sections.
The user id (value) must exist so that the user role assignment is created, otherwise it is ignored.
Please keep in mind, that a PUT operation updates all the user role assignments of this role. That means, that all existing members that are not listed in the call as part of the members section, are automatically removed. To perform delta operations, the PATCH operation should be used as described in the next example to remove a single role member.
Example: Remove Role Member
A user role assignment can be deleted without touching other memberships using the PATCH operation. A delta operation is performed via PATCH as follows:
PATCH https://<api-url>/api/scim/v2/Roles/96134805-6652-4301-82ea-8d5d2cc6a85c
{
  "schemas": [
    "urn:ietf:params:scim:api:messages:2.0:PatchOp"
  ],
  "Operations": [
    {
      "op": "remove",
      "path": "members",
      "value": [
        {
          "value": "601b465f-fa2a-45f5-b911-b82048e80b4e"
        }
      ]
    }
  ]
}
The user role assignment is established by maintaining the user id in the members sections.
The user id (value) must exist so that the user role assignment is created, otherwise it is ignored.
Only this single user role assignment is removed via patch. Other user role assignments are not affected. Similar to the remove operation, also new user assignments can be established in delta mode via PATCH “add” operation.
Swagger UI
AFC provides a Swagger UI for test-driving the SCIM V2 protocol live in the customer tenant. To get access to it, users must have assigned the role AFC_API_Access. After re-logon a new Fiori Launchpad tile named “Public API” appears.
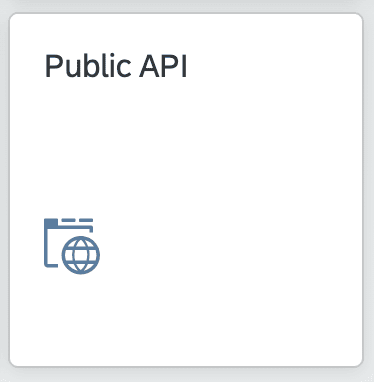
The tile opens a new app showing a list of all available public APIs of the AFC solution (currently only SCIM V2 – but more to come later).

A click on the SCIM row opens the Swagger UI for SCIM 2.0 in a new browser tab.
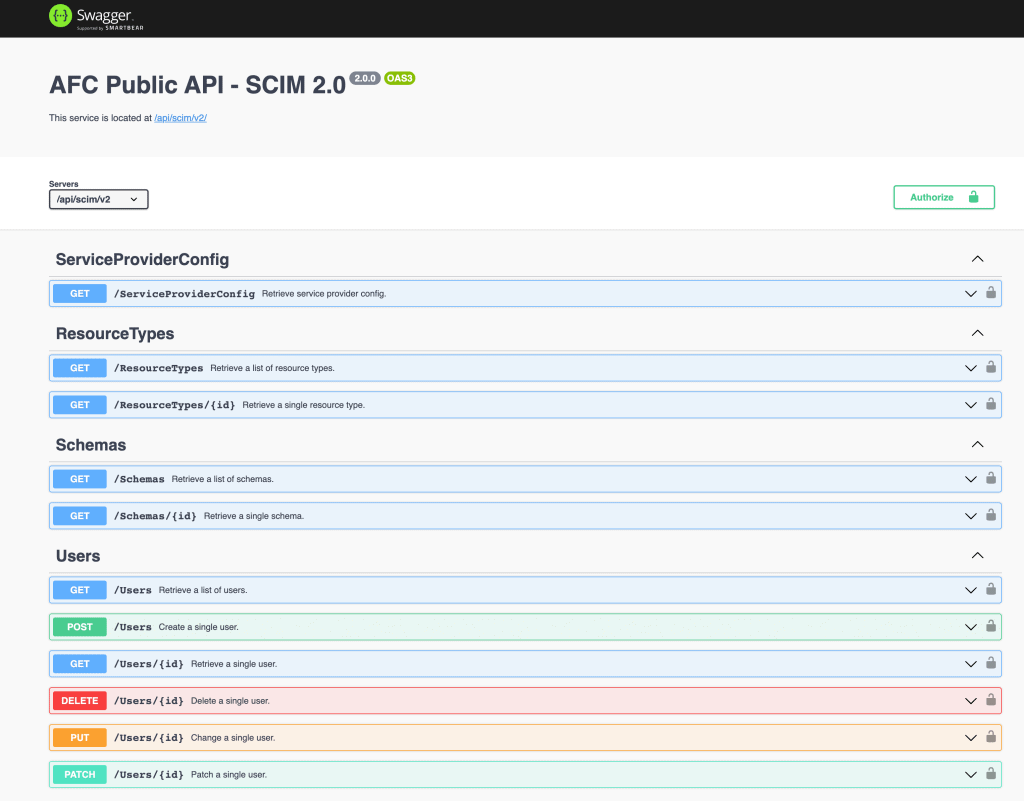
The swagger UI gives an overview of the SCIM V2 protocol, displaying the service operations. Furthermore, the SCIM V2 API can be tried out directly as follows:
- First the authorization needs to be established via OAuth2 flow using the Authorize Button.
- Provide the client_id and client_secret from the generated service key.
- Press again “Authorize” to perform OAuth client credentials flow and fetch the OAuth token.
After successful authorization the Swagger UI holds a valid OAuth token, that is used to perform the SCIM V2 API calls securely.
As an example we can fetch the list of users. This can be done as follows:
- Open the section “GET /Users”.
- Click the “Try it out” button.
- Optional: Fill out some parameters.
- Press the “Execute” button to perform the API call.
- The result is shown under section “Responses” and will display the first page of AFC users in the AFC system.
- In case authorization was not successful, the service returns an error code “401 – Unauthorized“.
SAP Cloud Identity Services – Identity Provisioning
The AFC Public API SCIM V2 service can be configured to be used in conjuncture with SAP Cloud Identity Services – Identity Provisioning. The main use-case is the user and user group synchronization from an Identity Provider (e.g. SAP Cloud Identity Services) to SAP S/4HANA Cloud for advanced financial closing (AFC).
The Identity Provisioning is part of the SAP Cloud Identity Services offering and needs to be configured to work properly with AFC. Therefore, the source and the target system need to be configured as described in the next sections.
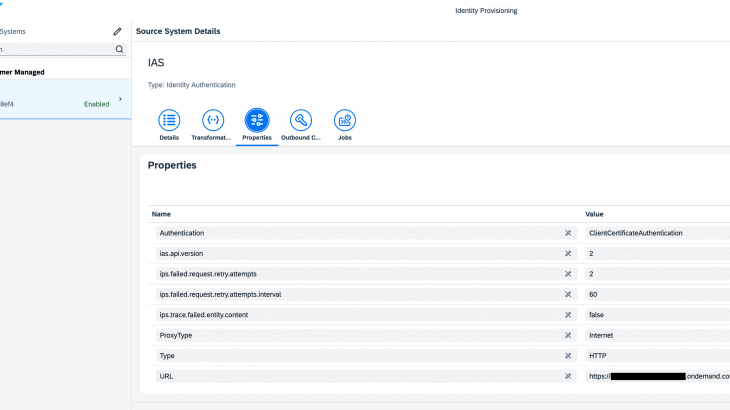
Configuration of Source System
A source system of type Identity Authentication can be configured to set up SAP Cloud Identity Service – Identity Authentication as a source system according to the documentation.
The properties of the source system shall look as depicted here:
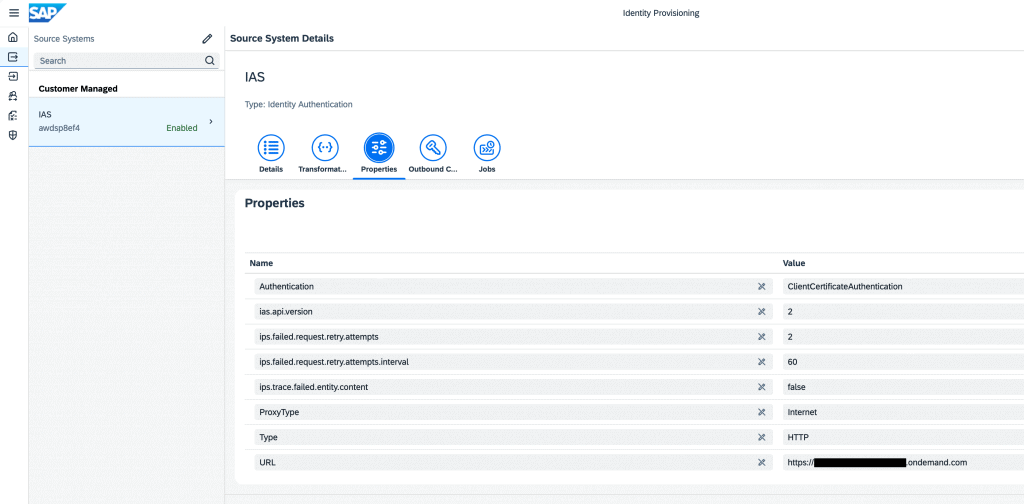
Transformations can be kept unchanged and the outbound certificate needs to be configured correctly to SAP Cloud Identity Service.
Configuration of Target System
A target system of type SCIM System can be configured to set up SAP S/4HANA Cloud for advanced financial closing (AFC) as a target system according to the documentation (a dedicated target type for AFC is planned to be provided later).
The properties of the target system shall look as depicted here:
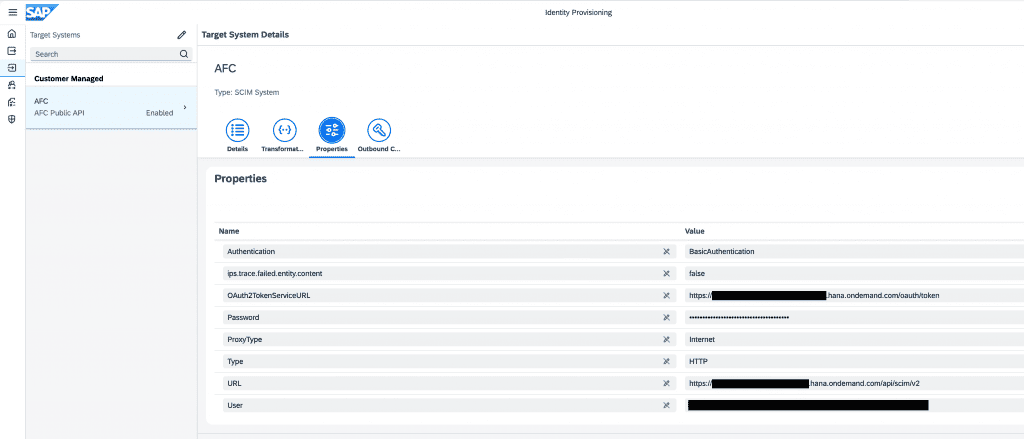
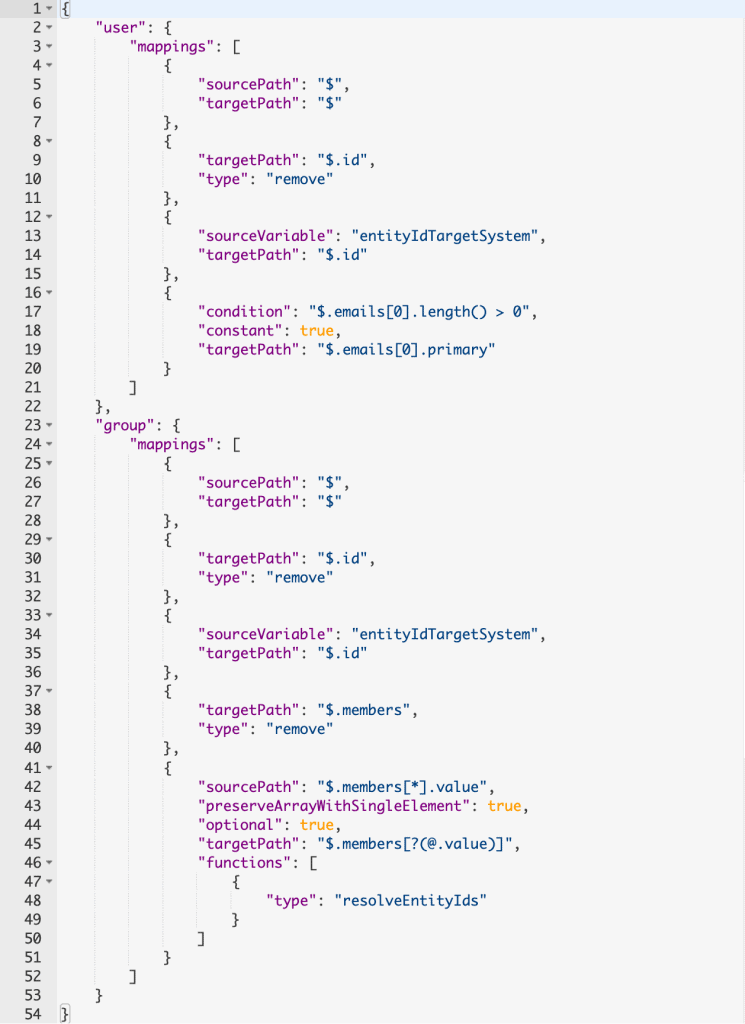
AFC SCIM V2 implementation allows additional features so that modifications to the target system transformations need to be performed.
- EnterpriseUser: To transfer enterprise user information, the following section under user -> mapping needs to be removed in transformation tab:
{

"targetPath": "$['urn:ietf:params:scim:schemas:extension:enterprise:2.0:User']",

"type": "remove"

}- Groups: To synchronize groups, the following flag needs to be removed under group section in transformation tab:
"ignore": true
The overall transformation looks as depicted in the following picture:
In the target system configuration set the created source system as “Source System” to setup the connectivity between the two systems.
Run Job
To start a synchronization job, switch back to the created source system on tab “Jobs“. There we can, for example, start a “Read Job” by pressing action “Run Now”. For periodical synchronization of users and groups, a job can be scheduled using the “Schedule” action button.
After pressing the “Run Now” button a job has been triggered. We can now switch to the Job Logs screen to check and monitor the Job Execution Logs. Press the “Refresh” button at the bottom to update the logs during execution. After the job finished, we can select it and display the details of the synchronization, such as the statistics (how much data has been read/written) and if there are error messages or failed entities that could not be synchronized:
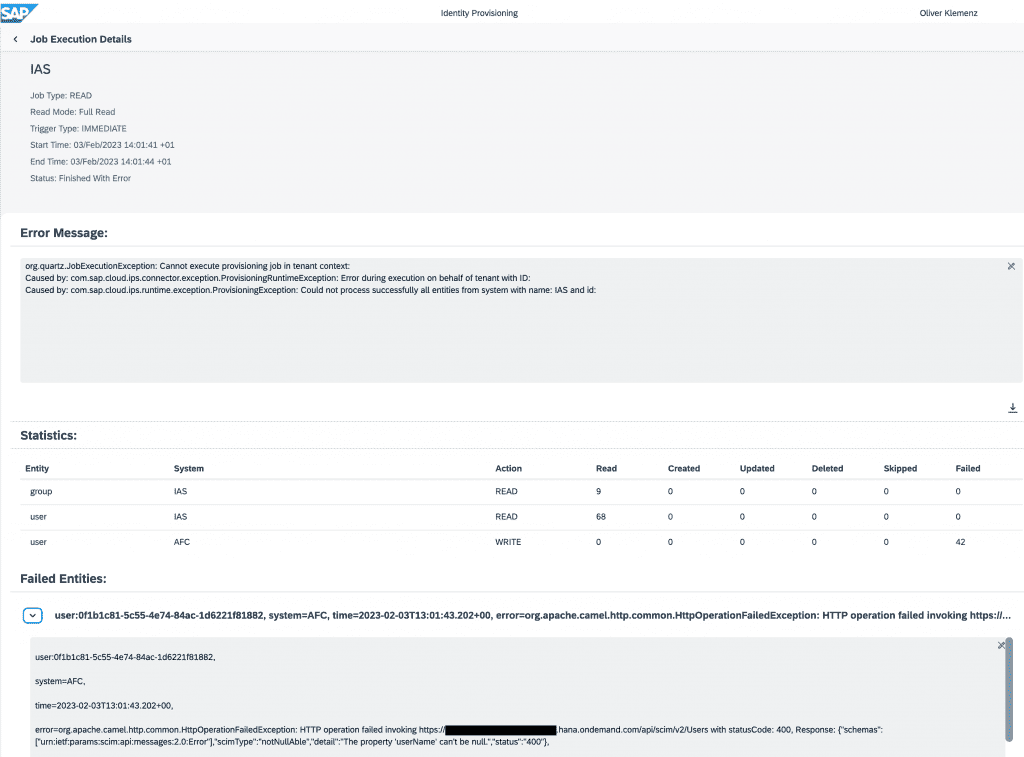
The job log helps to identify the root cause of a failed synchronization, and it displays the concrete message raised from the AFC SCIM V2 API, providing the reason why a request was rejected so that the configuration or the user/group record can be corrected.
The SAP Cloud Identity Services – Identity Provisioning (IPS) service has a lot of configuration possibilities. For example, we can configure, which users and which groups are relevant for synchronization, as we normally don’t want to synchronize all users and all groups of the company.


