
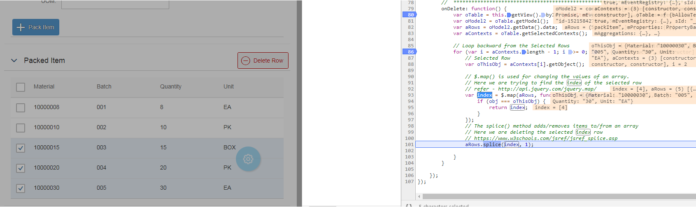
Playing with table control is always fun. Whether it is in normal module pool development or Web Dynpro tables or SAPUI5. Adding Rows and Deleting it from the screen is one universal requirement which you need to handle in any design, irrespective of the programming language. In our Part I of Add Delete and SAVE Multiple Records in SAPUI5 App, we learned how to design the screen, handle the message, add and display multiple rows in a table. If you have not completed the first SAPUI5 exercise, we recommend you to finish it first. Part 2 is the continuation of Part 1 and we will enhance the screen which we developed in Part 1.
And thank you very much for the positive response to the Part 1 article. It really motivates us.
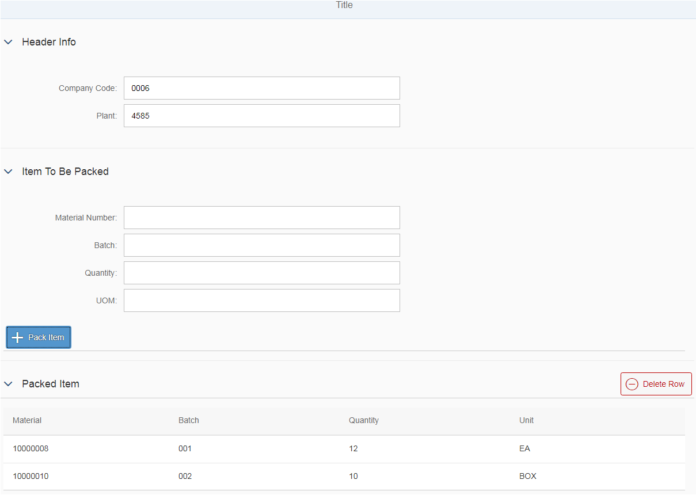
We created the below screen in the earlier exercise.
What if the user entered a wrong entry? They would like to select the wrong data and delete it.
Let us check, how they can achieve it.
Step 1 – Add CheckBox in the Table which allows users to select multiple rows
Before we add logic for onDelete function, let us add a CheckBox to the table, so that users can select the single or multiple rows.
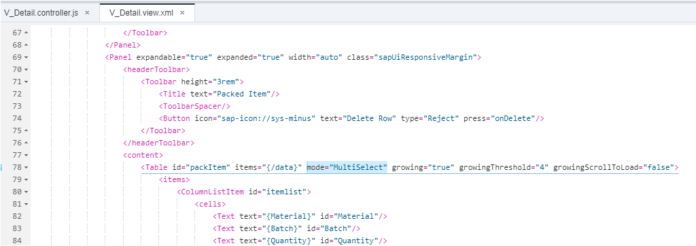
In the Third Panel (Packed Item) of the View screen, in last exercise we defined the property of the table as below.
<Tableid=”packItem” items=”{/data}” growing=”true” growingThreshold=”4″ growingScrollToLoad=”false”>
We will add another property called mode=”MultiSelect”. Replace the above code with below.
<Tableid=”it_item” items=”{/data}” mode=”MultiSelect” growing=”true” growingThreshold=”4″ growingScrollToLoad=”false”>
Let us check if the CheckBox appears or not in the output.
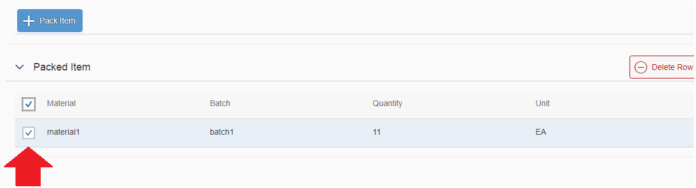
The MultiSelect mode did the trick for us.
Step 2 – Check Delete Row button triggers the onDelete Function.
Let us write one line of code to send an alert/information message.
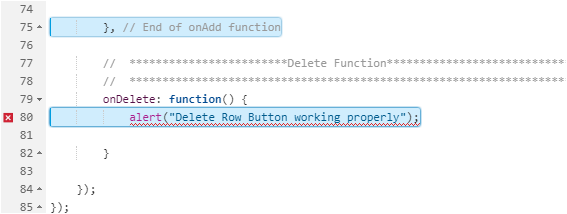
Let us test it.
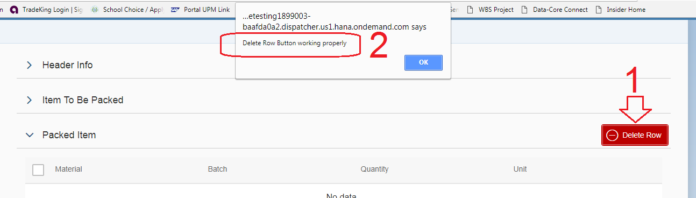
It works fine.
If the function does not trigger for you, do not proceed forward. Check the function name defined in the View and the function you wrote on the Controller are the same.
Note – Do not forget to put a comma at the end of the previous function (onAdd as shown in line 75 above).
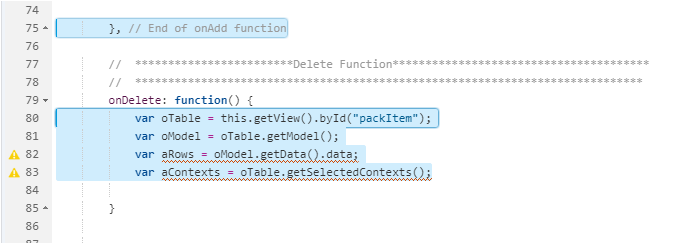
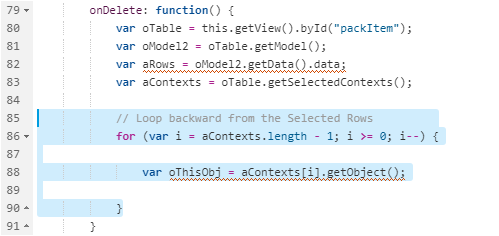
Step 3 – Read the Screen Table data and get the Context of the Selected Row(s)
Remove the alert syntax from the onDelete function and write the actual code as shown below.
3.1 Syntax to get Read the table entry of the screen
var oTable = this.getView().byId(“packItem”);
3.2 Get the Table Model
var oModel2 = oTable.getModel();
3.3 Read the data from the Model
var aRows = oModel2.getData().data;
3.4 Get the selected Context (identify which rows were checked)
var aContexts = oTable.getSelectedContexts();
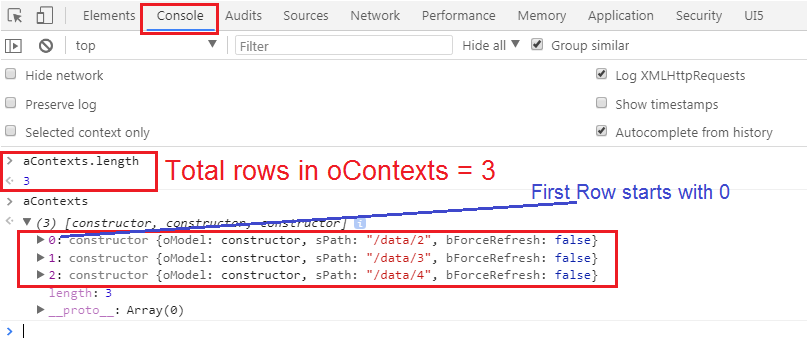
If you select check boxes of 4 rows, the aContexts.length would be 4 and oContexts would have the selected 4 rows. If you select 2 rows, the aContexts.length would be 2 (no brainer).
Let us debug and check how it looks at runtime.
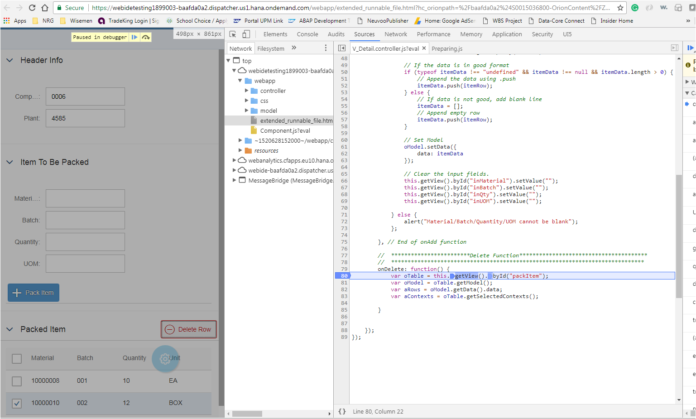
We added two rows to the table and set the break-point at onDelete Function by pressing F12 in Chrome. Then press F10 to go one step at a time in debugging.
If you are New to SAPUI5 Debugging – Check this Exercise.
Once oTable and oModel are defined at runtime, you can see the properties and data in the Console Tab in debug mode. Just type oModel and see the details like below.
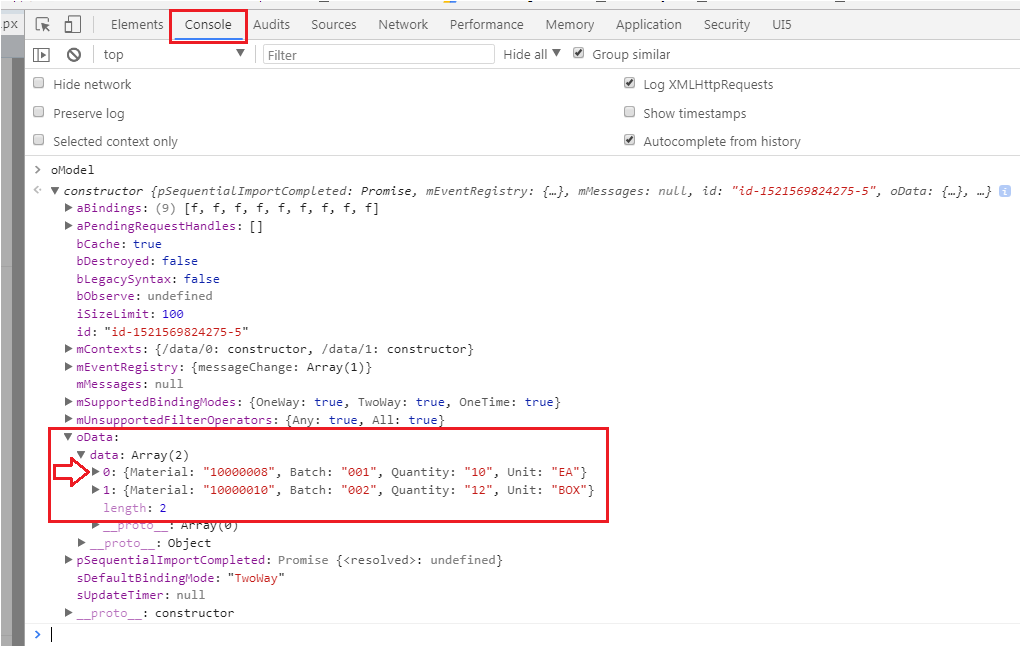
Note, the oData holds the data Array which has the screen table entries.
Also note, the index starts from 0 in SAPUI5, unlike SAP ABAP where it starts from 1.
The one line of code which we wrote, gives us the complete entries of the table.
var aRows = oModel.getData().data;
We have used oModel2, therefore oModel.getData().data should be replaced by oModel2 as shown below.
var aRows = oModel2.getData().data;

Step 4 – Loop through the Selected Rows of the Table.
for (var i = aContexts.length – 1; i >= 0; i–) {
var oThisObj = aContexts[i].getObject();
}
If you have done C or C++ programming during your school/college or other work, you would be familiar with this FOR (var i = aContexts.length – 1; i >= 0; i–). The FOR LOOP would take place for the ‘i’ value equal to the value of the number of lines in aContexts – 1 and decrease the value by 1 (i–) and continue till ‘i’ is greater than equal to 0.
If we are LOOPing for the total numbers of entries selected then why is it saying var i = aContexts.length – 1. Why minus 1?
Simple, in SAPUI5 we start from 0, not 1. So if you have 5 entries, then we need to loop from 0, 1, 2, 3, 4. If we loop backward, then we need to start from 4, therefore, it is done 5-1 = 4.
Let us Debug for better clarity. Enter 5 rows in the table and select 3 rows and hit the Delete Row button.
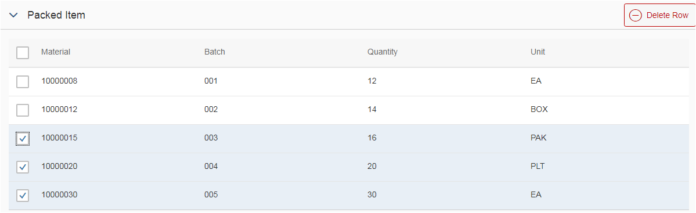
At runtime, you would find that aContexts.length value would be 3 as we selected 3 rows to be deleted. Also, note the first row of aContexts starts with 0. We will not repeat it again.
So, if we want to Loop backward, we need to start from (3-1) = 2.
Check the oThisObj or the aContexts[i].getObject() where i = 2, 1, 0.
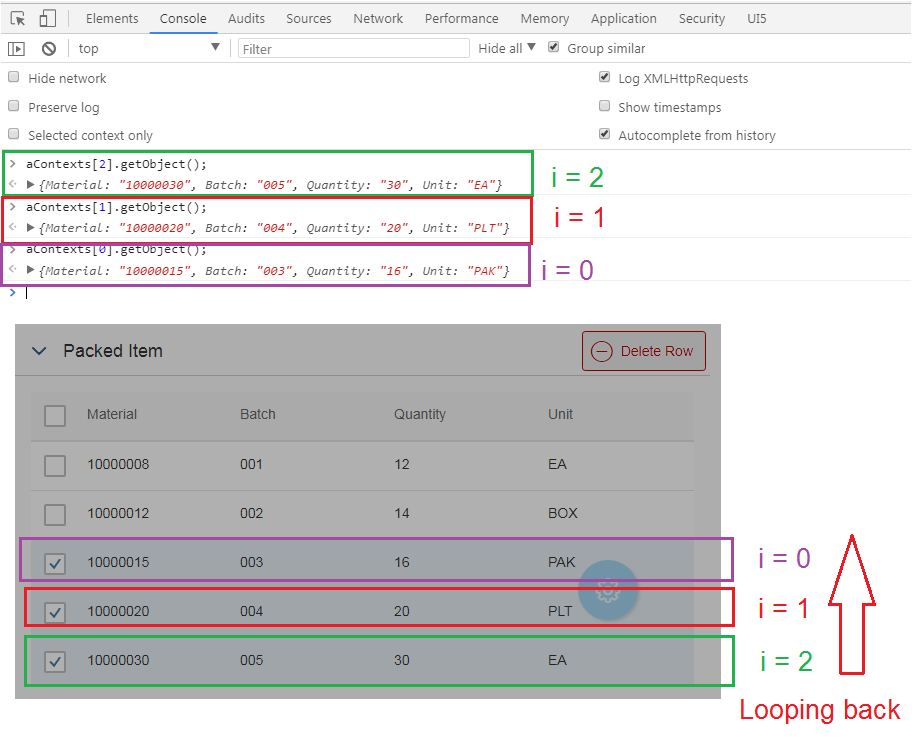
Hope it is clear, what the Loop is doing. It is just looping through the selected rows backward.
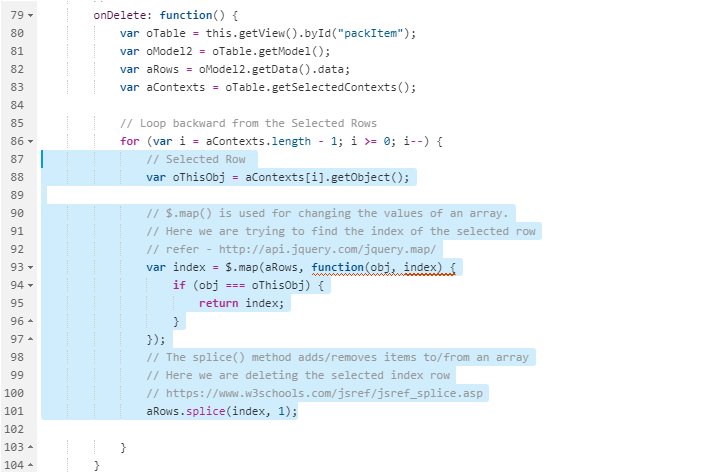
Step 5 – Identify the Selected Rows and Remove them from the Table
Let us modify the FOR LOOP again.
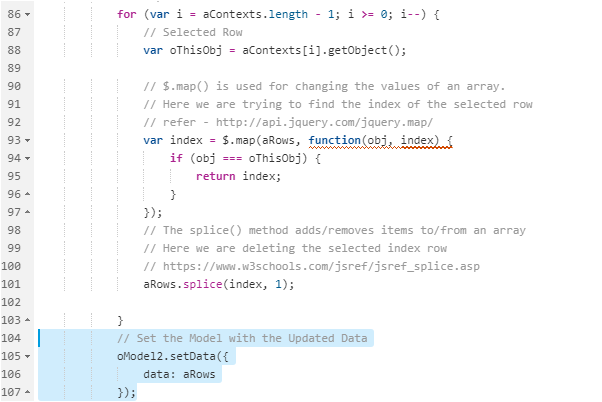
// Loop backward from the Selected Rows
for (var i = aContexts.length – 1; i >= 0; i–) {
// Selected Row
var oThisObj = aContexts[i].getObject();
// $.map() is used for changing the values of an array.
// Here we are trying to find the index of the selected row
// refer – http://api.jquery.com/jquery.map/
var index = $.map(aRows, function(obj, index) {
if (obj === oThisObj) {
return index;
}
});
// The splice() method adds/removes items to/from an array
// Here we are deleting the selected index row
// https://www.w3schools.com/jsref/jsref_splice.asp
aRows.splice(index, 1);
}
Let us debug and test how it behaves.
For the first LOOP pass when i=4, the last 5th Row should be deleted.
We have stopped our debugger at the .splice function at line 101. Let us check the console.
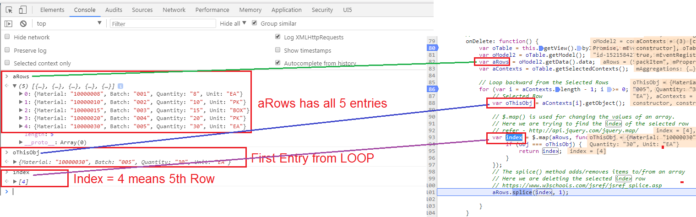
Once we pass the .splice function, the last Row (index 4) from aRows array should be deleted. Let’s check it.
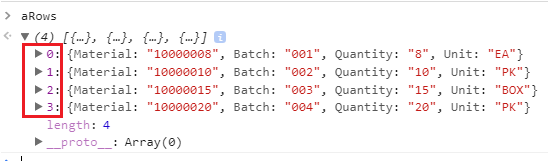
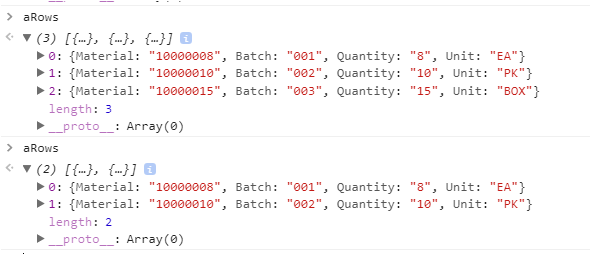
As expected only 4 Rows are available now.
Let’s check for 2nd Loop Pass and 3rd Loop Pass. As expected only 2 rows which were not selected stays. Rest 3 are deleted.
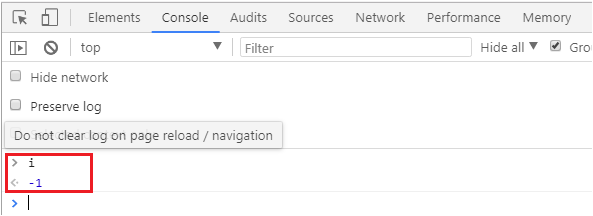
The moment the value of ‘i’ is less than 0 i.e -1 it comes out of the FOR LOOP.
Step 6 – Update the screen table to show only the current Rows
You would notice that, once you come out of the Debug mode, although aRows holds only 2 Rows (which you saw in debug), the screen still displays all entries i.e. the deleted entries are still visible on the table.

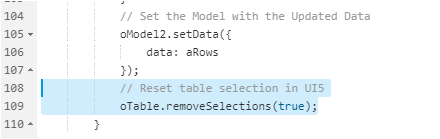
The below setData function should do the Trick. Always remember, oModel.getData and oModel.setData are very useful to Read and Write to the Model(Screen).
// Set the Model with the Updated Data after Deletiono
Model2.setData({
data: aRows
});
Let us test it one last time. Look all the 3 deleted entries are removed and only the first 2 Rows stays.

This should end our article today. We can delete single row and multiple rows as well.
Note: In case you want to be double sure that the selected items are deleted for sure, we can use the below line of code as well.
// Reset table selection in UI5
oTable.removeSelections(true);
In Part 1, we learned how to create different Panels in one View. How to Read the values of the elements of the screen, just like contexts in SAP Web Dynpro. How to Append entries in a table in SAPUI5 and to use Set Model to reflect the data on the Screen.
In today’s session, we learned:
- How to create Checkbox on the Table?
mode=”MultiSelect” - How to Read the table entry of the screen?
var oTable = this.getView().byId(“packItem”) - How to get the Table Model?
var oModel2 = oTable.getModel(); - How to Read the data from the Model?
var aRows = oModel.getData().data; - How to Get the Selected Context (checked rows)?
var aContexts = oTable.getSelectedContexts(); - How to do FOR Loop as shown below?
for (var i = aContexts.length – 1; i >= 0; i–) - How to READ the Array in LOOP?
var oThisObj = aContexts[i].getObject(); WHERE “i” is variable. - How to use $.map() function for changing the values of an array?
- How to use splice() function to add/remove items to/from an array?
aRows.splice(index, 1); It deletes one entry at the index from aRows array.


