In our Part I of Tutorial on SAPUI5, we created our first SAPUI5 Application without writing a single line of code. Just drag and drop and some clicks on the Descriptor and Layout Editors. We also handled a click action which gave us a Pop-Up message.
Today, we would write few lines of generic Javascript codes which we would need in the development of every other SAPUI5 Applications. No rocket science. Keep these syntaxes at your ready to use file/folder and refer to them for your initial few applications. And with experience and repetitive use, you would master them.
Our topic for the day is to explain Routing in SAPUI5. We would not discuss the types of routing and other theory. We would dedicate a separate post to discuss and explain them. Today’s tutorial would be pure hands on. Navigating from one View to Another View and passing data from the first View to the other View is our sole motto.
In order to achieve the above Navigation, we would create three Views. One of them would act like the container for the other two Views, i.e. one of the three would be a Root view. We would display the second view on top of Root view and then with a Click action we would display the third view on top of Root view.
Basically, we would be performing Hash(#) based Routing. One page would be loaded from the server in the beginning. Then based on the routers and logic, other pages would be dynamically rendered. When a new page is loaded, the URL would have a Hash(#) before the page pattern.
Something like below image.

We would name our views like V_Root_View, V_POHeader and V_PODetail. Check the gif file below. We would design something like it. We would embed POHeader view into Root View and then call PODetail view when some click action/event is triggered in POHeader view.
We would follow the below 14 Steps to achieve our target.
- Create the SAPUI5 Project
1.1 Create the three Views
1.2 Give an Id to Root View - Configure/Maintain manifest.json file
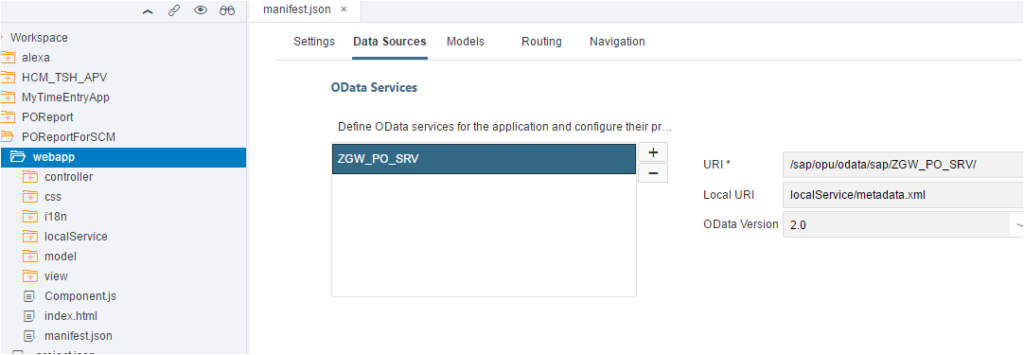
2.1 Define the Data Source (SAP Backend system)
2.2 Define the Default Service Model
2.3 Configure the Default Routing, Target Mapping, Routings and Pattern in Routings - Add the missing route names in the manifest.json file (2 names)
- Include the router class in the manifest.json file (1 line)
- Enable Hash(#) based routing for the application in Component.js file (1 line)
- Design the POHeader View screen elements and bind them to Data Set
- Test data is displayed in the POHeader view from Backend OData
- Add an Event on the POHeader View
8.1 Write one line of code in the Event function to capture the element on the view which was clicked. - Test the data again and Event action on the POHeader view
- Design the PODetail View screen elements and assign the property names to the UI elements which would be bound
- Configure the Pattern with correct parameter in the Route section of manifest.json file
- Enhance the Event handling function in the POHeader View controller to read the PO number clicked and pass the information to the PODetail View and Navigate to it using Routers (3 lines of code)
- Enable the Init Function in the PODetail View controller to accept the information passed by POHeader event and display the right information (2 functions with 5 lines of code)
- Test the application end to end
In most of the tutorial on the internet, you would find demo code to go to the second page with no data. They just show a click event and go to next page. What about passing the data? In real projects, we need to move data from one view to another and vice versa. By the time you finish reading this, the Routing and Navigation concept would be clear and you would be ready to handle more complex scenarios and of course capture data, pass them to multiple views and play around with them.
Let us start this interesting exercise.
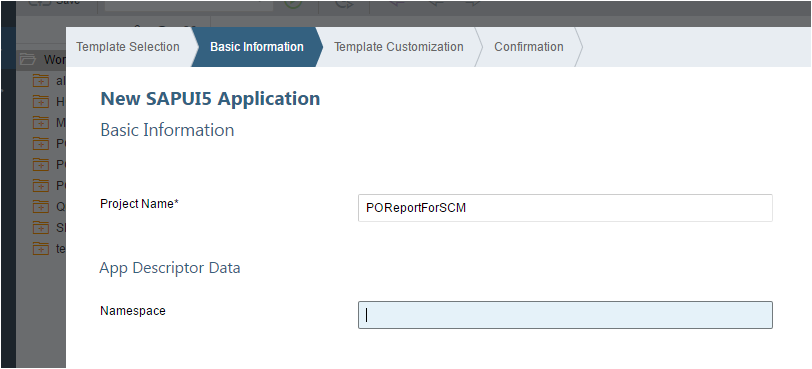
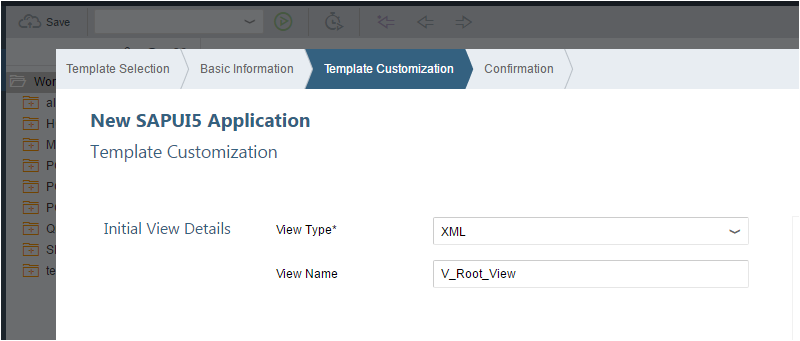
1. Create the SAPUI5 Project
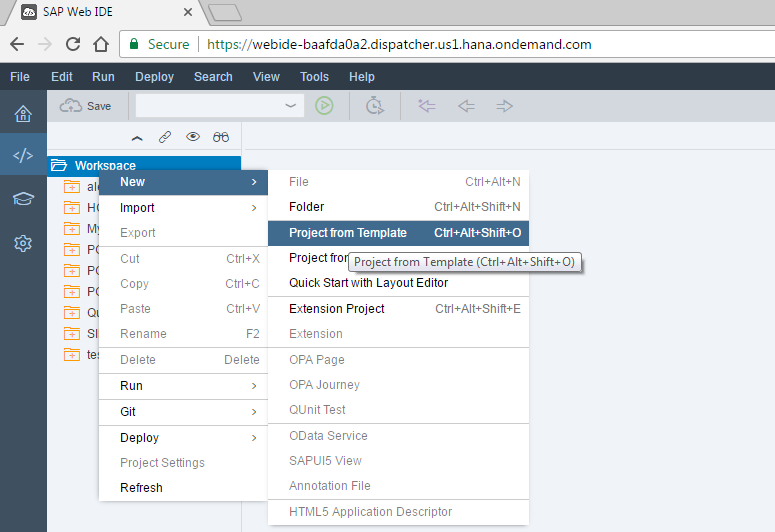

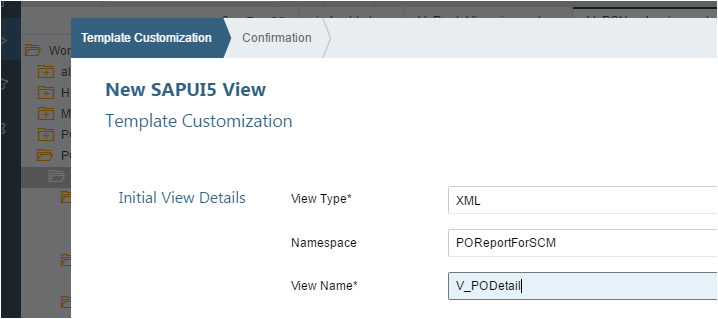
1.1 Create the three Views
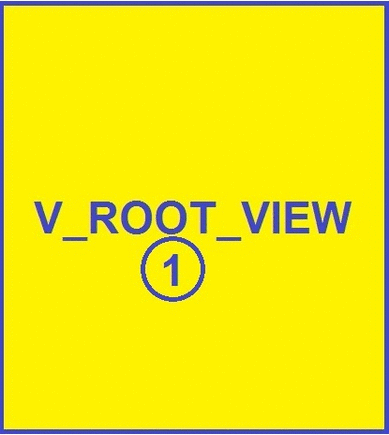
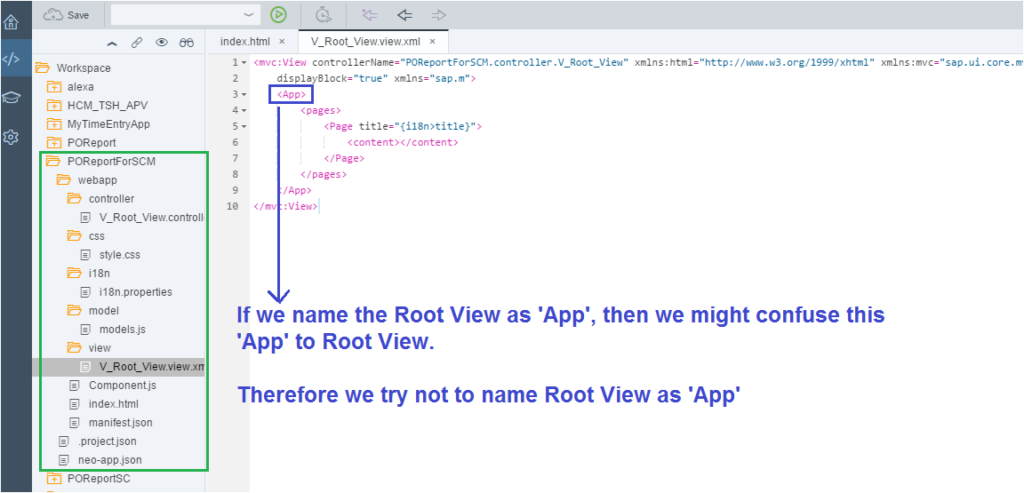
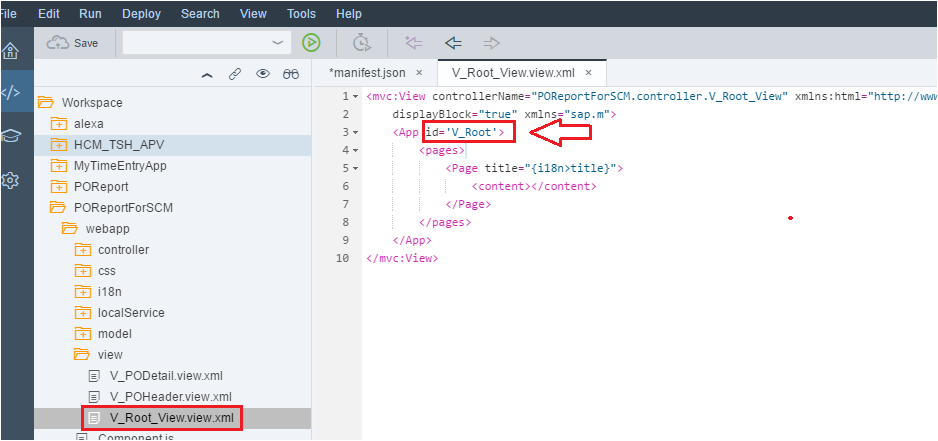
Choose XML type and view name as V_Root_View. In most of the tutorials they name the root view as ‘App’, but we prefer not to name it App. The name App creates confusions as the view has an inbuilt tag as App. Therefore we have coined the root view as V_Root_View
Now let us create our second View to show PO number only.
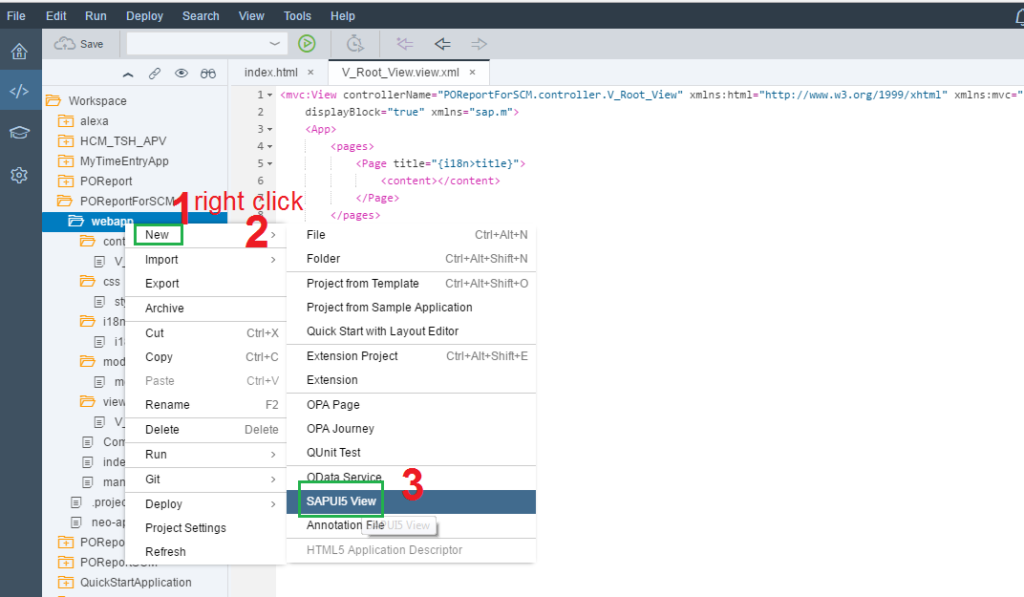
Similarly, create the third view to show details of the PO Header.
The idea of this development is to Embed POHeader View to Root View and then when an action is taken on POHeader View, it should navigate/route to PODetail View. Please note, both POHeader and PODetail would be shown on top of Root View.
Root View would act as a container of the POHeader and POItem views. Root View would not have any UI elements in itself.
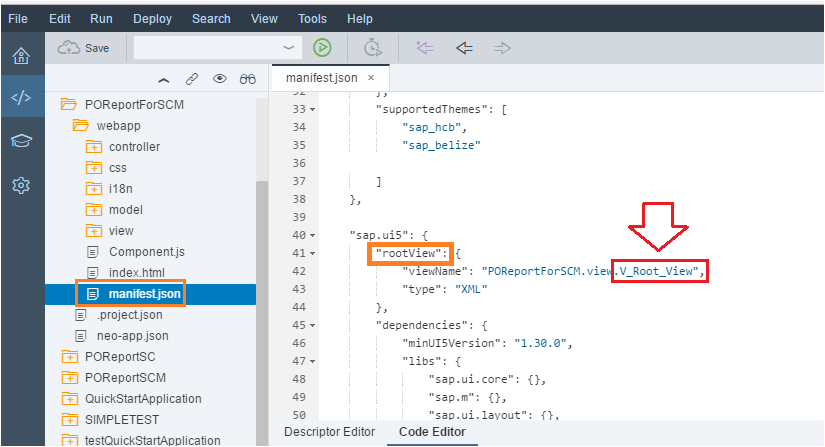
Before we proceed, check the manifest.json file. It has the rootView defined as V_Root_View.
1.2 Give an Id to Root View
2. Configure/Maintain manifest.json file
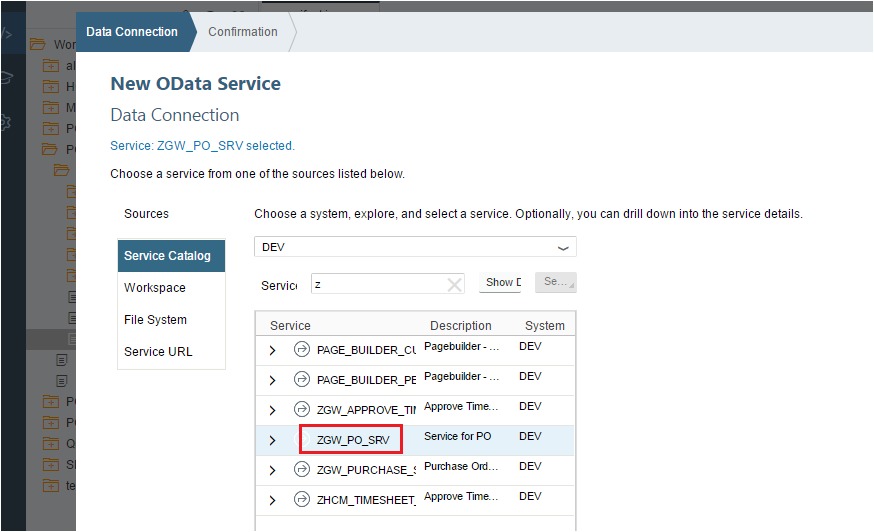
2.1 Define the Data Source (SAP Backend system)
Open manifest file in Descriptor Editor.
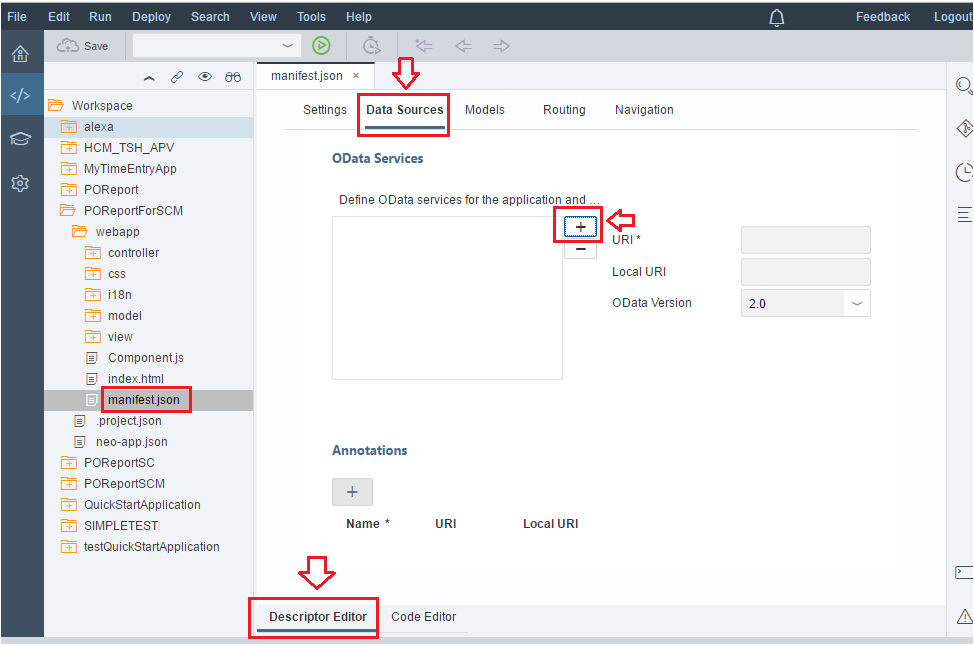
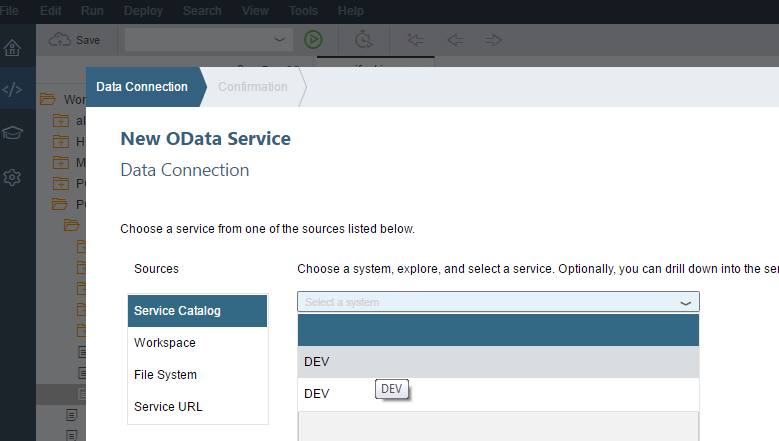
Give user id and password of your Backend SAP ABAP system.

Select the OData Service which we created in our SAP Netweaver Gateway and OData Tutorial.
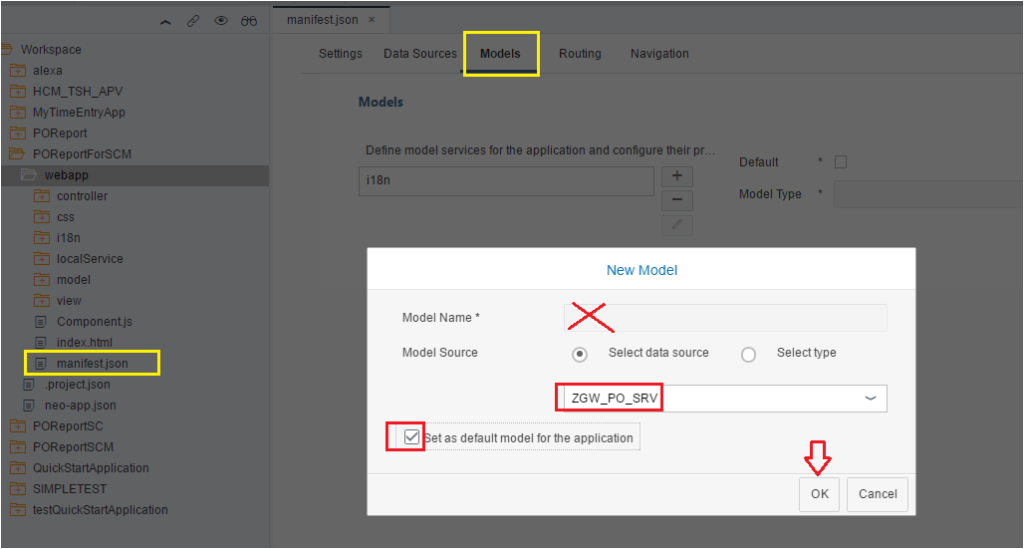
2.2 Define the Default Service Model
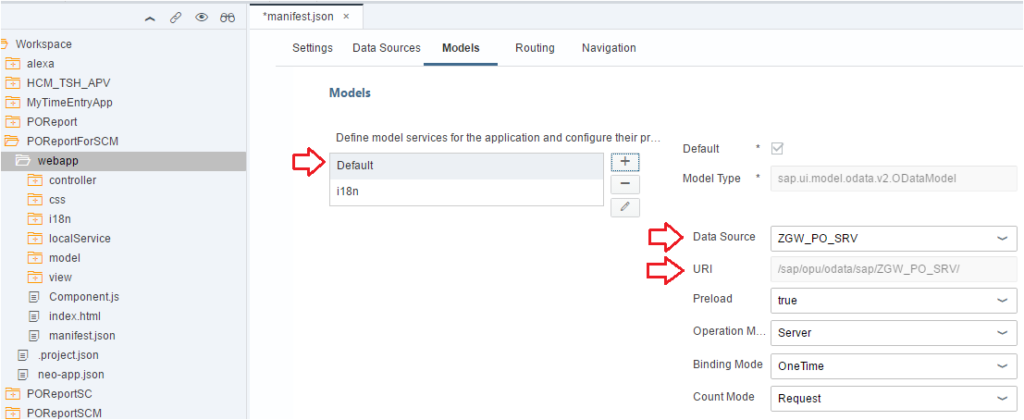
Let us set a Default Model. It is our OData Service Model from Backend from which we would fetch the data and display in our SAPUI5 App.
The model would look like below.
2.3 Configure the Default Routing, Target Mapping, Routings and Pattern in Routings
Before we go to Routing, which is the core of today’s article, we would re-visit V_Root_View and check the V_Root_View Id ‘V_Root. It is V_Root. We christened it a little while ago. We will need the Id now.

Let us go to Routing in the manifest.json and Configure the Default Routing.
View Path is the Project name and the View folder. For us it is POReportForSCM.view.
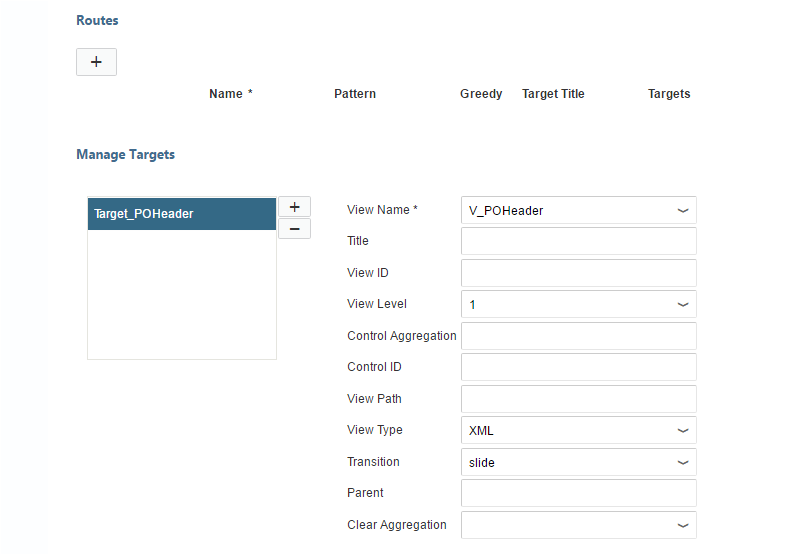
Control Id is the V_Root_View’s Id which we maintained in the above image, i.e. V_Root.
Control Aggregation is an identifier for what type of Routing it is. We are just planning to show two pages and Transition is slide type (just like the slide in powerpoint).
On the Root View, we want to show V_POHeader view which would be the first View. Therefore the View Level would be ‘1’.

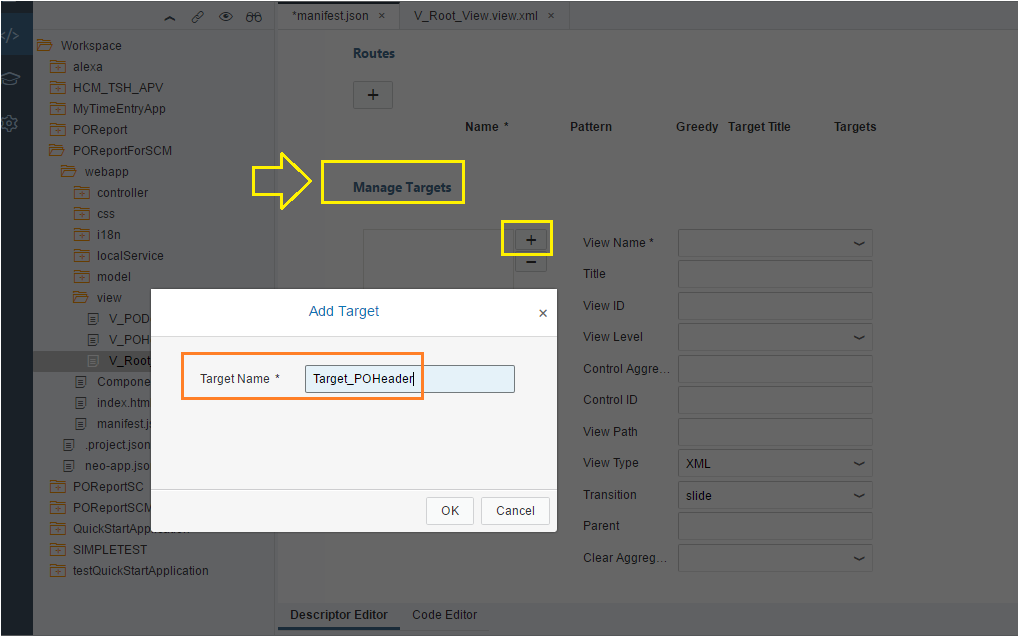
Now we need to tell the Routing the Target. Our target for View 1 is the V_POHeader. So let us configure the Target first.
We would create the first Target as Target_POHeader.
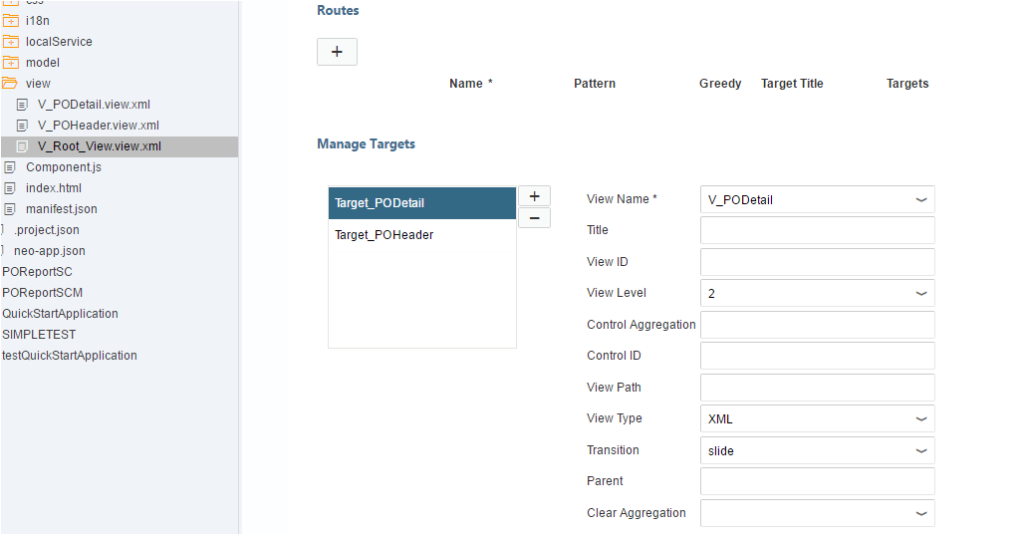
Now create the second Target for PODetail.
Create the Routes now.
The name itself is self-explanatory. It tells the App which Target to reach using which Route. For our example, the Route_POHeader would lead to Target Target_POHeader which in turn would display the view V_POHeader.
Route -> Target -> View. Simple right?
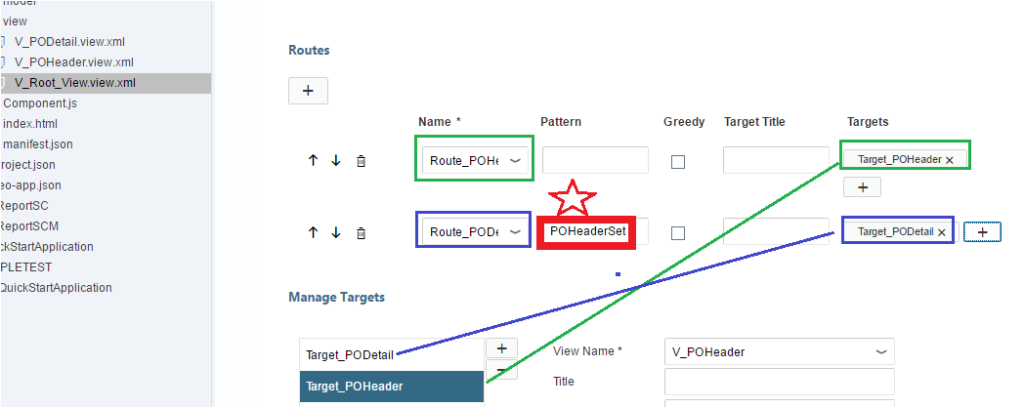
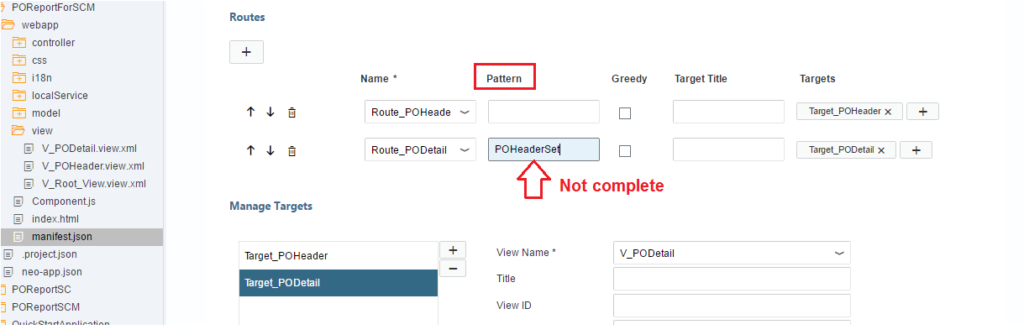
For the first Route (Route_POHeader) there is no Pattern, as it is the default route. But the Pattern on the second Route (PODetail View) is very important. Here we need to pass the Entity Set of the OData Service whose data you want to consume.
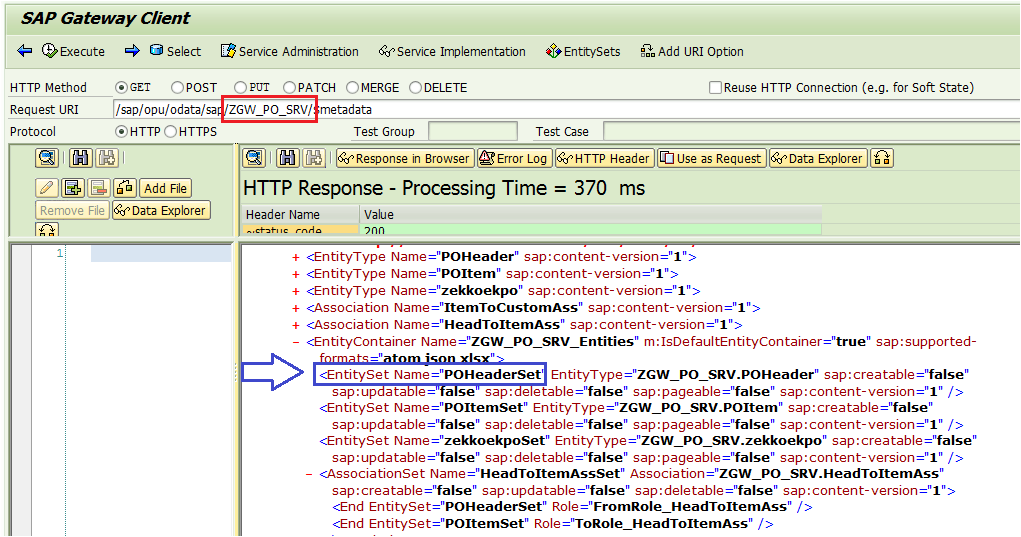
We could have also added the EntitySet POItemSet, but in this tutorial, we are planning to show data from POHeaderSet in two views. Therefore POHeaderSet is the pattern. In our future tutorials, we would show how to consume multiple entity sets of the OData services in the same SAPUI5 application.
Please note this down. It is very important to set the “Pattern” correctly. Else you would be scratching your hair why your navigation is not working.
3. Add the missing route names in the manifest.json file (2 names)
The Auto code generator of the manifest.json file has some issue. Route names are not populated correctly.
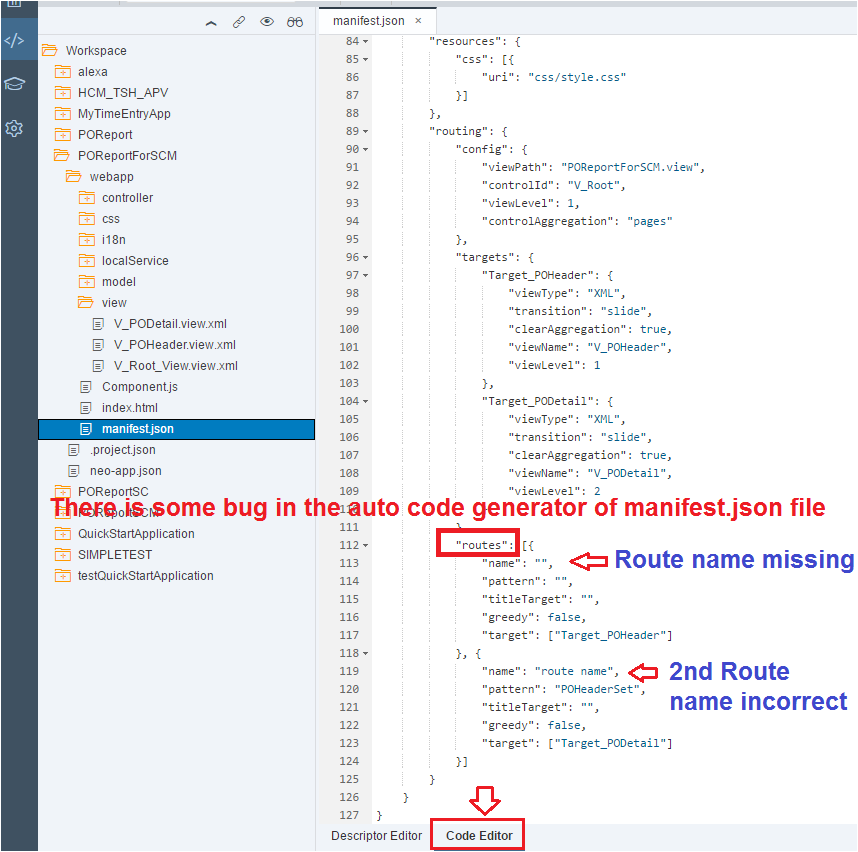
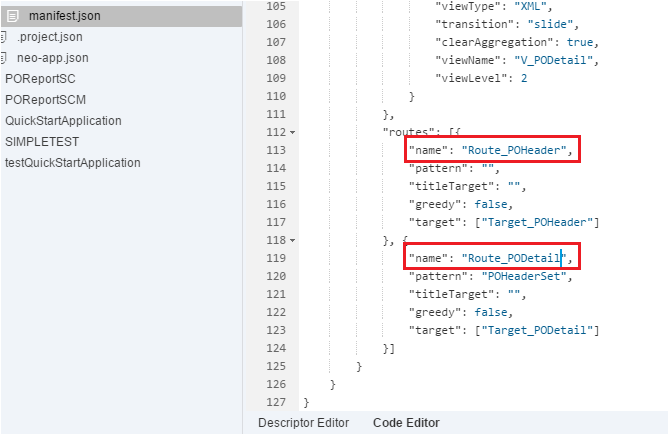
We need to correct this issue in the Code Editor of the manifest.json file and add the right names of the routes
High-Level Configuration of the Routing is complete. We have not written any syntax/javascript code yet. Happy ABAPers.
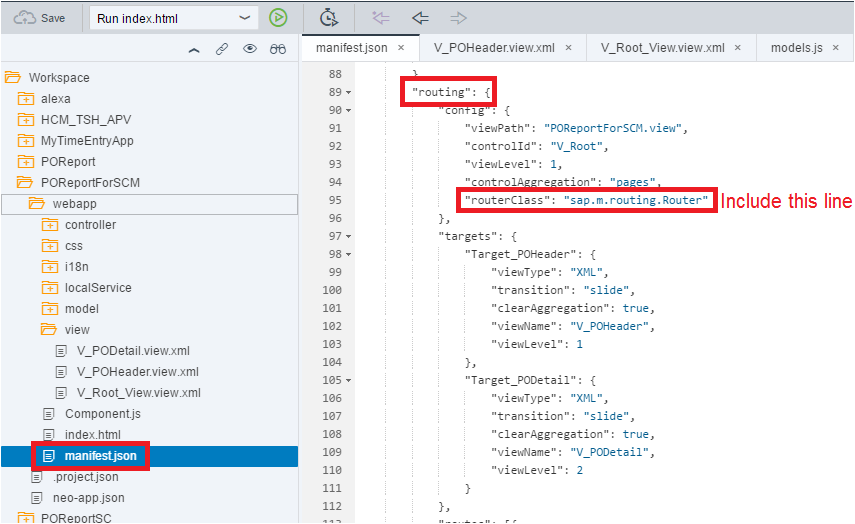
4. Include the router class in the manifest.json file (1 line)
Now let us write our first Javascript line to specify the Router Class in manifest.json file.
If someone asks you what is a Router in SAPUI5?
Answer: Router is an API class which is available in sap.m.routing.Router SAPUI5 library. This class helps in navigation and transferring data between views/pages in the SAPUI5 application.
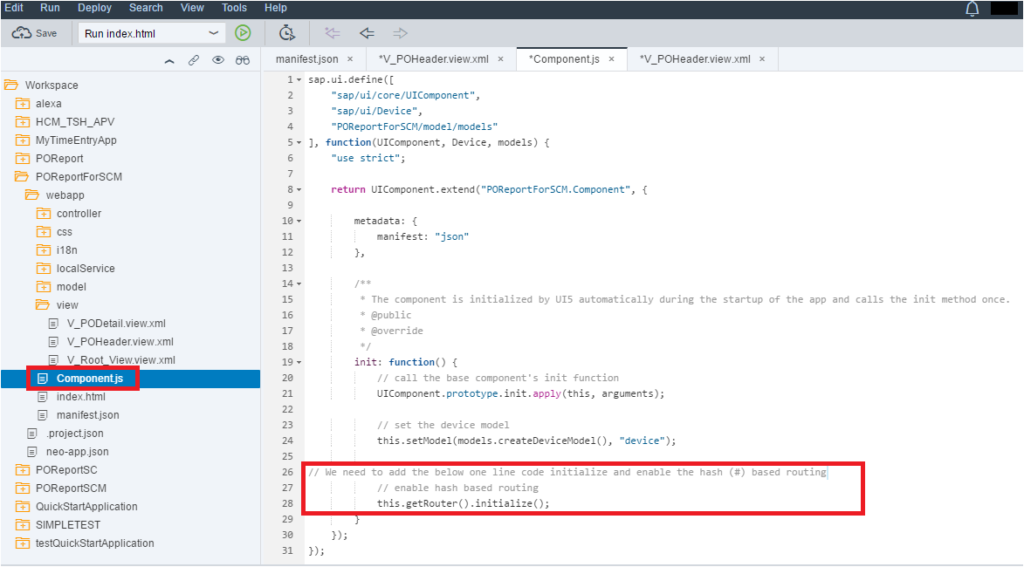
5. Enable Hash(#) Based Routing for the application in Component.js file (1 line)
At this moment, we need to write our 2nd Javascript line in Component.js file to enable the hash/pound (#) based Routing in SAPUI5.
// We need to add the below one line code to initialize and enable the hash (#) based routing
// enable hash based routing
this.getRouter().initialize();
6. Design the POHeader View screen elements and bind them to Data Set
Now we need to design the View screen. Right click and open the V_POHeader view in Layout Editor.
As done in Part 1 of SAPUI5 tutorial, drag the List Control and drop on the View Layout Page.
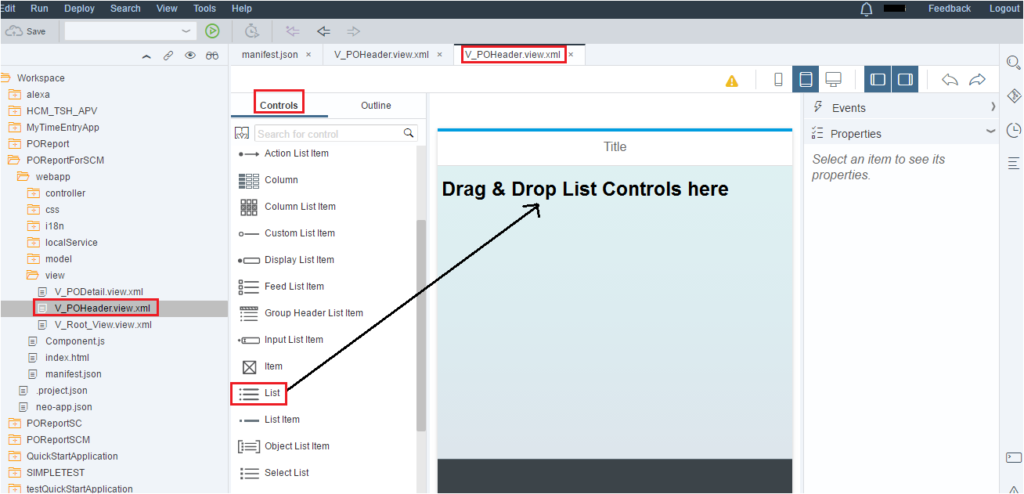
Three List Items are created. Delete two of them. Our list would be dynamic. It should display the list depending on the number of entries returned by the OData Service, therefore just one line is enough.
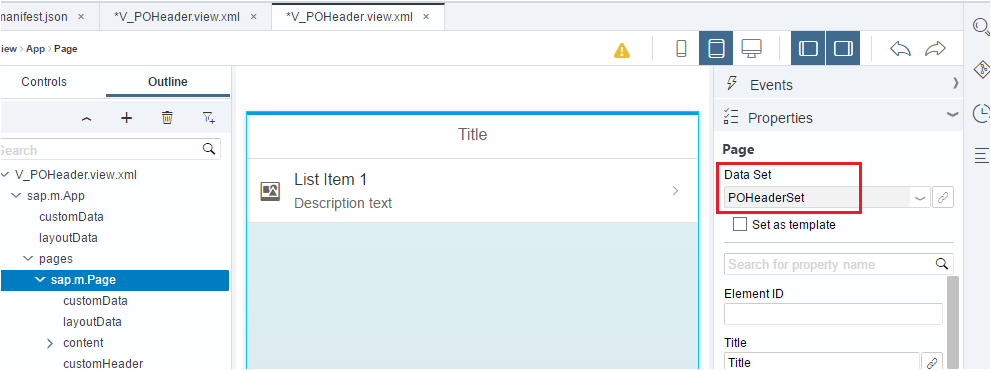
Go to the Outline and highlight the V_POHeader.view.xml. Check the XML View Data Set section. It says Not defined.
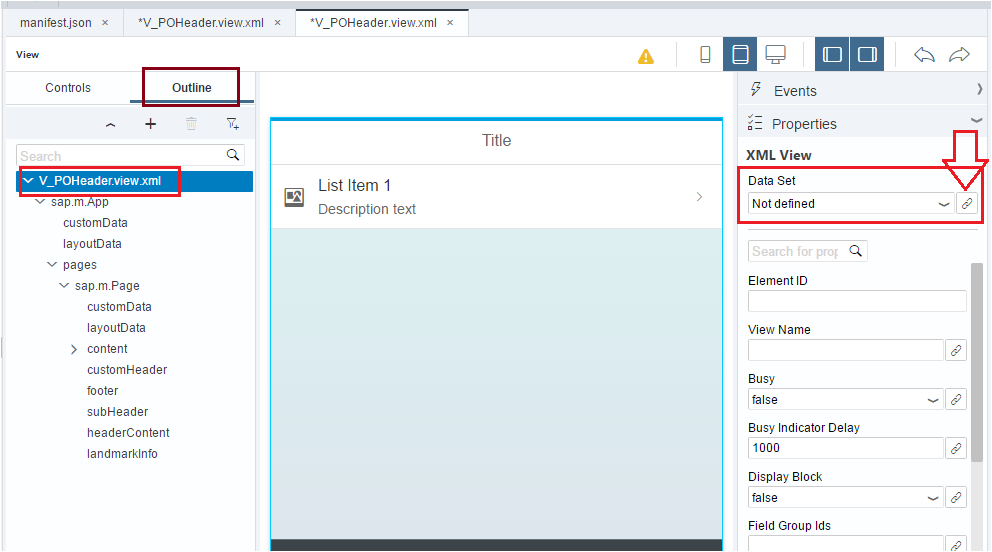
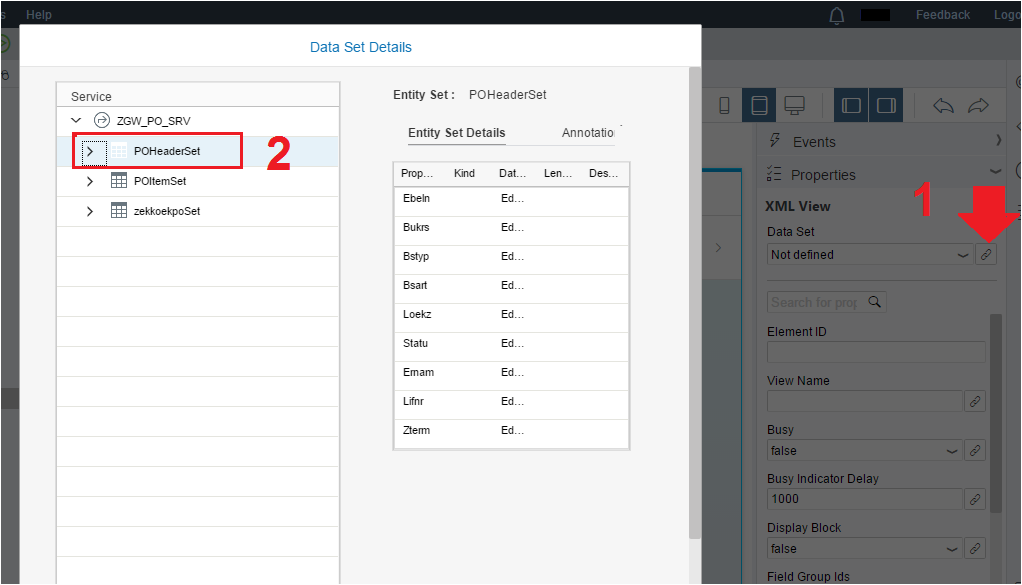
Bind the Data Set to POHeaderSet by clicking on the chain link Bind symbol.
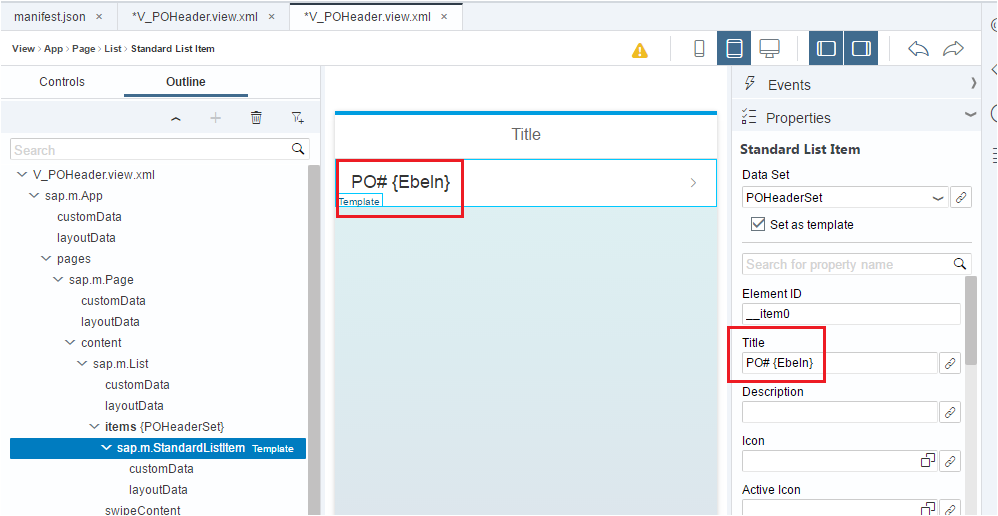
Now navigate to the sap.m.StandardListItem and set the Data Set as Template.
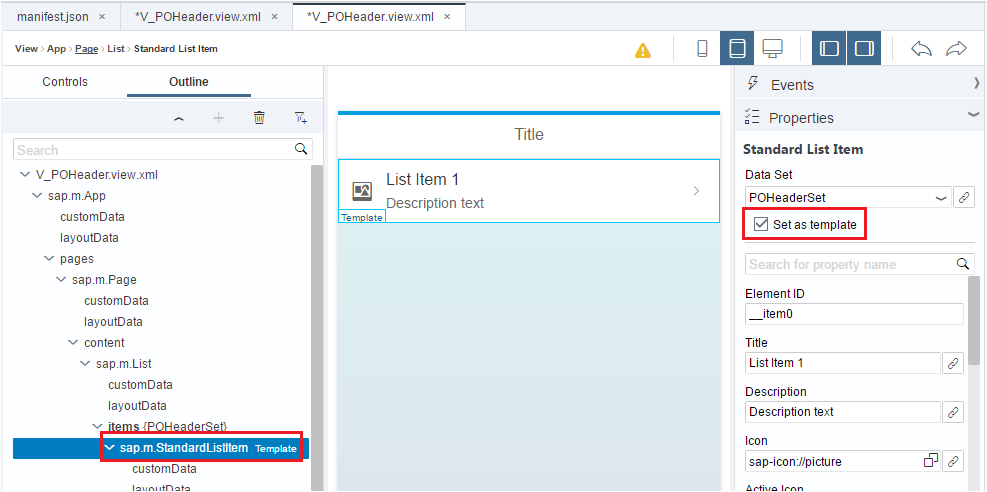
When we set it as Template all the fields and properties of Data Set becomes available to the View elements. Remove the default Description Text of the List and update it with PO#{Ebeln}. You also bind by clicking on the bind symbol and selecting Ebeln.
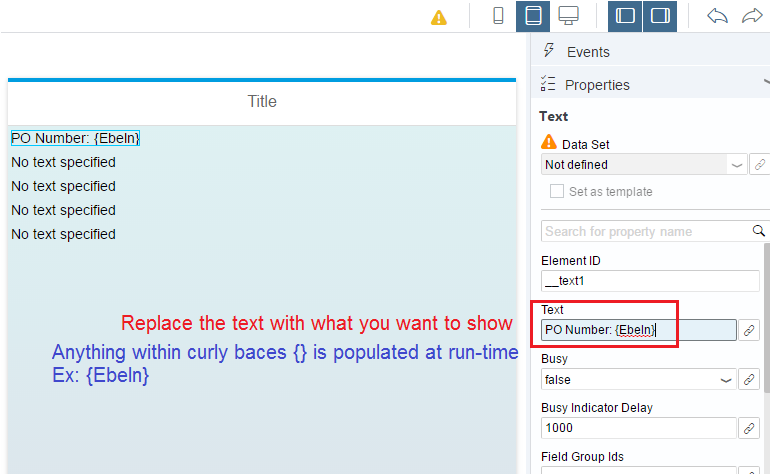
Remember anything with curly braces {} are dynamic. It has to be come from the service.
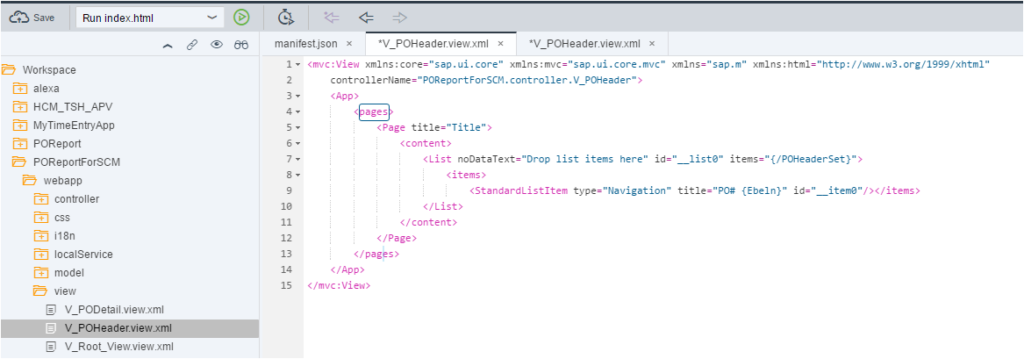
At this stage, let us check the V_POHeader View in Code Editor.

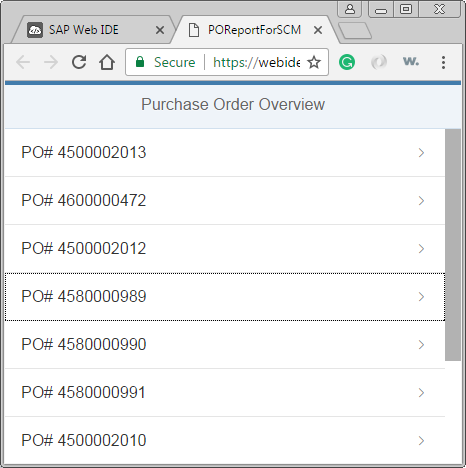
7. Test the SAPUI5 App. Data is displayed in the POHeader view from Backend OData
Let us test if our first View works properly. If you follow all the steps above, nothing came come in your Route to PO Header View.
Point to remember:
i. Enable hash based routing in Component.js file using this line of code
this.getRouter().initialize();
ii. In the manifest.json file Include the Router Class in the “routing” section.
“routerClass”: “sap.m.routing.Router”
iii. Correct the Router names in the manifest.json file
iv. Give an ‘Id’ to the root view
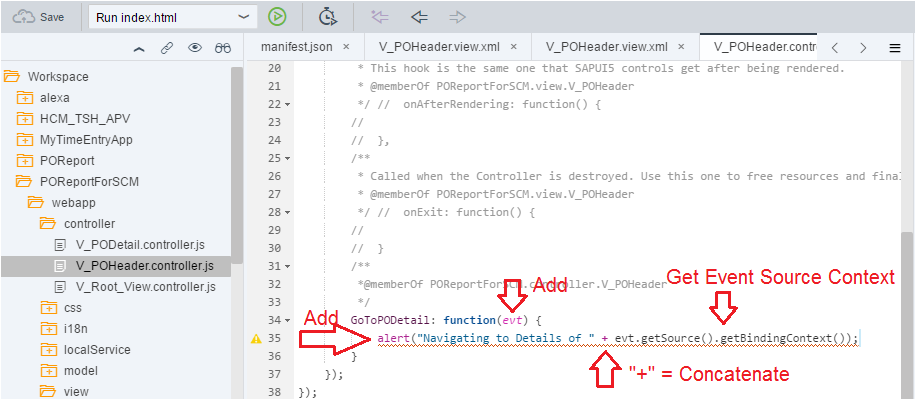
8. Add an Event on the POHeader View
The next step is to route from POHeader View to PODetail View. Our requirement is to display more information of the PO whenever the user clicks on any PO number. So we need to perform some Action and capture the Event.
In the POHeader View, create a New Function to handle the Press Event.
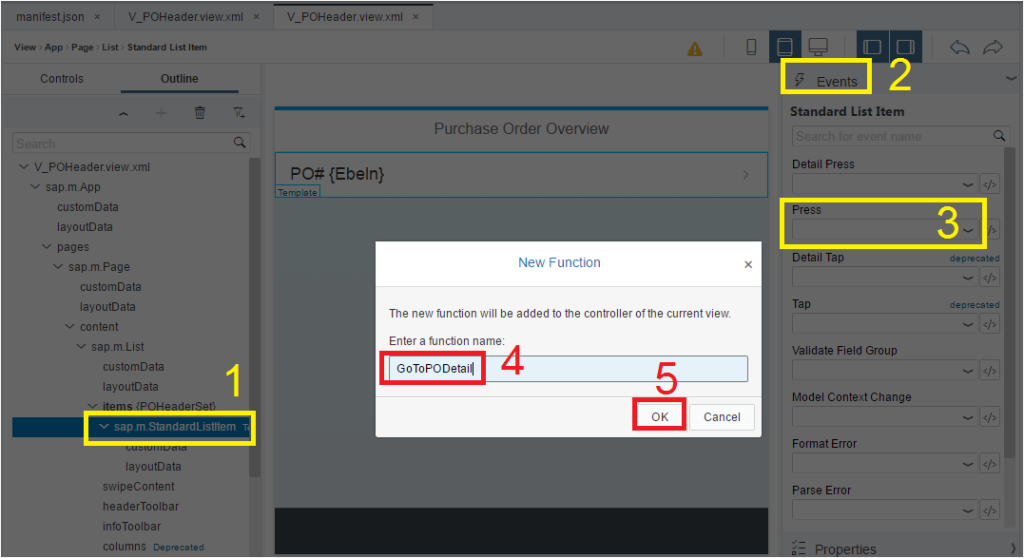
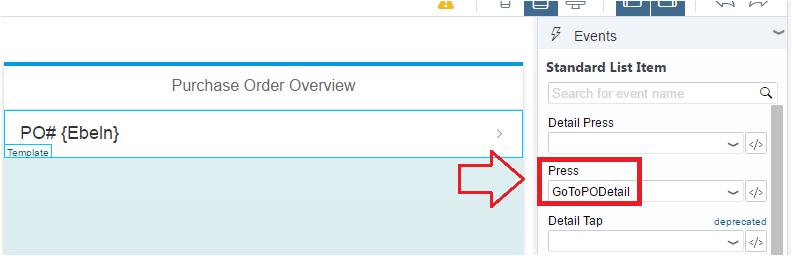
Go to V_POHeader.controller.js file to check the GoToPODetail function definition. Now we need write some simple generic (used in every SAPUI5 App) code to capture the Event, parameters and pass it to the next view.
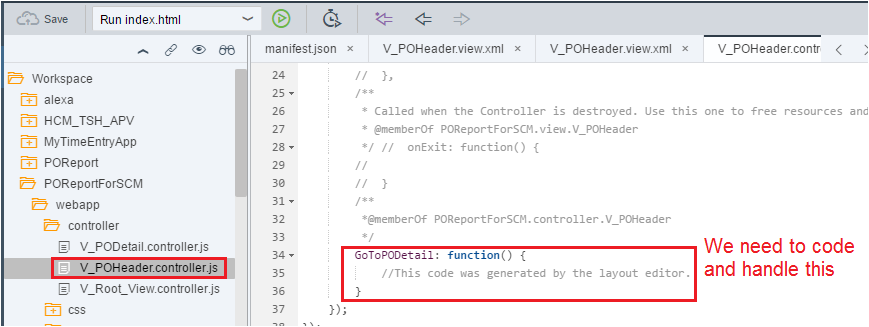
8.1. Write one line of code in the Event function to capture the element on the view which was clicked.
alert(“Navigating to Details of ” + evt.getSource().getBindingContext());
Let us write one line of above code. Also, we need to pass the event parameter, we have named it as “evt”.
9. Test the data again and Event action on the POHeader view.
Save and test the App again. When we click on any PO, it gives us the Alert with the details of the PO we clicked. Check we also know which PO was clicked. We have captured it in our Event Function.
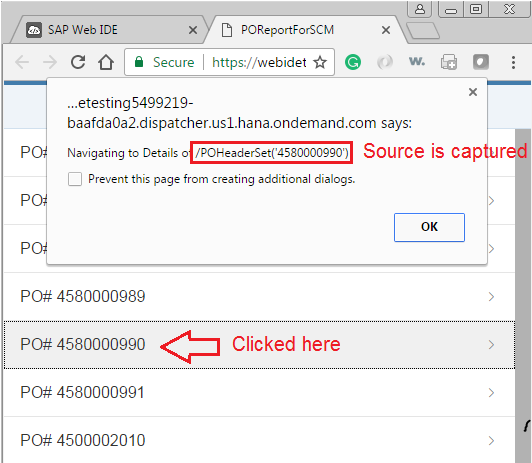
The idea is to read the Event Parameters and pass it to the PODetail View and display more information. Flow of data from one View to subsequent Views.
10. Design the PODetail View screen elements and assign the property names to the UI elements which would be bound
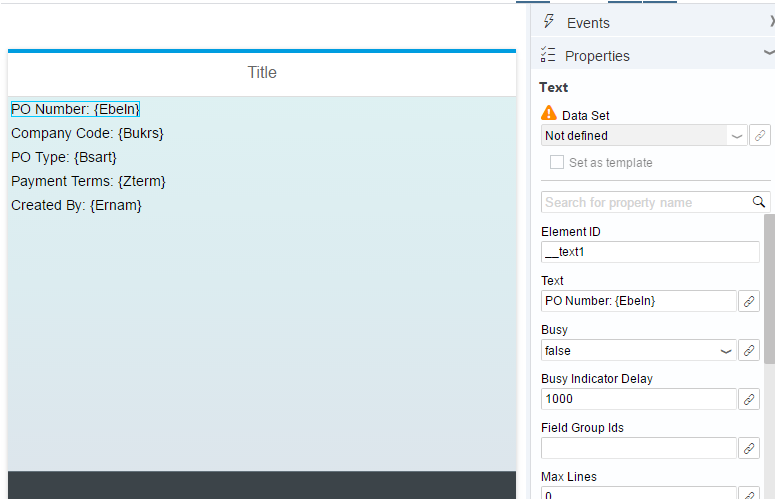
Let us design the V_PODetail View to show the PO Number, Company Code, PO Type, Payment Terms and Created By.
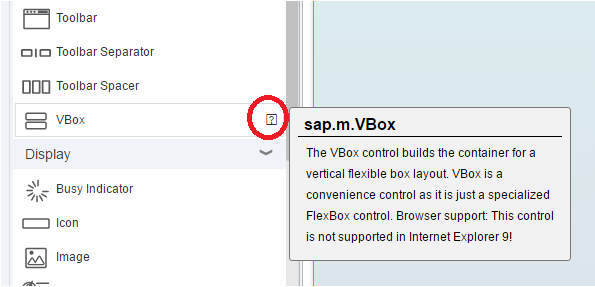
Create a VBox container for PO Detail View. There is a help (? mark) near the View controls. Click on it to learn more about it.
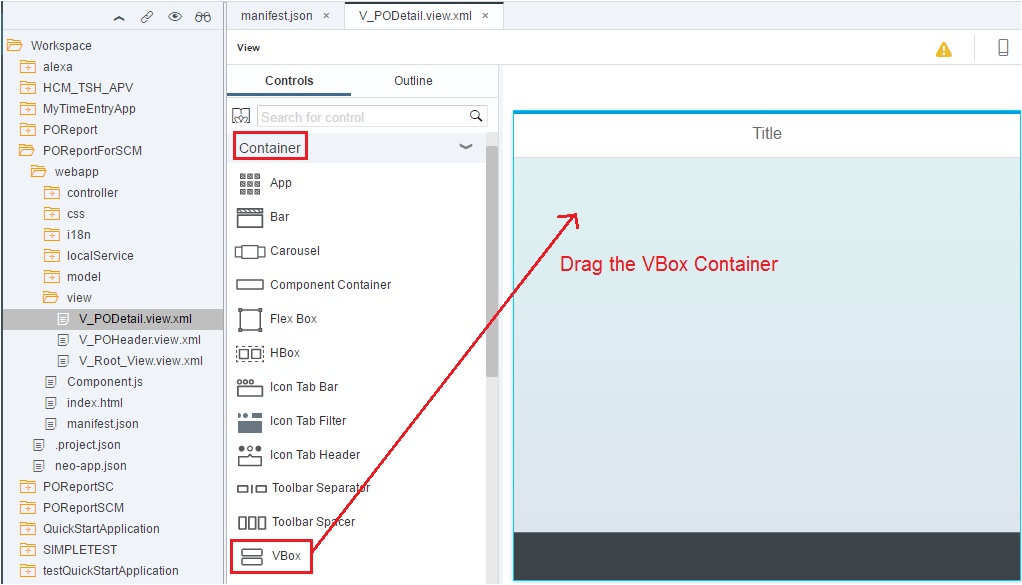
Now drag the Text to VBox container. Since we are planning to show 5 fields, we would drag 5 times.
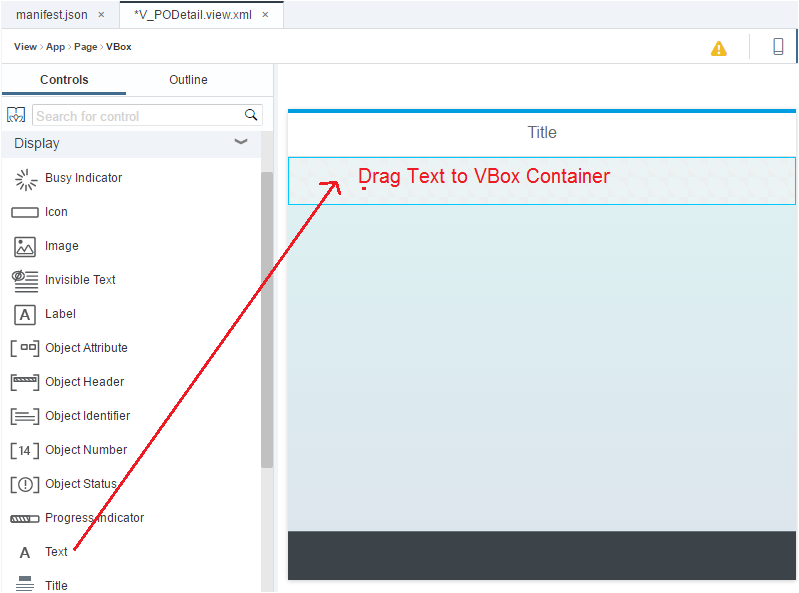
If you are practicing along with us, your screen would look like below.

Bind the Text Element to the Data Source Field. Please note, the binding icon would not work as we have not Set any Data Set Template to this View. We need to type the text and data set field name now. We would bind them in the code in the controller file.
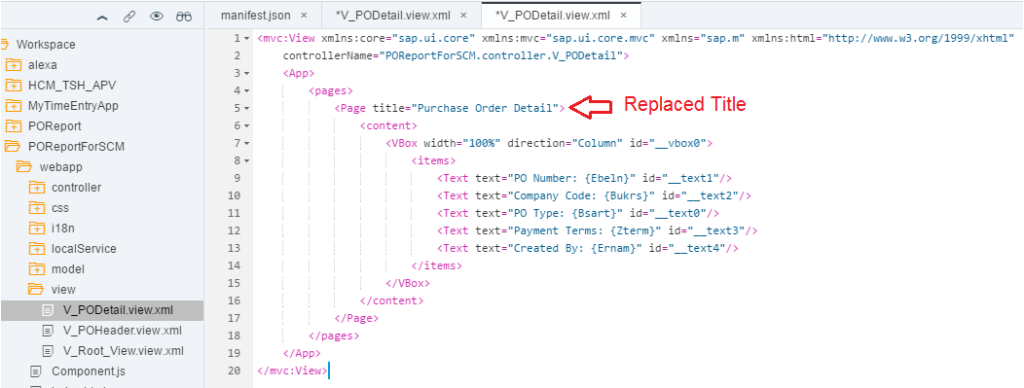
Let us check the PO Detail view in Code Editor. We have replaced the Title.
11. Configure the ‘Pattern’ with correct parameter in the Route section of manifest.json file
Second View design is over. Now we need to capture the event and call the right OData Service URL to pull the data. If you go back to OData Service tutorial where we talked about URI, when we needed more information of a particular PO, we passed the URI as below.
URI: /sap/opu/odata/sap/ZGW_PO_SRV/POHeaderSet(‘4500002013’)
Mark the Pattern. It has POHeaderSet followed by PO number in bracket within single quotes.

When the user clicks any PO on the first View, we need to prepare the pattern exactly as above and pass to PO Detail View to get data from backend using OData Service.
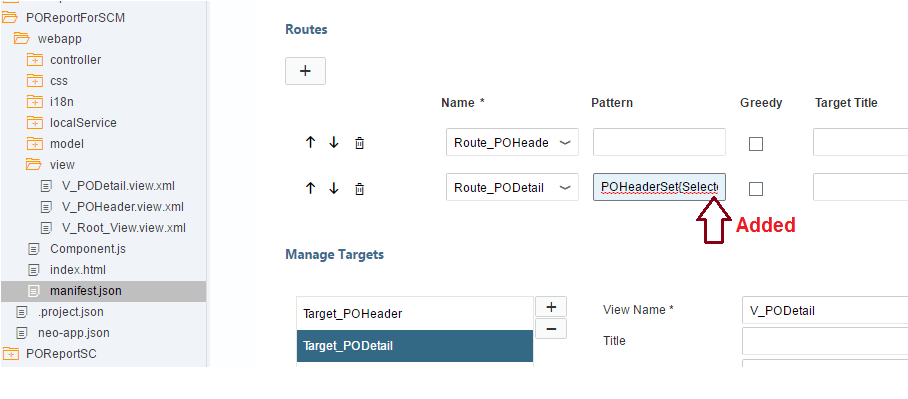
Did we Configure the Pattern?
Yes. But we configured partial pattern in the manifest.json file Routing section.
Let us complete it.
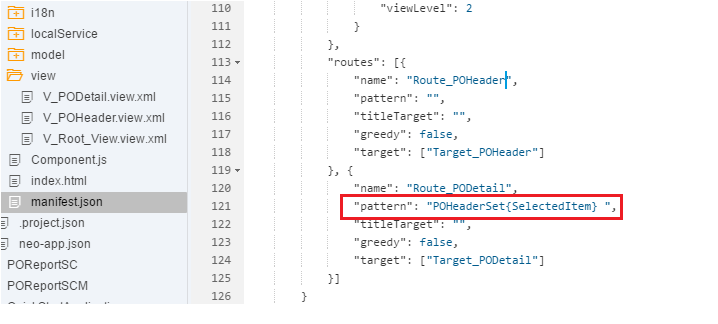
For the Route Route_PODetail, the correct Pattern should be POHeaderSet{SelectedItem}.
{SelectedItem} would hold PO number in single quotes with bracket for example {‘4500002013’}.
Let us configure the correct Pattern now.
{SelectedItem} is added to the Pattern.
Let us check how it looks in Code Editor.
12. Enhance the Event handling function in the POHeader View Controller to read the PO number clicked and pass the information to the PODetail View and Navigate to it using Routers (3 lines of code)
Finally, the Configuration is complete. Now we need to handle the Event Method.
Since we would be moving from POHeader View to PODetail View, we need to handle the Click at POHeader Controller Method. Add the below three lines of code.
// Get Propertyof the Clicked Item. i.e. PO numberof the item which was clickedvar selectPO = evt.getSource().getBindingContext().getProperty(“Ebeln”);
// Now Get the Router Infovar oRouter = sap.ui.core.UIComponent.getRouterFor(this);
// Tell the Router to Navigate To Route_PODetail which is linked to V_PODetail viewoRouter.navTo(“Route_PODetail”, { SelectedItem: selectPO});
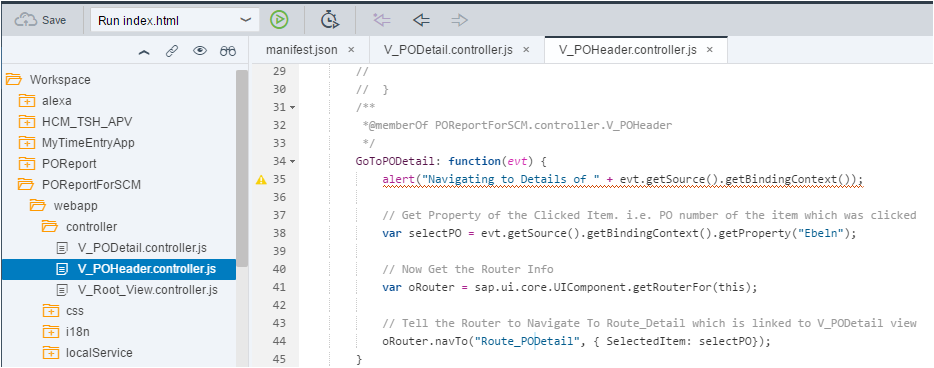
The above code captures the PO number which was clicked (if you use some other field on your application say, matnr, then get the Property of matnr). PO number is saved in variable selectPO above.
Then it gets the Router information (in variable oRouter) and finally, tells the Router to Navigate to (navTo) the Route_PODetail. Route_PODetail takes us to the View attached to it. For our case, it is V_PODetail view.
Point to be noted here is, in the Route we have a Pattern (POHeaderSet{SelectedItem} ) defined. So the navTo function would expect the parameter SelectedItem. Therefore SelectedItem is assigned the value of the selectPO variable which in turn holds the PO number of the clicked item. Hope it is clear.
13. Enable the Init Function in the PODetail View controller to accept the information passed by POHeader event and display the right information (2 functions with 5 lines of code)
So we have informed the source view (POHeader) where to go when someone clicks on the PO number. But we also need to inform the target view (PODetail) that if someone with proper identity knocks your door, accept it and provide them the details.
You guessed it right. We need to write some code in the V_PODetail controller.
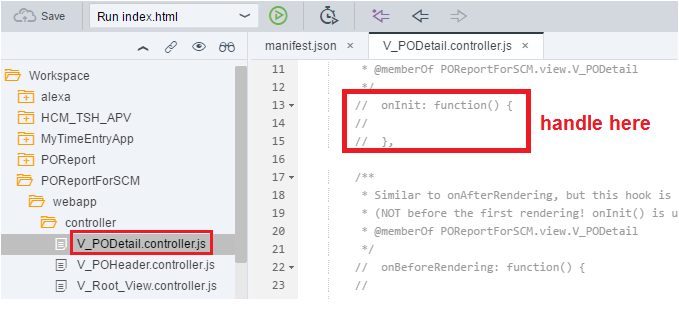
onInit: function() { // Get the Router Infovar oRouter = sap.ui.core.UIComponent.getRouterFor(this); // Validate/Match the Router Details sent fromsourceusing oRouter.navTo(“Router_Detail”, {SelectedItem: selectPO});oRouter.getRoute(“Route_PODetail”).attachMatched(this._onRouteFound, this); },
// Custom Methodto bind the elements using the Event Arguments_onRouteFound: function(oEvt) { var oArgument = oEvt.getParameter(“arguments”); var oView = this.getView(); oView.bindElement({path: “/POHeaderSet(‘” + oArgument.SelectedItem + “‘)”});}
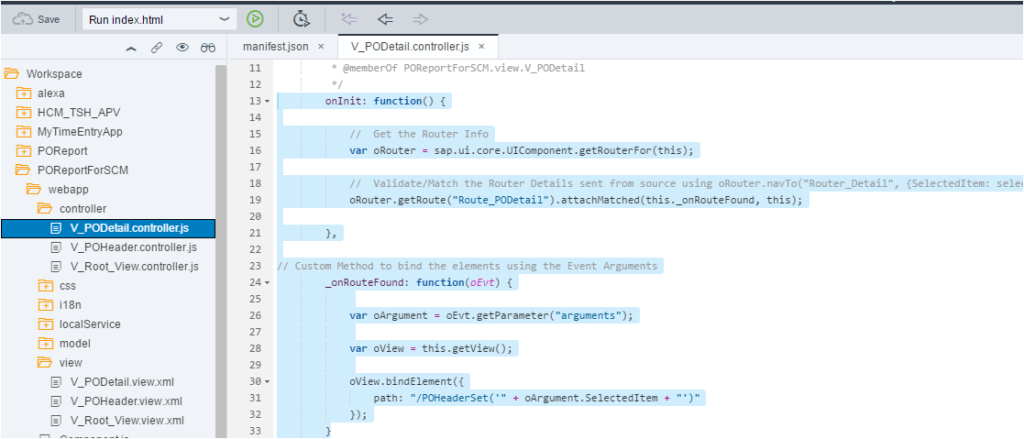
The syntax is self-explanatory. We retrieve the Router information (oRouter) and try to match (attachMatched) the parameter passed by the sender routing method to this receiver method. If the parameters match (i.e routing name and parameters) then we need to build the right pattern (path) for the application to understand.
For this, the method parameters (arguments) are read and stored in a variable (oArgument). Finally, we concatenate the pattern, /POHeaderSet{SelectedItem} to prepare the URI.
Remember, the URI needed /POHeader(‘4500002013’) format.
Say you pass /POHeader(4500002013), the system will not understand. If you do not pass the quotes in front and back of the PO number, it will not understand our pattern
URI for OData Service: /sap/opu/odata/sap/ZGW_PO_SRV/POHeaderSet(‘4500002013’)
Check this syntax. We are concatenating the quotes as well. oArgument.SelectedItem will have the PO number. SelectedItem is the part of the pattern.
oView.bindElement({ path: “/POHeaderSet(‘” + oArgument.SelectedItem + “‘)”})
Did we just do View Binding with syntax oView.bindElement?
14. Test the application end to end.
Let us test our Routing App. First View i.e. POHeader is displayed. Click on any PO.
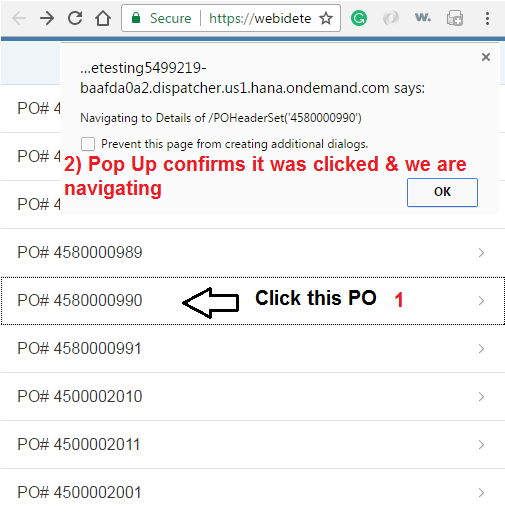
On Click, it navigates to the Second View PODetail. sweeeeettt!!
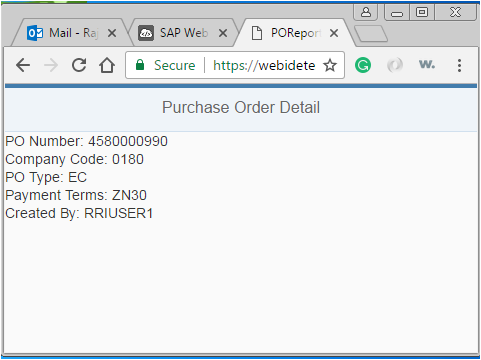
If you look at the URL, you would find the ‘#’ Hash and then the Routing Pattern.

Hope this article would be a good page for beginners to refer to. Today we consumed just one EnitySet (POHeaderSet) in two views. Configured and routed to two Views. In our future posts, we would show navigation between multiple pages and consume multiple EnititySets of the custom OData Services.


