Introduction:
In this blog post you will learn about the yard management in SAP EWM. Yard is a location outside the warehouse where the vehicle/TUs will arrive & leave to load and unload the goods. It is usually implemented to manage the truck movements within the yard. Below are the important aspects of a yard management.
Check Point: A check point is a location where the truck will enter & leave from the warehouse after completion of loading & unloading of goods. In simple words, it’s the gate for the yard.
Parking Spaces: A parking space is a location within the yard where the truck will be parked temporarily when the doors are not free. In case if the doors are free, then truck will be moved directly to the warehouse door from checkpoint.
Door: A door is a location where the truck arrives to load and unload the goods. After completion of loading/unloading the truck will leave from the warehouse through checkpoint.
Solution Approach:
The below mentioned configuration steps can be employed to achieve this functionality:
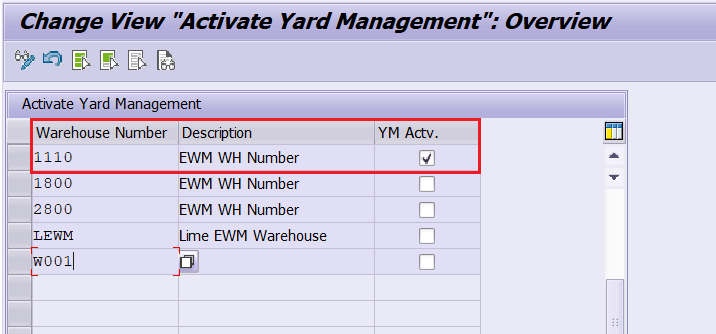
- Activate Yard Management for the respective warehouse using the below mentioned node:
IMG Path – SPRO -> IMG -> SCM Extended Warehouse Management -> Extended Warehouse Management -> Cross-Process Settings -> Shipping and Receiving->Yard Management-> Activate Yard Management for Warehouse.
- Create a yard storage type by enabling the required settings using the below mentioned node:
IMG Path – SPRO -> IMG -> SCM Extended Warehouse Management -> Extended Warehouse Management -> Master Data -> Define Storage Types.

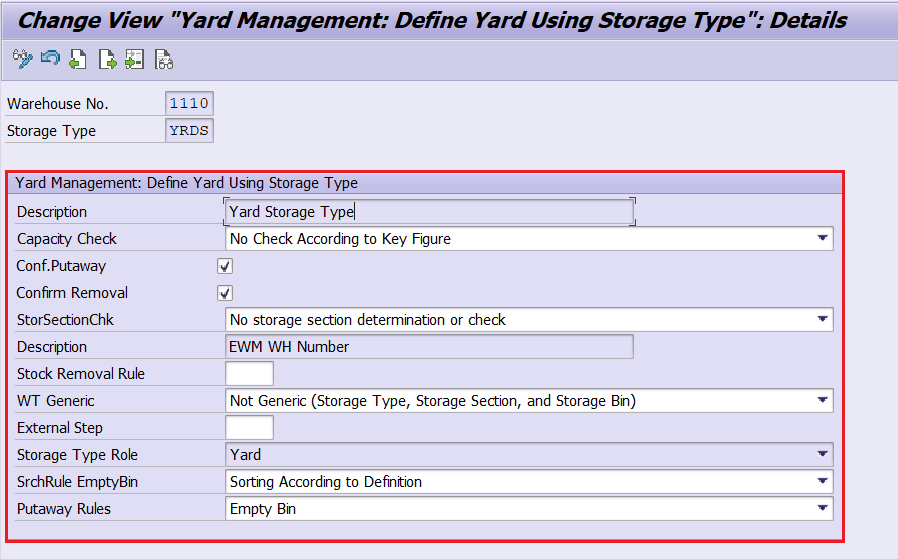
- The yard storage type which is created above can be viewed using the below mentioned node:
IMG Path – SPRO -> IMG -> SCM Extended Warehouse Management -> Extended Warehouse Management -> Master Data -> Shipping and Receiving->Yard Management-> Define Yard Using Storage Type.
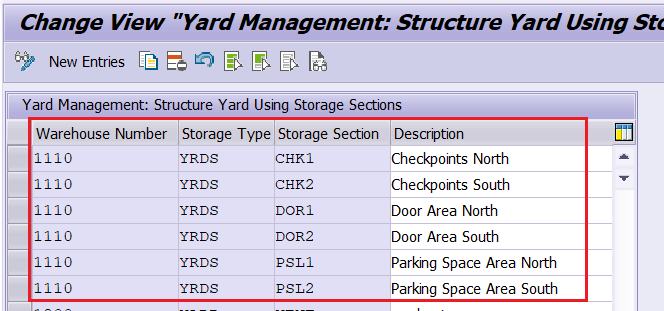
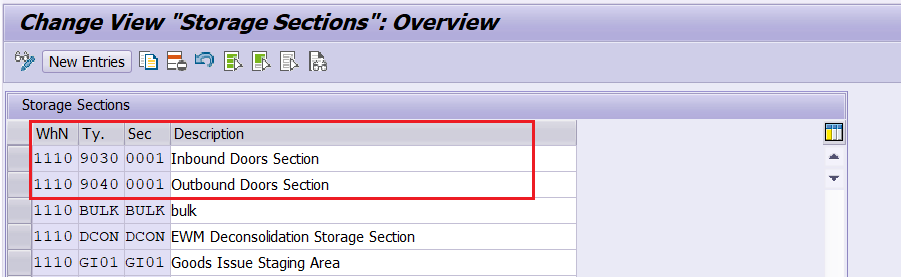
- Define yard structure by creating the storage sections for yard storage type.
Storage sections can be created by using any one of the below mentioned node:
IMG Path – SPRO -> IMG -> SCM Extended Warehouse Management -> Extended Warehouse Management -> Master Data -> Define Storage Sections.
Or
IMG Path – SPRO -> IMG -> SCM Extended Warehouse Management -> Extended Warehouse Management -> Master Data -> Shipping and Receiving->Yard Management-> Structure Yard Using Storage Areas.
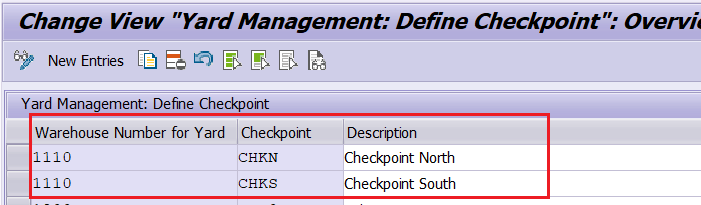
- Define Checkpoints using the below mentioned node:
IMG Path – SPRO -> IMG -> SCM Extended Warehouse Management -> Extended Warehouse Management -> Master Data -> Shipping and Receiving->Yard Management-> Define Checkpoints.
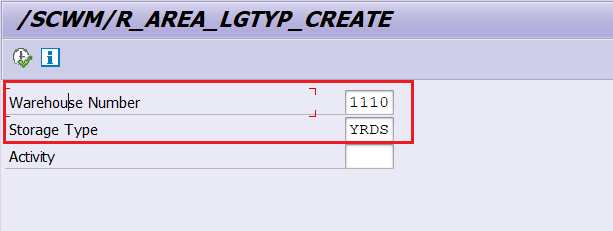
- Generate activity area for yard storage type using the below mentioned node:
IMG Path – SPRO -> IMG -> SCM Extended Warehouse Management -> Extended Warehouse Management -> Master Data -> Activity Areas-> Generate Activity Area from Storage Type.
- Create yard storage bin using the t-code:/SCWM/LS01 and this created bin can be viewed using the warehouse monitor (t-code:/SCWM/MON).

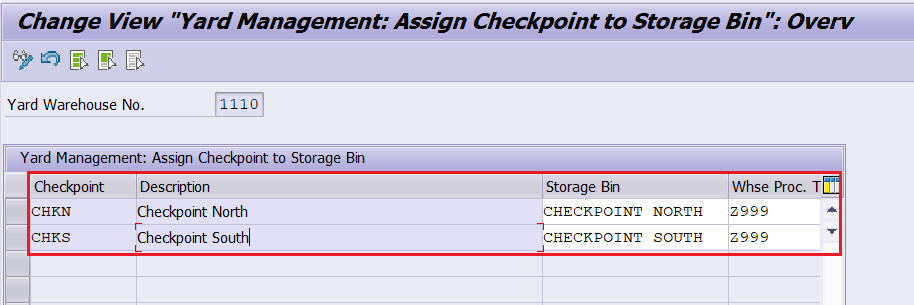
- Assign checkpoints with the respective storage bins, supply chain unit & warehouse process type using the t-code:/SCWM/YM_CHKPT_BIN.
Note: In this case we have created a custom warehouse process type: Z999 with immediate confirmation by copying the standard warehouse process type:9999. The reason for this custom wpt is just to track my yard movements uniquely, but you can use standard wpt:9999.
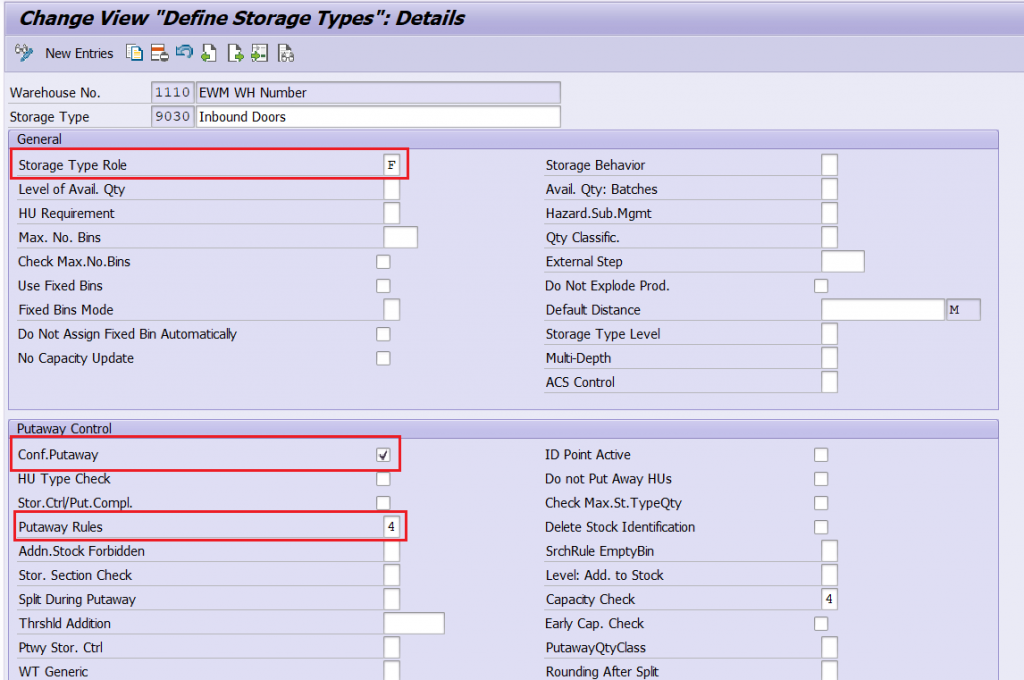
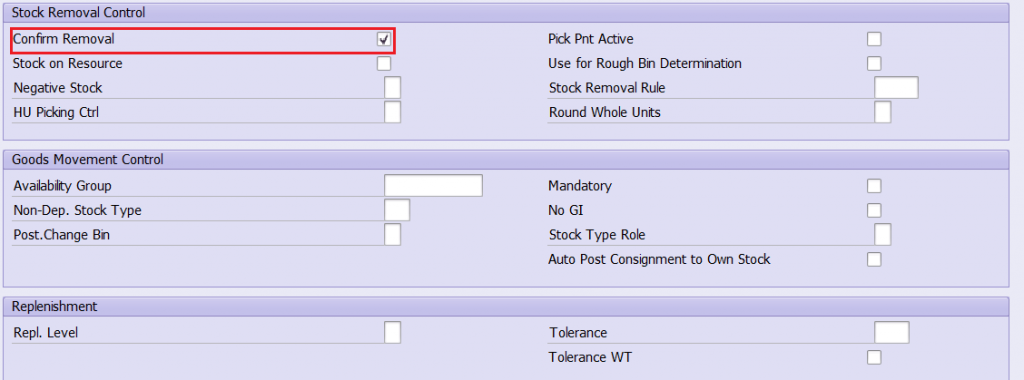
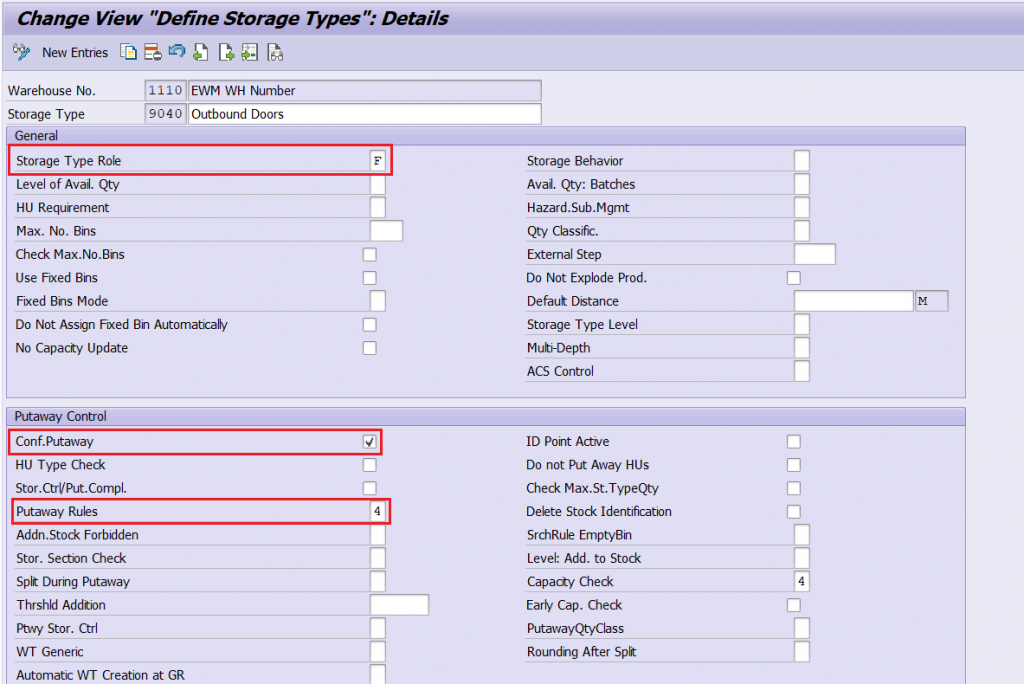
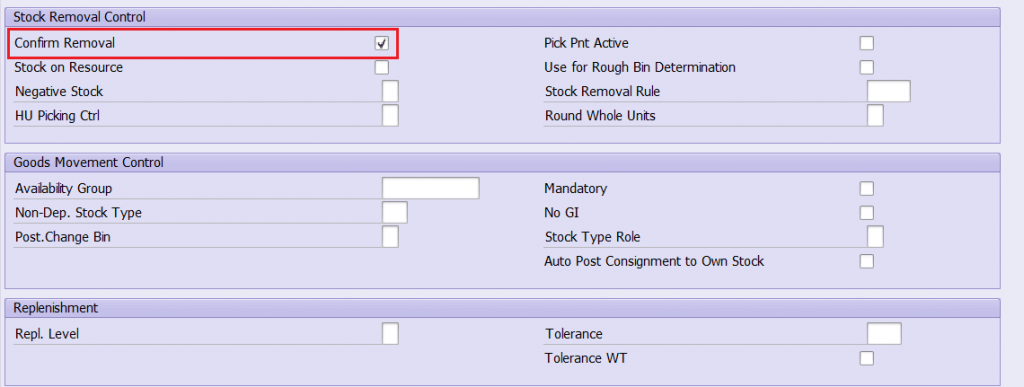
- Create a door storage type by enabling the required settings using the below mentioned node:
IMG Path – SPRO -> IMG -> SCM Extended Warehouse Management -> Extended Warehouse Management -> Master Data -> Define Storage Types.
Inbound Door Storage type:
Outbound Door Storage type:
- Create a door storage section using the below mentioned node:
IMG Path – SPRO -> IMG -> SCM Extended Warehouse Management -> Extended Warehouse Management -> Master Data -> Define Storage Sections.
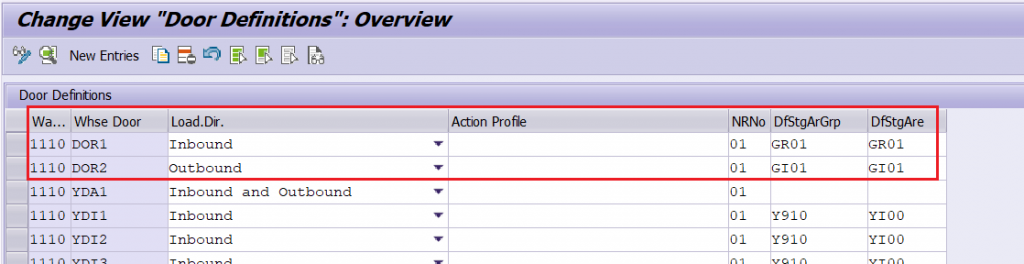
- Define warehouse door using the below mentioned node:
IMG Path – SPRO -> IMG -> SCM Extended Warehouse Management -> Extended Warehouse Management -> Master Data -> Warehouse Door -> Define Warehouse Door.
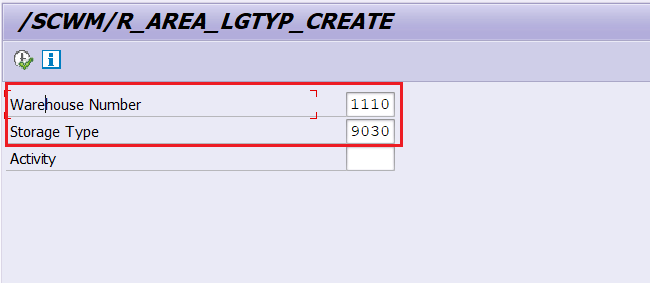
- Generate activity area for door storage type using the below mentioned node:
IMG Path – SPRO -> IMG -> SCM Extended Warehouse Management -> Extended Warehouse Management -> Master Data -> Activity Areas-> Generate Activity Area from Storage Type.

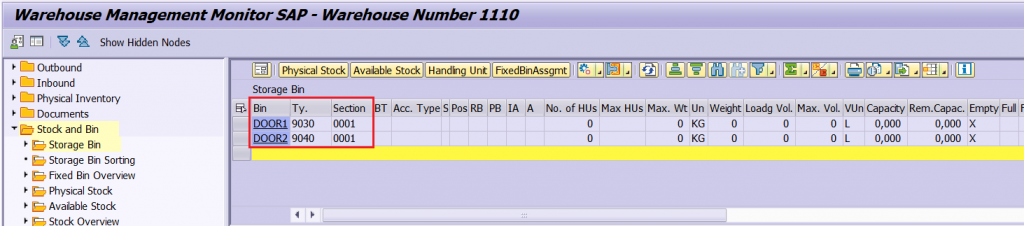
- Create door storage bin using the t-code:/SCWM/LS01 and this created bin can be viewed using the warehouse monitor (t-code:/SCWM/MON).
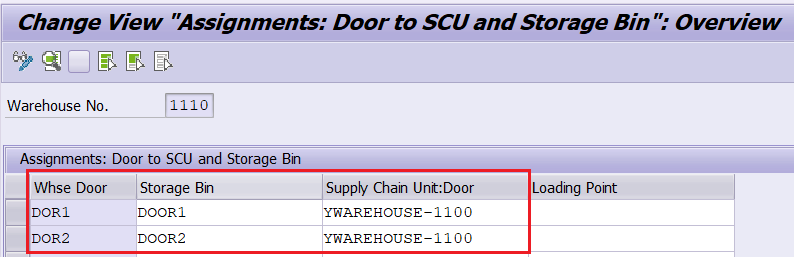
- Assign warehouse door to the door storage bin and to supply chain unit using the t-code:/SCWM/DOOR_SCU.
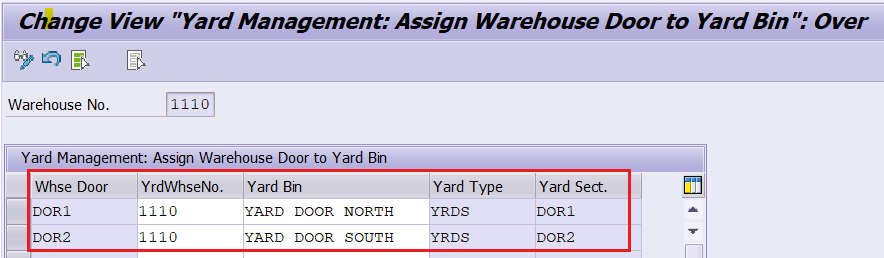
- Assign warehouse door to the yard bin using the t-code:/SCWM/YM_DOOR_BIN.
Testing:
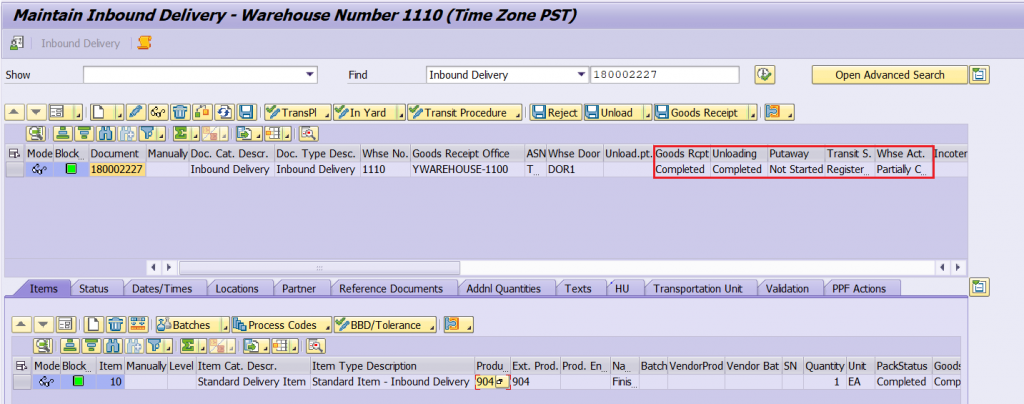
- Inbound delivery:180002227 is created with TU assignment to perform testing.

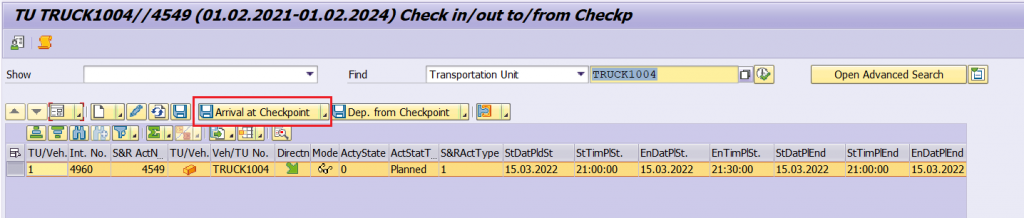
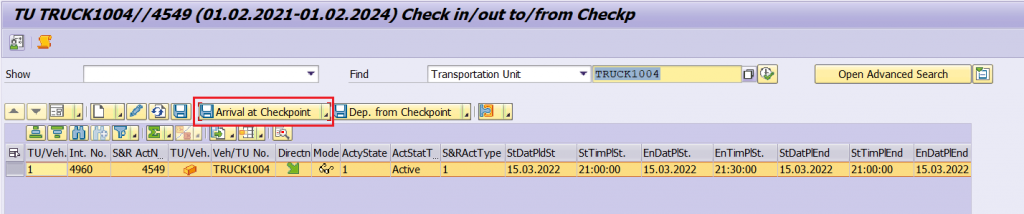
- Check-in the TU at the North checkpoint by clicking the “Arrival at checkpoint” button using the t-code:/SCWM/CICO.
Before check-in the TU will be in planned status and transit status of the inbound delivery will be “In-transit”.
After check-in TU will be changed to active status and correspondingly the transit status is changed to “Registered in Yard”.
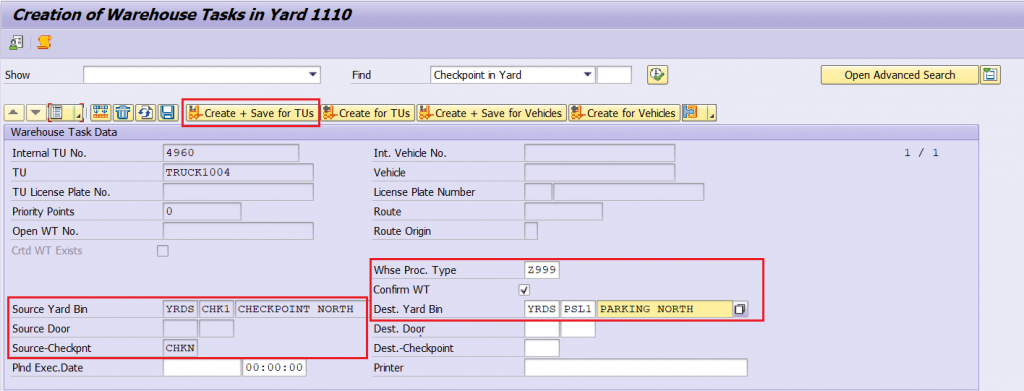
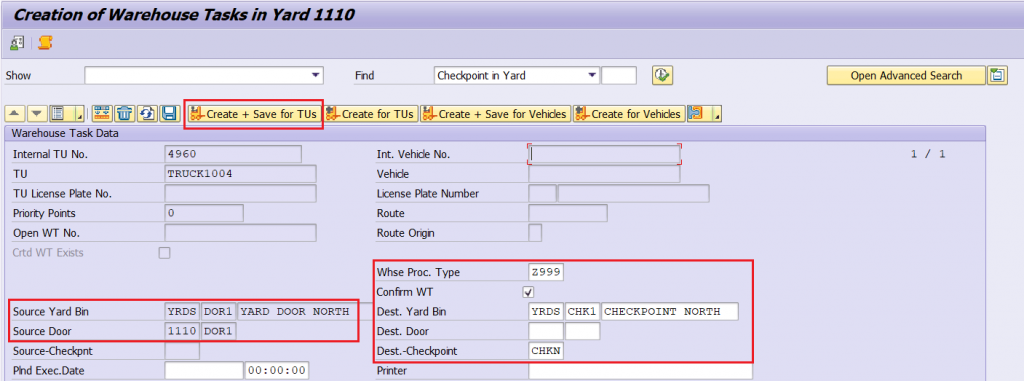
- After checking at the check point, move the TU to the door if the door is available else to the parking space by creating a warehouse task using the t-code:/SCWM/YMOVE. In this case we will be moving the TU to the parking space and then to the Door.
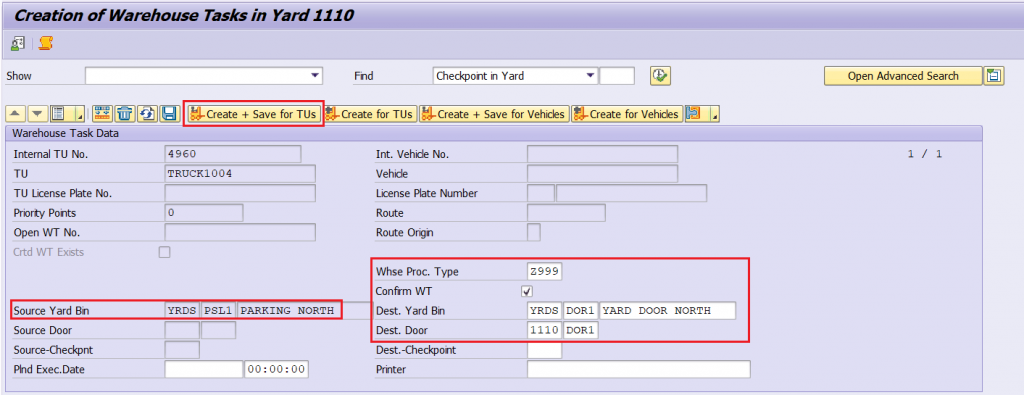
- Move the TU further from parking space to the door bin by creating a warehouse task using the t-code: :/SCWM/YMOVE.
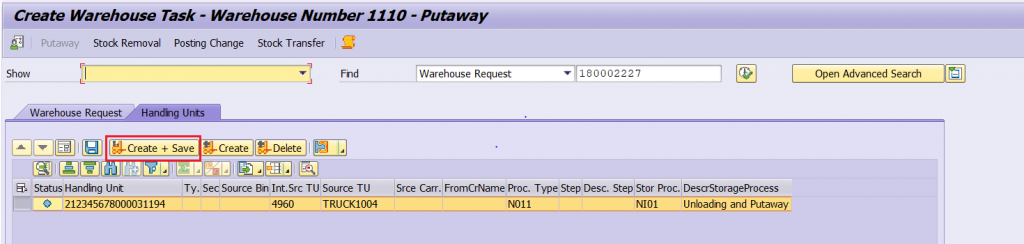
- Now the TU is at the door and it’s ready for unloading. In the delivery screen, create warehouse task manually by clicking on CREATE button and then SAVE.
Inbound delivery screen can be reached using the t-code:/SCWM/PRDI.
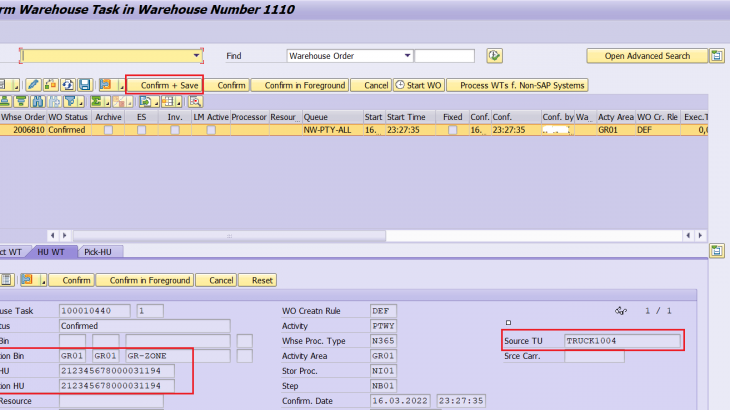
- Confirm the warehouse task to complete unloading using the t-code:/SCWM/TO_CONF so that the Handling unit will be moved from TU to the GR zone.
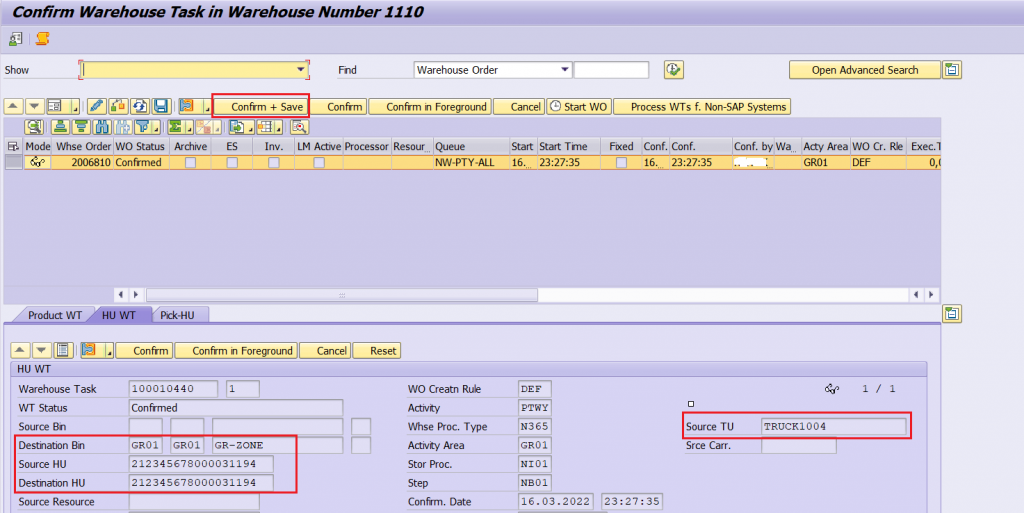
- Unloading status is marked as completed once the goods are moved to the GR zone.
- After completion of unloading, move the truck back to the checkpoint by creating a warehouse task using the t-code: /SCWM/YMOVE.
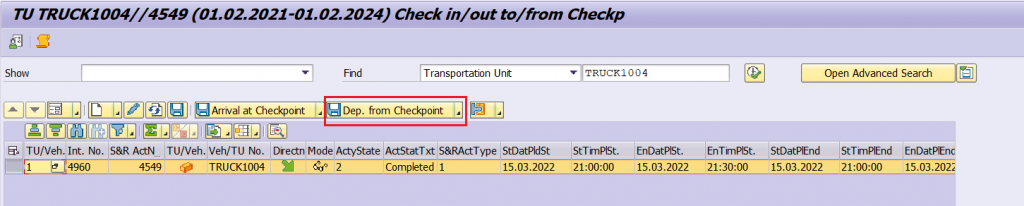
- Check-out the TU at the North checkpoint by clicking the “Departure from checkpoint” button using the t-code:/SCWM/CICO.
Before check-out the TU will be in active status.
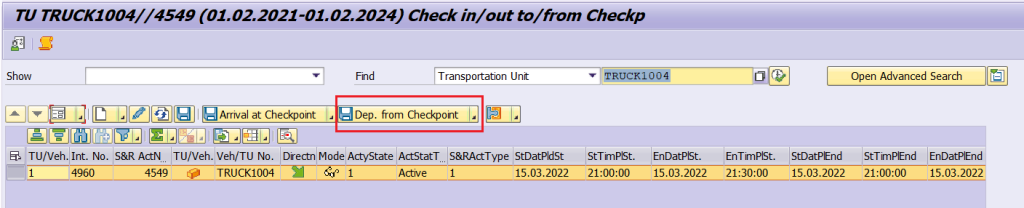
After check-out the TU status will be changed to completed.