One of the most common requirements is the segregation of responsibilities in the Finance department: who can Post Journal Entries (JE)? Who can Submit JE? Who can Verify to accept or reject the JE?
SAP S/4HANA Cloud provides you a standard solution to configure flexible workflows in the Verification Journal Entries process, where you can define Business Users as Requestors who can submit JE and Business Users as Processors who can approve or reject the JE.
In this blog, Im explaining how you can define the business roles and responsibilities groups for the Requestors and the Processors and activate the Workflow to verify the Journal Entries.
The following example was executed in an SAP Internal System. The activation of the Workflow to Verify General Journal Entries is based on the documentation provided by SAP Help Portal – SAP S/4HANA Cloud 2302 Examples of Defining Workflows for Journal Entry Verification > Example 3 Link.
Use case Example:
Let’s assume the requirement is the following:
The GL Accountant wants to verify all Journal Entries for a specific Company Code submitted by other business users. The Accounting Manager wants to verify the JE when the amount is equal to or exceeds 5,000 USD in the Post General Journal Entries app before posting.
Configuration Process Flow:
The configuration consists of three parts:
- Create Business users’ roles in defining who can submit and who can verify/reject JE.
- Define the Approvers groups in Teams and Responsibilities.
- Activate the workflow with a sequence of levels based on the threshold amount.

Define a Business Role for the Requestors
The definition of this role allows business user requestors to submit JE instead of Post directly. The Submit status does not have an impact on the accounting until the processor verifies and accepts the JE.
Configuration:
Open the Maintain Business Roles app
- Select the BR_GL_ACCOUNTANT role and click on the Copy button
- Define the new name and click on the OK button
- Delete the following business catalogs:
- SAP_FIN_BC_GL_JE_PROC_PC (to remove the Post directly permission)
- SAP_FIN_BC_GL_CONTROL_PC (to remove the access to the Teams and Responsibilities app and the Manage Workflows for Journal Entry Verification – General Ledger app
- SAP_FIN_BC_GL_JE_PROC_PC (to remove the Post directly permission)
- Save changes.

Remove the Requestor Business User in the GL_ACCOUNTANT role.
Delete the GL_ACCOUNTANT role from the Business User Requestor to take off the authorization to Post JE directly.
Configuration:
Open the Maintain Business Users app
- Search the Requester Business User
- Display the details
- Select the Assigned Business Roles tab
- Select the General GL_ACCOUNTANT role
- Click on the Remove button
- Save changes

Add the Requestor role to the Requestor Business User.
Add the new GL_ACCOUNTANT role created in the first step to the Business User Requestor to give the authorization to Submit JE.
Configuration:
Open the Manage Business Roles app
- Select the NEW GL_ACCOUNTANT role
- Display the details
- Select the Assigned Business Users tab
- Click on the Edit button
- Click on the Add button
- Select the Requester users
- Save changes

Define the Team and Responsibilities of the Processor of each Level of approval.
In this step, define the Business User Processors that will approve or reject the Submitted Journal Entries. Create a Team for each approval level.
Configuration:
Open the Manage Teams and Responsibilities For Journal Entry Verification in General Ledger app
- Click on Create button
- Define the name
- Select the FGLVG type
- Responsibility Definitions tab:
- Add the company code that needs to be verified.
- Add the company code that needs to be verified.
- Team Members tab:
- Add the Processors who verify the journal entries
- Select a group in the Functions
- Add the Processors who verify the journal entries
- Click on Save
- Change the status to Enable

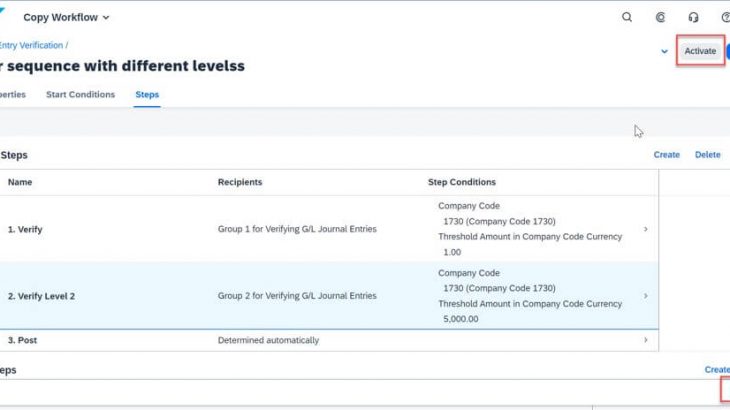
In this step, you will create the workflow with two approvals levels in sequence based on the threshold amount. For this example:
- The Processors of the first approval group will receive the workflow for the Journal Entries of the Company Code 1730 with an amount equal to or greater than 1.00 USD.
- The Processors of the second approval group will receive the workflow for the Journal Entries of the Company Code 1730 with an amount equal to or greater than $5,000.00 USD only after the first Processor approves the JE.
Define the Workflow to trigger the verification step:
- Open the Manage workflows for Journal Entry Verification in General Ledger app
- Select the General Journal Entry Verification workflow, and click on the Copy button

- Define the Workflow name
- Start Conditions – Empty

The following step is to create the first level of verification for Journal Entries:
- Steps tab – Display the Verify step
Recipients tab
- Assignment By: Role
- Role: Select the group you defined in the Teams and Responsibilities app.
Steps Conditions tab:
- Define the company codes that need to be verified by this Workflow.
- Define the amount the JE must be verified by the first approvers level.
- Click on the Apply button.
Go back to the previous screen.

The following configuration is to create the second level of verification Journal Entries.
Configuration:
In the initial screen, click the Create button in the Workflow Steps.

Header:
- Define the Step name
- Step type: Verify General Journal Entry
Recipients:
- Assignment By: Role
- Role: Select the group defined for the Level2
Step Conditions:
- Define the company codes that need to be verified by this Workflow.
- Define the amount the JE must be verified by the second approvers level.
- Click on the Create button.
Go back to the previous screen.

On this screen, click the Save button and then the Activate button.
Go back to the initial screen.

The new Workflow must appear as an Active status.

Once the configuration is completed, the expected result is that all the Journal Entries created by the Requestor will be saved with the Submitted status.
In the Verify General Journal Entries app, you can see the current status of the Journal Entries and who the processor is that is pending approval.


