Introduction
With S/4HANA 1709, the “Verify General Journal Entries” Apps were introduced. There are three apps, as follows:
- App ID F2547: Verify General Journal Entries – For Requester
- App ID F2728 :Verify General Journal Entries – For Processor (Inbox)
- App ID F2729: Verify General Journal Entries – For Processor (Outbox)
The process is driven by Standard Workflow Scenario WS02800046, where, the first step is for a ‘Requester’ to submit a document for review (Journal created as Parked) and the next step is for the Processor / Reviewer to approve or reject the document (approved journals get converted from Parked to Posted).
Also Read: SAP S/4HANA Financial Accounting Certification Preparation Guide
In my previous blog, I described the various artifacts that one needs to be aware of to set up the standard workflow in the system. Please find the link below:
If you read through my previous blog and follow all the steps, you should be able to activate the workflow in the system that would park ALL journals and send them for approval when approver is determined.
In this blog, I would explore customising the workflow so that different approvers can be configured for different scenarios. I would suggest reading the previous blog, as in this blog I would start from “Step 5. Manage Workflow” of the previous blog, describing an alternative approach.
Please note:
- The configurations described below are relevant for SAP S/4HANA 1909 onwards as we use the “Manage Teams and Responsibilities for General Journal Entry Verification” app here for approver determination. This Business Workflow was introduced in S/4HANA 1709, but there are slight variations in the way the approvers are determined.
- No coding is required to set up this workflow, so this can be done without any development or ABAP knowledge (breaks my heart to write this as I have lived most of my life as a developer).
Business Requirement
For the purpose of this blog, we would explore the requirements as follows:
- All Journal Requests should be submitted via the “Verify General Journal Entries – For Requester” App.
- For any Journal other than Company Codes 1004 or 1006, no review is required and the Journals should post directly.
- If the Journal is for Company Code 1004, User A (TSTID_91) would have to review the journals for all amounts.
- If the Journal is for Company Code 1006, User B (TSTID_92) would have to review the journals for all amounts.
- If User A or User B approves a journal, it should get posted directly, only if the Journal Amount in Company Code currency is less than 200.
- If User A or User B approves a journal and the Journal Amount in Company Code currency is more than 200, then User C (TSTID_93) would have to review the journal.
- If User C approves a journal, it should get posted directly.
- Any rejection should return the journal to the requester to make suggested changes.
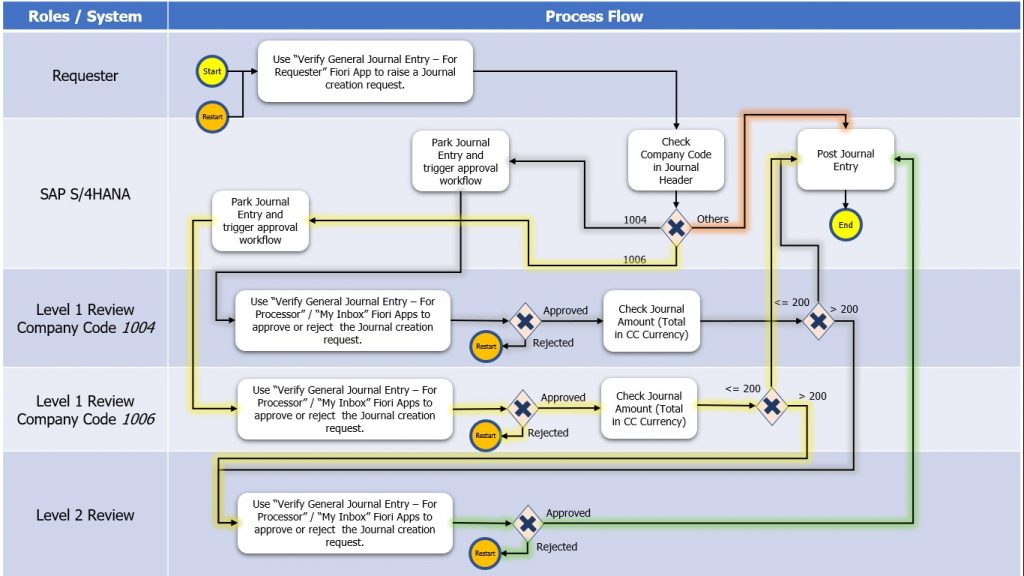
The following flowchart describes the Business Requirement (example).
Configuration Details
- Fiori Apps Required
Please refer to the App list mentioned in my previous blog.
- Steps to set up the Workflow
Step 1. Deactivate the Standard Workflow Scenario
- Launch the SAP Fiori App “Manage Workflows for General Journal Entry Verification”.
- Deactivate the standard App which appears by default

Step 2. Create Workflow Scenario 1 – Company Code 1004 with Amount threshold
- In SAP Fiori App “Manage Workflows for General Journal Entry Verification”, click on the ‘Add’ button at the top and proceed as shown in the images below.

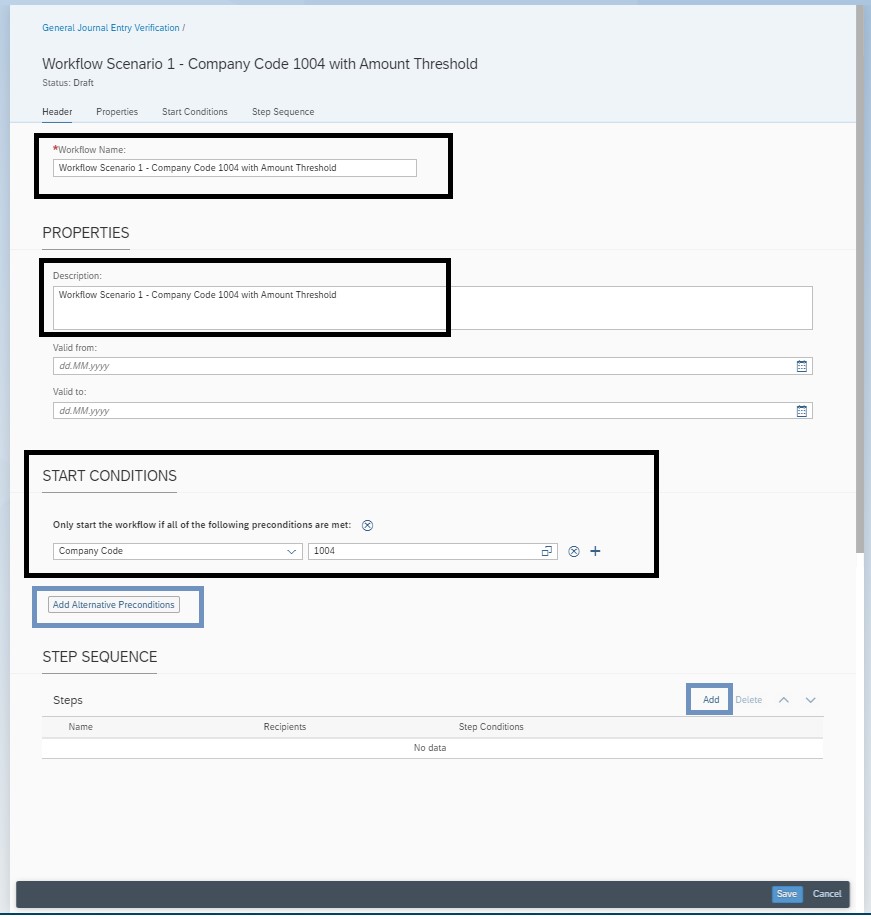
- Define a Workflow name and add a description.
- In ‘Start Conditions’ section, make this workflow scenario specific to Company Code 1004
- Alternative preconditions can be added here (an OR scenario), but in this example we are not using it for sake of simplicity
- Proceed to add ‘Step Sequence’
- Assign a step name
- Choose the Step Type “Verify General Journal Entry”. Please note, the step types are preconfigured in the system and available to choose from. The rest of the input options on the screen appear based on the Step Type selected.
- In ‘Assignment By’ select ‘Role’ and from the ‘Role’ dropdown, select ‘General Journal Entry Verification Level 1’ (you can refer to my previous blog for more details on the Roles set up)
- Leave the Step Condition section blank for this Step
- Configure the exception handling as shown in the image below.

- The following screenshot illustrates the various ‘Step Types’ that we can choose from and the various ‘Roles’ that either appear by default or have been configured in the system.

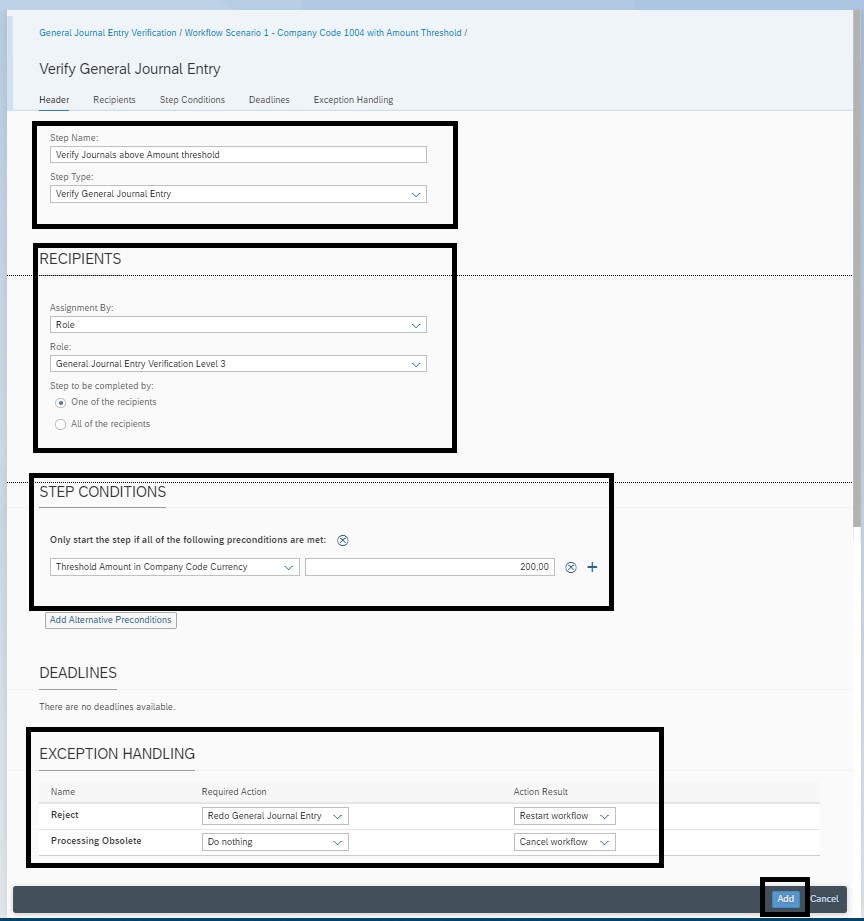
- Continue to add another step, this time with an amount threshold. This next step would prompt a second level of approval if the amount in the journal is above a certain threshold.
- Assign a step name
- Choose the Step Type “Verify General Journal Entry”. Please note, the step types are preconfigured in the system and available to choose from. The rest of the input options on the screen appear based on the Step Type selected.
- In ‘Assignment By’ select ‘Role’ and from the ‘Role’ dropdown, select ‘General Journal Entry Verification Level 3’. This assignment is different to the assignment in the previous step. In other words, the second level of review request would be sent to a different individual or group of people.
- In the Step Condition section, select “Threshold Amount in Company Code Currency” from the dropdown and assign an amount for the threshold definition.
- Configure the exception handling as shown in the image below
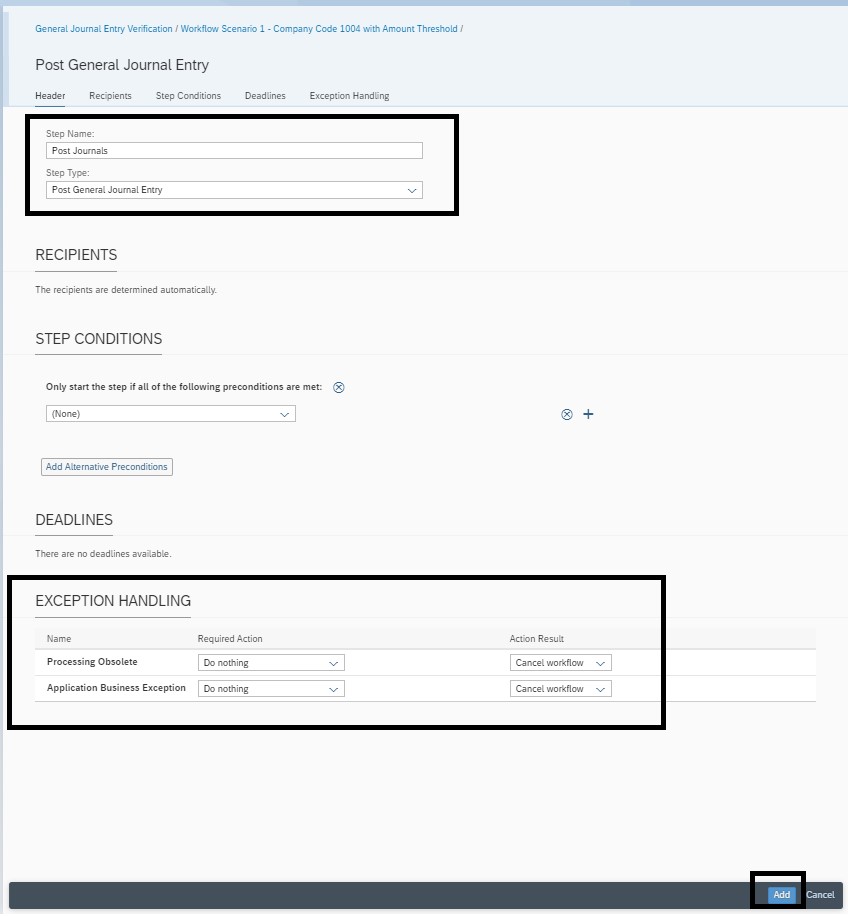
- Continue to add a final step, this time for document posting.
- Assign a step name
- Choose the Step Type “Post General Journal Entry”. Please note, the step types are preconfigured in the system and available to choose from. The rest of the input options on the screen appear based on the Step Type selected.
- This step does not require an agent assignment as we instruct this step to post a journal in the S/4HANA system on approval.
- Leave the step condition blank.
- Configure the exception handling as shown in the image below
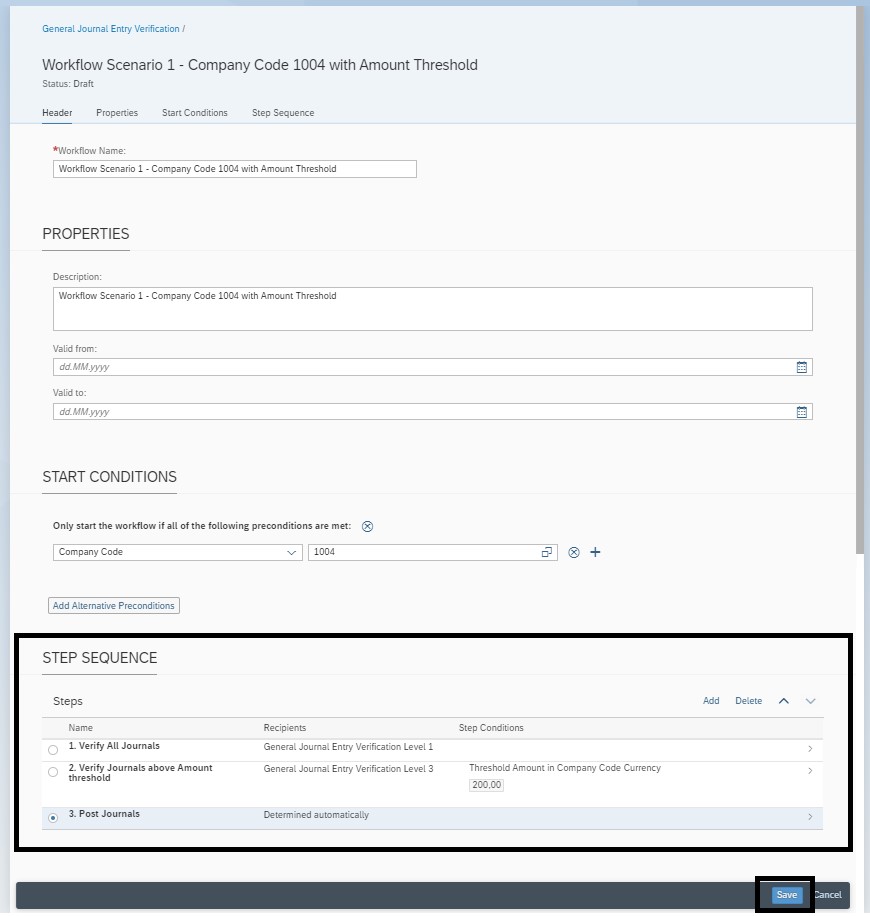
- At this stage, the first workflow scenario is defined.
- We have defined three steps, as can be seen in the image below.
- Click on Save.
- The Workflow scenario would only work after we activate it. Click on the Activate button.
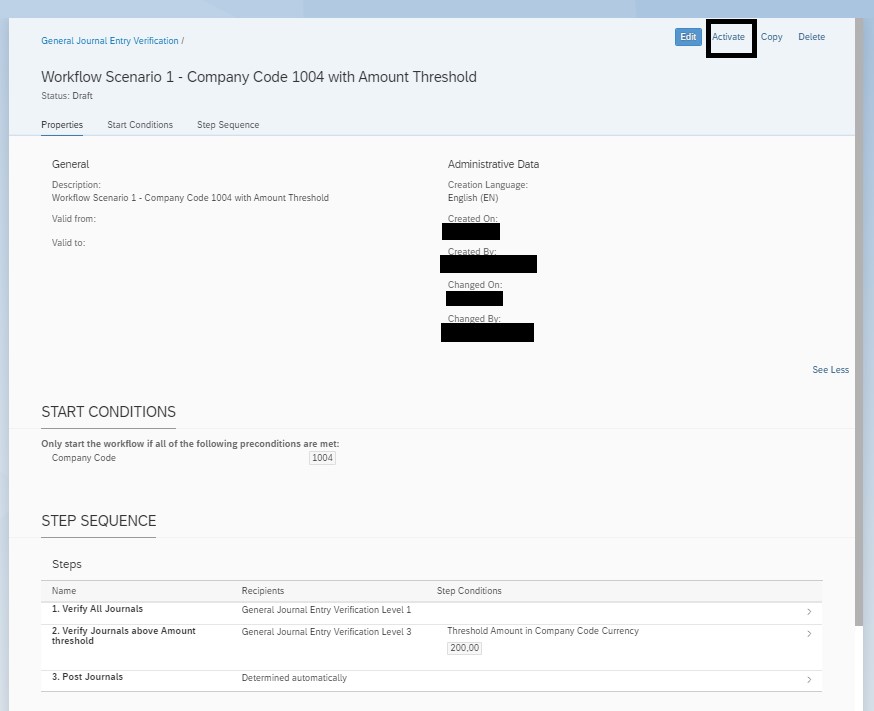
- Workflow Scenario 1 for Company Code 1004 with Amount Threshold has now been defined and activated.

- Before we define the remaining Workflow scenarios, let us take a quick look at some of the variations which we could have played with.
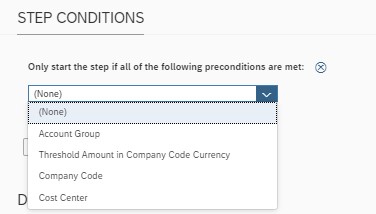
- As a Step Condition, we could select from a list of “Account Group”; “Threshold Amount in Company Code Currency”, “Company Code” or “Cost Centre”
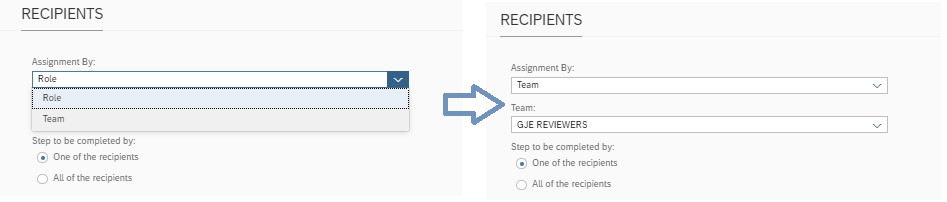
- For Recipient, instead of a Role, we could define a Team, which is managed using the “Manage Teams and Responsibilities for General Journal Entry Verification” app
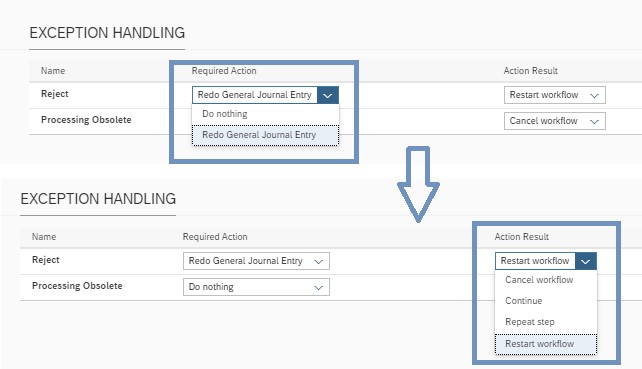
- In Exception handling, the required action and action result can be selected from the system predefined options.
- However, in this blog, we would not discuss these in any more details, and continue with the remaining Workflow Scenario set up.
Step 3. Create Workflow Scenario 2 – Company Code 1006 with Amount threshold
- This Workflow Scenario, for Company Code 1006, is expected to be very similar to that defined above for Company Code 1004. And thus, we would select the “Copy” option rather than creating a new Scenario.
- In SAP Fiori App “Manage Workflows for General Journal Entry Verification”, select Workflow Scenario 1 and click on the ‘Copy’ button at the top.

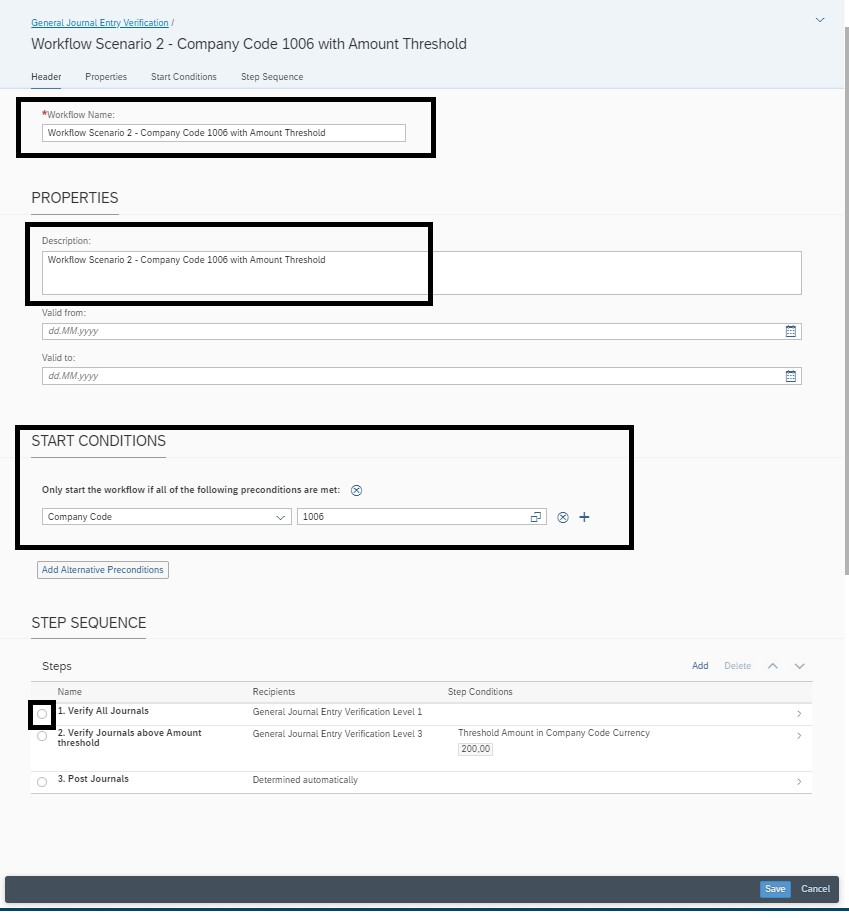
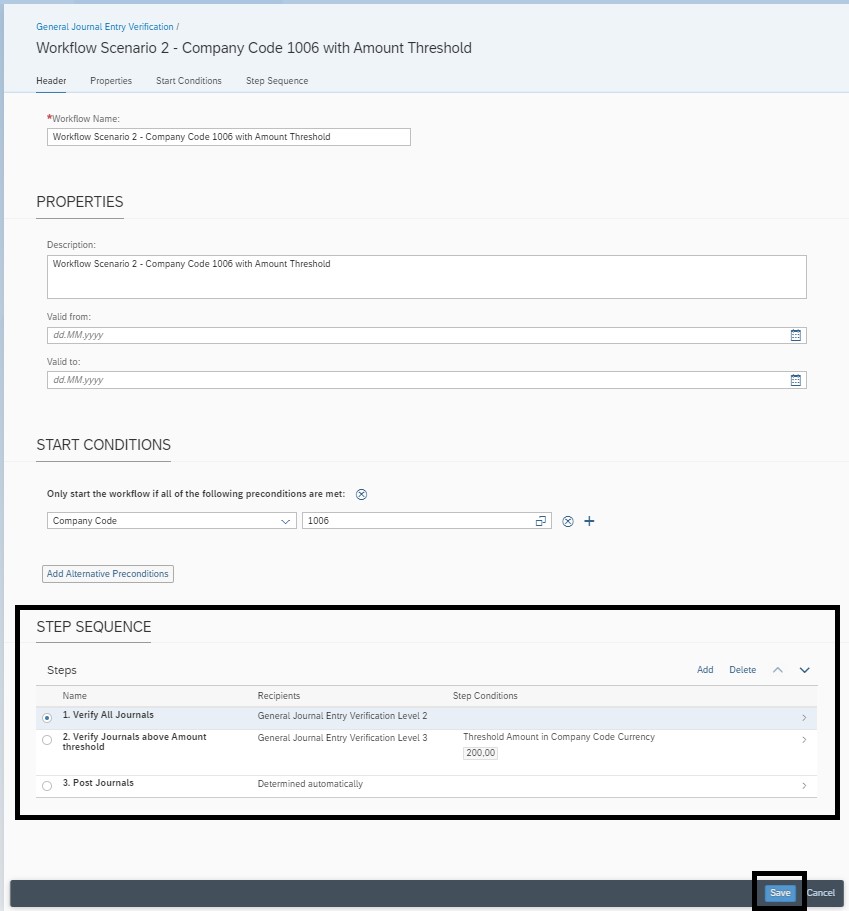
- Define a Workflow name and add a description.
- In ‘Start Conditions’ section, make this workflow scenario specific to Company Code 1006.
- Alternative preconditions can be added here (an OR scenario), but in this example we are not using it for sake of simplicity
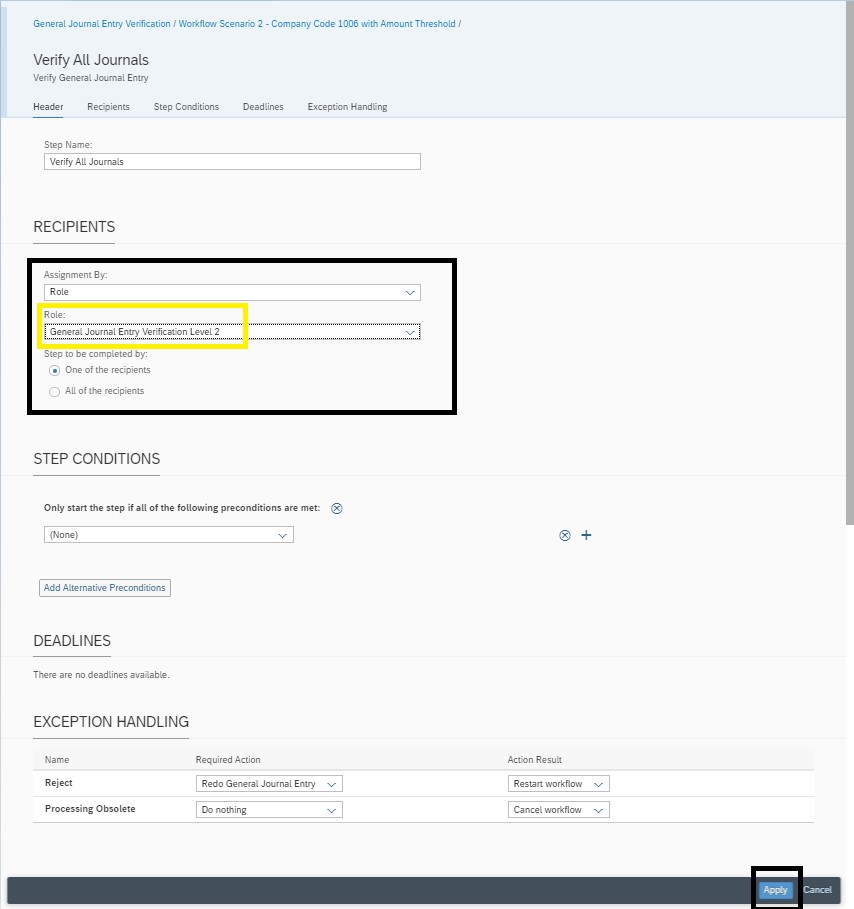
- Proceed to modify the steps in ‘Step Sequence’ section – Click on the first step in the sequence.
- Since we have copied from another scenario, the step name and step type would appear preselected.
- In ‘Assignment By’ select ‘Role’ and from the ‘Role’ dropdown, select ‘General Journal Entry Verification Level 2’ . Please note, this is different to the Role we selected for Company Code 1004 Level 1 verification.
- Leave the Step Condition section blank for this Step
- Leave the exception handling section unchanged and click on Apply.
- As described in the Business Requirement section, after the first level of approval, the process for both Company Code 1004 and 1006 are expected to be similar and the second level of approval would be owned by the same individual or group of people for both the company codes, for the exact amount threshold. Thus, we would not make any changes to the second and final steps in the sequence copied.
- Click on ‘Save’ to proceed.
- The Workflow scenario would only work after we activate it. Click on the Activate button.
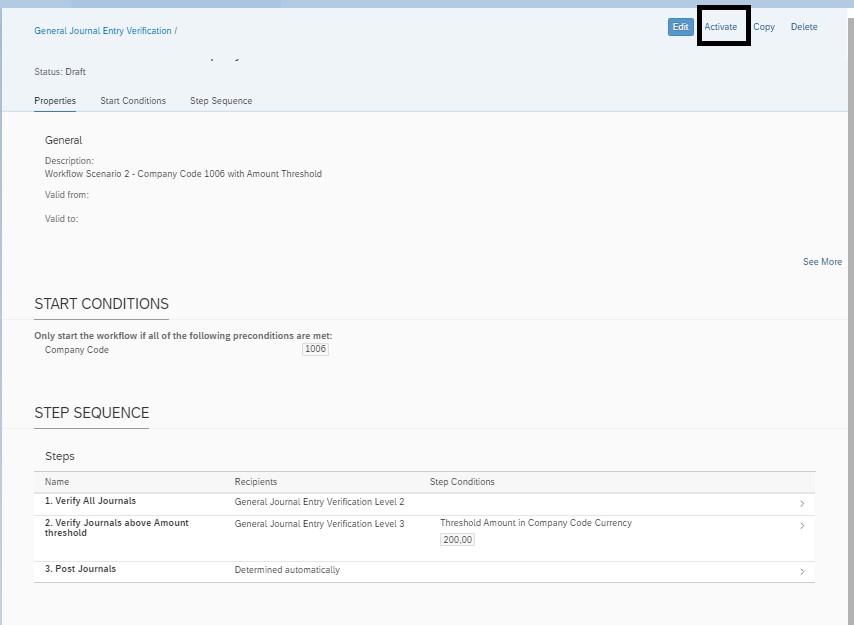
- Workflow Scenario 2 for Company Code 1006 with Amount Threshold has now been defined and activated.
Step 4. Create Workflow Scenario 3 – Post Journals
- As described in the Business Requirement, for journals that are created for all other Company Codes, apart from 1004 and 1006, no review or approval is necessary. In other words, those journals can post directly in the system without being parked.
- This final Workflow Scenario would take care of all those ‘Other’ cases that do not find themselves matching the conditions defined in Workflow Scenarios 1 and 2.
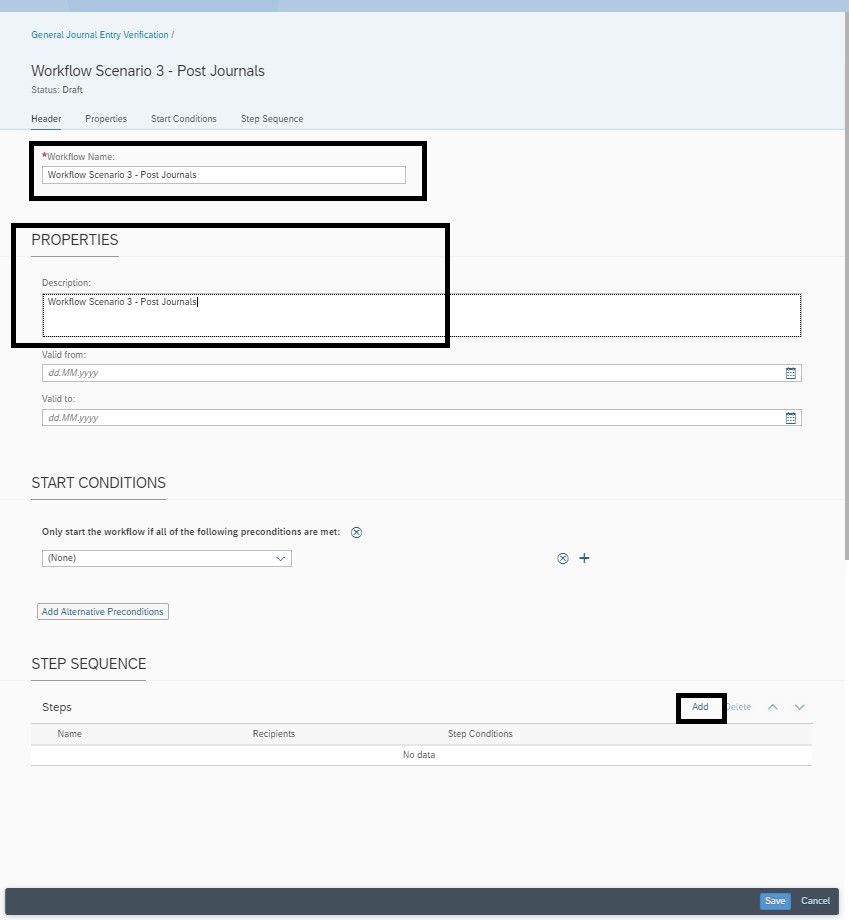
- In SAP Fiori App “Manage Workflows for General Journal Entry Verification”, click on the ‘Add’ button at the top and proceed as shown in the images below.
- Define a Workflow name and add a description.
- In ‘Start Conditions’ section, do not assign any preconditions.
- Proceed to add ‘Step Sequence’
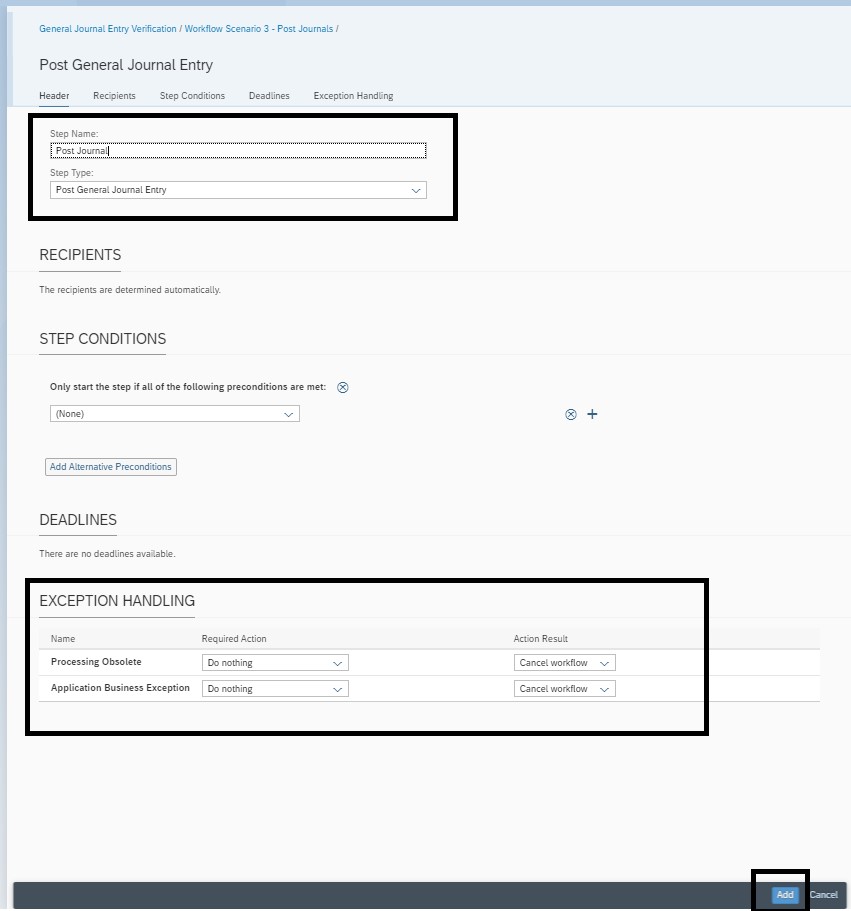
- Assign a step name
- Choose the Step Type “Post General Journal Entry”. Please note, the step types are preconfigured in the system and available to choose from. The rest of the input options on the screen appear based on the Step Type selected.
- This step does not require an agent assignment as we instruct this step to post a journal in the S/4HANA system directly.
- Leave the step condition blank.
- Configure the exception handling as shown in the image below
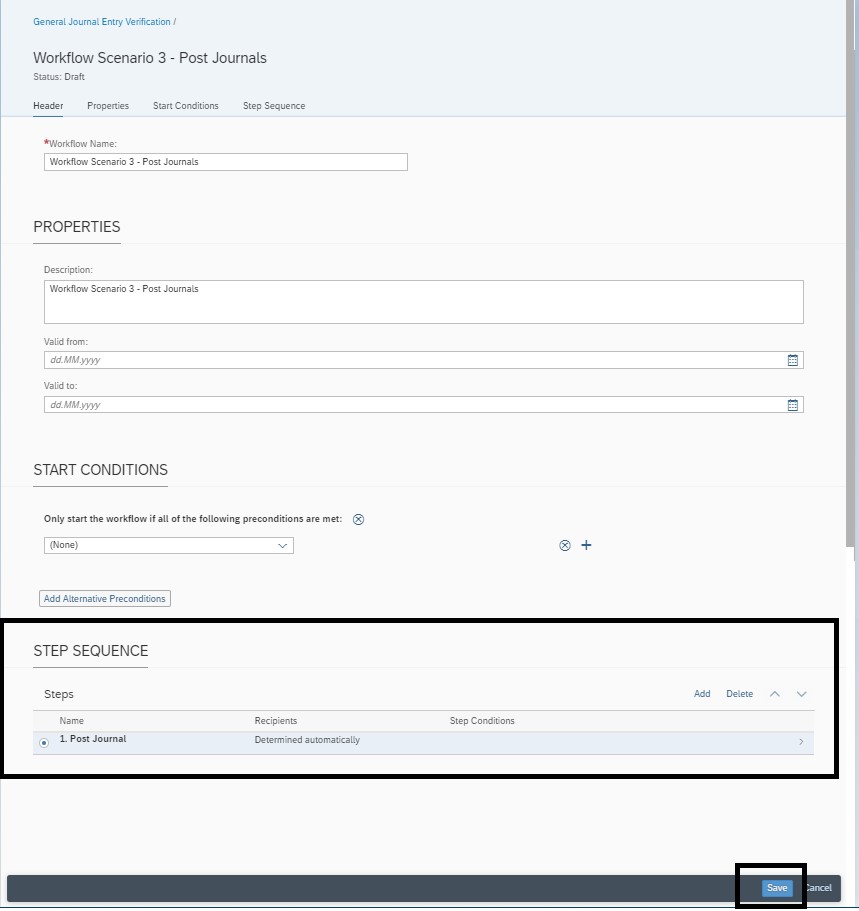
- This scenario requires only one step, i.e., post journals. Click on ‘Save’ to proceed.
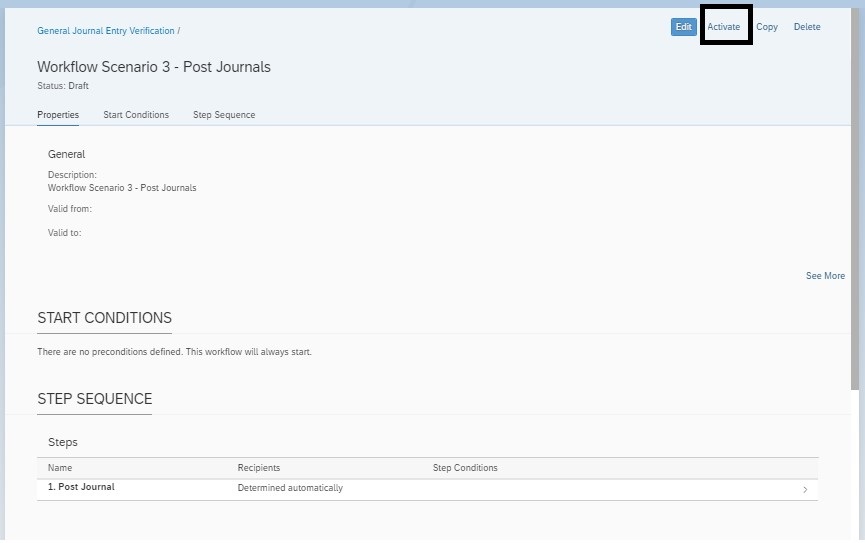
- The Workflow scenario would only work after we activate it. Click on the Activate button.
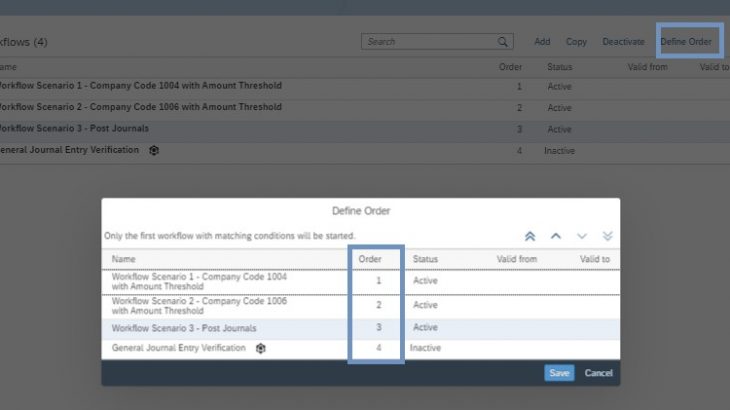
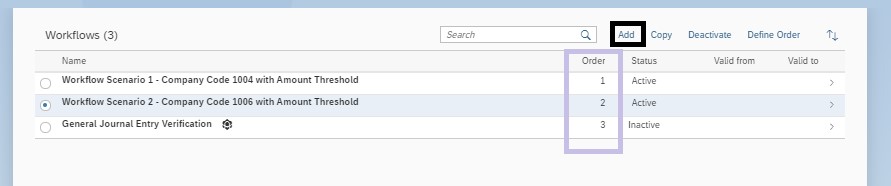
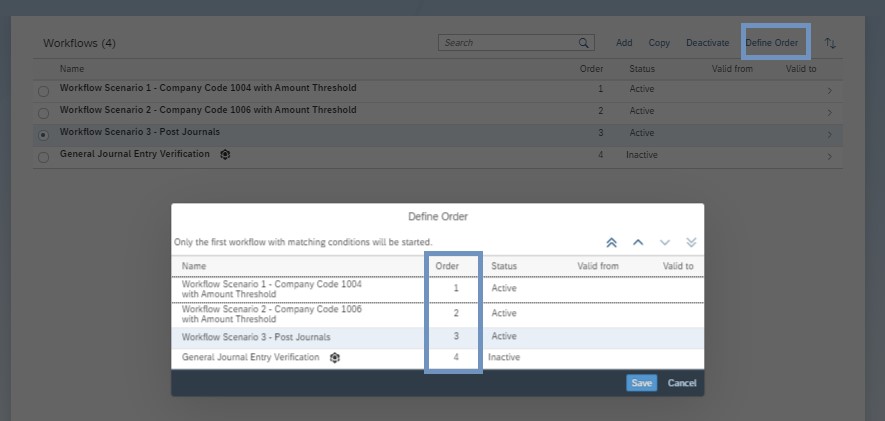
- With this step, we have now activated all 3 Workflow Scenarios that we need to meet the Business Requirement.
- Please note, each of them have a number assigned in the ‘Order’ column. This means that whenever a journal is created using the “Verify General Journal Entries” App, these scenarios would be executed in that exact order defined to identify which scenario resonates with the data in the journal.
- We can use the “Define Order” button to change the order of these Workflow Scenarios.
- Once a Workflow Scenario is activated, we can deactivate it and then delete it, but we cannot modify it. To modify, please use the Copy option and then add your modifications. Before you activate your modified workflow scenario, make sure you deactivate the one you no longer need.

Step 5. Define Teams and Responsibilities
- Now that the Workflow scenarios have been defined, the last configuration step is to set up the relevant responsibilities and functions so that the Approval workflow recipient can be identified.
- For this, we would need the Fiori App called “Manage Teams and Responsibilities for General Journal Entry Verification”.
- Basics of this app have been described in my previous blog in Step 4.
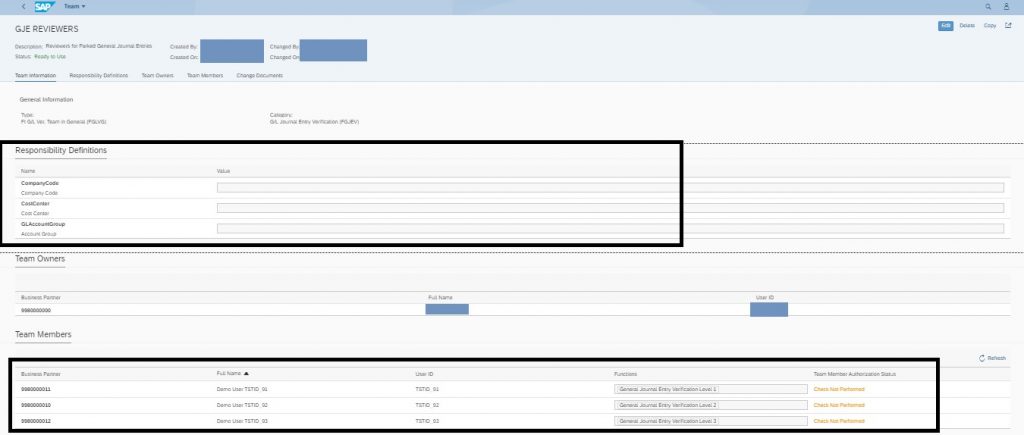
- In continuation to that, we would modify the Team called ‘GJE REVIEWERS’.

- We do not want any further preconditions assigned at the Team level, so leave the ‘Responsibility Definition’ section blank.
- In the screenshot below, we can see we have assigned one function each to three separate Business Partners / User IDs. These are:
| User ID | User Purpose | Assigned Function |
| TSTID_91 | Level 1 Reviewer for Company Code 1004 | General Journal Entry Verificaton Level 1 |
| TSTID_92 | Level 1 Reviewer for Company Code 1006 | General Journal Entry Verificaton Level 2 |
| TSTID_93 | Level 2 Reviewer for both Company Codes | General Journal Entry Verificaton Level 3 |
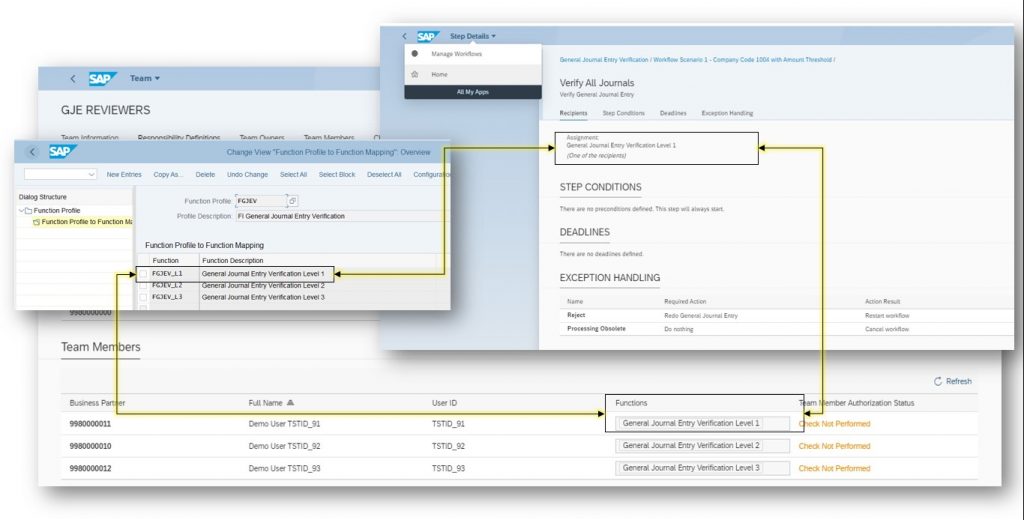
- The following image shows how a link is established between a Function assigned in the Team and also in the Workflow Scenario Agent assignment. These Functions would first have to be configured in the ‘Responsibility Management’ node (in SPRO) in the Backend.
Results
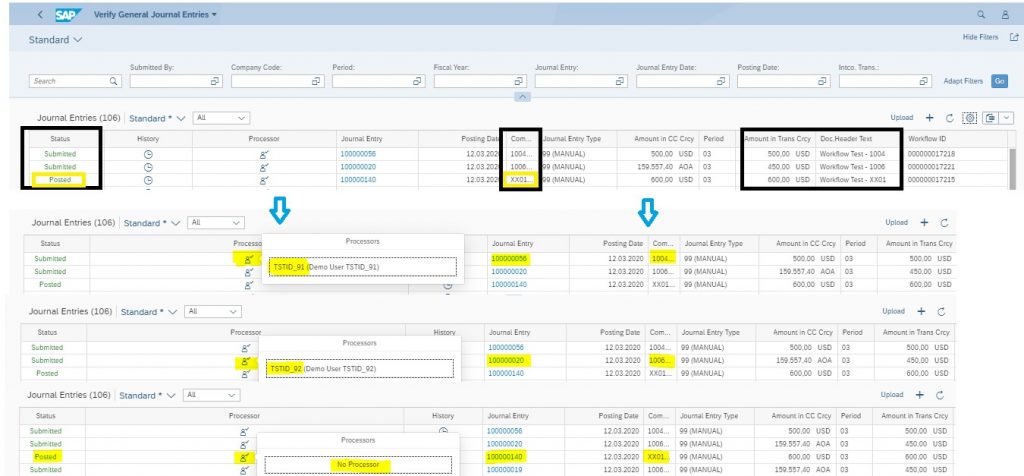
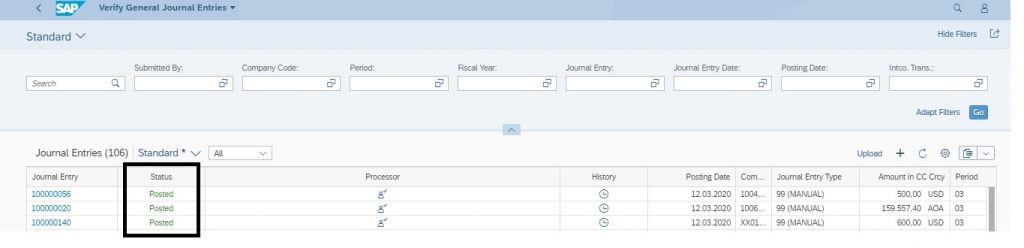
- To test out the configurations above, we created three journals, one each for Company Code 1004, 1006 and XX01.
- Journal Entry 100000056, created for Company Code 1004 for an amount over 200 (Company Code Currency), initiated an approval workflow. It was sent to User A (TSTID_91) for review. This agent determination happened in Step 1 – Workflow Scenario 1.
- Journal Entry 100000020, created for Company Code 1006 for an amount over 200 (Company Code Currency), initiated an approval workflow. It was sent to User B (TSTID_92) for review. This agent determination happened in Step 1 – Workflow Scenario 2.
- Journal Entry 100000140, created for Company Code XX01 for an amount over 200 (Company Code Currency), did not initiate any approval workflow. It was posted directly to the ledger. This follows the rules set in Step 1 – Workflow Scenario 3.
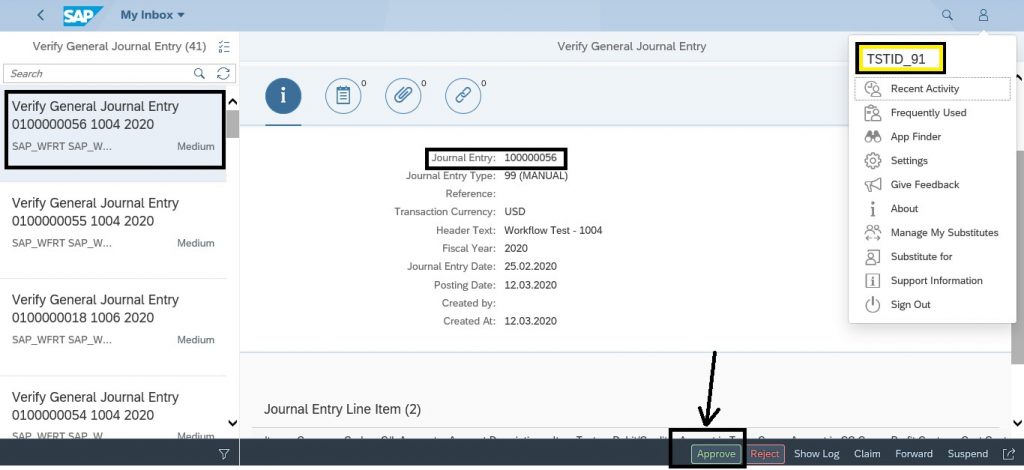
- We logged into User A (TSTID_91) and we found Journal Entry 100000056 pending a review.
- We used the Fiori App “Verify General Journal Entries – For Processor (Inbox)”. You can also use the “My Inbox” Fiori App.
- We approved the Journal using the “Approve” button at the bottom of the screen.
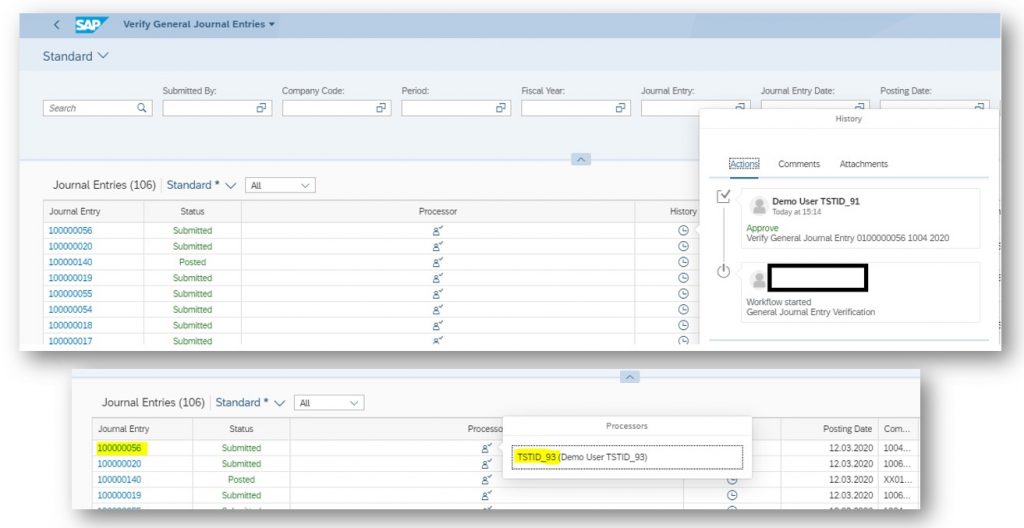
- Navigating back to the Fiori App “Verify General Journal Entries – For Requester”, we found that the journal was not posted, rather sent to User C (TSTID_93) for another round of review. This agent determination happened in Step 2 – Workflow Scenario 1.
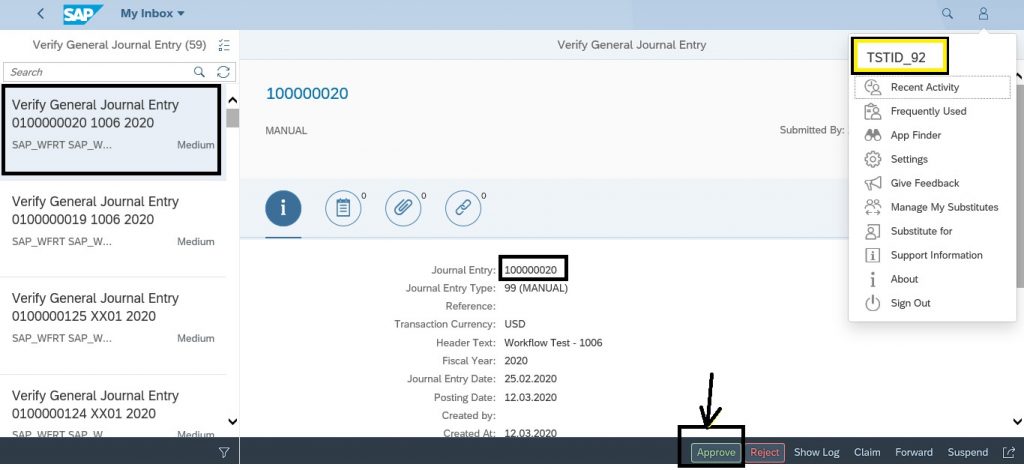
- We logged into User B (TSTID_92) and we found Journal Entry 100000020 pending a review.
- We used the Fiori App “Verify General Journal Entries – For Processor (Inbox)”. You can also use the “My Inbox” Fiori App.
- We approved the Journal using the “Approve” button at the bottom of the screen.
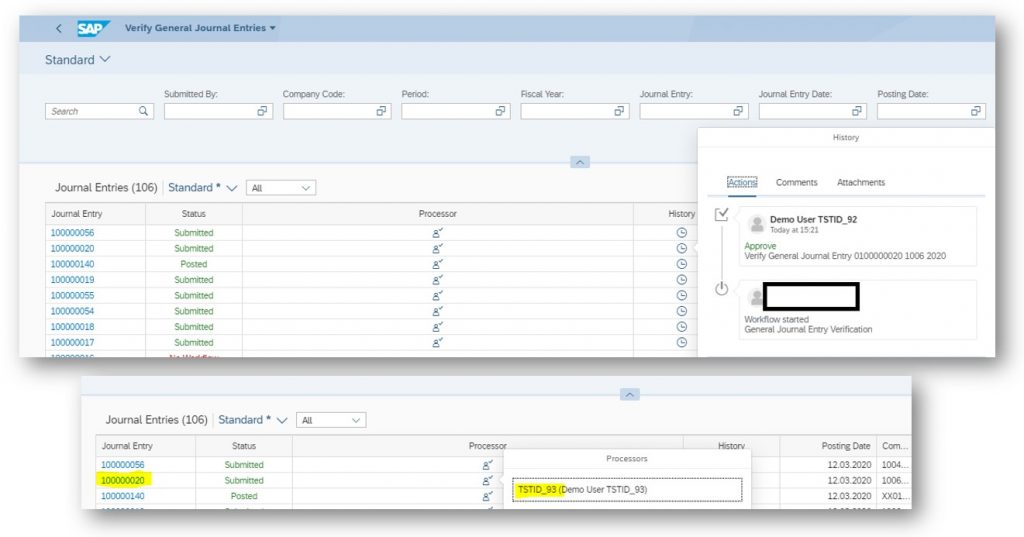
- Navigating back to the Fiori App “Verify General Journal Entries – For Requester”, we found that the journal was not posted, rather sent to User C (TSTID_93) for another round of review. This agent determination happened in Step 2 – Workflow Scenario 2.
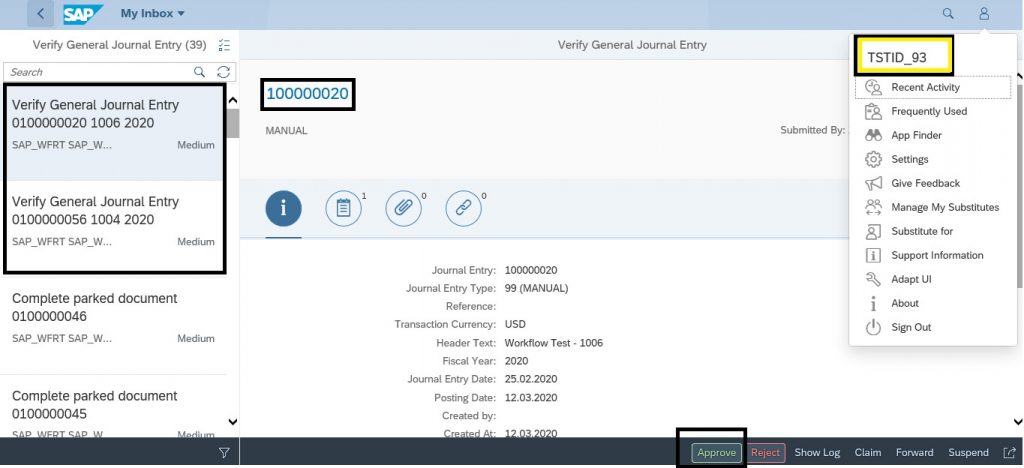
- Finally we logged into User C (TSTID_93) and we found Journal Entry 100000056 and 100000020 pending a review.
- We used the Fiori App “Verify General Journal Entries – For Processor (Inbox)”. You can also use the “My Inbox” Fiori App.
- We approved both Journals using the “Approve” button at the bottom of the screen.
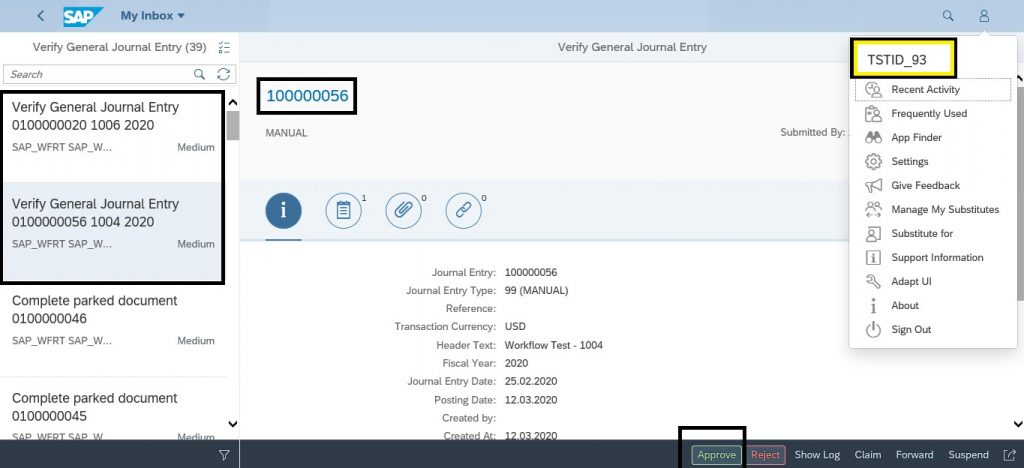
- Both journals were finally posted to the ledger after 2 rounds of reviews. These follow the rules set in Step 3 – Workflow Scenarios 1 and 2.
- Reject: Rejecting the workflow would mean it would return to the initiator / requester (or based on how the Exception handling has been set in the Workflow Scenario Steps)
- Claim: Claiming the workflow would mean it would disappear from the inbox of other reviewers, in case there were more than one.
- Forward: We can forward a workflow to another agent for review using this button
- Suspend: We can suspend a workflow up until a certain date
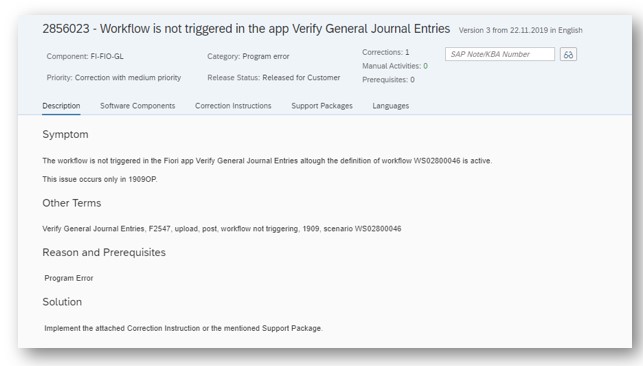
Please Note: There is a possibility that after you have set up the Workflow Scenarios as described above, the workflow would fail to find the right approver for a certain company code. You might find that no workflow is generated at all in some instances. It might be worth checking if you need the following OSS Note implemented on your support package level.