Introduction
With S/4HANA 1709, the “Verify General Journal Entries” Apps were introduced. There are three apps, as follows:
- App ID F2547: Verify General Journal Entries – For Requester
- App ID F2728 :Verify General Journal Entries – For Processor (Inbox)
- App ID F2729: Verify General Journal Entries – For Processor (Outbox)
The process is driven by Standard Workflow Scenario WS02800046, where, the first step is for a ‘Requester’ to submit a document for review (Journal created as Parked) and the next step is for the Processor / Reviewer to approve or reject the document (approved journals get converted from Parked to Posted).
Also Read: SAP S/4HANA Financials Professional Certification Preparation Guide
However, with S/4HANA 1909, the process of identifying ‘Processor’ or ‘Reviewer’ of the Journal changes. In S/4HANA 1709 and 1809 releases, the Processor was identified based on Rule 02800011 (FDC_GLJE_VER) maintained using Fiori App “Define Responsibilities” or with SAP Transaction Code FDC_ACC_VER_RESP. In S/4HANA 1909, the concepts of “Responsibility Management” using Functions, Function Profiles and Teams are introduced and the ‘Processor’ or ‘Reviewer’ is maintained using the “Manage Team and Responsibilities” App.
- Workflow Process: From Requester to Processor

This is the first blog in what should later shape up into a series. This first blog provides details of various configuration points and steps to enable the standard “Verify General Journal Entries” process in S/4HANA 1909. The next blogs in this series would explore possibilities of enhancing and extending the standard workflow to meet Business needs.
Configuration Details
Here are the steps to follow to set up the ‘standard’ process for SAP delivered ‘one-step’ approval workflow for verifying G/L Journal Entries. While the SAP Help Document for S/4HANA 1909 is pretty detailed, here we share some additional information about system set up, which we came across while implementing it in our S/4HANA 1909 environment.
- Apps Required: The following apps need to be activated
Please activate the following apps, i.e.:
- Activate the SICF Path
- Activate the OData Services
- Manage Business Catalog and Business Groups
- Assign Fiori App Target Mapping (Semantics) where applicable
Steps to set up the Workflow
Step 1. Configurations (SPRO) in the Front End Fiori Server
A. Set up Scenario Definition in the Front-end Server
- Navigate to SPRO Path: SAP NetWeaver > Gateway Service Enablement > Content > Task Gateway > Task Gateway Service > Scenario Definition.

- Click New Entries and provide the following values:
Scenario Identifier: FI_GLJE_VER
Scenario Display Name: Verify General Journal Entry
Service: /IWPGW/TASKPROCESSING
Version: 2
EntitySet External Name: Task
Property External Name: TaskDefinitionID
Default Sort by Property: CreatedOn
MassAction: True (X)

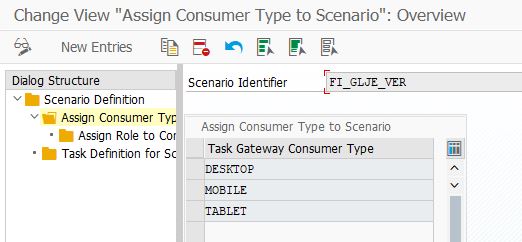
- Select the row of the newly added scenario and double-click Assign Consumer Type to Scenario in the left pane. Click New Entries and provide the following values:
DESKTOP
MOBILE
TABLET
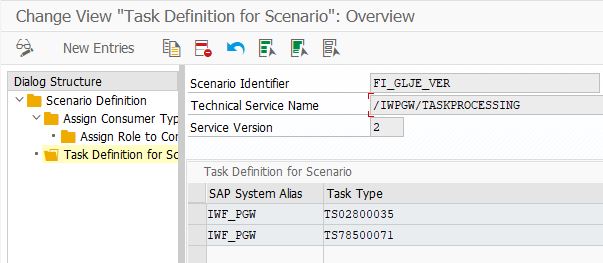
- Select the row of the newly added scenario and double-click Task Definition for Scenario in the left pane.
Provide the following values in two lines:
– SAP System Alias: [The system alias to the back-end system with software version /IWPGW/BWF]
– Task Type: TS02800035 and TS78500071
- Save the changes.
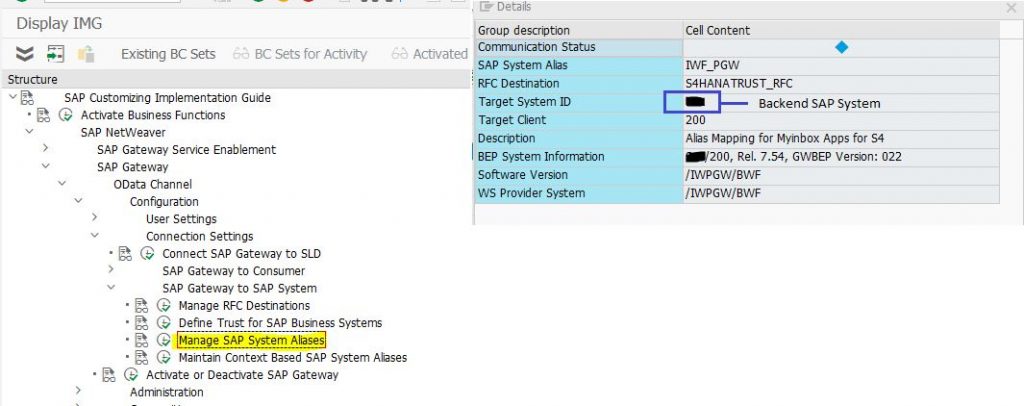
Please Note: ‘IWF_PGW’ in the example above was defined in SPRO path: SAP NetWeaver > SAP Gateway > OData Channel > Configuration > Connection Settings > SAP Gateway to SAP System > Manage SAP System Aliases
Please Note: In the example above, Task TS02800035 is for ‘Verify General Journal Entry’ in Workflow Scenario WS02800046 Step 10 and Task TS78500071 is for ‘Verify Intercompany General Journal Entry’ in Workflow Scenario WS02800046 Step 50.
Step 2. Configurations (SPRO) in the Back End S/4HANA 1909 Server
A. Steps of Maintaining Task Names and Decision Options
- Navigate to SPRO Path: SAP NetWeaver > Gateway Service Enablement > Content > Workflow Settings > Maintain Task Names and Decision Options.
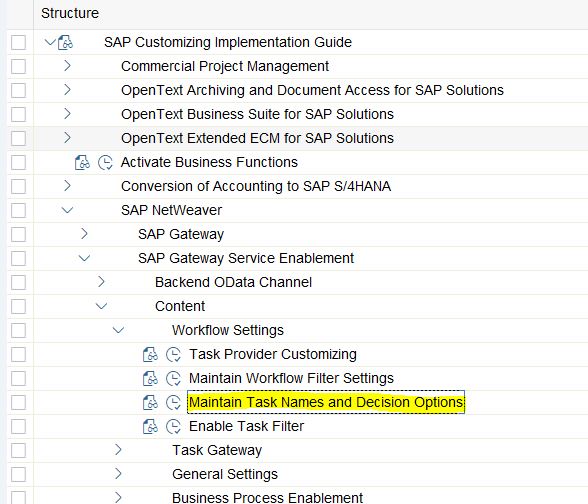
- Maintain Task Names and Decision Options. Click New Entries and provide the following values:
New Entry 1:
Workflow ID: WS02800046
Step ID: 000010
Step Description: Verify G/L Journal Entry
New Entry 2:
Workflow ID: WS02800046
Step ID: 000050
Step Description: Verify Intercompany General Journal Entry
Save the changes.

- Select the newly created entries, and double-click Decision Keys. Repeat for both new entries, i.e., for WF Step 10 and 50.Create two keys with the values as follows:
| Key | Icon MIME Repository Path | Decision text | Comment | Nature |
| 1 | (Empty) | Approve | (Empty) | Positive |
| 2 | (Empty) | Reject | (Select Checkbox) | Negative |

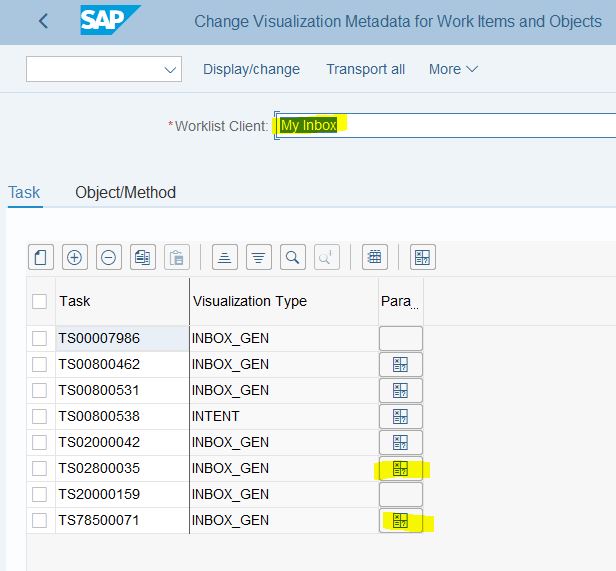
B. Steps for Adding Visualization Parameters
- Navigate to SPRO Path: SAP NetWeaver > Application Server > Business Management > SAP Business Workflow > Visualization of SAP Business Workflow Metadata > Client-Dependent Configuration .
Select My Inbox for the Worklist Client field –
Create an entry with the following values:
Task: TS02800035
Visualization Type: INBOX_GEN
Click Parameters icon in this newly created line and provide the following values and Save your changes.
| Parameter Name | Visualization Parameter Value… |
| SCHEME | sapui5 |
| APPLICATION_PATH | (Empty) |
| COMPONENT_NAME | cross.fnd.fiori.inbox.annotationBasedTaskUI |
| QUERY_PARAM00 | data=/sap/opu/odata/SAP/FAC_GL_JOURNALENTRY_VER_SRV;x=sid({SYSTEM}.{CLIENT})/C_GLJrnlEntryToBeVerified(CompanyCode='{&FI_GLJEVER.AUSBK&}’, AccountingDocument='{&FI_GLJEVER.BELNR&}’,FiscalYear='{&FI_GLJEVER.GJAHR&}’) |
| QUERY_PARAM01 | annotations=/sap/opu/odata/IWFND/CATALOGSERVICE;v=2/Annotations (TechnicalName=’FAC_GL_JOURNALENTRY_VER_ANNO_MDL’,Version=’0001′)/$value |
Save your changes.
Repeat step 1 and step 2, and then create an entry with the following values:
Task: TS78500071
Visualization Type: INBOX_GEN
Click Parameters icon in this newly created line and provide the following values Save your changes.
| Parameter Name | Visualization Parameter Value… |
| SCHEME | sapui5 |
| APPLICATION_PATH | (Empty) |
| COMPONENT_NAME | cross.fnd.fiori.inbox.annotationBasedTaskUI |
| QUERY_PARAM00 | data=/sap/opu/odata/SAP/FAC_GL_JOURNALENTRY_VER_SRV;x=sid({SYSTEM}.{CLIENT})/C_GLJrnlEntryToBeVerified(CompanyCode='{&AUSBK&}’, AccountingDocument='{&BELNR&}’,FiscalYear='{&GJAHR&}’) |
| QUERY_PARAM01 | annotations=/sap/opu/odata/IWFND/CATALOGSERVICE;v=2/Annotations (TechnicalName=’FAC_GL_JOURNALENTRY_VER_ANNO_MDL’,Version=’0001′)/$value |
C. Steps of Customizing Teams and Responsibilities
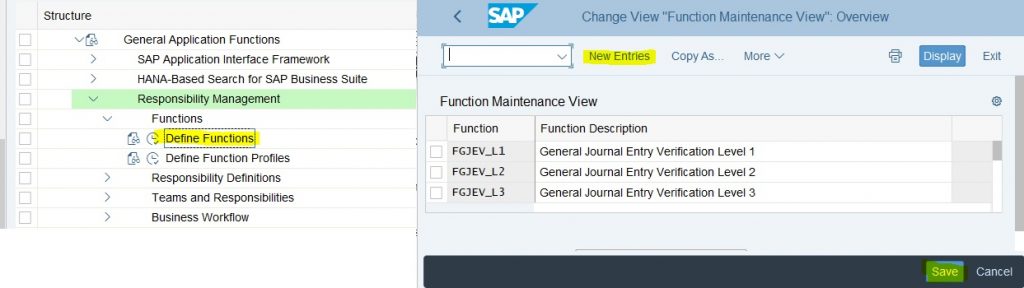
- Define Functions
- Navigate to SPRO Path: Cross-Application Components > Application Server > General Application Functions > Responsibility Management > Functions > Define Functions.
Create three entries with the following values and save changes
Function Function Description
FGJEV_L1 General Journal Entry Verification Level 1
FGJEV_L2 General Journal Entry Verification Level 2
FGJEV_L3 General Journal Entry Verification Level 3
- Define Function Profiles
- Navigate to SPRO Path: Cross-Application Components > Application Server > General Application Functions > Responsibility Management > Functions > Define Function Profiles.
Create one entry with the following values and save changes
Profile: FGJEV
Function Profile Description: FI General Journal Entry Verification
- Select the newly created entry and double-click Function Profile to Function Mapping. Create three entries with the following values and save changes:
Function Function Description
FGJEV_L1 General Journal Entry Verification Level 1
FGJEV_L2 General Journal Entry Verification Level 2
FGJEV_L3 General Journal Entry Verification Level 3

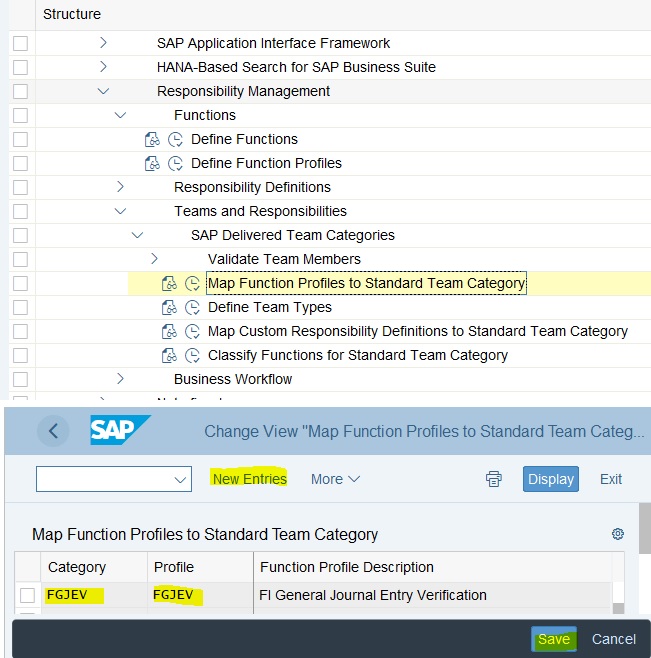
- Map Function Profiles to Standard Team Category
- Navigate to SPRO Path: Cross-Application Components > Application Server > General Application Functions > Responsibility Management > Teams and Responsibilities > SAP Delivered Team Categories > Map Function Profiles to Standard Team Category.
Create one entry with the following values and save changes
Category: FGJEV
Profile: FGJEV
Function Profile Description: FI General Journal Entry Verification
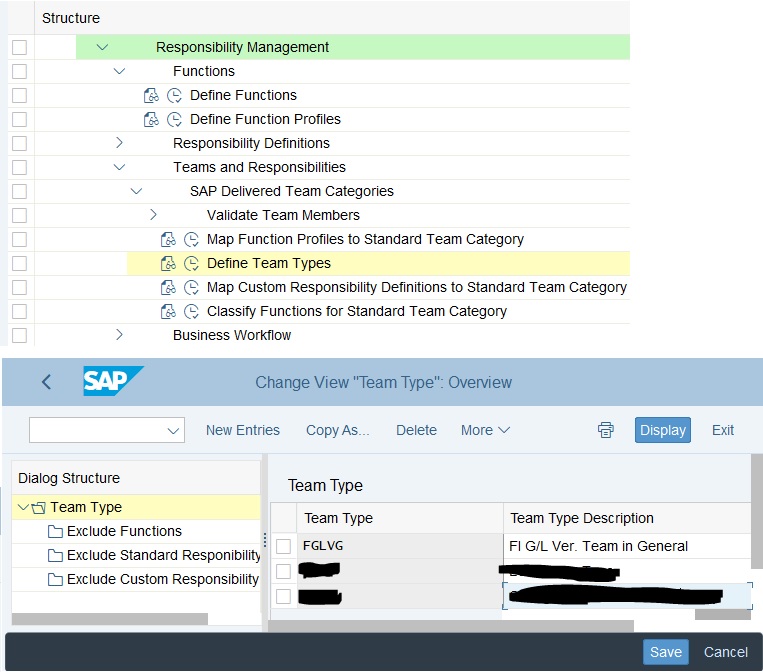
- Define Team Types
- Navigate to SPRO Path: Cross-Application Components > Application Server > General Application Functions > Responsibility Management > Teams and Responsibilities > SAP Delivered Team Categories > Define Team Types.
Create one entry with the following values and save changes
Team Type: FGLVG
Category: FGJEV
Team Type Description: FI G/L Ver. Team in General
Note: The entry created is the default team that is assigned to verify journal entries.
In the section below where the “Manage Teams and Responsibilities” App has been described, the relationships between Function Profile, Functions, team Category and Type have been illustrated.
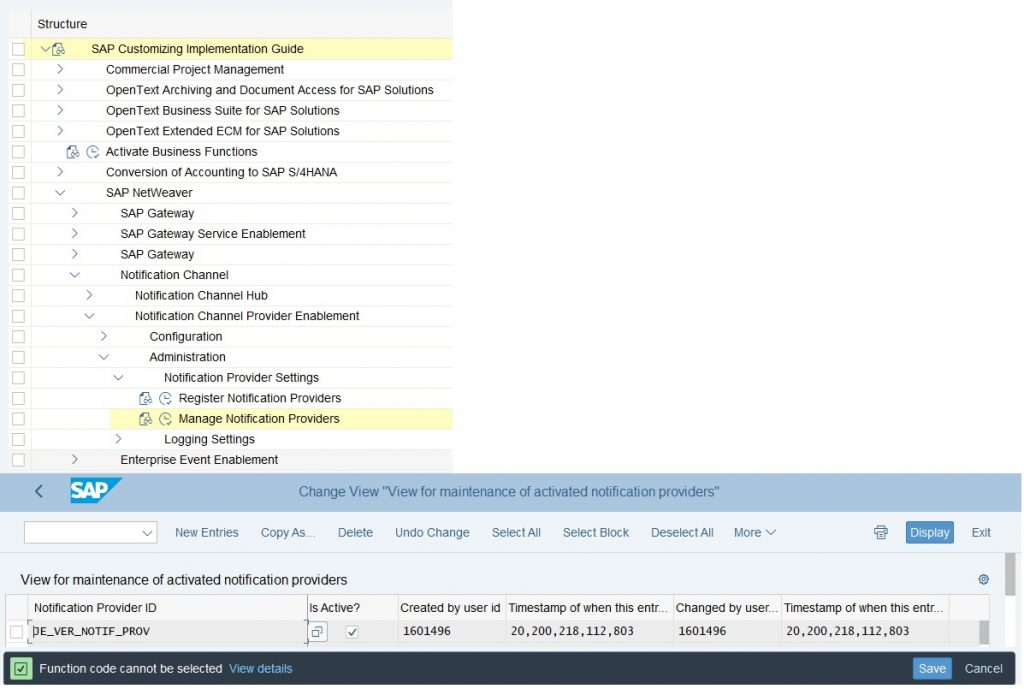
D. Steps of Customizing Notification
- Navigate to SPRO Path: SAP NetWeaver > Notification Channel > Notification Channel Provider Enablement > Administration > Notification Provider Settings > Manage Notification Providers .
Create an entry with the following values and save changes.
Notification Provider ID: JE_VER_NOTIF_PROV
Is Active?: Yes
Step 3. Maintain Employees
As mentioned in the sections above, in S/4HANA 1909, the Workflow recipient is determined by the concept of Teams and Functions managed via the App “Manage Teams and Responsibilities”. Once a Team is created (see Step 4 below for further details), Business Partners can be assigned to the team. However, only those Business Partners can be assigned that have one of the following three roles:
- BUP003 (Employee)
- BBP005 (Service Performer)
- BBP010 (Freelancer)
In S/4HANA, Business Partners cannot be created anymore for these roles above using the App “Manage Business Partner Master Data” or Transaction BP.
This Note provides details of how Business Partners can be created in S/4HANA system with Employee Roles, with or without HR Integration. In this example, we would follow the instructions provided for scenario ‘HR Integration is Inactive’.
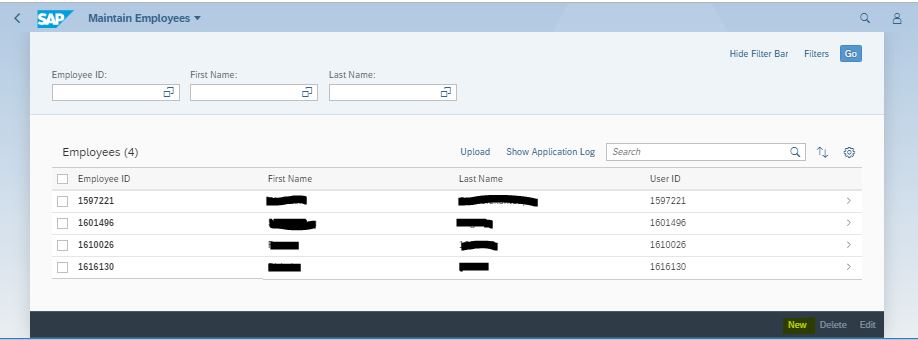
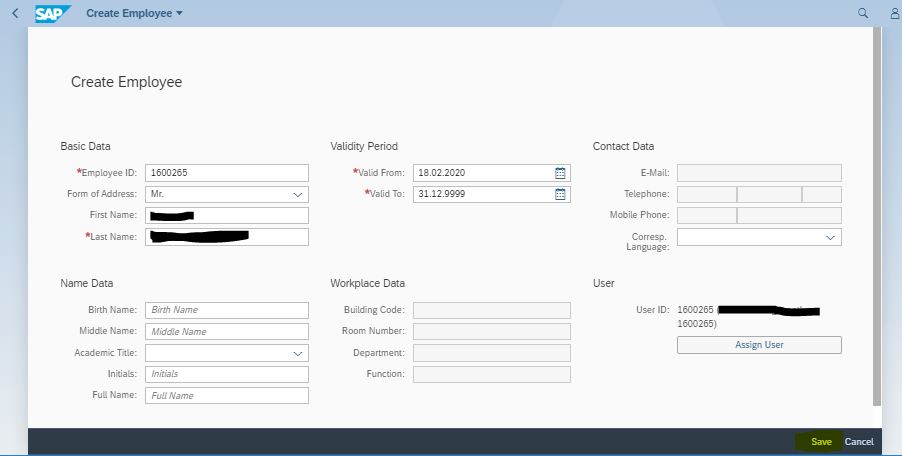
- Launch the “Maintain Employees” App – Click on the button called ‘New’ at the bottom
- Enter the Employee ID, click on the ‘Assign Users’ button. Select from an existing SAP User that needs to be linked with this new Employee. Two more buttons will appear. Select the ‘Copy User Data to Employee Data’ button.
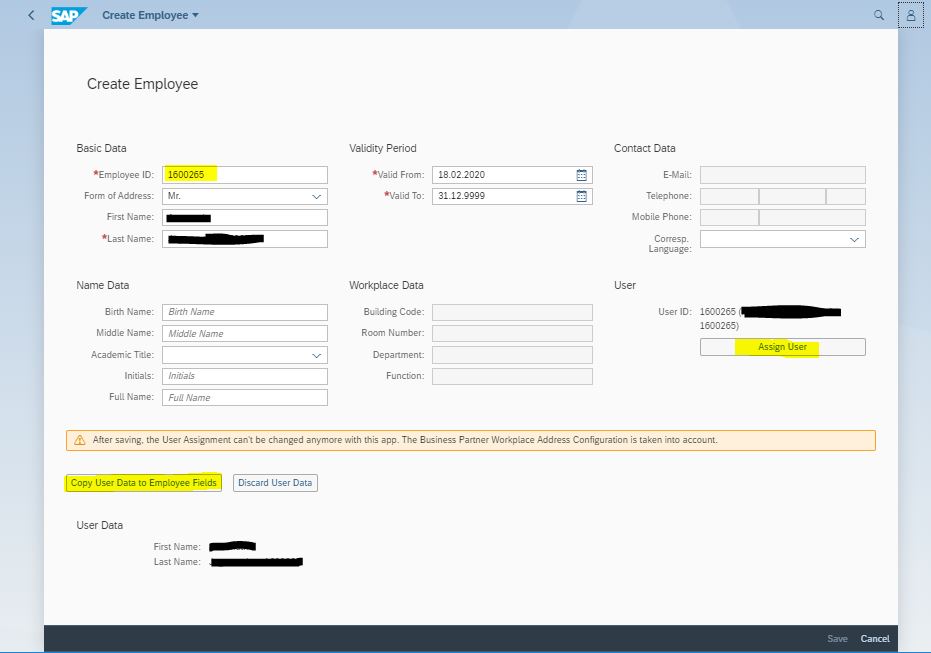
- Click on the ‘Save’ button at the bottom of the screen. If saved successfully, a message will appear at the bottom of the screen. Go back to the main list of Employees.
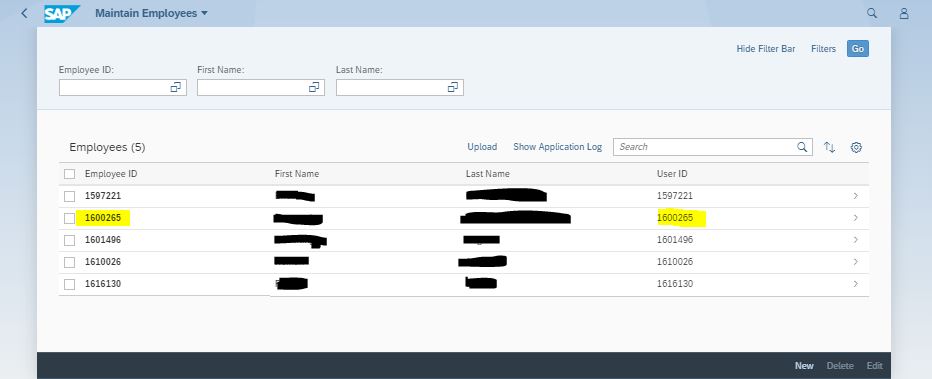
- The New Employee now appears in the list.
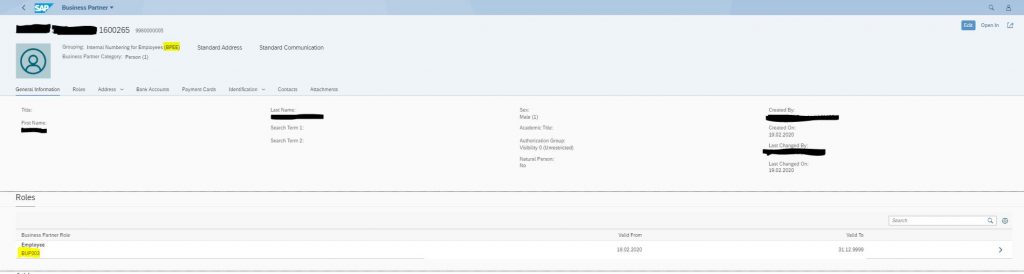
- On the “Manage Business Partner Master Data” App, a new Business Partner can be seen created with Role BUP003 (Employee) attached to it.
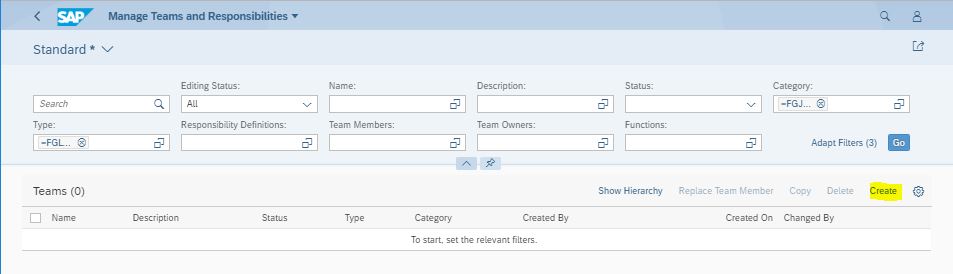
Step 4. Manage Teams and Responsibilities
Once the Employees are created in the system and linked to SAP User IDs, the Teams can be set up where the workflows would land for review and approval. This can be managed by the App “Manage Teams and Responsibilities – General Journal Entries Verification”
- Launch the “Manage Teams and Responsibilities – General Journal Entries Verification” App – Click on the button called ‘Create’ at the right hand side of the screen.
- Create a New Team. Assign a ‘Name’ of your choice, add a ‘Description’, change the ‘Status’ to ‘Ready to Use’, select the value ‘FGLVG’ from the dropdown field ‘Type’. The Team Type FGLVG was configured in Step 2.C above and assigned to Team Category FGJEV. In ‘Responsibility Definition’ add a Company Code, Cost Centre or GL Account Group to restrict the Workflow Team. Then assign a Business Partner as Team Owner and one or more Business Partners as Team Members. Once done, click on ‘Save’ button at the bottom.
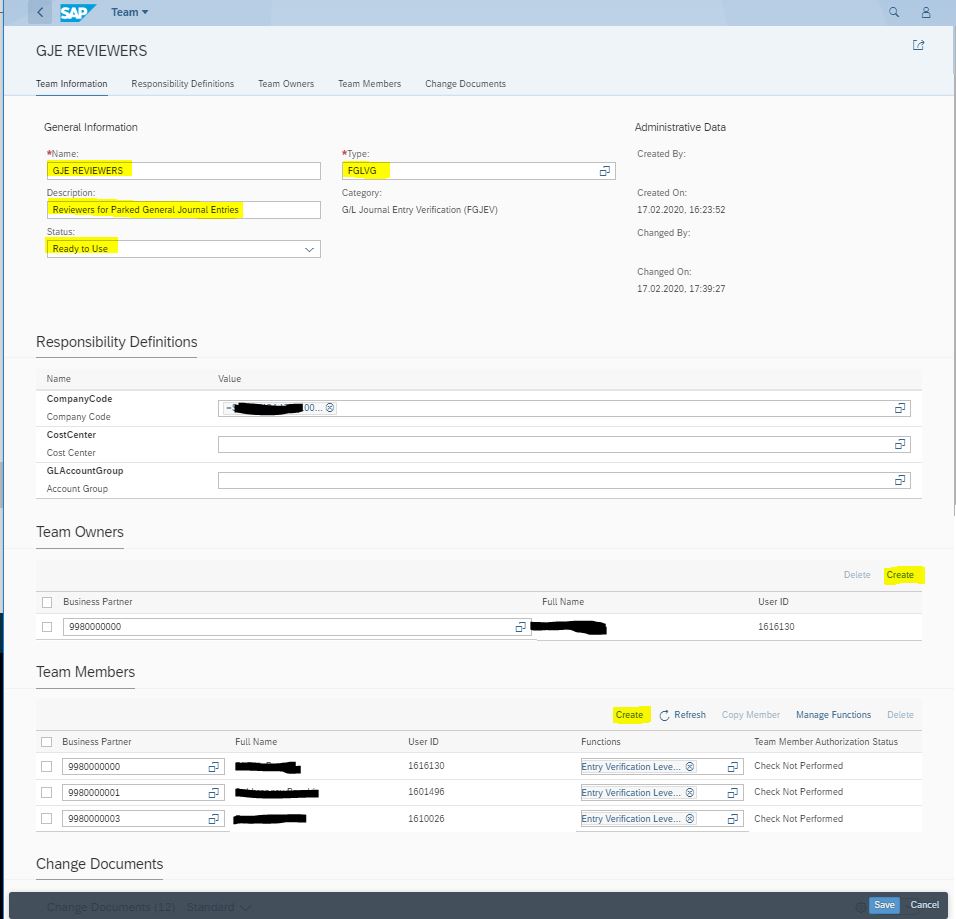
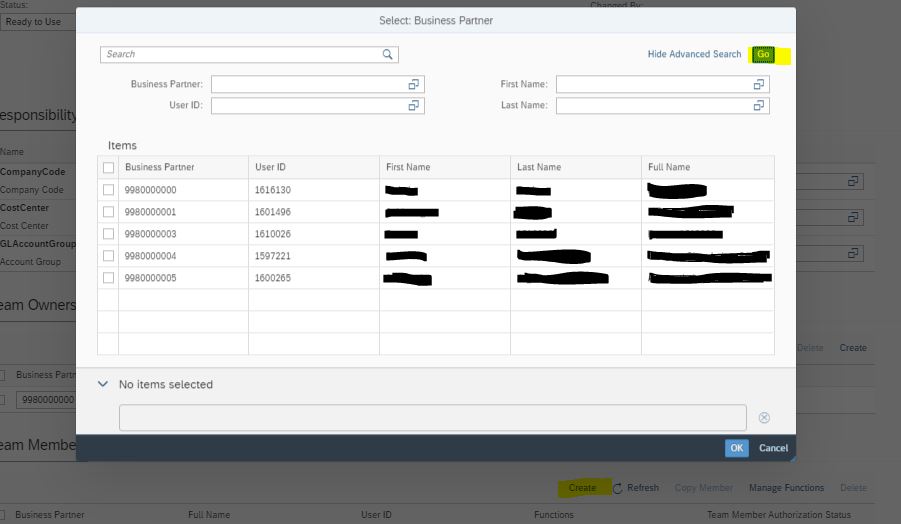
- If you click on the ‘Create’ Button for adding Team Owners or Members, the list of Business Partner that is displayed only looks for Roles BUP003 (Employee); BBP005 (Service Performer) or BBP010 (Freelancer). The data is retrieved from the Backend S/4HANA system using CDS View I_RESPYMGMTTEAMMEMBER (SQL View ITEAMMEMBER) for Team Members. Various other CDS Views with prefix ‘I_RESPYMGMTTEAM*’ are relevant to this app.
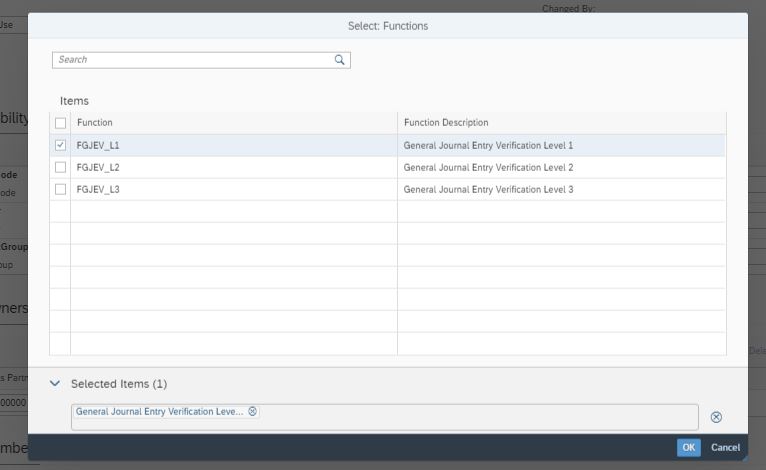
- Each Team Member is assigned a function. In this example, all three Business Partners were assigned the Function FGJEV_L1 (General Journal Entry Verification Level 1). In Step 2.C above, this Function was assigned to Profile FGJEV, which in turn, was assigned to Team Category FGJEV.
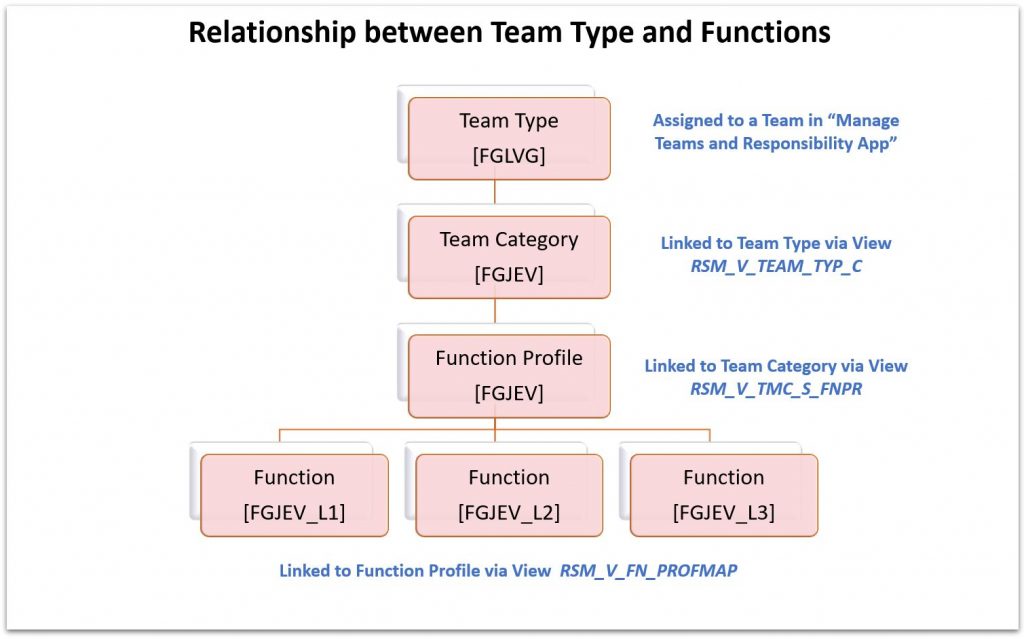
- The following figure provides an overview of the relationship between Team Type, Team Category, Function Profile and Functions defined in Step 2.C above and used by the “Manage Teams and Responsibility” App.
Step 5. Manage Workflow
After setting up the Employees and the Team, ensure the Workflow for Workflow Scenario WS02800046 is active in the system.
- Launch the “Manage Workflows for General Journal Entries Verification” App. The workflow called ‘General Journal Entry Verification’ should already exist with status ‘Active’. If not, click on the button called ‘Add’ at the top right hand side of the screen and proceed as follows.

- Add a new Workflow with name “General Journal Entry Verification” and add two steps, namely, 1.Verify and 2.Post.

- Configure the two steps as per the screenshots below. Once done, click on Apply and ensure the Workflow created is in status Active.
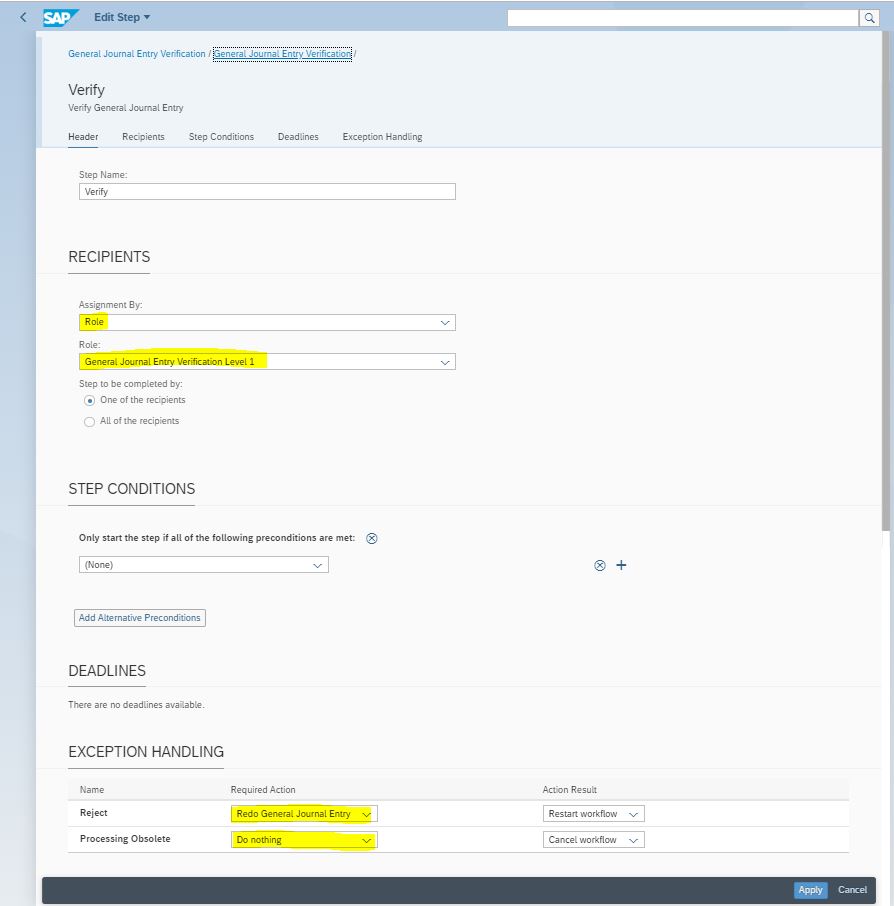
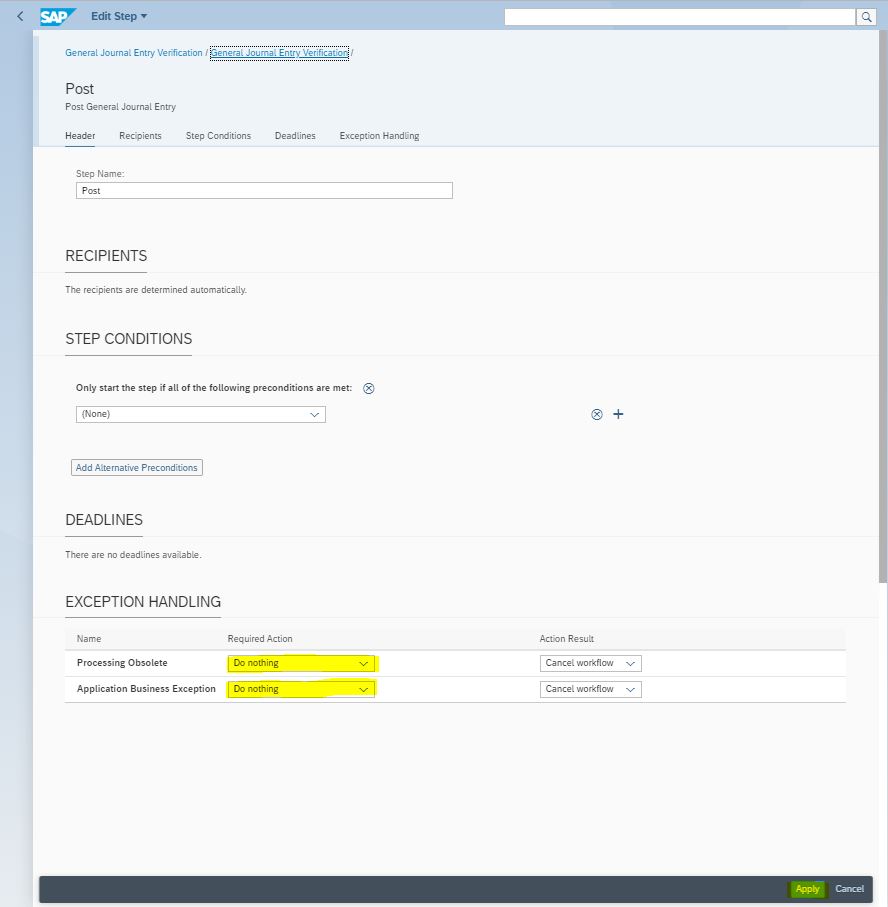
- Configuring the steps above any differently, would lead to different results.
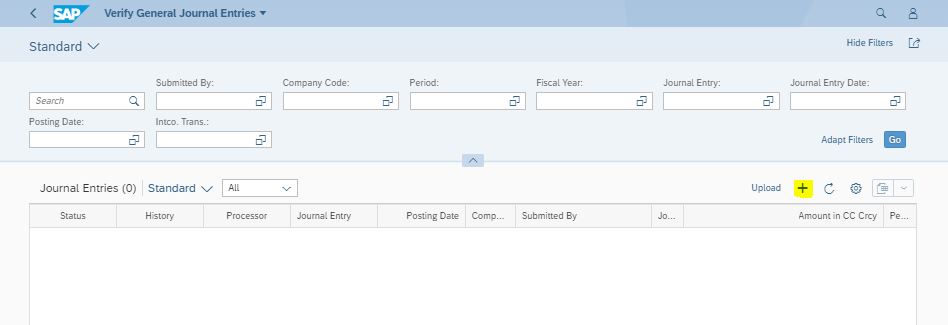
Step 6. Verify General Journal Entries – For Requester
The set up is complete and we are now ready to create a journal for verification.
- Launch the “Verify General Journal Entries – For Requester” App. Click on the ‘+’ sign to create a new Journal. In this example, we would only explain the process of creation of an individual journal using the ‘+’ button. Mass creation of Journals is possible by using the ‘Upload’ button.
- Enter values in the mandatory fields and expand each line item to add further item level details. Additional items can also be added here. When data is populated, either the ‘Simulate’ button can be used to check for errors, or the ‘Submit’ button can be used to Park the document for verification.
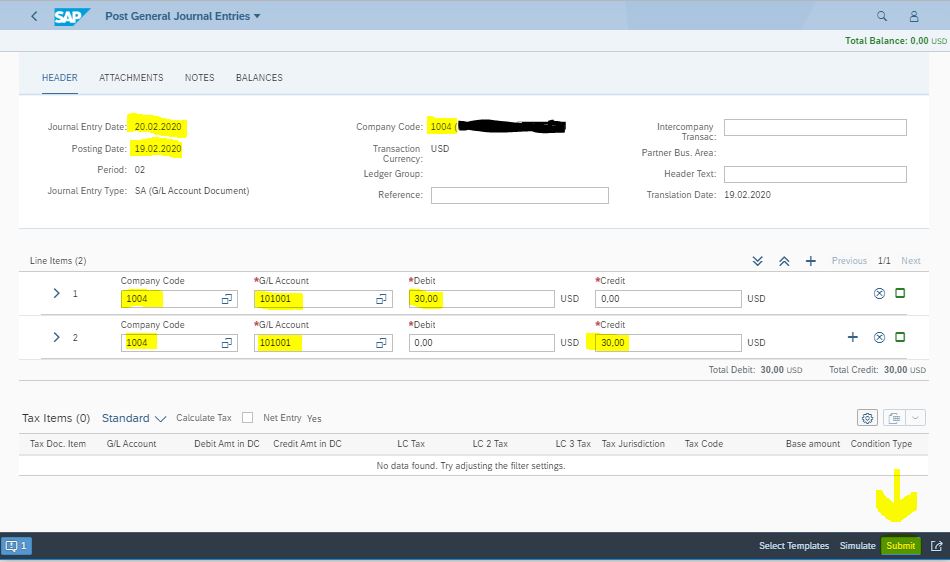
- Errors, if any, will be reported in a popup box.
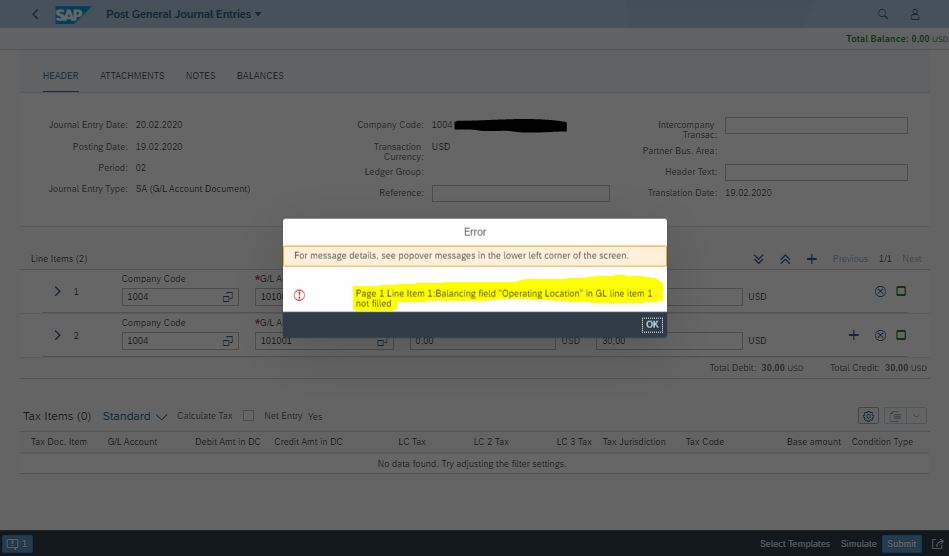
- Resolve errors and Submit Document to generate a new Journal.
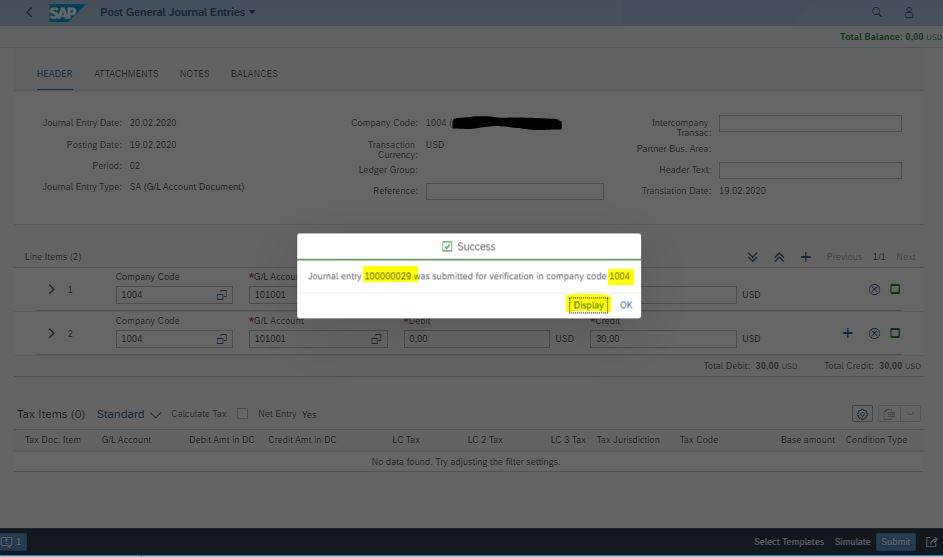
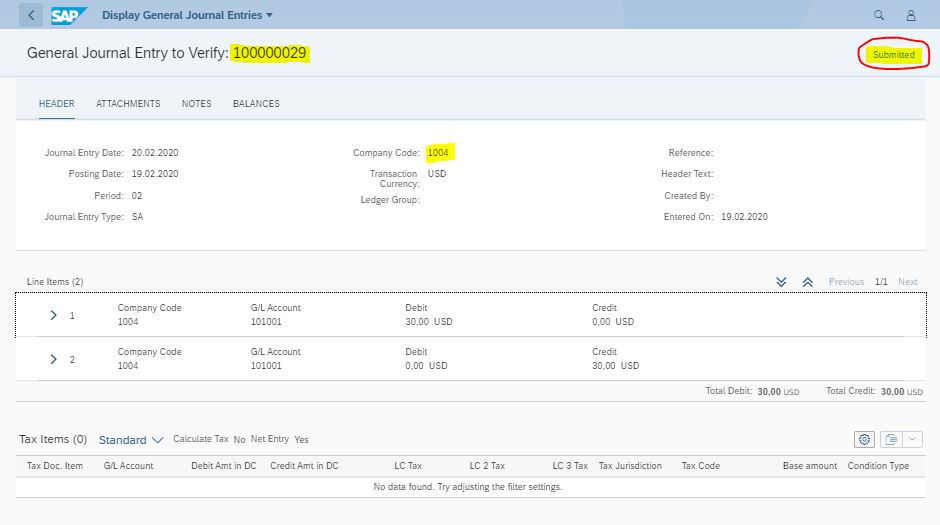
- Click on Display to check the Journal. The status ‘Submitted’ on the right top indicates the Workflow has triggered and is awaiting approval. Status ‘Error;’ would mean the Workflow is in error, whereas status ‘Posted’ would mean the document has been posted without the need of a workflow.
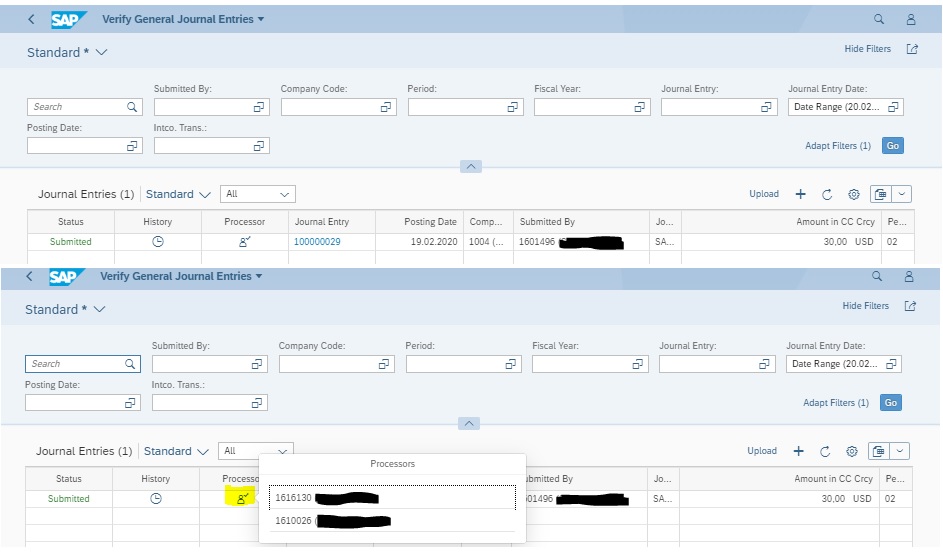
- Navigate back to the Verify General Journal Entries App to find the new journal and the Processors selected for approval. The two processors selected are two of the three assigned to team ‘GJE REVIEWERS’ in step 4 above. The third member of that team initiated this workflow and the workflow excludes the initiator from processor list, i.e., one cannot create a journal for verification and verify himself / herself.
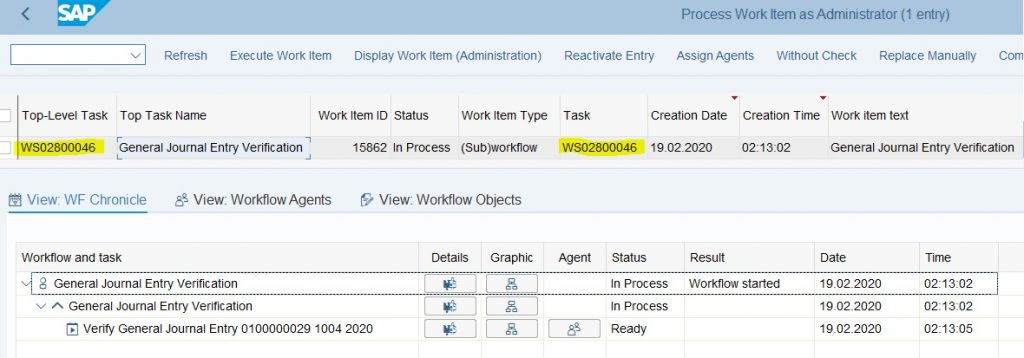
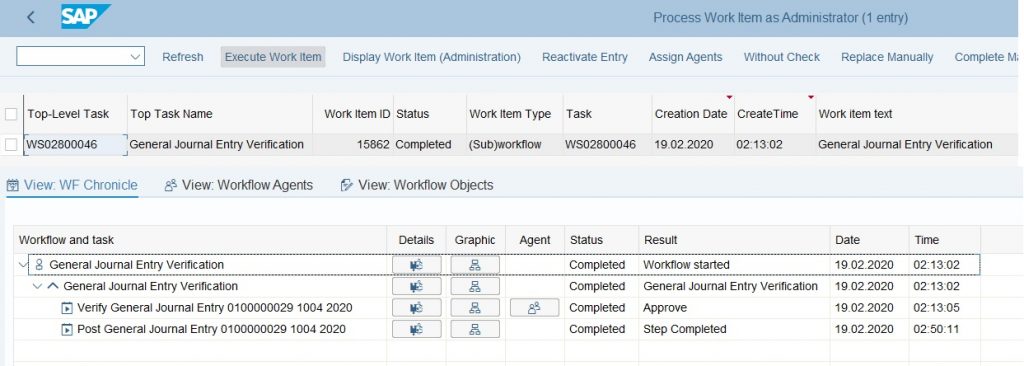
- The workflow log can be seen in the backend using Transaction SWIA or SWI1 – Workflow Task WS02800046.
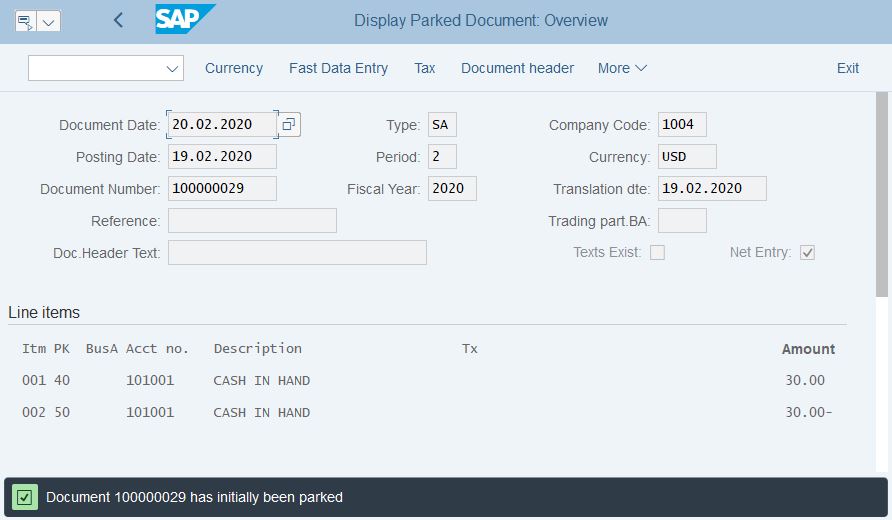
- The journal, in this example, can be seen in Parked status.
Step 7. Verify General Journal Entries – For Processor (Inbox)
This is the final section of this blog that shows how a journal can be reviewed and approved.
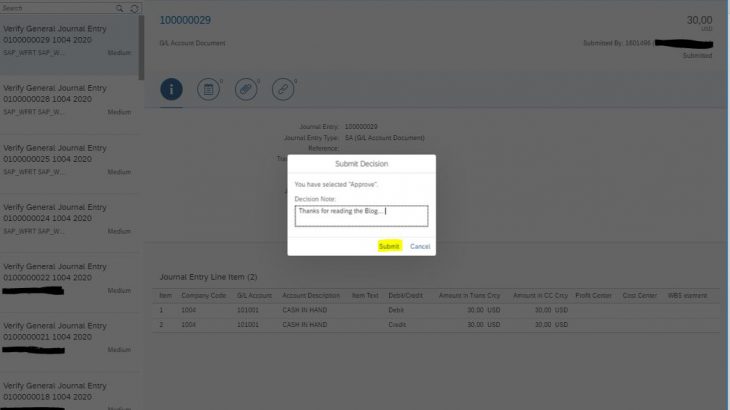
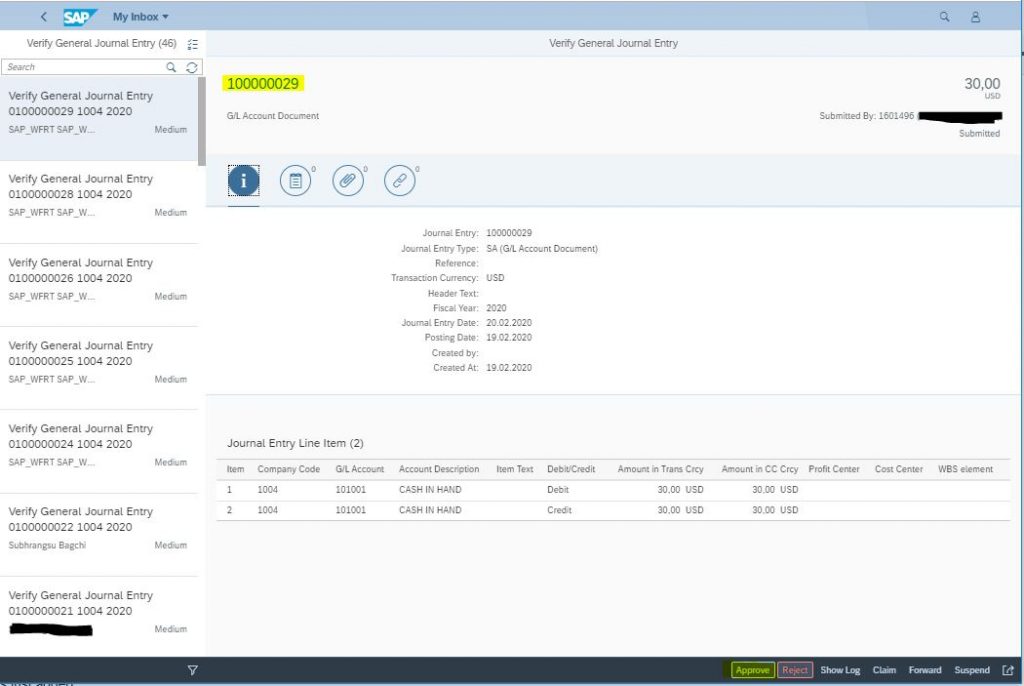
- Launch the “Verify General Journal Entries – For Processor (Inbox)” App. This opens up the ‘My Inbox’ app. Look for the journal which was just added. Click on the Journal Number to check further details. Else choose from one of the buttons at the bottom right corner of the screen.
- Approve: Document gets posted
- Reject: Can be returned to the initiator with comments for changes
- Claim: When multiple reviewers exist, claiming the workflow removes it from the other reviewers’ list. Once claimed, a new button appears called ‘Release’. That button makes the workflow available to all reviewers again.
- Forward: The workflow is forwarded to another user for review.
- Suspend: A date can be selected and the review can be suspended till then.
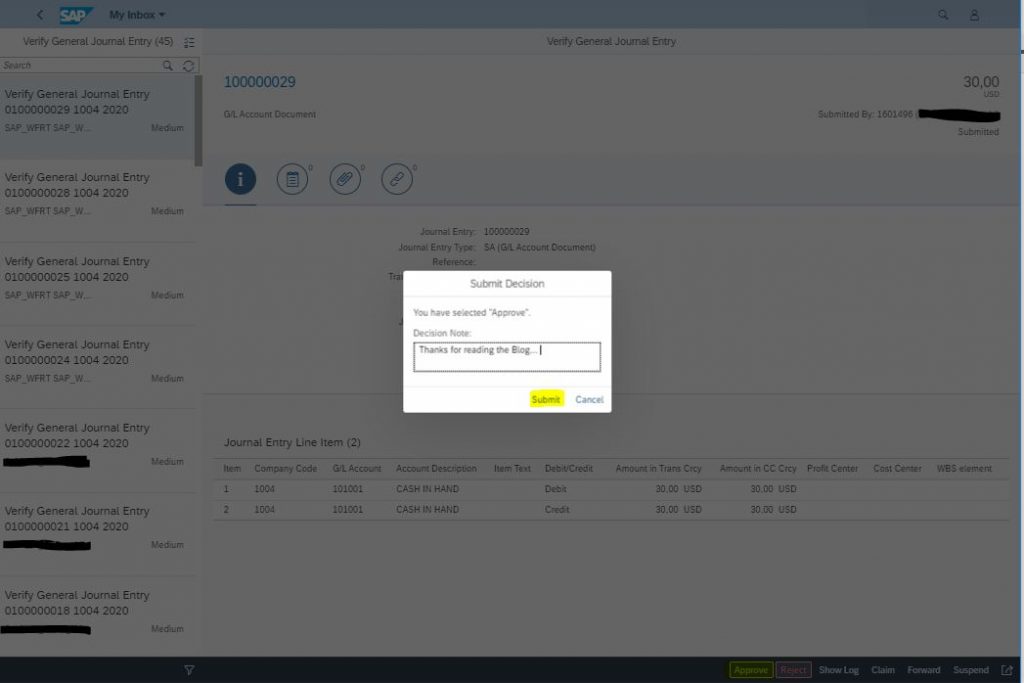
- When the journal is Approved, a popup box appears to record Decision Notes. When the reviewer clicks on Submit, the Journal is posted. with the message ‘Task Successfully Completed’.
- The Journal now appears with status ‘Posted’ and can be seen in the ‘Manage Journal Entries’ App.
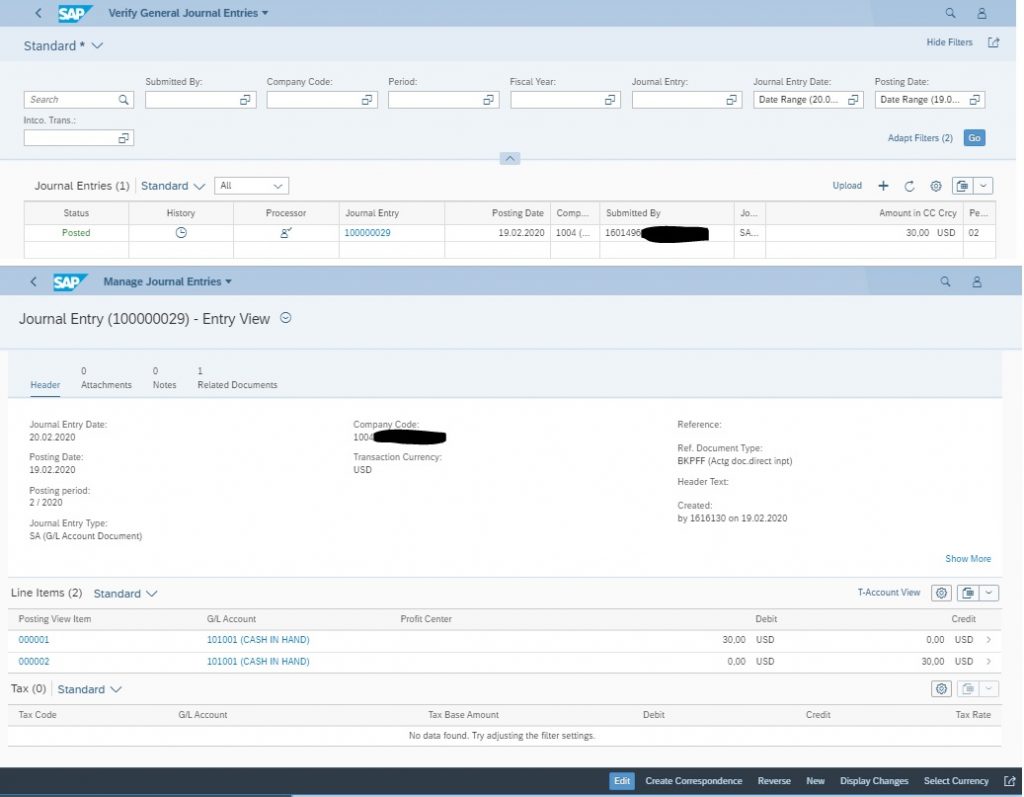
- The backend workflow (Transaction SWIA) moves to status ‘Completed’ at this stage
Please Note:
- Workflow User SAP_WFRT is used to trigger the notifications. Please check and ensure the user is set up properly with correct authorisations.
- If the code block has any custom field, they have to be introduced into the ‘Post General Journal Entries’ app using the ‘Custom Field and Logic’ app.
- Further technical settings are required in the system to connect front-end Fiori and back-end S/4HANA server if two separate servers are used.
- Please ensure the relevant Fiori Business Catalogs are assigned to appropriate users.


