
How to Consume External Resources in SAPUI5?
It is always fun playing around with SAPUI5 programming. After all, such cool and responsive SAP applications cannot be developed with vanilla ABAP. But SAPUI5 API solely is not enough to deliver your projects as per the demanding requirements from today’s clients. We are bound to involve third party resources to get our work done. After all, SAP has opened its arms to outside world for some good reason.
When I was learning and nurturing my SAPUI5 skills, delivering the simplest App was a mountain climb for me. I remember, during those nursery days, I tried to give the best possible key words while searching resolution at Google or SAP SCN. Sometimes, I was lucky and many times, I was not. I had been through these situations several times in my Developing career. I learnt the tricks of the programming world in a hard way.
That’s enough of my baby cry. In this article and series of articles to follow, I am planning to provide you step by step resolution to frequently needed concepts and solutions in real SAP Projects. You should not go through the same ordeals which I suffered. And we do not need to re-invent the wheel again and again. My goal is, whoever reaches this page, should have a resolution in hand before they exit out of this page.
In this article, I would cover the concepts, overview and theories. I know you hate theories. In fact I hate theories too. But without have our concepts clear, going to practical is pointless and not fruitful. So please be little patient and go through these salient points which would come handy while to design those sleek and soothing Apps. You would surely remember me then.
Step 1 : You should be familiar with WebIDE and creating project.
If not, refer this post to Learn and Create you first SAPUI5 in WebIDE.
Step 2 : There are two ways to use third party resources.
a. Online Resource
b. Local Resource.
Most of the companies prefer offline capabilities in their application, so we have to be very careful with the requirements of the clients. If they prefer offline then we have to load resources locally. Do not worry, we will be learning it soon.
Step 3 : At first we will look into Online Resource loading.
The resources can be added in ‘index.html’ or ‘Component.js’.
Note : Please do not load your resources form ‘index.html’ file.
If you look SAP Fiori closely, the loading starts from ‘component.js’ file, hence I prefer to load the resources in component.js file. In case of doubt, always follow standard SAP’s path.
How to Add resources?
Syntax :
jQuery.sap.includeScript(vUrl, sId?, fnLoadCallback?, fnErrorCallback?)
Example : Below are some examples. In this example I’m using ‘JQuery‘ library with only URl. There are other properties which can be taken into consideration.
Let’s see the properties (these are just few):
- vUrl : Provide the online URL you want to load
- sId : ID for the resource.
- fnLoadCallback : You can say this as a ‘Success’ function
- fnErrorCallBack : This is ‘Error’ function, which will inform if there’s any error while calling.
jQuery.sap.includeScript(“http://code.jquery.com/jquery-1.9.1.min.js”);
Where to put the code?
As discussed, you have to place the code in component.js or any specific controller where you want use it.
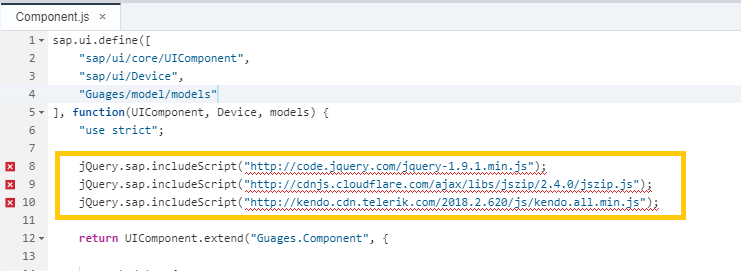
In this code snippet you can see that I have used three online resources. Same you can use in any controller file as well.
Note : Please do avoid using online resource loading, as it may consume your application loading time and may affect performance. You can use them based on the requirement.
Step 3 : Time to load the resources locally.
Now we’ll see how to load local resources. Create a new folder to add your resources. Folder can be named based on your preference. I prefer to name it as ‘Resources’ or ‘Util’ or ‘library’ or ‘libs’.
Edit / Right Click on webapp > New > Folder.

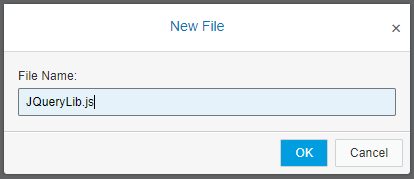
Step 4 : Create a file with relevant name.
In this example I’ll be using ‘JQueryLib.js’
Edit / Right Click on ‘Resource Folder‘ > New > File.

Give File Name and press ‘Ok’
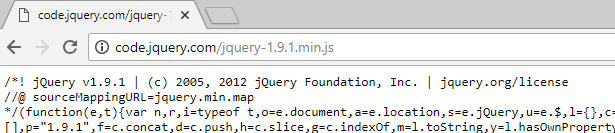
Step 4 : To get the source code, paste the URL in your browser. In my case I’m using this URL ‘http://code.jquery.com/jquery-1.9.1.min.js‘. When you run the URL you’ll get JS code. Just copy whole code from the link.
Step 5 : Pasting the code in your local file which you created above i.e ‘JQueryLib.js’
Good to Know : When you paste the code into your local file, chances are you might not see a formatted code which is very hard to analyse. WebIDE has an excellent option to format your code called as ‘Beautify‘. Please use ‘Beautify’ option. You can achieve it from ‘Edit > Beautify‘ or ‘Ctrl + Alt + B‘.
For those who are using Eclipse you’ll find online js beautifiers. Not necessary if you don’t want to analyse the code.
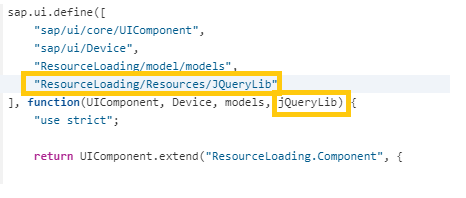
Step 6 : Just including the file into your application is not enough. You’ll have to do one last thing (trust me). You have to provide the data source path just like any other script or CSS files.
Good Practice – As mentioned above, please avoid loading the files in ‘index.html’. Go for ‘Component.js’ or the specific controller where you want to use the resource.
i. Loading in component.js (Which can also be called as Global loading).
ii. Same way it can be loaded in any controller (Which is also called as Controller specific)

I believe, it is enough for the first article in the series. We might not be able to assimilate if we try to inject more concept here. In the coming articles we will try to implement a real project case scenario using some External Resources (i.e Third Party Resources).


