Handle SAP Best Practices package updates in SAP Solution Manager 7.2
At a glance
SAP provides SAP Best Practices for its solutions including various content.
The content is free of charge and it is easy to find appropriate SAP Best Practices packages in the SAP Best Practices Explorer (https://rapid.sap.com/bp). The SAP Best Practices Explorer provides access to SAP as well as packaged Partner content.
Some packages are ready to consume and adopt in SAP Solution Manager 7.2 – Process Management. SAP also provides frequent updates of this content.
This post explains the procedure on how to update content packages in Process Management of SAP Solution Manager 7.2.
Content can be SAP Best Practices packages, SAP Model Companies as well as customers’ own content (templates).
There are some general rules to consider when working with process management content. In all cases SAP Solution Manager is the source of content creation. Furthermore, the process management content is based on unique deployment and content IDs. Both entities play an important role during the content recognition process.
The deployment and content IDs ensure a seamless exchange between different solutions within one SAP Solution Manager as well as different SAP Solution Manager 7.2 systems. It enables the exchange of several content updates. Thus, it is possible to manage template scenarios like roll in, roll out and roll back.
Use case
To explain the update process of process management content in SAP Solution Manager 7.2 we have defined the following customer situation:
Firstly, we define our as-is situation, which includes an initial import of an SAP Best Practices package, e.g. Version SAP S/4HANA on premise 1809 US. Secondly, we modify this content and simulate typical customer scenarios within Process Management. Thirdly, we recognize that an update is available, e.g. SAP S/4HANA on premise 1809 US, of our initial upload. This version we would like to import and identify what is new and understand the impact of this content on our own adjusted documentation. To keep it simple we use a reduced scope of an SAP Best Practices package.
Define the As-Is situation
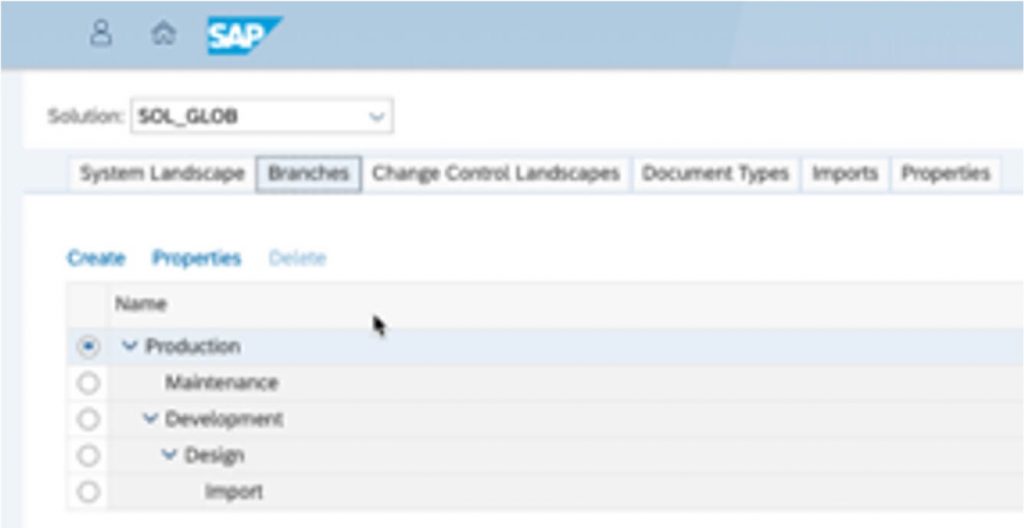
1. Customer set up his solution and system landscape.
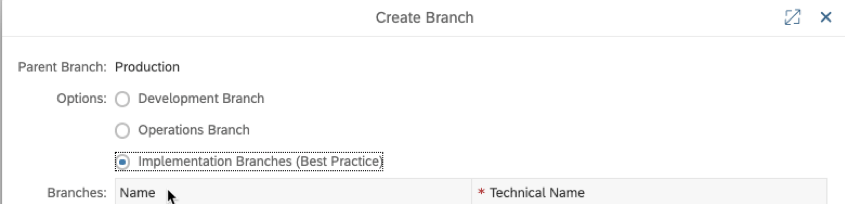
2. He followed the best practice branch setup for Implementation Branches (Best Practice).
3. In our example we applied SAP S/4HANA on premise version 1809 US version.
4. In the import content window the following selection was made:
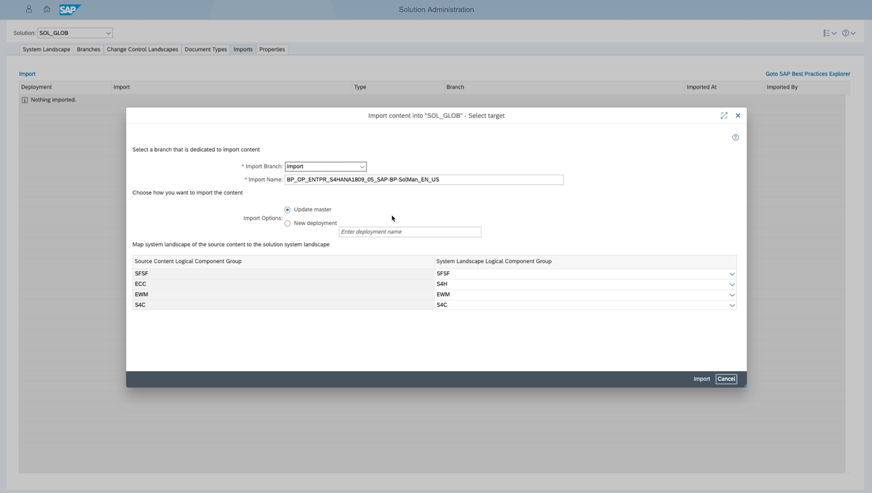
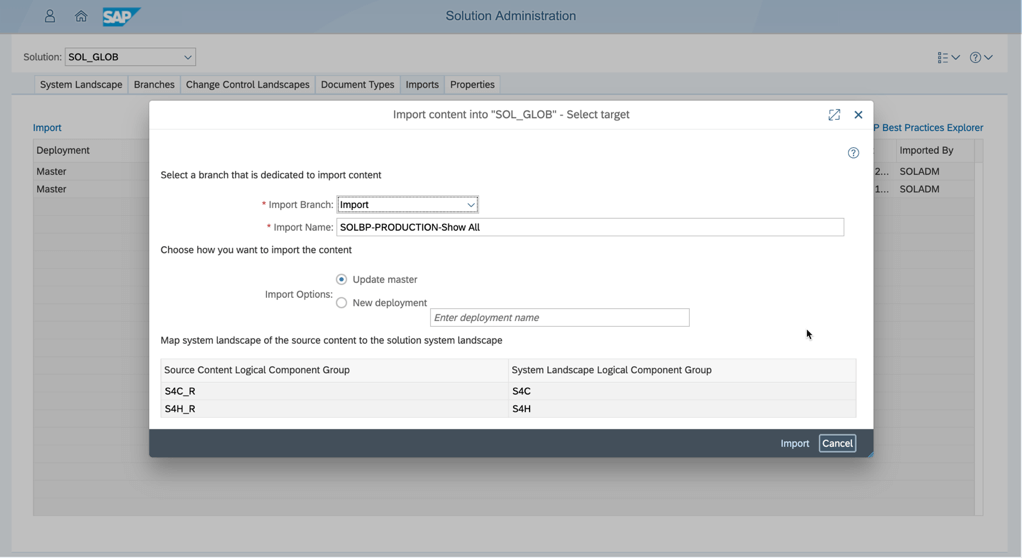
i. First you select a branch that is dedicated to import content.
Note: It is always recommended to use a dedicated import branch for content import. Nevertheless, if it is SAP Best Practices, Model Company or customer content. The branch for importing should be a child branch of the branch where the imported content shall be adapted. This gives you always an isolated environment to verify the import results.
You can always release the content from import to upper branches.
ii. Next, you should define a dedicated name for your import. As default the name of the upload file is used.
Note: Every import activity is tracked and shown under the import tab of ‘Solution Administration’.
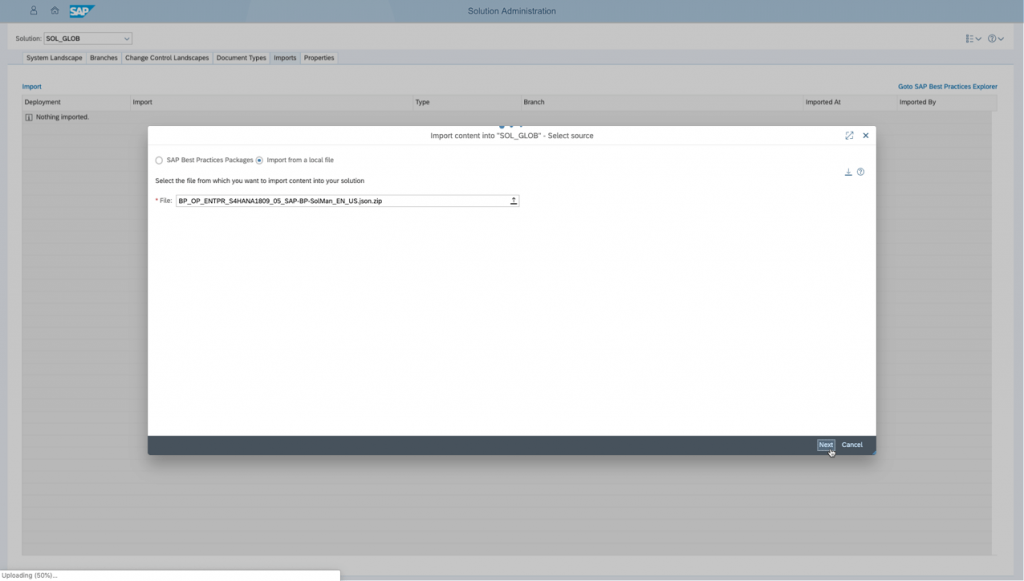
iii. Now you choose the import option:
Note: In order to understand the import options and behavior its recommended to make yourself familiar with deployments first.
- If you import specific content for the first time the import options are displayed as above.
(Re-import of content / deployments will be covered later in this document) - In most cases you should use the option “Update master” for all imports!
Note: Master is the simplest way of working with the import function, nevertheless if it is SAP Best Practices, Model Company or customer own content. This is also valid for the content update use case.
The import functionality will always recognize if you import content for the first time or if it is an update.
This is also relevant for deployments.
5. Coming back to the content import using the ‘update master’ option, you have to map your system landscape of your source solution to the target solution:
i. The left side displays all logical component groups from your source content. In our example the logical component groups coming from the SAP Best Practices package, meaning all required logical component groups used in this content source. This can be executable assignments, Process Step <Orig> assignments, executable library folders.
ii. On the right side you select to which Logical component group you want to map the content.
Note: You can only select logical component groups which are defined in your system landscape within Solution Administration.
iii. Please be aware that there is no system logic implemented which provides you an automated mapping based on component or product version.
This implies that you could theoretically assign any source system to any target system.
However, we strongly recommend creating logical component groups if a specific source system is not part of your system landscape.
Note: Please be aware that this mapping is a very critical activity from various perspective. First, this mapping of logical component groups is fixed once imported – it is difficult to reset. E.g. if you would like to re-import a SAP Best Practices it will always comes with this mapping of logical component group without an option to change this mapping. This is valid for deployments as well.
Second, the content assignment to logical component groups after import are fixed. For e.g. you cannot simply change the assignment of executables and the logical component groups in Solution Documentation.
iv. The only way to remove your defined mappings for master is a complete reset. This means basically you initialize everything, and you will lose all your information of master and deployment. You have to start from the beginning afterwards.
Note: Please consider this function very carefully due to the heavy impact.
6. If you have defined all your settings based on the above description you can select to import which triggers the background job.
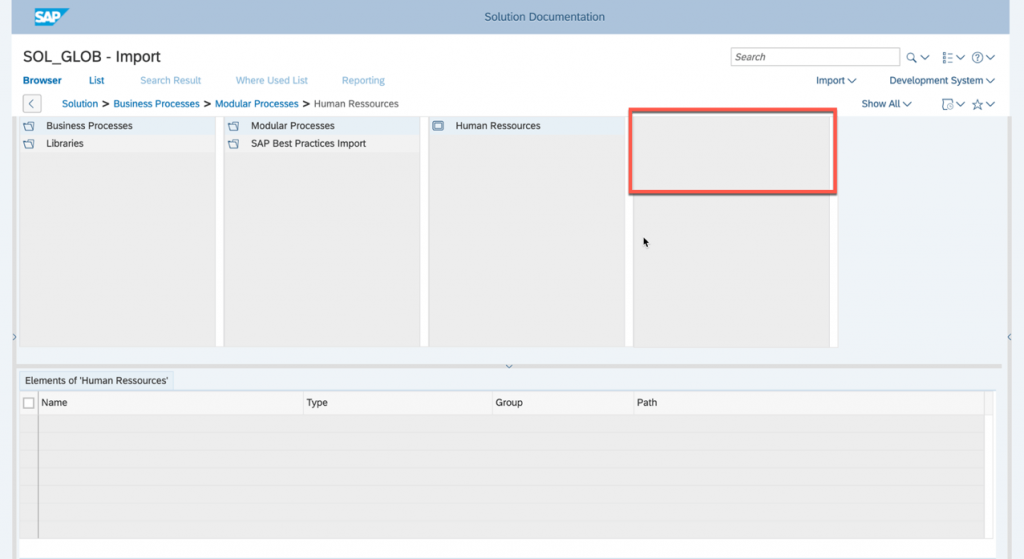
i. After the successful import you can check the results in Solution Documentation
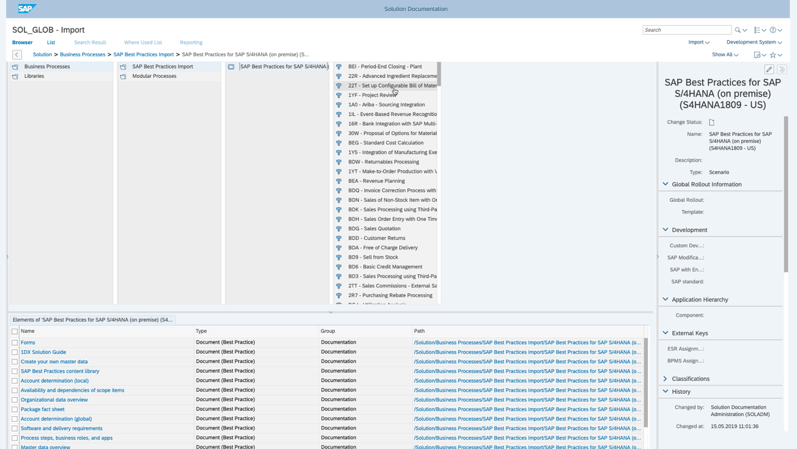
ii. In our example we use SAP Best Practices content. The content import creates the following hierarchy:
- FOLDER: SAP Best Practices Import
- SCENARIO: SAP Best Practices package <Product>+<Version>
- Processes: Scope Items
- Process Steps: Scope Item steps
- Processes: Scope Items
- SCENARIO: SAP Best Practices package <Product>+<Version>
Modify the imported content and simulate typical customer use cases in Process Management
In this section we want to reuse the previous imported content in order to perform some typical customer use cases in Process Management.
Customer use cases are:
– Move
- Move a scope item from SAP Best Practices import structure into customer’s own Process Hierarchy
– Delete (In SAP Best Practices content a deletion will not likely happen)
- Deletion of a transaction from the SAP Best Practices content
– Change
- Diagram flow adoption
- Rename of several elements (Process, Steps, Diagram)
– Create
- Creation of several elements (Steps, Executable, Configuration Units)
– Attribute assignment / change
Note: There are several kinds of changes which may be applied to the solution documentation content.
A change to a solution documentation element may be either:
- Creating a new element
- Modifying an existing element
- Deletion of an existing element
A modification of an existing element may be either:
- An attribute change:
- Setting, modifying or deleting the value of a single-valued attribute
- Adding a value, deleting a value or modifying a value of a multi-valued attribute
- A structure change:
- An element is moved from one location in the structure to another.
- The target of a reference element may be changed.
- The sequence of the elements within a location may be changed.
- A change of an external object which supports branch versioning:
- A KW document
- A process or interface diagram
- A job documentation
- A KW document
- An element is moved from one location in the structure to another.
- Setting, modifying or deleting the value of a single-valued attribute
An element is regarded as changed if at least one of the modifications above have been applied to the element.
Note: This customer use case is recognized if you re-import content. This is due to the fact that the content ID of the elements did not change. Also, if you perform an operation where content is newly created, no change impact will be recognized after re-import. This is applicable for operations like ‘create’ or ‘copy’. Therefore, it is always recommended to use the above-mentioned typical customer uses cases.
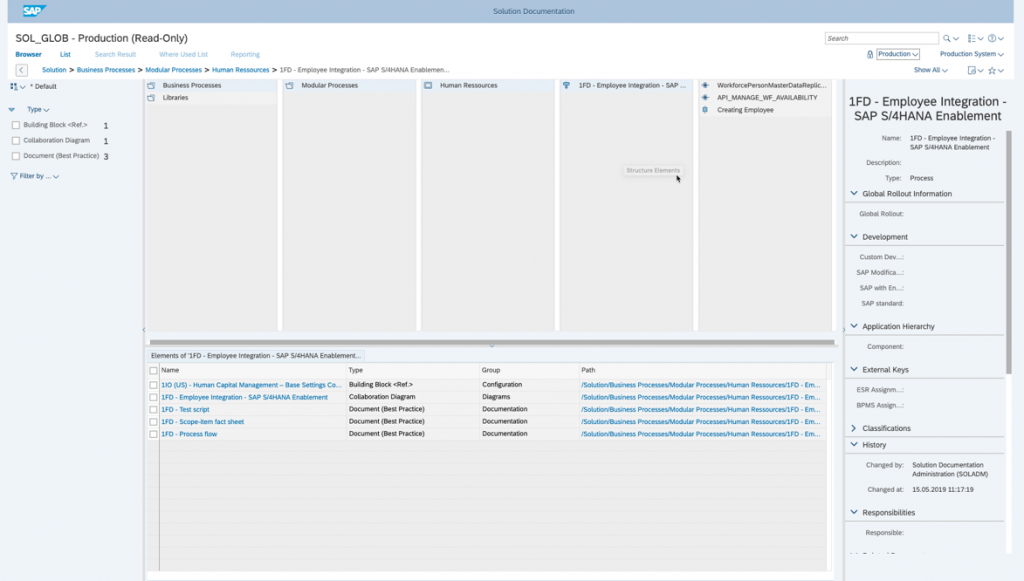
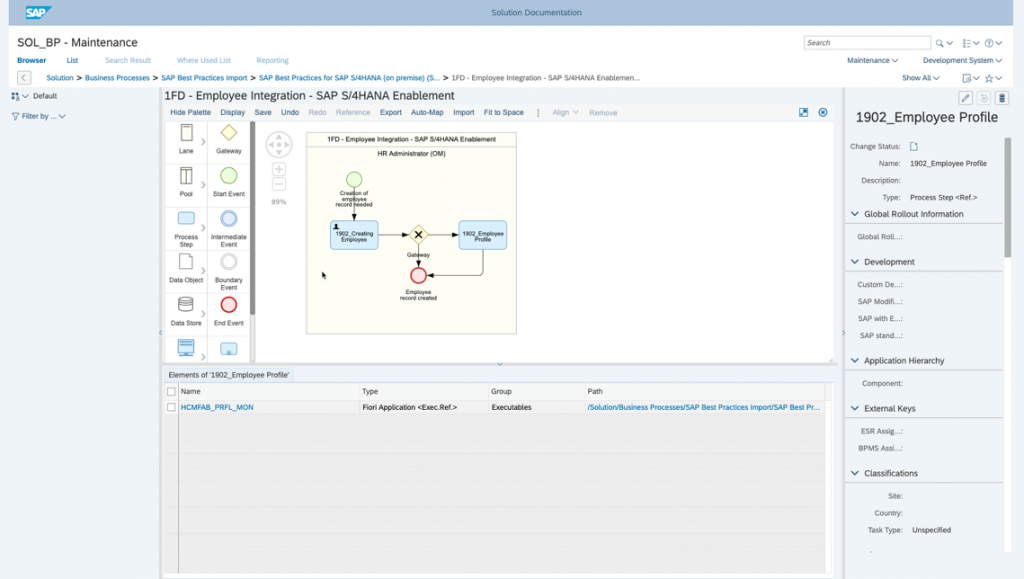
1. First, we decided to use scope item “1FD – Employee Integration – SAP S/4HANA Enablement” inside our own documentation:
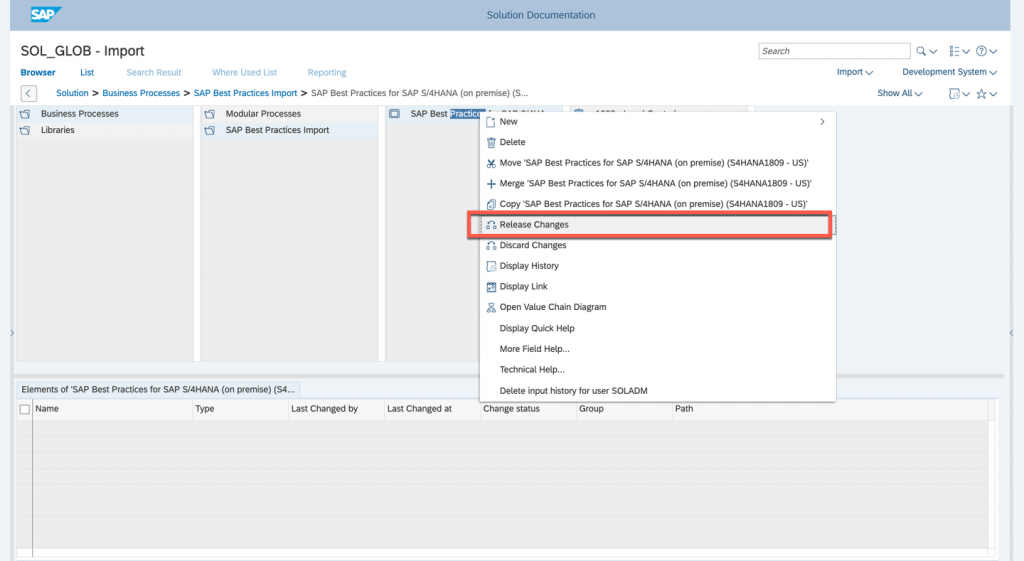
i. Make a right mouse click on the process and select ‘move’
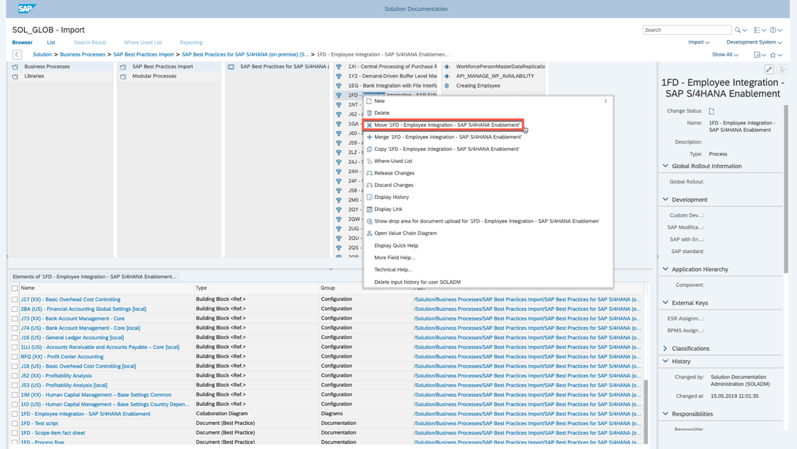
Note: By using the ‘Move’ operation the ID is kept and you ensure that a content update is recognized. This will not be the case if you use ‘Copy’ due the fact that a new ID will be created in background.
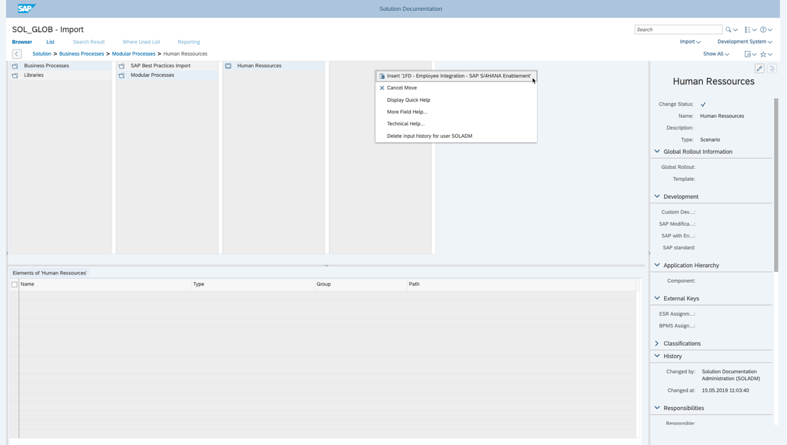
ii. Then we navigate into our self-defined process hierarchy and insert the selected process
iii. Finally, we release our content from ‘import’ to ‘design’ branch, where we further modify the content.

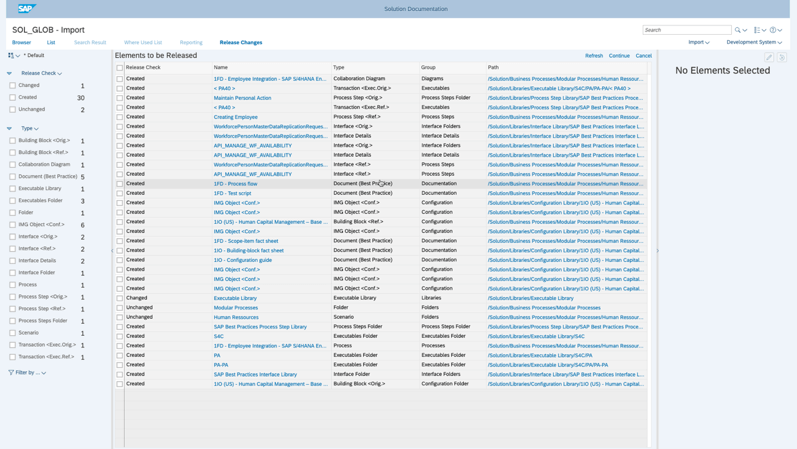
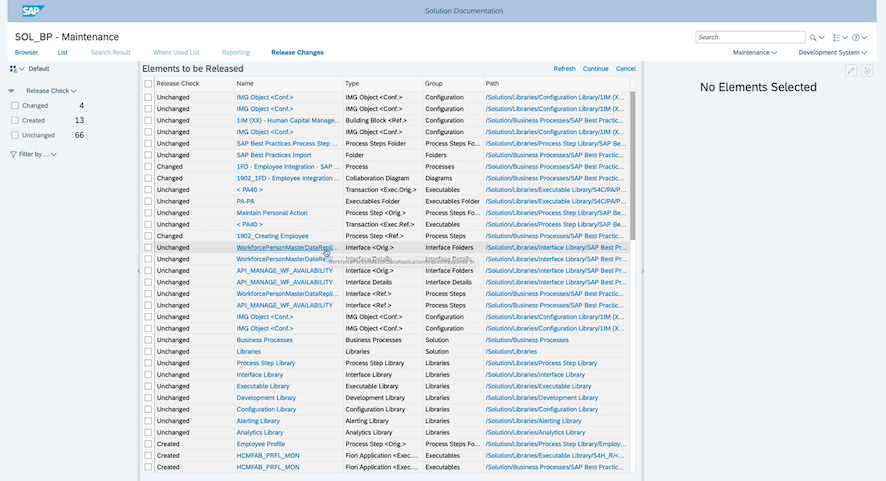
iv. This activity will play an important role during the following best practice update procedure. The ‘Release Changes’ window provides an overview of your effected elements before performing the actual release procedure. By clicking on “Show Details” you always get a convenient overview of your affected elements in a list view sorted by change status.
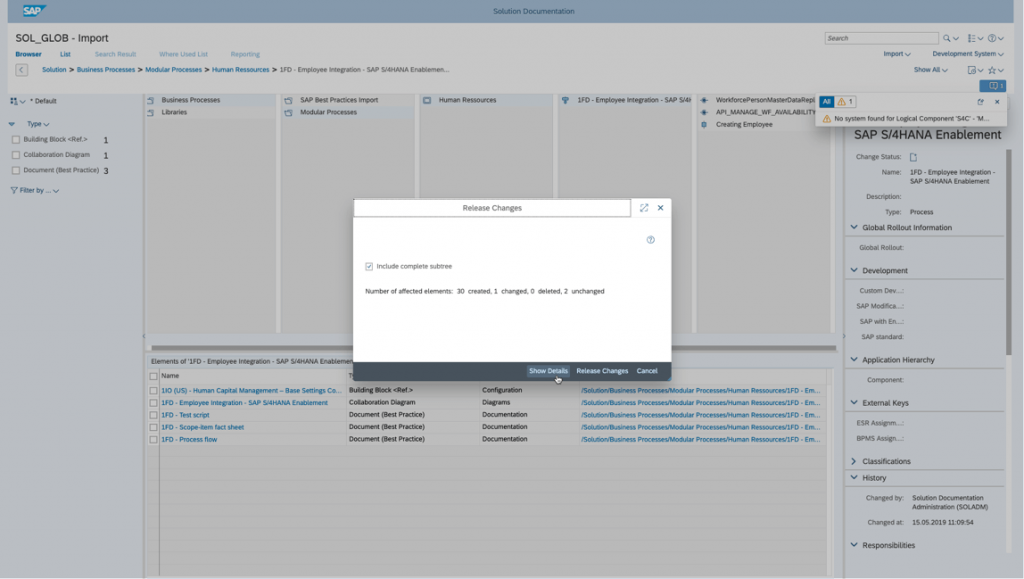
v. Use the left side panel value to filter the list. After an initial import, most of the content will be in status ‘created.’ From here you can exclude elements from your release action to the next branch.
vi. Depending on your continued releases, you will always find your content in the dedicated branch. In our example we release until ‘Production’ branch and will continue editing the content in the ‘Maintenance’ branch.
vii. In the upcoming section we simulate the following customer use cases:
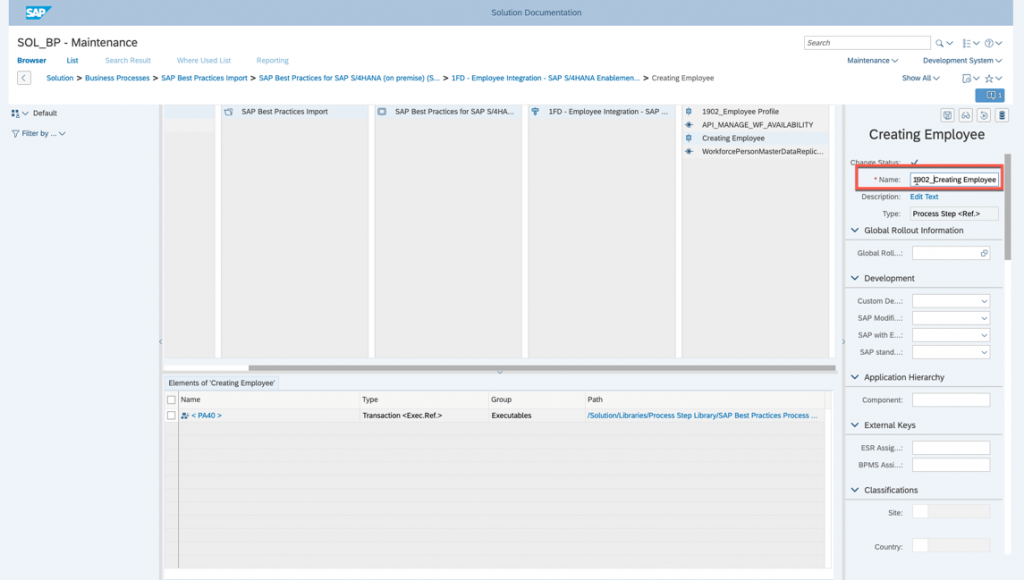
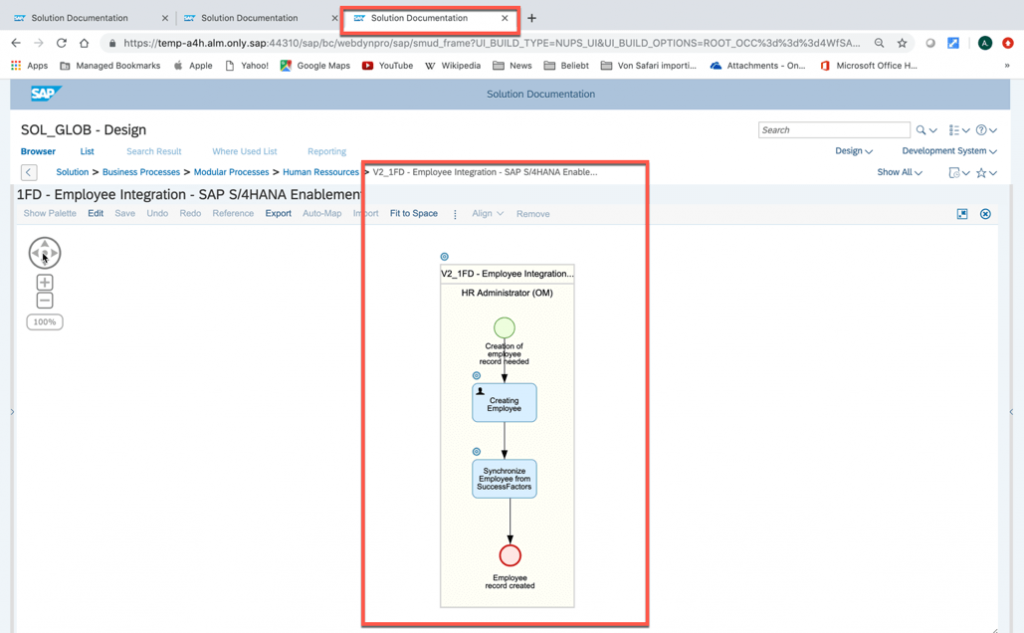
- Simulate a name change a process, from ‘1FD – Employee Integration…’ to ‘V2_1FD – Employee Integration…’
- Creation of a new process step ‘Synchronize Employee’ supported by Success Factors
- Assign a new executable
- Simulate a ‘delete’ operation of a transaction
- Assign multiple attributes to various elements
- Change the flow a of SAP Best Practices diagram
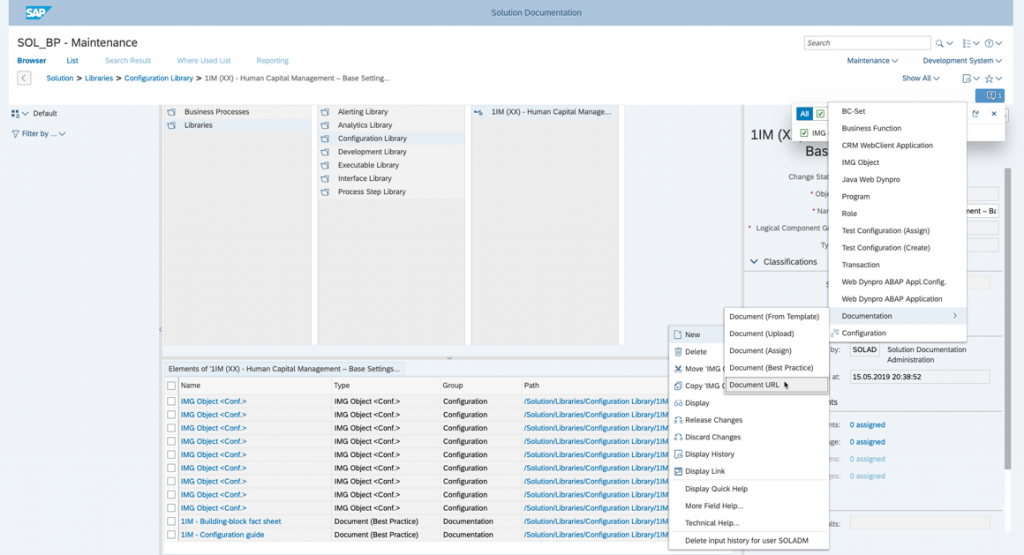
- Restructure library
viii. Finally, we release our changes of the SAP Best Practices content from ‘Maintenance’ to ‘Production’ branch
In this section we simulate changes on SAP Best Practices
In our example we simulate an updated version of the SAP Best Practices Content, for e.g. 1902. In reality this change is not known to customers and can only be recognized during the update import of the content. To make it more transparent we will list some typical update use cases. These changes were performed in a separate solution. Then we will export the content and afterwards import it into our target solution where our customer adoptions are located. Here we want to see the update impact.
1. The following changes were performed
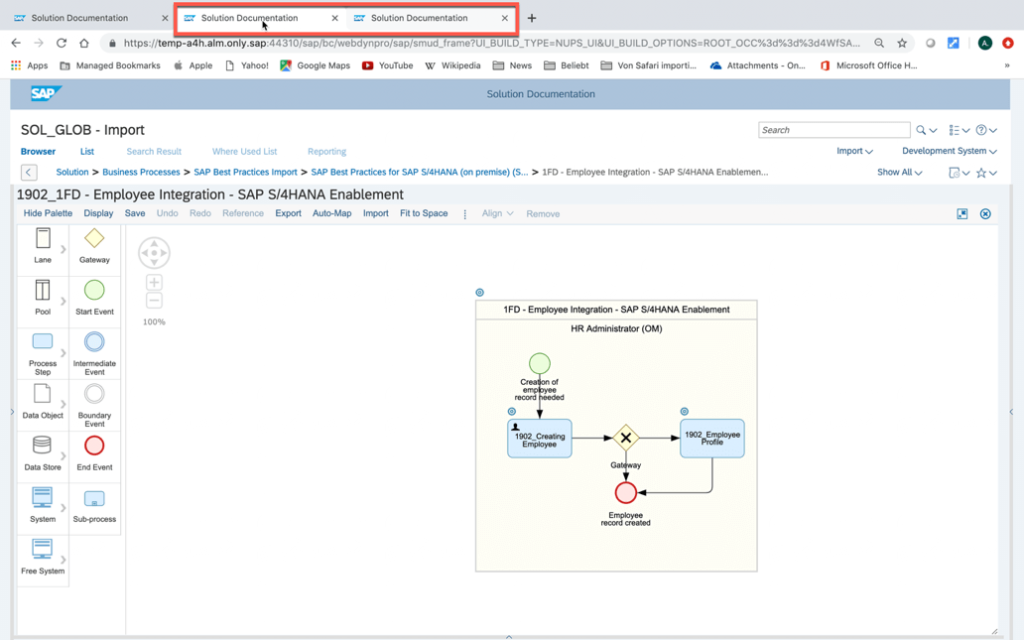
i. Change name of a process steps, e.g. Creating Employee to 1902_Creating Employee
ii. Assignment of a new Executable


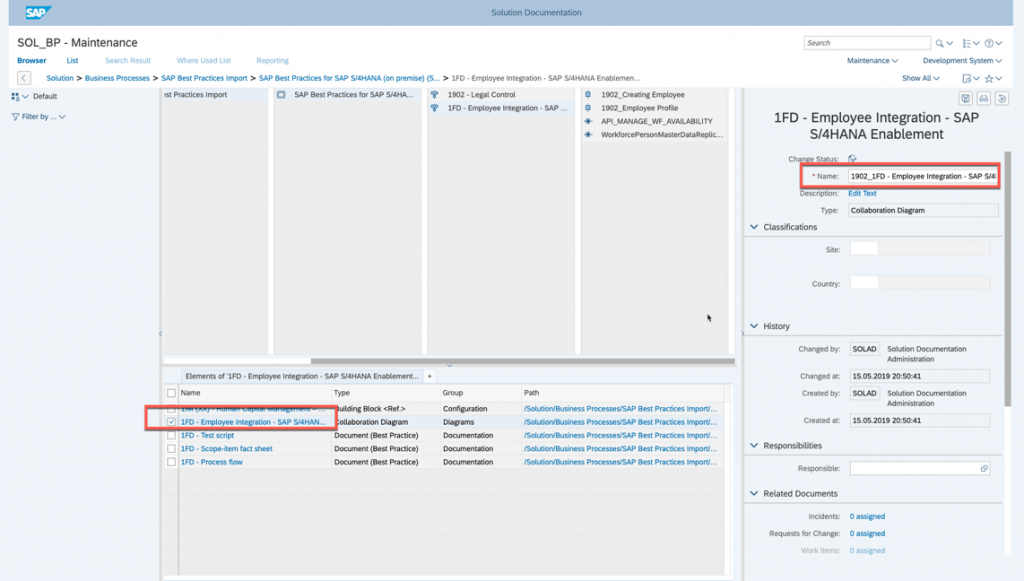
iii. Update of a diagram name and flow
iv. Creation of a new scope item process
v. Several attribute changes
vi. Test script creation
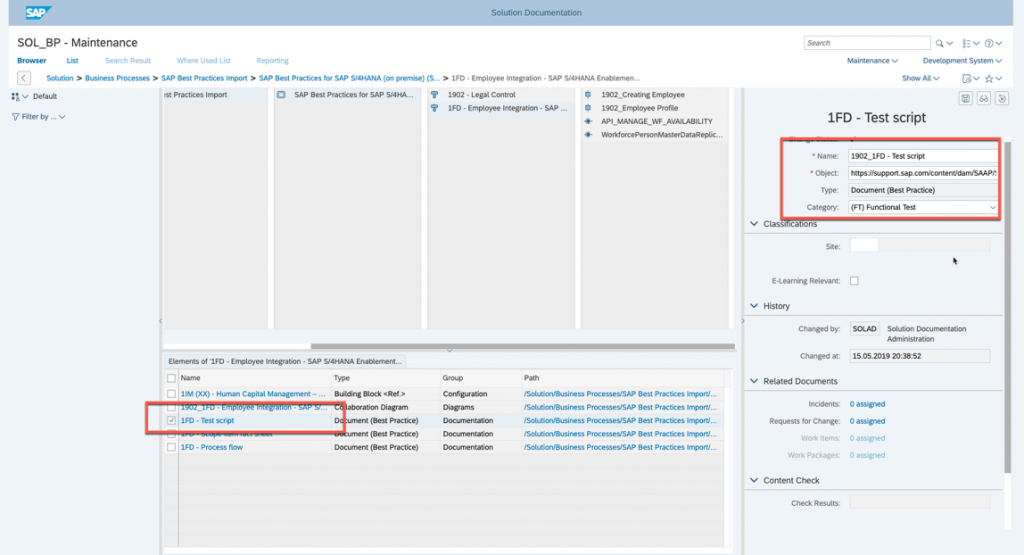
viii. Document creation
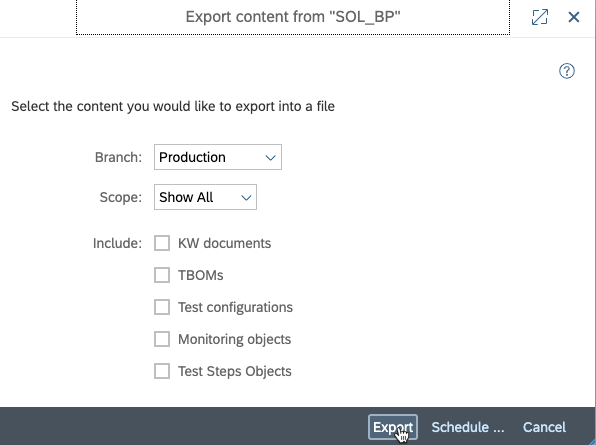
2. All changes were release and the export triggered. Note: The export is only used for our example to keep it simple and transparent. Its not part of regular content update process for SAP Best Practices.
In this section we import our new SAP Best Practices version into our solution [SS1] and verify the change impact
1. As a prerequisite it is recommended to first clean up the import branch of your target solution. This can be done via the operation “Discard Changes” on the top level of your solution. This operation has no impact on your upper branches.
Note: This procedure is recommended and ensures a clean environment for your upcoming import

2. Now we can trigger the import of the previous created export file (.json) in Solution Administration
Note: In a real live situation, customer will use the latest version of a SAP Best Practices package
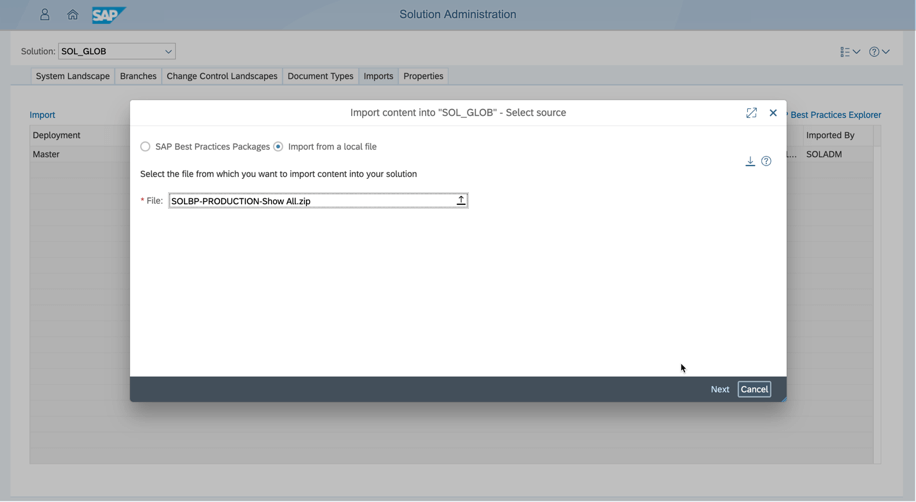
3. As in the initial content import, we get the following pop-up window.
Note: As described in the upper section we use “Update Master”. With that the import function recognizes the update. Therefore, the logical component group mapping is predefined (based on your initial settings) and not changeable anymore.
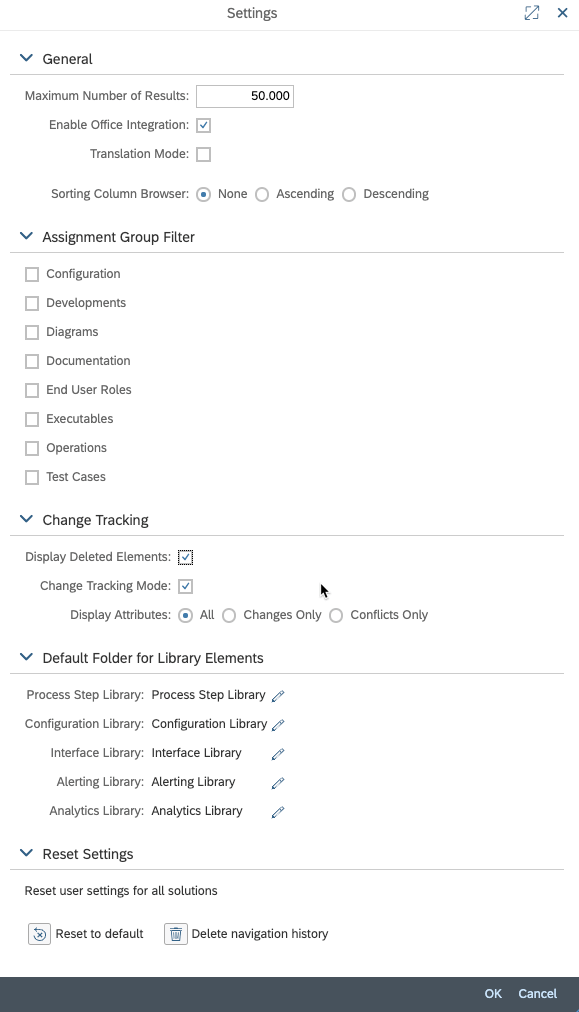
4. In Solution Documentation you need to activate the Change Tracking mode in your settings in order to see changes on your used elements.
5. After successful import we can check the results in Solution Documentation. First you will recognize that your selected processes were moved back into the SAP Best Practices scenario
Note: Don’t worry about this action. This is part of the regular behavior.
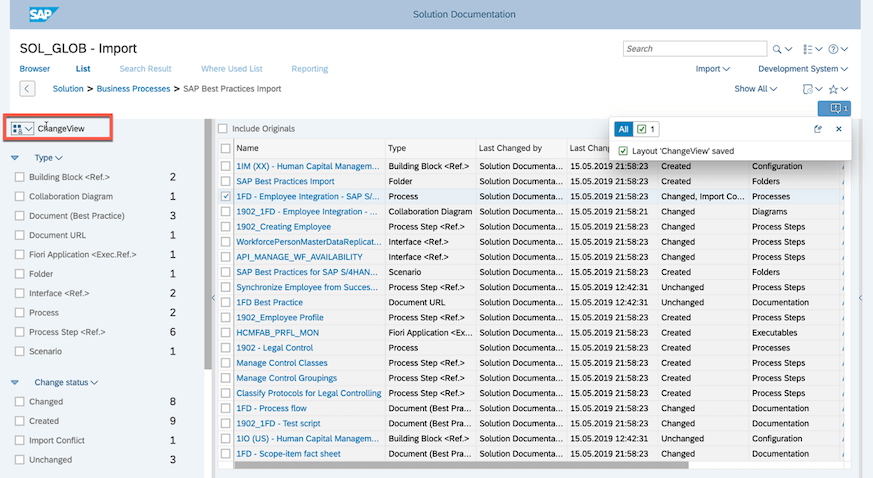
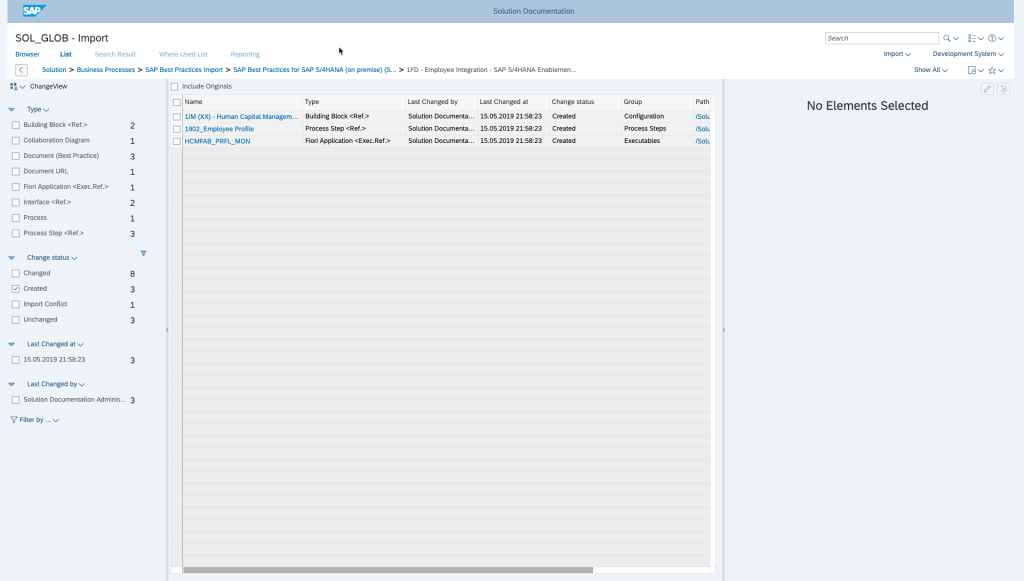
6. In the list view you can use different filters to see already the impact on your used SAP Best Practices content.
Note: It is recommended to define a custom layout based on your preferences. This should include your element types and the attribute “Change Status”.
Note: Possible status values for content import are:
- Unchanged: The element has not been changed in the branch.
- Created: The element has been created in the branch and does not yet exist in the parent branch.
- Changed: the element has been changed in the branch.
- Import Conflict: There are conflicting changes for this element in the parent branch. [SS1]
- Deleted: The element has been deleted in the branch and does still exist in the parent branch.
7. Now we can view the changes by ‘change status’. First, we look into the change status “Created”. The list shows all elements which are newly available after the content update.
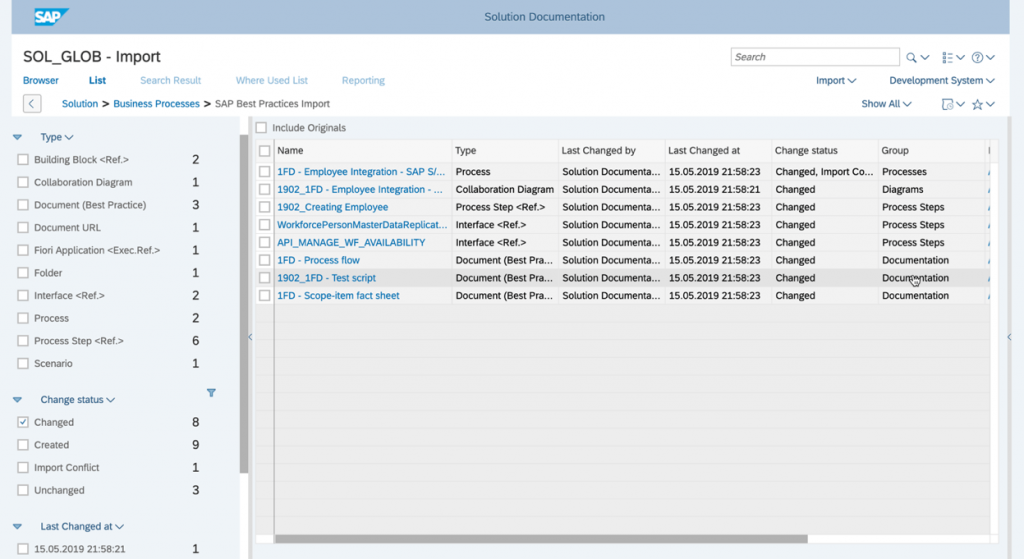
8. The status “Changed” shows in our case several elements that have updates available as part of our recent import. We can identify that these elements are used by your upper branches but are not modified so far.
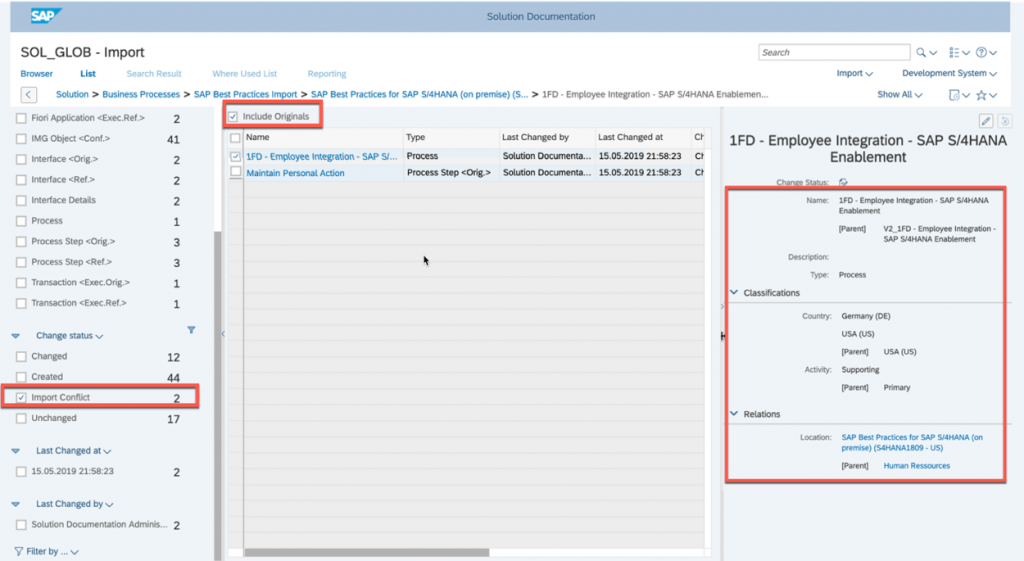
9. The change status values are always your first level to indicate the impact of a content update. Next, you can verify the change itself with the help of your attribute panel. Here you get a comparison of your updated version (second import) with the version of the parent branch (first import).
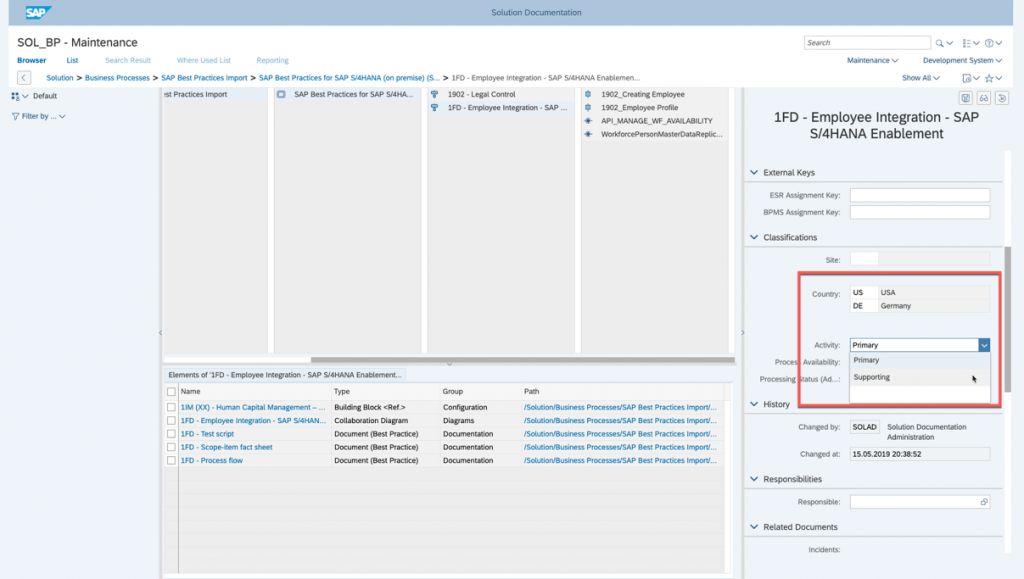
10. Especially, the import conflicts are of interest for us, because they could have a significant impact on our documentation.
In our example we can see the following import conflicts:
- Name: The name in the parent branch was adapted
- Country attribute: An additional attribute value (DE) is available after content import
- Activity attribute: The activity was changed from primary to supporting in the new content version
- Location: The location of the selected element changed
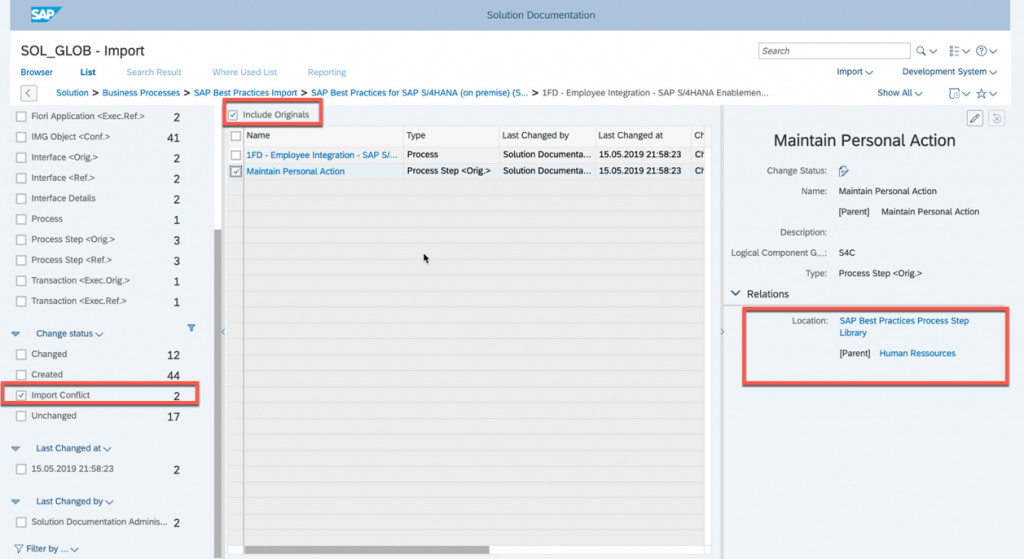
11. The location change also applies to the library for our Process Step <Orig.>.
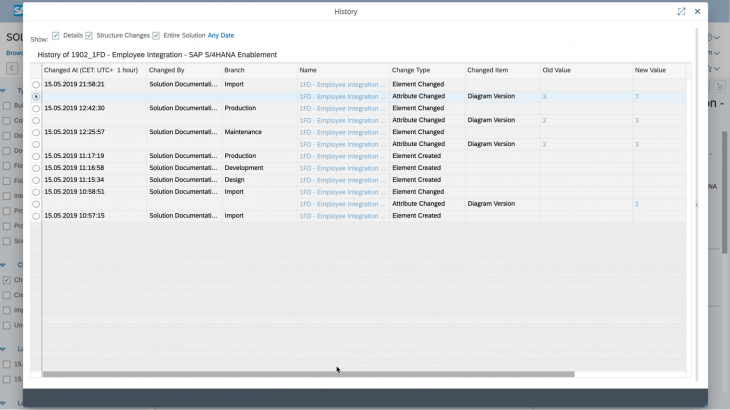
12. Another option to review the import conflict is to display the history of the elements.
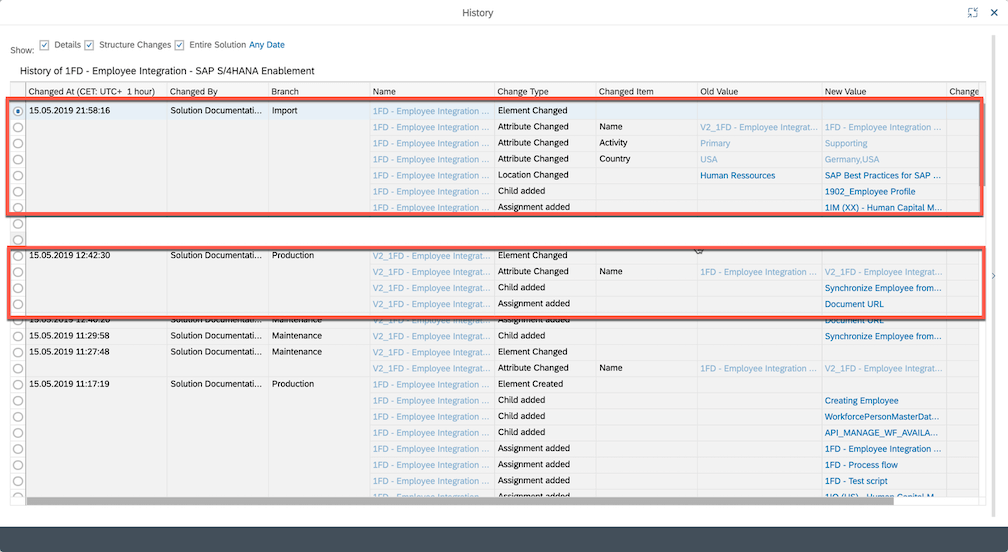
13. In case you indicate an import conflict on diagram level, the display history is helpful to verify if a new version of the diagram is available after content import.
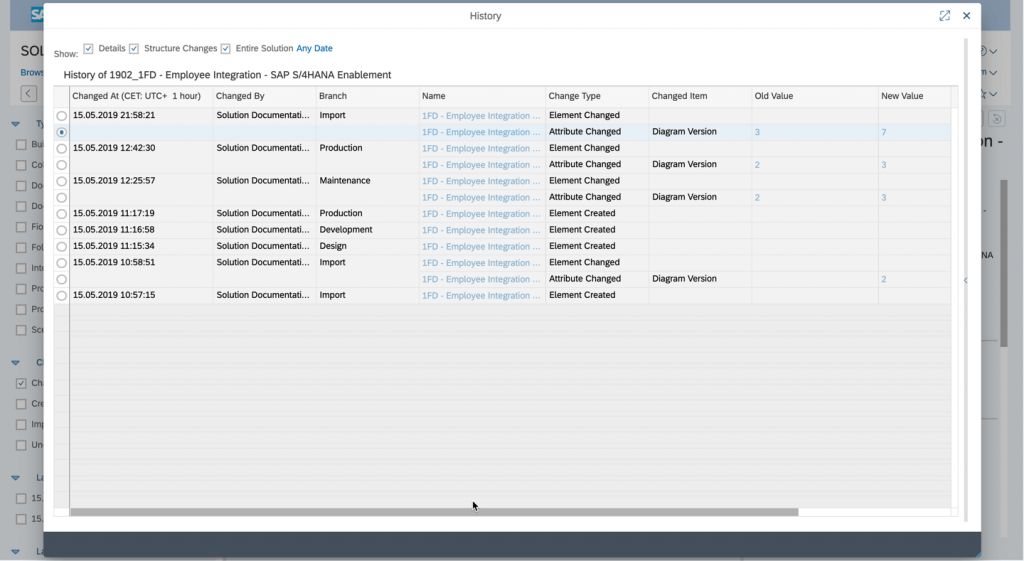
14. If so, you can perform a manual comparison with your parent branch.
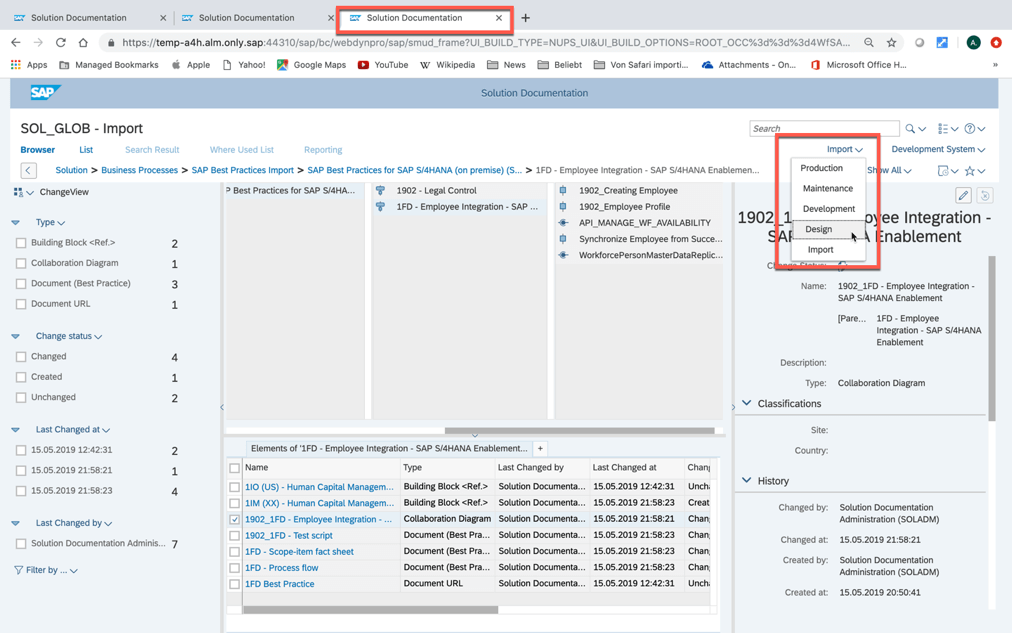
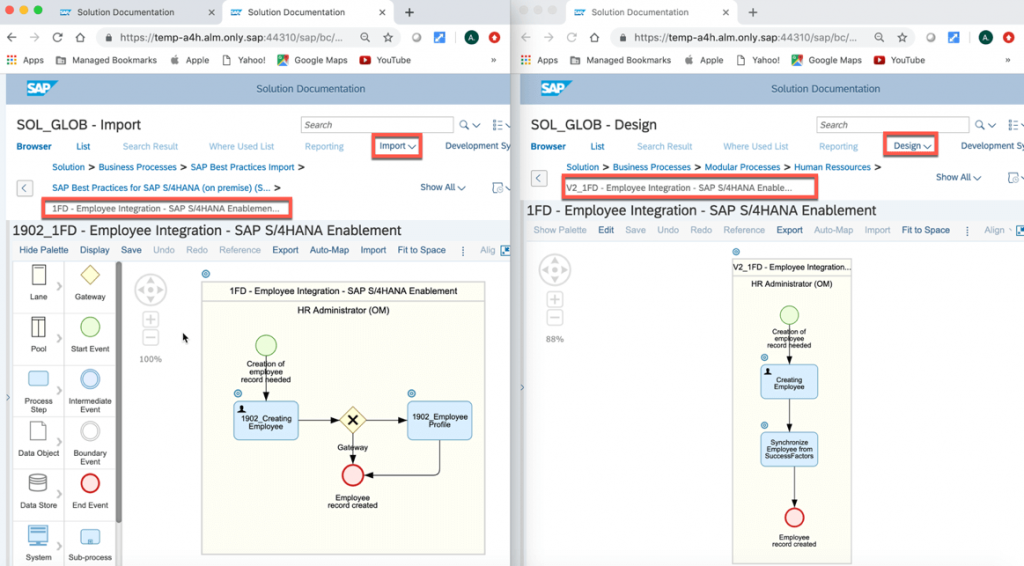
i. Duplicate your browser tab
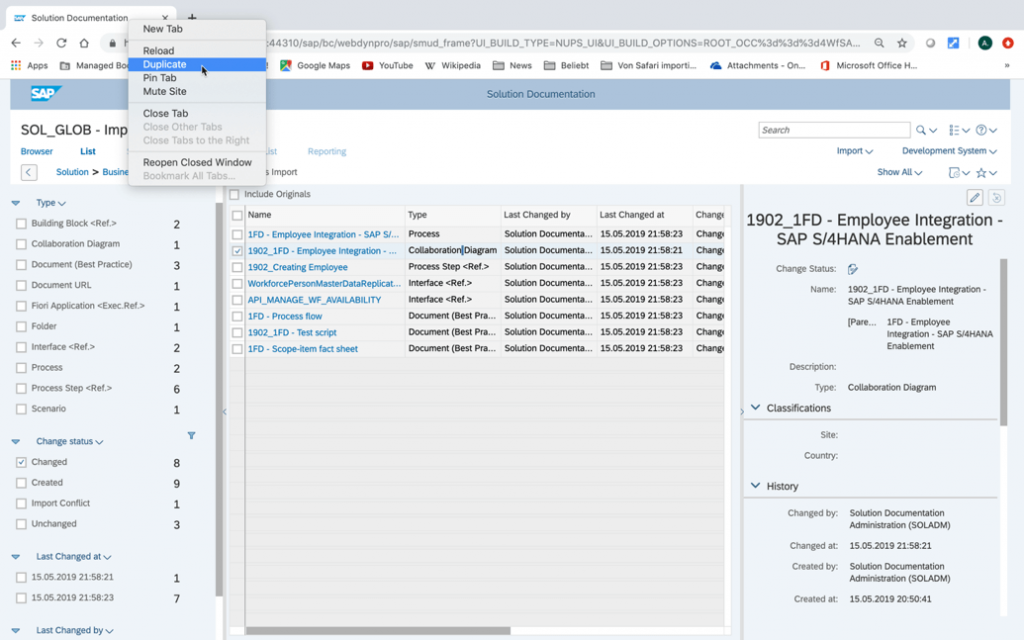
ii. Open the diagram
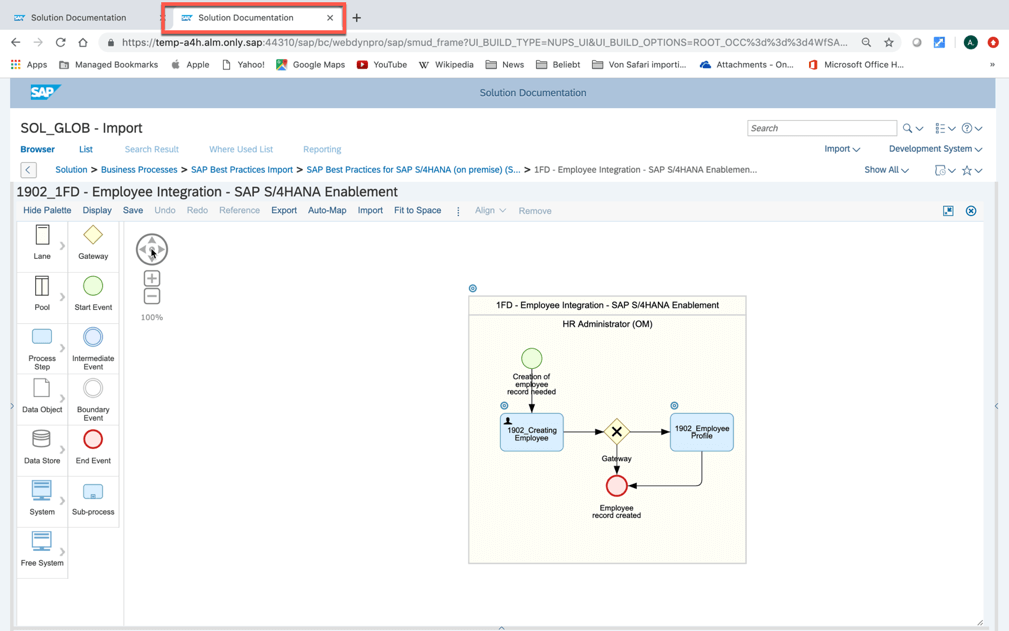
iii. Duplicate again the browser tab

iv. Change to your parent branch
v. Open the same diagram in this page
vi. Mark the two browser tabs with the open diagrams
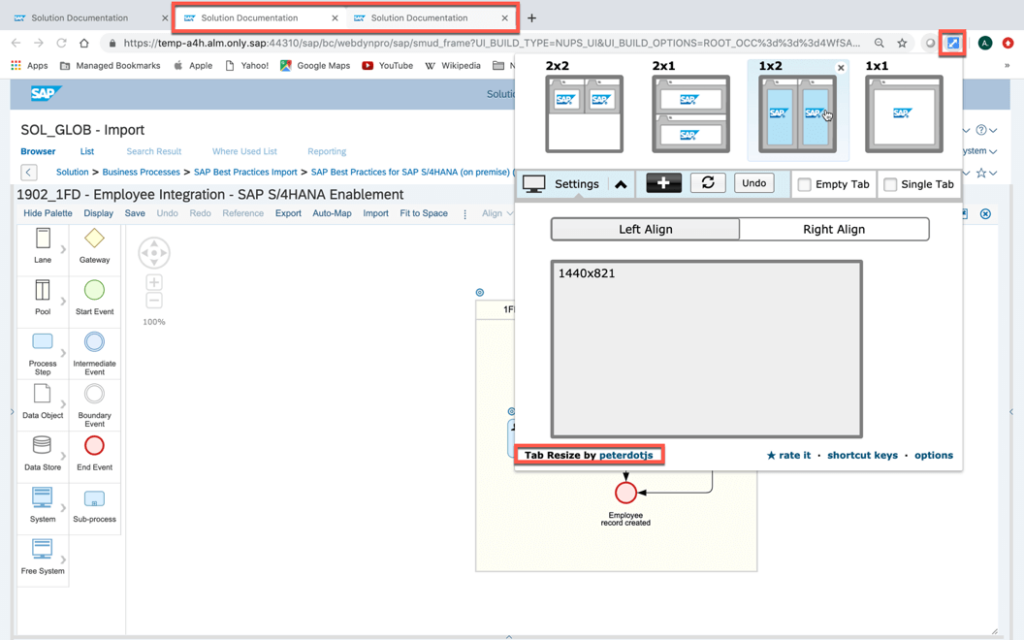
vii. Via the chrome add-on “tab resize by peterdotjs” you can show the tabs in one screen
viii. Now you can make a manual comparison
15. Once you are familiar with the available changes and the import conflicts of the content update you can proceed with release to the parent branch
Note: A release operation is also possible in the previous shown list view based on single elements and their change status.
16. With the upcoming pop-up you should be already familiar due to our previous release activities. It shows now an additional warning about detected import conflicts.
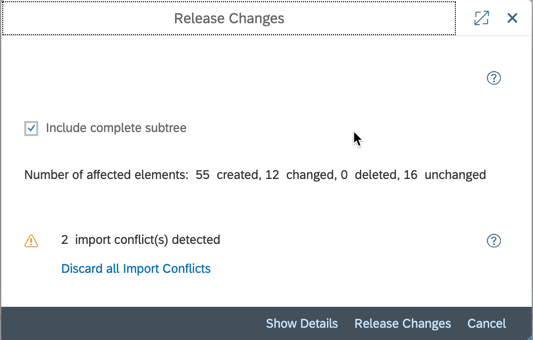
17. You now get the option to discard all import conflicts. This function is very important to keep all your current changes of the parent branches and not overwrite them during the ‘release’ operation. The ‘discard’ operation applies only to conflicts which were introduced above in the attribute panel.

Note: Please make sure you have applied SAP note 2776369 Errors Discarding Import Conflicts (<= SPS08).Note: The ‘discard’ operation is especially important to preserve your location changes. A ‘discard’ operation on attribute level (e.g. only location) is not possible.
18. In our example the ‘discard’ would be have the following impact:
– Keep the names of the elements from the parent branch
– Keep the attributes of the elements from the parent branch
– Keep the locations of the elements from the parent branch
However, we receive all the updates from our latest SAP Best Practices content,
for e.g.:
– New Scope Items
– Updates for existing Scope Items
– New SAP Fiori
– Etc.


