Overview
- CRM WebClient UI is a web based application for the modules covered in SAP CRM.
- This framework has evolved over the period of time as successor of different user interfaces provided by SAP for the SAP CRM.
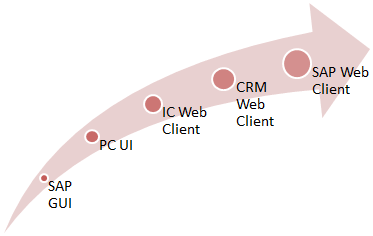
Web UI history
- It is a business role based application:
- This means that through this interface the user will be able to access only those applications for which he/she is having authorizations.
- If a user is assigned a single role, he will not have to select the role on logon.
- But in case there are multiple roles assigned to a user, he/she will have to select one of the available roles in order to log in to the CRM Web UI
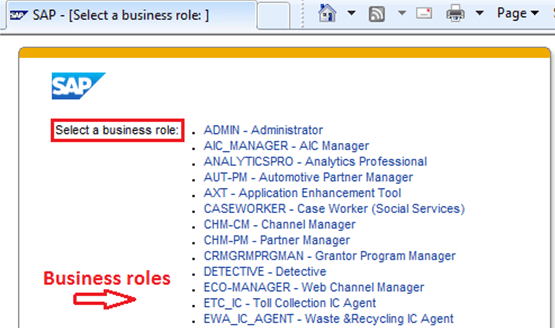
Business Role selection in first page of SAP CRM Web UI
- Irrespective of the role selected the screens of the CRM Web UI are structured in L-Shape.
- But the applications and functionalities which user will be able to access in the CRM Web UI depends up on the role selected.
L-Shape
- Once logged in, user can see the Web UI screens in L-Shape.
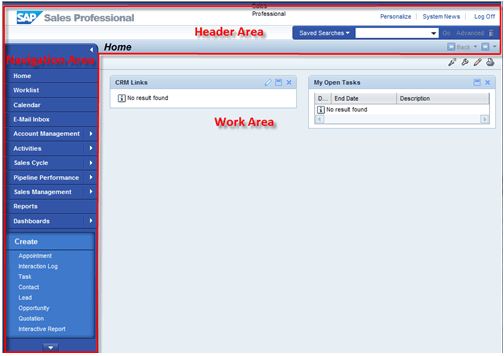
L-Shape display in SAP CRM Web UI
- It consists of following components:
- Header Area
- Navigation Area
- Work Area
- Positions of all components of the L-Shape are fixed and cannot be changed.
- An administrator can change the skin and logo of the web client as per company specific requirements.
- Header area is provided to access application independent URLs and functionalities.
- Using navigation bar user can access different applications, to which he is having authorizations.
- Work Area gets updated based on actions a user takes on the Navigation bar.
- It also gets updated for few actions on the header area.
Header Area
- It also gets updated for few actions on the header area.
- Header area is static and its position is fixed.
- It is possible to set its height in the CRM customizing but its position is fixed.
- Header area consists of following components
- System Links
- Saved Searches
- Work Area Title
- History

Components in SAP CRM Web UI Header
Navigation Bar
- Using navigation bar, user can accesses the application to which he/she is having authorizations.
- It also has few links for generic pages like:
- Home
- WorkList
- E-Mail Inbox
- Calendar
- Other links available in the navigation bar are application specific and vary from one business role to another business role. These links are divided into following:
- Application link
- Quick create links
- Recent Items
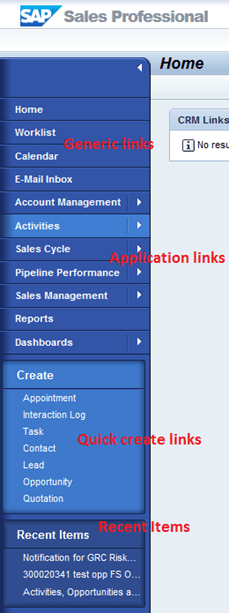
Navigation Bar in SAP CRM Web UI
- Application links can be configured at two levels.
- Using first level application links user can access the search, create and report links of a particular application.
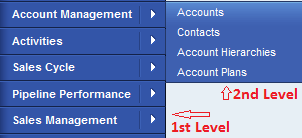
Levels of navigation via Navigation bar
- Second level application links directly takes user to particular search page.
- Quick create links are meant for direct access to the create page for a particular business process document.
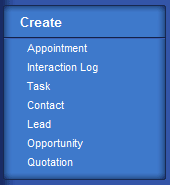
Quick create block in the navigation bar
- Recent items in navigation bar represent a kind of history and maintain last visited business documents or applications by the user.
Work Area
- Work area is the place where user works!
- It gets updated with actions that user takes on the navigation bar.
- It can consist of
- calendar,
- e-mail Inbox,
- work center groups,
- search-result page,
- overview pages,
- sub overview page
- Following are few generic pages available:
Home Page: - Depending upon the business requirement, content of the Home page can be configured for standard (My Open Tasks) or custom functionality (CRM Links).
- Navigation from the Home page will depend upon its content.

Home page
Worklist page:
- It displays alerts, workflow tasks and business transactions which are currently pending with or assigned to the logged in user.
- It is possible to navigate to different application or business transaction from worklist page.
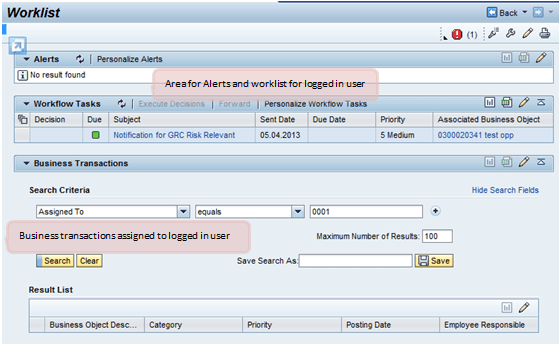
Worklist page
E-Mail Inbox and Calendar
- This page can be configured to be in sync with the user mailbox
- For this, CRM middleware settings are used so that user can access mailbox within Web UI
- Different views are possible within the calendar page – single day, week, month view
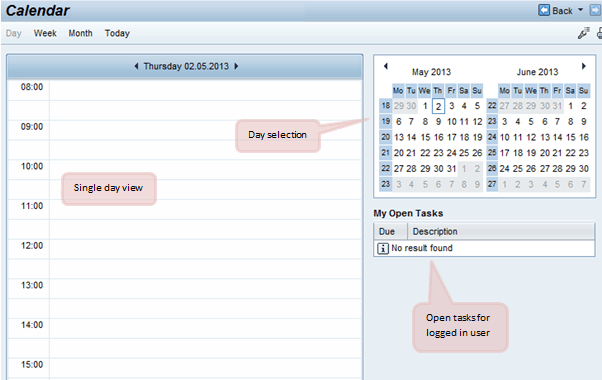
Calendar View
- Similarly user can see the E-Mail inbox in sync with the Lotus Notes server or Outlook.
Work Area
- Applications assigned to the logged in user are accessed in the Work Area
- On clicking on an application in navigation bar, work area displays work center with work area groups consisting of relevant links to create, search and report.

Work Area with Work Centre Groups
- From work center user can navigate to Create page, search page or report page.
- As discussed above, in case of generic pages like Home page, WorkList page, etc. work area has different layout and content.
- But for the applications in the navigation bar, the structure and layout of work area is identical across the applications.
- To implement “work area”, knowledge of both Web UI programming and CRM customizing is needed.
Search Page
- Search page is divided into search criteria, result table and saved search area.
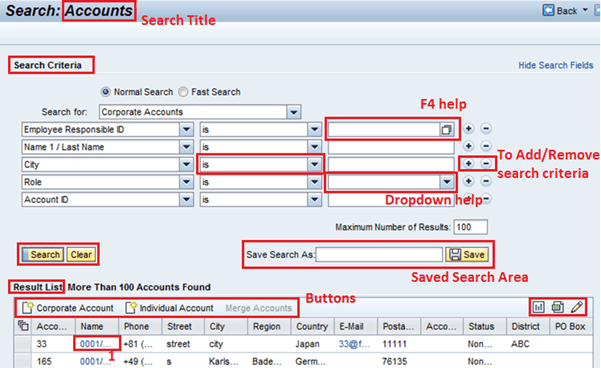
Advanced Search Page
- Within search criteria user can set the criteria to find an element.
- It is possible to add or remove search criteria using the buttons available next to search criteria fields.
- Search criteria fields can be implemented with F4 help or dropdown help.
- Multiple operators can be configured for each search criteria.
- Search result shows the result obtained from the search.
- Once search is performed, result table shows the number of records found, if any.
- It possible to have buttons on top of the result table header to provide some business process. For example, there are buttons to create different type accounts in the above figure.
- In general, buttons to create new record are presented on the search result table header.
- On the right-side end, search result table also contains buttons which enable user to export the records to excel sheet and the button for personalization of the search result table.
- The record found in the search result can also contain hyperlink in columns.
- With these hyperlinks, it is possible to navigate to the individual record which is displayed in the Overview page.
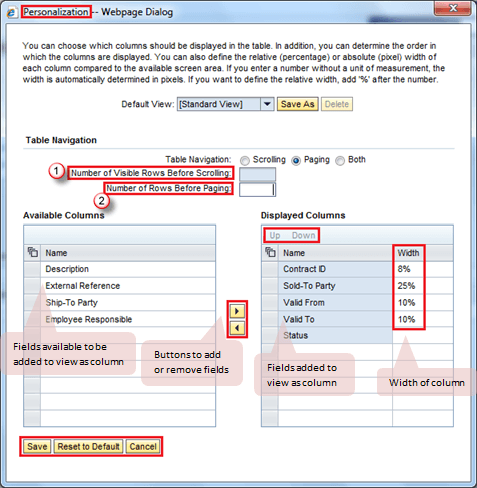
Personalization settings pop-up view.
- Using the personalization button on the search result table header, user can personalize this view for the columns displayed and the order in which the columns are displayed.
- As highlighted above:
- User can the value of row count after which scroll bar will be visible.
- Also user can set the values for number of records in single page.
Overview Pages
- Overview page can be used to work on complete data related to a single record.
- It is used to display, update and create new data such as business partner, sales order, etc.
- The data from single application or business transaction is organized into assignment blocks.
- First assignments block shows the header or main details and other data are grouped in to different assignment blocks as per the requirement.
- Possible views in an assignment block:
- Form view
- Table view
- Tree view
- The header of the Overview page displays the title of the object which is open and its description.
- The header also consists of the header buttons with which user can perform different task on the overview page.
- Another component of the header is the History buttons with which user can navigate back and forward within the work area.
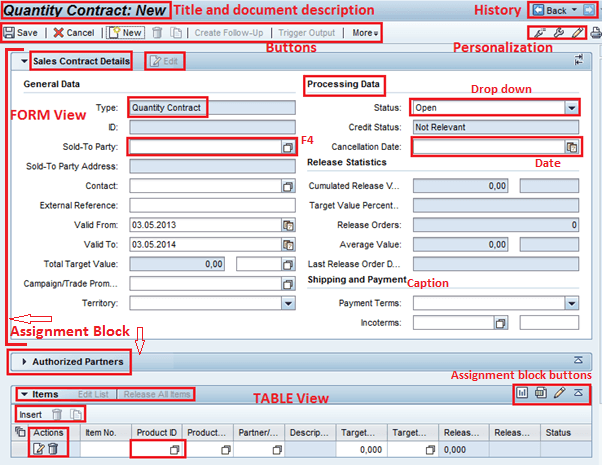
Overview Page Search Page – Form and Table View
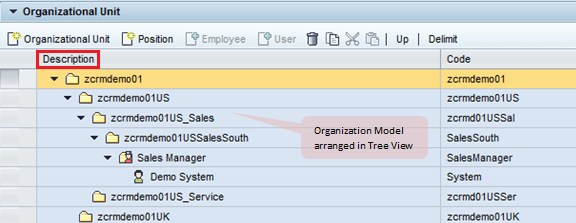
Tree View
- Similar to search result table, overview page contains a personalization button with which user can select which assignment blocks user can see within the page.
- An assignment block can by default be loaded in expanded or lazy mode. This helps in the performance improvement of the application.
- All types of view in assignment block i.e. form view, table view and tree view can contain input fields with F4 input help or dropdown input help.
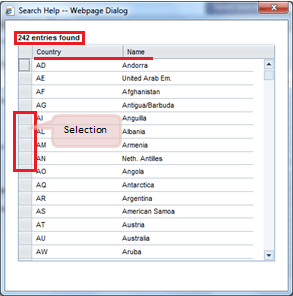
Value help Pop-Up using F4
- Date fields in the views are displayed with date help.
- Within form view we can group the data using the Captions.
- Individual assignment block can also contain buttons on the header.
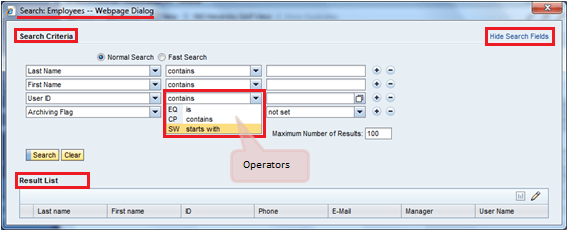
Search help Pop-Up
- Table view and tree view can contain header which can also have buttons.
- Also, it is possible to have buttons in the first column of a table view.
- It is possible to have hyperlinks within all these types of view.
- Using these hyperlinks it is possible to navigate from one application or business transaction to another. For example, to Sold-to party from a Sales Order.
- As per requirement, it is possible to have attachments assignment block in Overview page.
Assignment block for Attachments
- In this block it is possible to attach documents or URLs.
- It is possible to attach document from content management or from the local hard disk:
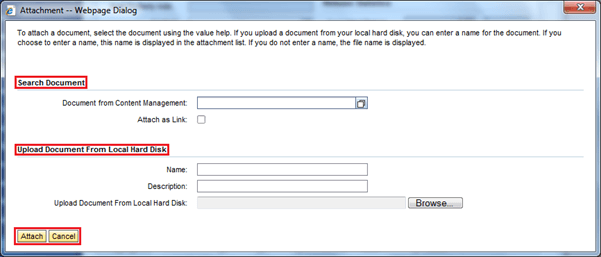
Pop-up to add attachment
- Once attached you can see the document properties, open it or delete it.

Assignment block for Attachments
- There is also a region for the error messages in the header area:
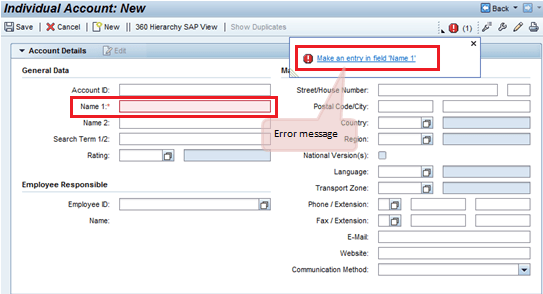
Personalize
- There is an option for personalization of the CRM Web UI.
- Here it is possible to set settings which are applicable across the applications for logged in user.
- Here user can also change the skin of the application.
- In the “Personalize My Data” section user can set values for the settings like format of date.
- In layout section user can set Skin of the application.
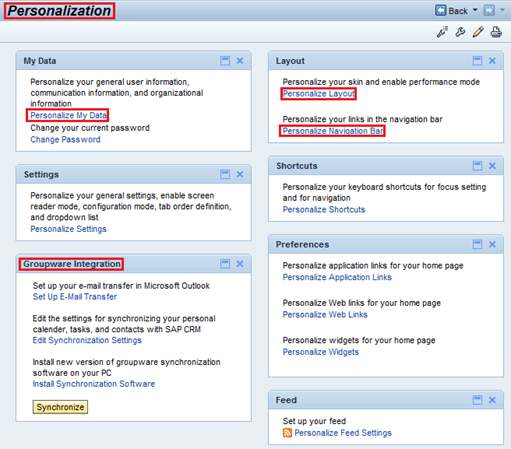
Personalization Options
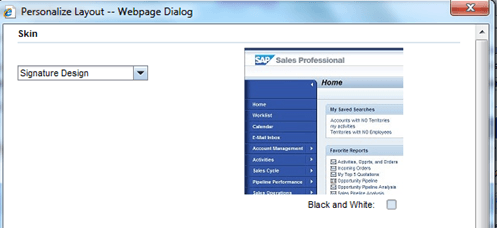
Setting skin in personalization
- There is a separate block for settings related to the Groupware integration.
- In this block user can maintain required settings for the integration of CRM with user mailbox for E-Mail and Calendar pages.
Rating: 0 / 5 (0 votes)


