Introduction
In this blog I am going to propose you a technical solution that I used on my last project to maintain “transports” between multiple environment packages in the same SAP Cloud Integration tenant.
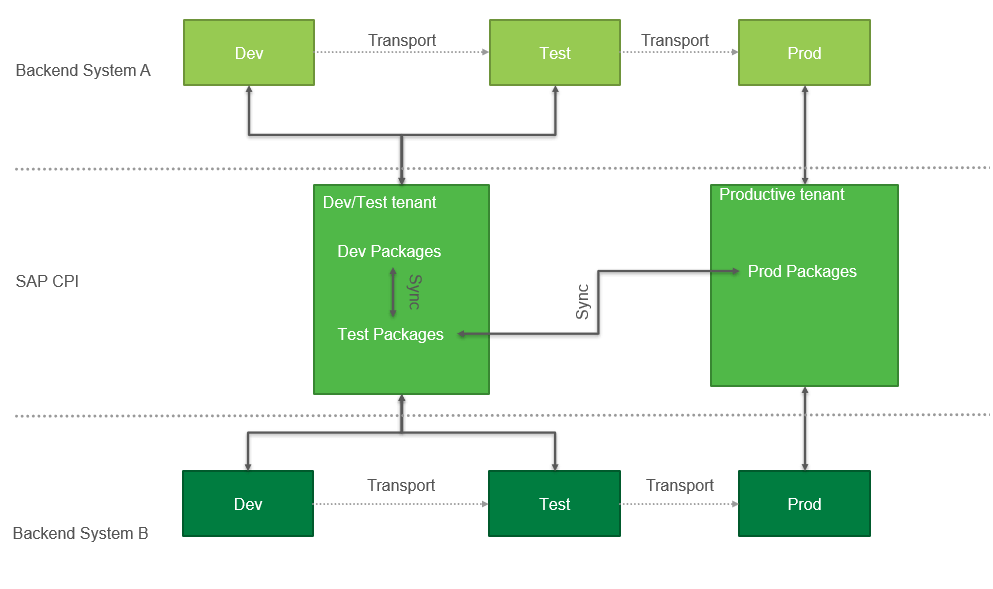
The problem, often found in projects, comes when a SAP Cloud Integration tenant need to support multiple environments. There are situations when, customers usually host DEV and TEST environments in the same Cloud Integration tenant. The challenge comes from having all the environments packages on sync with minimal risks and effort. On this problem SAP tools cannot help us i.e. (File based transport, Transport via CTS+, Transport via SAP Cloud Transport Management).
Define a procedure
Before starting to talk about synchronizing packages in the same SAP Cloud Integration tenant, I think it is very important to underline the idea of having a procedure in place that you should follow throughout the entire project.
From my experience I find it very easy to be tempted on changing “small things”, especially on testing phases SIT and UAT, directly on the interest package and after the tests are unblocked to modify also on DEV. But this kind of approach on long term is translated on freezing the DEV package and testing packages to serve on development and testing at the same time.
Even if we have to maintain multiple environments in the same SAP Cloud Integration tenant or not, it is important to have in mind that the DEV package is used only for development and all the changes are done in this package and TEST packages (doesn`t matter how many test systems there are) will be used only for testing and not performing changes on these packages.
Manual approach
Coming back to the packages synchronization in the same SAP Cloud Integration, an option could be downloading the integration flow locally, manually changing the IDs from manifest file and then importing the changes on the target package. This manual approach is not a feasible solution but is important to understand the process.
Required steps
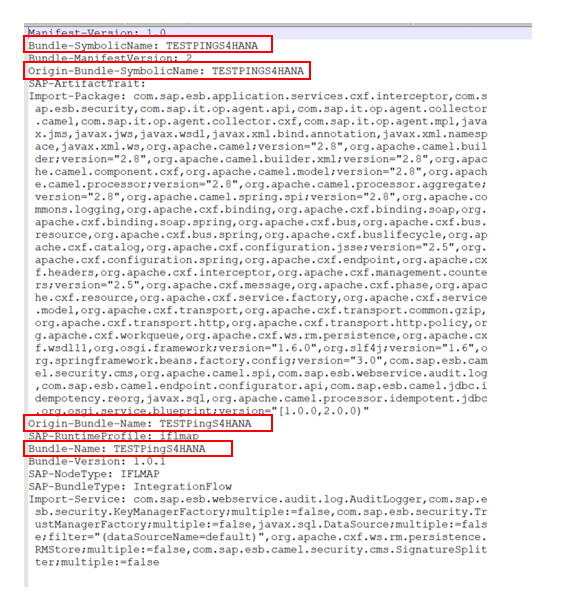
1. After you download the Integration flow from DEV package go on your computer and open the zip file. Go to the folder META-INF where is located the file MANIFEST.MF. Open the file and change the following fields with the ID of the integration flow from TEST package:
- Bundle-SymbolicName
- Origin-Bundle-SymbolicName
- Origin-Bundle-Name
- Bundle-Name
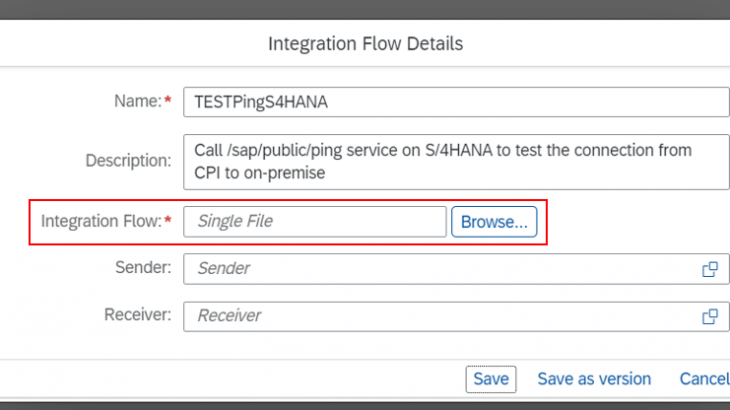
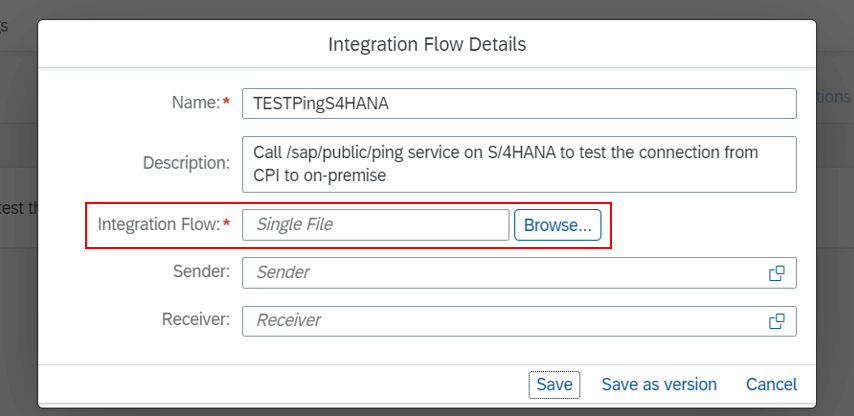
2. Save changes and upload the new ZIP to target integration flow. Go to the Integration flow, under Action button select “View metadata” and upload the file that you changed at Step 1.
With this technique you will be 100% sure that all the changes made in DEV will go to TEST package. But as you probably think, this process is time consuming and of course requires maximum attention to prepare the file.
Advantage
Ok, looks good, but why do I need this? Why not just delete the old TEST Integration Flow and copy the new version from DEV? The answer is because usually the Integration Flow has configurable parameters and once you make a new copy, it is necessary to change the DEV parameters to TEST. This is time consuming and requires, again maximum attention of checking all of them.
By using this approach, the Integration flow is updated, so the configurations remains the same and only thing that the end-user should do is pressing button “Deploy“. So simple, right?
Automatic approach
The manual process is an option, but still cannot be used in a real project where you have a lot of interfaces and the changes are frequently made in your landscape. In the end the developer will decide to make the changes directly in the environment where the team perform the tests, to save time. The versioning will be destroyed, and the changes will be performed manually in multiple Iflows.
After a short checking on API Business Hub, I have found Integration Content API collection. This collection has everything that I need to transform manual process in something that I could use on my project. Combining manual process with the API collection I decided to create a SAP Cloud Integration Iflow that will do the job. I used SAP Cloud Platform Integration to eliminate the hosting problem and the problem was reduced on building and an UI which receives some search keys from end-user, perform standard API calls and sending back a return message.
Bellow are the main steps that the integration flow should have:
1. Save from the request the key that will identify the source and target integration flows:

2. Download the source integration flow using following API call:
GET https://<CPI_HOST_ADDRESS>/IntegrationDesigntimeArtifacts(Id='{Id}’,Version='{Version}’)/$value

3. The ZIP file received from previous call, will be processed with a groovy script that needs to change from “MANIFEST.MF” file, the fields Only Bundle-SymbolicName, Origin-Bundle-SymbolicName, Origin-Bundle-Name, Bundle-Name with the ID of target integration flow. The rest of the ZIP content should remain unchanged.
Message replaceIflowID(Message message) {

    def input = message.getBody(java.io.InputStream);
    def SourceIflowID = message.getProperty("SourceIflowID");
    def TargetIflowID = message.getProperty("TargetIflowID");

    if(SourceIflowID == null || TargetIflowID == null){
        return input
    }

    MyZIP zipstream = new MyZIP(input);

    ByteArrayOutputStream out = new ByteArrayOutputStream();
    ZipOutputStream zos = new ZipOutputStream(out);

    ZipEntry entry = null
    isFound = false
    def StringSource = ""
    def stringPath=""


    while ((entry = zipstream.getNextEntry()) != null) {
        if(entry.getName().length()> 11 && entry.getName()[-11..-1] == """MANIFEST.MF"""){
            zos.putNextEntry(new ZipEntry(entry.getName()));
            def text = zipstream.text;
            text = removeSpace(text);
            text = replaceImportantValue(text,SourceIflowID.toString(), TargetIflowID.toString())
            zos.write(text.getBytes());
        }
        else{
            zos.putNextEntry(new ZipEntry(entry.getName()));
            zos.write(zipstream.text.getBytes());
        }
        zos.closeEntry();
    }
    zipstream.myClose();
    zos.close();

    message.setBody(new ByteArrayInputStream(out.toByteArray()))

    return message

}
4. Update the target integration using following API call:
PUT https://<CPI_HOST_ADDRESS>/IntegrationDesigntimeArtifacts(Id='{Id}’,Version='{Version}’)

The main functionality is done now, but still require some manual activities to find the IDs of the flows into SAP Cloud Platform Integration(which is quite difficult when the artefact is not deployed … require API call from Integration Content) and also to use an application that can send requests like Postman.
By creating another SAP Cloud Integration flow that can return a HTML page and could interact with end-user, the manual search into SAP Cloud Platform Integration disappears and the application can be used directly from a browser.
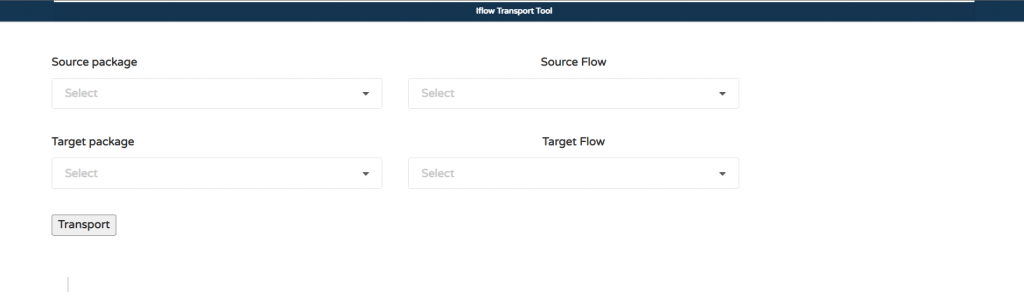
How the interface is working
The page has four drop-down menus and a button, when the user chooses the values and press button “Transport”, behind the HTML page an API call to main functionality (which I explained early) will be executed and will transport the changes from source to target Iflows. The response is checked and translated in an alert message that indicates if the changes were done or not.
When the page is loaded on browser, the dropdowns behind source and target package also will use an API call that will fill the menu with all the packages from your tenant. Again, a standard API from Integration Content was used.
GET https://<CPI_HOST_ADDRESS>/api/v1/IntegrationPackages

When the user selects a package name from the list, another API is called this time for extracting all the Iflows from the selected package and will fill the Iflow dropdown menu. When the Source and Target Iflow name are filled, the user can press the button “Transport” and the parameters will be passed to the functionality API.
GET https://<CPI_HOST_ADDRESS>/api/v1/IntegrationPackages(‘{Id}’)

The calls from HTML are made with Ajax framework and for a better understanding I will list below the call that is done when the button “Transport” is pressed.
$('#transport').click(function() {
    const resultTab = document.getElementById("results-table");
    resultTab.innerHTML = '';

    results = []
    let valueSource = $('#integration-flow-source').val();
    let valueTarget = $('#integration-flow-target').val();
    let objSource = integrationFlowsSource[valueSource];
    let objTarget = integrationFlowsTarget[valueTarget];

    if (objSource.iD === objTarget.iD && compareVersion(objSource.version, objTarget.version) === 0) {
      ...
      <Perform additional checks... Like if the versions are already in sync>
      ...
    } else {
        $.ajax({
                url: url + "/updatePack",
                type: 'POST',
                contentType: "application/json",
                data: JSON.stringify({
                    "SourceIflowID": objSource.iD,
                    "SourceIflowVersion": objSource.version,
                    "TargetIflowID": objTarget.iD,
                    "TargetIflowVersion": objTarget.version,
                    "TargetIflowName": objTarget.name
                }),
                xhrFields: {
                    withCredentials: withCred,
                    responseType: 'application/json'
                }
            })
            .then(function(response) {
                let data = JSON.parse(response);
                if (data.messageCode == "200") {
                    load_successPopUp();
                } else {
                    var errorMessage = data.message;
                    load_errorMessagePopUp(errorMessage);
                    load_errorPopUp();
                }
                let element = $('#results-table');
                element.append('<div class="item"> <pre> <code>' + response + '</code> </pre> </div>');
            });
    }
})


