With the release of SAP S/4HANA Cloud 2302 users of Map Format Data can use a new application called Test Incoming Format Mappings. With this tool, it’s easier to define a Format Mapping in Incoming direction, for example, custom specifications of MT940, CAMT.053/4, MT300, MT320, etc.
You can now continuously check while defining whether the definition of your format behaves according to given requirements. If it sounds too complicated now, don’t worry. In this blog, we’ll go through the entire process using a simple example from “the world” of bank statements.
Even though we decided to use bank statement and Map Format Data for Incoming Files from Banks, the described process will be the same for incoming format mappings defined in other Map Format Data integrations e.g.: Map Format Data for Treasury Correspondence and Map Format Data for Advanced Payment Management.
In this article, I’ll refer to various resources such as demo files and XML export of Format Mapping.
Requirements of the Bank Statement
If your bank requests you to receive an end-of-day bank statement, you have two options. Either use one of the standard formats, which are available within the Manage Incoming Payment Files app, or alternatively, if some customization is required, you can define a completely new mapping format in the Map Format Data for Incoming Files from Banks.
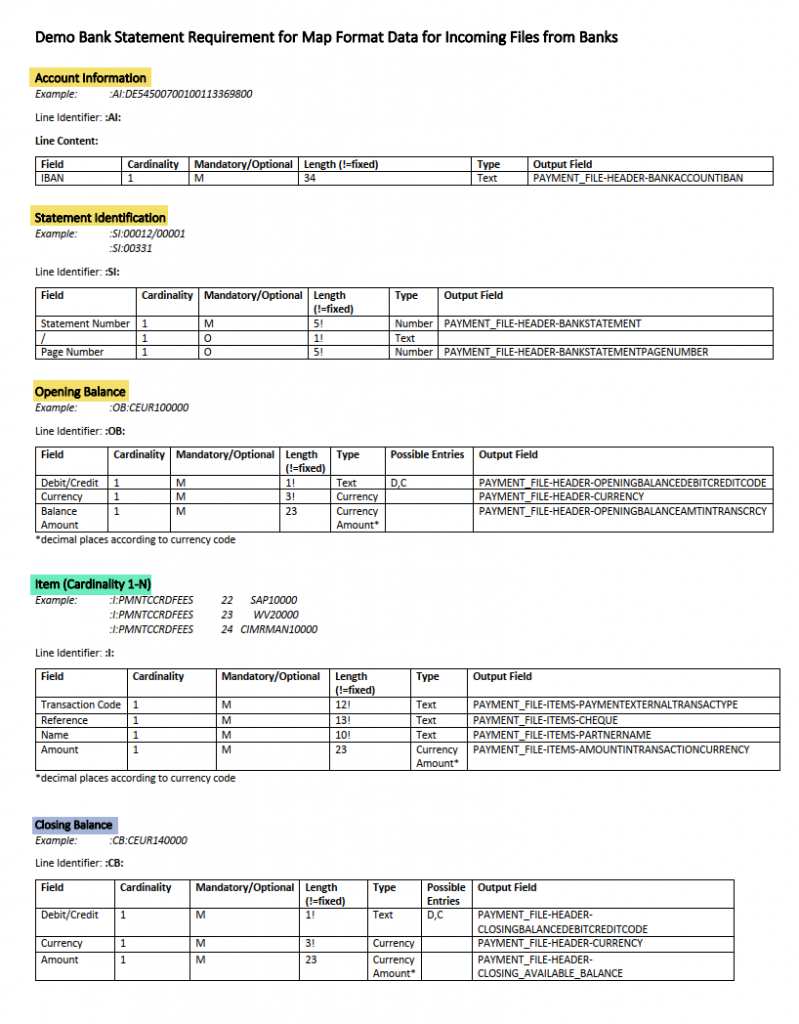
Within this demo we’ll show you the process on how to create such customized format mapping in the application emphasizing the testing possibilities of such mapping. Refer to SAP Note’s attachment “requirement.pdf”, which represents a simple demo bank requirement, which will be used further on in this document as a base for defining custom flat-file format mapping.
In general, the bank requirements, as well as the format mapping, can be divided into three logical parts – header (yellow), items (green), and closing/footer (purple).
In the next steps, we’ll create the format first, and continue with defining all the logical parts one by one, starting with the header of the statement. For this demo, we’ll always test our (even partial) definition in the Test Incoming Format Mappings after defining each part of the format mapping.
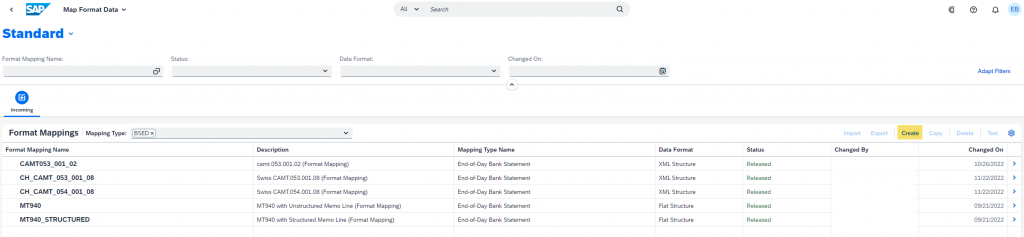
Format Creation
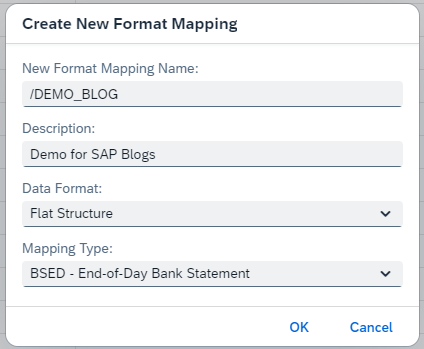
Let’s start with the creation of a new flat-file format mapping.
Defining a Header
If you wish to skip the manual configuration, you can upload “demo_blog_header.xml” from the SAP Note 3309184 – Test Data to Learn to use Map Format Data (incoming format mappings). The same step-by-step configuration is explained in the following text.
According to our demo requirements, the header shall consist of three lines: “Account Information”, “Statement Identification” and “Opening Balance”.
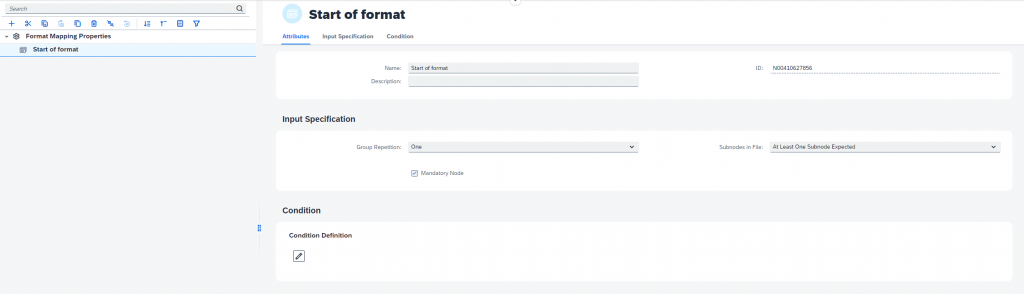
First, we need to define a node of a type “Record Group”. This node type is used to manage relations between records. For example, if a record (or a group of records) is expected to repeat more times, we need to encapsulate it in a record group with a defined number of expected occurrences. Similarly, if only one from a set of records is to be present, the records must be encapsulated in a record group.
As per the demo requirements, we need to include multiple lines (multiple records) in the format mapping definition, therefore we need to define a record group first. We’ll name it Start of Format. This record group defines, that we expect only one end-of-day bank statement per file, therefore in the Input Specification of this node we’ve to set the “Group Repetition” to one.
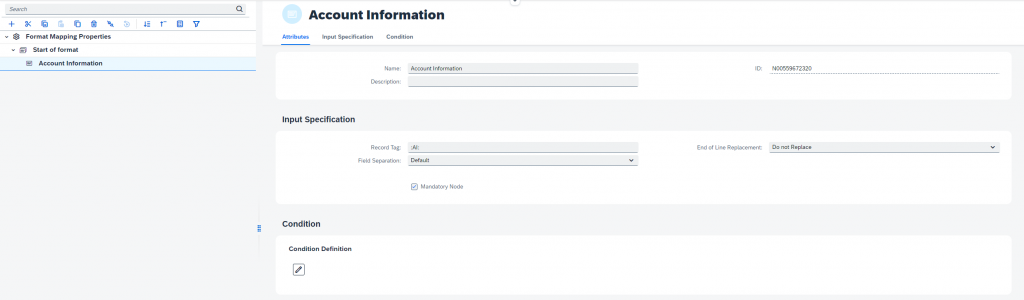
As a next step, we’ll define the Account Information as per requirements. First, create a Record for this line as a subnode of the Start of Format Record Group node. The Record Tag specifies how will the line start. In our case, the Record Tag shall be “:AI:” and the Account Information node will be mandatory (therefore the Mandatory Node checkbox is selected).
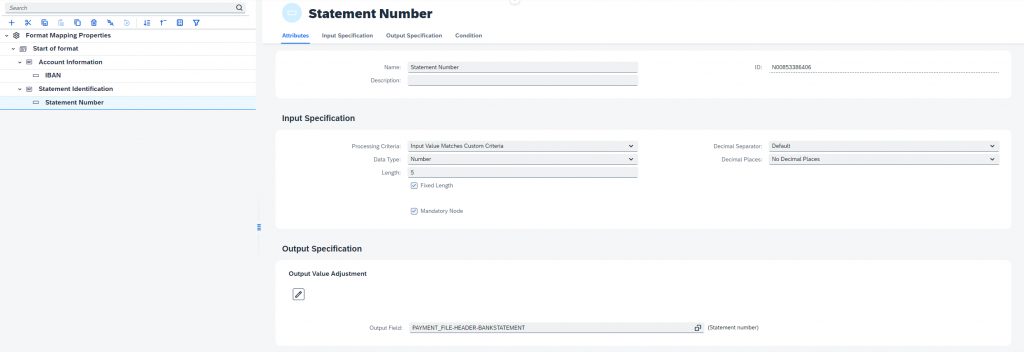
To map the content of this line, we need to introduce a new type of node called “Field”. In our case, the field that will be created as a subnode of the Account Information Record will represent the IBAN.
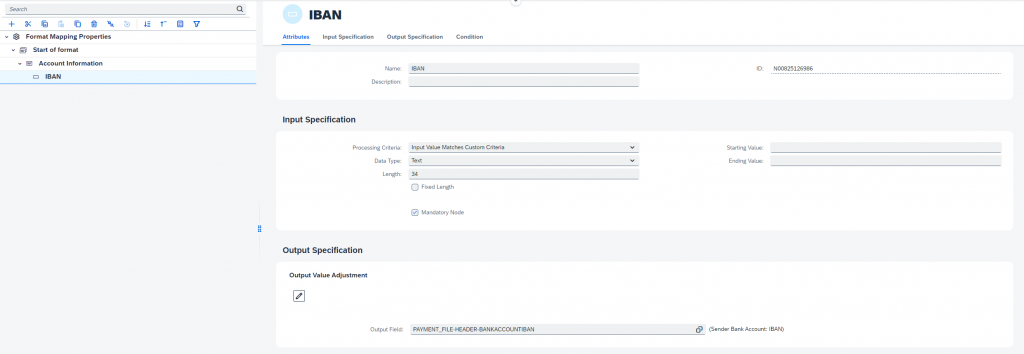
In the “Input Specification” tab, you can define the field itself, meaning what is expected of the field in terms of its type, length, etc.
There are four options that you can select as a processing criteria:
- Input Value Matches Custom Criteria – here you manually define length, type, starting, ending value, etc.
- Input Value Matches Constant Value – in such case that the mapping is successful when the value taken from the file matches the set constant
- Input Value Matches One of Enumerated Values – in such case mapping is successful when the value taken from the file matches one of the values set in the enumerations
- Input Value Matches Referred Node Value – in such case mapping is successful when the value taken from the file matches the value of the referred node
You can also define the mandatory or optional status of the node using the dedicated “Mandatory Node” checkbox. In case that the node is marked as mandatory, it must be present in the input file, otherwise the mapping process will be interrupted.
“Output Specification” defines in which table/structure/field the value is to be stored. You can use the value help to look for the right field.
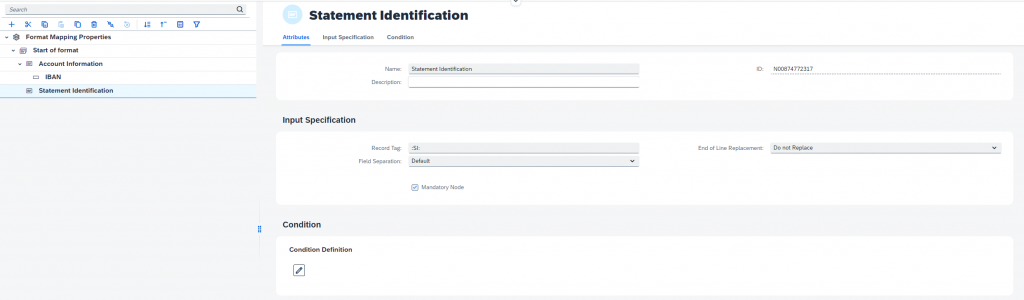
Let’s move on to the Statement Identification now. We’ll apply the same knowledge as for the Account Information record. The only differences are that “/” and “Page Number” are optional, so we need to maintain mandatory flag accordingly. If you want to speed up the format mapping creation, you can duplicate the previous record (and its field) and only adjust the necessary parts. In both cases, follow what is defined in the requirements.
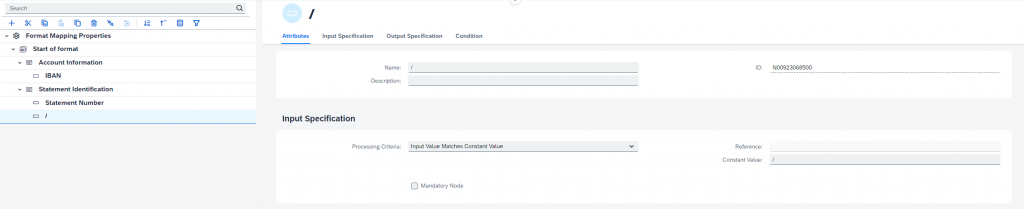
As the shash is always the same, select the Processing criteria as “Input Value Matches Constant Value” and set the Constant Value as “/”.

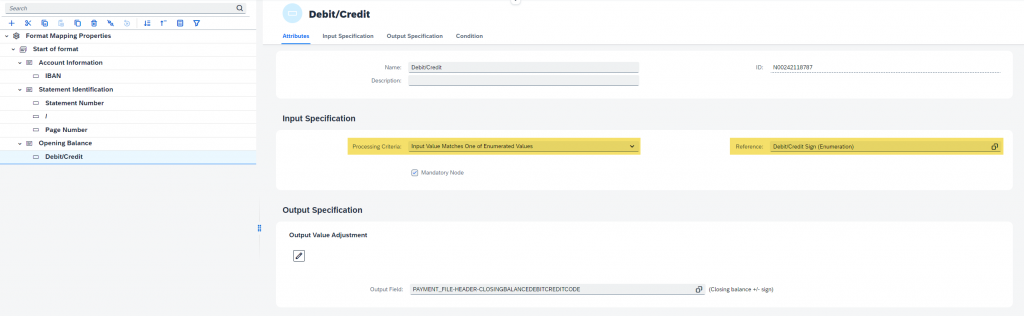
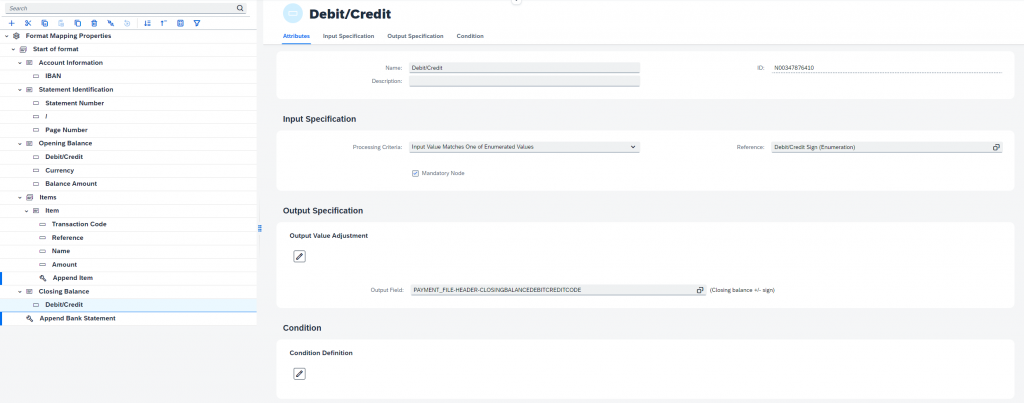
Here we’ll go again step by step as it will be slightly trickier when defining the next nodes. Debit/Credit node can take values of either C or D. For this, we can use the functionality of Enumerations that are defined on the Format Mapping Properties (root node).

Now we can define “Debit/Credit” node with the reference to “Debit/Credit Sign” enumeration. This definition means that the value from the file will be process only in case when it matches “D” or “C”. In other cases, the processing will be terminated.
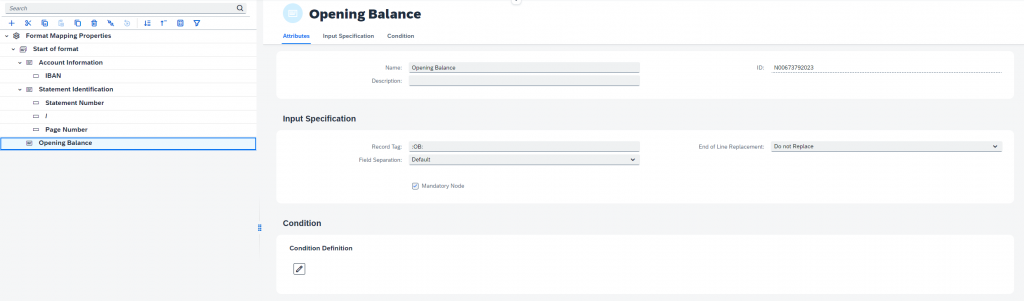
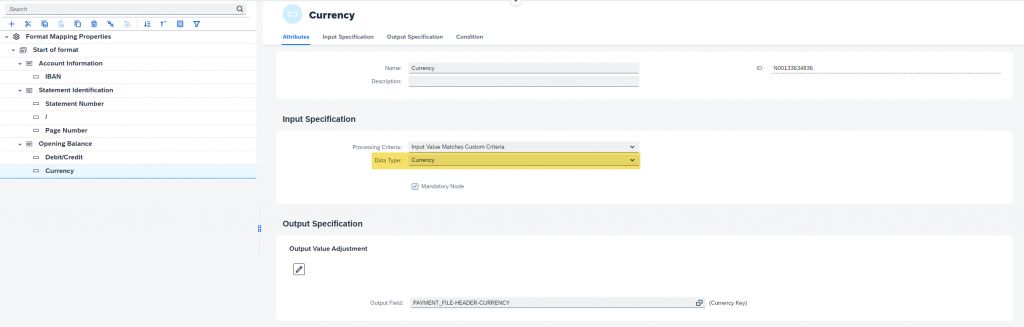
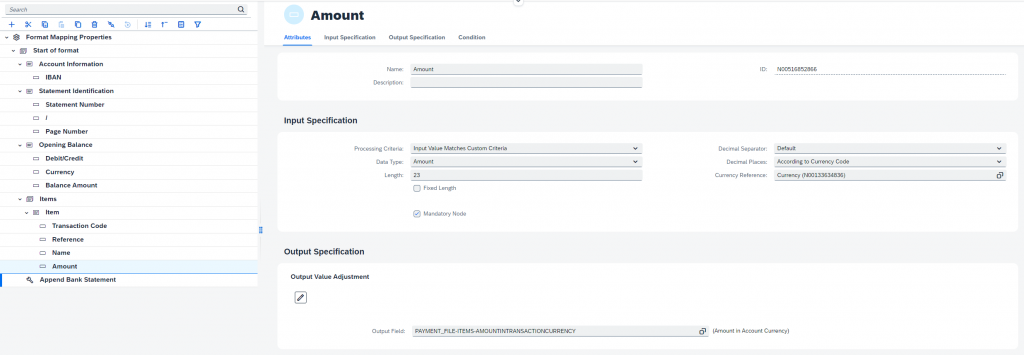
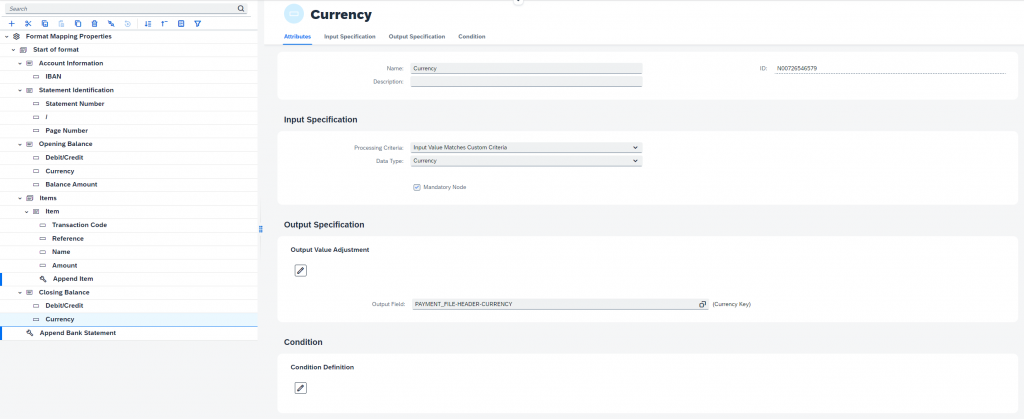
Opening Balance must include both Currency and Balance Amount information. Definition of currency is easy. The trick is to use currency data type, which will make the configuration simpler.

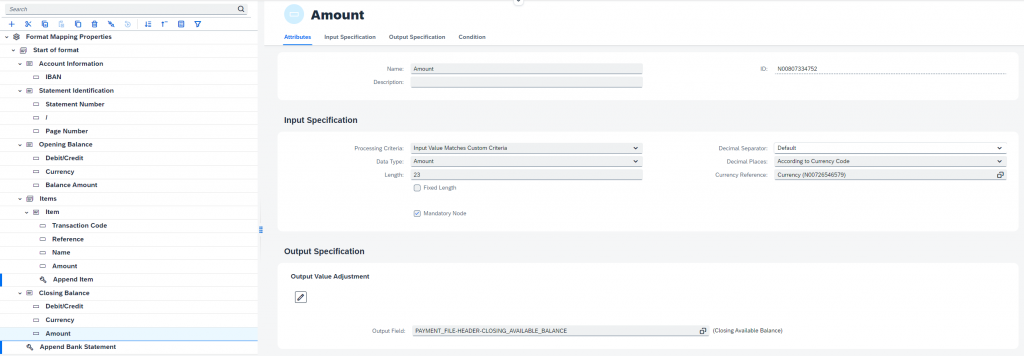
Node “Balance Amount” has the data type Amount, which enables you to adjust number of decimal places according to the currency code.
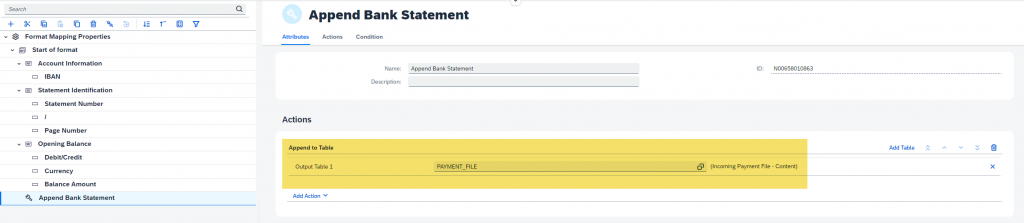
As the last step of defining the header, we need to append the data to the output structure “FEB_MAPPING”. To append the prepared data, we’ve to use the action node, which enables us, upon other things, to append data to the output table. To find out more about appending, wait until we go through the definition of “Items”, it will be clearer. As of now, create the new Action Node on the same level as the Opening Balance and name it Append Bank Statement. Then click on the dropdown next to Add Action and select the “Append to Table”. As an Output Table, select the PAYMENT_FILE as follows.
As outlined at the beginning of this document, it’s reliable to test the format as you define it.
Therefore press the “Release” button and then click the “Test” in the top-right corner of the screen to access Test Incoming Format Mappings app. A new tab with the Test Incoming Format Mappings will open.
Test #1: Header
In this first test, we’re going to check, whether the header information data that were prepared, are being mapped correctly. The Test Incoming Format Mappings enables us to simulate the mapping, so that we can visually check, whether the data were correctly mapped into the output structure as we’ve intended.
Go to the Test Incoming Format Mappings app (which was opened from the Map Format Data app). To create a test run, click the “New Run” button and in the subsequent dialog select the file, which you want to simulate the run with. In this case, use “demo_bank_statement_01.txt” from SAP Note 3309184.


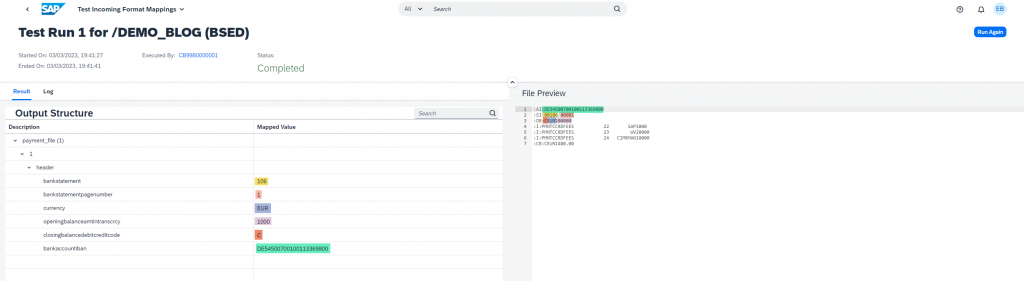
When the test run is finished, use the arrow on the right side of the row to open the detail page. The detail page provides the information about the output structure on the left side of the screen, where you can analyze the mapped data and their format. You can also use the Log tab to see the detailed information about the engine run itself. The right side provides the context with the file that you have used for the test run.
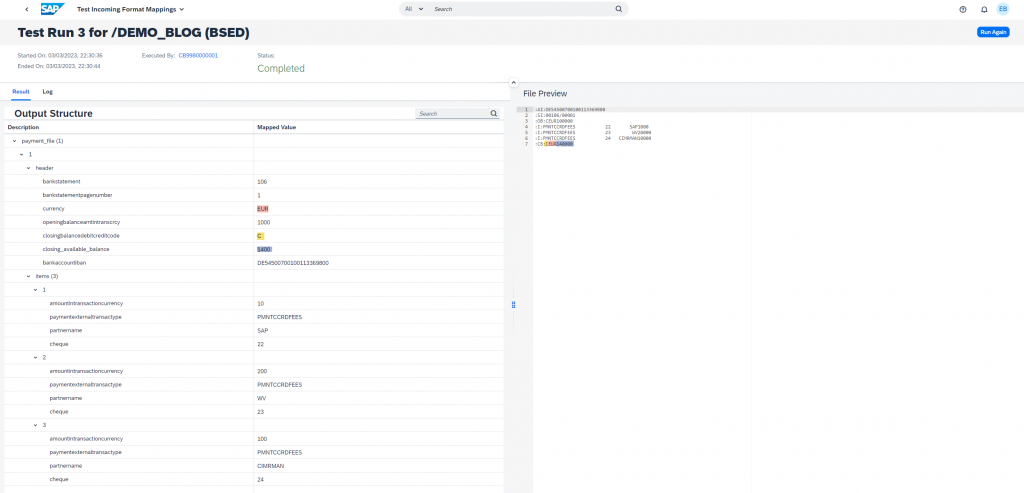
As you can see in the following picture, in our case, the data are stored in the output structure according to the definition.
Note: Currency amounts in the input file don’t contain decimal separator. Hence, “100000” means 1000.00, which leads to displaying 1000 in the output structure.
Defining Items
If you wish to skip the manual configuration, you can upload “demo_blog_items.xml” from the SAP Note 3309184 – Test Data to Learn to use Map Format Data (incoming format mappings). The same step-by-step configuration is explained in the following text.
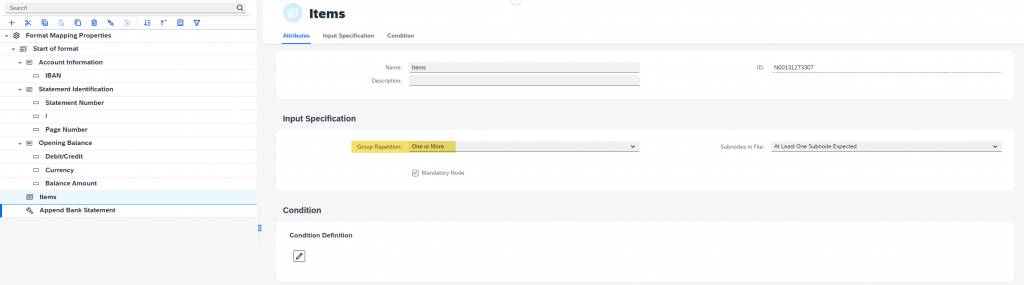
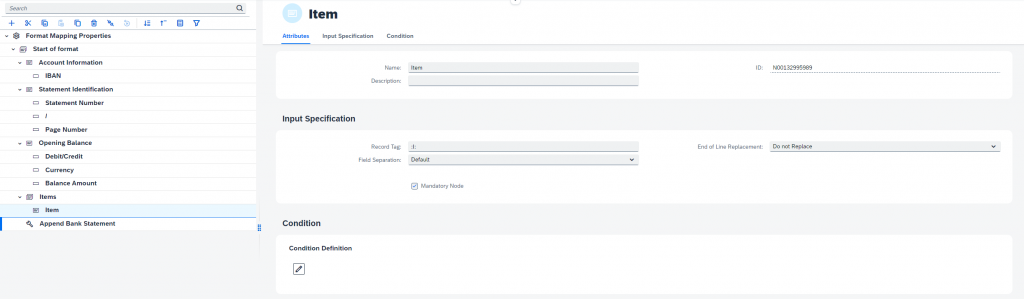
We’ll start with definition of the encapsulating “Items” node, within which we’ll specify how many times do the line appears in the input file. Therefore, we’ll create a New Record Group (on the same level as the Opening Balance) and name it Items. According to our requirements, we must set is as Mandatory and the “Group Repetition” needs to be “One or More” as the Cardinality is 1-N.
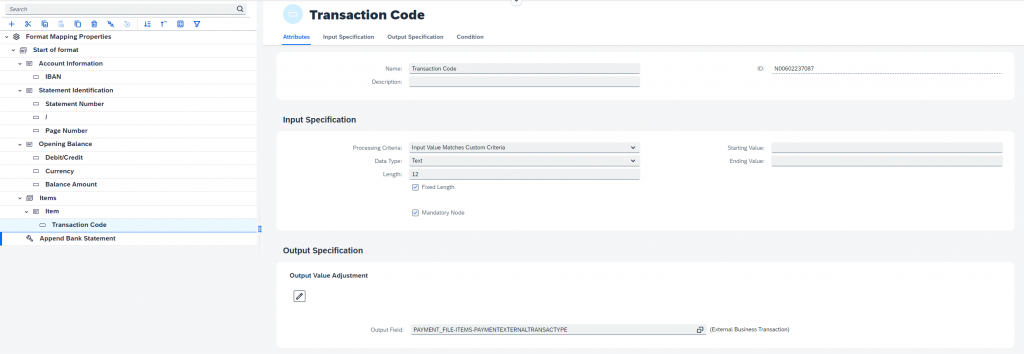
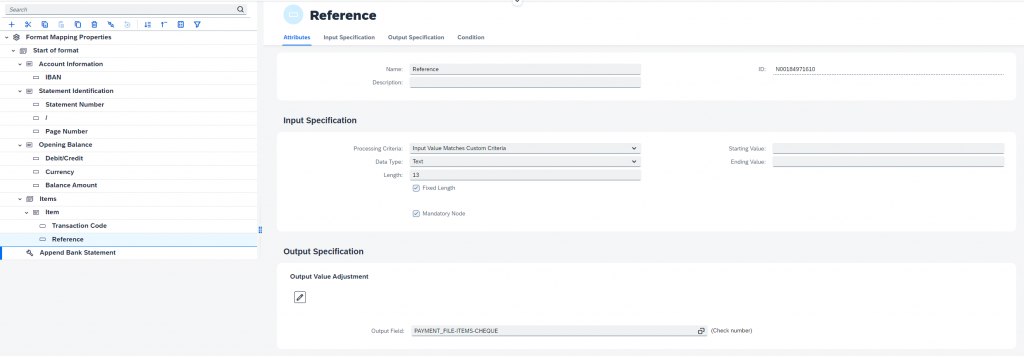
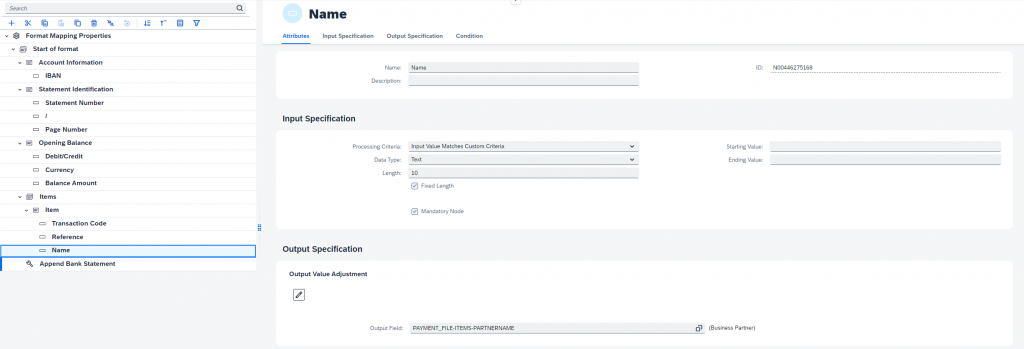
Defining the records and nodes below the Items record group will be like how we’ve defined the nodes in the previous parts of this text. First create the Record Item. Then the new fields Transaction Code, Reference, Name, and Amount. Set all nodes and its specification as per the screenshots bellow.
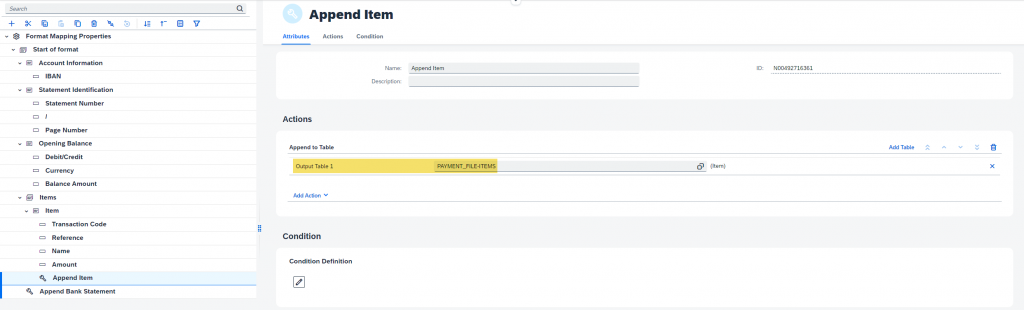
As the last node of the whole Item line, we need to append the table PAYMENT_FILE-ITEMS. Items table is a nested table in the PAYMENT_FILE structure. We need to provide the information about every item present in the file, meaning we need to append Items table every iteration of the Item record. Defining this will be done by creating a new action node as shown in the screenshot bellow.
Now we can release format mapping once again.
Test #2: Items
We can perform a test run, the same way as in the first case. Use the “demo_bank_statement_01.txt” from SAP Note 3309184 again. Please be aware of the New Run and Run Again button differences. In both cases, the actual released mapping format is used, however the “Run Again” button uses the previous input file, which was used in the previous run, hence in the “New Run” forces you to insert a new input file. We can see the results in the following picture.
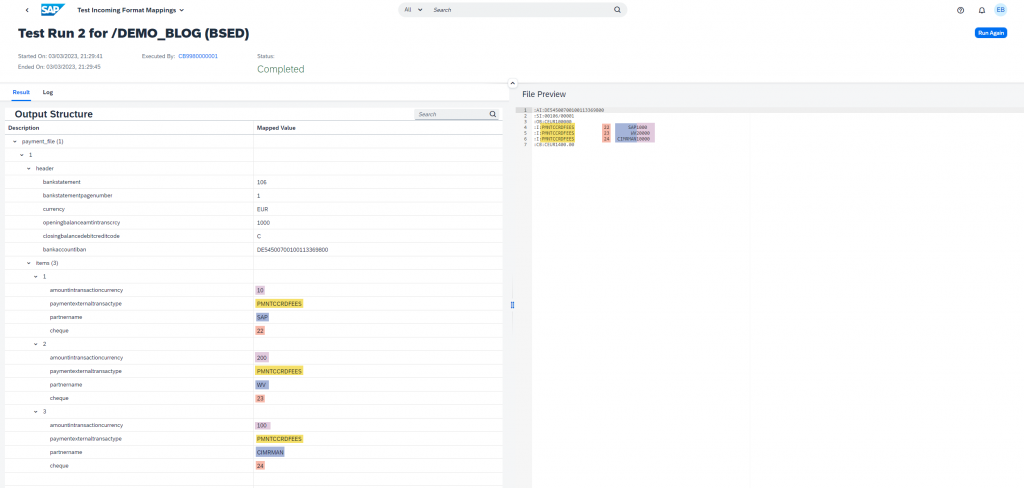
We can confidently say, that our data are so far mapped correctly.
Defining a Closing Balance
If you wish to skip the manual configuration, you can upload “demo_blog_complete.xml” from the SAP Note 3309184 – Test Data to Learn to use Map Format Data (incoming format mappings). The same step-by-step configuration is explained in the following text.
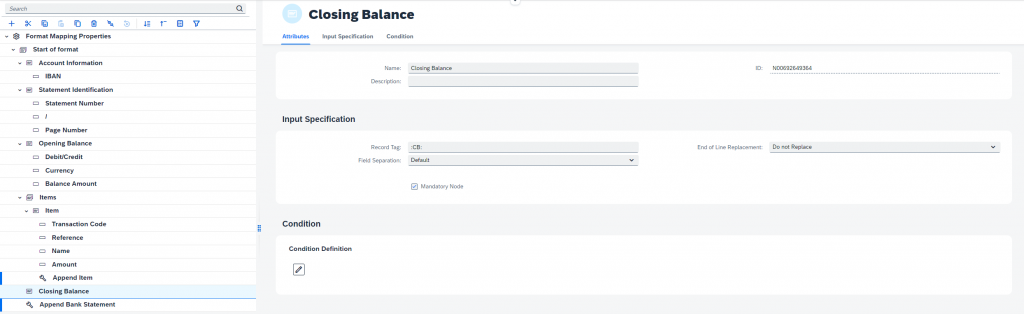
Definition of a Closing Balance now becomes clear. It will be created as a new record on the same level as the Opening Balance. Check out following screenshots and set your format mapping accordingly.
As you could have noticed, we don’t need additional append in this situation as we’re using the header of PAYMENT_FILE structure that will be appended in the “Append Bank Statement” that we already defined.
Final Test
The last three pieces of information were correctly mapped into the output structure. Again, use the “demo_bank_statement_01.txt” from SAP Note 3309184.
Now, we could upload this bank statement into Manage Incoming Payment Files app with confidence.
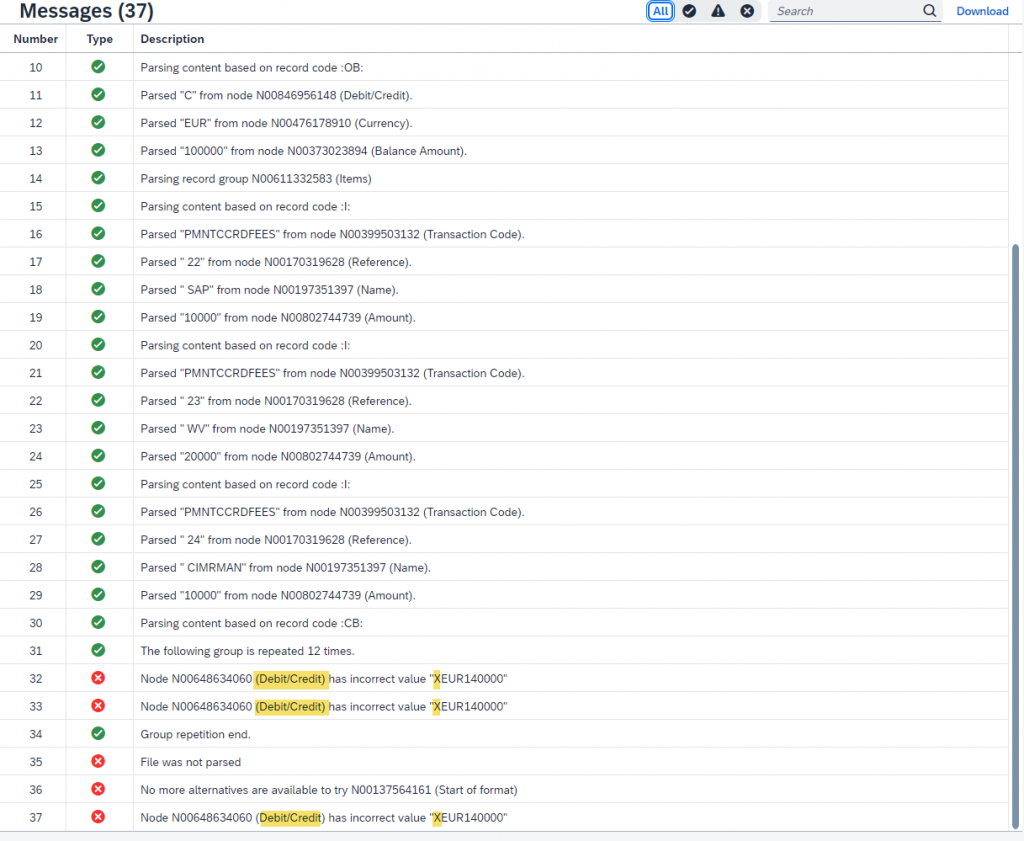
Analysis of Mapping Errors
At the very end, let’s look at how a test run that would have ended with an error would look like in the test tool. For that, create a new test run and use the file “demo_bank_statement_02.txt”.

When we enter the detail of this run, there’s no output structure tab, because no data were mapped. Instead, we’ll be focused on the log tab. See the screenshot bellow.