Problem Statement:
Lets say in a table we have more fields then can be properly displayed, what can we do in order to ensure that all the needed data fields are there without messing up the UI. Let’s have a look!
We will fix this problem using Table personalization. For Table Personalization we use the Table Perso Controller in conjunction with a persistence service based on the abstract Table Perso Provider to have changes made and persisted in a sap.m.Table control. The Table personalization Dialog is used for allowing the user to personalize the table, specifically column visibility and order.
Objective:
To have a simple working example of table personalization using an OData Service. Hence we will use the Northwind service as it is available to everyone. Please find below the URL for the Northwind Service to be used.
https://services.odata.org/V2/Northwind/Northwind.svc/Employees
Agenda:
- Create Destination for Northwind Service
- Create a application based on worklist template in SAP BAS using the Northwind Employee Service.
- Run the project created to ensure that the project is working fine.
- Make necessary changes to implement the Table personalization feature to the table.
Prerequisites:
- Access to SAP BTP Trial account
- Access to SAP Business Application Studio
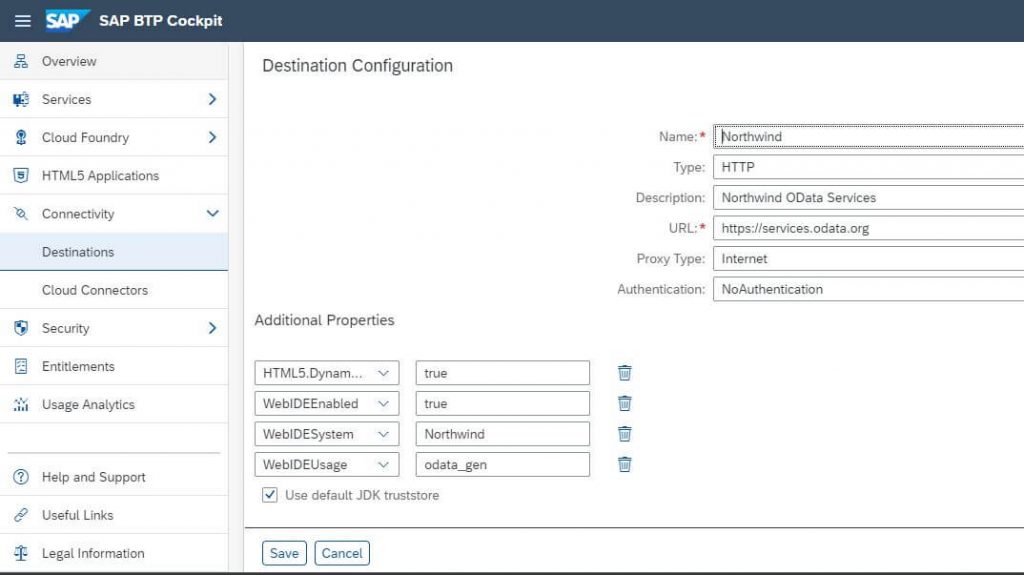
Lets start by creating a New Destination in the SAP BTP Trial account for northwind service. For the same go to the Destinations tab and click on the New Destination button. Enter the details as in the below image and click on Save.
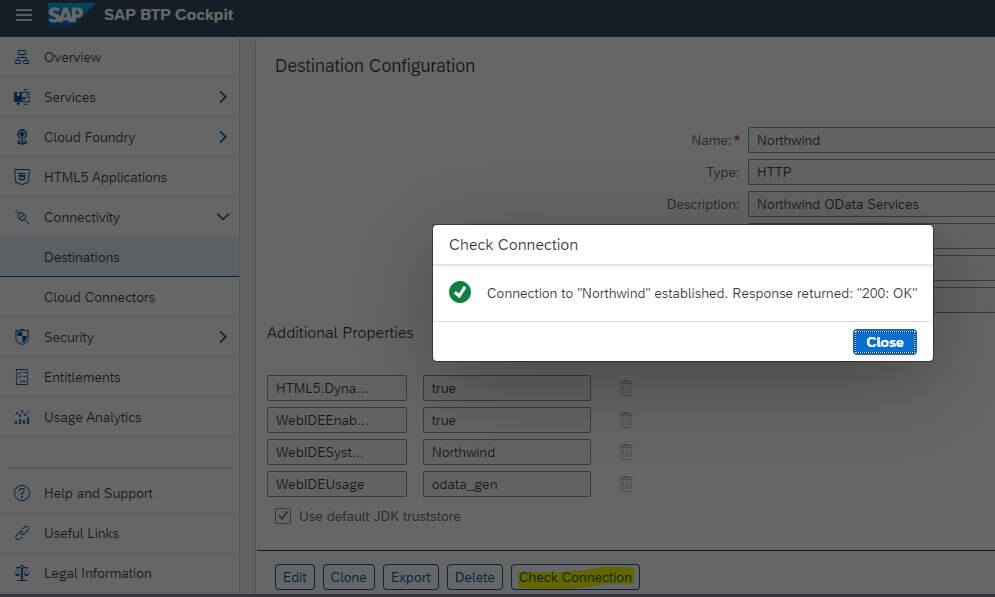
Once the destination is created, we need to test it to ensure its working properly. Click on the Check connection button for the same. If you get the popup as in the below image everything is going as planned.
Next we will create an application based on the worklist template in the SAP BAS (Business application studio).
Open the Business application studio and from the Menu select File->New Project from Template.
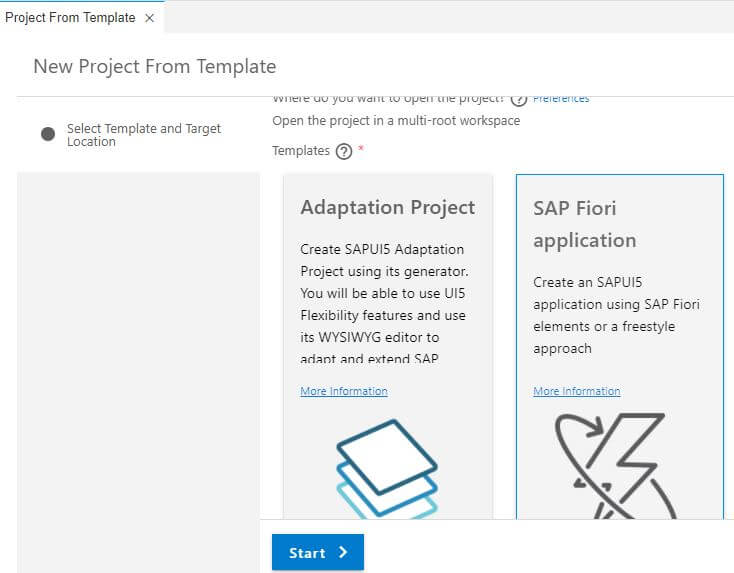
Click Start as in the image above.
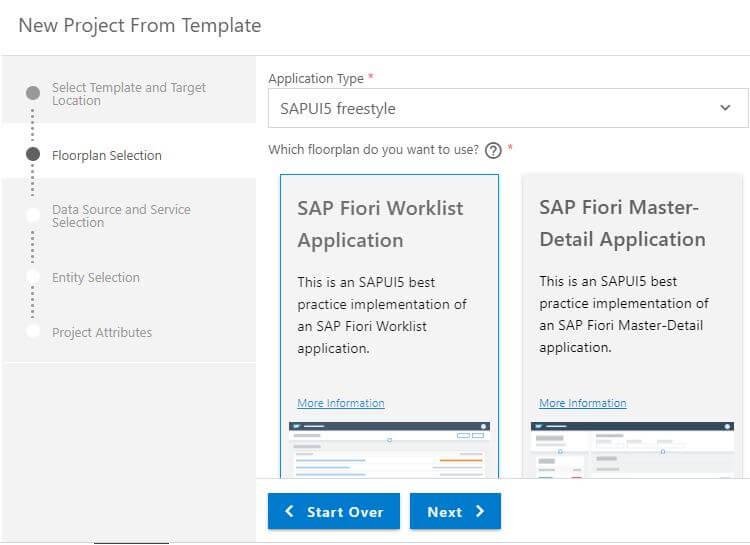
Click Next as in the image above.
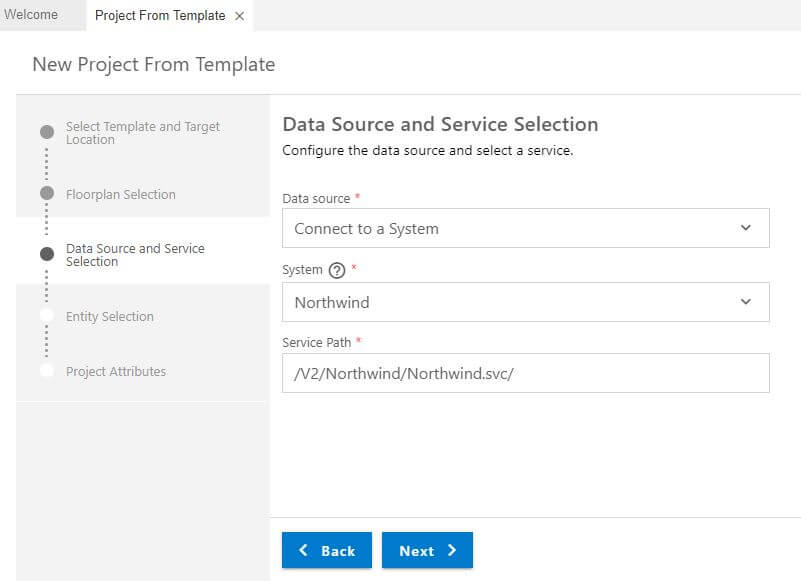
Click Next as in the image above.
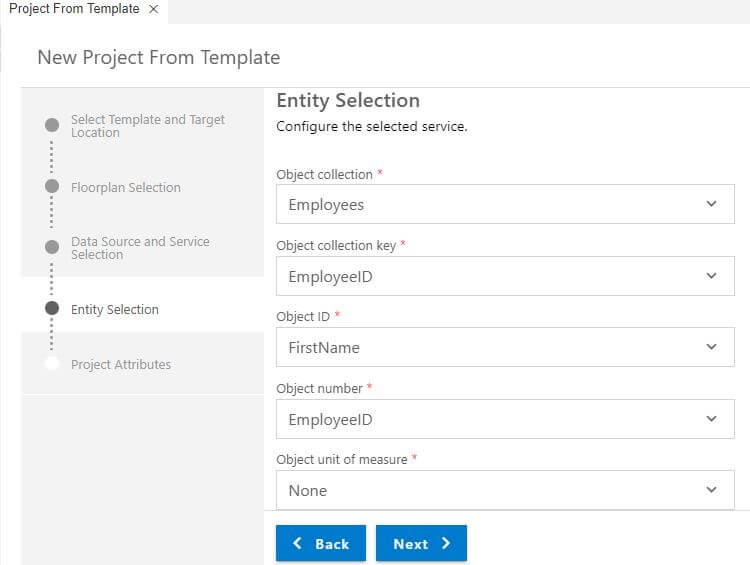
Click Next as in the image above.
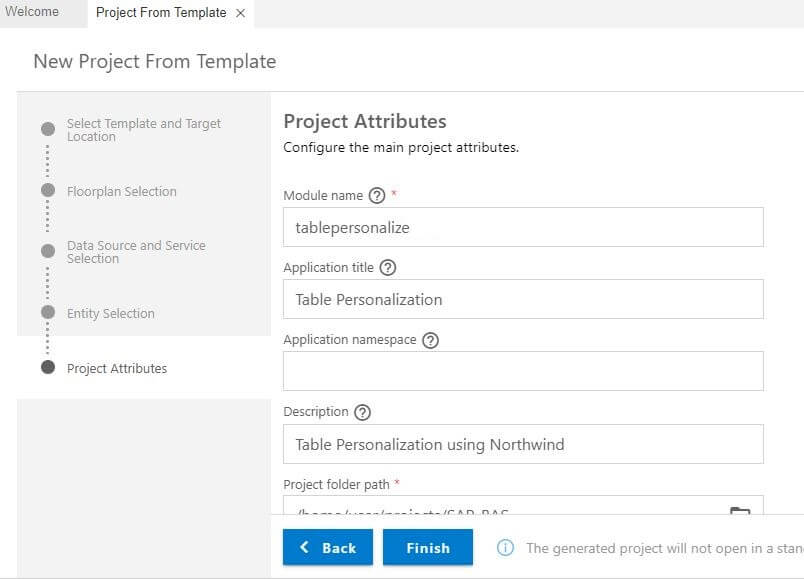
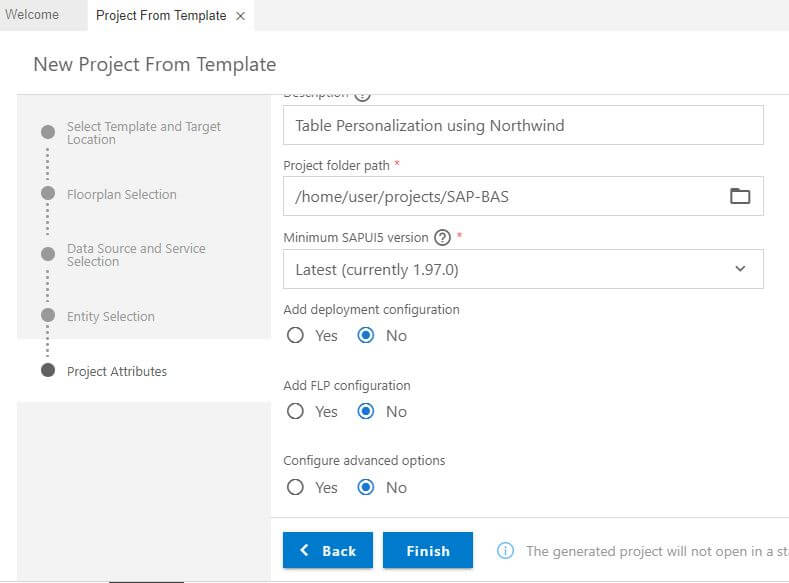
Click the Finish button to create the application. Once done your workplace may look something as below.
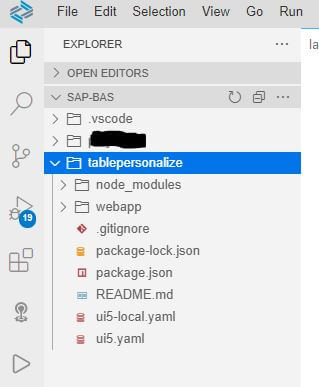
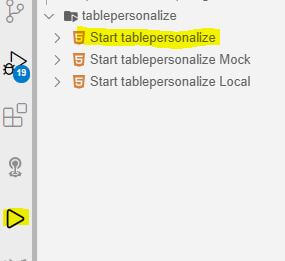
As can be seen in the above image we now have the tablepersonalize project created for us, lets try to run it once. To run it, select Run Configurations ( as highlighted in the image below) from the left side menu. On clicking it we will see the testing options for the project tablepersonalize. we will select the first option as highlighted in the below image and run it.
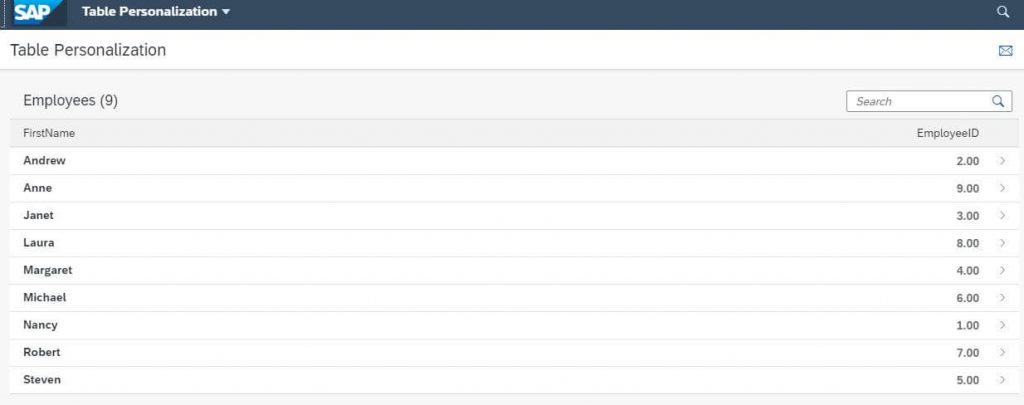
The first test run of the application may take some time. Finally if the application looks something as below, then we are on the right track.
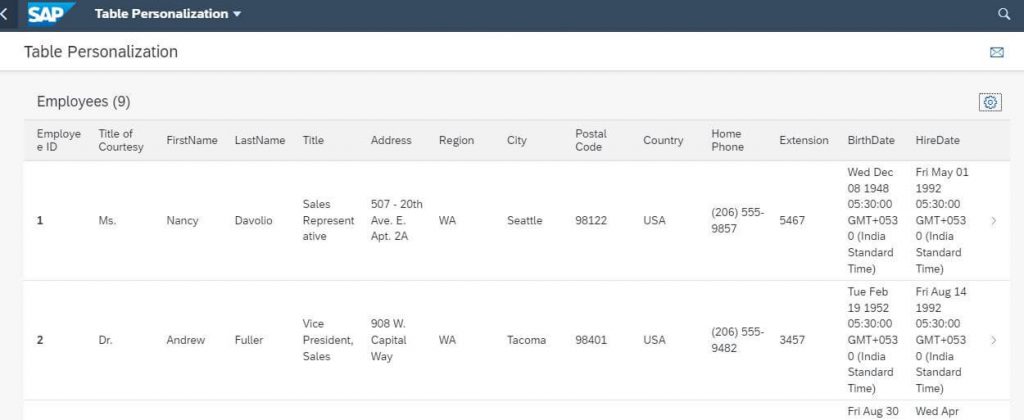
For now we can see only two fields in the table let’s add some more fields to make it interesting. In the Worklist.view.xml file replace the table code with the below code. In the below code for the view we have added the additional fields in the table.
<Table
                id="table"
                width="auto"
                items="{
                    path: '/Employees',
                    sorter: {
                        path: 'EmployeeID',
                        descending: false
                    }
                }"
                inset="true"
                noDataText="{worklistView>/tableNoDataText}"
                busyIndicatorDelay="{worklistView>/tableBusyDelay}"
                growing="true"
                growingScrollToLoad="true"
                updateFinished=".onUpdateFinished">

                <headerToolbar>
                    <OverflowToolbar id="_IDGenOverflowToolbar1">
                        <Title
                            id="tableHeader"
                            text="{worklistView>/worklistTableTitle}"
                            level="H3"/>
                        <ToolbarSpacer id="_IDGenToolbarSpacer1" />
                        <Button id="_IDGenButton1" icon="sap-icon://action-settings" press="onPersoButtonPressed" />
                    </OverflowToolbar>
                </headerToolbar>

                <columns>
                    <Column id="_IDGenColumn1">
                        <Text id="_IDGenText11" text="Employee ID"/>
                    </Column>
                    <Column id="_IDGenColumn2">
                        <Text id="_IDGenText12" text="Title of Courtesy"/>
                    </Column>
                    <Column id="_IDGenColumn3">
                        <Text id="_IDGenText13" text="FirstName"/>
                    </Column>
                    <Column id="_IDGenColumn4">
                        <Text id="_IDGenText14" text="LastName"/>
                    </Column>
                    <Column id="_IDGenColumn5">
                        <Text id="_IDGenText15" text="Title"/>
                    </Column>
                    <Column id="_IDGenColumn6">
                        <Text id="_IDGenText16" text="Address"/>
                    </Column>
                    <Column id="_IDGenColumn7">
                        <Text id="_IDGenText17" text="Region"/>
                    </Column>
                    <Column id="_IDGenColumn8">
                        <Text id="_IDGenText18" text="City"/>
                    </Column>
                    <Column id="_IDGenColumn9">
                        <Text id="_IDGenText19" text="Postal Code"/>
                    </Column>
                    <Column id="_IDGenColumn10">
                        <Text id="_IDGenText20" text="Country"/>
                    </Column>
                    <Column id="_IDGenColumn11">
                        <Text id="_IDGenText21" text="Home Phone"/>
                    </Column>
                    <Column id="_IDGenColumn12">
                        <Text id="_IDGenText22" text="Extension"/>
                    </Column>
                    <Column id="_IDGenColumn13">
                        <Text id="_IDGenText23" text="BirthDate"/>
                    </Column>
                    <Column id="_IDGenColumn14">
                        <Text id="_IDGenText24" text="HireDate"/>
                    </Column>
                </columns>

                <items>
                    <ColumnListItem id="_IDGenColumnListItem1"
                        type="Navigation"
                        press=".onPress">
                        <cells>
                            <ObjectIdentifier id="_IDGenObjectIdentifier1"
                                title="{EmployeeID}"/>
                            <Text id="_IDGenText8" text="{TitleOfCourtesy}"/>
                            <Text id="_IDGenText1" text="{FirstName}"/>
                            <Text id="_IDGenText2" text="{LastName}"/>
                            <Text id="_IDGenText6" text="{Title}"/>
                            <Text id="_IDGenText3" text="{Address}"/>
                            <Text id="_IDGenText4" text="{Region}"/>
                            <Text id="_IDGenText5" text="{City}"/>
                            <Text id="_IDGenText10" text="{PostalCode}"/>
                            <Text id="_IDGenText31" text="{Country}"/>
                            <Text id="_IDGenText7" text="{HomePhone}"/>
                            <Text id="_IDGenText9" text="{Extension}"/>
                            <Text id="_IDGenText32" text="{BirthDate}"/>
                            <Text id="_IDGenText33" text="{HireDate}"/>
                        </cells>
                    </ColumnListItem>
                </items>
            </Table>
Save the application and run it again. In the below image you can see the table, you may notice the table is looking distorted, there is too much data.
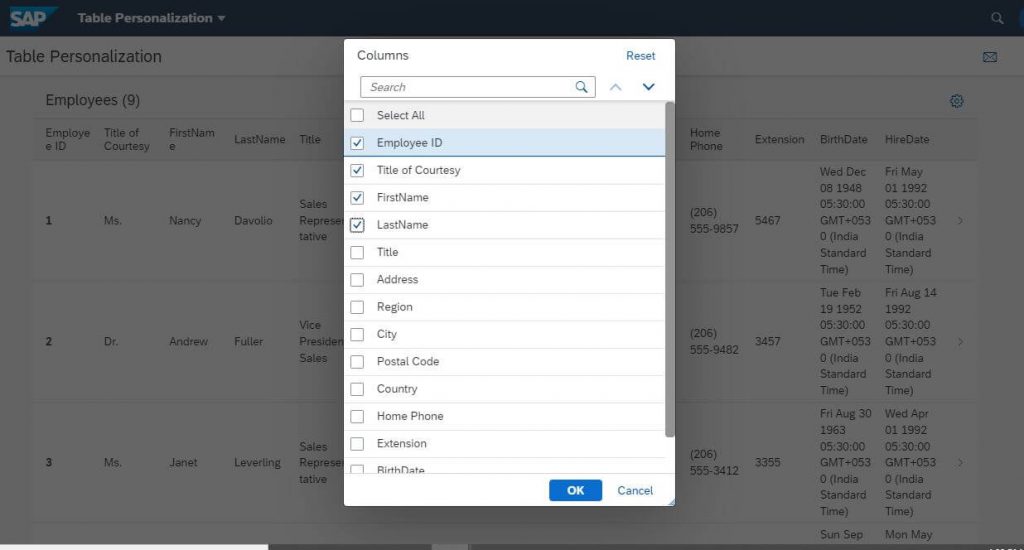
Now how to fix this? Lets implement the Table Personalization for this. For this we have already added the setting icon on the table, though the click event is not implemented yet.
On clicking the settings icon we should get an option to display only selected fields in order to improve the look and feel of the UI.
In Worklist.controller.js add the below code in the onInit method. In the above code we are initiating and activating the Table Personalization Controller. In the TablePersoController we need to pass the table id, component name and persistence service.
// init and activate Table Personalization Control
			this._oTPC = new TablePersoController({
				table: this.byId("table"),
				//specify the first part of persistence ids e.g. 'demoApp-productsTable-dimensionsCol'
                componentName: "demoApp",
				persoService: DemoPersoService
			}).activate();
Add two methods onExit and onPersoButtonPressed.
- onExit: Lifecycle event
- onPersoButtonPressed: to handle the click even of the settings button.
onExit: function () {
			this._oTPC.destroy();
		},

		onPersoButtonPressed: function (oEvent) {
			this._oTPC.openDialog();
		},
Once done save Worklist.controller.js. Create a new file in the controller folder and name it DemoPersoService.js. Once created copy the below code to the file. In this we have two methods.
- getter method for Table Personalization
- setter method for Table Personalization: it is using this that the visibility of various fields are set using the visible property.
sap.ui.define(['jquery.sap.global'],
function(jQuery) {
"use strict";
// Very simple page-context personalization
// persistence service, not for productive use!
var DemoPersoService = {
//Getter for Table Personalization data
getPersData : function () {
var oDeferred = new jQuery.Deferred();
if (!this._oBundle) {
this._oBundle = this.oData;
}
oDeferred.resolve(this._oBundle);
// setTimeout(function() {
// oDeferred.resolve(this._oBundle);
// }.bind(this), 2000);
return oDeferred.promise();
},
//Setter for Table Personalization data
setPersData : function (oBundle) {
var oDeferred = new jQuery.Deferred();
this._oBundle = oBundle;
oDeferred.resolve();
return oDeferred.promise();
},
};
return DemoPersoService;
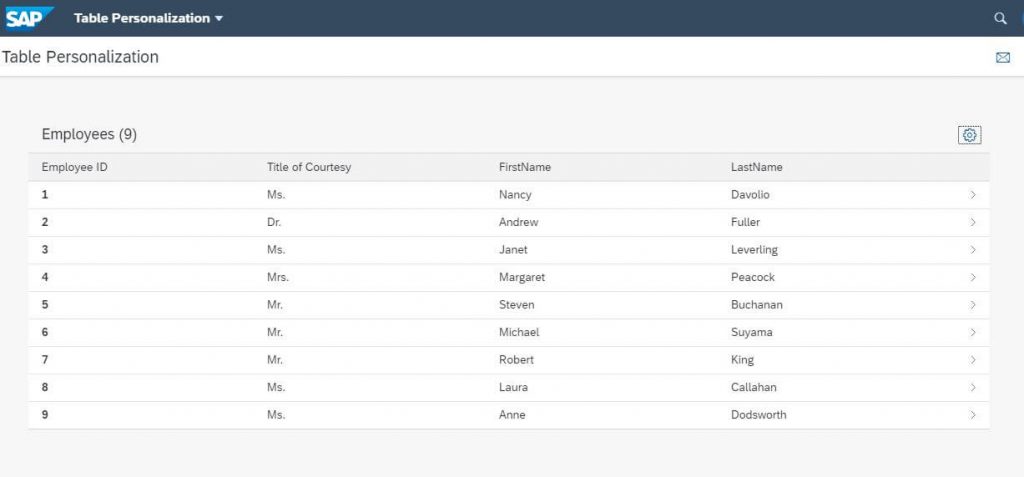
});Once done Save it and reference it in the Worklist.controller.js as we are using the DemoPersoService.
sap.ui.define([
    "./BaseController",
    "sap/ui/model/json/JSONModel",
    "../model/formatter",
    "sap/ui/model/Filter",
    "sap/ui/model/FilterOperator",
    "sap/m/TablePersoController",
    "./DemoPersoService"
], function (BaseController, JSONModel, formatter, Filter, FilterOperator, TablePersoController, DemoPersoService) {
    "use strict";
Let’s now run the application and open the settings icon to manage the fields visibility. Select the fields as needed and select Ok.