In this blog post, I will explain the Table Maintenance Generator Events, create, update and delete step by step with small examples.
1. Preparing the Table
Let’s start by creating a sample table first.
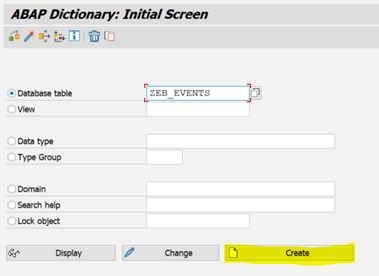
First, we go to the Se11 t-code. Then we enter a table name and click the ‘Create’ button. (Figure-1)
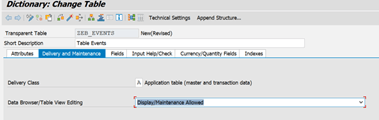
Then we choose for Delivery class ‘A’ and for Data Browser/Table View Editing ‘Display/Maintenance Allowed’.(Figure-2)
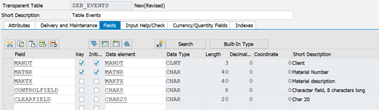
In order to use it in our examples, we create 4 fields, which can be seen in Figure-3. And we activate and save our table.
Now, since our table should be a maintenance table, we follow this path.
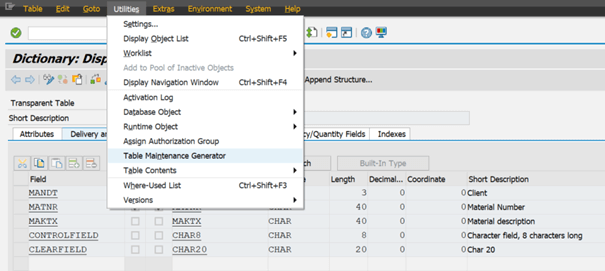
Utilities => Table Maintenance Generator. (Figure-4)
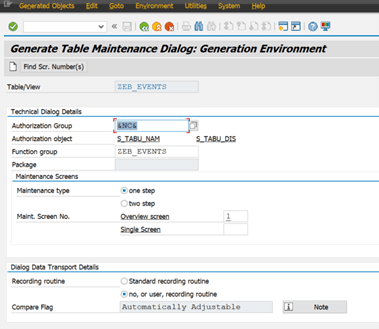
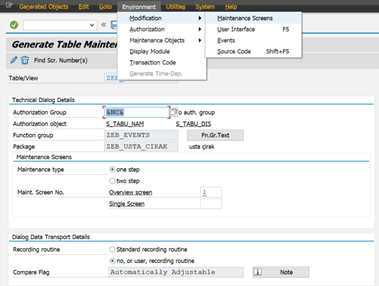
On the Incoming Screen, for Authorization Group ‘&NC&’, and for Function Group section write the name of the table , and for the Maintenance type One Step,after that press ‘Find Scr. Number(s)’ button and click the create button. (Figure-5)
2. Create Event
After creating the Maintenance Table, for creating the “Create” event. We must follow this path;
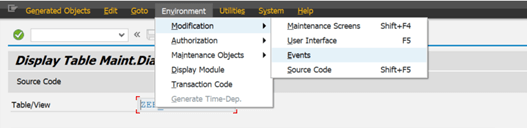
Environment => Events. (Figure-6)
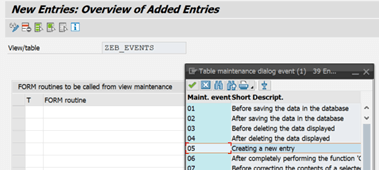
On the screen that opens, the ‘New Entries’ button is clicked and the ’05’ ‘Creating a new entry’ option is selected. Then we name the Event Name as ‘Create’. (Figure-7)
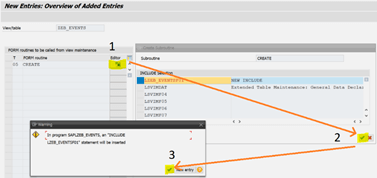
Clicking on the Editor button, we follow the steps shown in Figure 8.
In the scenario we want, when we fill the material (Matnr) field, we want to fill the Material desciription (Maktx) field automatically. You can use the code block below for this.
FORM create .

 IF zeb_events-matnr IS NOT INITIAL.

  SELECT SINGLE
    Maktx
    FROM makt
    INTO @zeb_events-maktx
    WHERE matnr EQ @zeb_events-matnr
    AND spras EQ 'E'.

 ENDIF.

ENDFORM.
We activate all inactive objects.(Figure-9)

- This step is very important, do not forget to Save after activating the objects.
In our scenario, Maktx field must be non-editable since Maktx will fill automatically after selecting Matnr. For this;
Utilities => Table Maintenance Generator=> Environment=> Modificaion => Maintenance Screens
(Figure-10)
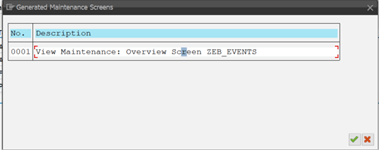
We selected and confirmed our screen in the popup seen in Figure 11.
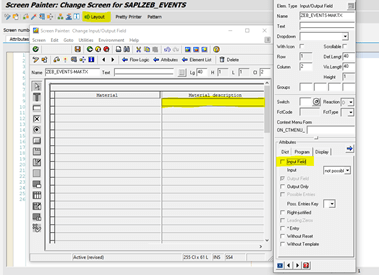
We open the Layout tab. We open the Material description field with a double click and remove the ‘Input Field’ Tick under the program tab. In this way, the option to manually fill in the material definition field in our ‘ZEB_EVENTS’ table is turned off. (Figure-12)
Now we can go to the SM30 tcode and test the Create event. For this;
Goto sm30=> maintain => New Entries
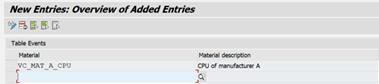
We select a material and press enter, and now we see that the description of the material is filled automatically.(Figure-14)
3. Update Event
Now there is the Update event next. In this event, we will use the ‘Controlfield’ and ‘Clearfield’ fields that we created earlier in our Table.
When our Control Field field is selected as ‘A’, the inside of our Clearfiel field will be cleared.
First, let’s start by creating our Update event. After opening our table (SE11);
Utilities=> table Maintenance Generator => Environment => modification=> Events => New Entries
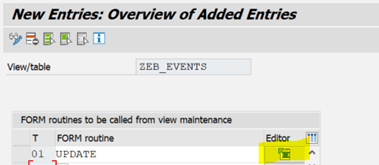
Let’s create our event by following this path. By clicking on the Figure 14 Editor button, we write the code below.
FORM update.
FIELD-SYMBOLS: <fs_field> TYPE ANY .
 LOOP AT total_m.
  IF <action> EQ 'U'.
    ASSIGN COMPONENT 'CONTROLFIELD' OF STRUCTURE <vim_total_struc> TO <fs_field>.
     IF <fs_field> EQ 'A'.
       ASSIGN COMPONENT 'CLEARFIELD' OF STRUCTURE <vim_total_struc> TO <fs_field>.
       <fs_field> = ' '.
     ENDIF.

    READ TABLE extract WITH KEY <vim_xtotal_key>.

     IF sy-subrc EQ 0.
      extract = total_m.
      MODIFY extract INDEX sy-tabix.
     ENDIF.

    MODIFY total_m.
  ENDIF.
 ENDLOOP.
ENDFORM.
Activate all inactive objects. Don’t forget to go back and save. After the activation processes are done, we can now try the update event. For this, we go to the maintenance table from the SM30 T-code.
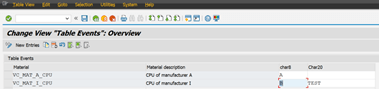
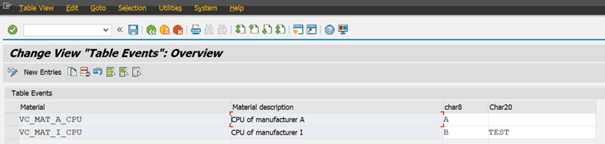
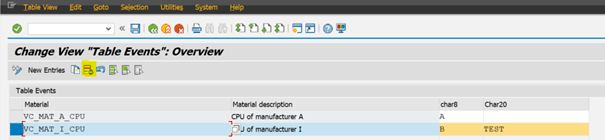
The sample data we created before saving the data is shown in Figure 15.
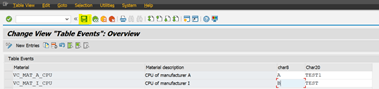
As we can see, the line where we wrote ‘A’ in our ‘Controlfield’ cleared the ‘Clearfield’ field.
4. Delete Event
In this event, we want to save the log information in another table. When we delete an item from our “ZEB_EVENTS” table that we have created before.
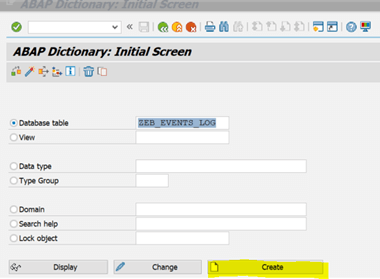
Let’s start by creating our log table first.
We go to SE11 and enter the name of our table and press the “Create” button.(Figure-17)
We make the fields of the table as in Figure-18. Here, we enter the fields that we deleted in our previous table, that we want to keep like the material, material description, the user of the person who deleted the material, and the delete date (Figure 18). We activate our table and continue.

We open the “ZEB_EVENTS” Table, which is the first table we created. (SE11) and we are following the path again.
Utilities=> table Maintenance Generator => Environment => modification=> Events => New Entries (Figure-19)
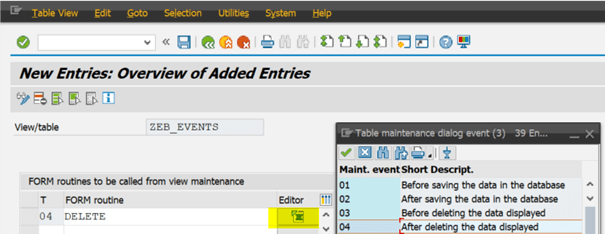
The codes we need to write in the event are as follows;
FORM delete .

  DATA:  lt_data TYPE  TABLE OF zeb_events_log,
         wa_ekpo TYPE zeb_events_log.


    SELECT *
    FROM zeb_events
    INTO TABLE @DATA(lt_event) .
    SORT lt_event BY matnr.
READ TABLE lt_event INTO DATA(ls_data) INDEX index.
wa_ekpo-matnr = ls_data-matnr.
wa_ekpo-maktx = ls_data-maktx.
wa_ekpo-username = syst-uname.
wa_ekpo-updatedate = syst-datum.
APPEND wa_ekpo TO lt_data.
INSERT zeb_events_log FROM TABLE lt_data ACCEPTING DUPLICATE KEYS.

ENDFORM.
Activate all inactive objects. Don’t forget to go back and save. After the activation processes are done, we can now try the delete event. For this, we go to the maintenance table from the SM30 Tcode. (Figure-20)
Let’s select a line and delete it and save it.(Figure-21)
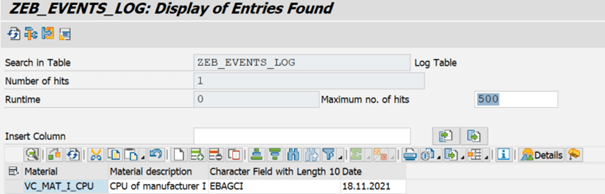
To check the data of our log table, let’s go to the SE16n Tcode and enter the table name.(Figure-22)
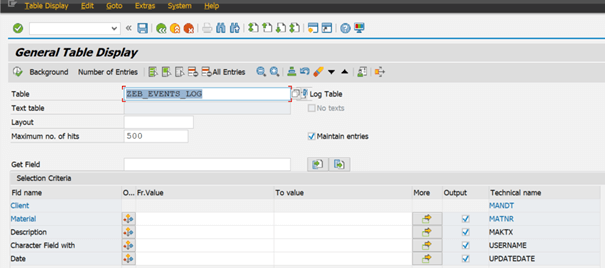
When we executed the table, we see that it keeps the logs of the data we have just deleted. (Figure-23)
For this example, don’t forget to delete and save the data one by one. I tried to explain these events with simple examples so that you can implement them in your own scenarios.


