This time we have lots of smaller albeit not less important enhancements. The scenarios are however not so complex, so I don´t need much words to explain them. As usual, let´s start the journey into the new features with a short overview on what we provide. For more details you can then jump into the relevant sections. Or you just read from top to bottom to be informed on all we deliver in May H1 2022 release.
Here is the overview:
1. Time Tracking Features
1.1 Time Tracking Usage Reporting
– helps to count in your company user number for which time tracking features are configured
1.2 Check tool Check for Time Tracking Usage
– provides a quick glance on the numbers of employees for which time tracking features are configured, but provides less detailed information than the above mentioned report
1.3 Late comer detection
– allows to detect late comers and raise alerts on this
1.4 Alerts based on time collectors
– allows to raise alerts to employees, time admins or managers based on the value of a time collector or counted event. You can for example now raise alerts when an employee was more than 3-times late in a month, or when he has performed more than 10 night shifts
1.5 Clock in/out availability in all data centers
– is what it says: general availability for this service in each data center
1.6 Clock in/ out location capturing
– you can get the geo coordinates added to mobile clock in / out events
1.7 Clock in /out proxy management
– the manage clock in / out app to administer clock in / out punches supports now the proxy functionality to use it as a different user
1.8 Multi-language support for Clock in / out
– translation possibilities of the clock in / out events and clock in / out group
1.9 Allowance recording in different units
– allows not only to record allowances in hh:mm, but in a generic decimal format. You can now record for example kilometers, mileages, amounts….
1.10 Allowance recording with deviating cost center
– allows to add a deviating cost center to an allowance time type and hence do a cost allocation for this record via the payroll system
2. Time Off Features
2.1 Parallel Absences General Availability
– some countries need 2 active absence types existing in parallel. Was in last release Early Adopter and is now general available
2.2 Termination End Handling General Availability
– provides more features to support a terminate and rehire process. Was in last release Early Adopter and is now general available
2.3 Early Adopter: Support of German eAU (elektronische Arbeitsunfähigkeitsbescheinigung)
– Provides the “exclusion reason” field in EC Time off absence record to support eAU process in EC Payroll or SAP HCM Payroll
2.4 Check tool check for time profile
– checks for inconsistencies in time profile
3. Other Features
3.1 Call for action: don´t use absence requests for home office, business travel or any other attendance
– some customers use absences for attendance recording. This can lead to major problems.
3.2 Call for switch to new Time Sheet UI
– upgrade to new Time Sheet User Interface
3.3 Different Time Sheet workflow based on time valuation results
– not new, but many did not know that this is possible: approval of time sheet when overtime below 5 hours to approver A, when above to approver B
3.4 Alert Configuration with custom fields
– allows you to add context information per time valuation alert type in the Admin Alert UI
3.5 Mandatory custom fields for allowances
– if you ever wanted mandatory custom fields for allowances – now you´ve got it
3.6 Reporting enhancements (join and workflow details)
– allows you to add workflow details for time sheet and employee time reports
3.7 Further useful information
– some additional blog posts that might help you
1. Time Tracking Features
1.1 Time Tracking usage report
Did you ever wanted to find out how many employees in your big company are really using Time Tracking features? To avoid for example that a country/ employee group is using those features without that the central IT Department knows? Or to validate if your number of Time Tracking licences are matching the real usage in your company? This time tracking SAC usage report gives you this information.
In this report you can drill down to each Time Tracking feature and get the information where it is used and how many employees are authorized to use it. It is worth emphasizing that the report does not give you the employee numbers that actually used Time Tracking features, but employee numbers for which Time Tracking features have been configured.
Let´s take the Time Tracking feature Single Record Approval as an example: the report does not give you the employee numbers who have recorded time types with single record approval in the last month. But the report gives you employee numbers for which time types are assigned in the time profile that triggers a single record approval.
What is the Time Tracking usage report evaluating in detail?
This report lists employees that are set up / have configuration assigned for following Time Tracking features:
- Clock in/ out (assigned in Job Information)
- Allowance recording with unit decimals (assigned in time profile)
- Cross Midnight attendance recording (cross midnight work schedule/time recording profile)
- Enhanced holiday calendar filters for cross midnight (time recording profile)
- Single record approval (workflow configuration on time type)
- Time collector alert (time valuation)
- Single records filter to support late comer detection (time valuation assigned in time recording profile)
The pure existence of the configuration in the system is not counted, only when it is assigned to employees in the Job Information.
Correspondingly, the SAC report gives you all these Time Tracking Features for selection in the view-field:
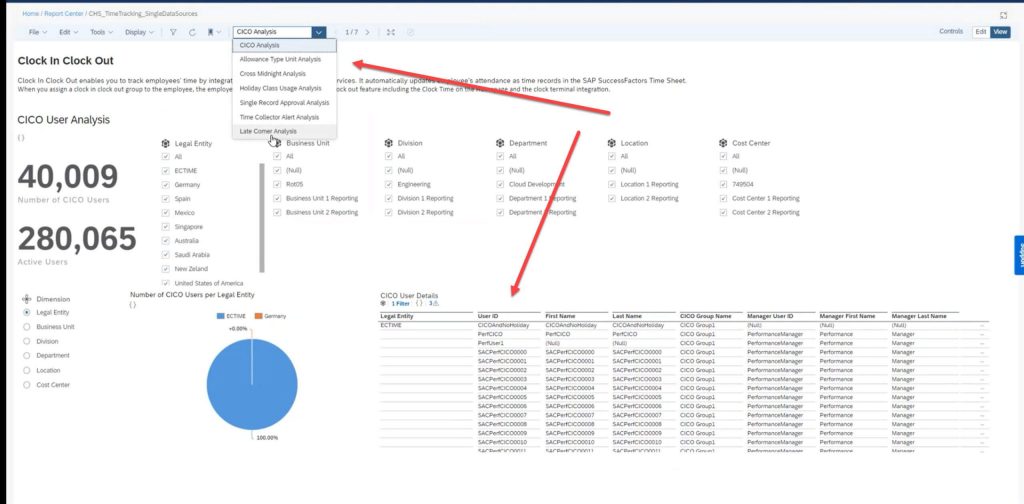
And in the report you have the full power of SAC: drill down, filtering by department, location, legal entity, business units…. Then you can select the dimensions, selection dates……
This report digest lots of data and needs to dig into the system very deep. If you have got lots of employees it might be advisable due to run time to schedule the job (daily, weekly, monthly, yearly) and look at the results offline via the CSV files.
So, a very powerful tool and you can get any detailed figures out of the system that you want to have.
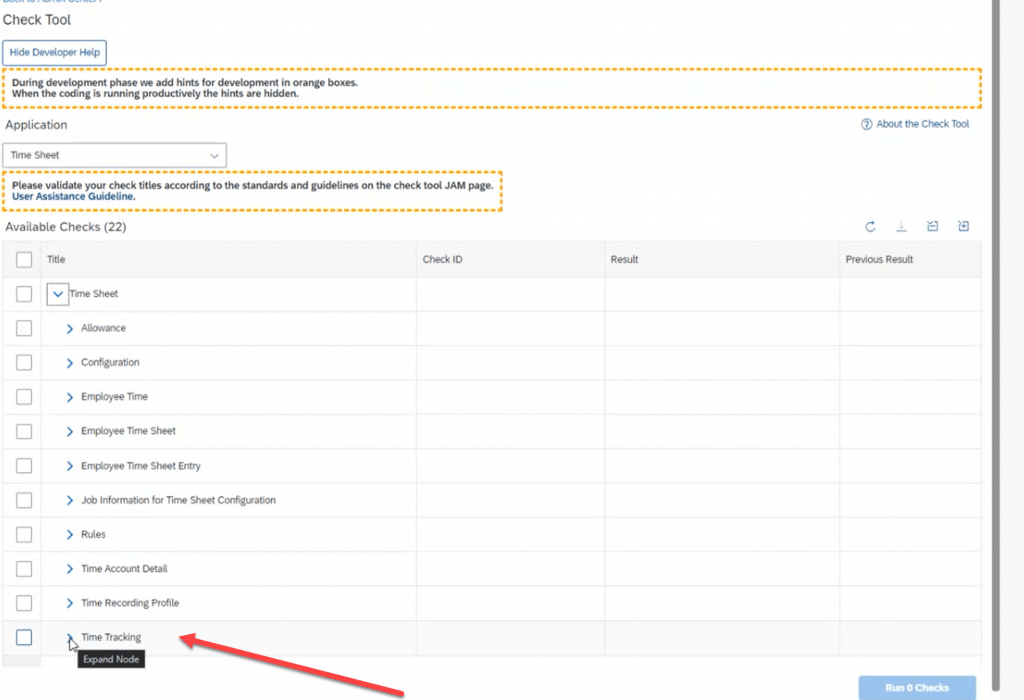
1.2 Check tool Check for Time Tracking Usage
If you just want to get a quick number without all the beauty of the SAC Report you can also use our new check tool check on Time Tracking usage. This check gives you quickly same figures as in the SAC report but in a kind of condensed manner and without all the details of the SAC report. If there are less than 1000 employees it gives you the employee list as well, but if there are more you need to choose the SAC report to get the detailed view. But the check tool check does not give you the for example the employees per feature overview and there is also no user and object permission check as opposed to the SAC report.
Let´s check what the check tool check gives you. First you need to execute it:
The result is then listed per company:
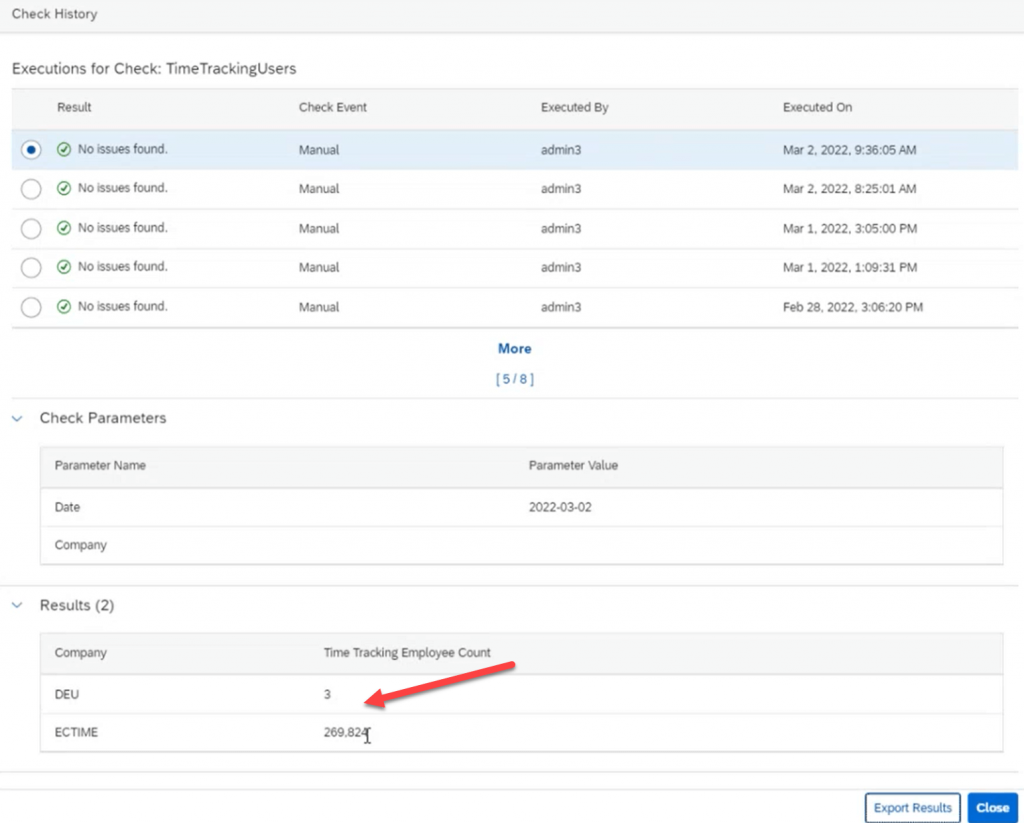
Small side note: when the time tracking population is bigger than 1000 employees you get only a condensed view in the check tool.
1.3 Late comer detection
Long awaited by many customers. Especially from those using our clock in / out integration. And this is the only topic I want to elaborate a bit closer, cause we provide a new time valuation type and I think it is useful to explain what this does and how to set up time valuations in more detail.
This feature allows you to detect employees that clocked in (or recorded any other attendance) after start of the planned working time. So, to call it frankly as it is: this employee is a late comer.
The actions customers want to perform after late coming vary. Some want just an alert, some want after the 3rd time in a month an automated 1 day salary deduction, others 1 day vacation deduction. So, big variety what to do next when a late coming is detected. Some do not want an automated salary deduction, some want that their managers are notified and have then some freedom to decide what to do next, based on the context of the overall constellation.
Due to this variability of follow up activities we only provide an alert in the case the employee is late. All follow up activities can then manually be maintained in the system just as the customer wants to.
Hence, here it is described how you can detect later comers and how you can configure alerts for late coming.
Let´s first have a look on this picture, cause it explains the scenario perfectly:
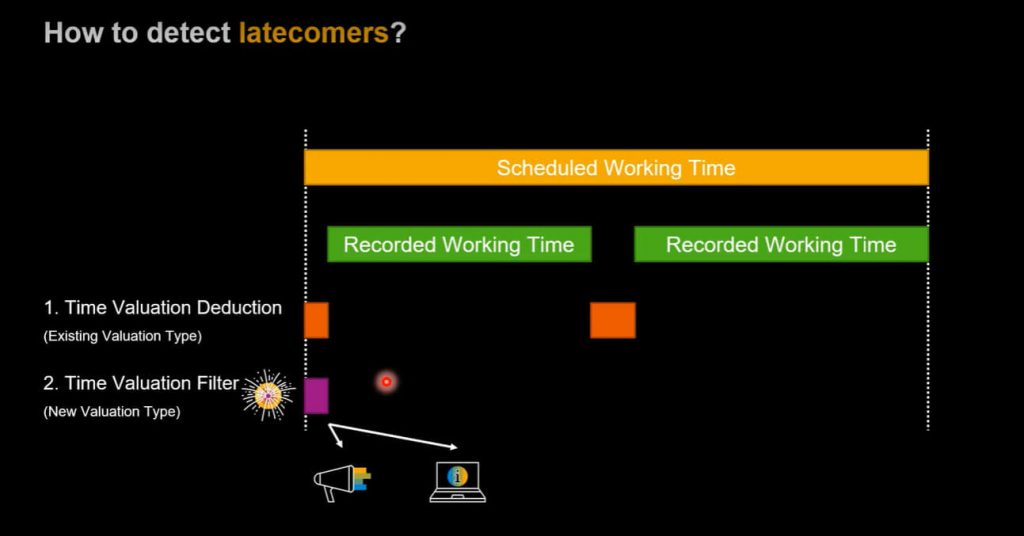
Employees have a planned working time and they can have one or multiple time records per day. With current time valuation possibilities you can filter out the “gaps” compared to the planned working time. The gaps are visualized in orange in the above picture. The employee has a gap at the beginning of working time and in the middle. For the late comer detection only the very first gap is of interest – cause this is the late coming. And to exactly detect this gap at the start of the planned time a new time valuation type has been coded. And with the already delivered and well-known functionality of alert raising you can then raise an alert based on this late coming.
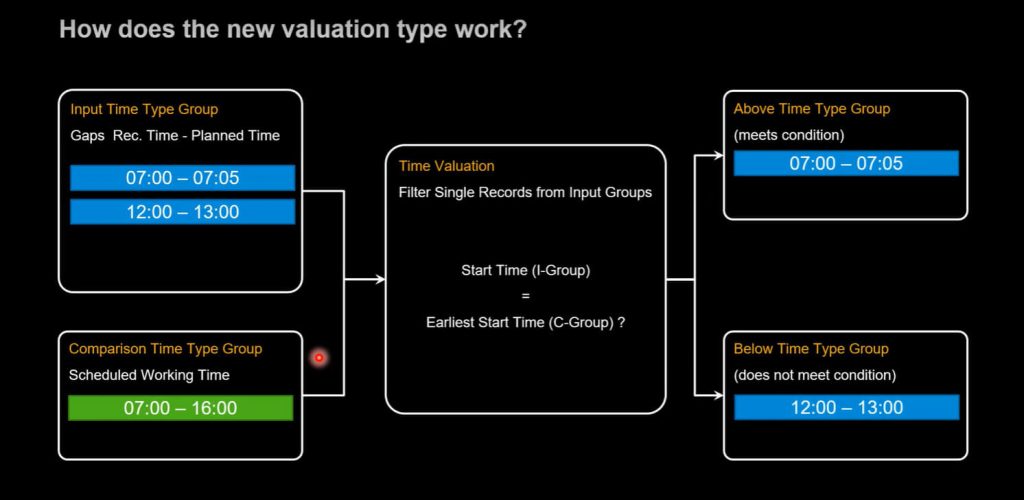
The new time valuation type to detect late comers is called “Filter Single Records From Input Groups“. Let´s have a look how this works in detail:
The new valuation type loops over every gap and compares it with a comparison group in the time valuation rule (which in this case should be the scheduled working time / planned working time). The gap which is at the beginning of the planned time meets the conditions of the time valuation type and gets routed into the “above” time type group. The gap during the planned time is routed into the “below” time type group section. But let´s visualize this again with a picture. Based on the example where the employee has two gaps, one at the beginning and one during the planned time the time valuation type would give you this result:
And based on the value in the “above” time type groupo section you can then raise an alert. You even can create a time valuation result with the amount of minutes and store this on the database for reporting purpose.
To get this overall running you need however a couple of time valuations. I just describe them briefly here, most of the mechanisms of the time valuations I have already described in earlier blogs.
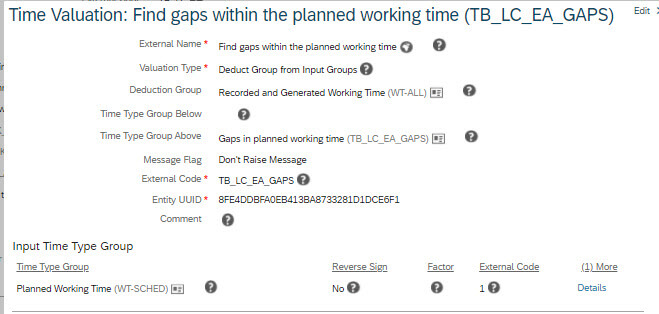
1. Create a time valuation to find the gaps
Use a “Deduct Group from Input Group” Valuation type. Use a time type group that contains the planned working time as Input time type group. Use as an deduction group a time type group that contains the recorded working time. And as Time Type group above you assign your container time type group for gaps. Looks like this:
2. Find gaps on start of planned time = late comer
Now, here you need the new valuation type “Filter single records from Input groups”. You take your gaps time type group that you calculated in step 1 as input group, use the planned working time as comparison group, set your attributes to “Earliest Start Time” and the operator to equal, and when there is a gap on the start time of the planned time these slice is put as a result into the time type group you state in the “below” section:
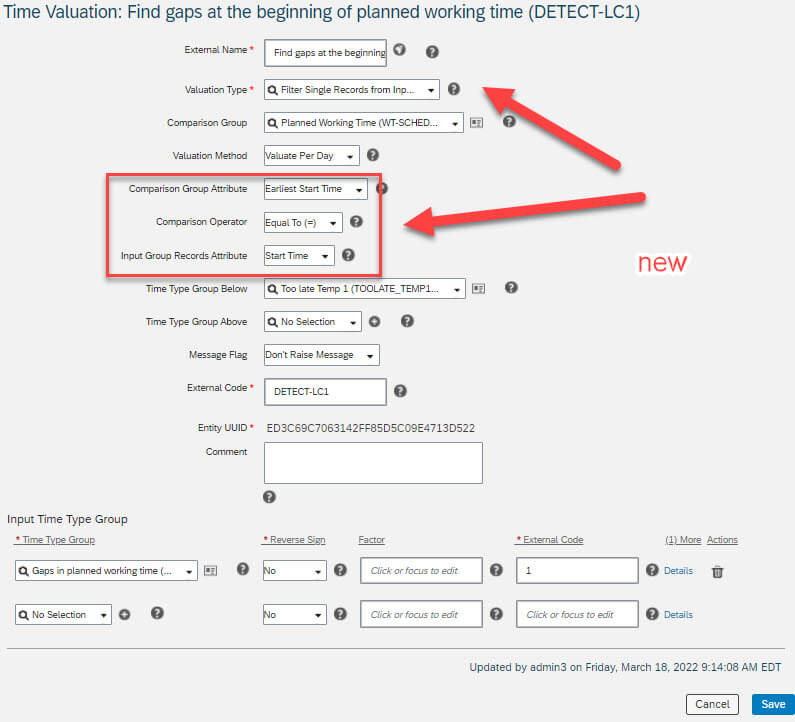
And let me draw your attention to the new features that are in this time valuation type – apart from the hard coded behaviour of this type you also have now some more flexible parameters like
- comparison group attribute. Current values: earliest start time; latest end time
- comparison operator. Current values: equal to; less than or equal to; greater than or equal to
- input group records attribute. Current values: start time; end time
This allows already quite flexible and sophisticated usage, and there is potential in this parameters for the future to even enhance them ;-).
So, this are the new elements of the new valuation type. And now coming back to our scenario:
This could be already it. If you want to raise an alert upon this, enter in the above valuation in the section Message Flag an alert upon the time type group below. Done. You achieved the configuration to detect late comers and to raise an alert upon it.
You now might ask – okay, cool. But that´s only one piece of the cake, isn´t it ? What to do when I not only want to detect late comers – but also early leavers? What if I want to find out those employees who clocked out earlier then the end of the planned time. Is this possible?
Yes. But at the moment with one restriction.
The restriction is that this works currently only properly if there is only 1 attendance time record per day. When the employee has multiple attendance time records you want to have this check only for the very last attendance record on the day, and not for each record. And this is currently not possible. But we already work on this enhancement.
So, to make it clear: if your customer / company has usually got only 1 time record per day, use the above mentioned mechanisms, adopt the valuations with check of end of planned time and you also can figure out early leavers. But if your time recording scenarios are a bit more complicated and your employees have got more than 1 attendance record per day, you need to wait for the next enhancement. The crucial thing here is that this kind of check ought to be done only once per day and not with each time record – and this kind of functionality is yet missing but already in the development pipeline.
But lets come back to the delivered late comer scenario:
Above mentioned steps are sufficient to cover the basic scenario. But there might be some more advanced aspects to consider. And here you can think if you use this optional steps as well in your valuations:
Do you want to raise a late comer alert when the employee does not have recorded any time on scheduled days? Not really, cause then it is not really a late comer. There is then something else wrong. Maybe he is ill and calls later, or maybe he has completely forgotten to record times. Then you rather want a different message. But he is not really a late comer. Especially not when you count late comer events for payroll deduction purpose. To avoid this alert when no times at all are recorded you can use this valuations:
Optional step 3: Check if the employee has recorded time at all
You use an “compare threshold with input and route input” valuation type:
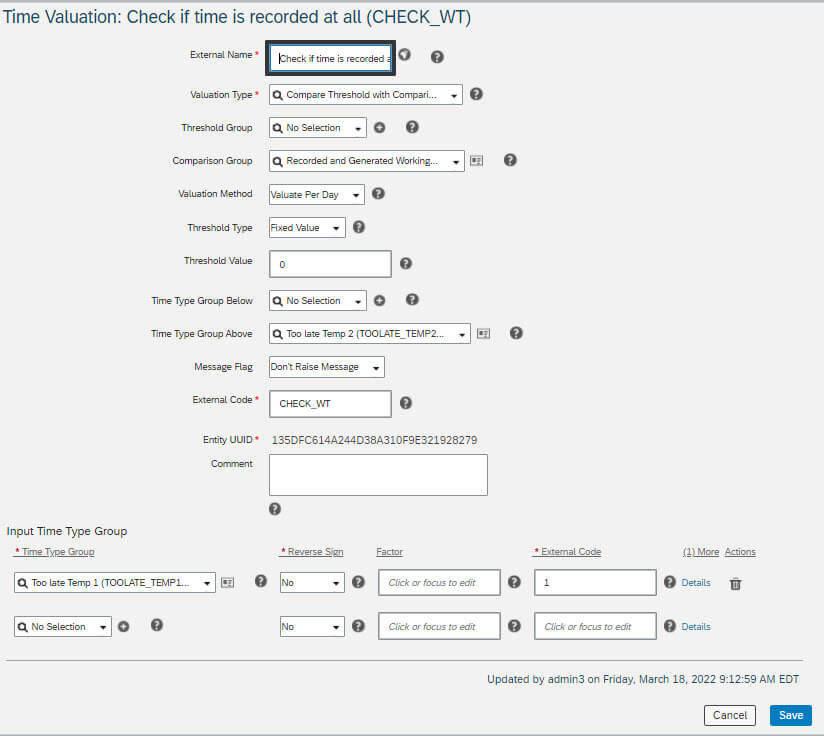
Input time type group is your fact that the employee has a gap at the beginning of planned time group (the one that you have created in the steps before). You compare with the group that contains recorded time on this day. If there is recorded time the condition is met and the result from the input time type group moved to the time type group stated in the Above field. If there is no working time at all, then this calculation gives no result and hence no late coming alert. So, you suppress an alert in this constellation.
Now let´s face another aspect:
Let´s assume there is working time on this day. Hence an entry is in the above “too late temp2” group. There could also be the fact that the employee has recorded overtime before his shift, has a gap at the beginning of the planned time and then recorded a few minutes after planned again working time. Do you regard this employee as a late comer? No. But when we leave the rules like above, there would be an alert. Maybe this scenario is not applicable in your company at all, then you don´t need to bother, but if you want to avoid an alert in this constellation we need 2 more valuations:
Optional step 4: Check if recorded time exist before the start of planned time
Here we use our new valuation type again:
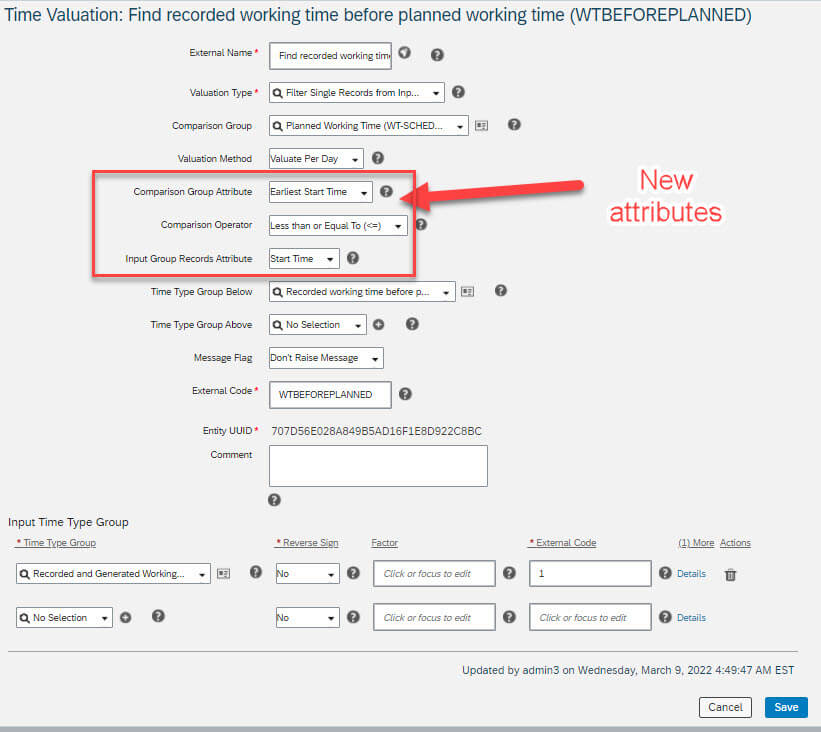
This valuation collects any recorded working time before the planned time in the time type group mentioned in the below field “recorded working time before planned”. We use here again the new parameters to compare with the start of planned time and the attributes “less than or equal”. And as input time type group we choose of course the recorded working time type group.
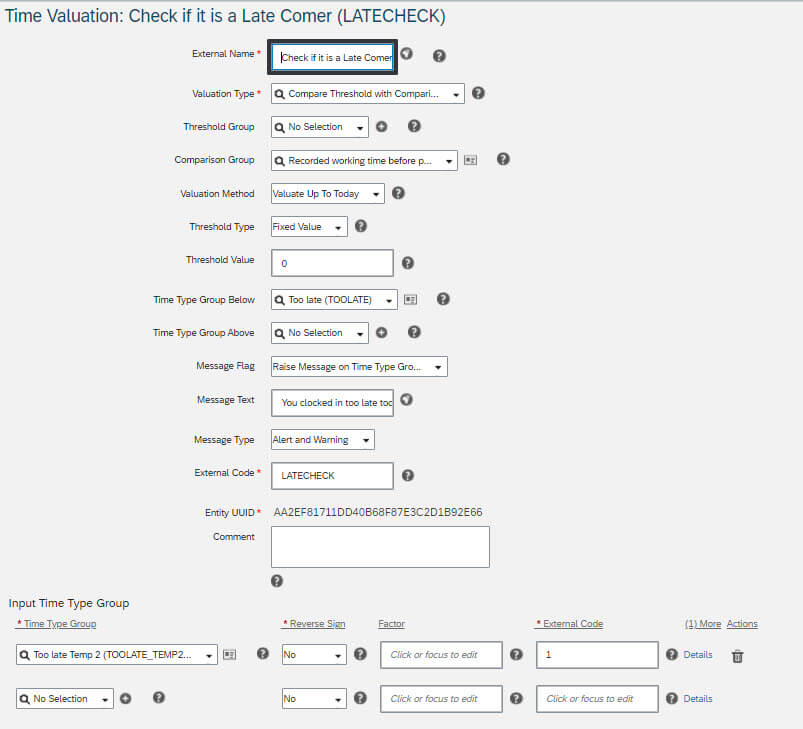
Optional step 5: create alert only when there is no working time before planned
This is now the last optional step. We use valuation type “compare threshold with comparison group to route input”
Comparison group is the working time before planned time. Input time type group is our gap group on start of working time (but the advanced one, the one that is only created if at all working time exists from step 3), and if so this finally means:
- the employee has a gap or not-recorded time on the start of the planned time
- on a day where there is a time recording at all
- and on a day where there isn´t time before the shift started but with nevertheless a gap on the start of the planned time
Looks like this:
You are done even with the optional steps ;-), and with this chapter.
And one final comment – if you don´t want to raise a late coming alert where the employee has at the beginning of the shift a partial day absence recorded (he took the first half of the day off, or had a doctors appointment), you need to consider also absence time type groups in step one where you use the “recorded working time” type group as a deduction group.
So, couple of things to consider in this scenario ;-).
1.4 Alerts based on time collectors
Time collectors- small recap what this is. With time collectors you can “count” flexibly and store the result on the database. The collector values show up in the time admin workbench and you can even visualize it to the employee in the time sheet. Time collectors count currently per week or per month (further periods are in planning). Examples are: counting of recorded working hours per month – cause an employee ought not work more than 180 hours. Counting of performed night shifts, cause employee ought not to perform more than 10 in a month. Counting of on call times, counting of working time on Saturdays…..or counting of late comings per month (see above).
The collectors were also able to raise errors once a defined threshold is reached.
But many customers requested not only errors, but also alerts on collectors. And this has been realized right now.
Take the example with the late comers above. Your customer could have the policy that only if there is 3-times a late coming in the month then there ought to be a salary deduction, or full-day time account deduction, or simply only the time admin / manager needs to be informed. So, not immediately when the employee is only one time per month late, but only when this happens 3-times.
The information of time admins / managers once a specific constellation occured for x-times can now be done with the new enhancement. And based on this the time admin can create a time account deduction or create a deduction wage type for payroll via the spot bonus portlet for example. What do you need in time valuation to create these alerts? Lets continue the example from above with the later comers and enhance it with the requirement to trigger an alert when the employee was 3-times late in a month.
The overall mechanisms are not new, the only new thing is that you can raise now an alert upon a time type group “counted events”. But let´s have a look how you configure this:
First you need to collect the occurences of late coming per month. You need to use a time valuation of type “Compare threshold group with Input and Count events”:
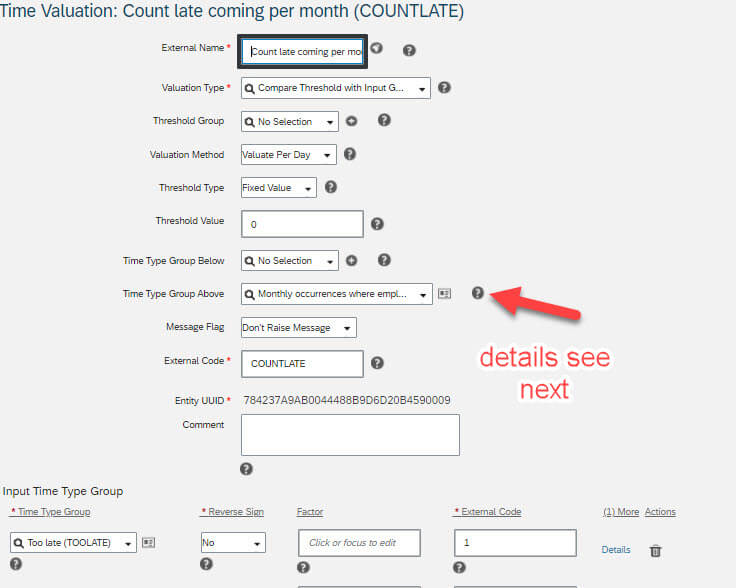
Input time type group is your late comer group, threshold is a fix value with 0 and the result is counted in the time type group assigned in the above field. Make sure that this time type group is of the category “counted events”:
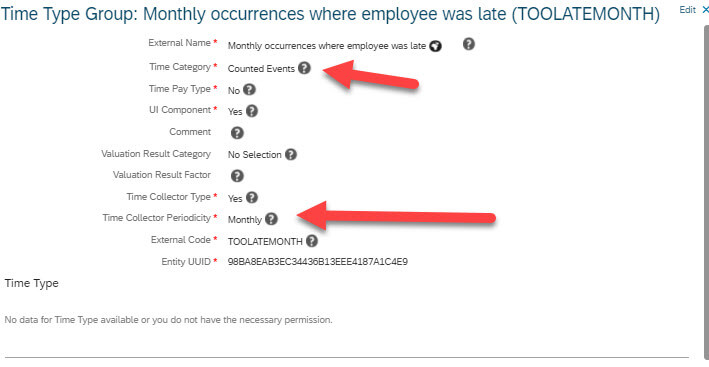
And note that the time collector periodicity is set to “monthly”
Last step is then to create a valuation that raises the alert. This is pretty simple. Choose the valuation type “Aggregate input group and split”, use as input time type group your monthly counted events collectors, set a fix threshold of 3 and raise an alert on the time type group above (here you need due to technical reasons assign another time type group of counted event type as a kind of container for the alert). Done:
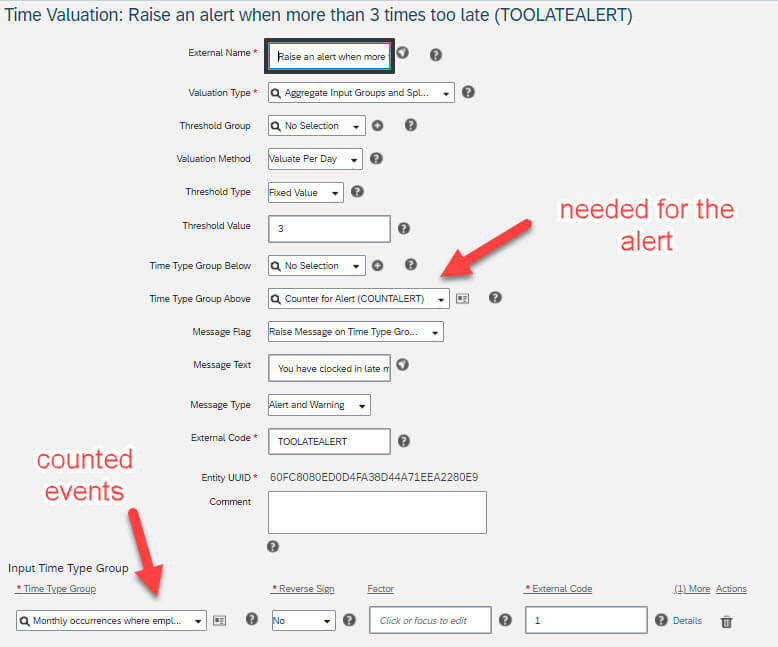
That´s it, if the employee is more than 3 times late in a month he gets the alert text stated in the message text field and the alert is send to the Admin Alert UI, where a Time Administrator can then react and do follow up activities.
1.5 Clock in/out availability at all data centers
First it has to be mentioned that the Clock in/out integration is now available in all data centers. As you might remember, there was a phased roll-out, but now it´s general available everywhere.
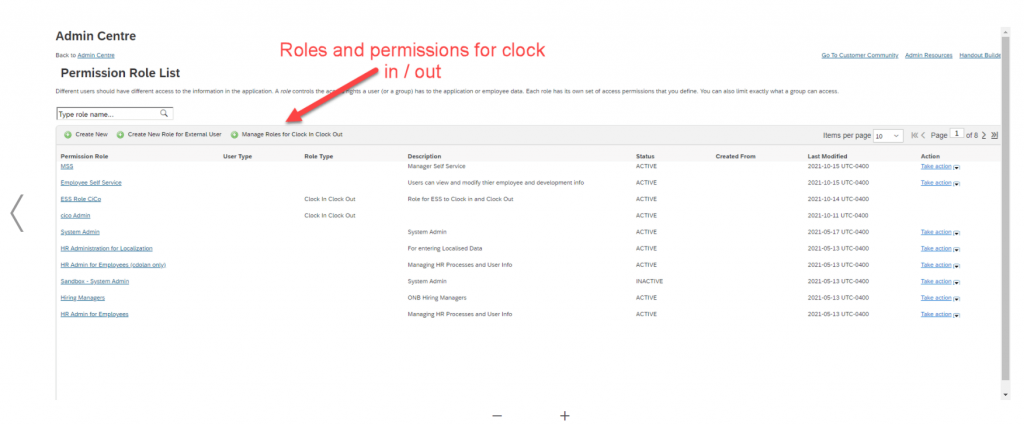
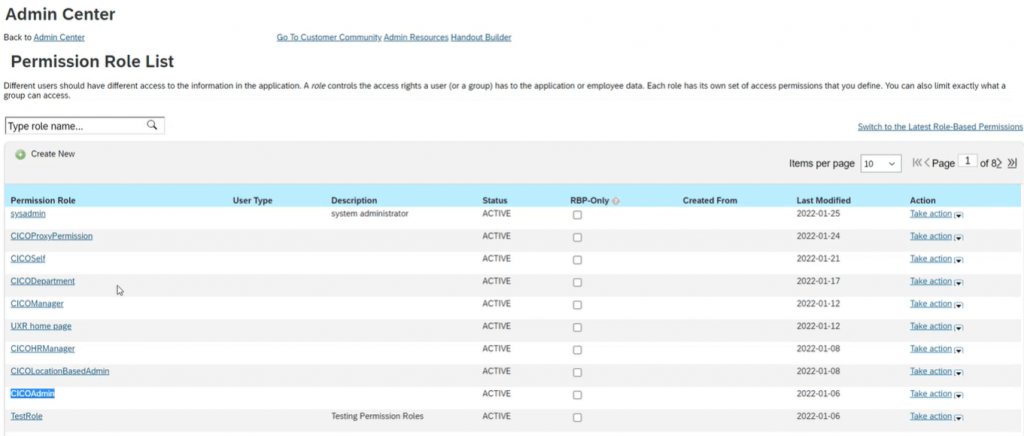
1.6 Enhanced Permissions for Manage Clock in / Out App
Till this release we provided limited permission capabilities for the Manage clock in / out app. This has changed now.
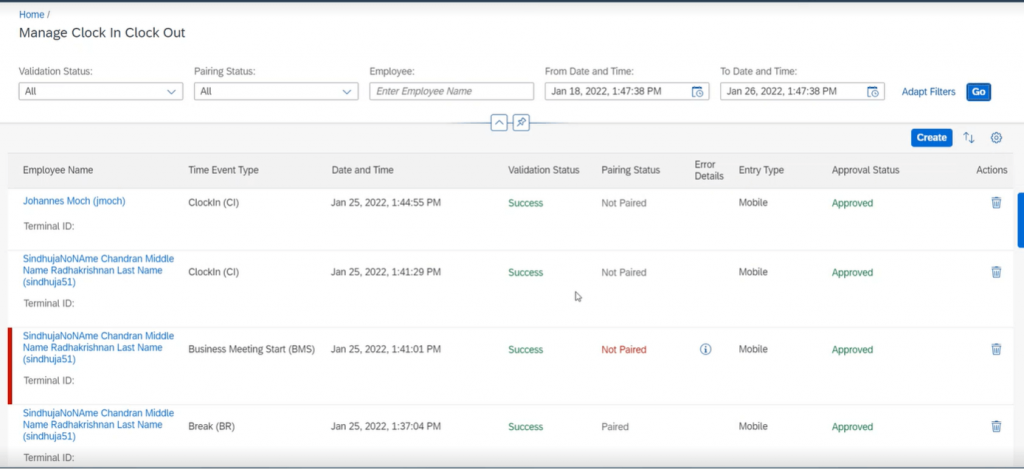
As a recap what the Manage Clock in / out App is: this is the place where you can (depending on the permissions) view, create and edit clock in / out punches (time events) for employees. Here the screenshot:
And maybe you remember – but in last release the permissions for the clock in / out where a bit a special setting. There was in the permission role an extra button where you could define the permissions for the clock in / outs. But this has changed now. The permission settings for clock in / out have moved into the normal Successfactors permission configuration. Not only the look and feel is now the same, but also the functionality that the normal permission roles provide can now also be used for clock in / out.
Just a glance how it was in previous releases:
And this is how it is now:
So, in summary, the configuration of permission roles as described in my previous blog has been enhanced and is now done same way as for any other permission. But if you have already set up your roles in the old way, no need to bother, you don´t need to change anything. This is only relevant then if you want to set new permission roles.
Due to this move we can provide much more flexibility. In the past the permission roles for admins allowed only all or the permission group access. Managers had only access to the clock in / out app for their direct reports and employees only to their own data.
Now we enhanced this for admins and managers:
You can create now more sophisticated permissions for admins and managers in a way that you can decide if:
- an admins permission can be reduced to a department or location
- manager can / can´t access his own data
- managers access data a level up and down
- manager with direct reports and permission groups
- and also HR, Matrix, Second and Custom Manager access
With this you are now able to configure exactly what role is allowed to see / edit for which employee group – even in big multi-country companies with lots of sophisticated time manager roles.
1.7 Proxy management for Manage Clock in / out events
You know for sure the normal proxy functionality in Successfactors. With this you can assign for a time being the tasks and roles of a user to a different user. This is for example useful when your time admin goes on vacation and you want to enable another user to take over for a given period the tasks / roles of your time administrator. This feature is now also available for the Manage clock in / out. When you set the proxy management than the user who receives the proxy has for Manage clock in / out same possibilities as the user from which the proxy came.
Here is where you set the proxy management – you can restrict the data access for example to Employee Central / Employee Profile functions:

And if you now ask if the “delegate feature” is supported: right now not. One step after the other ;-). Enablement of the proxy management is the first step, in future we plan also to enable the “delegate feature” for the Manage clock in / out application.
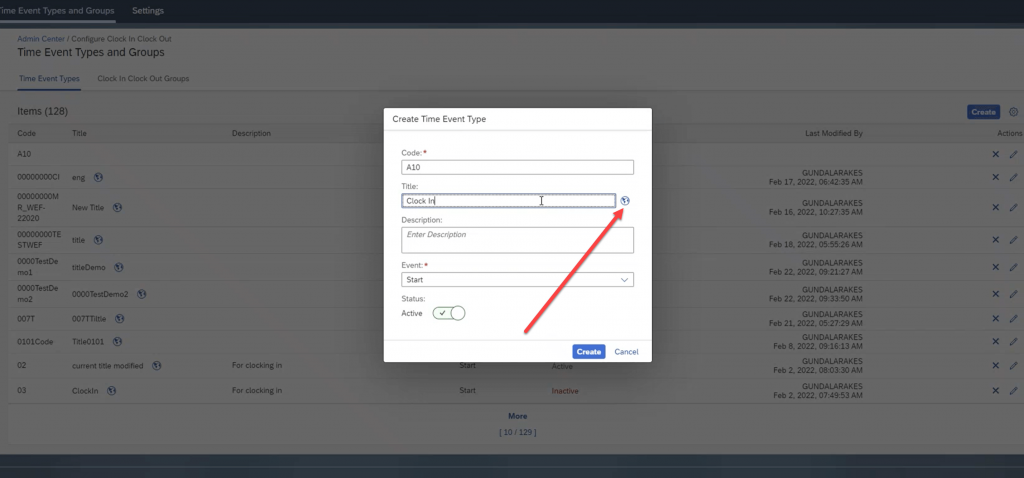
1.8 Multi-language support for time event types and clock in/out groups
When you configure our clock in / out scenario you need so called time event types. Time event types are used to differentiate from a business point of view multiple clock in / out reasons. Like clock in, clock out/break start, clock in/break end, Start Dienstgang, Ende Dienstgang….This time event types are later used in the upload to time sheet process in order to create different time types in time sheet.
Up to now there was no translation possibility for time event types. This was a problem when customers used our clock in / out scenario in multiple countries – cause the customer needed to double the time event types only because of a different language. Or even when an employee in the same country is logged on with a different language, there was no translation. You can now maintain the translation for clock in / out events and for the clock in/out group in the configuration of the time events respective clock in / out group. This is the screen where you create in the configuration a time event type. Click on the right globe icon and you can maintain the translation:
Translation pop-up appears that shows all languages that are activated for the company:
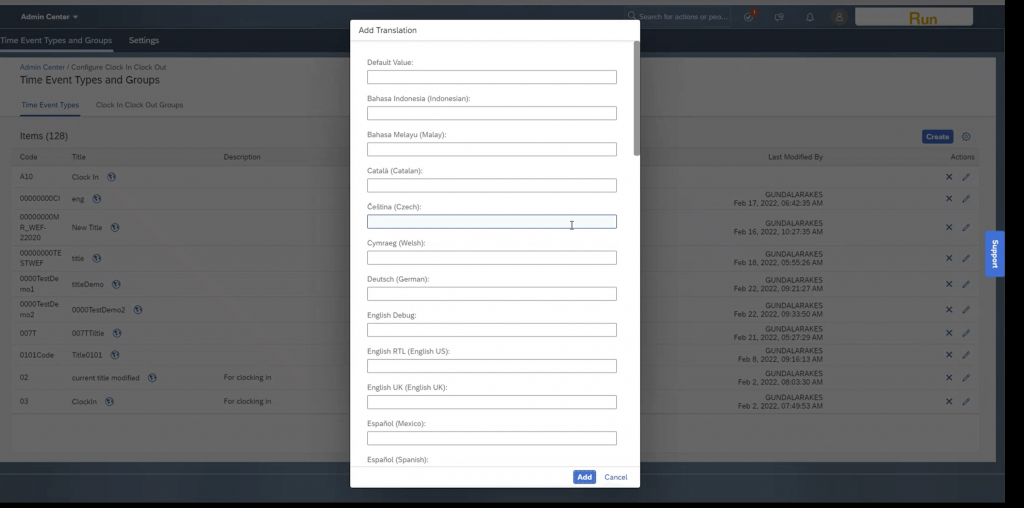
And this translation is of course shown not only in the manage clock in / out app, but also where we show the time events in the time sheet, mobile app or in the clock in/ out quick action on the home page.
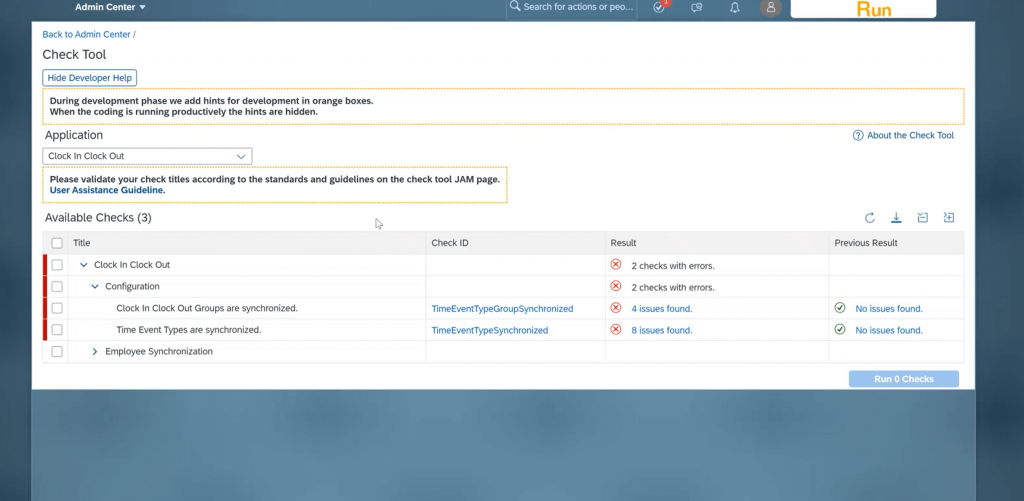
Due to the fact that the clock in / out solution is running as a microservice on a different platform, the translation needs to be synchronized with your Successfactors System. To monitor the synchronization once you change the translation we provide a check tool check. Usually you don´t need to bother with this, but just in case after changing the configuration you don´t see the changes in your Successfactors UIs, run this check and use the fix possibilities in the check tool check:
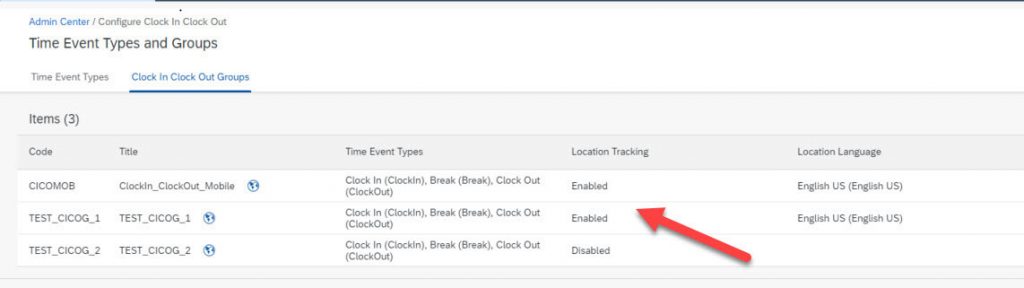
1.9 Location capturing for clock in / out
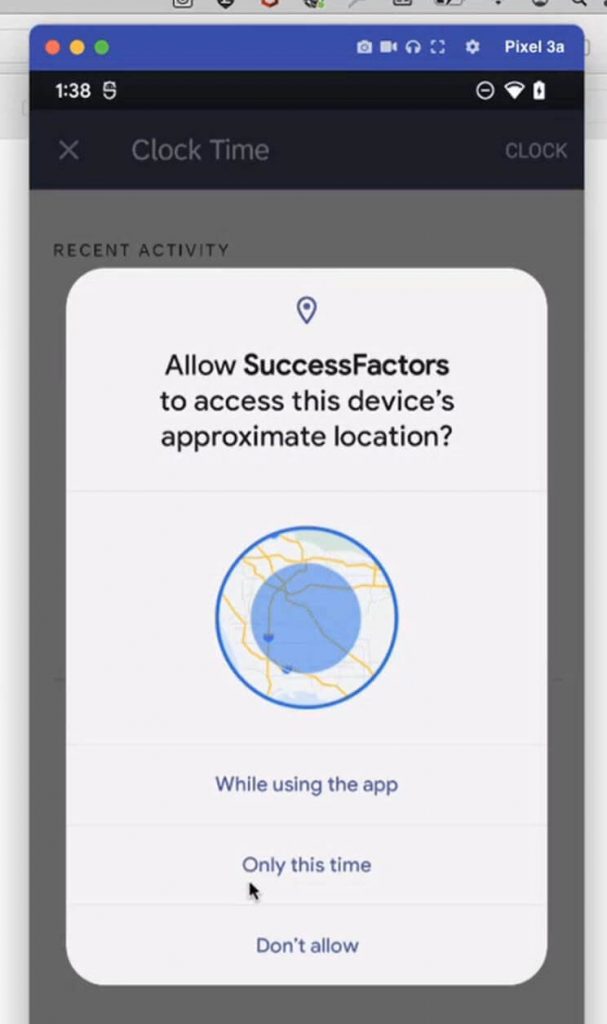
This is now a bit a controversial topic. Depending on local laws and cultural habit this topic might be completely irrelevant for some countries and even not allowed. We are well aware of the criticality of this feature with respect to data privacy, and this is why the location capturing can be made available via configuration only for specific countries / user groups. You do this kind of configuration for the Clock in / out group that you set up and assign to employees. And, most important: this usage needs the consent of the employee, it cannot be done without the consent of the employee.
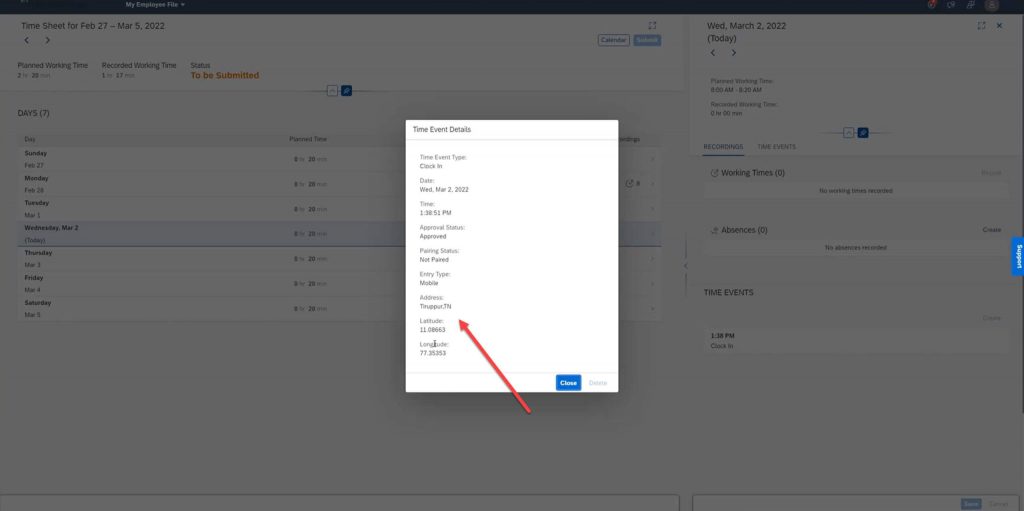
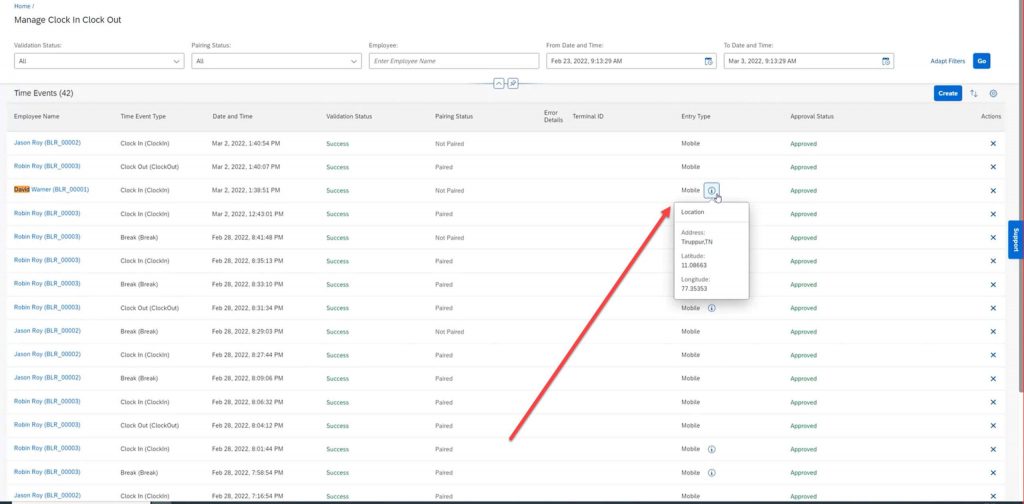
So, what is it? When employees clock in via the mobile punch clock gps coordinates can be captured and stored together with the time event. A time admin and employee can then see this information together with street name and city in the clock in / out admin app and in the employees time sheet.
With this you can verify if an employee using the mobile clock in / out has really performed his work from home at his home address or from a different address – this might even have taxation implications then. Or when you allow using the mobile clock in/ out possibilities on the campus ground that the employee really did punch in only within the Campus area.
The general configuration of the location capturing is done per clock in/out group. Means, you can enable it for a specific group of employees:

We provide furthermore an indicator in the clock in/out groups overview so that you easily can see in which clock in / out group this feature is enabled:
But is there also the possibility to restrict who should be able to see the location details once it is activated? Yes. With permission roles setting you can restrict what users are allowed to see the location and gps coordinates at all. This is done in the section of the Manage clock in / out permissions:

With this setting you can via different roles restrict for example managers to see in employees time sheet the location of their employees time punches, but allow it for time administrators.
And in any case, when the location is going to be captured the user needs always give his consent. So, when he performs a clock in via mobile and the location tracking is configured for him, he needs to consent. If he does not give his consent, the coordinates are not transferred.
If the user gives his consent, the information is shown in the time events details in the time sheet (again, if you have the appropriate permissions):
And this information is also shown in the manage clock in / out UI. For those employees where the location capturing is enabled you get an Information icon in the “entry type” field and clicking on it gives you the information:
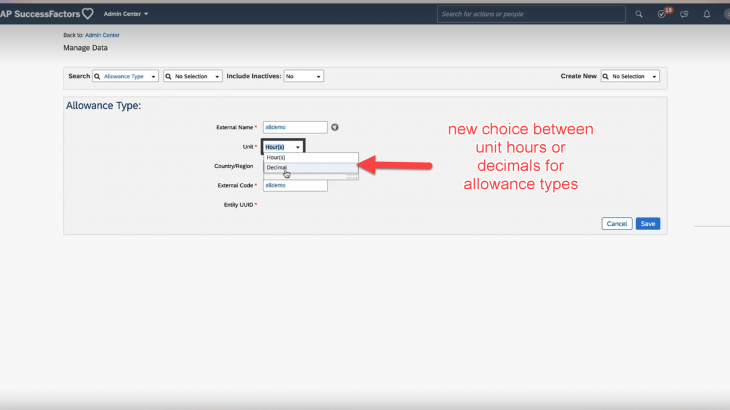
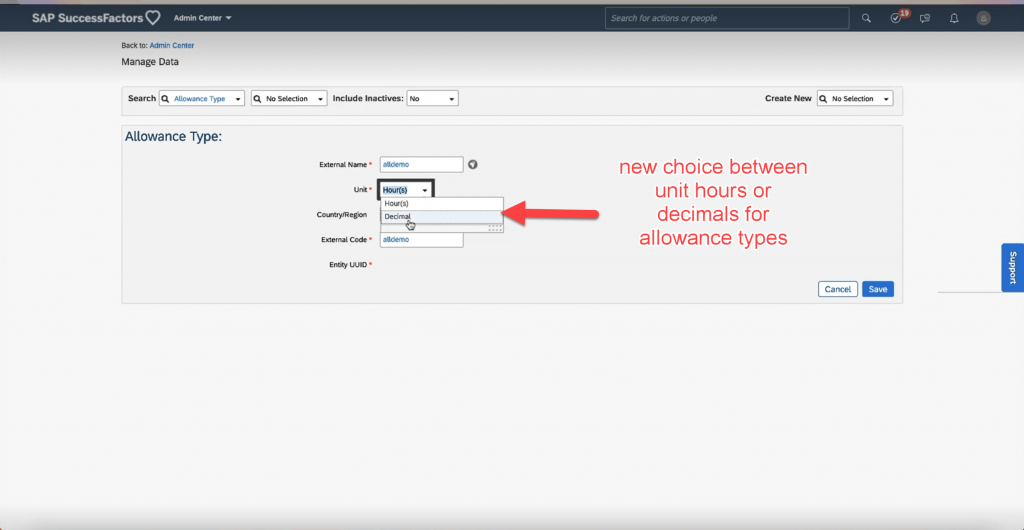
1.10 Allowance recording in different units
This is an enhancement request that has received many votes in the past. And we acted accordingly.
Allowances – just a small recap what it is: Employees record in time sheets their attendance times. And one part of the time valuation is that it calculates based on the time recording hourly pay, overtime premium, shift differentials and Sunday-, Night- Public holiday premiums. But there are also special payments which time valuation cannot calculate, cause it´s a extra-ordinary constellation or situation. Example could be a dirty work allowance: the employee has worked 4 hours in a dirty area. Usually a time valuation system does not know this. Or a hard ship allowance when he worked for a couple of hours at a dangerous place.
Another use case for allowances could be that customers do not want to use the flexibility of the real-time time valuation to auto-calculate premiums. They might want that employees explicitly record a premium pay – like for example a meal allowance. Meal allowances are normally granted when you work more than 6 hours. Time valuation could calculate it, but as mentioned, many customers want this explicitly be recorded from employees. Cause maybe they brought their own lunch and then there is no meal allowance granted and time valuation would calculated it only based on the attendance hours, not knowing that the employee has brought his lunch from home.
Allowances are passed 1:1 to the payroll system and replicated for EC Payroll / SAP HCM Payroll into the Infotype 2010 Renumeration Info. Untill H2 2021 release allowances could only be recorded in the hh:mm format. But there are many allowances that do not match the hh:mm format – like kilometers, pieces, liters….If you wanted to record 1 meal allowance per day you had to record 1:00 hour. Not really nice.
We have now enhanced the allowance recording in a way, that you can choose a generic decimal unit. That´s pretty flexible. You can more or less provide now any unit in your time sheet, cause in the end it ends up in a decimal field. And when you include in the label of your allowance type the semantic meaning of the unit – than you can enter pretty much anything you like ;-). So, you can have an allowance type “Meal allowance (pieces per day)”, “travel distance (km)”, and even “monetary costs (Euro)”. The allowance is visualized and stored in a decimal format.
To achieve this you need to configure now for any allowance type if an hh:mm format or a decimal format shall be used:
And when this is done you can choose the allowance type and enter a decimal value in the time sheet UI:

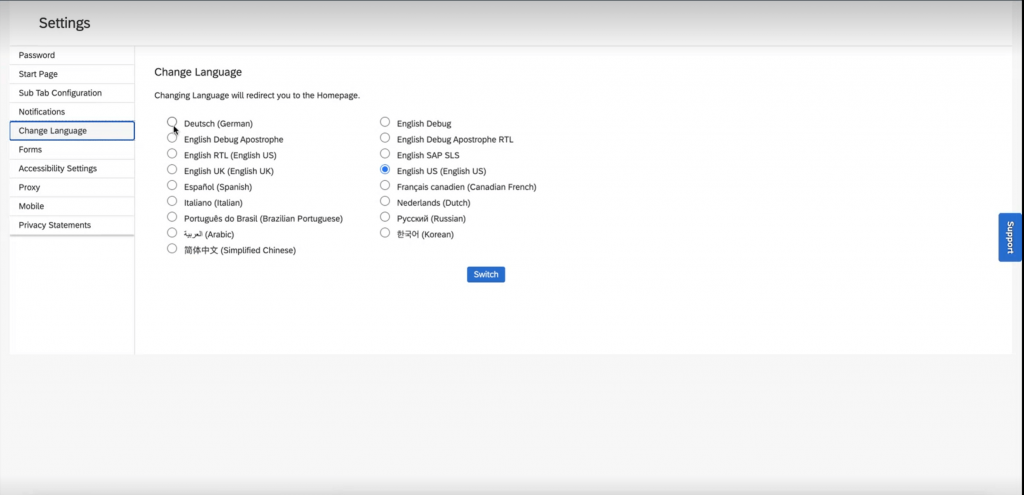
Of course in the summary section of the time sheet this allowances are summed up and visualized in the decimal format as well. And the visualization of the decimal format depends on the choosen language of the user. If you want european format 1,00 instead of 1.00 you need to change the language in the user settings:
And when it comes to replicating this information to the Infotype 2010 then you just map this allowance type to the corresponding wage type that contains the concrete unit you want to have in the payroll system. Cause the IT2010 wage types / IT2010 subtypes come with a dedicated unit. It´s then only a mapping question.
So all in all for those customers who used up to now the workaround to create meal allowances in the hh:mm format I think this is a great usability enhancement for the end users.
Please note:
This feature is not yet available in mobile apps (but planned).
1.11 Allowance recording with deviating cost center
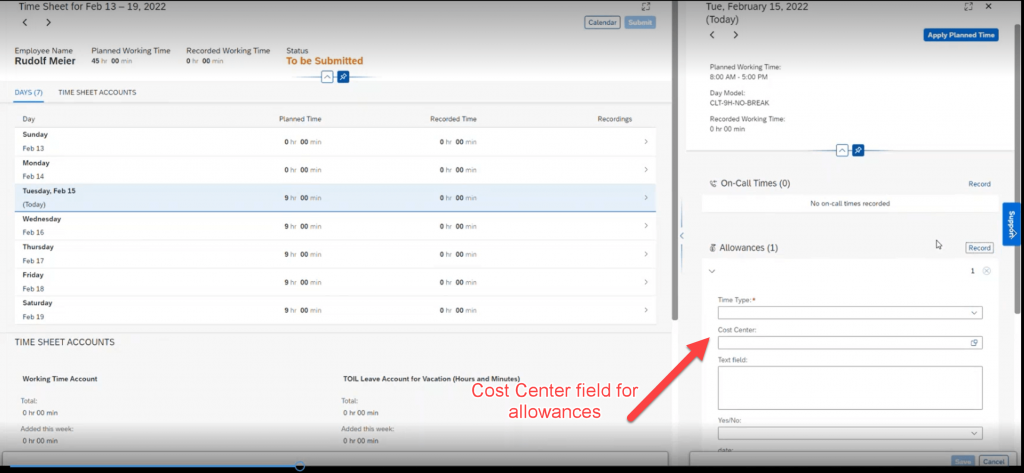
This one is briefly explained. As you know we can allocate deviating cost centers when an employee records attendance or on-call times in the time sheet. With this allocation employees can distribute their hours worked to a different cost center. This information is via our time valuation results passed onto the EC Payroll or SAP HCM Payroll. Payroll calculates then the amount and creates a financial posting to the deviating cost center.
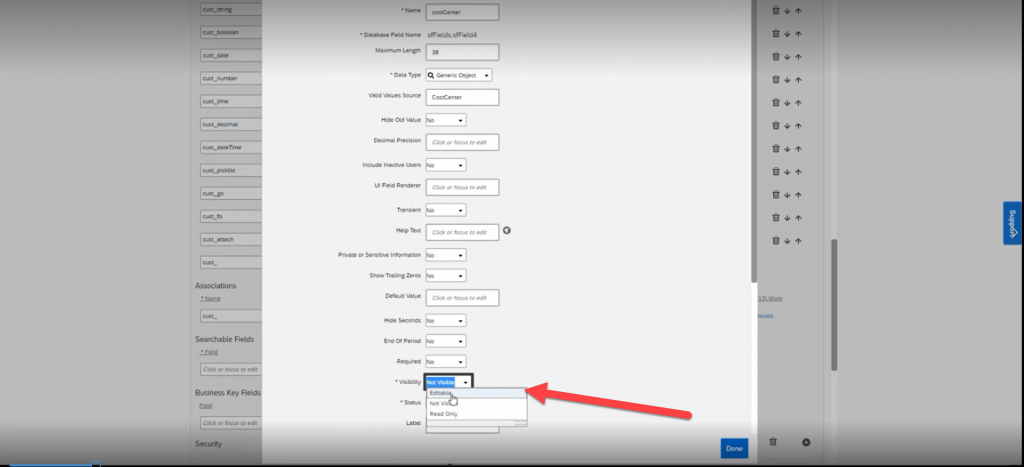
The new enhancement is that you can now also assign a deviating cost center to an allowance time type.
What do you need to? First, via configure object definition set the cost center field for allowances to “editable”. And please, note, since this is a Time Tracking feature you can only do this when you have activated Time Tracking in provisioning.
After this is done you can choose the cost center in the allowance section of the time sheet:
Currently it is not yet possible to restrict the value help of cost centers showing up (but it is already planned as a future enhancement), but you can create save rules for the time sheet where you can perform checks which cost centers are allowed and which not. But of course the value help considers the read permissions, hence only those cost centers show up on which the user has permissions to see.
Since this feature is only available for Time Tracking, this feature is not available for the old Time Sheet UI.
Please note:
This feature is not yet available in mobile apps (but planned).
That´s it for the Time Tracking enhancements, lets turn now to Time Off:
2. Time Off Features
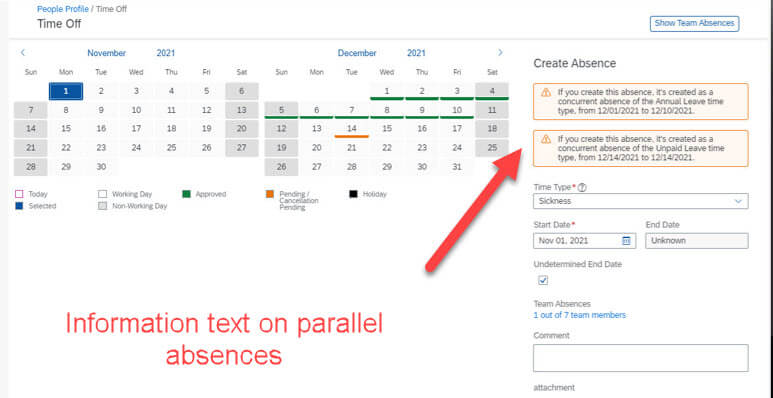
2.1 Parallel Absences General Availability
This is just to mention that our Early Adopter Feature Parallel Absences has been advanced to General Availability. In some countries there is the need of having two valid absence records at the same time. This might be due to UKs requirement to create each illness record with an unlimited end-date until the employee really returns from illness- and hence this might then be in parallel to future already recorded vacation records that you don´t want to kick out of the system.
Or with use cases in Netherlands where you can be ill, but nevertheless be on vacation. There are multiple of country specific use cases. This feature is available for all countries, but fully tested and validated only for the countries UK, Spain and Netherlands. You can use it for other countries as well – but you need to self-test (especially payroll implications) and validate if this feature works for your requirements (time off rules count for example 2 absence days and reporting gives you also 2 absence days).
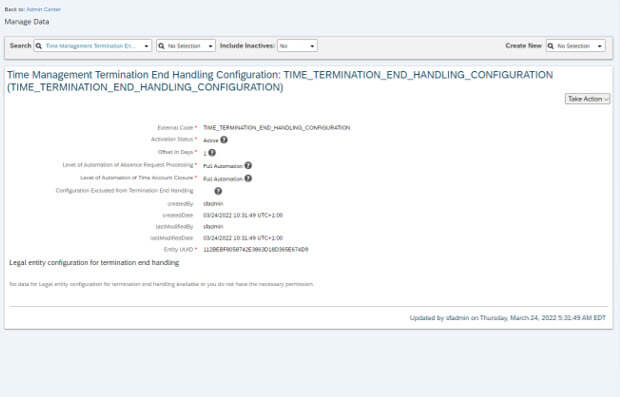
2.2 Termination End Handling General Availability
Since 2 releases we provide the Feature “Termination End Handling” as an Early Adopter feature. We gathered customer feedback and finetuned the feature and now it is for general availability and can be used by any customer.
This enhancement supports better the process of termination and rehiring during the same time account accrual period. So, when there is a yearly time account accrual period and you terminated an employee on 30. June, but rehired him on 1st September there was a conflict with the time accounts. This feature triggers now an automated clean-up of time account postings, time accounts and absences beyond the termination date. You can automatically close time accounts for example. This avoids issues during the rehire process.
Configuration for this is done in the new object “Time Management Termination”:
2.3 Early Adopter Feature Germany: Support of eAU process
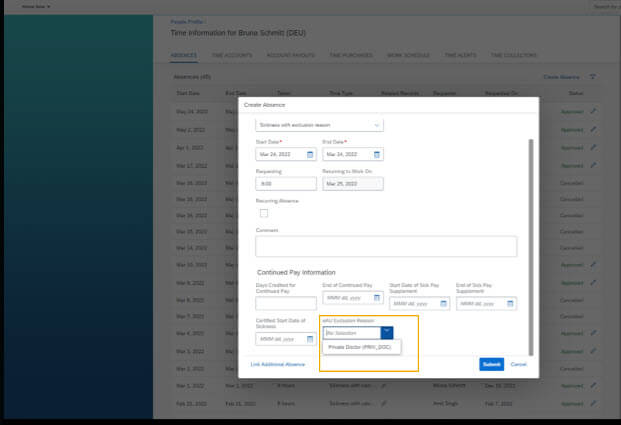
This enhancement is now only relevant for Germany. eAU stands for elektronische Arbeitsunfähigkeitsbescheinigung. In english: electronic certificate of incapacity of work – due to illness. In Germany all communications from Doctors to health insurances regarding an employees illness record shall be done electronically (mandatory on January 1st 2023 as of today). So, a doctor informs the health insurance on the illness data. Health insurance sends only part of this information (without illness diagnosis for example) to the employer electronically. And the employee himself records the illness in the time management system.
EC Payroll and SAP onprem Payroll provide an interface to health insurances and provides the possibility to compare the records coming from the health insurance with the records coming from EC Time (via replication into the Payroll absence infotype 2001).
There might now be constellations where there is no possibility for this electronical exchange, cause the employee has consulted a doctor in a foreign country not connected to the eAU process. For this it is necessary to maintain in the EC Time Off absence record a dedicated field “Exclusion reason” which gets replicated to the IT2001 absence type in the payroll system.
This “exclusion reason” field is available as Early Adopter feature with H1 in the country extension Germany:
2.4 Check tool check for time profile and data inconsistencies
We are working currently on introducing time dependency into our configuration objects. Time Profile is going to be the frontrunner – but the development is still ongoing so we cannot release it in H1 release. However, as a positive side-effect of this developments we can already now provide a check tool check that can be of use for many customers. With this new check tool check you can validate your time profiles on data inconsistencies:
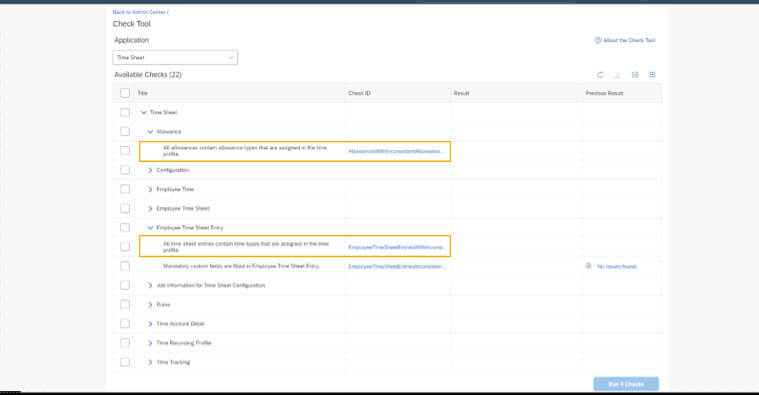
You can search for absence types, attendance, oncall, allowances that are in the system, but not assigned anymore to a time profile. This can happen when you set time types to “inactive” but the employee has already used them for future dates.
Or you can check for time profiles that you have set to inactive – but are still assigned to employees.
And you can even check for accrual postings without an accrual period ID.
So, all in all a useful tool to get rid of inconsistent data.
That´s it with Time Off enhancements, let´s check what other enhancements we provide:
3. Other Features
3.1 Call for action: don´t use absence requests for home office, business travel or any other attendance
This is not a new feature. This is a call for action / prevention. There are some customers that use the absence request form or Odata Api to record on a daily basis home office, business travel days or even working time. So, we have got customers having 40.000 employees but 800.000 absence records per month. This would end up in 9 mio absence records per year. For 40.000 employees !
The absence request form and the underlying time off architecture is not designed to cater for this and this might slow down system performance and even slow down the whole data center performance. Only the time sheet – where attendances are recorded, can cope without any problems with this data load.
But negative performance effects are not the only problem. This kind of wrong usage of absence recording for attendance business processes leads to wrong results in reporting, wrong results in time off rule scenarios, wrong results in time valuation and time sheet handling, wrong time recording collision checks and wrong results wherever we hard code on absence / attendance category (auto-submit of time sheets for example).
So, recap: what is an absence and what is an attendance record?
With an absence record an employee documents that he is not productive working nor acting on behalf of the employer during this time. Examples are vacation, illness, time in lieu off.
An attendance classifies a time record where an employee is working or is in other forms active on behalf of the employer. The work or action does not need to be from the workplace, and it does not need to be productive work neither. It can be for example only an occupational training, travel time that is acknowledged as working time (even if only for some calculations only with a percentage factor), or home office work.
This is clearly documented in our implementation guides, and it is stated there as well that using absence time type category to record home office for example is a misuse. We informed on this in our documentation, blogs, community posts since long.
If you have configured the system in this way: change it. In the long run you will get problems with this configuration.
If you need approval for home office records for example: this is provided with Time Tracking Single Record Approval feature.
3.2 Call for switch to new Time Sheet UI
Once more a call for action for those customers using the old time sheet UI. Please consider moving to the new Time Sheet User interface. You don´t have to subscribe for Time Tracking licences when you use the new Time Sheet UI. You can run the new time sheet UI with the same licences, but more functions and better usability like responsive web UI, calendar control for navigation and accessibility. We are promoting the move to the new time sheet UI since long, but there are still some customers using the old UI. Please be aware that there will be an opt-out with H2 release and a mandatory switch probably in 2023. The earlier you prepare and adopt the better.
3.3 Different Time Sheet workflows based on time valuation results
Long title ;-). The essence is: you can send a time sheet workflow to approver A if there is just normal time recorded and no overtime calculated for example. But if the time valuation calculates overtime – or a Sunday premium, or a premium for work after 20:00 or whatever the time valuation can calculate – then you can send this workflow to a different workflow recipient. So, you can pick a time valuation result in your workflow configuration and use it therein.
Another example would be if you don´t want to send an approval at all if there is no overtime calculated, but if 1-5 hours overtime are calculated the approval should go to the manager, but if there are more than 5 hours overtime the approval should go to manager AND HR.
3.4 Mandatory custom fields for allowances
This is a quick one: for the allowance recording in the new time sheet UI you can now configure mandatory custom fields. This was a feature gap compared to the “old” time sheet UI
3.5 Customizing of admin alerts with context information
The admin alert tools provides the possibility to add custom fields – and this is now also supported for the time management alerts. What does this mean? Quite simple: if you want to have more context information for time management alerts, you can add them now just like you want. You can add custom fields to alert types, and these show up then in the admin alert tool.
Example could be that you want to provide additional user information to the standard fields user first/ last name.
How to achieve this?
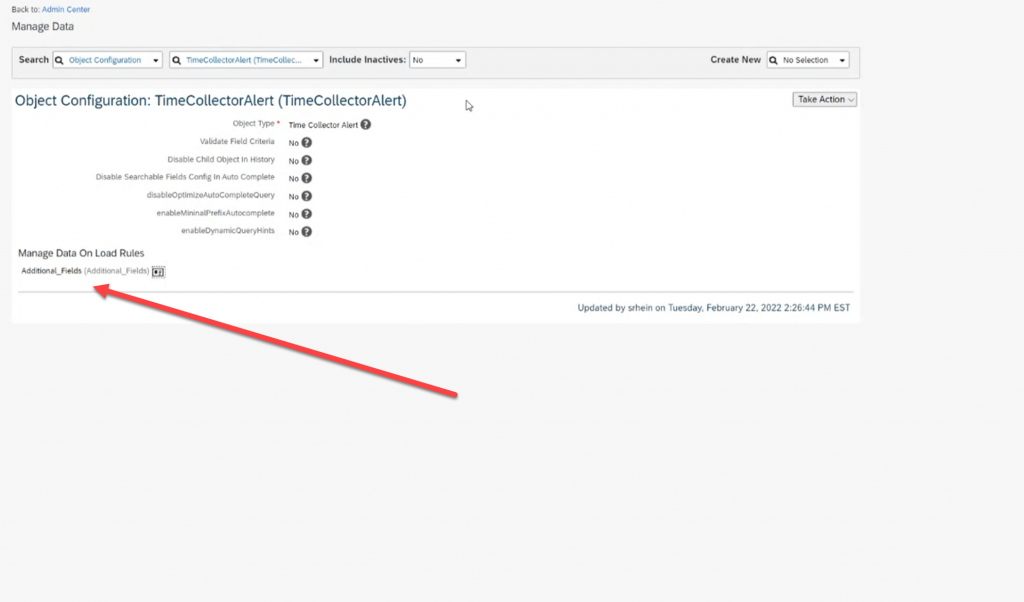
First you need to maintain the custom field for the object. Second step is to create a Custom MDF for the configuration where you create an own load rule.
Let´s check first how the standard looks like:
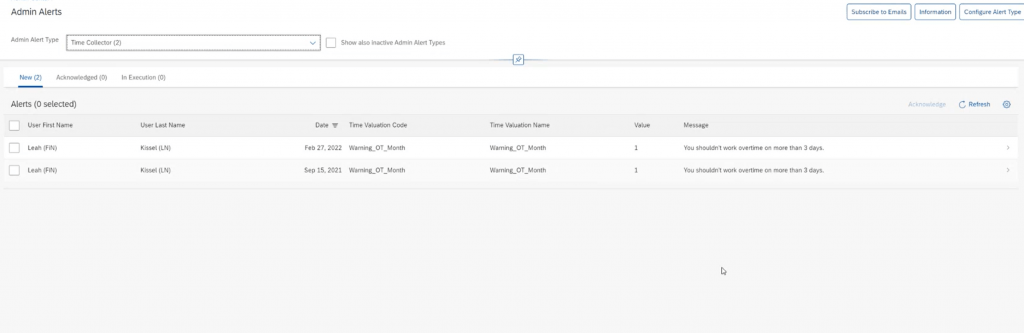
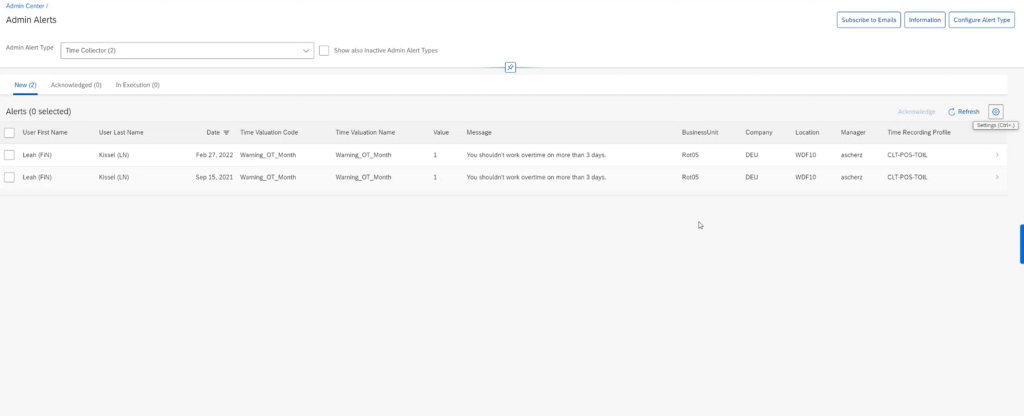
This is for example how our new time collector alerts show up in the admin alerts:
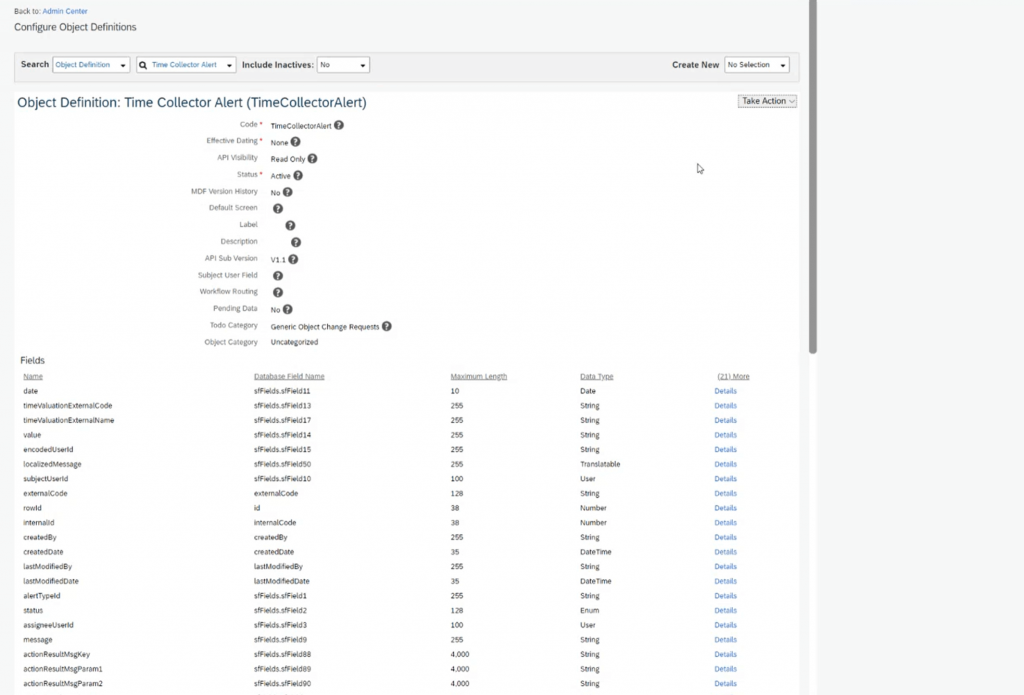
When you now want to add more context fields like business unit, location…then you need to first maintain this fields for the object via configure object definition:
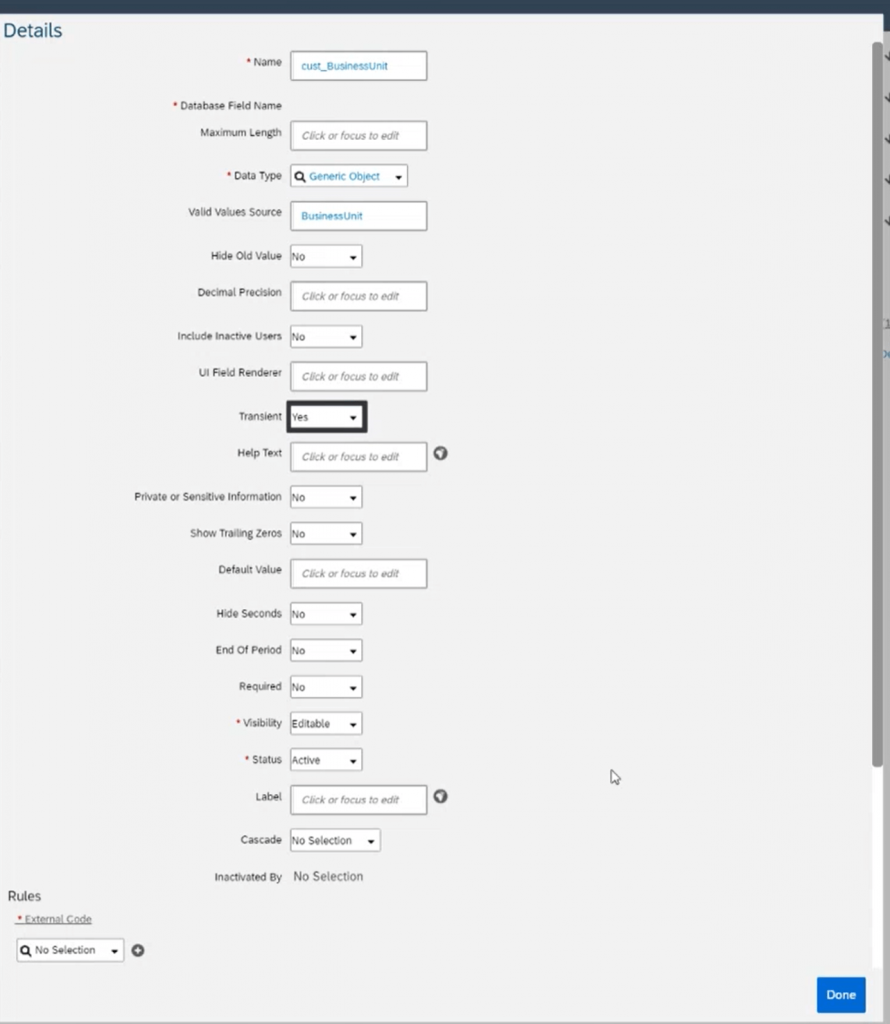
Click on edit and add the custom fields – make sure you choose generic object and that you make this field transient =yes. Let´s take the business unit as an example:
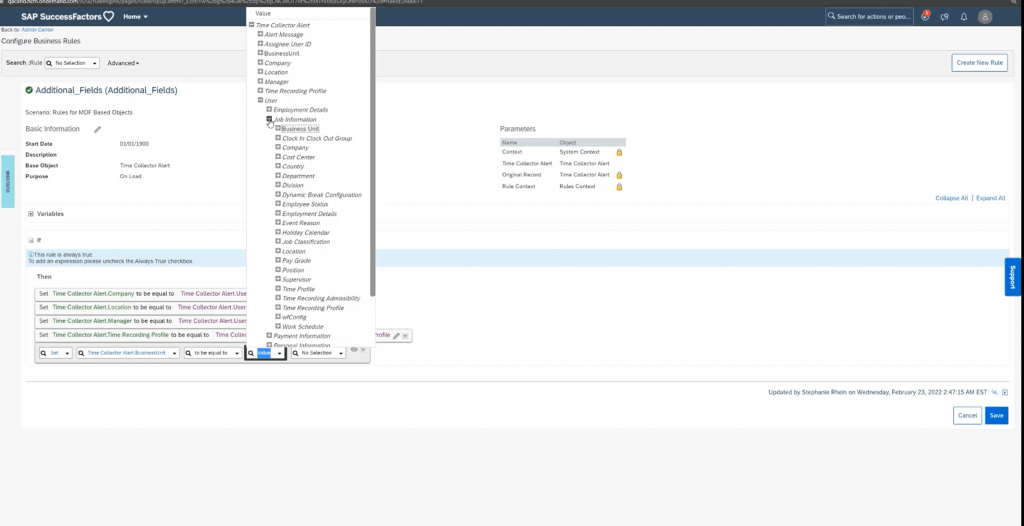
Next step is to create an on- load rule where you specify which fields shall be loaded when the UI is called. You create the rule where you specify which fields shall be loaded for that UI / object – navigate to the field that you want to see:
And you assign the rule in the object configuration of the time collector alert object:
Last step choose in the UI the custom fields you have added for this view:
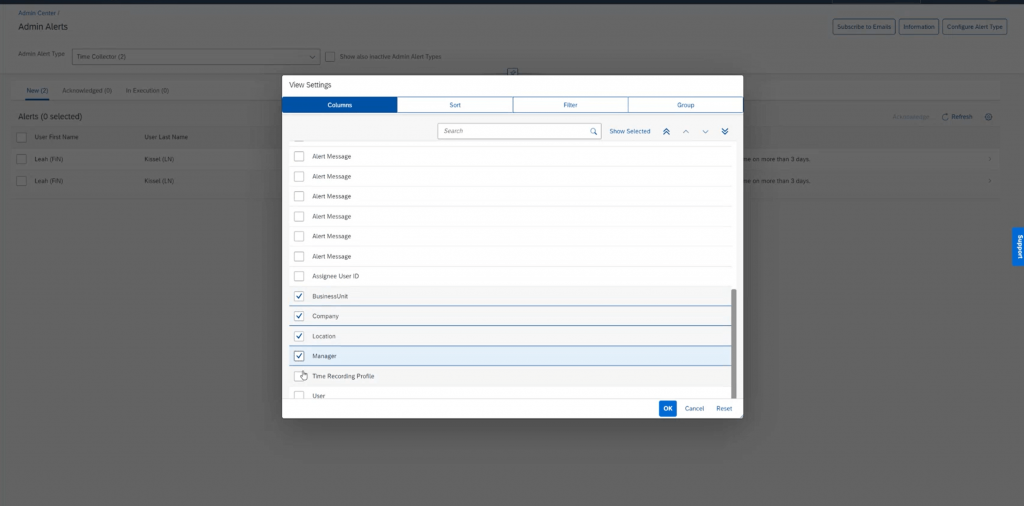
..and the fields get added:
Done.
3.6 Reporting enhancements
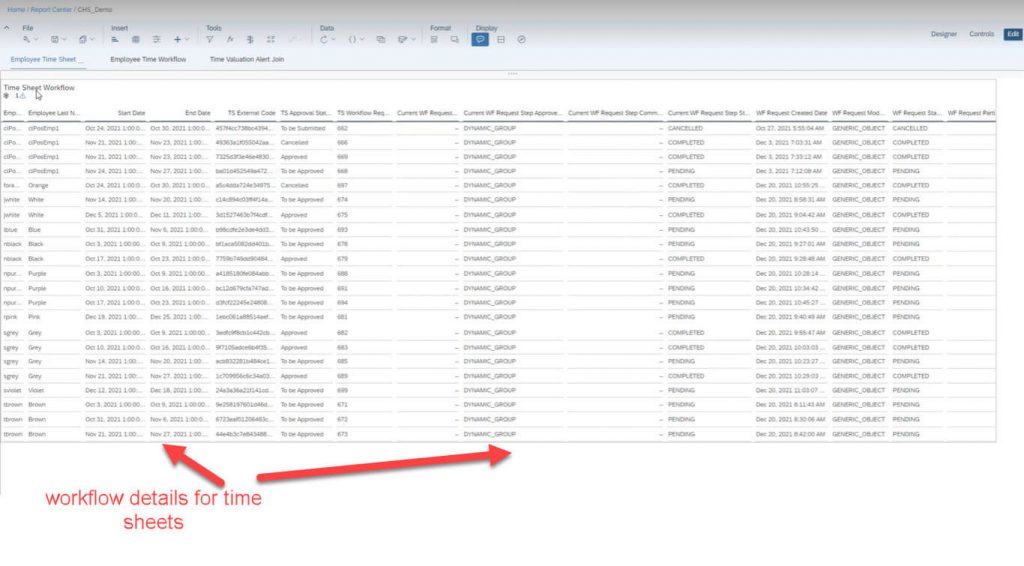
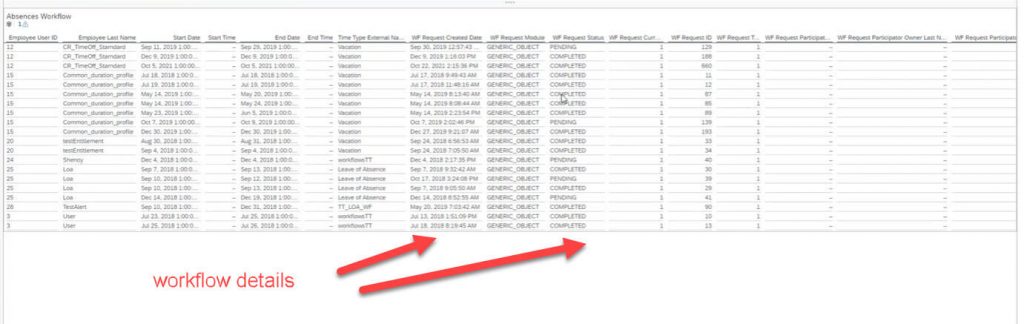
You can now add workflow information data to time sheet reports or employee time data report. So, you can add workflow details like workflow status, workflow Id, created on, workflow participants and so on into your attendance and absence reports.
You can furthermore add same workflow details into your time sheet report. With this you can easily find out the approval status of time sheets for example. Looks like this then:
And the same is possible for the employee time object, like for example the absence report. This can now include workflow details as well:
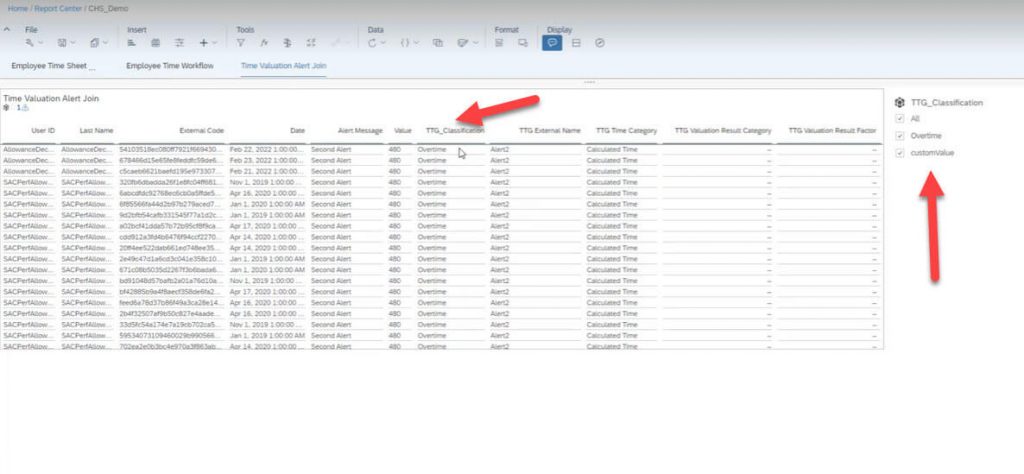
You can also add custom information to our time alerts report. The time alerts report gives you a list of all alerts that have been created based on the time valuation configuration. To group this alerts in a more meaningful way you can create classifications such as “overtime alerts”, “flextime alerts”, “maximum working hours alerts” and the alerts are then grouped into this sections.
This has been achieved by adding a join from the time alerts report to the time type group object.
To use this join in your report you need to add in the time type group object a custom field of type picklist, for example “classification” via configure object definition.
In the time type groups that are used for the alerts you can then further specify this custom field pick list. You can for example use “overtime” as a further classification:

In the time alerts report itself you can do a join on this classification custom field and get the result that there is an additional grouping of the alerts using the classifications you have created:
With this you can add more business context value to the time alerts report and put for example a filter only onto the overtime alerts, maximum working time violation alerts or whatever you want.


