Introduction
This blog, we will go through a scenario of posting a new Meeting Event on Outlook Calendar from C4C Activity (Appointment ) using MS Graph API in CPI iFlow.
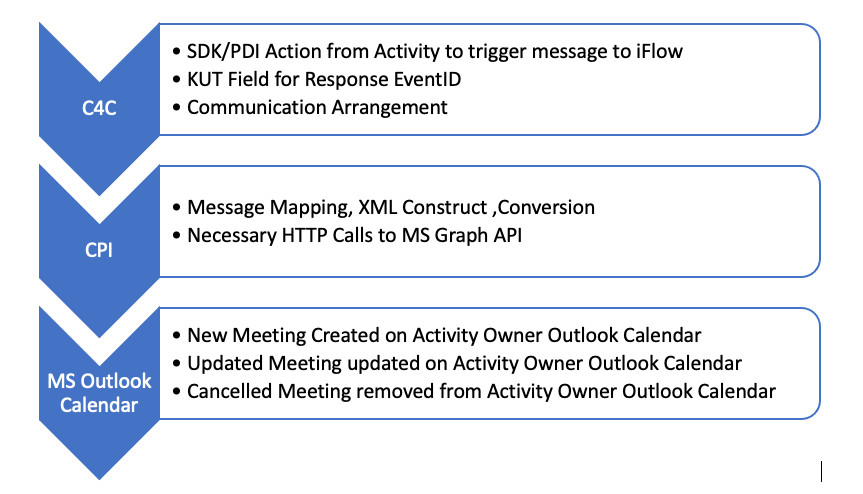
As part of the iFlow we will take care of CREATE / UPDATE / CANCEL Event on the Outlook Calendar of the Activity Owner.
The reason I received this requirement was that I was not able to use the ‘out of the box’ MS TEAMS Integration’ for C4C, due to an issue with the SAP App API Permissions which endup being too risky for the use in a large global organization.
Prerequisites
- Your MS Admin should create an App for CPI with necessary API permissions and provide you with ClientID and Client Secret #.
- You have tested the API successfully using Postman, for Create Event / Update Event / Cancel Event / Get User TimeZone
*The scenario includes some PDI /SDK in C4C, as well as New KUT Field creation. However, in this blog the focus is on the CPI iFlow settings and the necessary MS Graph API Calls to support this scenario.
Steps
- High Level Design / Test in Postman
- It is recommended to start with Postman collection build of the required API calls. In our Scenario we would need the following API Calls:
- OAuth2 Token (https://login.microsoftonline.com/{{SiteID}}/oauth2/v2.0/token) – New Token Generate
- Get Outlook ‘User ID’ from Email Address – The ‘User ID’ will be needed later for the Calendar Event Post. (https://graph.microsoft.com/v1.0/users(‘xxxx.xxxx@xxxx.com’)
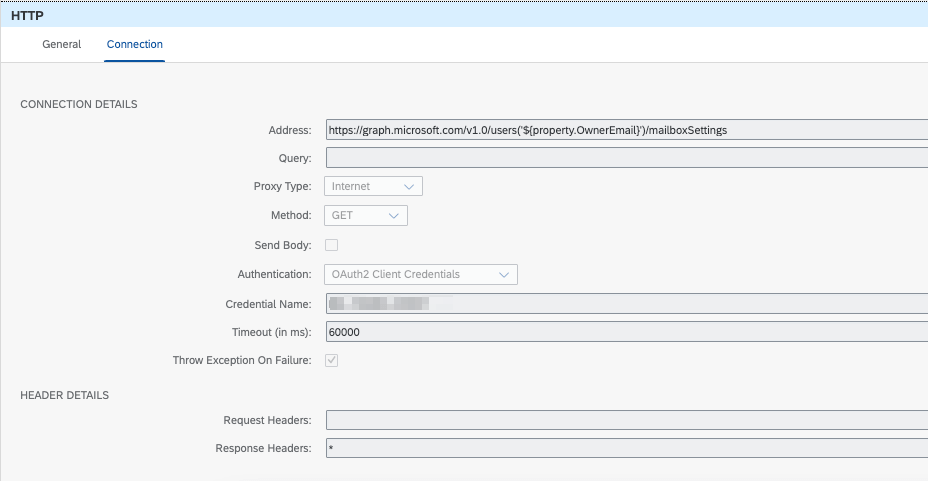
- Get Outlook User Mailbox Settings – Will be used to get the User Timezone settings. This will be required for the Timezone conversion later in the iFlow. (https://graph.microsoft.com/v1.0/users(‘xxxx.xxxx@xxxx.com’)/mailboxSettings )
- Create Event – POST a new Event on the User’s Calendar. (https://graph.microsoft.com/v1.0/users/{UserID}/events)
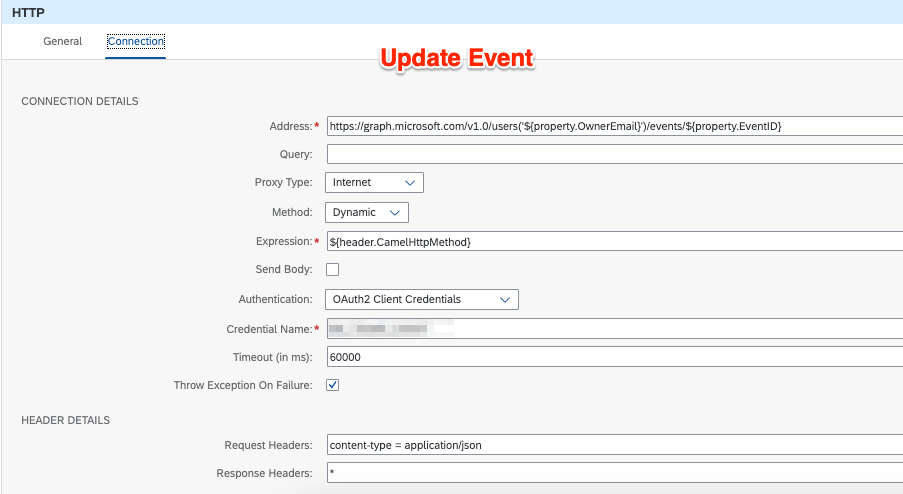
- Update Event – PATCH will be used for the meeting updates, based on the {UserID} and {EventID}. (https://graph.microsoft.com/v1.0/users(‘xxxx.xxxx@xxxx.com’)/events/ XXXXXXXXXXXZZZZZCCCCXXXXXXXXXXXXXXXXX)
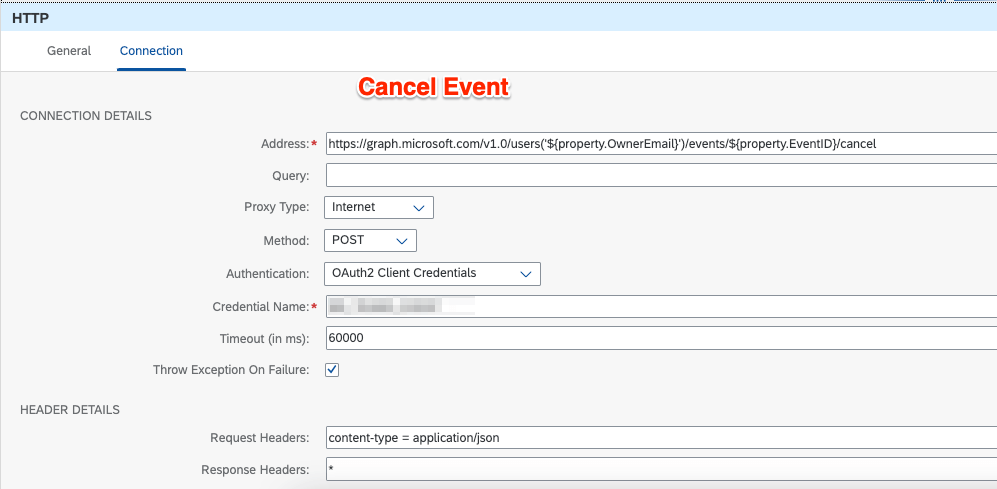
- Cancel Event – POST will be used to remove the event from the user’s calendar in case of cancellation status update. (https://graph.microsoft.com/v1.0/users(‘xxxx.xxxx@xxxx.com’)/events/ XXXXXXXXXXXZZZZZCCCCXXXXXXXXXXXXXXXXX/cancel)
- OAuth2 Token (https://login.microsoftonline.com/{{SiteID}}/oauth2/v2.0/token) – New Token Generate
- Create new wsdl file for the SDK Action in C4C
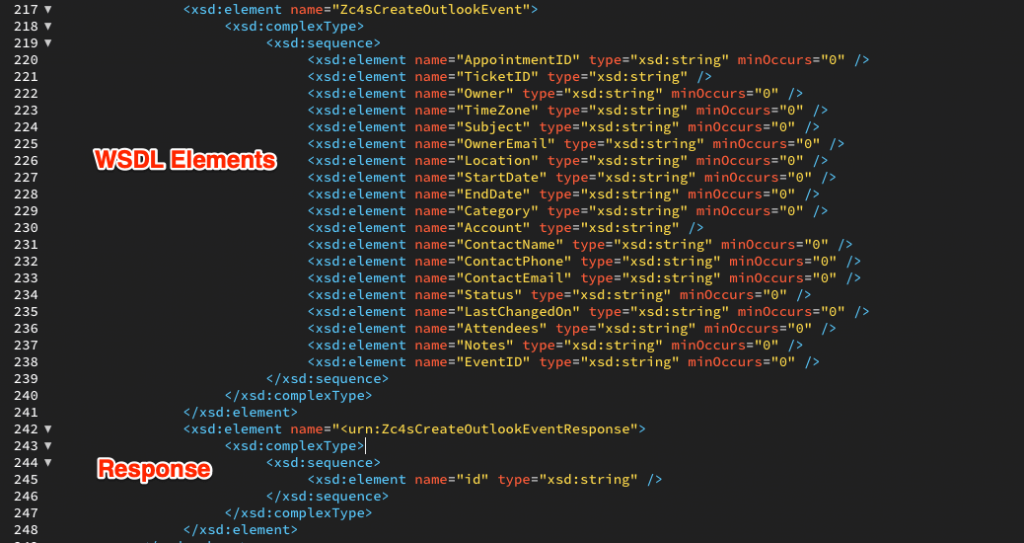
- Based on the data gathered from above step about the Graph API required fields for Event Create and the Fields available within the C4C Activity (Appointment), prepare a new WSDL file for the SDK/PDI Action Use in C4C. This will be the background for the Incoming SOAP message from C4C.
*It is recommended to prepare a Technical Specs Design document which holds the Field mapping as example below:
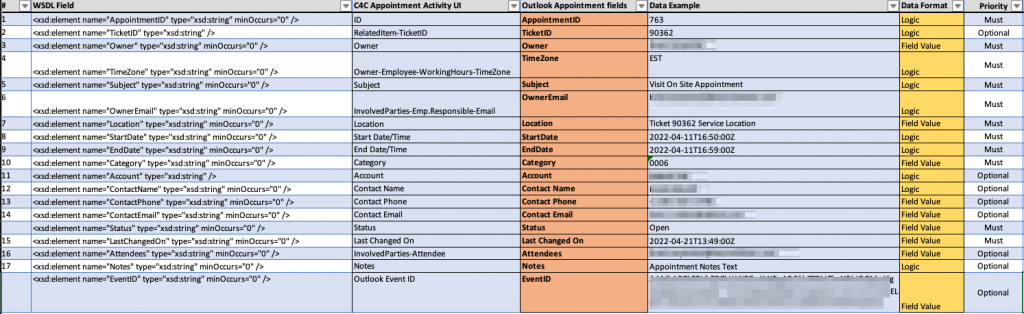
**The WSDL Response should contain the ‘Event ID’ from Outlook. This will be used for the Event Update /Cancel scenarios. For this scenario the WSDL will look like that:
- CPI: ‘OAuth2 Client Credentials’ setup
For our connection to SharePoint Graph API, we are going to use ‘OAuth2 Client Credentials’. We would need to setup a new OAuth2 Credentials under Overview >Security Material with following information:
| Name | {{Credentials_Name}} |
| Grant Type | Client Credentials |
| Description | {{Description}} |
| Token Service URL | https://login.microsoftonline.com/{{SiteID}}/oauth2/v2.0/token |
| Client ID | {{ClientID} |
| Client Secret | {{ClientSecret}} |
| Client Authentication | Send as Request Header |
| Include Scope | Check Checkbox |
| Scope | https://graph.microsoft.com/.default |
| Content Type | application/x-www-form-urlencoded |
- Create new iFlow in CPI
Now we are at the point of new iFlow creation/configuration (based on the business scenario requirements and the High-Level Design Step:
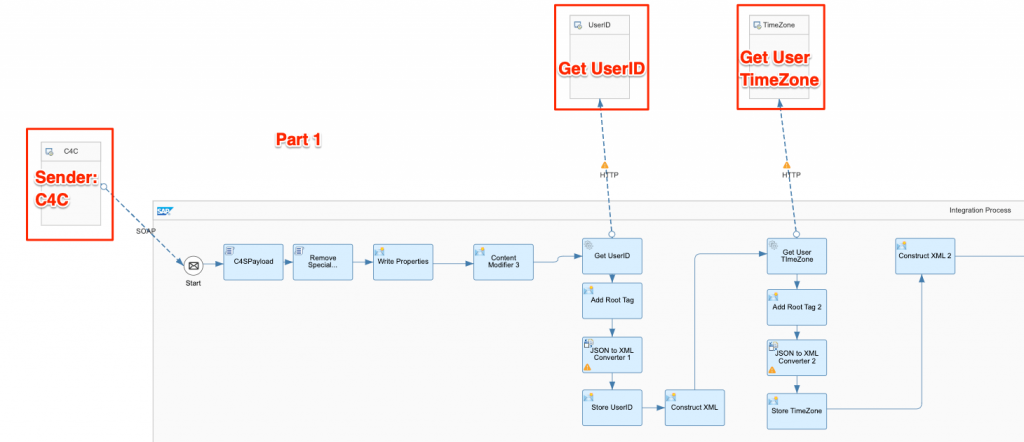
Part 1:
Sender (C4C) is sending the SOAP message (See below). Next we will remove special characters, write the properties and capture the message body again (${in.body}) before moving to GetUserID step.

Part 2:
In this part, we will focus on the ‘Get Outlook ‘User ID’ from Email Address‘ and ‘Get Outlook User Mailbox Settings‘ from the High Level Design above.
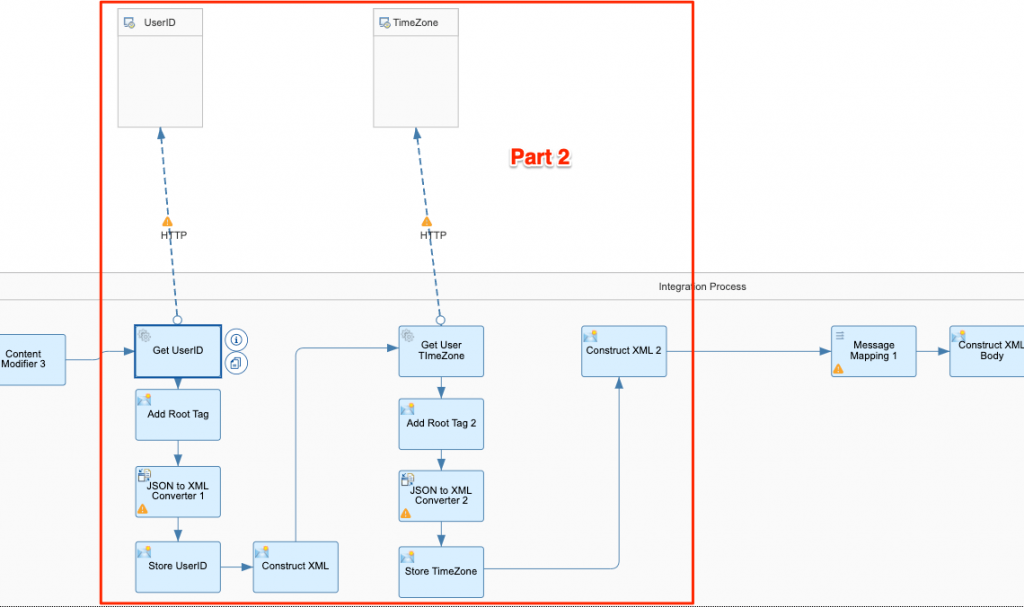
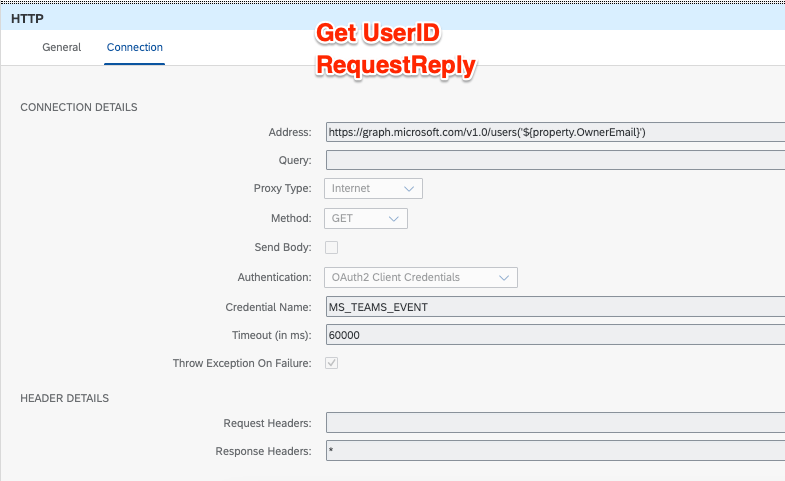
Get UserID – in this step, we imitate the same GET User ID query we did on our High Level Design with Postman: * We need to make a use of the ${property.OwnerEmail} in order to get the specific User ID from Outlook and complete the API end-point: (https://graph.microsoft.com/v1.0/users(‘xxxx.xxxx@xxxx.com’)
Add Root Tag: In this step we will add to the message body a ‘root’ tag. This is necessary before the conversion to XML.
JSON to XML Converte: the next required step before storing the UserID.
Store UserID: We create a property to store the UserID from the response as below:

Construct XML: in this step we just we just put in the body expression the ${property.C4S_Payload} to continue to the next query of user Timezone.
Get User Timezone:
in this step, we imitate the same ‘Get Outlook User Mailbox Settings’ query we did on our High Level Design with Postman: * We need to make a use of the ${property.OwnerEmail} in order to get the specific User Default Timezone from Outlook and complete the API end-point:(https://graph.microsoft.com/v1.0/users(‘xxxx.xxxx@xxxx.com’)/mailboxSettings )
We will repeat the steps of Add Root Tag, JSON to XML Converter as in earlier step.
Store Timezone: We create a property to store the User Timezone from the response as below:

Construct XML: in this step we just we just put in the body expression the ${property.C4S_Payload} to continue to the next Part and the step of Message Mapping.
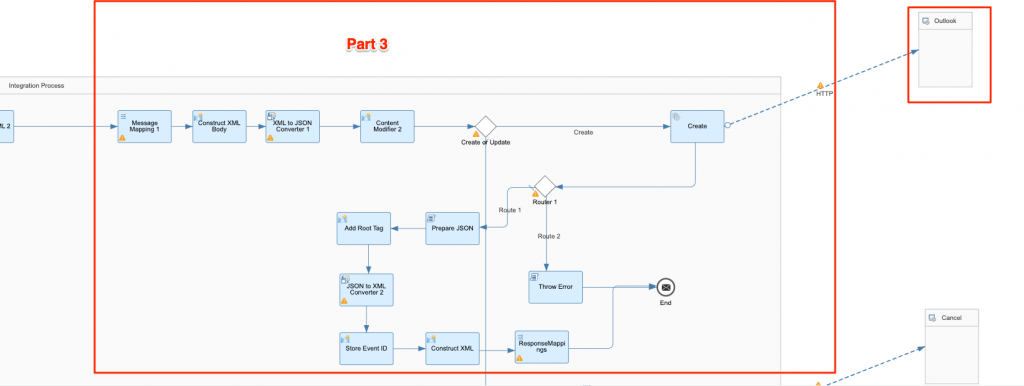
Part 3:
In this part, we will focus on the ‘Create Event‘ from the High Level Design above. We will also need to take care of the response as it is required for the Event Update/Cancel later.
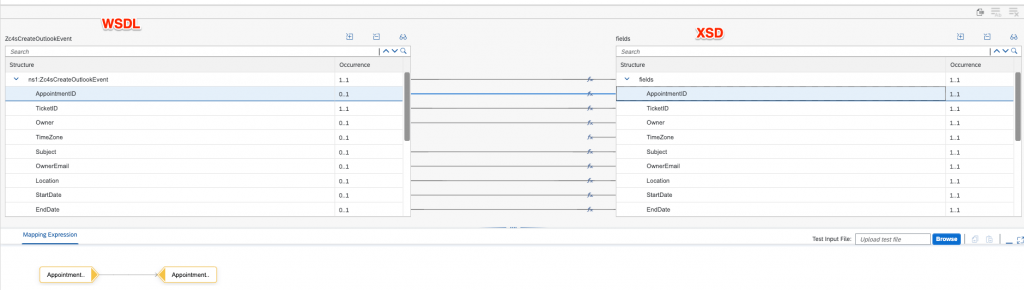
Message Mapping: In this step will do the required mapping between our WSDL elements and our XSD elements.
Construct XML Body: In this step we will build the XML Body using the properties we already stored in order to prepare for the JSON Conversion. MS Graph API is expecting a specific JSON Request Body as mentioned in documentation.
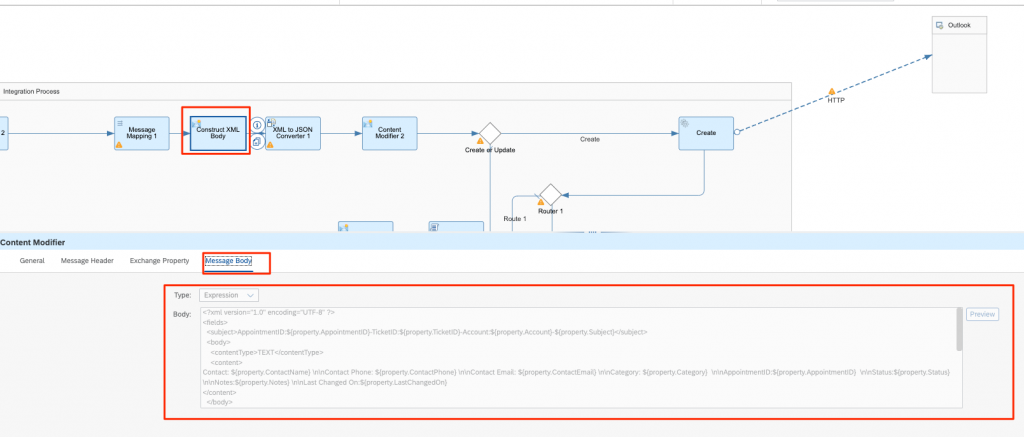
*This will have an effect on how your Meeting on Outlook Calendar will look and what data is included there, so make your own XML body based on Customer requirements.
Check the example below (without MS Teams link ):
<?xml version="1.0" encoding="UTF-8" ?>
<fields>
  <subject>AppointmentID:${property.AppointmentID}-TicketID:${property.TicketID}-Account:${property.Account}-${property.Subject}</subject>
  <body>
    <contentType>TEXT</contentType>
    <content>
Contact: ${property.ContactName} \n\nContact Phone: ${property.ContactPhone} \n\nContact Email: ${property.ContactEmail} \n\nCategory: ${property.Category}  \n\nAppointmentID:${property.AppointmentID}  \n\nStatus:${property.Status} \n\nNotes:${property.Notes} \n\nLast Changed On:${property.LastChangedOn}
</content>
  </body>
  <start>
    <dateTime>${property.StartDateUpdate}</dateTime>
    <timeZone>${property.OutlookUserTZ}</timeZone>
  </start>
  <end>
    <dateTime>${property.EndDateUpdate}</dateTime>
    <timeZone>${property.OutlookUserTZ}</timeZone>
  </end>
  <location>
    <displayName>${property.Location}</displayName>
  </location>
  <allowNewTimeProposals>true</allowNewTimeProposals>
</fields>
XML to JSON Converter: In this step we will convert our XML body from previous step into the required JSON format.
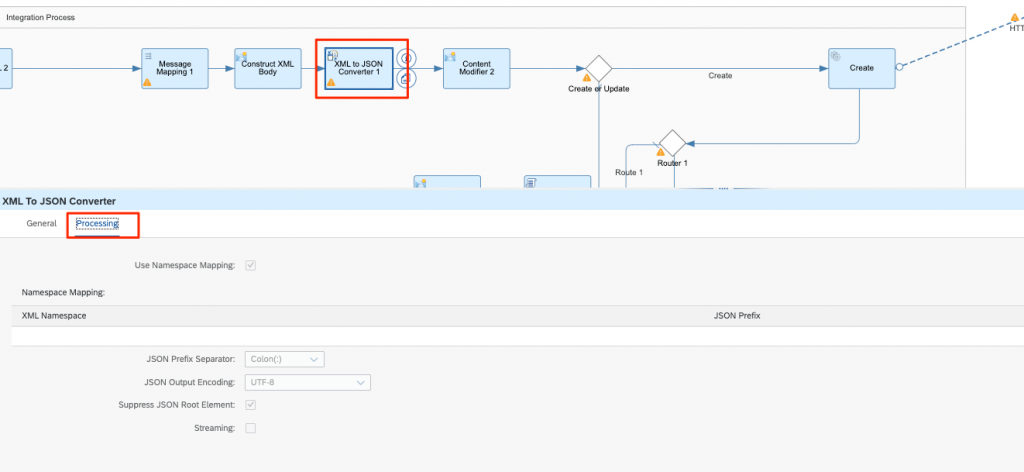
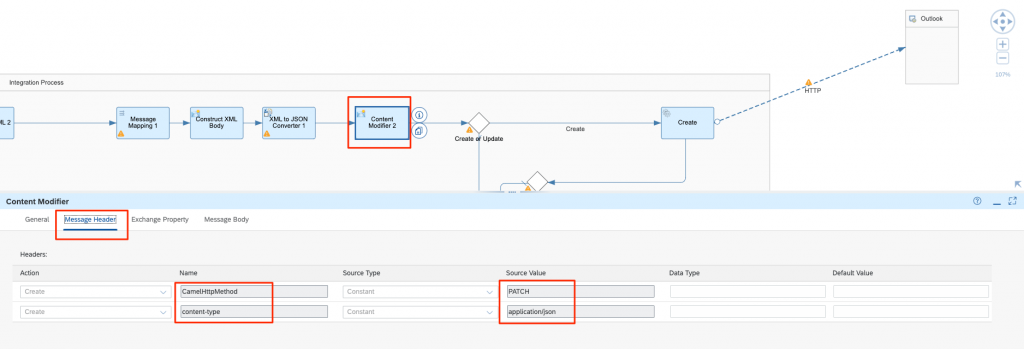
Content Modifier 2: In this step we will create 2 Headers that will used later.
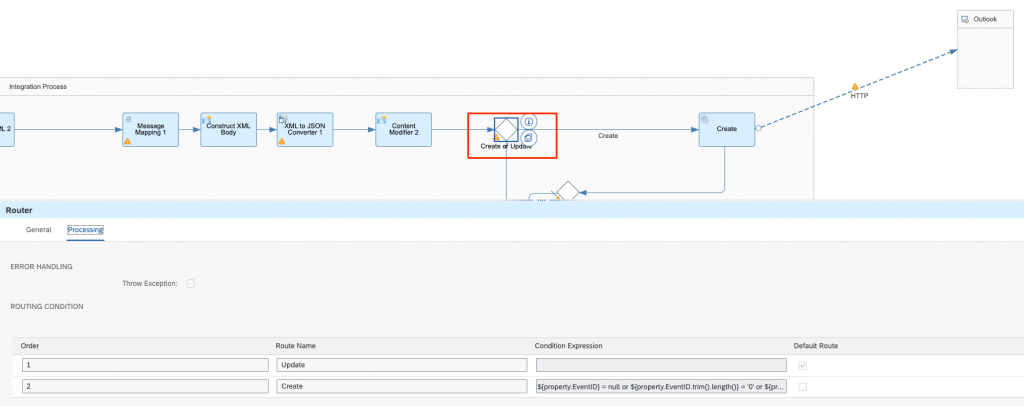
Router-Create or Update: This Router will be used to determine the route to CREATE / UPDATE /CANCEL scenarios as below.
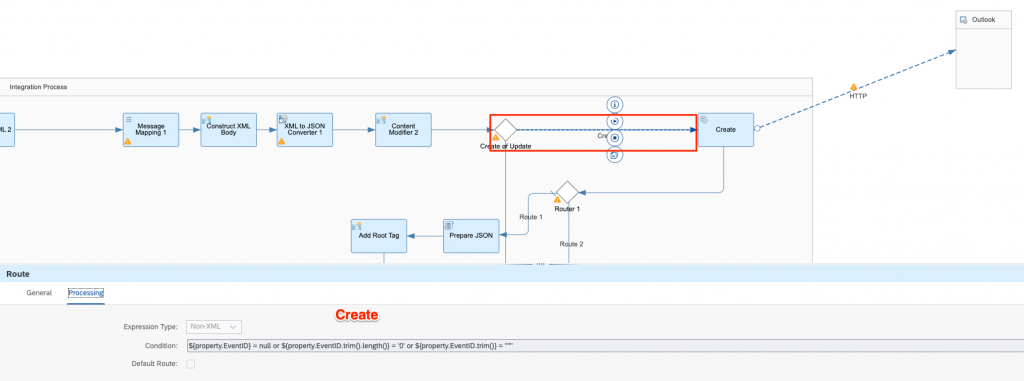
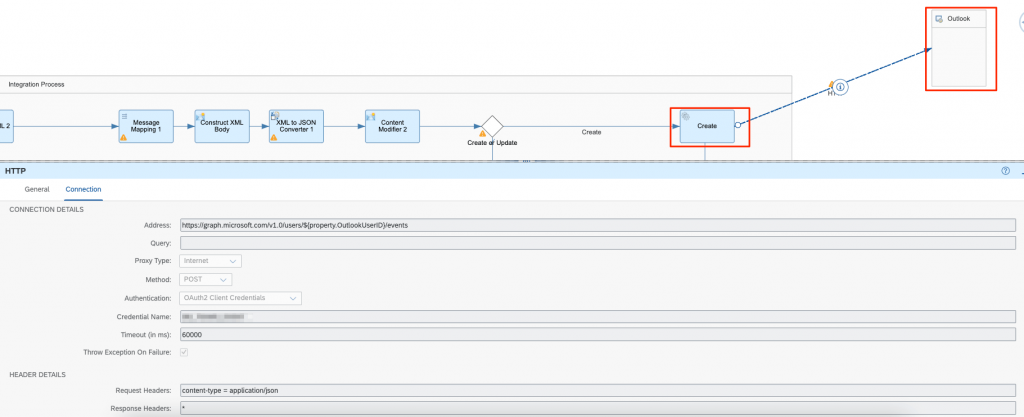
Create Event HTTP Call: *As in our Pre-design: POST a new Event on the User’s Calendar. (https://graph.microsoft.com/v1.0/users/{UserID}/events)
Handling the Response: This group of steps to handle the response from MS Graph API is required based on the end-user requirements. In our Example, we need the Event ID from response in order to use it in our C4C Activity (Appointment) and store it in the hidden KUT field we have prepared.
Once the KUT Field is populated, the next save action on that Appointment ID will trigger the iFlow, but this time with EventID in the Payload which will make the Router go to UPDATE or CANCEL call (based on the Status).
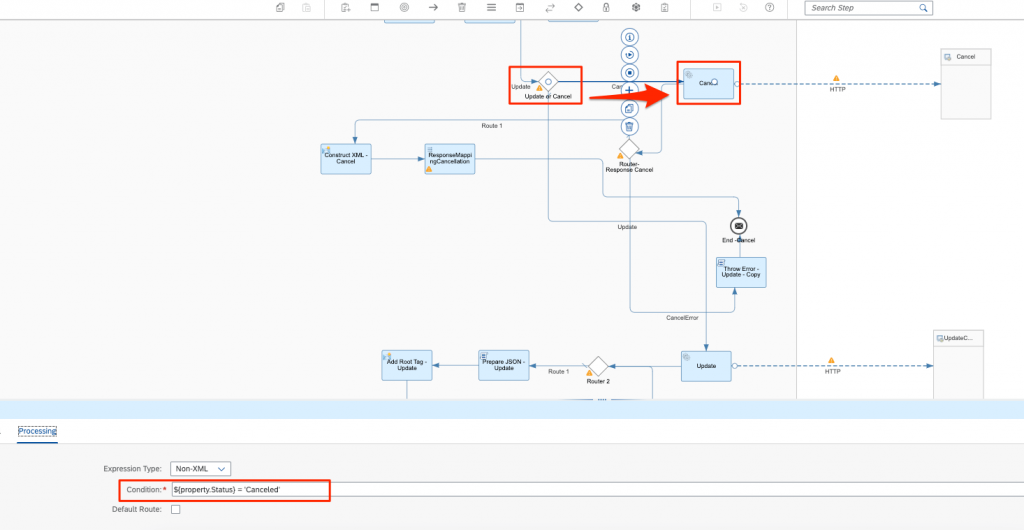
Part 4:
In this Part we will create condition router and steps for the Cancel or Update calls.
See below example:

*Next, we save and deploy the iFlow, Create /Configure the Communication Arrangement in C4C side and create an appointment activity from Service Ticket to test the result on our Outlook Calendar.
Testing our Integration:
Create a new Activity from Service Ticket:
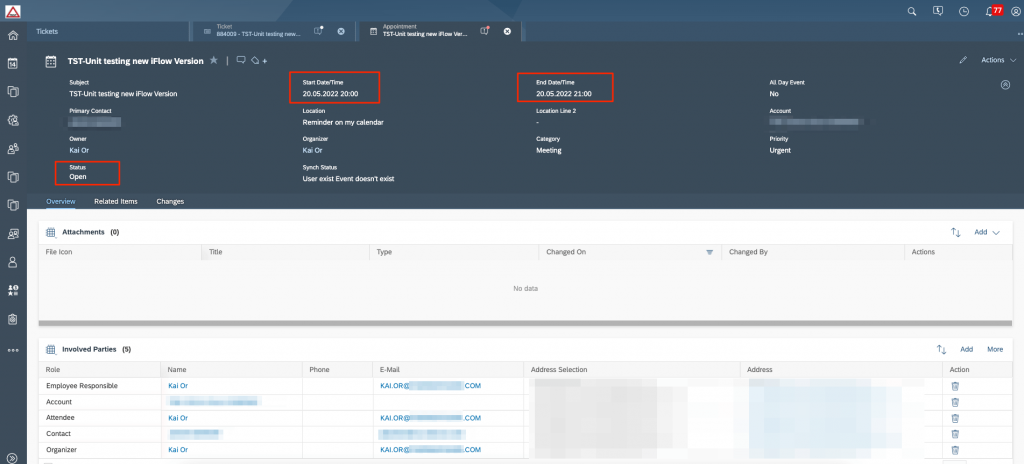
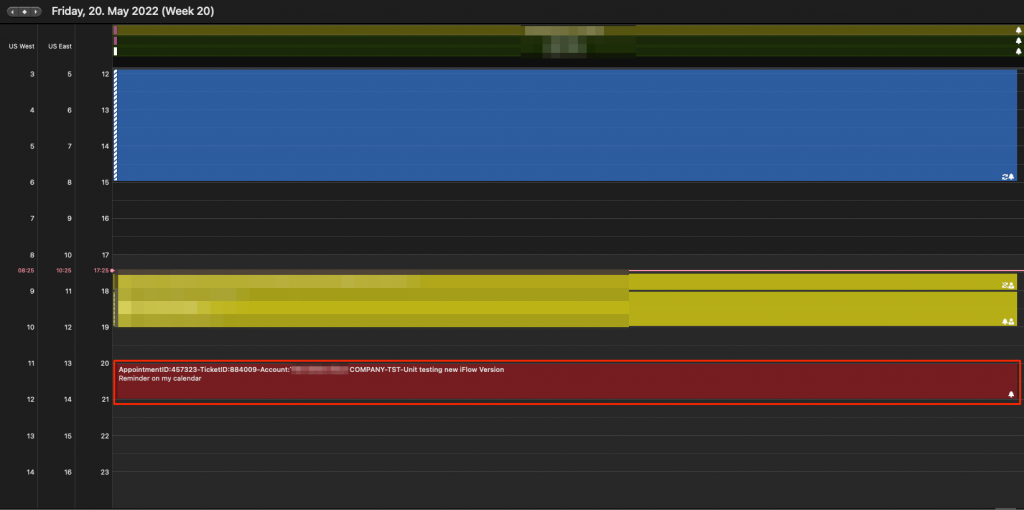
Once we save the appointment, the New Meeting created on my Calendar:
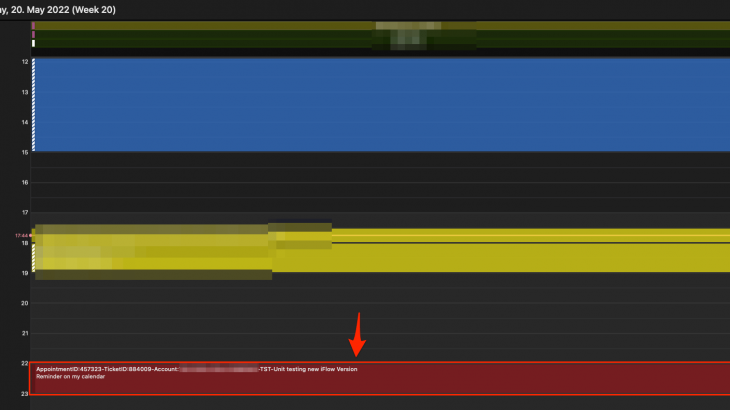
Now I will update the Date/Time, to check if it is updated on my calendar as well:
StartDate:
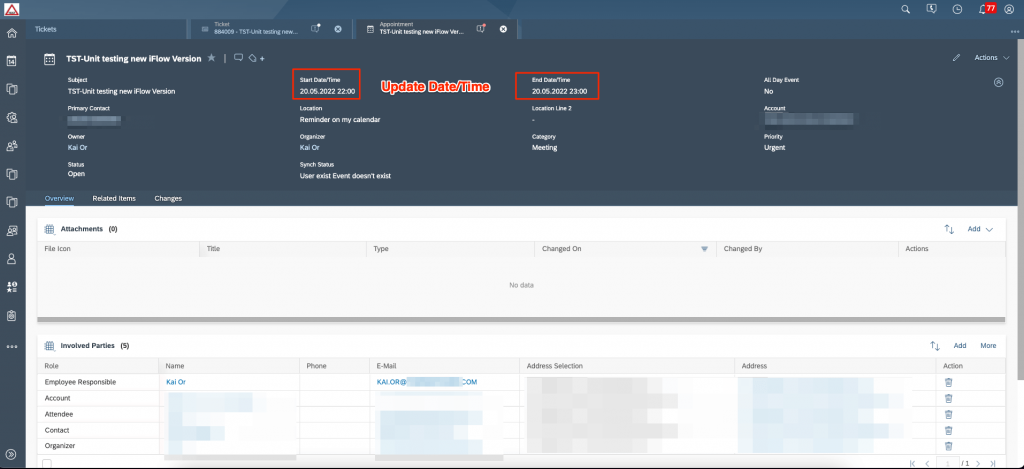
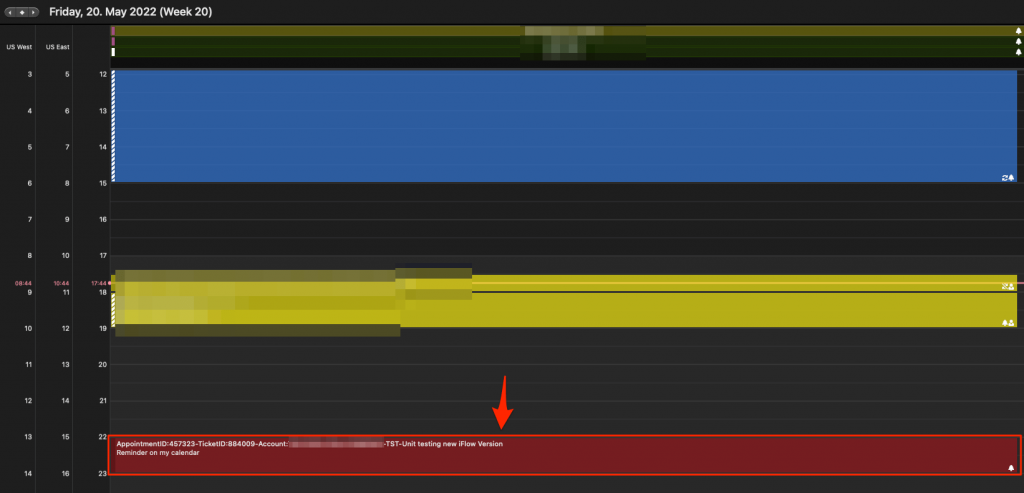
You can see that the meeting on the Outlook Calendar is also updated with new StartDate/EndDate:
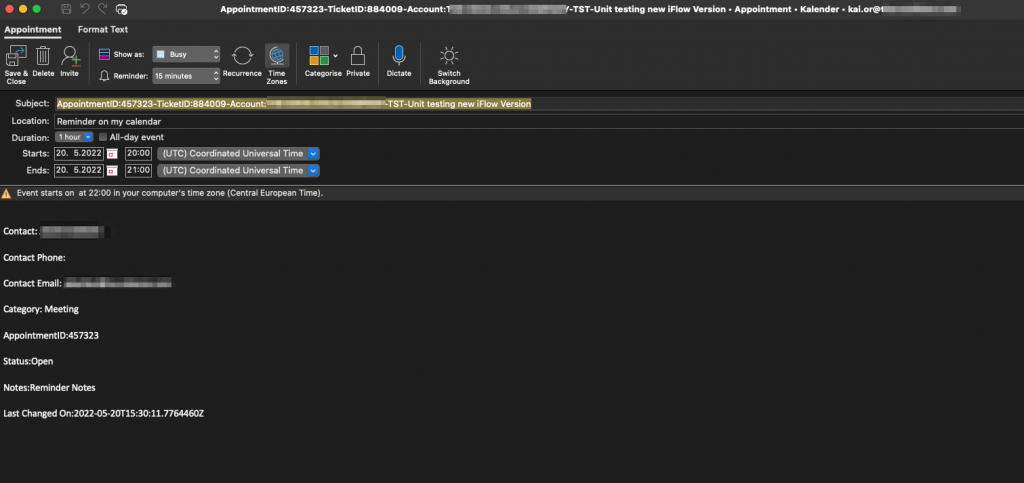
When opening the meeting, you will see the related data in the Subject, Location and Body of the meeting, as we configured in our ‘Construct XML Body’ step:
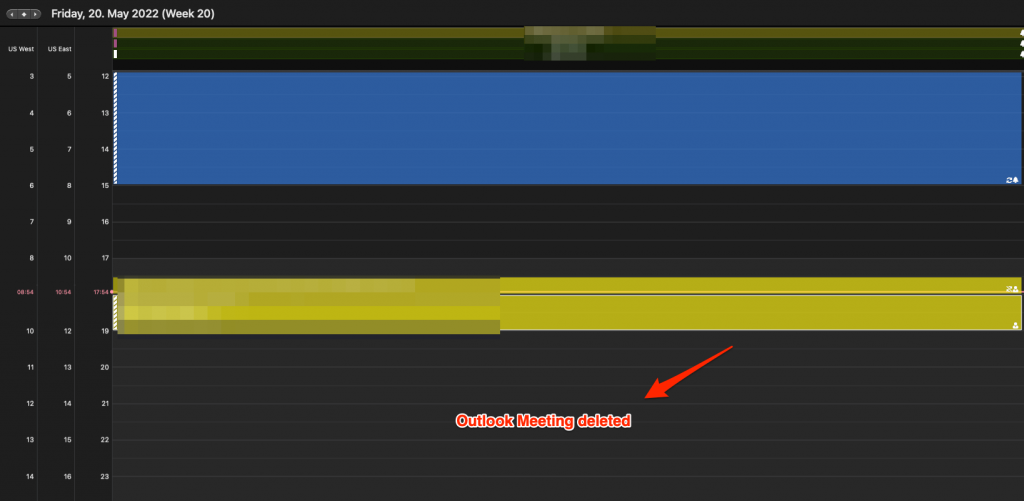
Change activity status to ‘Cancelled’:
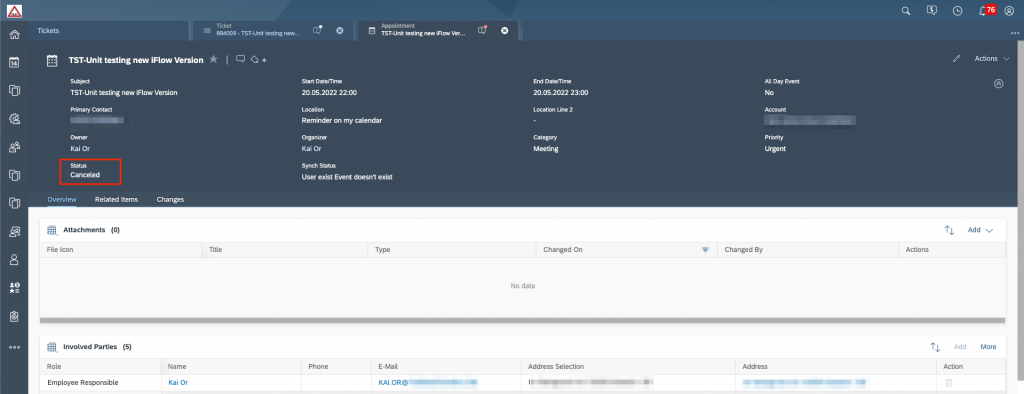
The Outlook Meeting is removed from the calendar: