Object List Item is a variant among the other variants of List Items in SAPUI5. List Item can be a Object List Item, Standard List Item, Display List Item, Action List Item or a Feed List Item. Many of us might be using some or all of these list items without understanding them. In this tutorial, I will try to provide the explanation and usage of Object List Item.
I had created a List Control and added StandatdListItem as items aggregation of the List Control. Let us enhance the same code to replace StandardListItem with a ObjectListItem.
Below is my previous article I mentioned above:
SAPUI5 – Binding JSON Model Data in SAPUI5 List Control using SAP Web IDE
While a StandardListItem can display only the Title and Description of any object, an ObjectListItem can further display Title, Key Figure, Attributes and Status. Such an list item is preferred while making a Master Detail type of an application. In a master detail application, the master view contains a List of ObjectListItems displaying the most important attributes of an object based on which user can make a decision whether to select the item and see its details or not.
Let us first enhance our JSON model to contain information which can be displayed on ObjectListItem. Also we need to enhance the model to contain the information which should be displayed on the press event of ObjectListItem. In our example of Employee data, so far, we have displayed only employee id and employee name. Lets add few more attributes like employee experience (in years), location and cadre (like band 1, band 2 etc…). These additional attributes would be displayed on the ObjectListItem. Let us also add the list of all projects the employee has worked on. So, on click of a ObjectListItem, another List should be get populated with a list of projects employee has worked on.
After enhancing the JSON model as described above, it will look like shown below.
<code>onInit: function () {
			var oEmpData =
			{
	"emp": [{
			"empid": "111111",
			"empname": "John Walter",
			"exp": "120 months",
			"age": "34",
			"city": "Colombo",
			"country":"Sri Lanka",
			"cadre": "Band 5",
			"designation": "Delivery Manager"
			"projects": [{
					"projectid": "PGIMPL",
					"projectname": "P & G SAP Implementation"
				},
				{
					"projectid": "ARMSUPPORT",
					"projectname": "Aramco Support"
				}
			]
		},
		{
			"empid": "222222",
			"empname": "Rashid Khan",
			"exp": "40 months",
			"age": "34",
			"city": "Mumbai",
			"country":"India",
			"cadre": "Band 1",
			"designation": "Software Engineer",
			"projects": [{
					"projectid": "TATAIMPL",
					"projectname": "Tata SAP Implementation"
				},
				{
					"projectid": "AIRIMPL",
					"projectname": "AIRBUS Implementation"
				}
			]
		},
		{
			"empid": "333333",
			"empname": "Supriya Singh",
			"exp": "60 months",
			"age": "34",
			"city": "Tokyo",
			"country":"Japan",
			"cadre": "Band 3",
			"designation": "Sr. Software Engineer",
			"projects": [{
					"projectid": "PGIMPL",
					"projectname": "P & G SAP Implementation"
				},
				{
					"projectid": "ARMSUPPORT",
					"projectname": "Aramco Support"
				}
			]
		}
	]
};
var oModel = new JSONModel(oEmpData);
this.getView().setModel(oModel);
		},</code>
In the new JSON model, we’ve added experience, age, city, country, cadre and designation and projects information of the employee.
As explained in last article, in the above code, we are doing 3 things:
- First, creating Data of Employees in JSON format. ‘emp’ is the root node.
- Secondly, we are creating an instance of JSON model using Employee data. var oModel = new JSONModel(oEmpData);
- Lastly, we are setting the Model to the View so that its data is available to the control’s of the view for binding. this.getView().setModel(oModel);
Now, lets add ObjectListItem control in the View. The updated code of View1.xml is below. In previous exercise, we used StandardListItem.
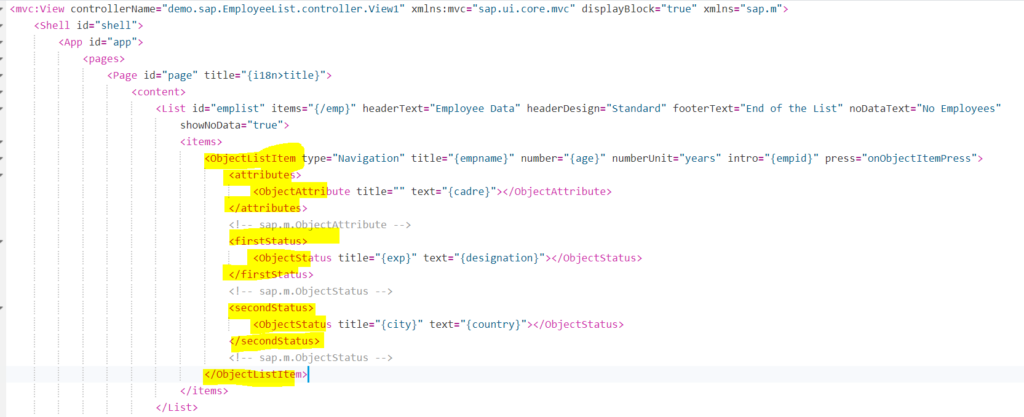
View Showing use of ObjectListItem Control
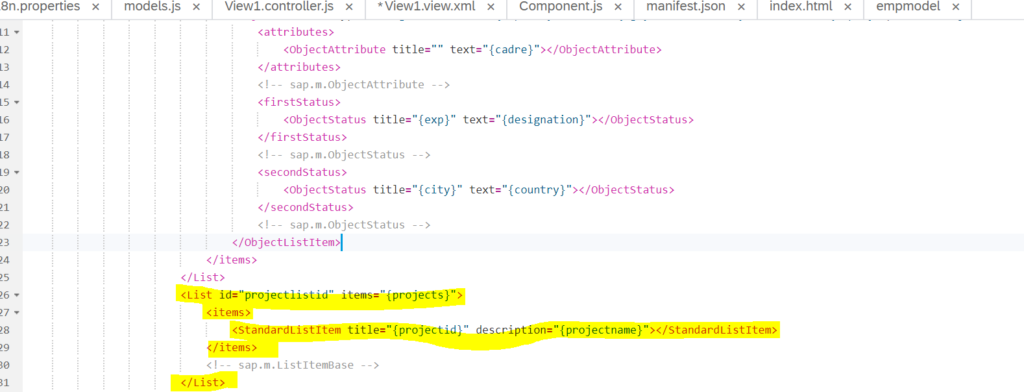
Another List to display projects the employee has worked on
- In the updated view code, we’ve added an ObjectListItem Control. We’ve made use of its title, number, numberUnits and intro properties. Also we’ve used its attributes, firstStatus, secondStatus aggregations.
- We’ve used mentioned properties and aggregations to bind JSON model data to it. Please look at the above figures carefully to note which attribute of Model is bound to which property of ObjectListItem.
- We have made the list clickable by setting the type = “Navigation”.
- We’ve also defined a event Handler called onObjectItemPress in the controller of the view. Check below code for the event handler
- Also, we have used StandardListItem to display project details.
<code>onObjectItemPress:function(oEvent)
		{
			var oItem = oEvent.getSource();
			var oCtx = oItem.getBindingContext();
			var path = oCtx.getPath();
			this.getView().byId("projectlistid").bindElement(path);
}</code>- This code derives the binding path of the clicked ObjectListItem based on oEvent parameter.
- It then takes handle of another List control which is there in the view and uses Element Binding to display the data available on selected item’s path. In our case it will display projects information of the employee.
This is it… Lets run the application.
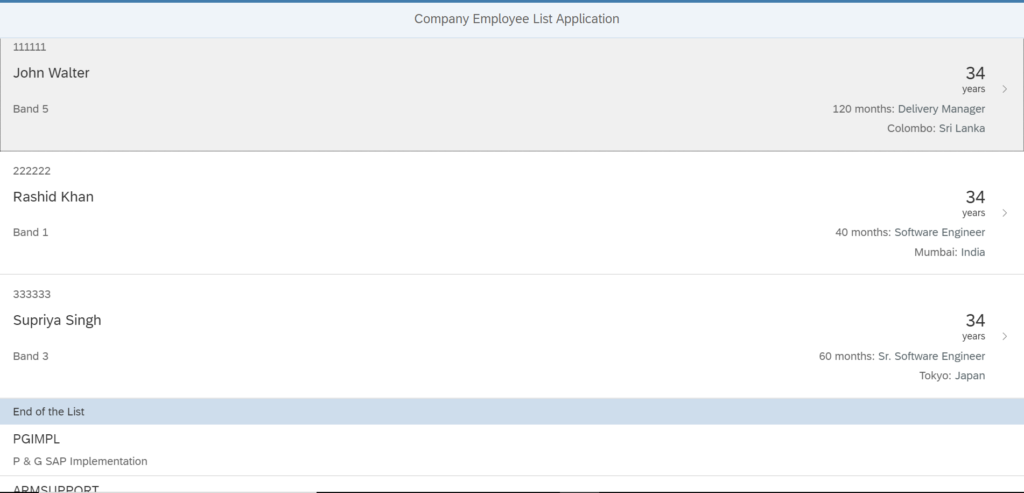
Output showing Employee Info in Object fashion using ObjectLIstItem. Another List below showing the projects of clicked item using StandardListItem.
In the above output, the information of the employee as per binding done in the XML view is being displayed using ObjectListItem. The list is clickable because we have set type property to Navigation. The clicked employee’s project information is displayed in another list below the first list.


