In our previous post, we showed all the struggle and hiccups faced by an experienced ABAPer (with more than 11 years ABAP experience) during his first SAPUI5 development. Somehow he was able to reach the finish line (read App moved to the production system and went live). Today, we would show how the SAPUI5 development was converted to a Fiori App which the happy users are accessing and using it from their smartphones.
The end users provided the feedback that they are able to utilize the 90 minutes of to-fro commute time to office/home in the public transport (bus/metro train); actually working on their smartphone and planning for the day. After all, they do not need to be in office network to access SAP. Thanks to our App which is available on their smartphone.
But we are sure, you would be more interested in knowing what NOT to do and what to AVOID while deploying to SAPUI5 ABAP Repository. After all, there are numerous good documents on the internet showing how to deploy the SAPUI5 App. And you would not want to read the same thing here at SAPSPOT, and we too are also not interested in re-inventing the wheel.
Considering, there are numerous readers who visit our site directly even before googling, we would show the Deployment steps of SAPUI5 in details and at the relevant spot, we would warn what not to do and where to take special care.
Let us start. Once your SAPUI5 app is created and tested in the WebIDE, the next step is to test the app in your smartphone or tablets. You can open WebIDE on your smartphone and do the same test, but businesses want the Apps, not links to test the SAPUI5 developments on smartphones. In order to convert our SAPUI5 development to Fiori Apps, we need to do the following steps.
- Deploy to SAPUI5 ABAP Repository
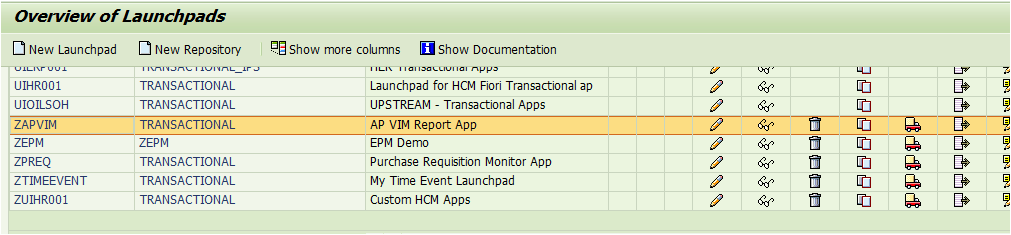
- Create a new Launchpad in LPD_CUST. Maintain the URL, Application Alias and Additional Information in Launchpad
- Manually move the Launchpad to a Transport Request (Very Important)
- Create Semantic Object in /UI2/SEMOBJ.
- Manually move the System Alias of the service to a Transport (Very Important)
- In Fiori Launchpad Designer Create Catalog Object for the App
- Create Target Mapping for the Catalog Object
- Create Tiles for the Catalog Object
- In Fiori Launchpad Designer Create Group for the Catalog object or use an existing Group
- Include to Catalog object into the Group
- Ask the Security Team to add the Catalog, Group and SAPUI5 service to the User Role
Let us check in details all the steps.
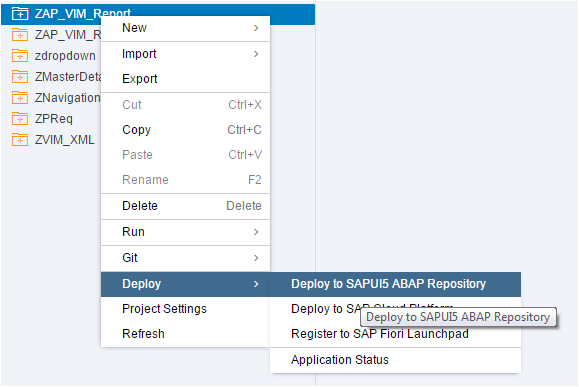
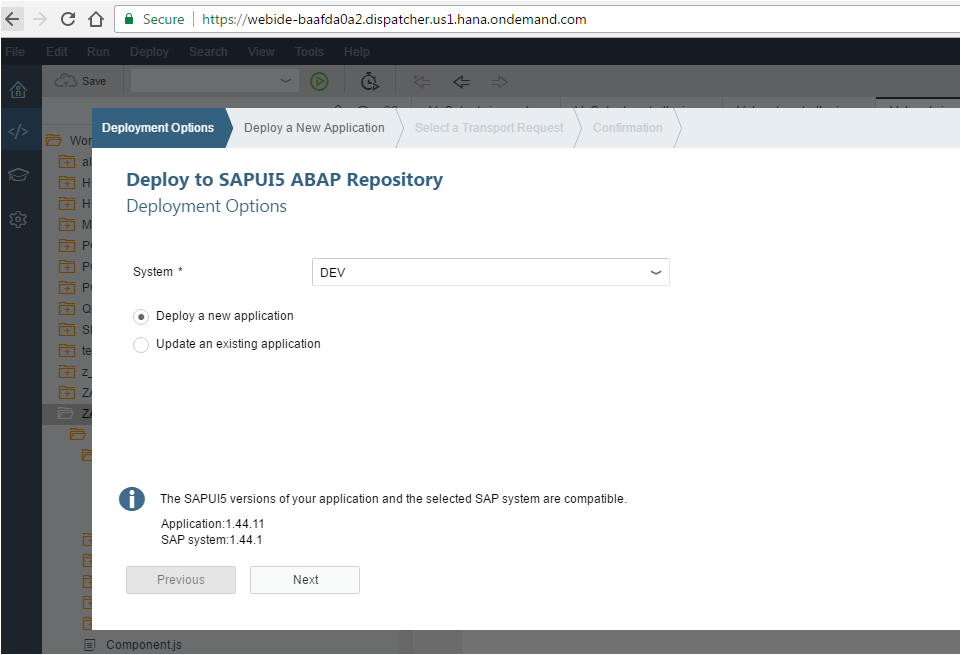
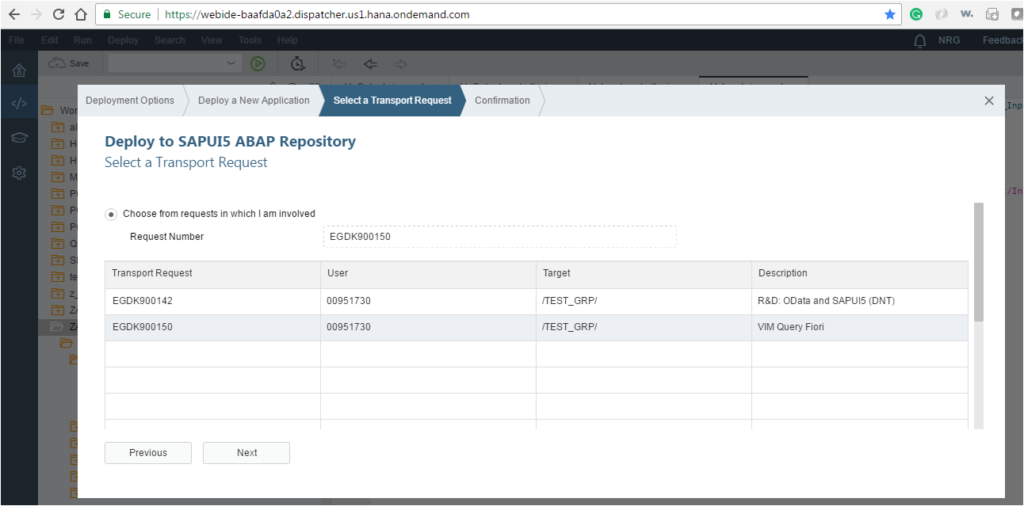
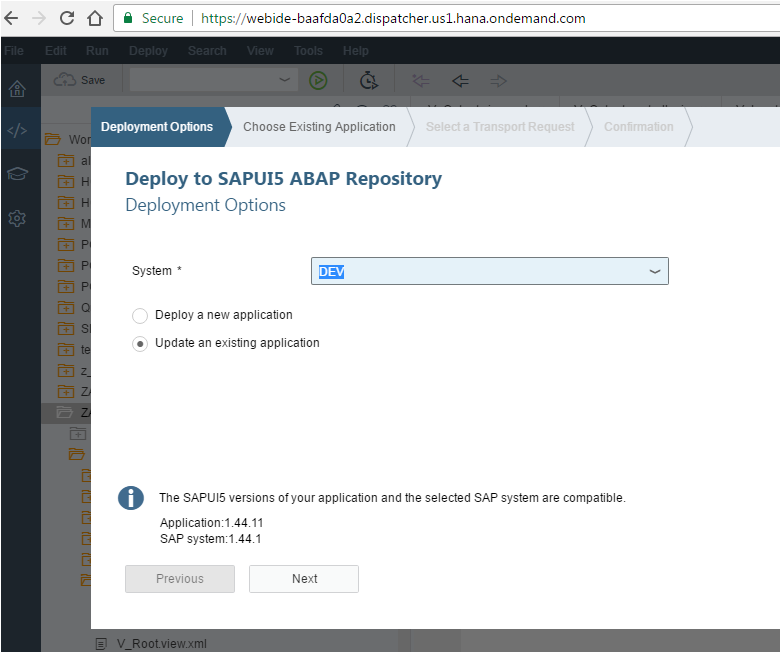
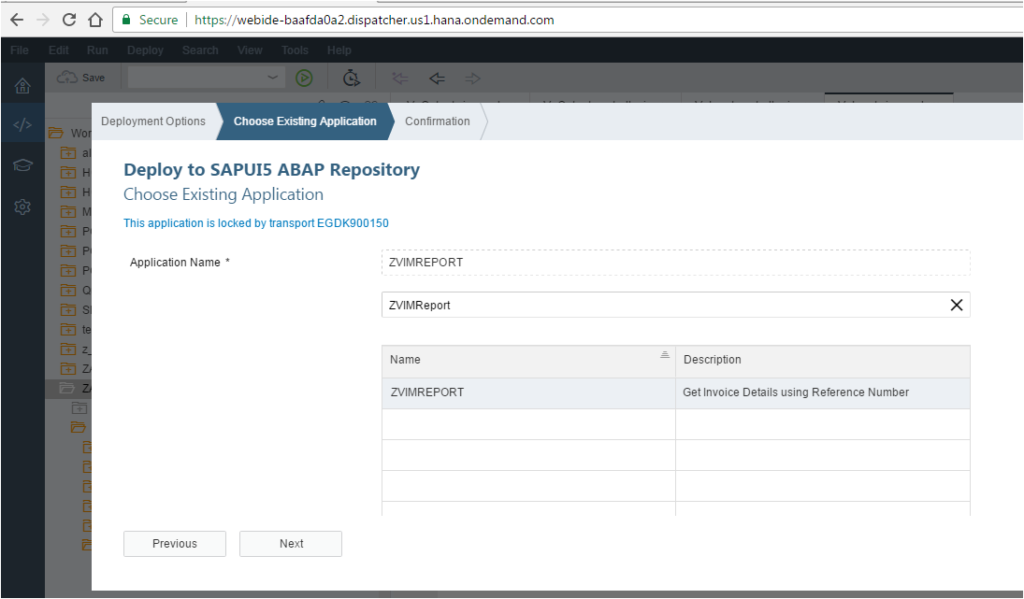
Step 1: Deploy to SAPUI5 ABAP Repository
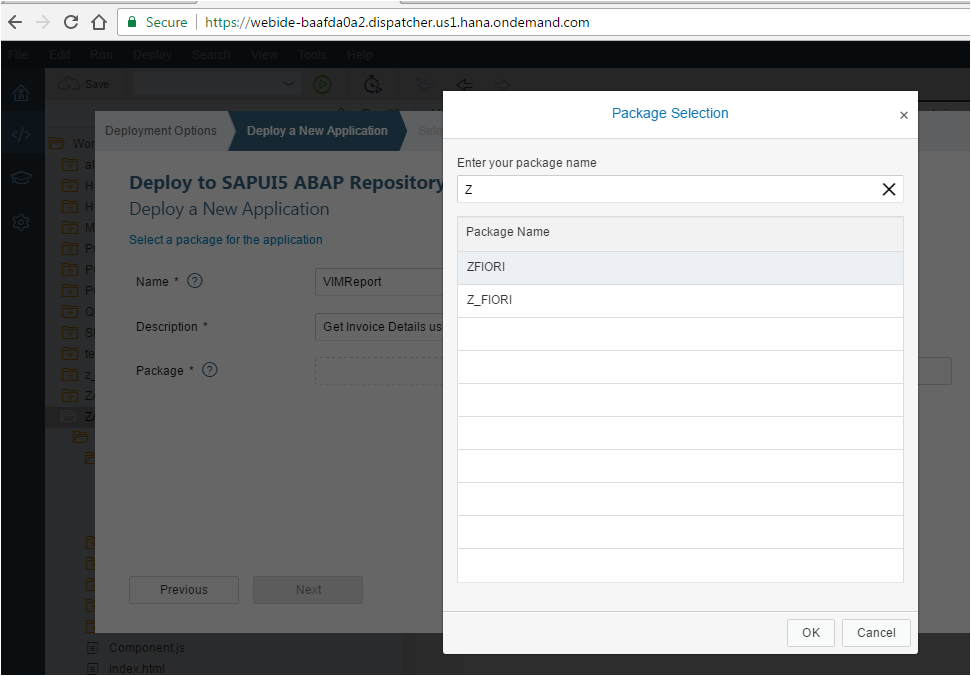
Give a name and description.
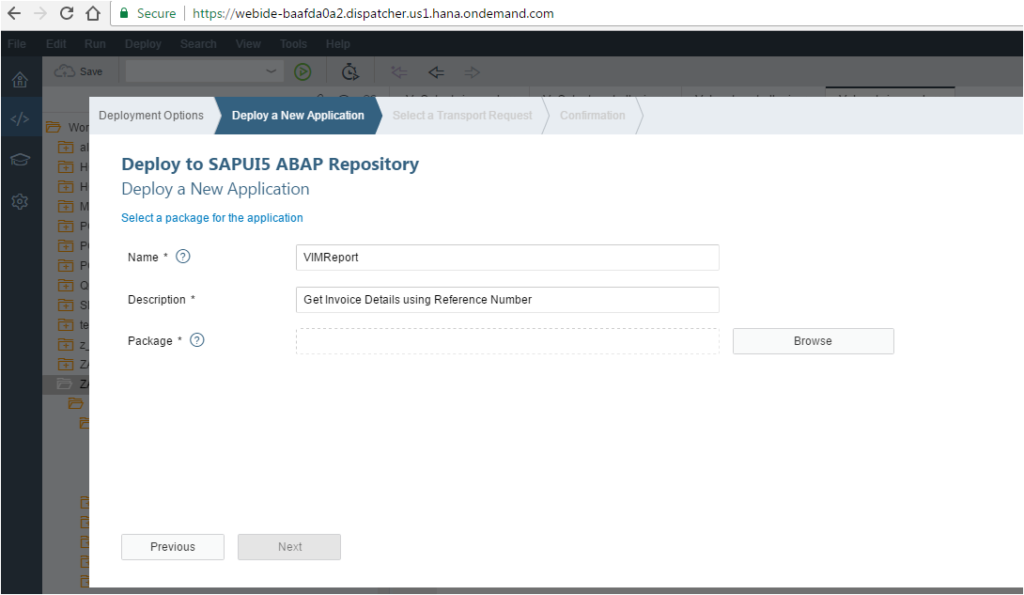
Package name might not appear on its own. You need to type the initials and then they start showing up.
Oops!! You get this red message on the very first step.
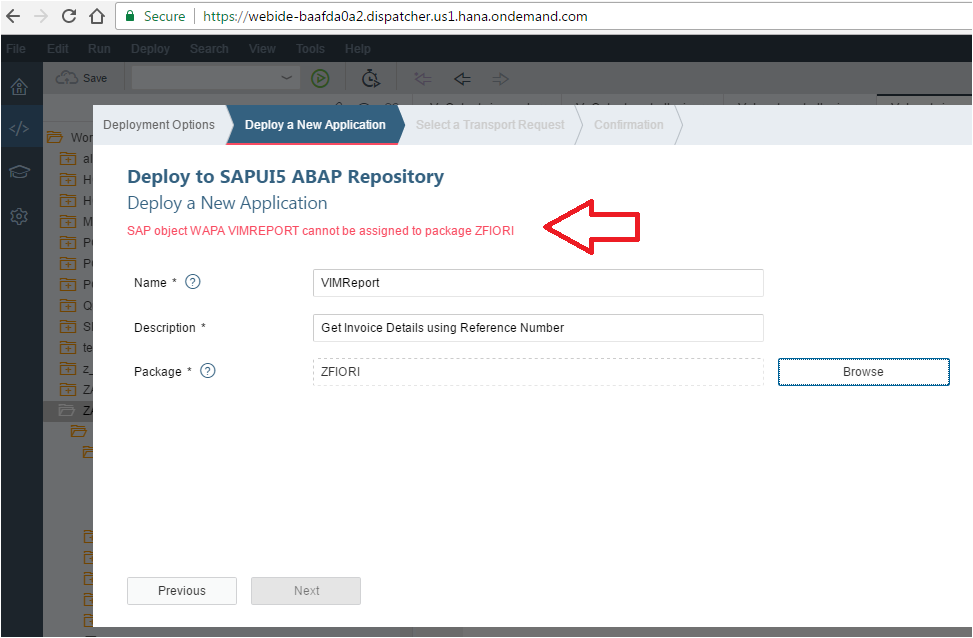
“SAP object WAPA cannot be assigned to package” or more generically “SAP object WAPA XXXXXX cannot be assigned to package ZPACKXXXX”
Since we are saving in a custom package (Z/Y package), the name of the App should begin with Z or Y. Later we found that a BSP application is created in the backend when we deploy the SAPUI5 to ABAP repository. Therefore as for any other custom object, the ABAP Repository name has to start with Z/Y as they are custom BSP applications.
This was our first issue. A simple one right?
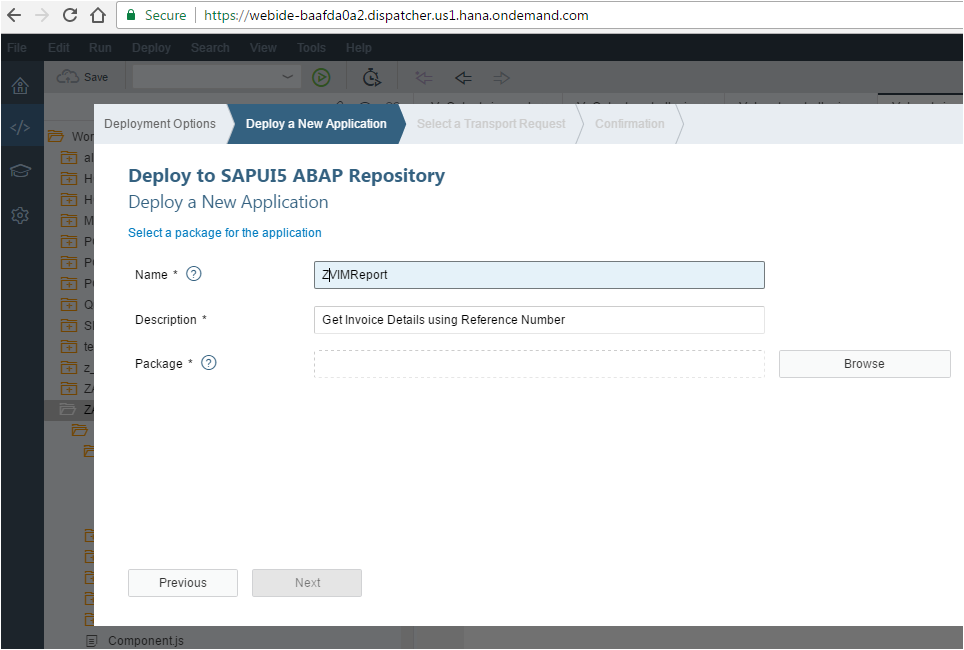
Let us put a Z at the beginning and proceed.
Note the “Deployment in DEV in progress” message on the top right.
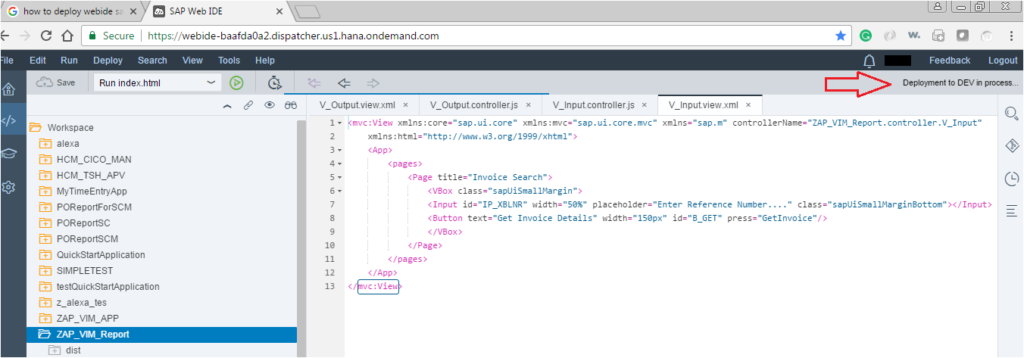
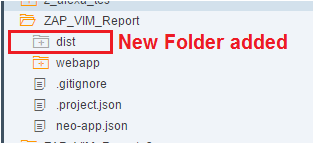
After it is deployed, the “dist” folder appears. This is how I identify if a project is deployed or not.
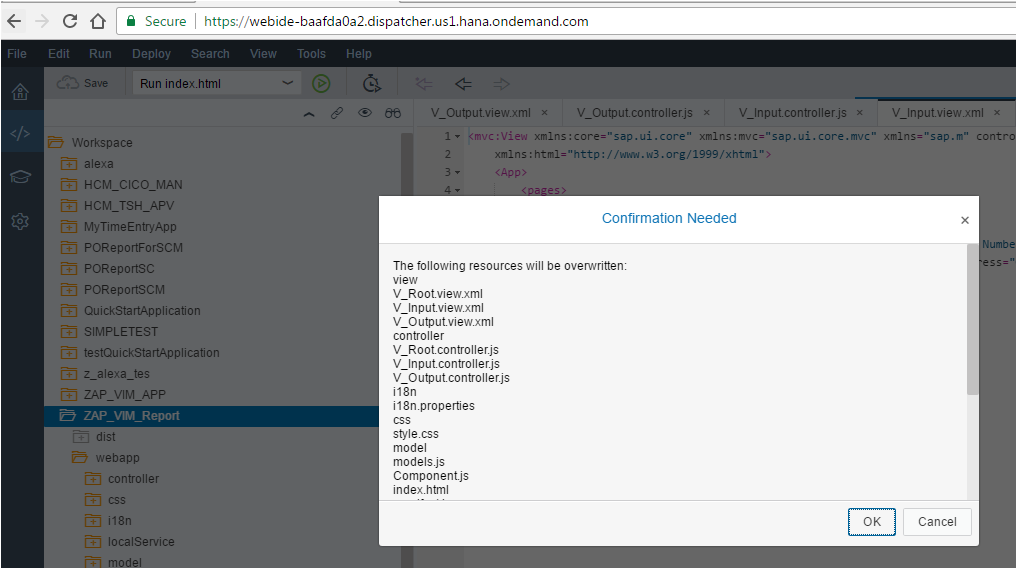
Say after deploying your sapui5 project, you need to make some change in the UI or logic. You need to re-deploy to make your changes effective. The steps are the same.
Go to Deploy to SAPUI5 ABAP Repository. System would identify by itself that it is an Update.
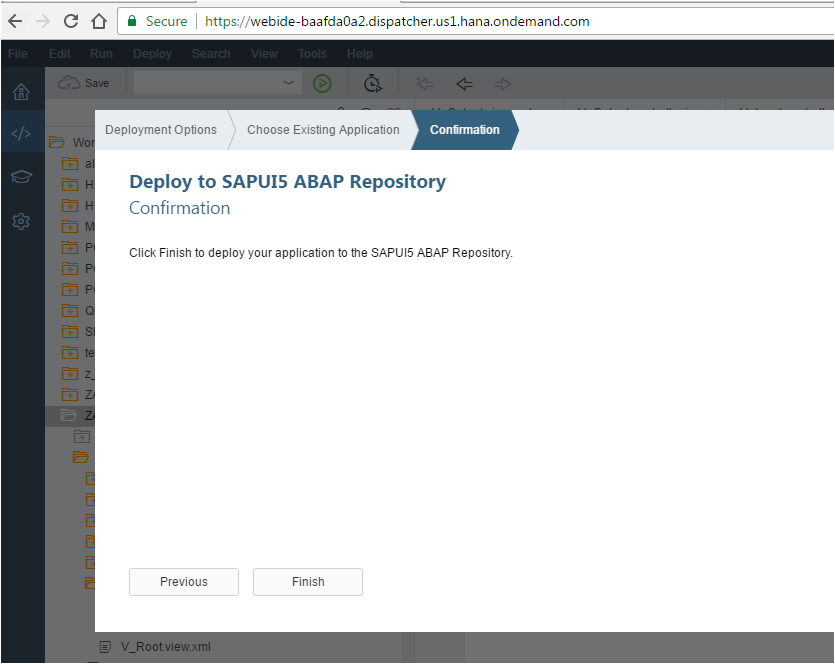
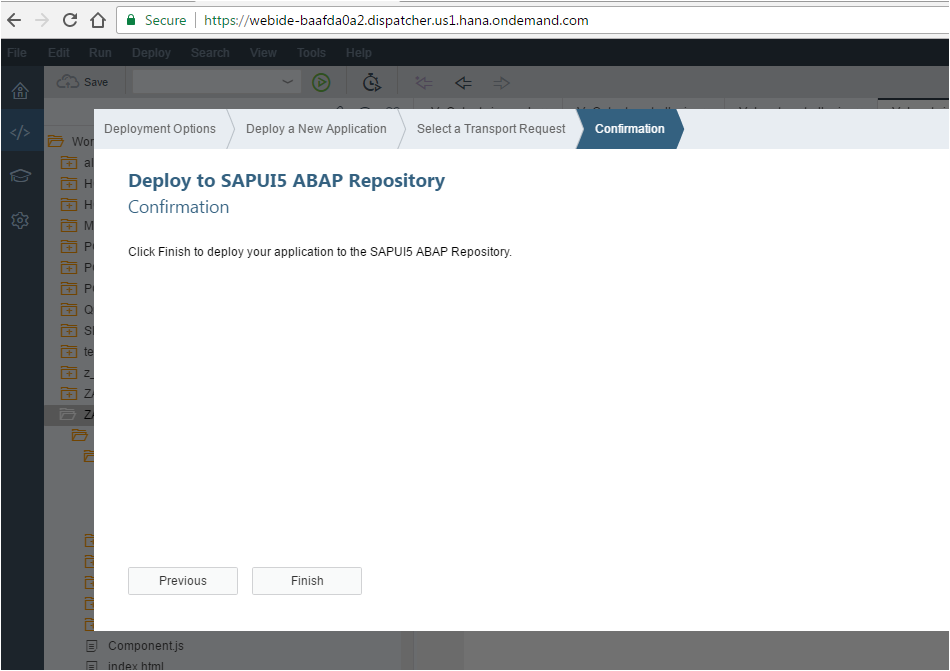
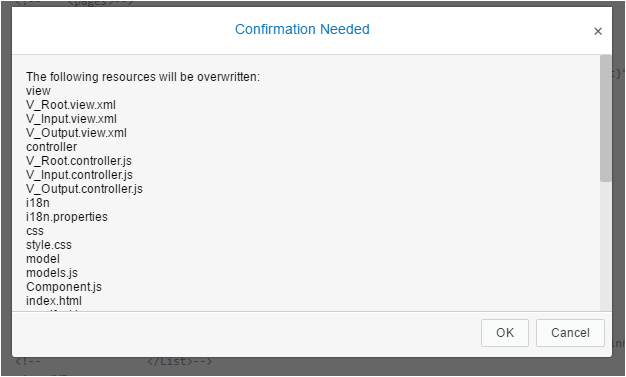
After you hit Finish, Pop-up would ask for Confirmation.
Check on the top right for “Deployment in DEV in progress”.

Once the Deployment is complete, go to Frontend SAP system of the corresponding UI. Go to transaction SE80 and check the BSP Application just created in the ABAP Repository.
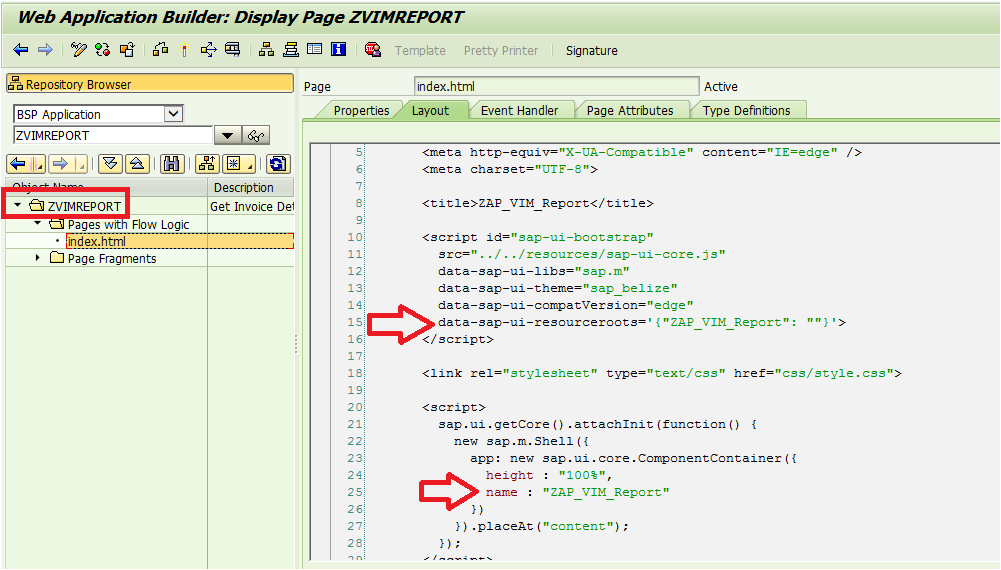
SICF service would be generated with the same name. It should be active by default, if not Activate it.
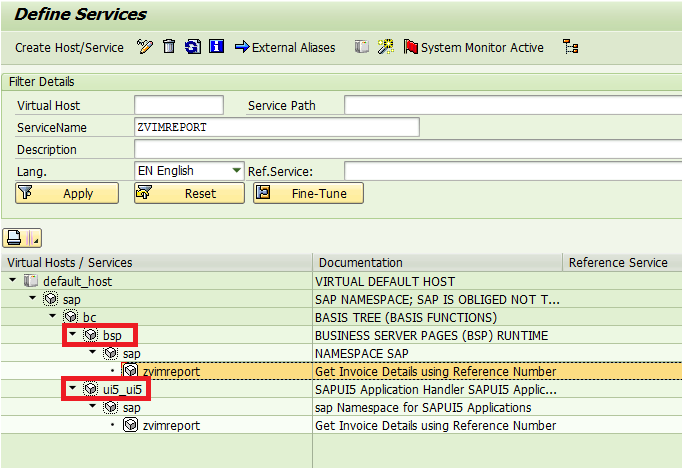
Please note there are two paths for the same service name. One is in bsp path and another is in ui5_ui5 path.
We will need ui5_ui5 path in our Launch Pad customization later.

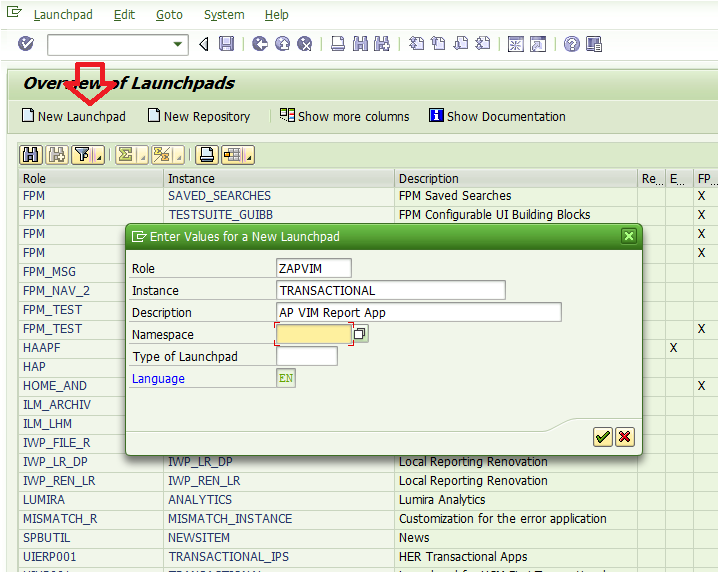
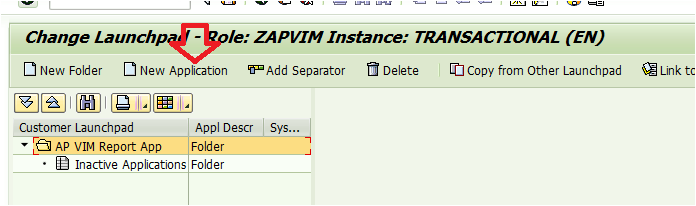
Step 2: Create a new Launchpad
Transaction Code is LPD_CUST. Hit the New Launchpad button and pass the below entries.
Maintain the URL, Application Alias and Additional Information in Launchpad.
Click on New Application. Give a text to the Link and select Application Type as “URL”. Hit the write/text icon beside URL to give your service path. Remember to give ui5_ui5 path from SICF.
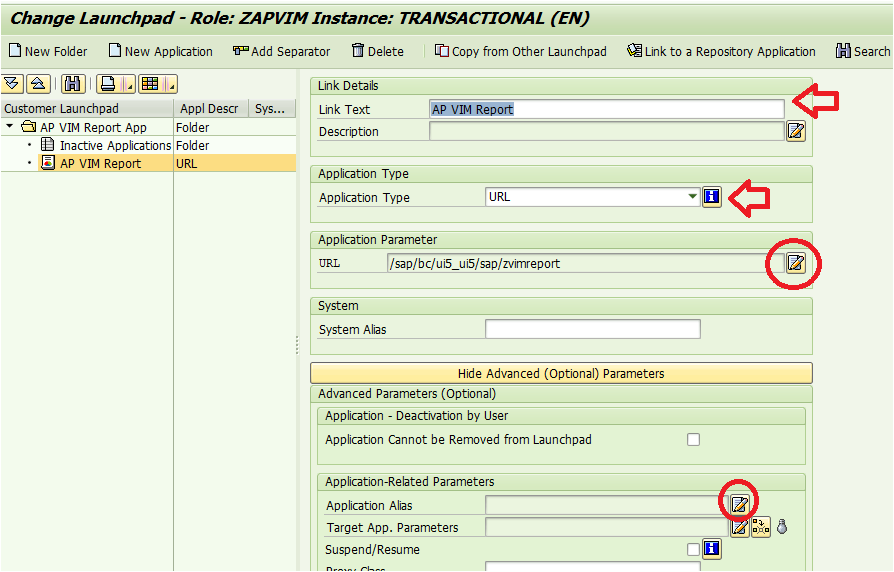
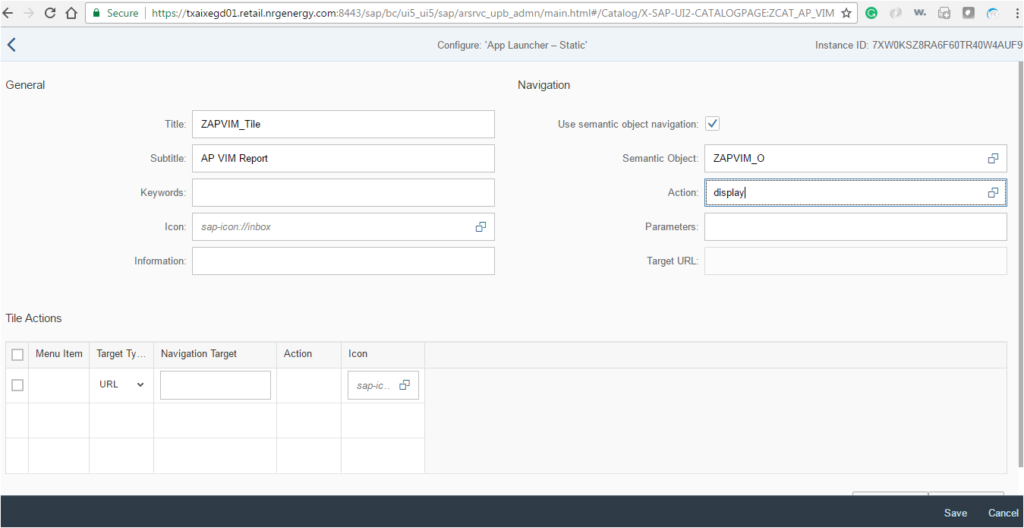
Hit the Advance Parameters button and give the Application Alias name.
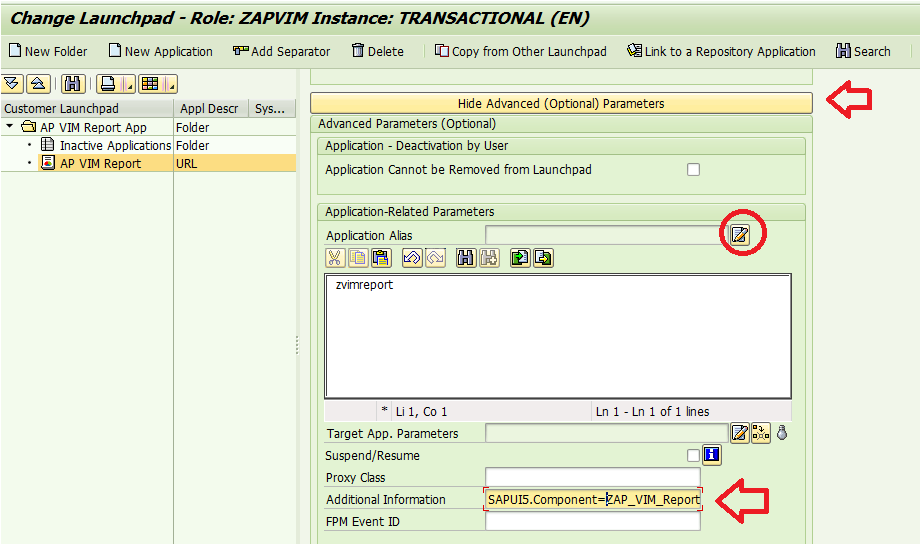
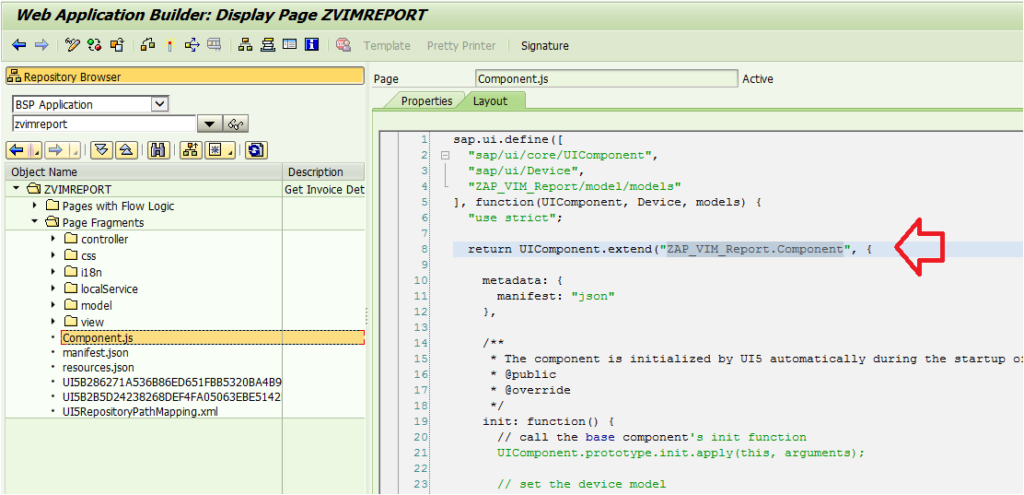
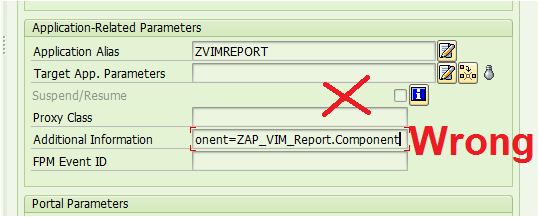
Give the Additional Information as SAPUI5.Component=ZAP_VIM_Report. Give the name as it is in your UI Project component.js file and save it.
If you mess anything in this Additional Information section above, you will face problem while launching your final App.
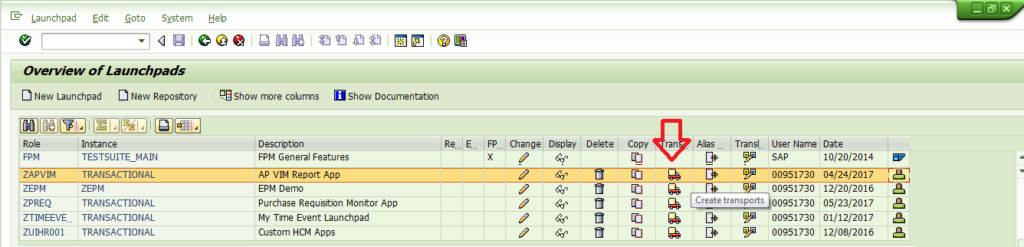
Step 3: Manually move the Launchpad to a Transport Request (Very Important)
Go back to t-code LPD_CUST. Select your Launchpad row and hit the truck (transport) icon and save it in your transport request. Until SAP provides something which would pop up and say, save in transport while saving the Launchpad, till that time, consultants have to remember to manually put in the transport.
Step 4: Create a Semantic Object in /UI2/SEMOBJ
Go to t-code /UI2/SEMOBJ and hit New Entries. Give a Semantic Object name and description of your choice.

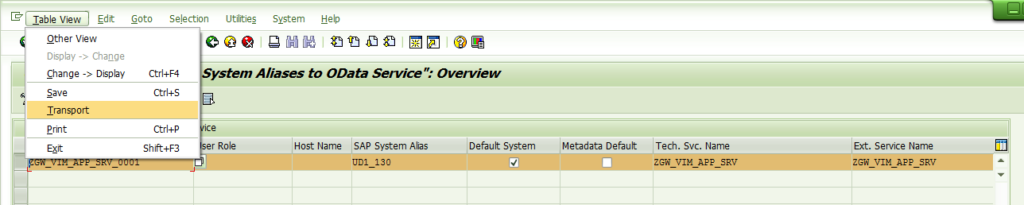
Step 5: Manually move the System Alias of the service to a Transport (Very Important)
Go to t-code /IWFND/MAINT_SERVICE, select your OData service.
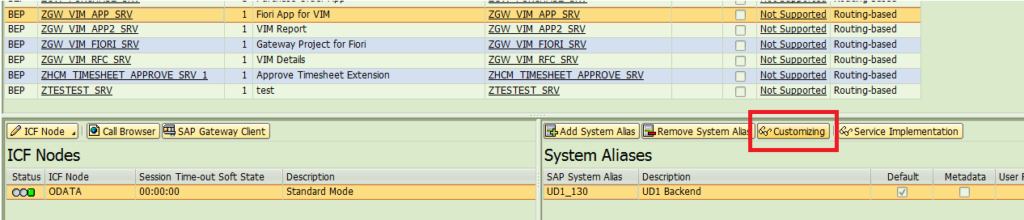
Do not forget to Include the line in transport and save it.
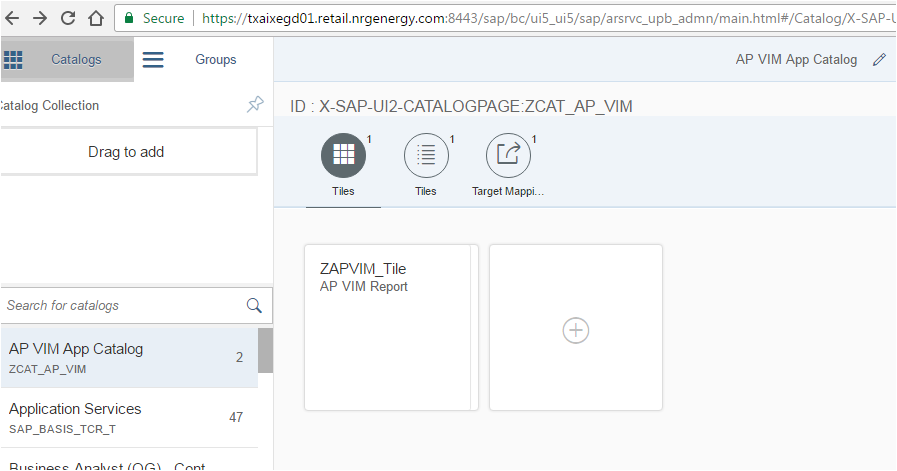
Step 6: In Fiori Launchpad Designer Create Catalog Object for the App
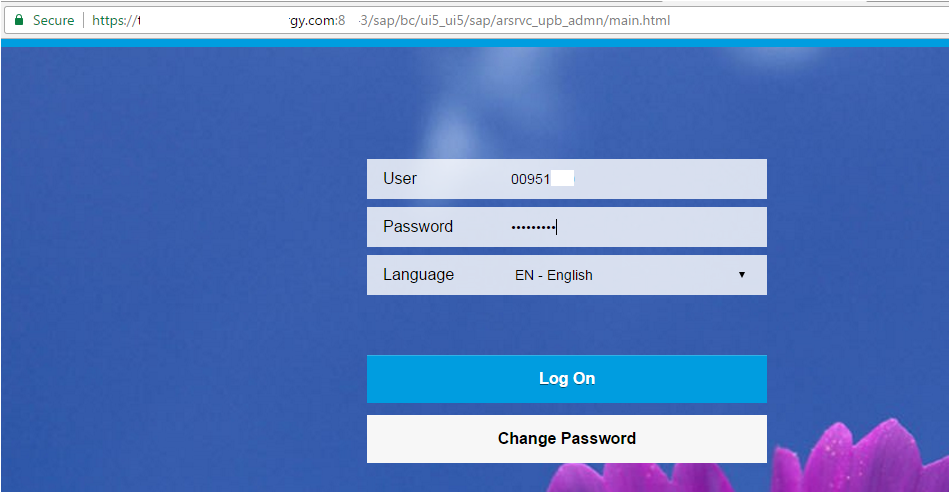
This is the generic URL for Fiori Launchpad Designer:
https://:/sap/bc/ui5_ui5/sap/arsrvc_upb_admn/main.html
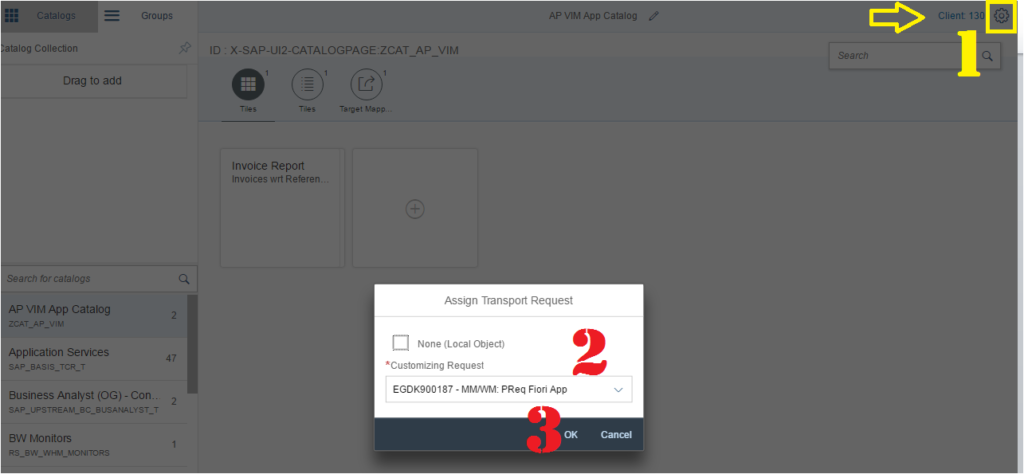
The moment you are in the Launchpad designer, your first and foremost duty is to assign a transport. Fiori does not prompt you for transports when you save it. You have to be proactive.
Hit on the tool icon on top right and assign a customizing transport.
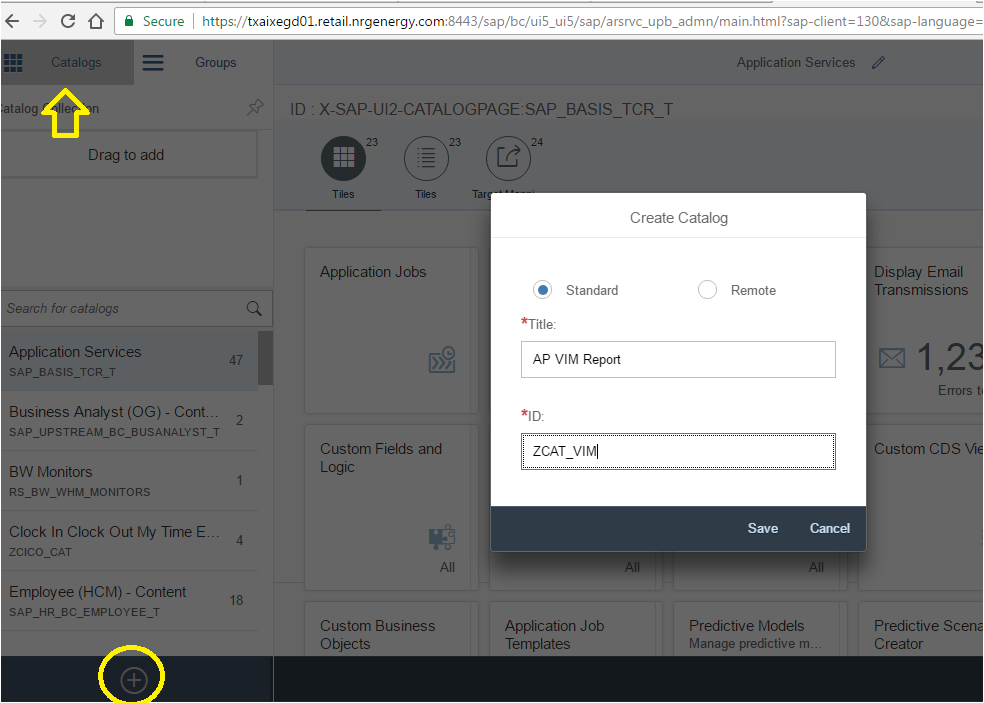
Create a Catalog.
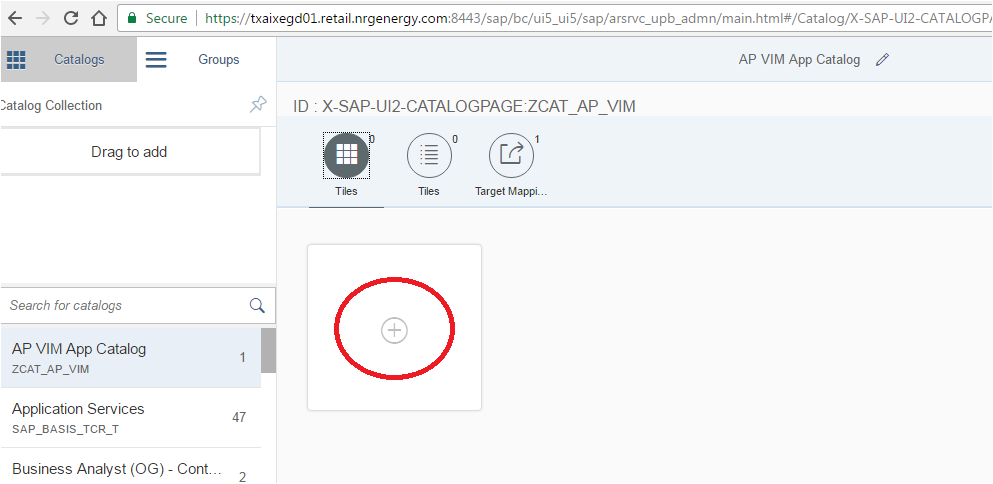
Select the Catalog Menu and hit the + icon on the left bottom.
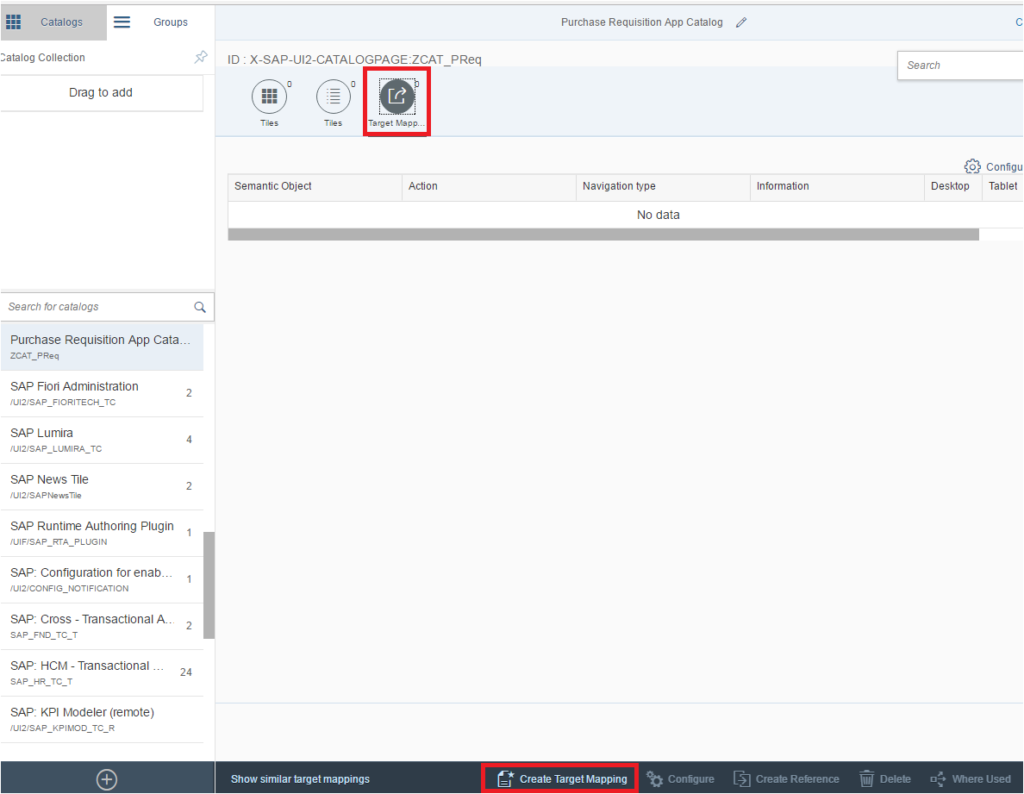
Step 7: Create Target Mapping for the Catalog Object

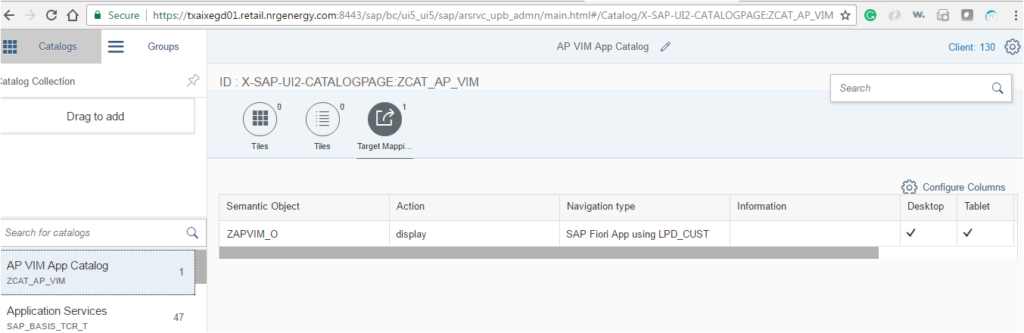
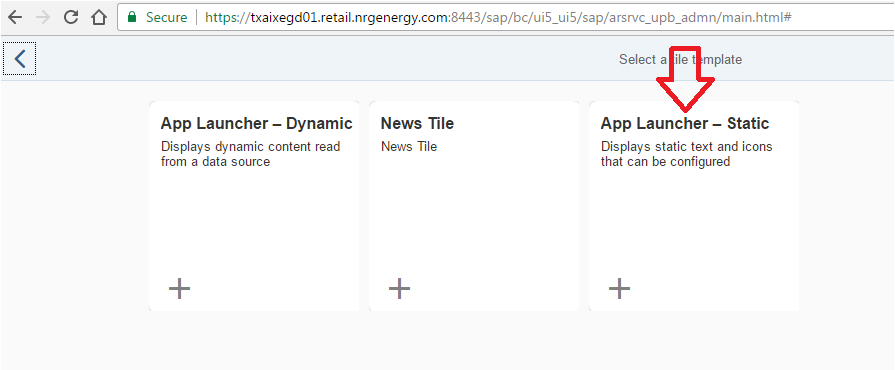
Step 8: Create Tiles for the Catalog Object
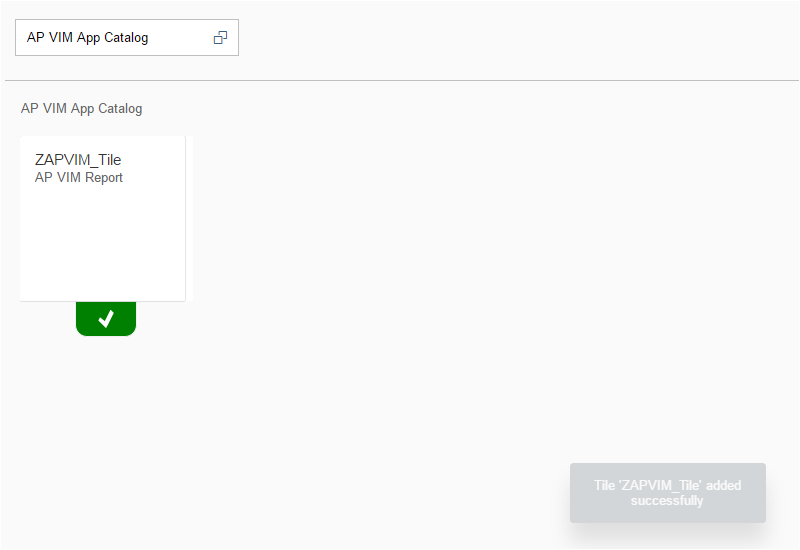
Your Catalog would look something like below.
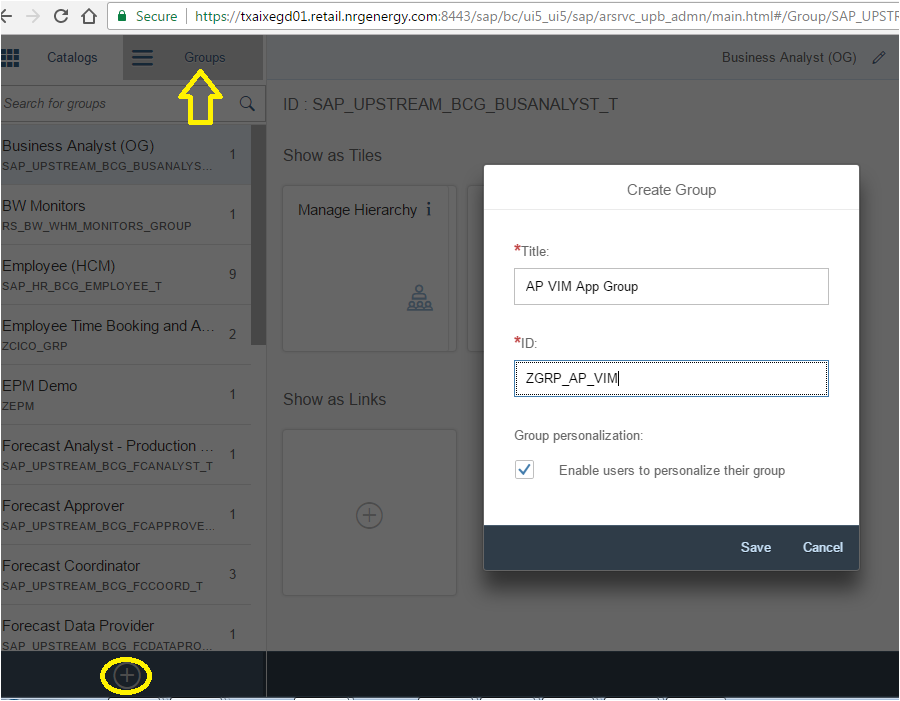
Step 9: Create Group for the Catalog object
Select the Groups Menu and hit the + icon on the left bottom.
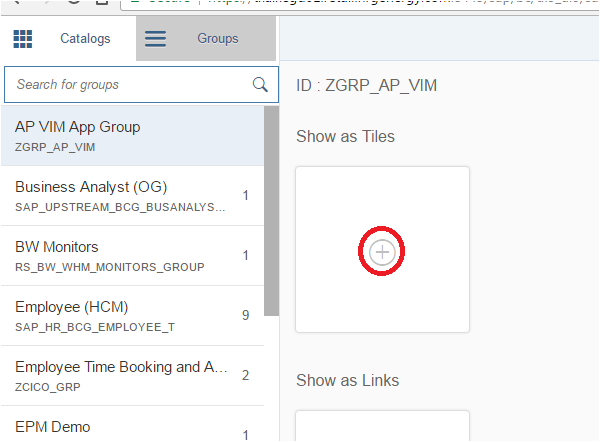
Step 10: Include to Catalog object into the Group
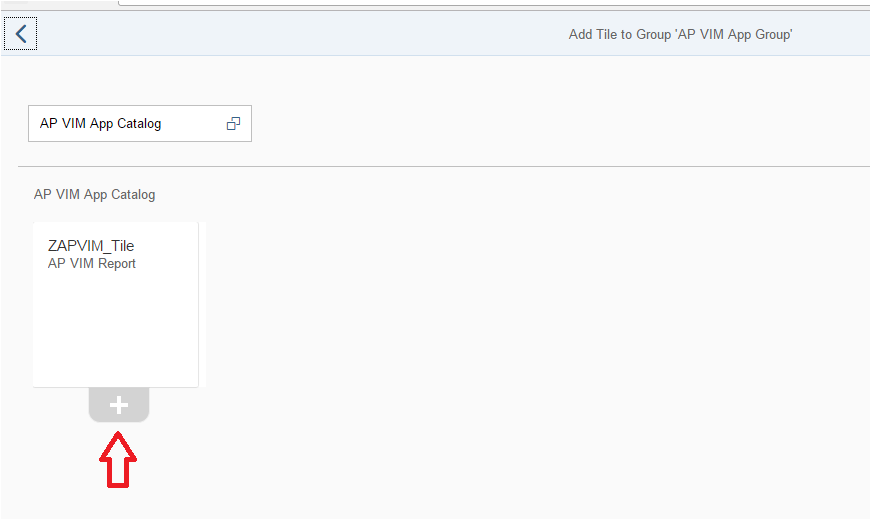
Once the Group is created, click on the + icon and add the Catalog which you created earlier.
Look for the Catalog and hit the + icon.
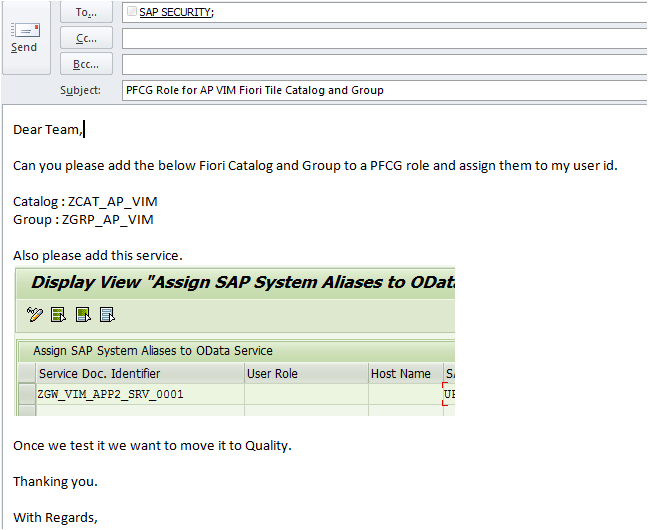
Step 11: Ask the Security Team to add the Catalog, Group and SAPUI5 service to the User Role
Finally, once you have created the Catalog and the Group, ask your SAP Security/Admin team to add the Catalog, group and OData Service in a role and provide you the access. Sample mail below. Too much spoon feeding.
All the above steps are the ideal steps. In the real world, we are bound to face some problems. Let us see what are the common mistakes we might make and their solutions.
Frequently encountered Issues in Custom SAPUI5 Fiori App
Issue 1: “Could not open App. Please try again later”
After you have done all the above-mentioned steps, you log into Fiori Launch Pad. You are happy to see the Fiori Tile in the Group. You click the App and oops, you get the error: “Could not open app. Please try again later“.

Now there can be 101 reasons for that error.
Before cursing anyone, check these two items:
i) The Application Alias which you are maintaining in LPD_CUST should be the same in Launchpad Designer Target mapping. For your reference below is the Application Alias field in Target mapping in LPD_Designer

ii) Additional Information Path in LPD_CUST
For any custom UI5 applications, the component.js name in UI and Additional Information in the LPT_CUST should be exactly the same when we execute this app from Fiori Launchpad
In our case, our additional information should fill with below:
SAPUI5.Component=ZAP_VIM_Report


Initially, we saved it wrong as below where we typed SAPUI5.Component=ZAP_VIM_Report.Component. Remember: “.Component” is not needed.
This was the reason for our App not opening. It might be so simple and silly issue. Check how we wrongly saved it.
Issue 2: The App neither opens in Browser mode nor in mobile/iPad app mode in the Quality system after transport.
You might need to:
i. Manually activate SICF service for OData in UI frontend system
ii. Manually activate SICF service for BSP application in UI frontend system
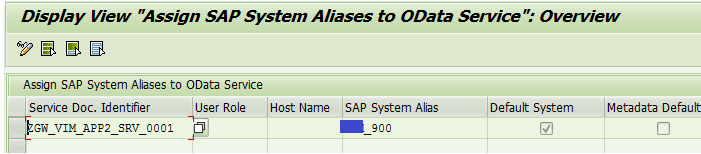
iii. Maintain SAP System Aliases to OData Service in Quality system
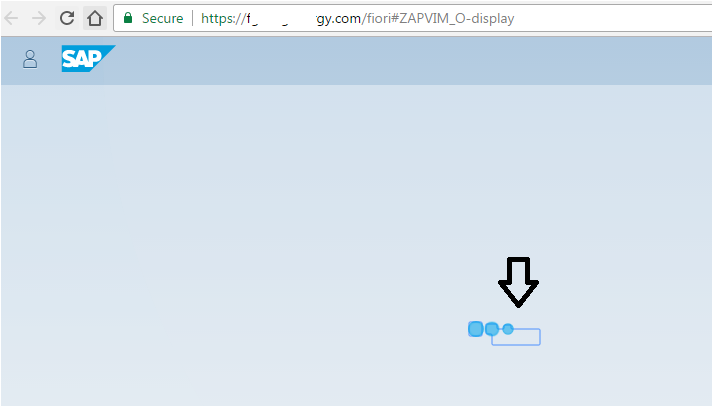
Issue 3: App Tile is available in Browser but it is not visible in mobile or Ipad.
Once your app is moved to quality, it does not open. The progress indicator keeps moving and moving but never stops. Seems like it went into some infinite loop and stuck somewhere.
We checked t-code /IWFND/ERROR_LOG but it did not help much. Finally, we found the issue by looking at the system logs in t-code SLG1. Who in this whole world would think SLG1 would also log Fiori Logs? But it does.
When /IWFND/ERROR_LOG fails, age-old SLG1 comes to rescue.
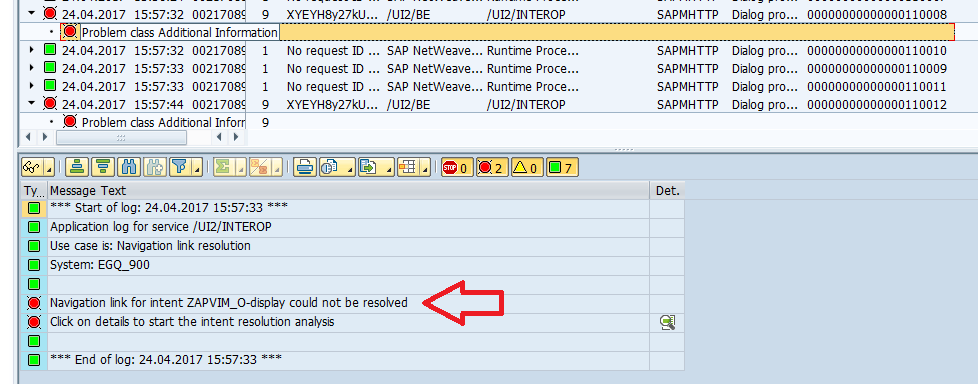
It says “Navigation link for intent could not be resolved“.
When we saw this message, the bell rang. The log was clear to point towards the Launchpad. Surprise surprise!! We forgot to save the Launchpad to a transport and move to Quality.
The log message had keywords: Intent, Object ZAPVIM_O-display. So Launchpad was the culprit. Not we.

Issue 4: New update/change in UI does not reflect in Quality system after re-transport
To your surprise, the new UI changes are not effective in the Quality. You transport looks good. So what happened?
It is the CACHE issue. Just like in SAP Workflow we use t-code SWU_OBUF to clear the buffer and the workflow changes start reflecting. Similarly, in SAPUI5, we need to refresh the CACHE.
Refresh CACHE after every UI Change in Quality System. Transaction /IWFND/CACHE_CLEANUP should help. Also check t-code /IWBEP/CACHE_CLEANUP.
This was our experience with our first SAPUI5 Deployment. There were some road blockers and hurdles. But in the end, we made it through. As we always say, the issues in SAP might seem humongous, but the solution is always small and simple. But finding that simple right solution is the trickiest and time-consuming part.
It was a good learning experience for all our team members. It was also exciting to see our first app in our mobile and iPad. Moreover, our end users are super happy. Although this was a super simple App, still they use it more often and the report we already have for them in SAP backend. After all, the UI is so pretty and intuitive. The end users do not need any training to use it. Did we ever take training to play our Temple Run App on our mobile? Same should hold good for SAP Fiori Apps. Sometimes, business should be fun and delightful.


