Being an ABAPer with no prior Java or Javascript knowledge, it was really difficult for me to transition to a UI developer. Not that I wanted to change from ABAP to UI role, but because we did not have any UI developer in our team. Necessity is the mother of any invention and the same held good for our team. I have taken a paid SAPUI5 training and thought that I would be able to accomplish my first SAPUI5 assignment for my client in a breeze.
But the reality check was different. Although I was lucky to receive the simplest of the simple UI requirement where I had to design one input field with a button, fetch the data and display summary when the button is clicked and then show the details when the summary line is clicked.
For ABAPer it is like:
i. Selection Screen with one Parameter and a Button.
ii. When the Button is hit, it needs to do the data selection and display Summary in an ALV Table.
iii. When one row of the ALV Table is hit, it should drill down and show the Details of the selected line.
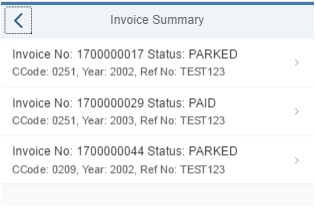
The below screens are the outcome of my first SAPUI5 development which moved to production and is being used by happy end users.
Basically, one button and two routes. Thanks to my friend at the client team who gave me this requirement and opportunity.
I quickly developed the backend Gateway OData services and published it. I tested my OData stand alone (t-code /IWFND/GW_CLIENT) and it was working as expected. CRUD Operations in OData is a cake walk for ABAPers. The challenge for me was to consume this OData in UI.
The hurdles which I faced in this development were:
- How to read value of the Input Field of the View (reading value of selection screen fields was so easy in ABAP) ?
- How to read the values of the argument parameters of the Routers after some action?
- How to route to 2nd level detailed View?
- How to navigate back?
- How to read window history?
I will try to focus on the above five points and show how I resolved it and created my first application. I have provided the working app’s whole project with all files at the end for you to download. You can simply import it in your WebIDE and check the code. You would, however, need to develop your own OData services.
With the limited knowledge, I created the first screen for Input Field and Button. I prefer making use of the Layout Editor of the View and then modify in the View Code editor. Lazy ABAPer after all.
Code for Input Field and Button in SAPUI5 View.
<mvc:View xmlns:core=”sap.ui.core” xmlns:mvc=”sap.ui.core.mvc” xmlns=”sap.m” controllerName=”ZAP_VIM_Report.controller.V_Input”xmlns:html=”http://www.w3.org/1999/xhtml”>
<App>
<pages>
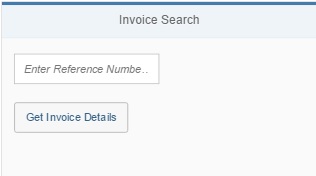
<Pagetitle=”Invoice Search”>
<VBox class=”sapUiSmallMargin”>
<Inputid=”IP_XBLNR” width=”50%” placeholder=”Enter Reference Number….” class=”sapUiSmallMarginBottom”></Input>
<Button text=”Get Invoice Details” width=”150px” id=”B_GET” press=”GetInvoice”/>
</VBox>
</Page>
</pages>
</App>
</mvc:View>
Issue No 1 faced in my first SAPUI5 App: Not able to Read Input Field Text
I stumbled upon my first hurdle when I was not able to read the value entered in the Input Field when the Button was clicked. For some reason, the help found online was not helping me. After spending a considerable amount of time, I had to take the Phone a Friend lifeline. He guided me with the basics. He showed me how to use the Inspect (Developer Tool or F12) and debug and check values in Console.
For beginners, you need to read the View and get the value using the Id of the screen element.
// Get View info
var oView = this.getView();
// Get the value entered in the Input field
var lvv_xblnr = oView.byId(“IP_XBLNR”).getValue();
Complete code of Input View
sap.ui.define([
“sap/ui/core/mvc/Controller”
], function(Controller) {
“use strict”;
return Controller.extend(“ZAP_VIM_Report.controller.V_Input”, {
onInit: function() {},
GetInvoice: function(evt) {
var oView = this.getView();
var lvv_xblnr = oView.byId(“IP_XBLNR”).getValue();
// Now Get the Router Info
var oRouter = sap.ui.core.UIComponent.getRouterFor(this);
// Tell the Router to Navigate To Route_Output which is linked to V_Output view
oRouter.navTo(“Route_Output”, {
ip_xblnr: lvv_xblnr
});
}
});
});
After I was able to keep the input field value in a variable, I needed to route to the second view. Routing Config, Targets and Routes need to be maintained properly in the manifest file.
Check our dedicated post on Routers and Navigations in SAPUI5.
Routing Config and Targets:
“routing”: {
“config”: {
“viewPath”: “ZAP_VIM_Report.view”,
“controlId”: “V_Main”,
“viewLevel”: 1,
“controlAggregation”: “pages”,
“routerClass”: “sap.m.routing.Router”
},
“targets”: {
“Target_Input”: {
“viewType”: “XML”,
“transition”: “slide”,
“clearAggregation”: true,
“viewName”: “V_Input”,
“viewId”: “1”
},
“Target_Output”: {
“viewType”: “XML”,
“transition”: “slide”,
“clearAggregation”: true,
“viewName”: “V_Output”,
“viewId”: “2”
},
“Target_Detail”: {
“viewType”: “XML”,
“transition”: “slide”,
“clearAggregation”: true,
“viewName”: “V_Detail”,
“viewId”: “3”
}
},
Routes:
“routes”: [
{
“name”: “Route_Input”,
“pattern”: “”,
“titleTarget”: “”,
“greedy”: false,
“target”: [
“Target_Input”
]
},
{
“name”: “Route_Output”,
“pattern”: “{ip_xblnr}”,
“titleTarget”: “”,
“greedy”: false,
“target”: [
“Target_Output”
]
},
{
“name”: “Route_Detail”,
“pattern”: “Route_Detail/{p_belnr}/{p_bukrs}/{p_gjahr}”,
“titleTarget”: “”,
“greedy”: false,
“target”: [
“Target_Detail”
]
}
]
Now the second view needed to be designed which was pretty simple. I again used the Layout editor of the view.
Issue No 2 faced in my first SAPUI5 App: itemPress event not triggering
Please note, I have type=”Navigation”. It means if clicked it would take to next view. The press event would fire my custom method “NavToDetailView“.

Initially, I tried itemPress=”NavToDetailView” but for some divine reason, itemPress did not trigger the init method of the Detail Controller. After some struggle and hit and try, I found press=”NavToDetailView” did the needful for me. It is still a mystery for me why itemPress did not work.
Check the syntax to read property of the field which is bound to the current context of the View.
var selBelnr = oEvt.getSource().getBindingContext().getProperty(“Belnr”);
Full code of the function from the calling View Controller.
NavToDetailView: function(oEvt) {
var selBelnr = oEvt.getSource().getBindingContext().getProperty(“Belnr”);
var selBukrs = oEvt.getSource().getBindingContext().getProperty(“Bukrs”);
var selGjahr = oEvt.getSource().getBindingContext().getProperty(“Gjahr”);
var oRouter1 = sap.ui.core.UIComponent.getRouterFor(this);
oRouter1.navTo(“Route_Detail”, {
p_belnr: selBelnr,
p_bukrs: selBukrs,
p_gjahr: selGjahr
});
}
By now, I was conversant with reading the value of the event parameters.
var oArgument = oEvt.getParameter(“arguments”);
var lv_xblnr = oArgument.ip_xblnr;
The name you give to the mandatory parameter in the pattern of the Routes is available in the event arguments. If for example, you have three parameters in the pattern of the route, say V_Detail/{ip_xblnr}/{ip_belnr}/{ip_budat} then the way to read the values is:
var oArgument = oEvt.getParameter(“arguments”);
var lv_xblnr = oArgument.ip_xblnr;
var lv_belnr = oArgument.ip_belnr;
var lv_budat = oArgument.ip_budat;
Issue No 3 faced in my first SAPUI5 App: How to Filter the OData Items Table?
Ok, I was able to read event parameters, but I wanted to filter the items table using the input field value. Again, I had to take the Phone a Friend lifeline again. He gave me the syntax and use case example of Filter in SAPUI5.
Code snippet to declare a filter and populate the filter value:
var filters = new sap.ui.model.Filter({
and: true,
filters: [new sap.ui.model.Filter(“Xblnr”, sap.ui.model.FilterOperator.EQ, lv_xblnr)]
})
Finally, the filter was bound to the target table (items).
var binding = this.byId(“list”).getBinding(“items”);
binding.filter(filters);
Issue No 4 faced in my first SAPUI5 App: Not able to route to second detailed view
I was able to display the summary as per the input field. My next mission was to show the details of the clicked summary item. The first problem I faced here was, I was not able to navigate to the next view. For some reason, the init method of my next view (Detail view) was not getting triggered. I read some scn question where some users have reported the same problem. The 2nd detail view was not being triggered. I tried all my tricks but again, I could not be successful. The pattern I gave for my Route was {ip_xblnr}. So I had to Phone a Friend for the third time. This time my friend also had a difficult time. But luckily after some research, he reverted the below (actual mail).
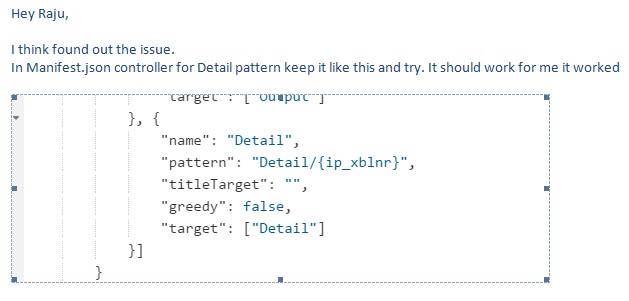
Not sure, why I needed to give “Detail/” before {ip_xblnr}. But it worked. Later I found that if you give “XYZ/” or “V_Detail/” or any other text, it still works. So till I do not get the explanation why? I would keep using this pattern (i.e V_Detail/{mandatory parameter} for my 2nd detail view. I had to use 3 mandatory parameters to fetch the unique record using the key.
In the Detail controller, as shown above, I read three parameters of the Event Argument using below code.
var oArgument = oEvt.getParameter(“arguments”);
var lv_belnr = oArgument.p_belnr;
var lv_bukrs = oArgument.p_bukrs;
var lv_gjahr = oArgument.p_gjahr;
Now, I wanted to use the path: “/POHeaderSet(‘” + oArgument.SelectedItem + “‘)” to retrieve data using the OData service. Unfortunately, I failed, therefore I used the filter method to get my result. I know it is not the right way, but till someone shows me how to do it correctly or till I learn the better way, I have to live with this Filter.
Issue No 5 faced in my first SAPUI5 App: Multiple Filters for the selected OData items
In the filter, I had to pass three fields. So this was another new syntax for me. Hopefully, it would help some other beginners, how to use multiple properties (elements/fields) in the Filter.
var filters = new sap.ui.model.Filter({
and: true,
filters: [new sap.ui.model.Filter(“Belnr”, sap.ui.model.FilterOperator.EQ, lv_belnr),
new sap.ui.model.Filter(“Bukrs”, sap.ui.model.FilterOperator.EQ, lv_bukrs),
new sap.ui.model.Filter(“Gjahr”, sap.ui.model.FilterOperator.EQ, lv_gjahr)
]
});
Issue No 6 faced in my first SAPUI5 App: Display columns of the table row one below the other
For example, the table row had data as column1 column2 column3 etc. The client wanted to show it as below:
column1
column2
column3
etc
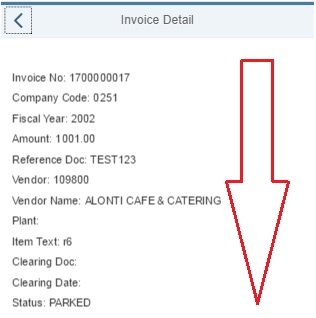
In the debugger, I could see the right data. My client’s requirement was to display the data in Detail view in rows (one below another) because it would not look good in the mobile if we display in columns, all the columns would not show properly. After all simple and delightful are 2 out of 5 basic principles of Fiori/SAPUI5 apps. Now again I stumbled on a new hurdle. How to show fields of a table one below another? I tried VBox but somehow I could not bind the elements.
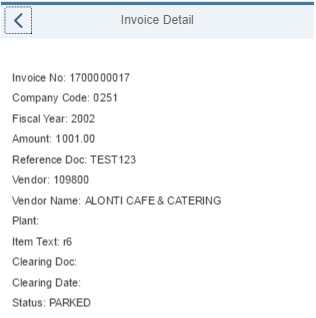
Finally, ObjectListItem, Attribute, and ObjectAttribute came to my rescue. Check below code. This is how I met the requirement.
<Pagetitle=”Invoice Detail” showNavButton=”true” navButtonPress=”GoToOutput”>
<content>
<List noDataText=”No data found” id=”list” items=”{/DocDetailSet}”><items><ObjectListItem>
<attributes>
<ObjectAttribute text=”Invoice No: {Belnr}”/><ObjectAttribute text=”Company Code: {Bukrs}”/><ObjectAttribute text=”Fiscal Year: {Gjahr}”/><ObjectAttribute text=”Amount: {Amount33}”/><ObjectAttribute id=”Xblnr” text=”Reference Doc: {Xblnr}”/><ObjectAttribute text=”Vendor: {Lifnr}”/><ObjectAttribute text=”Vendor Name: {Name1}”/><ObjectAttribute text=”Plant: {Werks}”/><ObjectAttribute text=”Item Text: {Sgtxt}”/><ObjectAttribute text=”Clearing Doc: {Augbl}”/><ObjectAttribute text=”Clearing Date: {Budat}”/><ObjectAttribute text=”Status: {Stat}”/></attributes>
</ObjectListItem>
</items>
</List>
</content>
</Page>
We have already shown the output above. Still repeating the screenshot.
On a side note, if you Routers are not working, you need to know that in the component.js file you need to initialize the router.
// enable hash based routing
this.getRouter().initialize();
Coming back to my first SAPUI5 App in WebIDE. Let us devote some space for the Back Button.
While working with any UI tool we would need forward and back button.
For my case, I needed 2 Back Buttons. First back button to go back to Input screen from Output screen and second to go back to Output screen from Detail screen. Going back to input screen was pretty straight forward using the default pattern. The reason being, the pattern was empty. So the Router took to the initial view seamlessly.
// Go Back to Input View
NavToInputView: function(oEvt) {
var oRouter = sap.ui.core.UIComponent.getRouterFor(this);
oRouter.navTo(“Route_Input”, {});
},
Issue No 7 faced in my first SAPUI5 App: Going back to the previous View keeping the same data
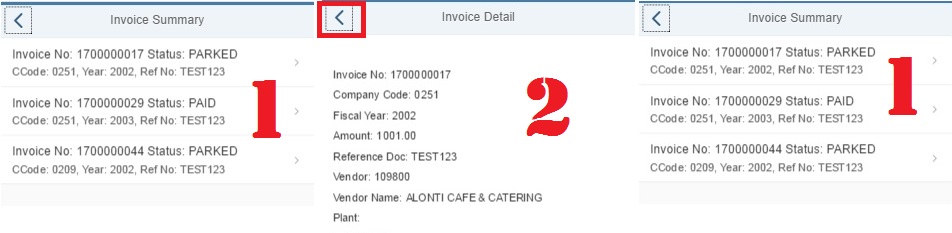
But for going back from Detail to Summary view, I had to read the screen value of the elements (which unfortunately I was not able to read). Hopefully, I will learn it soon. But for now, my friend introduced me to the new library class “sap/ui/core/routing/History” and function (History). By the time this post is published, I have already written in detail about History Library Class in one of our previous SAPUI5 Tutorial titled Navigation in SAPUI5 without Routers.
sap.ui.define([“sap/ui/core/mvc/Controller”, “sap/ui/core/routing/History”], function(Controller,History)
// Go Back to Output View
GoToOutput: function(evt) {
var oHistory = History.getInstance();
var sPreviousHash = oHistory.getPreviousHash();
if (sPreviousHash !== undefined) {
window.history.go(-1);
} else {
var oRouter = sap.ui.core.UIComponent.getRouterFor(this);
oRouter.navTo(“Route_Input”, true);
}
}
This was the story of my struggle with my first real SAPUI5 App for a real client project. Demo projects and example done during training and self-learning classes give us confidence, but doing our first project in any new area (language) is little challenging. I still remember my senior who hand held me and guided me in every step during my first ABAP development more than 12 years ago. If you are a novice in UI development just like me, hopefully, this post would help you.
Before I close today, I happen to remember another issue which I faced.
I was declaring the Model incorrectly
var oModel = new sap.ui.model.ODataModel(“/sap/opu/odata/sap/ZGW_VIM_APP_SRV/”);
Correct way to declare a Model in SAPUI5 (WebIDE)
var oModel = new sap.ui.model.odata.v2.ODataModel(“/sap/opu/odata/sap/ZGW_VIM_APP_SRV/”);
I found that there are lots of help in SAPUI5 on the internet, but most of them are for Eclipse-based or there are only hints provided for any issue. For freshers, those hints are helpful but not sufficient. Also, for WebIDE base SAPUI5 development, we still need some more materials and help. Our aim in SAPUI5 is to generate such step by step documents which the freshers in this area can easily understand, assimilate and use them in their real projects.
As promised above, please click the below link to download the working project of the App.
I revealed that this app is already live in our client’s system. You must have guessed it that I have converted the SAPUI5 app to Fiori app. In the next post, I would show how to deploy the SAPUI5 App, put them in the transport, do the Launchpad configuration, configure the catalog and group for Fiori and provide the right roles for the users. Please stay tuned for another interesting article on End to End Deployment of SAPUI5 to SAP Fiori App and use it from any mobile device.


