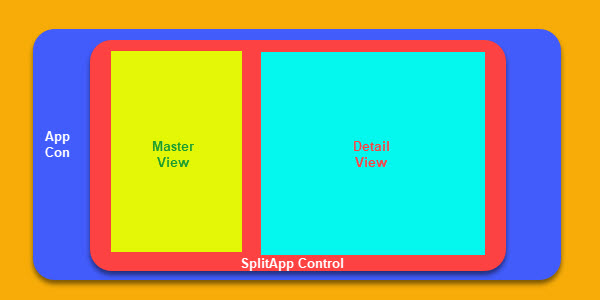
Routing is required when there are 2 or more views in an application. If the application consists of 2 or more full page views, routing is easier to perform. You can simply add all the views in an App control and use the ‘to’ function of the App control to navigate to the target view. But in case of a Master Detail scenario, navigation is a bit complex as the Master and Detail views are on the same page but belonging to 2 different aggregations of the SplitApp control. Master View belongs to the masterPages aggregation and Detail View belongs to the detailPages aggregation. Keeping this in mind, the routing configuration is done.
Let us try to understand this Routing concecpt with the help of a practical Master Detail Application example in this tutorial.
Creating the Required Views
We will need 3 Views to achieve navigation in a Master Detail scenario.
- SplitAppView
- MasterView
- DetailView
SplitAppView will be the root view and will be contained in a App Control. It will contain the SplitApp Control.
MasterView will be the Master view and will be contained in the masterPages aggregation of SplitApp Control.
DetailView will be Detail view and will be contained in the detailPages aggregation of SplitApp Control.
Routing Configuration
Based on the above three statements, this is how our routing configuration will look like.
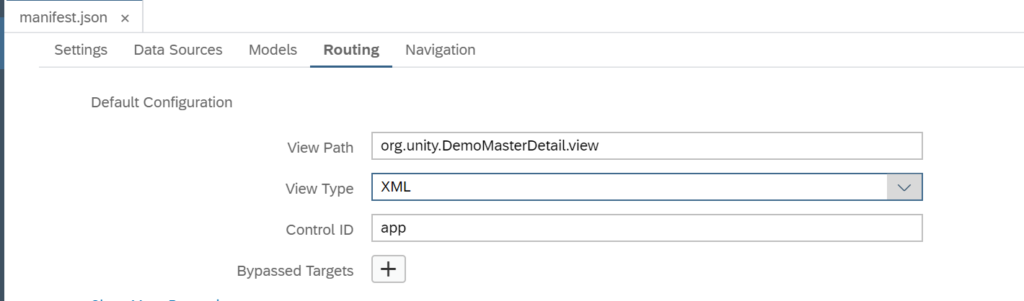
This is the default router configuration. ‘app‘ is the id of App Control which we will add SplitApp View later in this tutorial
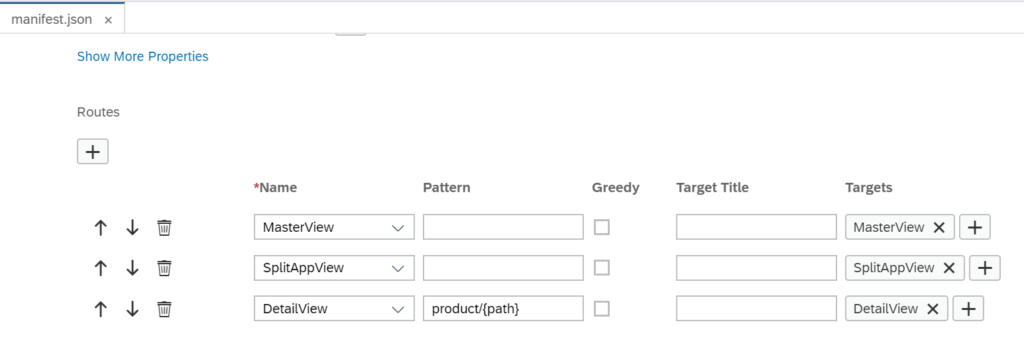
This shows the name, pattern and target of the routes
Note: In the above screenshot, pattern of 2 routes i.e SplitAppView and MasterView are blank. It means they will be rendered one after the other when blank pattern is identified in the URL. Since SplitAppView is configured as the root view (in manifest.js file) of the application, it will be rendered first. Then the router will be initialized. After router initialization, URL pattern will be checked and if blank pattern is found, MasterView will be rendered.
Also, in above configuration, note that the pattern of DetailVIew is product/{path}. It means, name of the pattern is ‘product‘ and ‘path‘ is a dynamic attribute which we are passing to the target at the time of navigation. How to pass this parameter is also explained in this tutorial.
Each of the routes configured above is mapped with a target. Target is nothing but the view which will be rendered for a given route. See below how targets are defined.
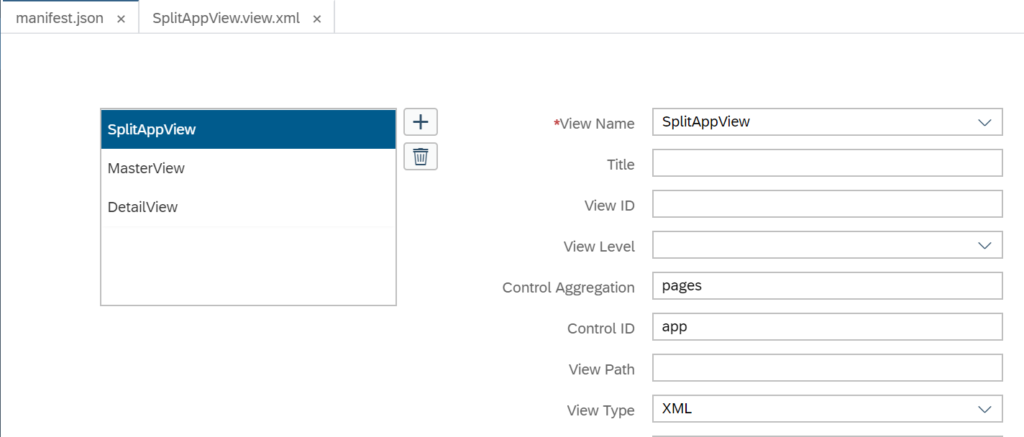
There are 4 settings defined for this target
- View Name : This is the name of the view which must be rendered when the target is hit by the URL pattern
- Control Aggregation : The aggregation of any UI5 control into which this view will be rendered, for example: pages aggregation of the App Control.
- Control ID : The id of the UI5 control into whose aggregation this view will be rendered
- View Type : XML, HTML, JSON, Javascript. Bacially what is the type of the view which is targeted to be rendered.
Let’s talk about the next target i.e. MasterView. Below screenshot tells you what configuration is done at Router for MasterView.
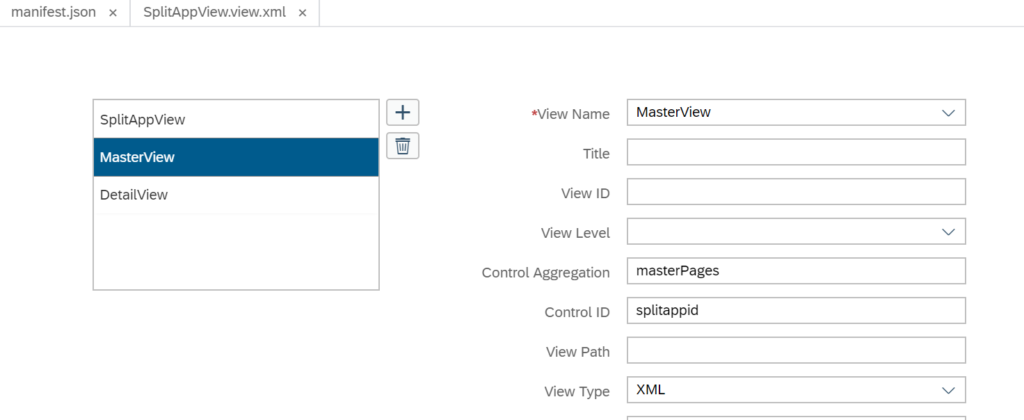
In this also, there are 4 properties defined for configuring the target. MasterView is the name if the view, masterPages is the name of the aggregation of SplitApp Control whose id is splitappid. The type of the view is XML.
Further, lets look at the configuration of DetailView
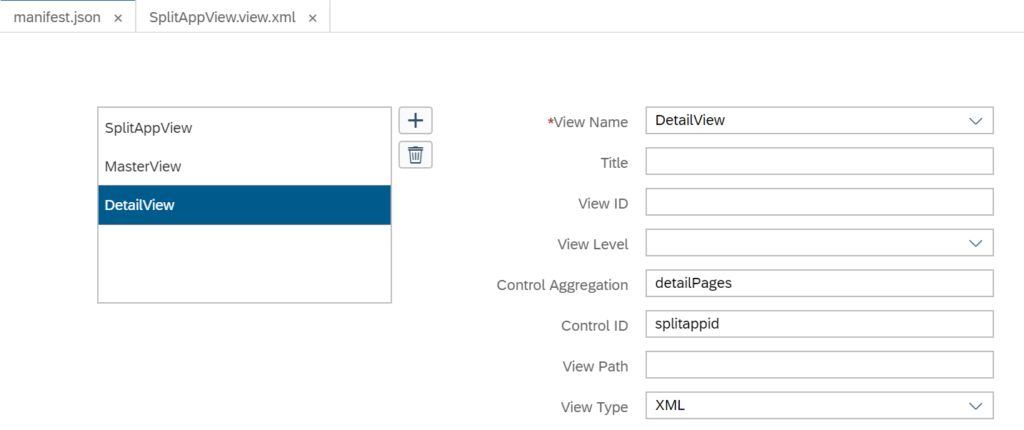
The target of DetailView is configured similar to MasterView Target. DetailView is the name of the view, detailPages is the name of the aggregation of SplitApp Control whose id is splitappid. The type of DetailView is XML.
After the above configuration of router is done using the Descriptor editor we can display the same in the Code editor. If you are comfortable with code editor, you can directly do the configuration in code editor too.
<code>"routing": {
			"config": {
				"routerClass": "sap.m.routing.Router",
				"viewType": "XML",
				"async": true,
				"viewPath": "org.unity.DemoMasterDetail.view",
				"controlId": "app",
				"clearControlAggregation": false,
				"bypassed": {
					"target": []
				}
			},
			"routes": [{
				"name": "MasterView",
				"pattern": "",
				"titleTarget": "",
				"greedy": false,
				"target": ["MasterView"]
			}, {
				"name": "SplitAppView",
				"pattern": "",
				"titleTarget": "",
				"greedy": false,
				"target": ["SplitAppView"]
			}, {
				"name": "DetailView",
				"pattern": "product/{path}",
				"titleTarget": "",
				"greedy": false,
				"target": ["DetailView"]
			}],
			"targets": {
				"SplitAppView": {
					"viewType": "XML",
					"viewName": "SplitAppView",
					"controlAggregation": "pages"
				},
				"MasterView": {
					"viewType": "XML",
					"viewName": "MasterView",
					"controlAggregation": "masterPages",
					"controlId": "splitappid"
				},
				"DetailView": {
					"viewType": "XML",
					"viewName": "DetailView",
					"controlAggregation": "detailPages",
					"controlId": "splitappid"
				}
			}
		}</code>
Coding the XML part of SplitAppView
The SplitAppView will simply act as a container for SplitApp control. There will be no other UI controls within it to be used to display business data. This is the xml code of SplitAppView.
<code><mvc:View xmlns:core="sap.ui.core" xmlns:mvc="sap.ui.core.mvc" xmlns="sap.m"
	controllerName="org.unity.DemoMasterDetail.controller.SplitAppView" xmlns:html="http://www.w3.org/1999/xhtml">
	<App id="app">
		<pages>
			<Page title="Online Store">
				<content>
					<SplitApp id="splitappid" masterButtonText="Master" masterNavigate="" afterMasterNavigate="" masterButton="" detailNavigate="">
						<masterPages></masterPages>
						<detailPages></detailPages>
					</SplitApp>
				</content>
			</Page>
		</pages>
	</App>
</mvc:View></code>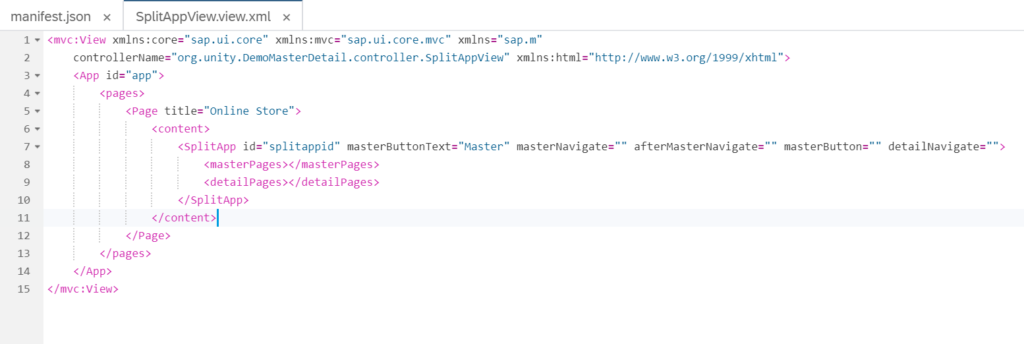
SplitApp controller will have no coding as it is not required.
MasterView XML code
In the Master View, there will be a List Control to display the List of products.
<code><mvc:View xmlns:core="sap.ui.core" xmlns:mvc="sap.ui.core.mvc" xmlns="sap.m"
	controllerName="org.unity.DemoMasterDetail.controller.MasterView" xmlns:html="http://www.w3.org/1999/xhtml">
	<App>
		<pages>
			<Page id="masterpageid" title="Products" titleLevel="Auto" showNavButton="true" showHeader="true" showSubHeader="true" navButtonText=""
				navButtonTooltip="" enableScrolling="true" icon="" navButtonTap="" navButtonPress="">
				<content>
					<List id="productlist" items="{/Products}" headerText="Products" headerDesign="Standard" footerText="End of the List"
						noDataText="No Employees" showNoData="true">
						<items>
							<ObjectListItem type="Navigation" title="{ProductName}" number="{UnitPrice}" numberUnit="INR" intro="{ProductID}" press="onSelectionChange">
								<attributes>
									<ObjectAttribute title="" text="{QuantityPerUnit}"></ObjectAttribute>
								</attributes>
								<firstStatus>
									<ObjectStatus title="{UnitsInStock}" text="{designation}"></ObjectStatus>
								</firstStatus>
								<secondStatus>
									<ObjectStatus title="{Discontinued}"></ObjectStatus>
								</secondStatus>
							</ObjectListItem>
						</items>
						<headerToolbar>
							<Toolbar>
								<content>
									<Title text="Products" title="Search"></Title>
									<ToolbarSpacer/>
									<SearchField search="onSearch" width="50%"></SearchField>
								</content>
							</Toolbar>
						</headerToolbar>
					</List>
				</content>
			</Page>
		</pages>
	</App>
</mvc:View></code>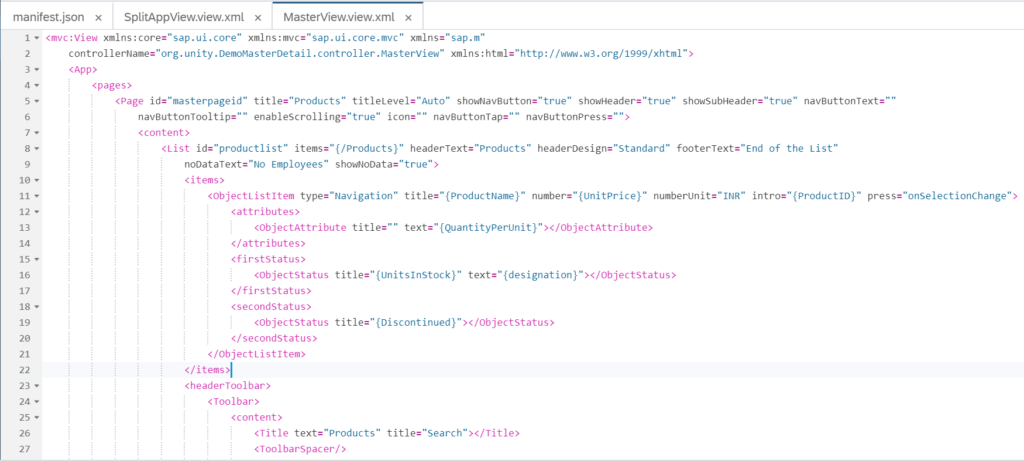

MasterView’s Controller code
<code>onInit: function () {
// access OData model declared in manifest.json file
			var oModel = this.getOwnerComponent().getModel("myModel");
//set the model on view to be used by the UI controls
			this.getView().setModel(oModel);
		},
		onSelectionChange: function (oEvent) {
// get the source control which triggered this event
			var oItem = oEvent.getSource();
// get the binding context of the control
			var oCtx = oItem.getBindingContext();
// get the binding path and truncate the first '/'
//so that it does not cause problem when appending the path as navigation //pattern in the url
			var sPath = oCtx.getPath().substr(1);
// get the instance of the router and navigate to
//Detail View.
			var oRouter = this.getOwnerComponent().getRouter();
			oRouter.navTo("DetailView",{path:sPath});
		},</code>
Comments mentioned in the code above explains it.
DetailView’s XML Code
<code><mvc:View xmlns:core="sap.ui.core" xmlns:mvc="sap.ui.core.mvc" xmlns="sap.m"
	controllerName="org.unity.DemoMasterDetail.controller.DetailView" xmlns:html="http://www.w3.org/1999/xhtml">
	<App>
		<pages>
			<Page id="detailpageid" title="Product Details" titleLevel="Auto" showNavButton="true" showHeader="true" showSubHeader="true"
				navButtonText="" navButtonTooltip="" enableScrolling="true" icon="" navButtonTap="" navButtonPress="">
				<content>
					<ObjectHeader id="objectheaderid" title="{myModel>ProductName}" number="{myModel>UnitPrice}" numberUnit="{myModel>CurrencyCode}">
						<statuses>
							<ObjectStatus text="Some Damaged" state="Error"/>
							<ObjectStatus text="In Stock" state="Success"/>
						</statuses>
						<attributes>
							<ObjectAttribute text="{myModel>SupplierID}"/>
							<ObjectAttribute text="{myModel>CategoryID}"/>
							<ObjectAttribute text="{myModel>QuantityPerUnit}"/>
							<ObjectAttribute text="www.sapspot.com" active="true"/>
						</attributes>
					</ObjectHeader>
				</content>
			</Page>
		</pages>
	</App>
</mvc:View></code>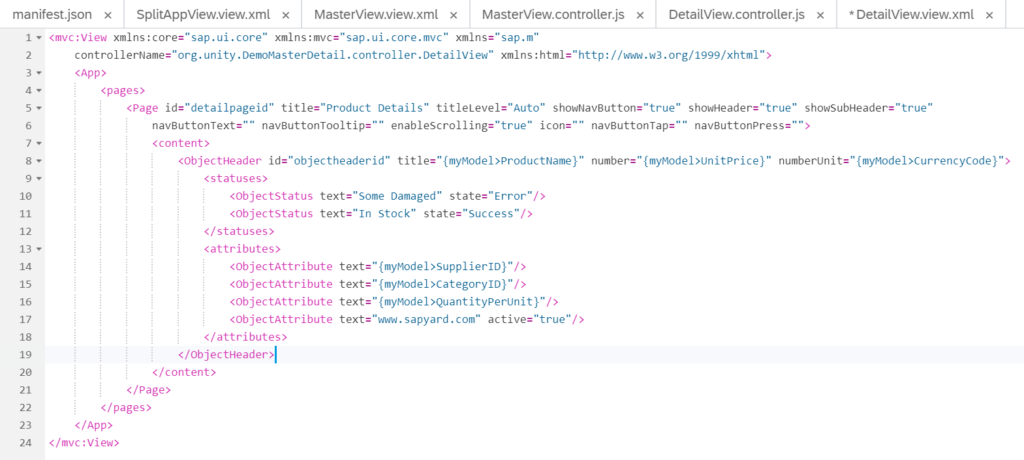
The XML view of detail page contains a ObjectHeader Control which displays information from the Selected Item in the Master List.
Detail View’s Controller Code
<code>onInit: function () {
// get the handle of router
			var oRouter = sap.ui.core.UIComponent.getRouterFor(this);
// attach an event to the router which will be fired
//whenever DetailView route is found in the URL Pattern
			oRouter.getRoute("DetailView").attachPatternMatched(this._onObjectMatched, this);
		},

		_onObjectMatched:function(oEvent){
// read the path variable which is passed as part of
// the URL pattern (defined in router configuration)
			var sPath = oEvent.getParameter("arguments").path;
// use the path to perform Element binding on the
// ObjectHeader UI control in this view
			this.getView().byId("objectheaderid").bindElement({path:"/".concat(sPath), model:"myModel"});
		}</code>
The code shown above has appropriate comments. Please go through to understand what each statement is meant for.
Execute the Application
Click on run button in the toolbar of Web IDE. Another browser window will open with the application displayed as shown below.
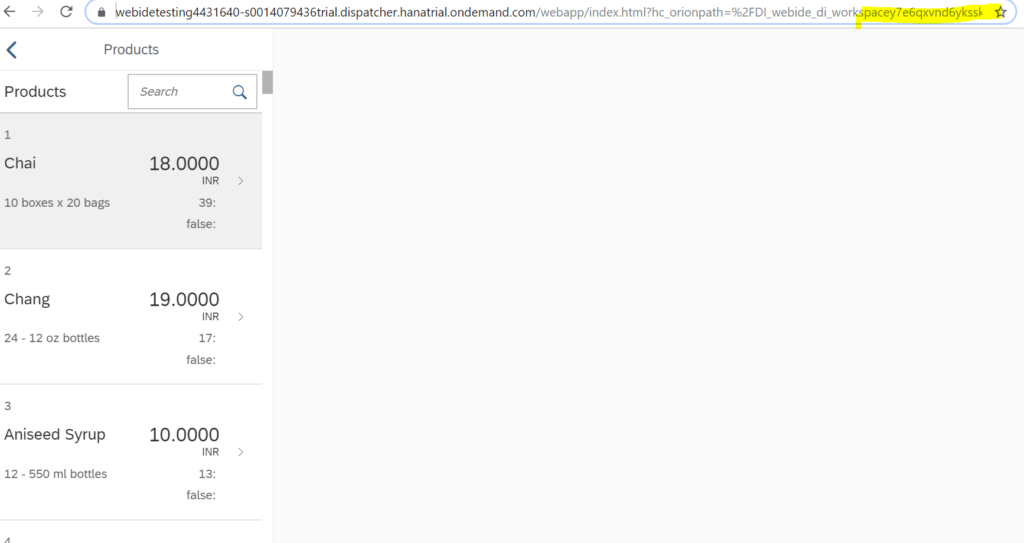
Check the URL:
Scroll towards the end of the URL and you will see that there is no hash pattern (#) appended in the URL. So the Targets which are configured for blank pattern are rendered. In our case, these are SplitAppView and the MasterView. Now click on an item in the MasterView, below will be displayed.
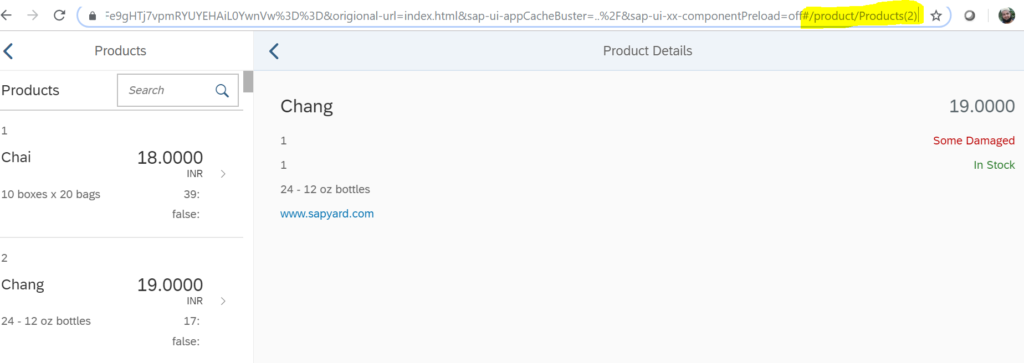
I clicked on product id 2.
Check the URL one more time:
Notice that the router has come into play and has appended a hash(#) pattern in the URL. This hash pattern will resolve to a Target. In our case it will resolve to the DetailView. Also note that a dynamic parameter ‘path‘ is being passed to the Pattern. This dynamic parameter is used in the DetailView to perform Element binding and display the currently clicked product details.


