Not only User Interface, but good User Experience is the ultimate aim of every ERP industry. Therefore, UI5 is the future in SAP. Do not get us wrong, ABAP is not dead nor is it going to die in distant future. But let us be honest. We might not develop many front end applications in ABAP as we did in past. With S/4HANA and new releases of SAP, SAPUI5 and Fiori Applications have definitely taken the front seat. As an ABAP developer, metamorphosing to UI is a good move. Getting comfortable with HTML, CSS, JS is a good idea.
In our SAPUI5 series, we have been trying to put simple application examples which the developers can try and understand. With the vision to help ABAP developers learn the trade and tricks of UI, we present our next tutorial below. In this simple article we would show how to play around with the visibility property of the view to meet our full screen and detailed screen requirement.
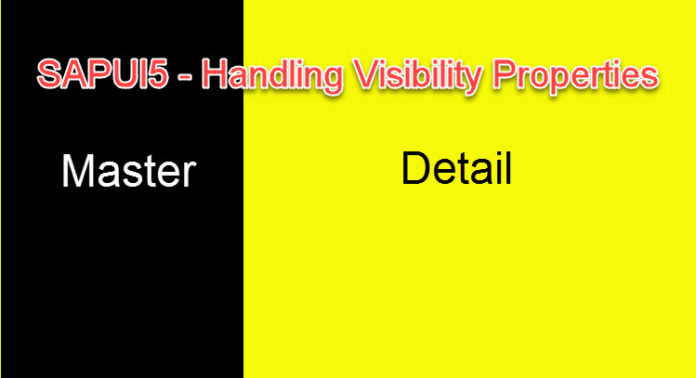
Scenario
We are going to design an application which loads a full screen initially but when we click a button it would navigate to master-detail screen.
Approaches:
There is not always one correct way to achieve any functionality. Therefore, we would demonstrate 2 approaches to meet our goal. You can then decide which one to choose based on your needs and convenience.
Approach – 1: Maintaining two controls in root view(App.view.xml), one is control (for full screen) and other is control (for master-detail)
Approach – 2: Maintain only one control in root view(App.view.xml), for both full screen (here we will hide the master page and making only full screen visible) and master-detail (making both master and detail page visible)
Approach – 1: Maintaining two controls, one for full screen() and other is for master-detail()
- High Level Steps:
- Create a root view(App.view.xml) with controls &
- Create a full screen view
- Create 2 views (Main.view.xml – for master page, Empty.view.xml- for detail page)
- Configure routes, routing and target in manifest.json
- Initialize router in component.js
- Controller.js for navigation on button click
- Execute the application
Let us elaborate each steps in details for the benefit of the SAPUI5 beginners.
Step-1: Create a root view(App.view.xml) with controls & < SplitApp>
The project structure should look like

The root view App.view.xml should look like below
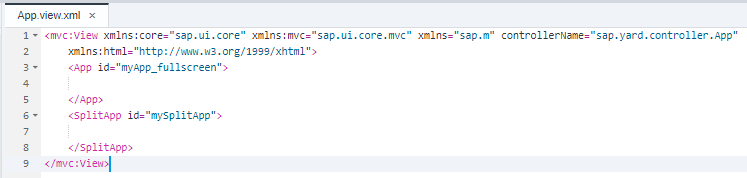
In the above image the control and control should be provided with id as shown
Step-2: Create a full screen view
My full screen page which loads initially should be
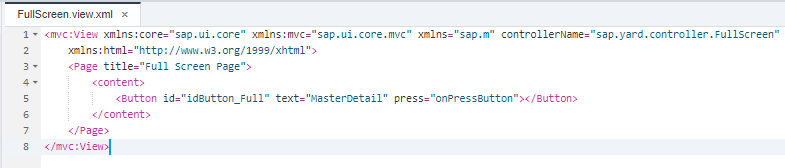
In the above image, we have created a button “MasterDetail”, clicking on that will navigate to master-detail pages.
Steps-3: Create 2 views (Main.view.xml – for master page, Empty.view.xml- for detail page)
Main.view.xml:

Empty.view.xml:
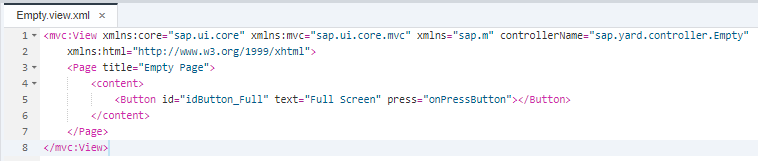
In the above image we have created a button “Full Screen”, clicking on that will navigate back to full screen page.
Step-4: Configure routes, routing and target in manifest.json
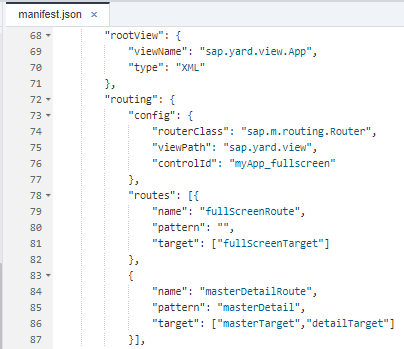
In the above manifest.json, the root view and the config along with its id is provided as shown below,
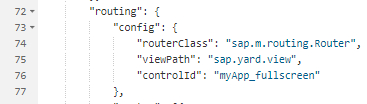
Note: Here the controlId: “myApp_fullscreen” is the id for control which can be seen in App.view.xml
The full screen page and master-detail page is defined in routes as
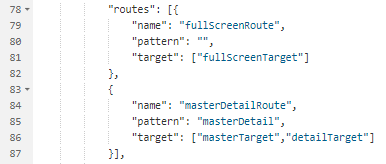
Please Note:
Name – will be provided where we are navigating to next screen
Pattern – will appear in browser hash tag
Target – will be used to display the page which should be displayed
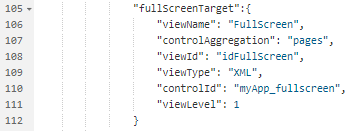
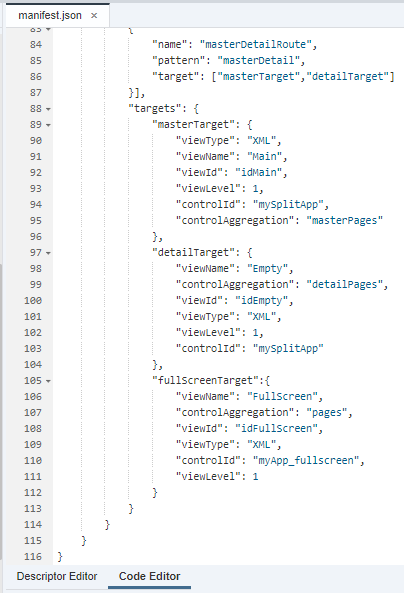
In the above image in order to load the full screen page initially with respect to control,
The “viewLevel” is set to “1”,
The “controlId” is “myApp_fullscreen” which is the control id.
Since it is a full screen page, the “controlAggregation” should be “pages” (if it is master page then it should be “masterPages”, if it is detail page then it should be “detailPages” which is shown below)

Since the master-detail page is linked with control, the controlId for splitapp control is provided here and the viewlevel is set to 1 since the master and detail page are initial display for master-detail
Step-5: Initialize router in component.js

Note: The router initialization is instantiated in init function as shown above.
Step-6: Controller.js for navigation on button click
After full screen page is displayed we need to navigate to master-detail page.
So we will write the code functionality in event handler of button in FullScreen.controller.js as:
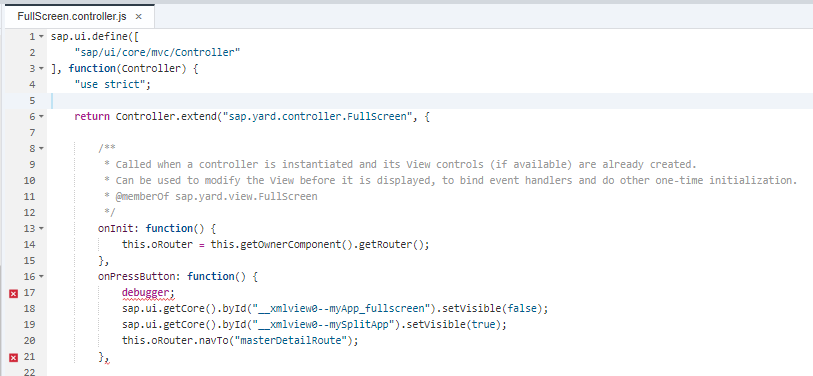
Since and controls have been used in single root view, we need to make control visibility as “false” when navigating from full screen page to master-detail page making control visibility as “true”
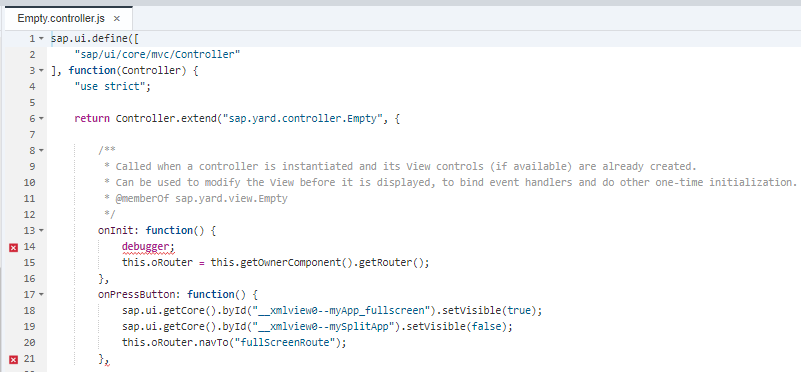
The vice versa for master-detail to full screen page is written in Empty.controller.js as
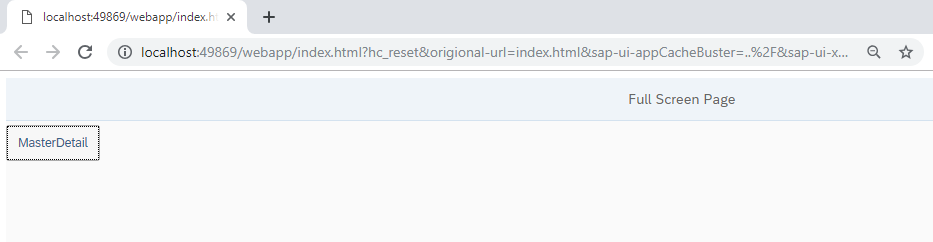
Step-7: Execute the application
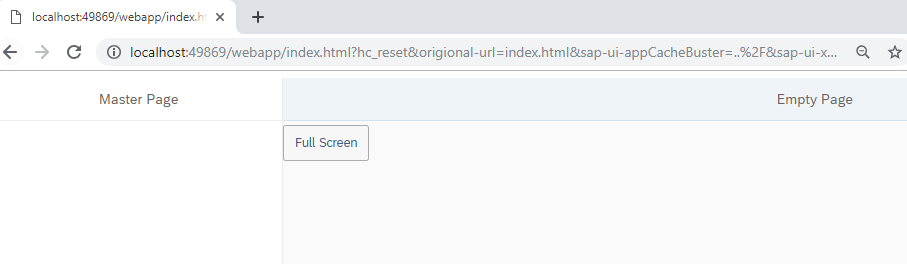
Initial display
Now the pattern is

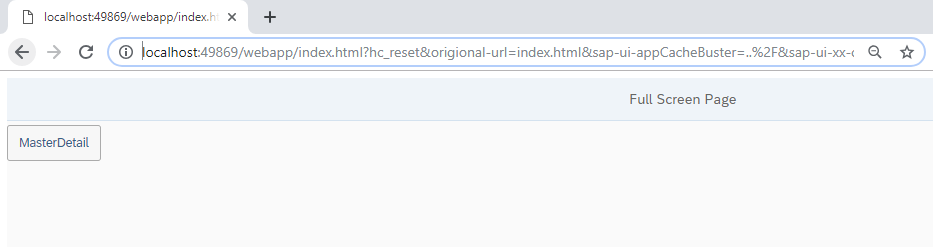
Now click “MasterDetail” button, it should navigate to master-detail page as shown below
Now the pattern is

Now click the button “Full Screen”, it should navigate back to full screen page as
ABAP developers would not help but relate the UI5 concepts with Web Dynpro. And there is nothing wrong in it. After all the principle of MVC (Model View Controller) is used in both the designs. Whatever we showed in this article, as an ABAP Web Dynpro developer, we did the same thing.
This was a simple trick to play with the visibility property of the view. But doing it for the first time is the most difficult part. Since now you learned it, you know what to do, at least conceptually, how to design such applications in real projects.


