There are various patterns of applications as per Fiori design guidelines in SAP. One of the pattern is Master Detail pattern. It can be achieved by using SplitApp Control. It is available in the sap.m library. It is meant for providing a main column on the screen typically on the left side (1/4 of the screen size) and another column on the right side(3/4 of the screen size). The left column contains a list of Items which the user can scroll through and select an appropriate item from the list. The selected item’s details are displayed on the right column which is of a larger width.
Let us continue with the example of Employee information application which we built in last tutorial and design it in a master details fashion. The left column i.e. the master view would display a List with ObjectListItem as the template of items aggregation. On click of the ObjectListItem, we would use routing with parameter to display clicked objects details on the detail page. The detail page would consist of another List control displaying projects information.
Let’s start..
In your SAP Web IDE, create a new project from template. Name it ‘demomasterdetail‘. After the project creation wizard finishes, your project structure will look like shown below.

Add SplitApp Control
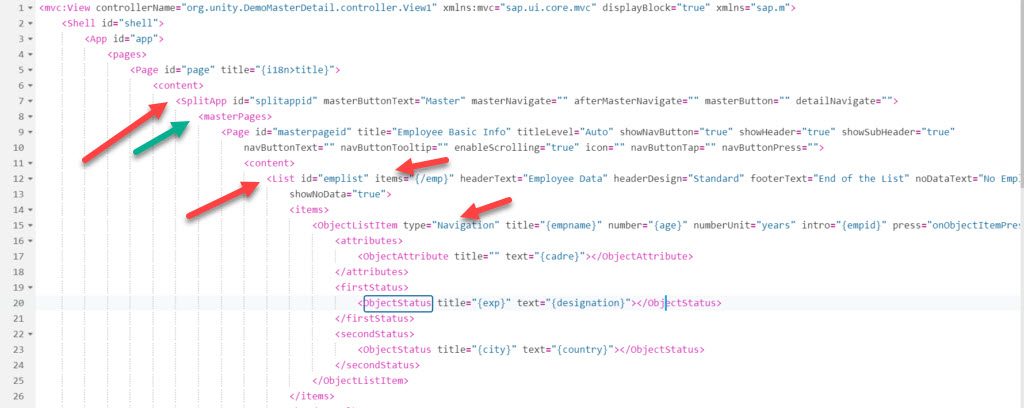
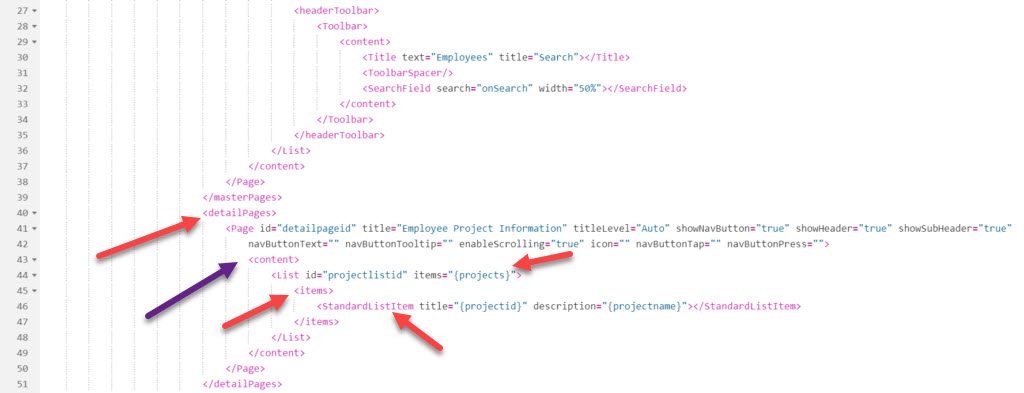
Next, add a SplitApp control in View1.xml file. SplitApp control has 2 main aggregations called masterpages and detailpages. In these aggregations, you can add multiple Master Pages and multiple Detail Pages. The SplitApp control provides navigation feature as well between the master<->master pages and detail<->detail pages. For the sake of simplicity, in this tutorial, lets add one master page and one detail page in our SplitApp. In the Master Page, we’ve added a List containing Object List Item. In the Detail Page, we’ve added a List containing Standard List Item. We’ve done binding of both these lists with a JSON model created in the controller of the view.
Further, lets add a header toolbar in the Master Page’s List Control. In this toolbar, there is a search field which does the search/filter function. Based on this explanation, the code of xml view is shown below for your reference.
<code><mvc:View controllerName="org.unity.DemoMasterDetail.controller.View1" xmlns:mvc="sap.ui.core.mvc" displayBlock="true" xmlns="sap.m">
	<Shell id="shell">
		<App id="app">
			<pages>
				<Page id="page" title="{i18n>title}">
					<content>
						<SplitApp id="splitappid" masterButtonText="Master" masterNavigate="" afterMasterNavigate="" masterButton="" detailNavigate="">
							<masterPages>
								<Page id="masterpageid" title="Employee Basic Info" titleLevel="Auto" showNavButton="true" showHeader="true" showSubHeader="true"
									navButtonText="" navButtonTooltip="" enableScrolling="true" icon="" navButtonTap="" navButtonPress="">
									<content>
										<List id="emplist" items="{/emp}" headerText="Employee Data" headerDesign="Standard" footerText="End of the List" noDataText="No Employees"
											showNoData="true">
											<items>
												<ObjectListItem type="Navigation" title="{empname}" number="{age}" numberUnit="years" intro="{empid}" press="onObjectItemPress">
													<attributes>
														<ObjectAttribute title="" text="{cadre}"></ObjectAttribute>
													</attributes>
													<firstStatus>
														<ObjectStatus title="{exp}" text="{designation}"></ObjectStatus>
													</firstStatus>
													<secondStatus>
														<ObjectStatus title="{city}" text="{country}"></ObjectStatus>
													</secondStatus>
												</ObjectListItem>
											</items>
											<headerToolbar>
												<Toolbar>
													<content>
														<Title text="Employees" title="Search"></Title>
														<ToolbarSpacer/>
														<SearchField search="onSearch" width="50%"></SearchField>
													</content>
												</Toolbar>
											</headerToolbar>
										</List>
									</content>
								</Page>
							</masterPages>
							<detailPages>
								<Page id="detailpageid" title="Employee Project Information" titleLevel="Auto" showNavButton="true" showHeader="true" showSubHeader="true"
									navButtonText="" navButtonTooltip="" enableScrolling="true" icon="" navButtonTap="" navButtonPress="">
									<content>
										<List id="projectlistid" items="{projects}">
											<items>
												<StandardListItem title="{projectid}" description="{projectname}"></StandardListItem>
											</items>
										</List>
									</content>
								</Page>
							</detailPages>
						</SplitApp>
					</content>
				</Page>
			</pages>
		</App>
	</Shell>
</mvc:View></code>
XML code’s screenshot taken from the Web IDE. Entire view’s code split in 3 screenshots.


Adjust the View Controller
Now time to code in the View’s Controller. In the onInit() method of the controller, we will create a data set which contain employees data. We will use this data set to create a JSON model and then we will set this Model in the view. Refer the code below for onInit() method of the controller.
<code>onInit: function () {
			var oEmpData = {
				"emp": [{
					"empid": "111111",
					"empname": "John Walter",
					"exp": "12",
					"age": "40",
					"city": "Tokyo",
					"country": "Japan",
					"designation": "Delivery Manager",
					"cadre": "Band 5",
					"projects": [{
						"projectid": "PGIMPL",
						"projectname": "P & G SAP Implementation"
					}, {
						"projectid": "ARMSUPPORT",
						"projectname": "Aramco Support"
					}]
				}, {
					"empid": "222222",
					"empname": "Rashid Khan",
					"exp": "3",
					"age": "24",
					"city": "Tokyo",
					"country": "Japan",
					"cadre": "Band 1",
					"designation": "Software Engineer",
					"projects": [{
						"projectid": "AIRBNB",
						"projectname": "AIRBNB Implementation"
					}, {
						"projectid": "TATA",
						"projectname": "Tata Power Support"
					}]
				}, {
					"empid": "333333",
					"empname": "Supriya Singh",
					"exp": "5",
					"age": "34",
					"city": "Tokyo",
					"country": "Japan",
					"cadre": "Band 3",
					"designation": "Sr. Software Engineer",
					"projects": [{
						"projectid": "INDIAGOV",
						"projectname": "INDIA GOV SAP Implementation"
					}, {
						"projectid": "ARMSUPPORT",
						"projectname": "Aramco Support"
					}]
				}]
			};
			var oModel = new JSONModel(oEmpData);
			this.getView().setModel(oModel);
		},</code>
Handle the Events
Further, lets add the code for event handler of onPress event of the Object List Items which are populated in the Master page of the SplitApp. In the onPress event handler, we shall derive the binding path of the item which was clicked by the user and then use this binding path to do Element binding of the List which needs to be displayed in the Detail Page of SplitApp.
Here is the code for your reference..
<code>onObjectItemPress: function (oEvent) {
			var oItem = oEvent.getSource();
			var oCtx = oItem.getBindingContext();
			var path = oCtx.getPath();
			this.getView().byId("projectlistid").bindElement(path);
		},</code>
Provision to Search
Further, lets write code for another event handler for the event which is triggered when user performs a search on the Master List. Below is the code. The comments written in this code explain each line of the code.
<code>onSearch: function (oEvent) {
			// create a blank filter array
			var aFilter = [];
			// get the string which was searched by the user
			var sQuery = oEvent.getParameter("query");
			// create new filter object using the searched string
			var oFilter = new sap.ui.model.Filter("empname", FilterOperator.Contains, sQuery);
			// push the newly created filter object in the blank filter array created above.
			aFilter.push(oFilter);
			// get the binding of items aggregation of the List
			var oBinding = this.getView().byId("emplist").getBinding("items");
			// apply filter on the obtained binding
			oBinding.filter(aFilter);

		}</code>
On the onSearch event, we are performing below activities:
- Creating an empty filter array (table)
- Getting the input search string
- Create the filter object using the searched string
- Push the filter object to the filter array
- Retrieve the binding of items aggregation of the list
- Finally apply the filter
Pre-requisites for Filter Operation
For the Filter and FilterOperator objects to work, we need to define both these in the sap.ui.define statement on top of the controller.

Download WebIDE Zipped Project
With this, our development is complete. You may import the attached Master Detail Project to your WebIDE in case you want to refer to my development.
Take this Free Video Course on ABAP 7.4 for S/4HANA
Testing Time
Lets now run the application to see our Master Detail Application in action. Click on the run icon shown on the toolbar of your WebIDE. This will launch the application in a new browser window. The application is not yet deployed on any repository like ABAP, Cloud, GIT etc.. It is running on the SAP WebIDE.
Output…
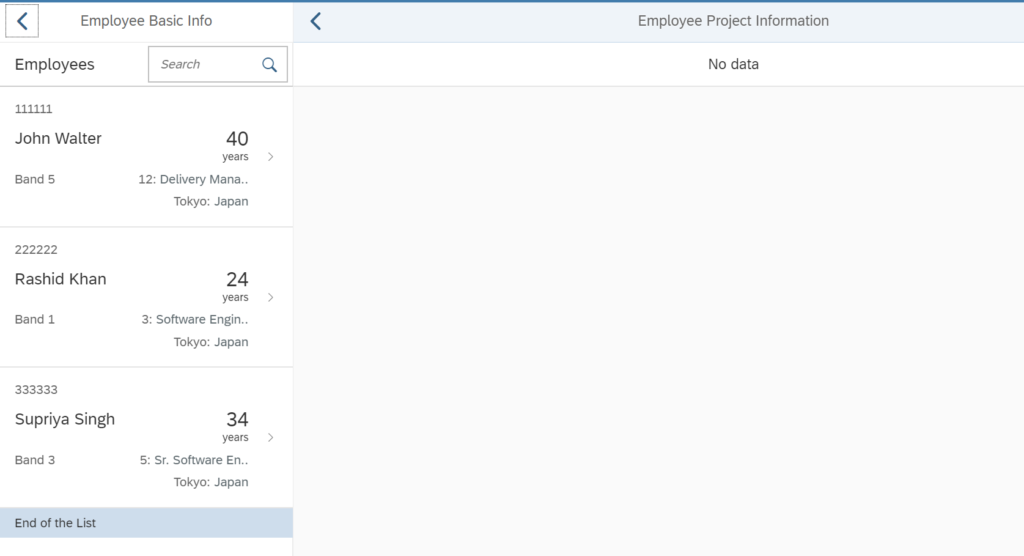
By default no employee is selected, so the detail page does not show any projects information and shows a ‘No Data’ text.

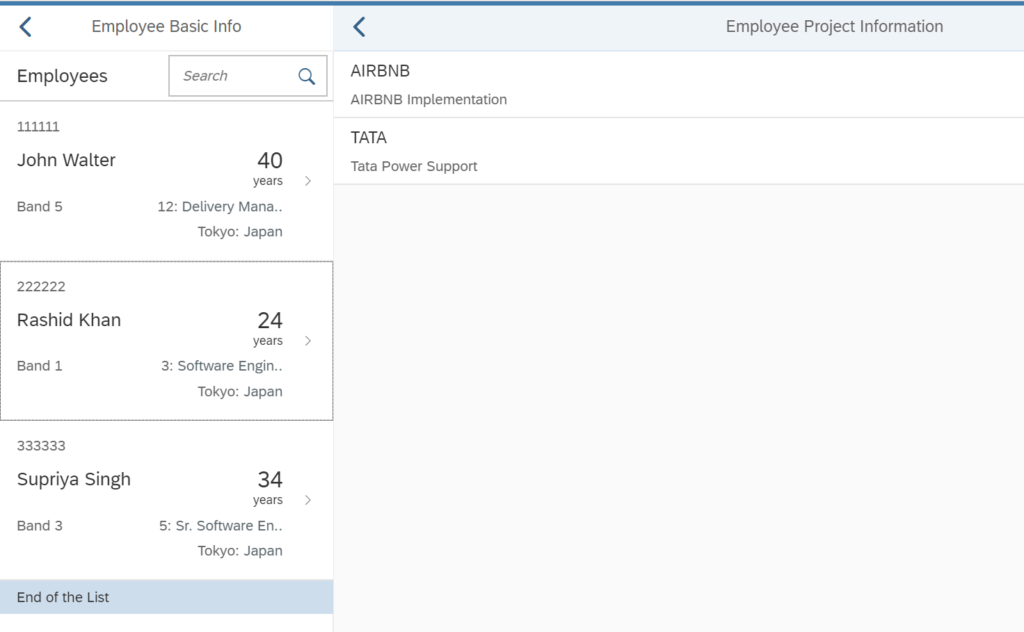
When an employee info form the Master list is clicked, corresponding project details are shown in the Detail section by the virtue of Element binding.

Enter a Search term in the Search Field in the Master Section. List will be filtered based on empname attribute of the JSON Model.


