This post explains the introduction and utilization of various data binding that can occur during the sapui5 program.
SAPUI5 Data Binding
Applications do a lot of data work, such as data imported from outside, data created by internal needs, data before user input values are received and stored in the database, and data that have been calculated or processed by business. Among them, we will find out how to output data to Control (Lable, Button, Table, etc.), input, or import selected data.
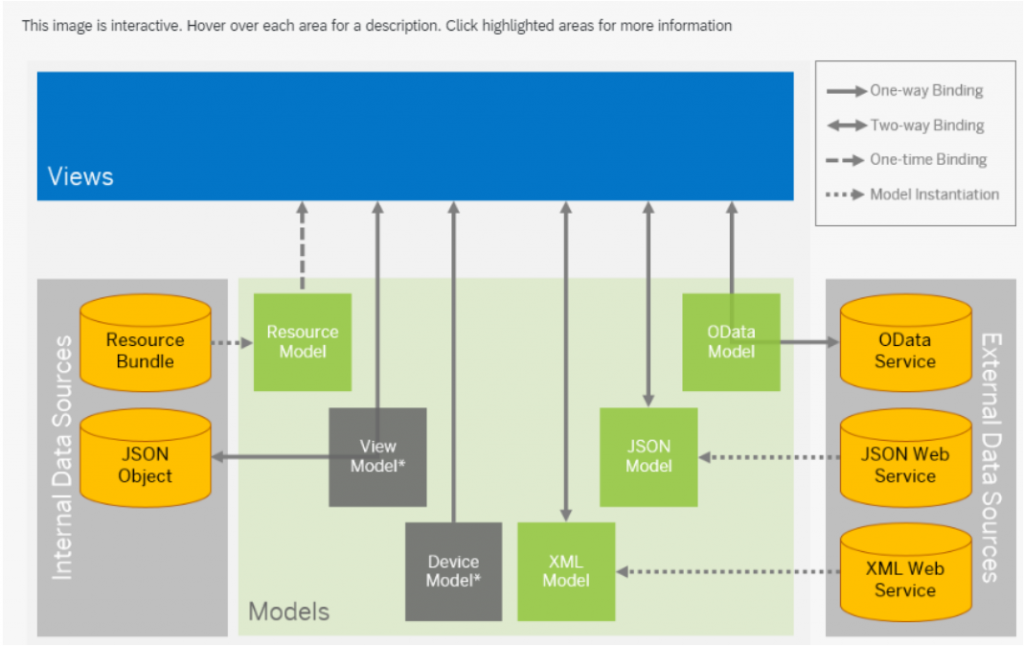
Model values used in view can be used in several ways. Let’s look at the following.
/* Bind the specified value in the model*/
<Input value="{/firstName}"/>

/* model uses a value for a specified path and defines it as a specified type*/
<Input value="{path: '/firstName', type: 'sap.ui.model.type.String'}"/>

/* Use the value of the specified path in the model and change it to a custom formatter */
<Input value="{path: '/firstName', formatter: 'my.globalFormatter'}"/>

/* Event occurs when the value of the designated path is used in the model and the value is changed */
<Input value="{path: '/firstName', events: { dataRequested: '.onMyDataRequested'}"/>

/* Select and use a number of designated paths in the model*/
<TextField value="{
	parts: [
		{path:'birthday/day'},
		{path:'birthday/month'},
		{path:'birthday/year'}
	],
	formatter:'my.globalFormatter'
}"/>

/* Use some custom formators while selecting multiple specified paths in the model*/
<Text text="{path:'gender', formatter:'.myGenderFormatter'} {firstName}, {lastName}"/>

/* Compare the specified value in the model with a control statement and express it as the desired value*/
<ObjectStatus state=="{= ${products>UnitPrice}  > ${/priceThreshold} ? 'Error' : 'Success' }"/>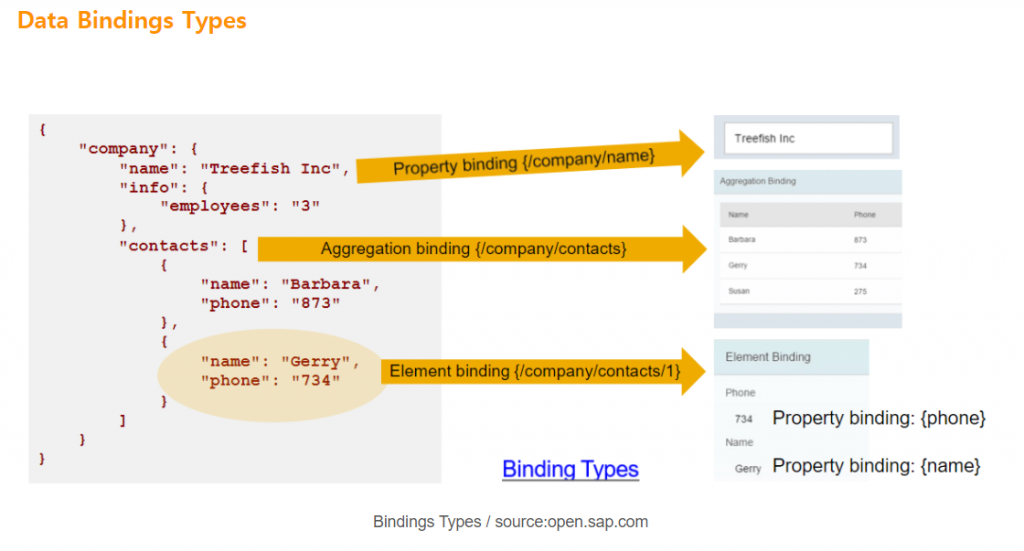
There are four types of binding for data binding.
- Context Binding (Element Binding)
- Property binding
- Aggregation binding
- Expression binding
Check how data binding is configured and used.
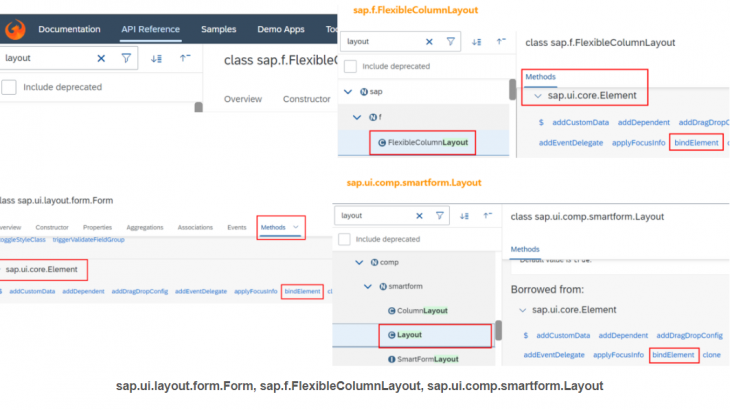
1. Context Binding(Element binding)
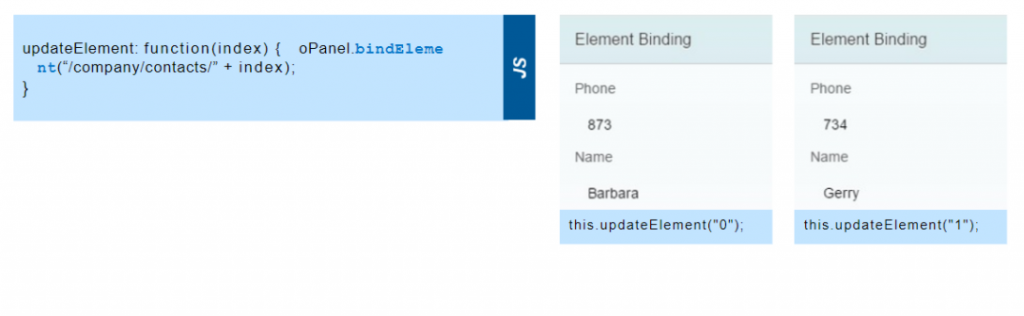
Element binding is useful for containers and layouts containing other controls. All of these child controls are required to use the same model object or the properties of the model node, so it is recommended to use element binding.
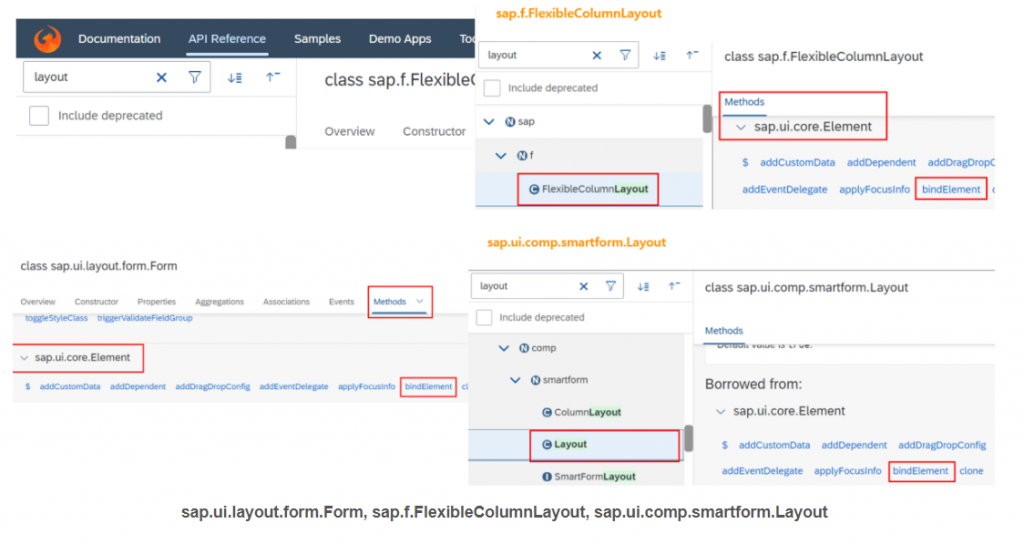
Check the Control Methods in the SAPUI5 SDK API Reference. Most of the Layout Controls support functions, so let’s take a look
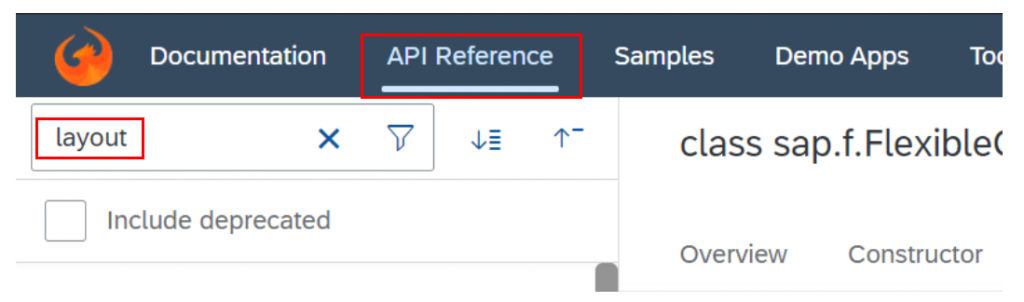
Check sap.ui.core.element on the Methods tab and use it if you have a bind element as follows.
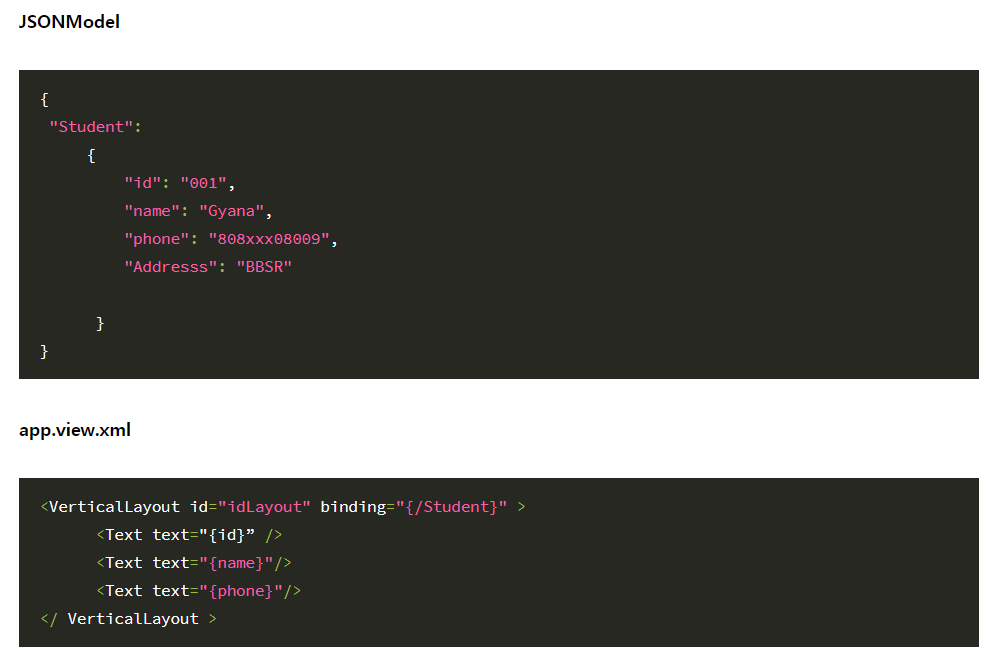
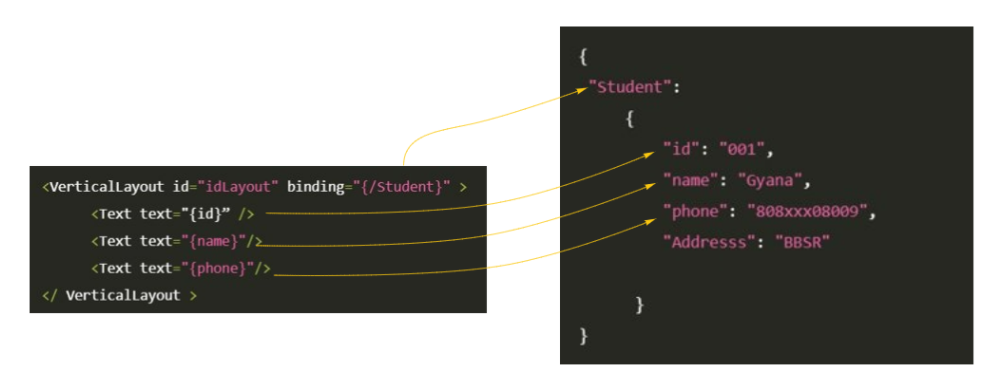
If binding={“/Student”} is specified, the sub-next location can be used immediately without using all paths.
2. Property binding
Property, the binding control properties of the automatically can reset, you can update the data
The control bindproperty xml, you can use in view
Property Text.view.xml
<Button id="buttonDisplay" text="Display" visible="{oUi>/readMode}"/>
<Button id="buttonEdit" text="Edit" visible="{oUi>/editMode}"/>
<Button id="buttonSave" text="Save" visible="{oUi>/saveMode}"/>
<Button id="buttonDelete" text="Delete" visible="{oUi>/deleteMode}"/>
Property Text.controller.js
//pageMode C Create, V View, E Edit
var oUi = new JSONModel({
    readMode : true,
    editMode : false,
    createMode : false
});
// Register the model under the name of "oUi".
this.setModel(oUi, "oUi");

// onSearchButtonPressPress Event
onSearchButtonPress: function () {
// If you click the inquiry button, it will be exposed to the screen.
oUi.setProperty("/readMode", true);
// Expose the function so that it can be modified when clicking the inquiry button.
oUi.setProperty("/editMode", true);
// When clicking the inquiry button, it is not in the modification mode, so it is not exposed to the screen.
oUi.setProperty("/saveMode", false);
// When clicking the inquiry button, it is not in the modification mode, so it is not exposed to the screen.
oUi.setProperty("/deleteMode", false);
}
a) The onSearchButtonPress function controls the items to be exposed to the user screen using the visual value of the contol registered in xml.
{
		"sfc" : {
		     "name"  : "Neo."
         }
}
b) It can also be applied as an input control value.
<mvc:View
	controllerName="com.sfc.App"
	xmlns="sap.m"
	xmlns:mvc="sap.ui.core.mvc">
	<Input id="inputName"	value="{/sfc/name}"/>
</mvc:View>
c) You can use bindproperty depending on the situation.
var oInput = this.getById("inputName");
oInput.bindProperty("value", "/sfc/name");
d) Values can be used through calculations or control statements.
var oImage= this.getById("image");
oImage.bindProperty("src", "/sfc/trusted", function(bValue) {
	return bValue ? "green.png" : "red.png";
});
3. Aggregation binding
Aggregation binding is used to automatically create child controls according to model data.
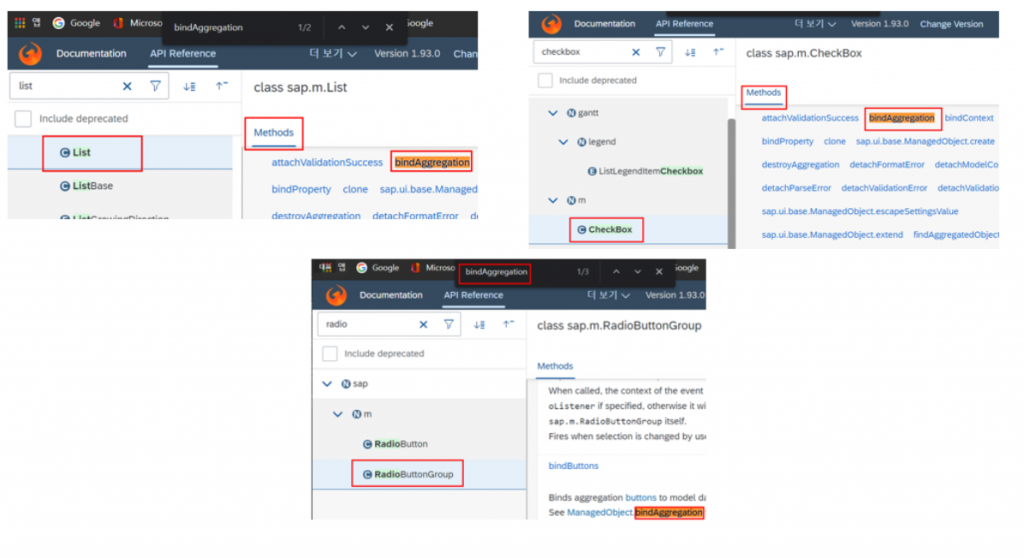
After searching and selecting Control in the SAPUI5 SDK API Reference, most of them are available if bindaggregation is in the method. It is mainly a control that can be used if ListItem, List is included in the control name.
a) {name} and {city} are repeated and output in the order of the JSONModel companies array below.
{
	companies : [
		{
			name : "Acme Inc.",
			city: "Belmont",
			state: "NH",
			county: "Belknap",
			revenue : 123214125.34
		},{
			name : "Beam Hdg.",
			city: "Hancock",
			state: "NH",
			county: "Belknap"
			revenue : 3235235235.23
		},{
			name : "Carot Ltd.",
			city: "Cheshire",
			state: "NH",
			county: "Sullivan",
			revenue : "Not Disclosed"
		}]
}
b) can dynamically create a control template, you can take advantage of.
var oItemTemplate = new sap.ui.core.ListItem({text:"{name}"});
oComboBox = new sap.m.ComboBox({
	items: {
		path: "/companies",
		template: oItemTemplate
	}
});

var oItemTemplate = new sap.ui.core.ListItem({text:"{name}"});
var oComboBox.bindAggregation("items", "/companies", oItemTemplate)

//unbind aggregation Remove bind aggregation.
oComboBox.unbindAggregation("items");
*Important: The list size of the model is up to “100”. You can’t see it even if you bring more.
https://sapui5.hana.ondemand.com/#/api/sap.ui.model
4. Expression binding
Expression binding is a method of using binding values for control in XML without comparing or calculating them in controller.
Control events such as press can be controlled by the controller, and in the case of button, area, or selection, good processing use in xml can significantly reduce the amount of code.
{=expression}
It will be applied as soon as the model value changes.
/* -------------------------------------------------------------------------- */
{:=expression}
If the model value changes, it will be applied only once.

// CreateMode is ModelData.
/* -------------------------------------------------------------------------- */
createMode = false
<Label visible="{=${oUi>/createMode}}"/>
Result : false
/* -------------------------------------------------------------------------- */
createMode = false
<Label text="{=${oUi>/createMode}===false?'TRUE':'FALSE'}"/>
Result: TRUE
/* -------------------------------------------------------------------------- */
createMode = true
<Label text="{=${oUi>/createMode}==='false'?'TRUE':'FALSE'}"/>
Result : FALSE
/* -------------------------------------------------------------------------- */
/* =! Denial */
createMode = true
<Label text="{=!${oUi>/createMode}}"/>
Result : false
/* -------------------------------------------------------------------------- */
createMode = true
text="{= ${createMode} === true ? 'Yes':'No'}"
Result : Yes.
/* -------------------------------------------------------------------------- */
Or conditions ||
createMode = true
visible="{= !${createMode} || ${editMode}}
Result : true or false when createMode=false or editMode=true
/* -------------------------------------------------------------------------- */
And conditions & conditions & conditions
visible="{= !${createMode} || ${editMode}}
Result : true or false when createMode=false or editMode=true
Other ways to use it.
| Syntax Element | Symbol |
| Literal | number, for example 42, 6.022e+23 or -273.15 object, for example {foo: ‘bar’} string, for example ‘foo’ null true false |
| Grouping | (…), for example 3 * (4 + 10) |
| Unary operator | ! + – typeof |
| Multiplicative operator | * / % |
| Additive operator | + – |
| Relational operator | < > <= >= |
| Strict equality operator | === !== |
| Binary logical operator | && || |
| Conditional operator | ? |
| Member access operator with the . operator | Note With these, you can use members and member methods on standard types such as such as string, array, number, and so on. Example: {$message>/}.length}>0 or ${/firstName}.indexOf(‘S’). |
| Function call | f(…) Note You can use functions that are available via global symbols, such as Math.max(…) or isNaN(…). |
Array literals | […], for example [2,3,5,7,11] |
| Property/array access | o[…], for example ‘foo/bar’.split(‘/’)[1] |
| in operator | ‘PI’ in Math (true) or 0 in [] (false) |
| Global symbol | Array, Boolean, Date, encodeURIComponent, Infinity, isFinite, isNaN, JSON, Math, NaN, Number, Object, parseFloat, parseInt, RegExp, String, undefined |
#Exercise : Data Binding
Step 1. Create databind project (Business Application Studio)
user: projects $ yo
? 'Allo neo! What would you like to do? @sap/fiori

Make sure you are in the directory you want to scaffold into.
This generator can also be run with: yo @sap/fiori

? Application Type SAPUI5 freestyle
? Which floorplan do you want to use? SAPUI5 Application
? Data source None
? View name App
? Module name databind
? Application title SAPUI5 DataBinding
? Application namespace com.sfc
? Description SAP Fiori Cafe(SFC) - SAPUI5 Beginner UINIT9 Data Binding
? Project folder path /home/user/projects
? Add deployment configuration No
? Add FLP configuration No
? Configure advanced options No
Step 2. Element binding test

- Modify the App.view.xml file for the Element binding test.
- add control
1) Add Panel Layout control items and control to the area.
2) Panel header Text grants element binding.
3) Input control id grants inputName.
<content>
    <Panel headerText="Element binding">
        <Input id="inputName"/>
    </Panel>
</content>- App.controller.js registers the JSON model to be used for element binding.
onInit: function () {
    var oJSONModel =  new JSONModel({
        "Student": {
            "id": "001",
            "name": "Neo",
            "phone": "010-2265-0000",
            "Addresss": "SAP Fiori Cafe"
        }
    });
}
4. After adding a getModel(), setModel() method that allows you to register and view the model, register the JSONModel as a model in the current View. This.getView().setModel(oJSOModel) registers JSOModel as the default in View connected to the current controller.js. If you use setModel() without a model name, you can use it without a model name.
onInit: function () {
    var oJSONModel =  new JSONModel({
        "Student": {
            "id": "001",
            "name": "Neo",
            "phone": "010-2265-0000",
            "Addresss": "SAP Fiori Cafe"
        }
    });
    this.getView().setModel(oJSONModel);
},
getModel : function (sName) {
    return this.getView().getModel(sName);
},

setModel : function (oModel, sName) {
    return this.getView().setModel(oModel, sName);
}- this.Use byId to assign the value control “id” to the inputName.
- Grant Student to the inputName.bindElement.
- Allocate the JSONModel “name” to the value property using the inputName.bindProperty.
onInit: function () {
    var oJSONModel =  new JSONModel({
        "Student": {
            "id": "001",
            "name": "Neo",
            "phone": "010-2265-0000",
            "Addresss": "SAP Fiori Cafe"
        }
    });
    this.getView().setModel(oJSONModel);
    var oinputName = this.byId("inputName");
    oinputName.bindElement("/Student");
    oinputName.bindProperty("value", "name");
}
8. Check the result with npm start run at Terminal.
Step 3. Property binding test
1) Add panel control.
2) Panel headerText=”Property binding”
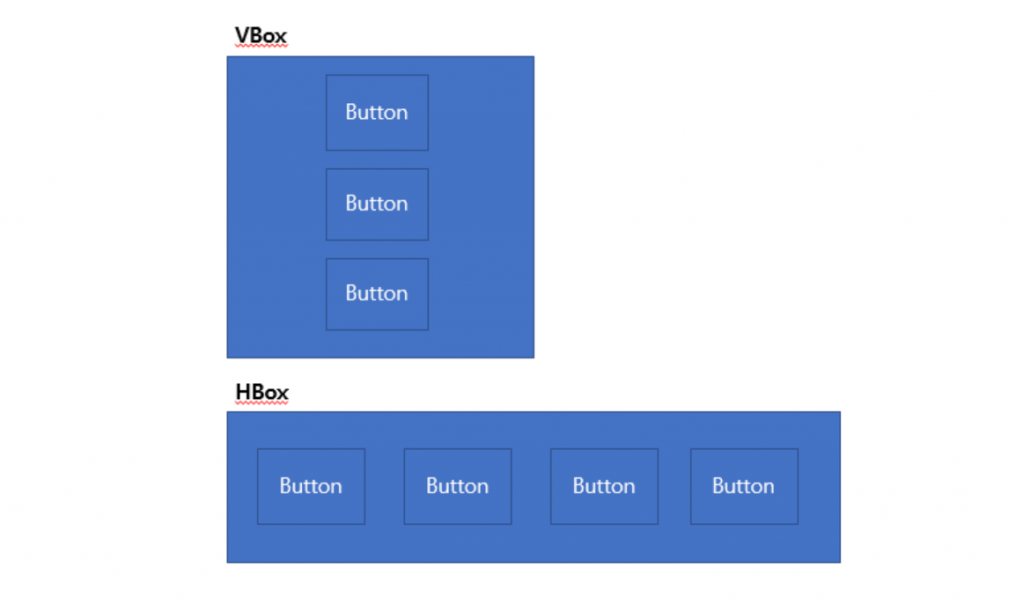
3) When configuring Layout, use Vertical Alignment Layout (VBox) and Horizontal Alignment Layout (HBox) and add Buton.
4) In Buton, visibility determines Buton’s exposure.
5) width=”4em” is assigned to give HBox spacing.
<Panel headerText="Property binding">
        <VBox>
            <HBox class="sapUiSmallMarginBottom">
                <HBox width="4em">
                    <Button id="buttonDisplay" text="Display" />
                </HBox>
                <HBox width="4em" class="sapUiTinyMarginBegin">
                    <Button id="buttonEdit" text="Edit" />
                </HBox>
                <HBox width="4em" class="sapUiTinyMarginBegin">
                    <Button id="buttonSave" text="Save"/>
                </HBox>
                <HBox width="4em" class="sapUiTinyMarginBegin">
                    <Button id="buttonDelete" text="Delete"/>
                </HBox>
            </HBox>
        </VBox>
</Panel>
6) Add the following JSON model to determine the exposure of each button according to the state.
App.controller.js > onInit : function()
var oProPerty =   new JSONModel({
                    readMode : true,
                    editMode : false,
                    saveMode : false,
                    deleteMode : false
                });
7) Register your property using the button control property visibility.
Use model name> when using a model registered as a *set Model.
<Panel headerText="Property binding">
        <VBox>
            <HBox class="sapUiSmallMarginBottom">
                <HBox width="4em">
                        <Button id="buttonDisplay" text="Display" visible="{oProPerty>/readMode}" />
                </HBox>
                <HBox width="4em" class="sapUiTinyMarginBegin">
                    <Button id="buttonEdit" text="Edit" visible="{oProPerty>/editMode}"/>
                </HBox>
                <HBox width="4em" class="sapUiTinyMarginBegin">
                    <Button id="buttonSave" text="Save" visible="{oProPerty>/saveMode}"/>
                </HBox>
                <HBox width="4em" class="sapUiTinyMarginBegin">
                    <Button id="buttonDelete" text="Delete" visible="{oProPerty>/deleteMode}" />
                </HBox>
            </HBox>
        </VBox>
</Panel>
8) In the process of number 6, the values of the model were applied and the currently exposed button display was visible.
var oProPerty = new JSONModel({
    readMode : true,
    editMode : false,
    saveMode : false,
    deleteMode : false
});
9) Add a press event method to Buton and add the code to App.view.xml in response to Buton.
<Panel headerText="Property binding">
    <VBox>
        <HBox class="sapUiSmallMarginBottom">
            <HBox width="4em">
                 <Button id="buttonDisplay" text="Display" visible="{oProPerty>/readMode}" press=".onButtonPress('display')"/>
            </HBox>
            <HBox width="4em" class="sapUiTinyMarginBegin">
                <Button id="buttonEdit" text="Edit" visible="{oProPerty>/editMode}" press=".onButtonPress('edit')"/>
            </HBox>
            <HBox width="4em" class="sapUiTinyMarginBegin">
                <Button id="buttonSave" text="Save" visible="{oProPerty>/saveMode}"  press=".onButtonPress('save')"/>
            </HBox>
            <HBox width="4em" class="sapUiTinyMarginBegin">
                <Button id="buttonDelete" text="Delete" visible="{oProPerty>/deleteMode}"  press=".onButtonPress('delete')"/>
            </HBox>
        </HBox>
    </VBox>
</Panel>
10) Implement the press method in App.controller.js.
onButtonPress(arg){
    sap.m.MessageToast.show(arg); //Check the parameters.
    var oProPerty = this.getModel("oProPerty"); // Refer to the oPropertyJSONModel.
    var oUi = this.getModel("oUi");
   // Button initializes every event.
    oUi.setProperty("/readMode", false);
    oUi.setProperty("/editMode", false);
    oUi.setProperty("/saveMode", false);
    oUi.setProperty("/deleteMode", false);

    switch(arg){  // Controls the parameter value to switch. Expose only the necessary button.
        case "display":
            oProPerty.setProperty("/editMode", true);
        break;
        case "edit":
            oProPerty.setProperty("/readMode", true);
            oProPerty.setProperty("/saveMode", true);
            oProPerty.setProperty("/deleteMode", true);
        break;
        case "save":
            oProPerty.setProperty("/readMode", true);
            break;
        break;
    }
},
11) Run( npm start run)
Step 4. Aggregation binding test
1) Add an array-type structure (Study Type) to the oJSON model.
var oJSONModel = new JSONModel({
"Student": {
"id": "001",
"name": "Neo",
"phone": "010-2265-0000",
"Addresss": "SAP Fiori Cafe"
},
"StudyType" : [{
"title": "Fiori",
"code": "001",
"desc": "SAP Fiori",
"maxnum": "7",
"Status" : "A"
}, {
"title": "SAPUI5",
"code": "002",
"desc": "SAP SAPUI5",
"maxnum": "5",
"Status" : "B"
}, {
"title": "CDS VIEW",
"code": "003",
"desc": "SAP CDS VIEW",
"maxnum": "6",
"Status" : "C"
}
]
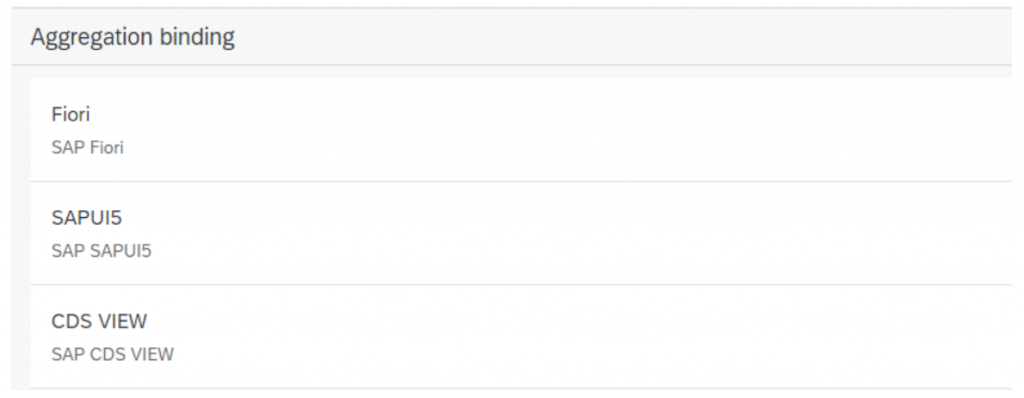
});2) Add a panel and determine the header Text value aggregation binding. To output array-type data, use List control and assign the StudyType added to the oJSON model to the items property. In StandardListItem, assign values to Title, description.
<Panel headerText="Aggregation binding">
    <List id="StudyTypeList" items="{/StudyType}">
        <items>
            <StandardListItem
                title="{title}"
                description="{desc}"
            />
        </items>
    </List>
</Panel>
3) run (npm start run)
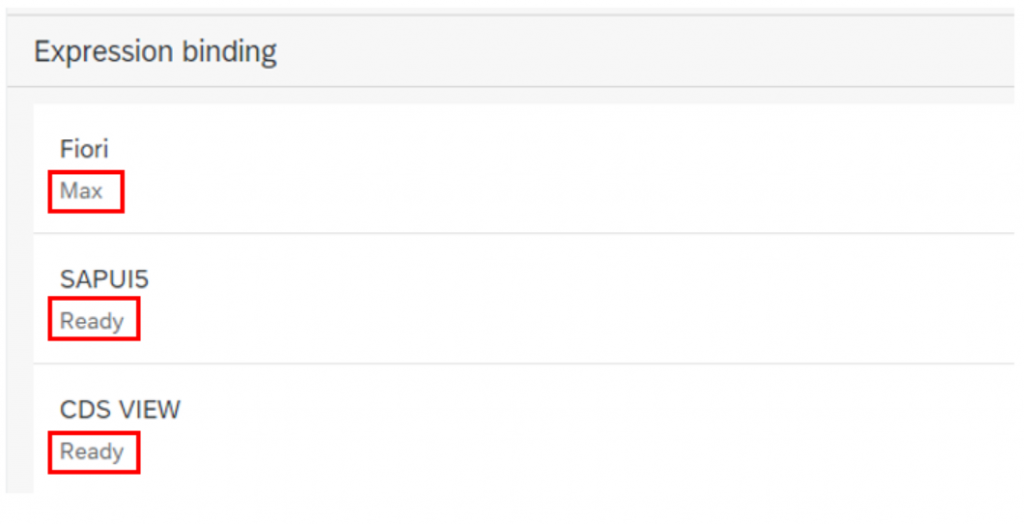
Step 5. Expression binding test
- Copy the aggregation panel value and change the title. If the maxnum value in the <StandardListItem description item is greater than 6, “Max If not, make sure to print Ready.
<Panel headerText="Expression binding">
    <List  items="{/StudyType}">
        <items>
            <StandardListItem
                title="{title}"
                description="{=${maxnum} > 6 ?'Max':'Ready'}"
            />
        </items>
    </List>
</Panel> - Run ( npm start run)
*Important: DataBinding, Model parts are used and used differently depending on the communication method, communication type, model type, etc. Make sure to make sure! You have to refer to it.


