Scenario
SAP Successfactors Time off provides an option of having a temporary work schedule / shift assigned to an employee for a short duration of time which might be required due to various business needs.
As per the current process, once the HR admin gets the required inputs from the manager or the supervisor, they have to access time administration section of the employee, provide the necessary details and complete the transaction. This involves the below steps
- Navigate to employee profile
- Navigate to Time section of employee. Direct navigation to Administer Time section is also possible
- Navigate to Work schedule section
- Click on Temporary assignment
- Select the start date and end date of the assignment
- Select the new work schedule from the list
- Press Assign
- Check the assignment
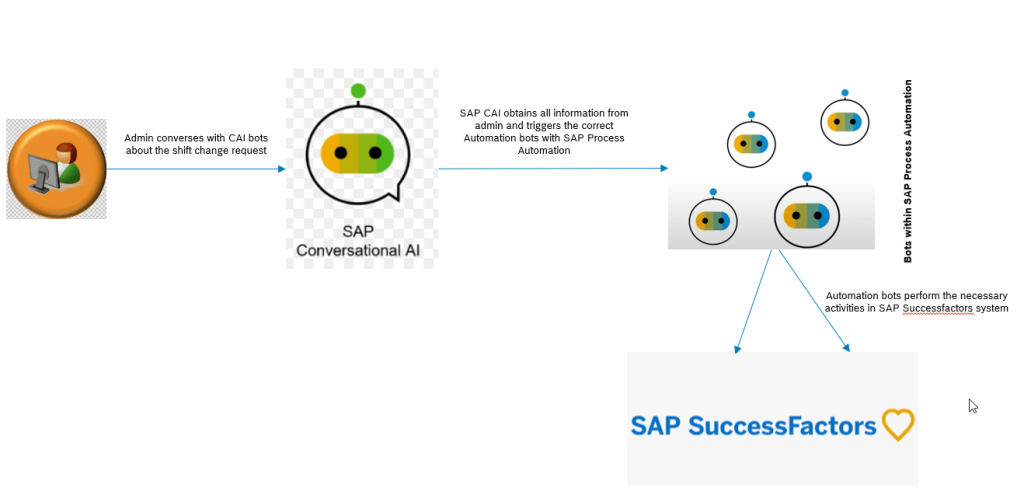
Overview of Automated process
The above manual steps of admin performing the assignment of temporary shift can be replaced with admin conversing with SAP CAI in simple languages. SAP CAI then gets the necessary info and triggers the automation artifact within SAP process automation which in turn performs the required steps in SAP Successfactors system.
Configuration Steps
Pre-requisites
- SAP BTP Free tier account should be available – Details are already provided in the challenge announcement blog post
- SAP Process automation services to be setup using the boosters —SAP Process Automation: Free Tier is out, create your own automations!
- SAP RPA Desktop agent to installed. Desktop agent Setup
SAP CAI Configuration
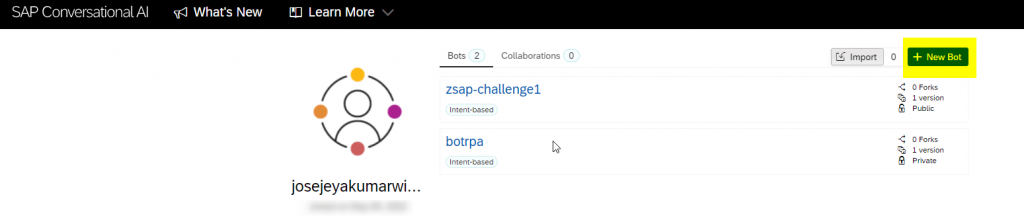
Navigate to SAP CAI and create a new bot.
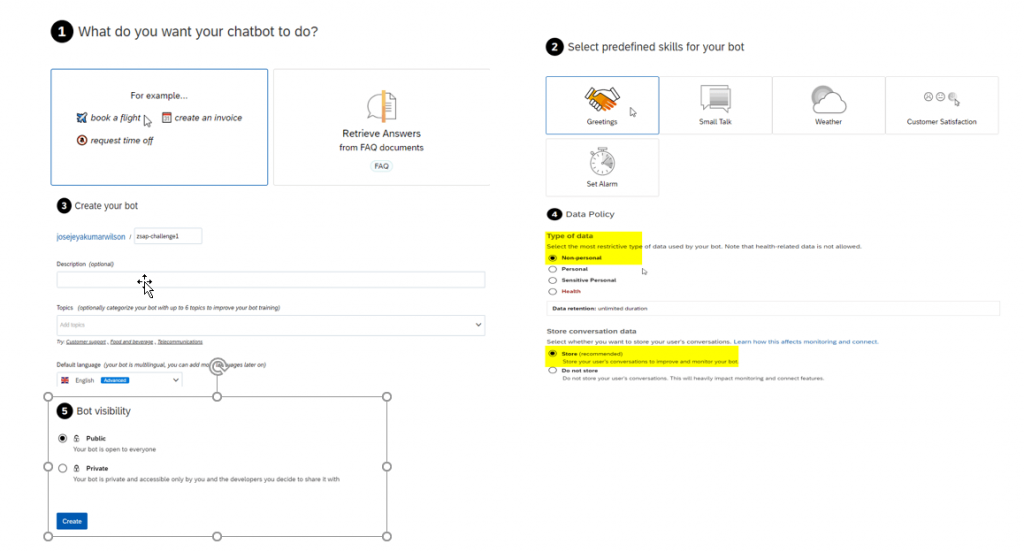
Select ‘Perform Actions’ as we need the bot to perform a task/transaction
For this use case, I selected Greetings alone as a predefined skill for the bot.
Provide a valid name, other details like type, storage and visibility as below and then create the bot.
Intents and entities
The below intents, expressions and entities were created

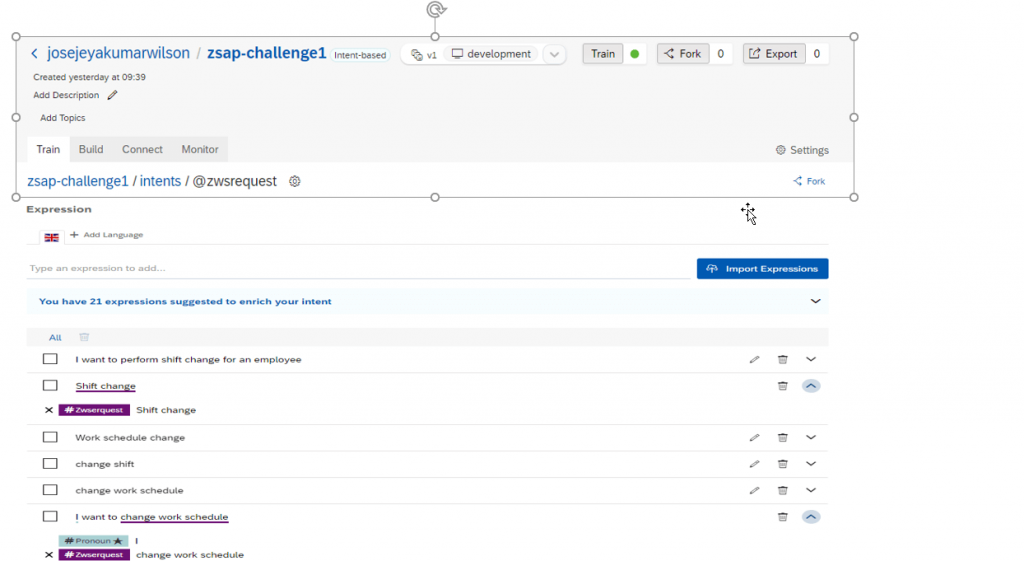
- To identify the change shift request
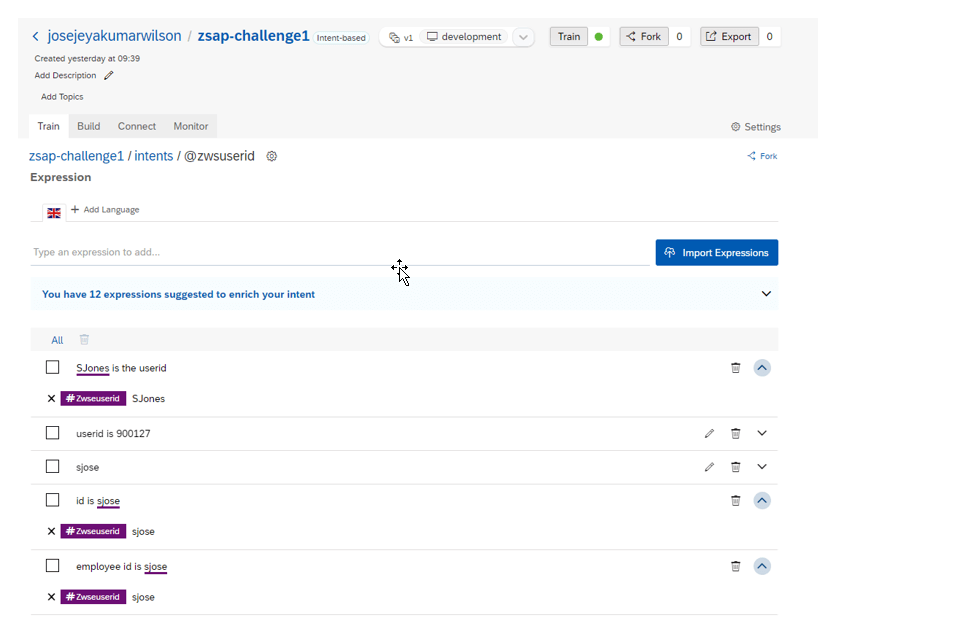
- to identify the user id
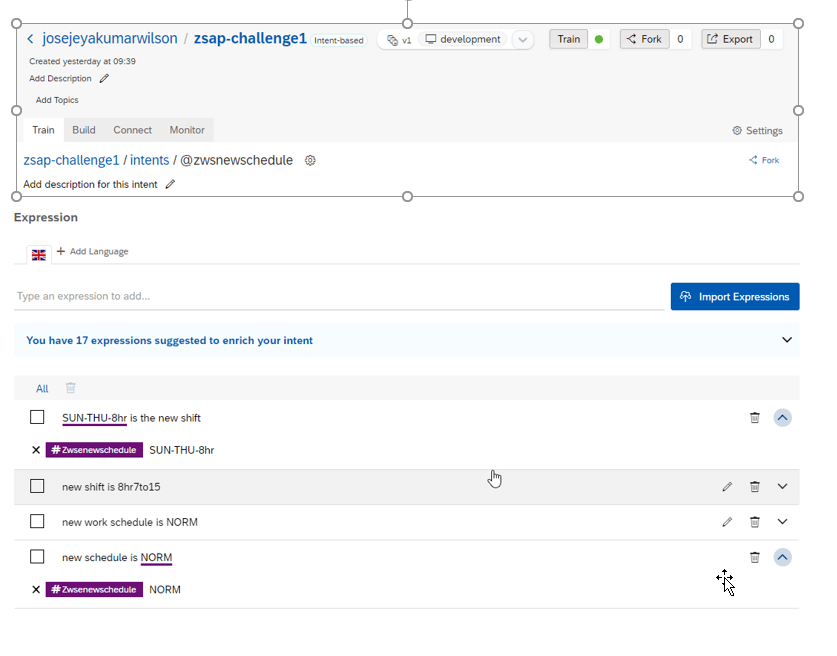
- to identify the new work schedule/shift
- to identify the start and end dates of the shift assignment
Skills creation
The below skills were added from the build section of the bot.
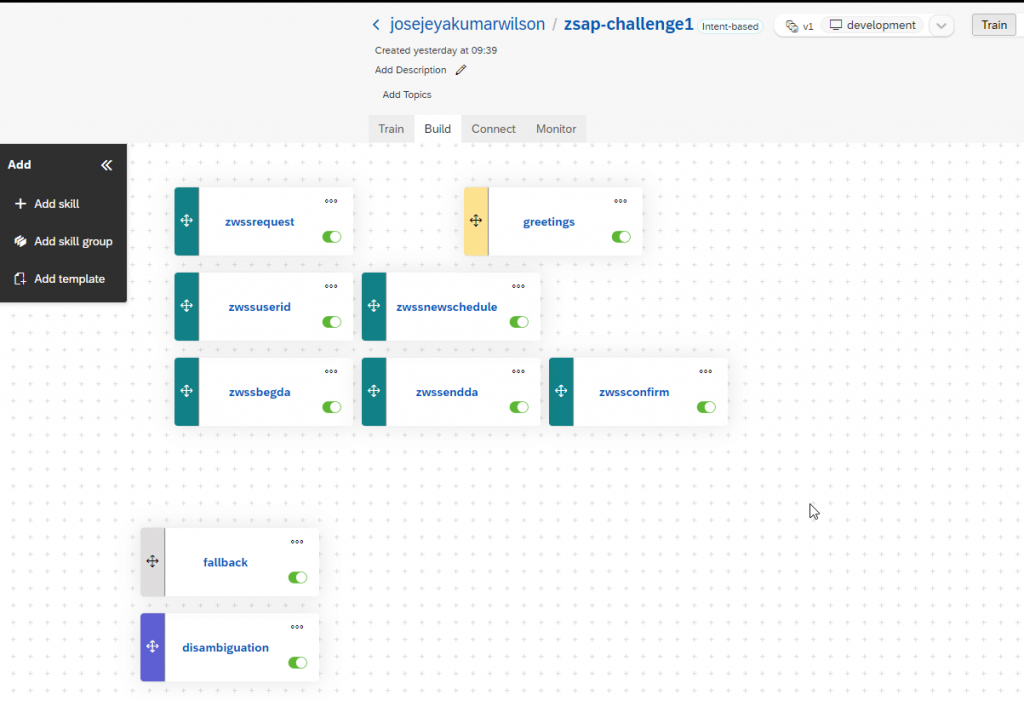
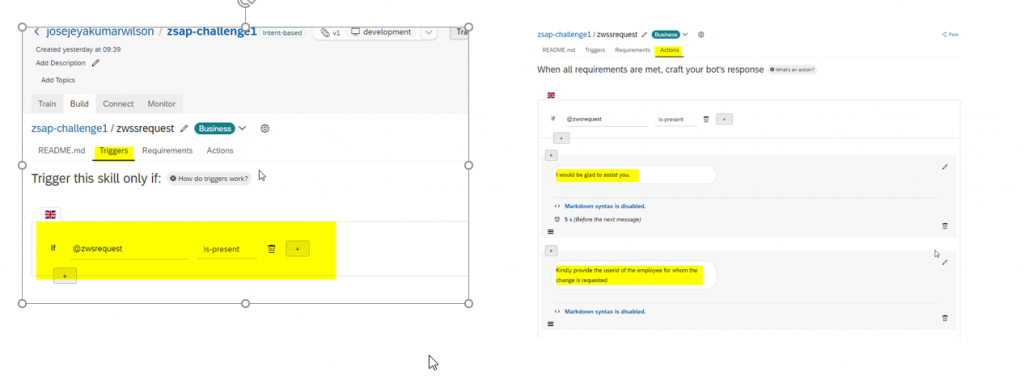
Skill zwsrequest
The intent for change request is checked as part of the Triggers and the message to be displayed is configured in the actions section
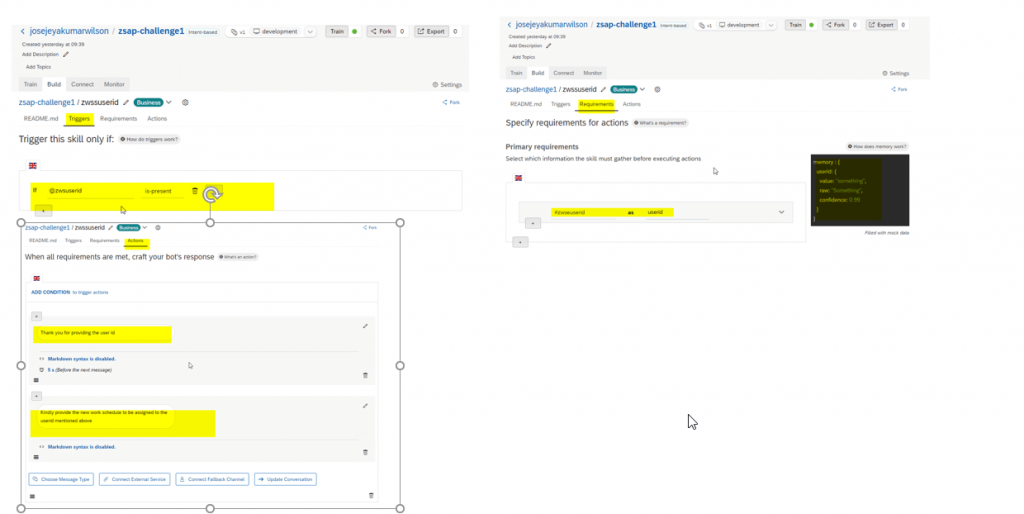
Skill zwssuserid
The intent for the user details is checked and the user details are stored as a memory variable in the requirements section. The Actions section is configured for subsequent messages.
Skill zwssnewschedule
The intent for the new work schedule is checked and the new work schedule are stored as a memory variable in the requirements section. The Actions section is configured for subsequent messages.

Skills for Start Date and End date
Skills for the duration is created as same as the above skills, requirements are determined and the subsequent messages are configured in the action sections.
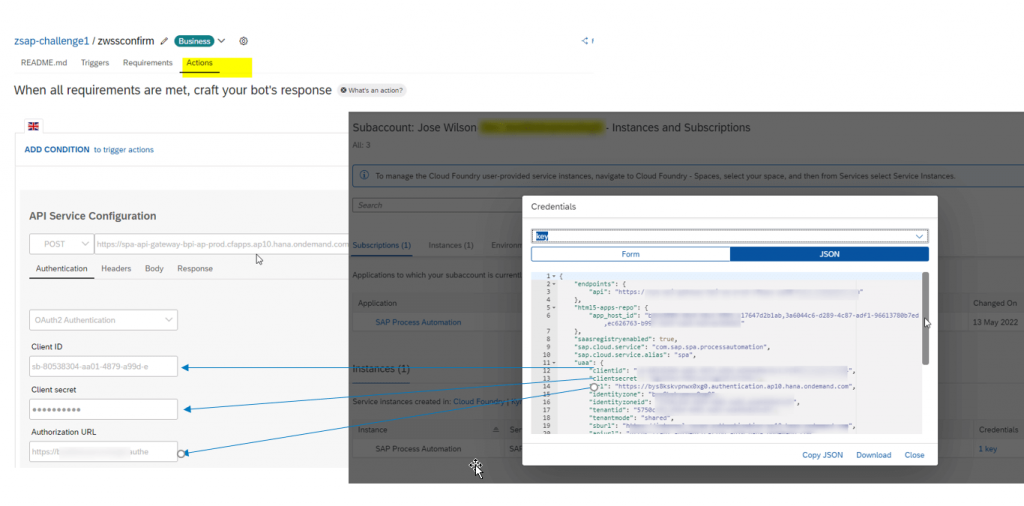
Skill zwssconfirm
Once all the necessary details are obtained from the skills above, zwssconfirm skill connects to SAP process automation and triggers the respective automation bot.
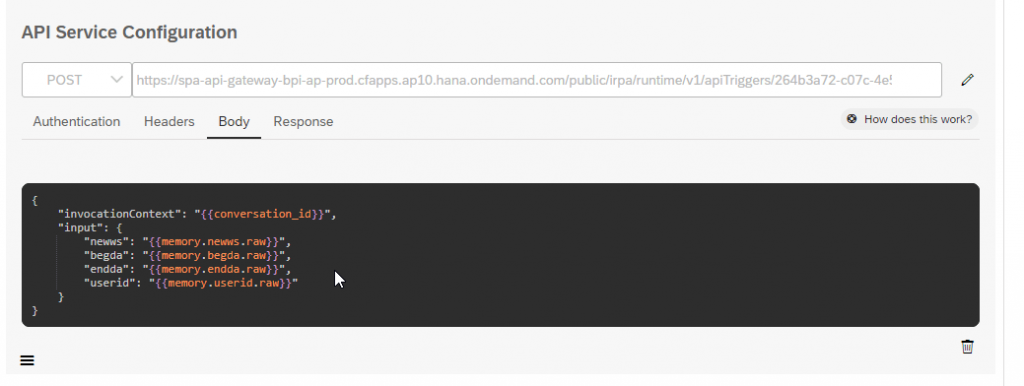
The oauth details have to be obtained from the service instance credentials created for SAP process Automation instance within SAP BTP.
The POST API URL is obtained from the deployed automation artifact within SAP Process automation. Kindly refer to ‘Deployment and Notification trigger’ within SAP Process Automation configuration section below
The value mentioned against irpa-api-key is obtained from the deployed SAP process Automation artifact. Kindly refer to ‘Deployment and Notification trigger’ within SAP Process Automation configuration section below. You can update the value once automation artifact is deployed.
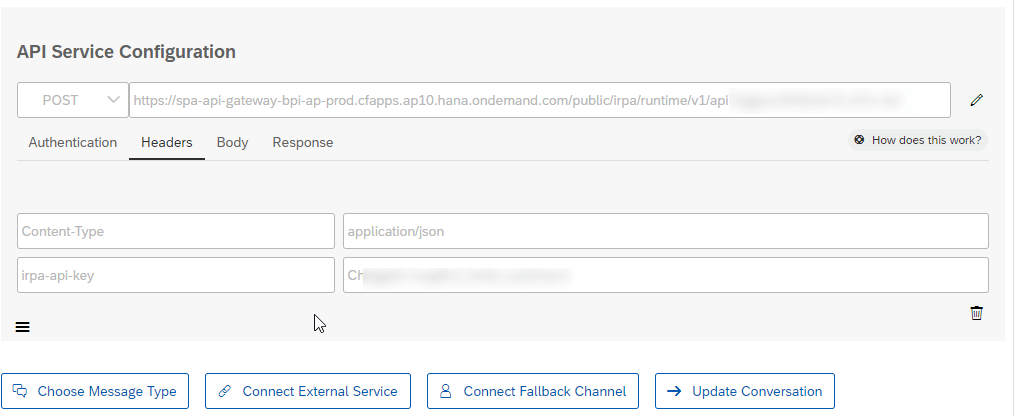
The payload is also obtained from the deployed automation artifact. The below fields are passed as input variables to the automation artifact.
SAP Process Automation configurations
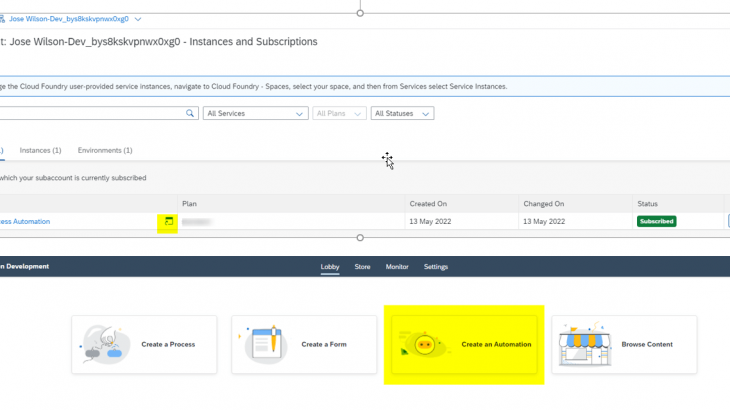
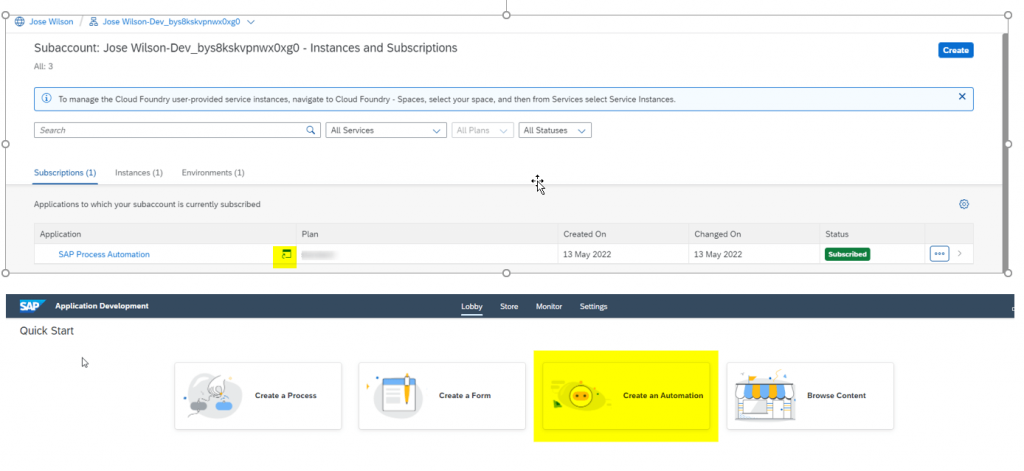
Navigate to the SAP process automation lobby section and create Automation project.
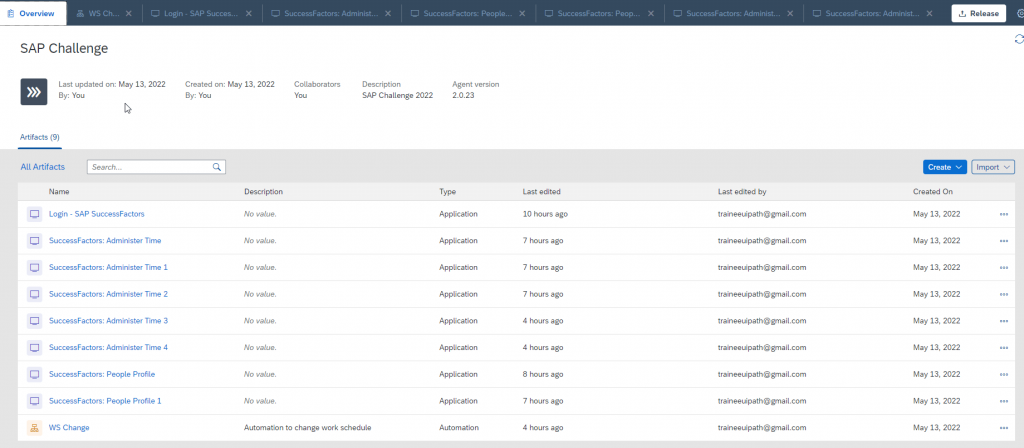
The respective steps to be performed in Successfactors system has been captured as various applications within the automation project.
Screen Captures
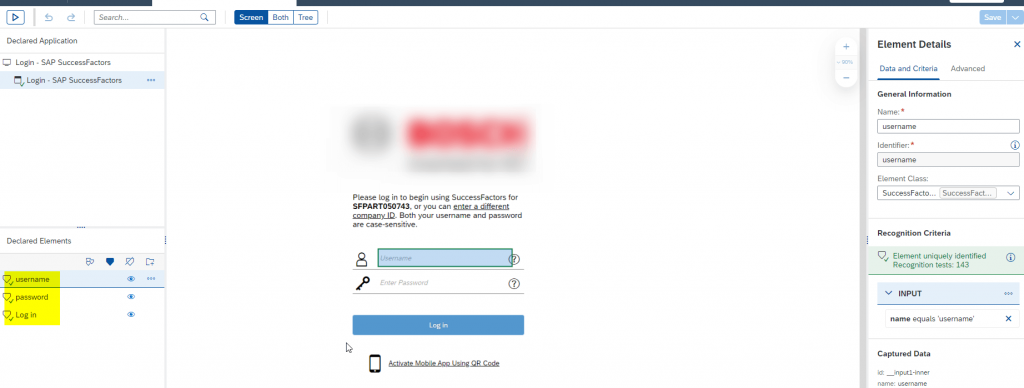
Login screen
Employee Profile screen
Navigation within the employee profile screen is captured as below
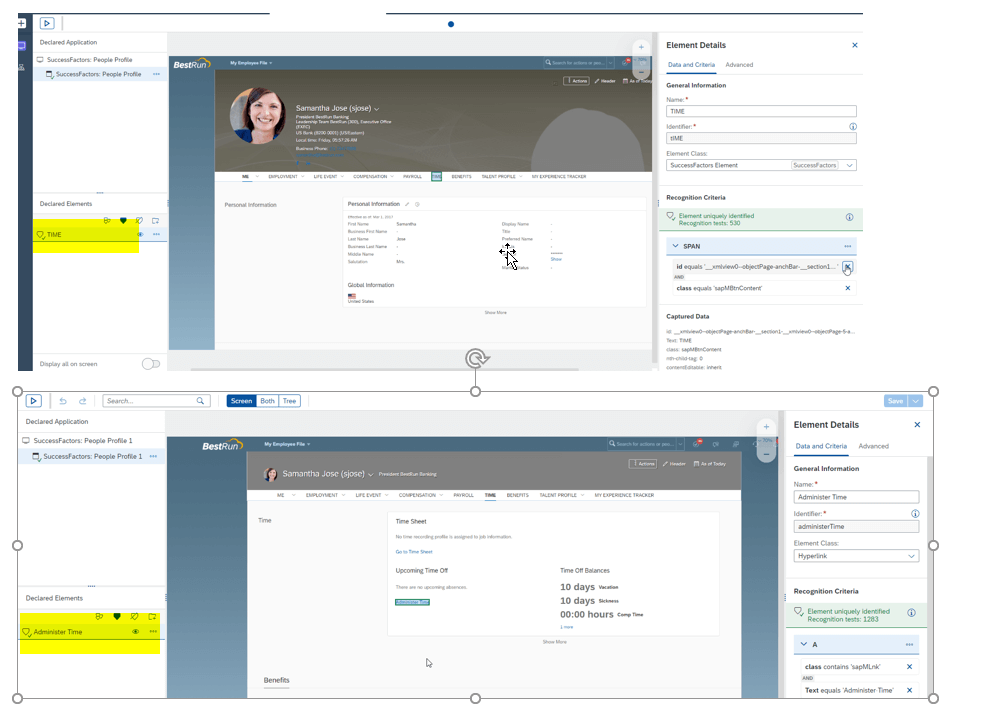
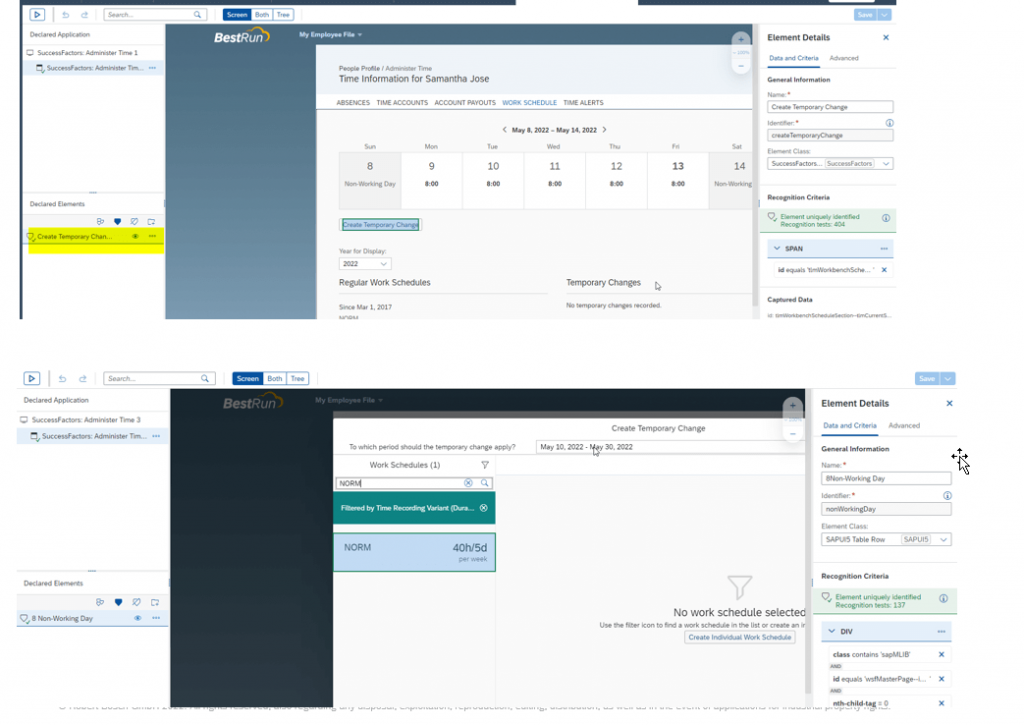
Workschedule Screen capture
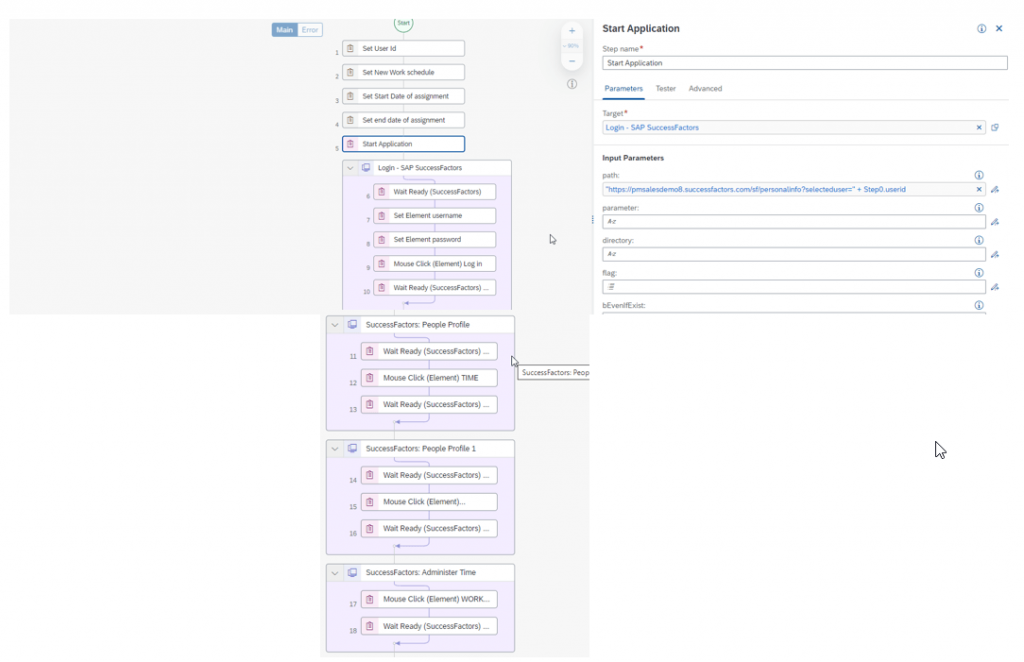
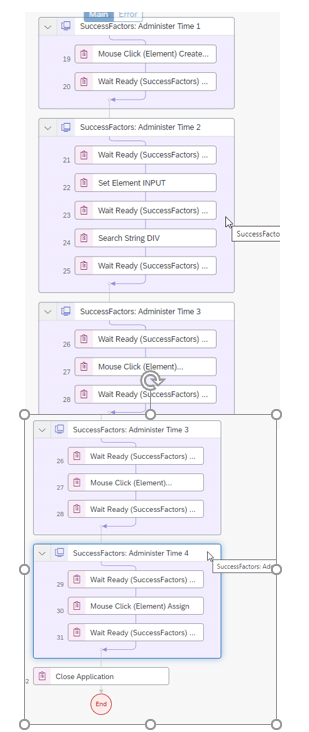
Automation
The Automation artifact is designed with the above screen captures as below.
Kindly note that in the START Application, i have provide the deep link to navigate directly to personal information section of the employee
Deployment and Notification Trigger
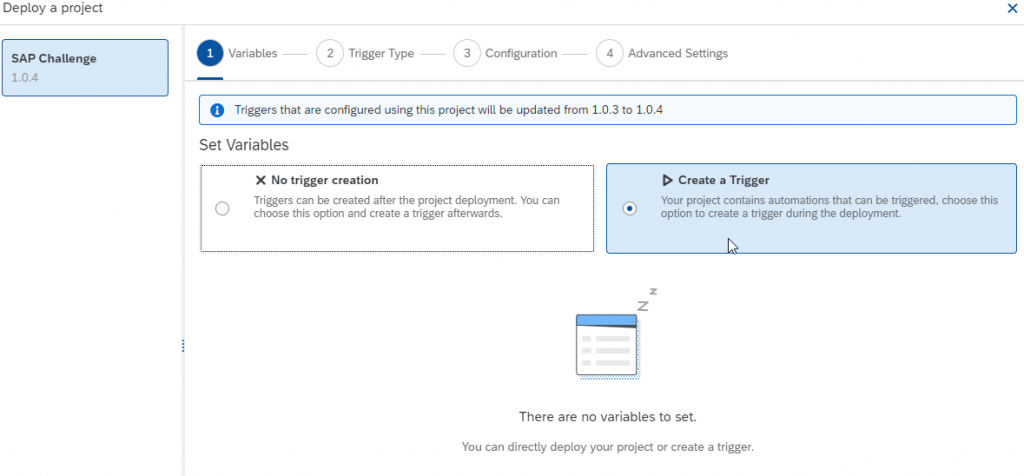
Once the artifact is tested locally, Press the RELEASE button and then press DEPLOY.
During Deploy option, select the option ‘Create a Trigger’ as this automation artifact would be triggered from SAP CAI.
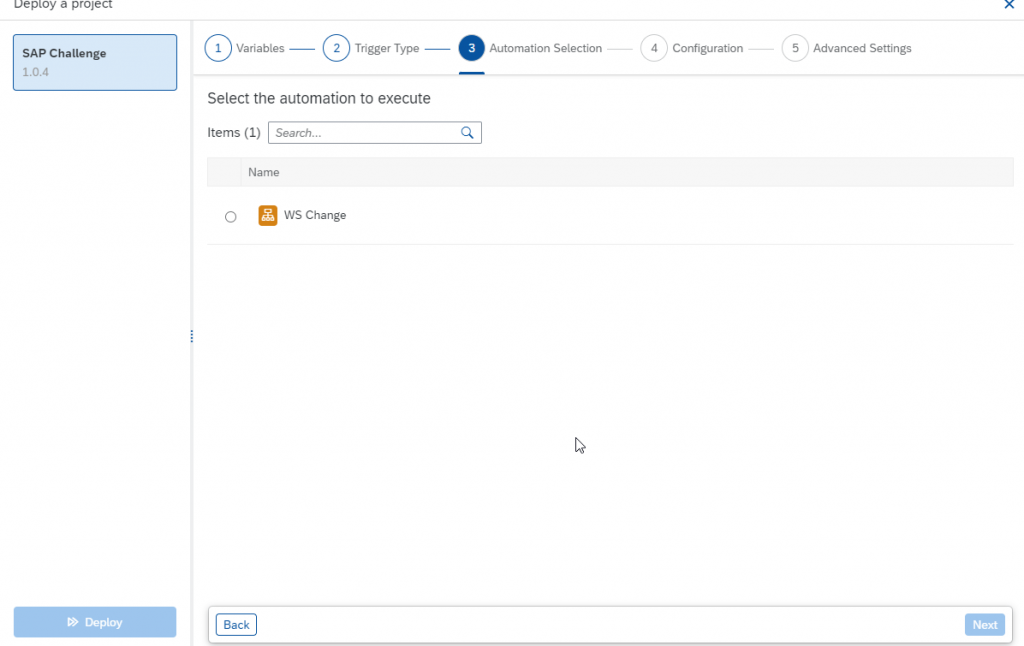
Select the Trigger type as ‘API’, automation artifact that has to be executed and confirm.
Navigate to section Monitor from the overview page and click on the tile ‘Automations’ within the manage section.
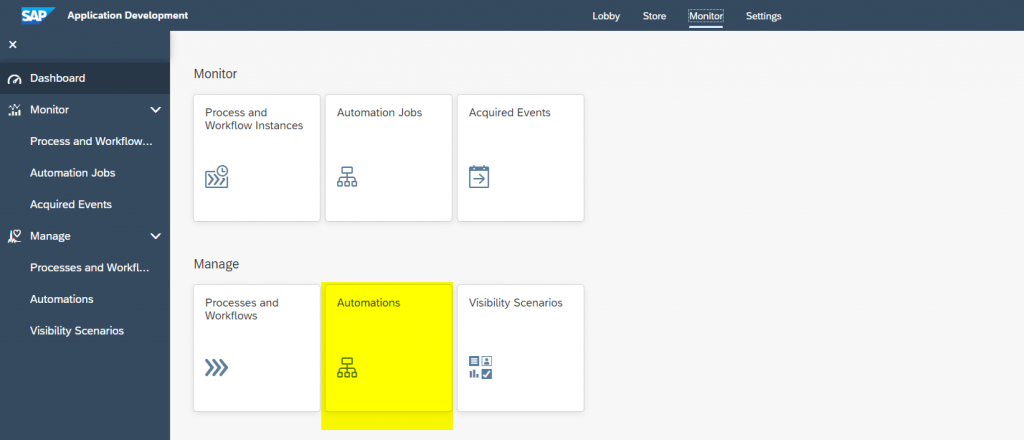
This would display the details of the deployed artifact and also the POST URL which is used in the SAP CAI API connection section.
The payload to be used in SAP CAI is also provided in the details.
To get the API keys, navigate to the Settings sections and the keys can be created.

Notifiers can be created for the start, success and failure actions of the bot.


