Migration Cockpit – Data Migration Made Easy in S/4HANA
Introduction of SAP S/4HANA
SAP S/4HANA, is SAP Business Suit 4 which is specially designed for HANA platform. SAP S/4HANA was released in 2015. Earlier versions of SAP business suits like ERP, CRM, SRM can also run on HANA platform. Now the question comes, what is need of SAP S/4HANA?
SAP wants to design a simplified business suit that will combine all functionality of ERP, CRM, SRM, and others into a single HANA system and replacing the earlier generation of ERP System.
Thus we can say, SAP Business Suite 4 SAP HANA (or SAP S/4HANA) is a business suite that is built on SAP’s proprietary Operational Database System and in-memory computing platform called SAP HANA.
DID YOU KNOW, SAP NOW DOES NOT CONSIDER HANA AS JUST AN APPLIANCE, BUT IT IS NOW A PLATFORM TOO?
S/4HANA Editions
S/4HANA comes with two choices, S/4HANA on premises and S/4HANA on cloud. Choice of edition depends on Source system and S/4HANA target edition
1. S/4HANA on Premises
SAP S/4HANA, on-premise edition covers functionality, industries, and languages that is similar to current SAP Business Suite. For the move to the SAP S/4HANA, on-premise edition SAP offers a one-step procedure for the majority of the current SAP Business Suite customer. This one-step procedure includes the database migration (for those customers not yet on SAP HANA database) plus the installation of the SAP S/4HANA Core with the appropriate innovation packages.
2. S/4HANA on Cloud
SAP S/4HANA, cloud edition covers specific business scenarios for the marketing line of business and for the professional services industry as well as the most essential scenarios to run an entire enterprise in the cloud with a digital core, which includes: finance, accounting, controlling, procurement, sales, manufacturing, plant maintenance, project system, and product lifecycle management, plus integration with SAP SuccessFactors Employee Central, SAP Ariba Network, SAP Hybris Marketing, SAP Fieldglass and SAP JAM.
In this article, we will talk about S/4HANA on-premises edition.
S/4HANA Implementation
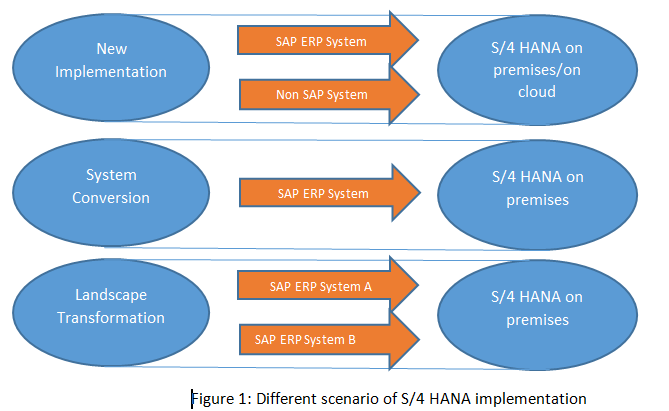
There are 3 different scenarios for how the customer wants to implement S/4HANA.
- New Implementation – In this scenario, new system (Greenfield) will be implemented in S/4HANA from the legacy system or existing SAP system. We will cover more of this in this article.
- System Conversion – In this scenario, existing SAP system will move into S/4HANA system. Please note, SAP does not say it is Upgrade from ECC to S/4HANA. They call it Conversion.
- Landscape Transformation – In this scenario, system landscape will transform into S/4HANA for existing SAP business suite.
S/4HANA New Implementation Tool
In this scenario, the SAP S/4HANA system is implemented, and master and transactional data are migrated from the legacy system. Depending on the SAP S/4HANA edition and detailed customer requirements, SAP Landscape Transformation (SAP SLT) or SAP Data Services Technology is used for the required data migration.
Following are different options available for data migration in SAP S/4HANA on premises:
- S/4HANA Migration Cockpit with Migration Object Modeller
- SAP DATA Services (SAP DS)
- SAP Information Steward
- SAP Rapid Data Migration Content
LSMW (Legacy system migration workbench) is available in S/4HANA but it is not recommended to use this tool as it can provide an incorrect interface for some applications of S/4HANA.
Here we will discuss only S/4HANA Migration Cockpit. For other option, we will talk in subsequent articles.
S/4HANA Migration Cockpit (MC)
S/4HANA migration cockpit is a new migration tool which was initially designed for S/4HANA cloud edition but now it is also available for 1610 S/4HANA on premises and later versions.
PS: MC = Migration Cockpit in rest of the below content.
MC is browser based (WebDynpro) interface. No additional setup or activation is required once we setup SAP S/4HANA system.
- To access MC on premises, use transaction LTMC. It will open MC on a new web browser.
- To access MC on cloud, choose the option ‘Manage your solutions’ on Launchpad.
Key Features of Migration Cockpit
- This tool is embedded and delivered with S/4HANA system.
- No programming is required by the customer.
- As the name suggests, this tool is used for migrating data from SAP or Non SAP system to S/4HANA.
- This tool has predefined migration object which contains the mapping for all master and transactional data. It reduces migration cost and time.
- Migration activities are predefined and easy to use.
Steps to Migrate Data using MC
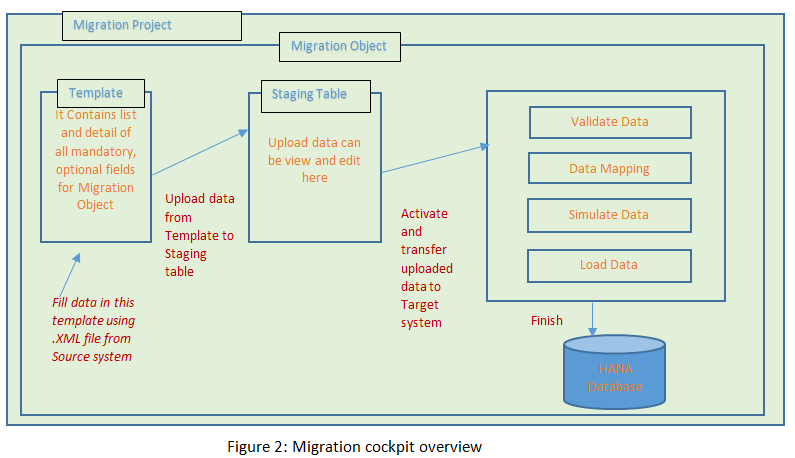
Below is an overview of the Migration Cockpit. It shows different element, the relationship between them and flow of data from the file to the database.
1. Migration Project – First step is to create or open migration project in MC. Migration project facilitates the transfer of data from source system to S/4HANA system and monitor migration status.
The migration project is always associated with ‘Transfer ID’. This transfer id is a unique identifier which facilitates the transfer of projects between different systems of the landscape. For example, if we transfer migration project from quality to production system then project transfer id should be same in both system.
Below is the screenshot, where we are creating new project Z_NEW_PROJECT with transfer id 006 and default view, is On Premises.
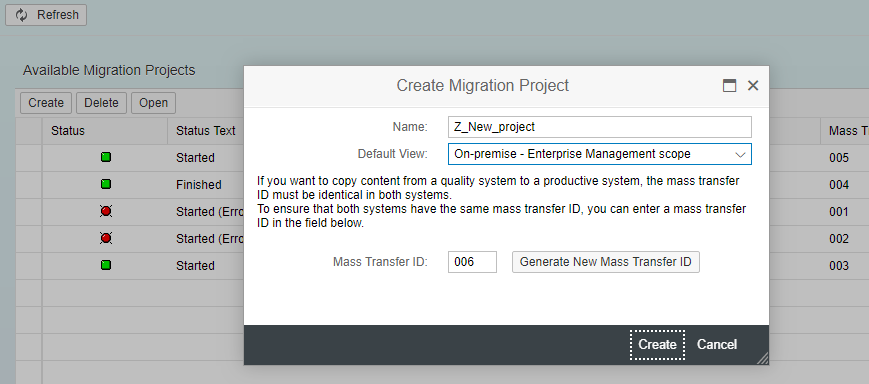
Press create.
2. Migration Object– Once migration project is created, we need to choose migration object. Migration Objects are predefined and provided by SAP system. We need to choose migration objects as per our requirement (The Business objects like Material, Customer, Cost Center etc are the migration object now).
Below is a screenshot of migration object available on a migration project.
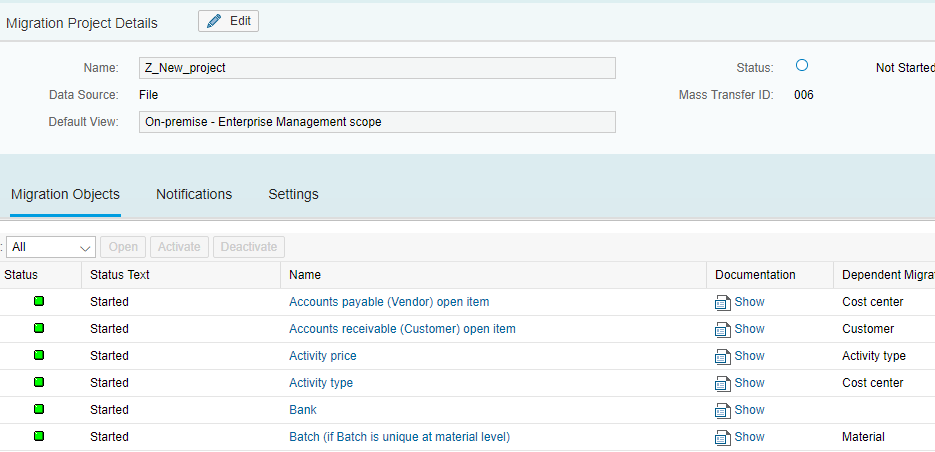
Migration object comes with the following information:
- Status – Object can be active – available for migration, deactivate – not available for migration and started – migration has started on this object.
- Object name – It is migration object name which is relevant to customer master or transactional data.
- Documentation – Once we click on documentation it will open a new window where we can find all information on migration object like required structure, fields, uses.
- Dependent migration object – It shows a list of migration object that must be loaded first or already present in the system. For example, before loading material master, profit center object data must be loaded or exist in the system.
For our example, we select Material Migration Object and the following screens would appear:

After selecting migration object we need to execute the below steps.
1. Download Template – When we click on download template for the first time, the system will copy object template into migration project. This template will provide a list of fields which should be filled for data transfer. The template is downloaded by default in Excel format. If .xml is not given then save file with .xml explicitly. We should not change template fields, type, length and always use paste ‘V’ option for copying data in the template.
Once the template is copied into the project, then any changes to the template by SAP does not reflect in that project’s template. Here is a sample of the template file.

Here we can see one file is in orange (yellowish) color, it means this is a mandatory sheet in which we have to provide data. Others sheets are optional.
2. Upload file – We can fill legacy data into the downloaded template and then can upload .XML file in MC for migration. More than one file can also be uploaded.
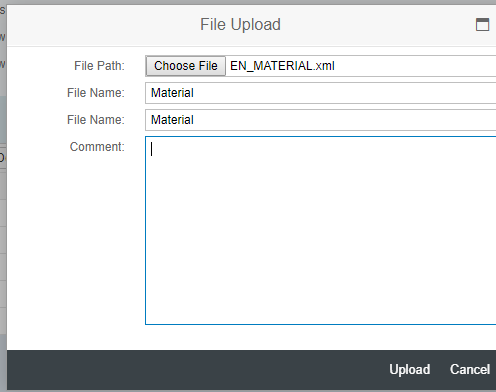
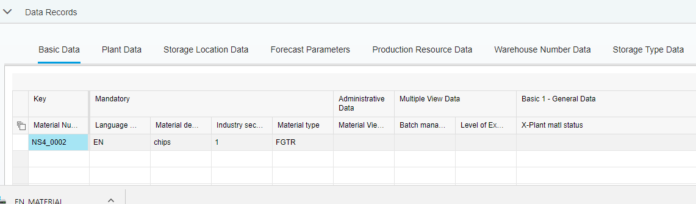
3. View and Edit– Once the file has uploaded, we can view data by clicking on the name of the file and if required we can edit data in the file by clicking on edit button.
4. Activate – To take the file into next step i.e. start transfer we need to select that file and click on activate button.
5. Deactivate – In case of multiple files, if the user doesn’t want to transfer some file then he can choose file and deactivate them. Only the file with active status will move for transfer.
6. Start Transfer – We can start data transfer for active files by clicking on button ‘start transfer’.
Below screen would appear after start transferring where we need to perform 4 steps
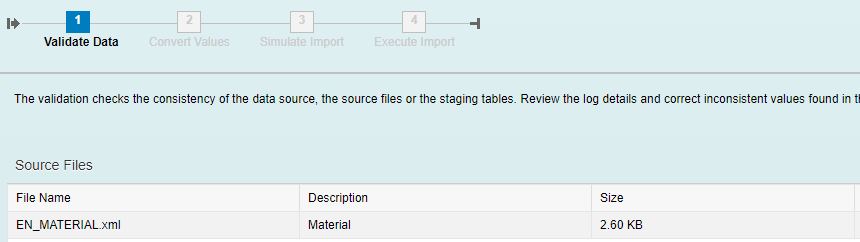
Following steps has to executed after starting the transfer of data:
i. Data Validation– Data stored in the staging area is checked against the mandatory field, type, length.
ii. Value Conversion– Mapping rules can be defined between source to the target system. For example country code ‘USA’ is set in source system but in the target system, it should be mapped to ‘US’.
iii. Simulation– Data stored in the staging area is processed by actual BAPIs but commit is not performed (after all it is simulation/test run). Here we can find warning and error messages.
iv. Execution/Finish– In this step data is actually posted to SAP HANA system using relevant BAPI.
After executing all above steps, press FINISH button to commit changes to the database.
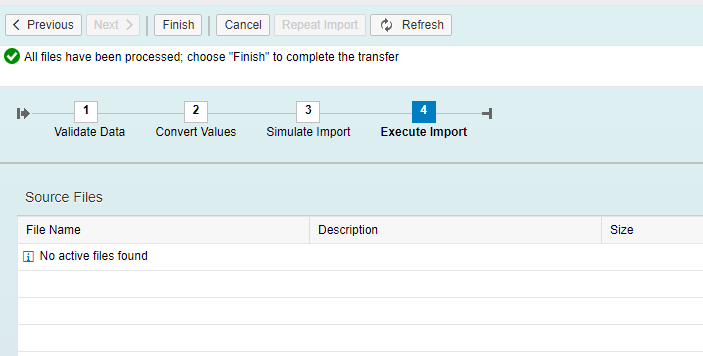
After execution it shows status as follows:

In case of error records, we need to filter out successful records and then again run the file for the corrected record only because we cannot upload the same record. MC supports only INSERT statement. In fact, HANA database is optimized for INSERT only.
We can validate the output of our load file by going to t-code MM03 (as we uploaded the material master). Please check the input file and the material data in S/4HANA matches.
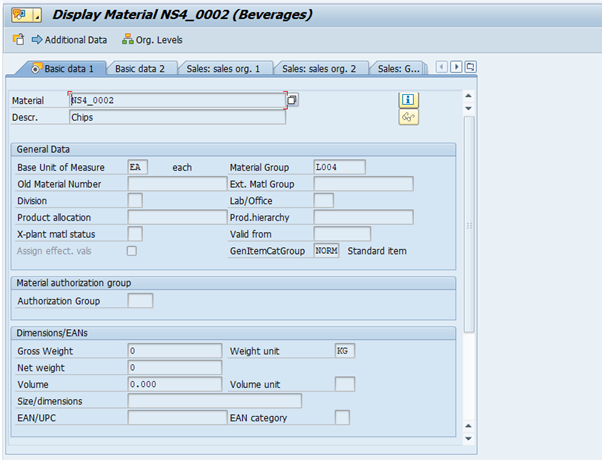
This is how we make use of Migration Cockpit. We can leverage the same steps for other business objects (viz Business Partners, Cost Center, etc) migration. The templates would be different, but the fundamentals remain the same.


