Introduction:
In this document, I would like to explain the different scenarios in the procurement process. The procurement process starts from purchase requisition and ends with payment to the vendor. Hence this process is popular with the word ‘P2P’ Process. It deals with procuring materials, services, different contracts associated with procurement. I have explained few popular scenarios. It is a 3-way matching rule (PO-GR-IV).
This document is a continuation of my previous blog posts part-1 & 2. In my previous blog posts, I have explained 1,2,3,4, and 5 scenarios (1-Standard purchase order, 2-Capex purchase order, 3-Consumption Purchase Order, 4-Stock PO with the Price difference, and 5-Service-Related PO with price differences). In this blog post, I will show the 6 to 10 scenarios (6-Stock Transfer Process Manually, 7- STO thru PO, 8-Down-payment against to PO, 9-Scheduling agreement Process PO, and 10-Purchase Order Using Internal Orders.
You can find my previous blog post information below.
The below table gives a high-level overview of different scenarios.
Note: The below 10 scenarios screenshot will be best visible in the desktop version.
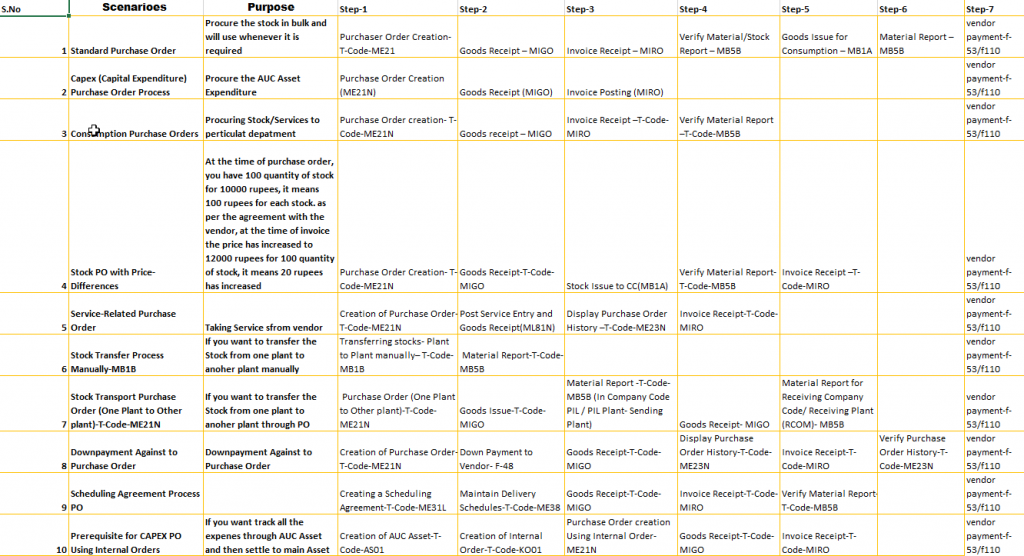
6. Stock Transfer Process Manually-MB1B
We can do the Stock Transport either manually(T-Code-MB1B) or Thru PO (ME21N). We can transfer the stock from Plant-Plant within the company code and between the company codes.
In this step, I am doing Stock Transfer between Plants and between company codes
If we are doing stock transfer between two plants that belong to two different company codes, we should do the below two steps.
- Make sure to Create the same material in both the Plants
- Make sure to Configure ‘OBYA’ Cross Company Code Settings
I have extended the same material in the receiving plant and I have done cross-company code settings in the system. So that directly I am doing stock transfer process.
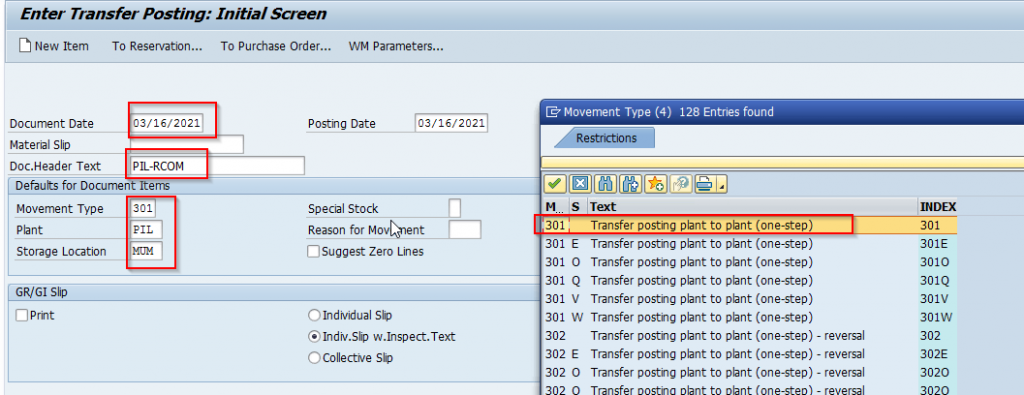
6.1 Transferring Stocks- Plant to Plant Manually- (T.Code-MB1B)
In the below scenario, I am transferring the values from one Plant to another Plant.
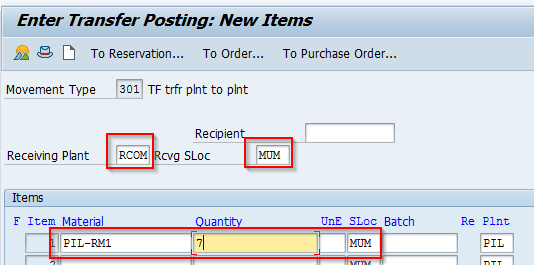
Enter the Document Date, Document header text, Movement type, Plant, and Storage Location for the Sending Plant. Click on enter
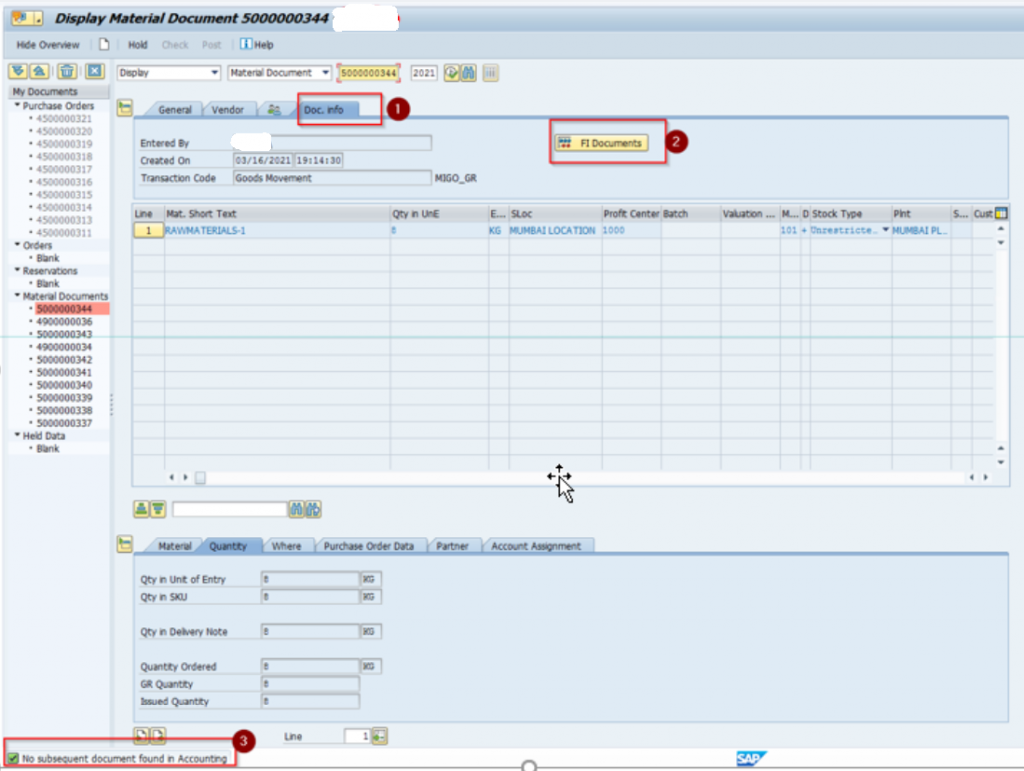
In the below screen, In the Header part enter the Plant and Storage location of the Receiving Plant. In the Items level, enter the material, Quantity, and Storage location of Receiving Plant and then Save. The system will generate a document (MM document & FI document).
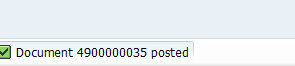
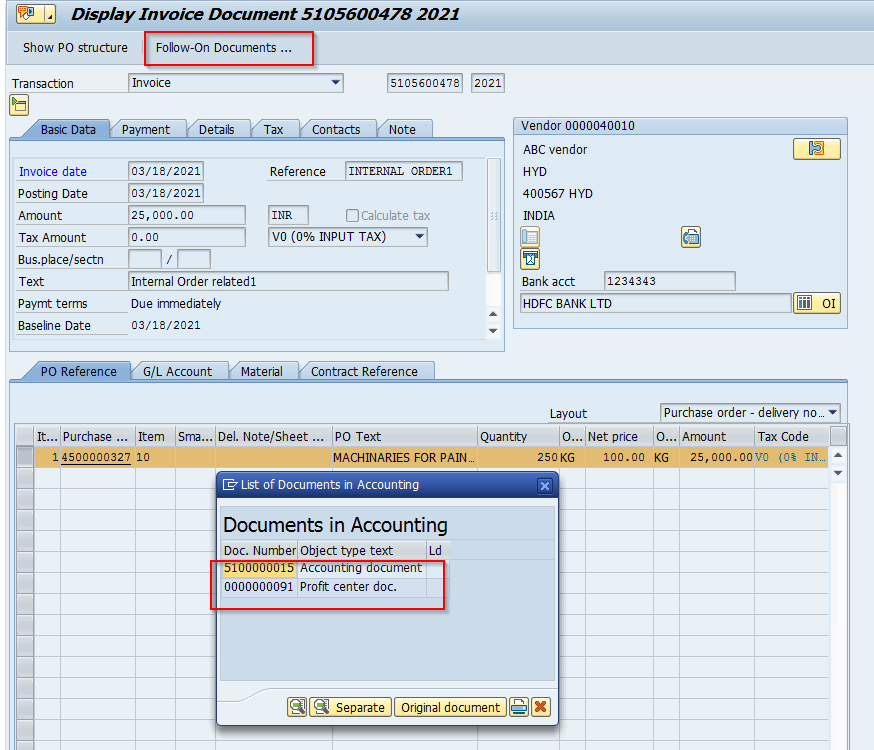
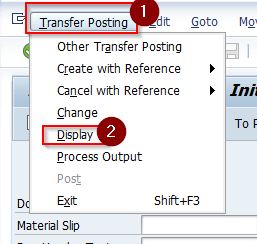
On the same screen (MB1B) Check for the Accounting Documents. From the Menu- Transfer Posting- Display
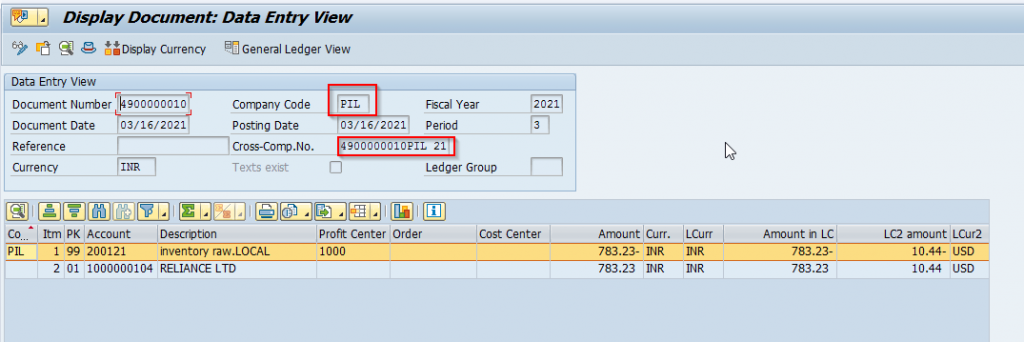
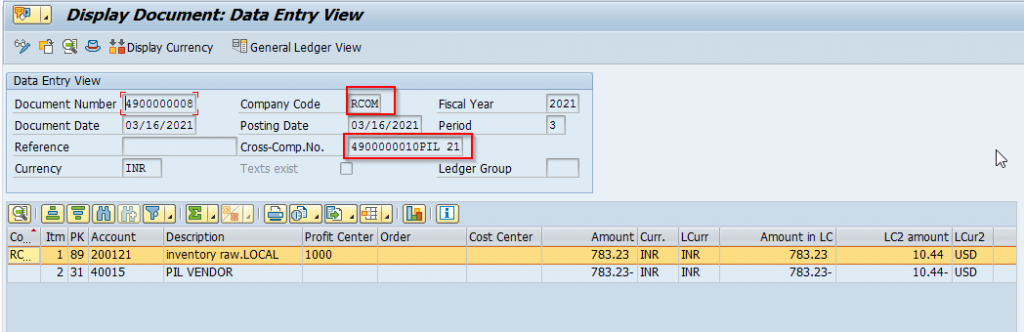
In the below screen, the system generated the below Accounting Documents in both Plants/Co. Codes. Double click on Accounting Documents.
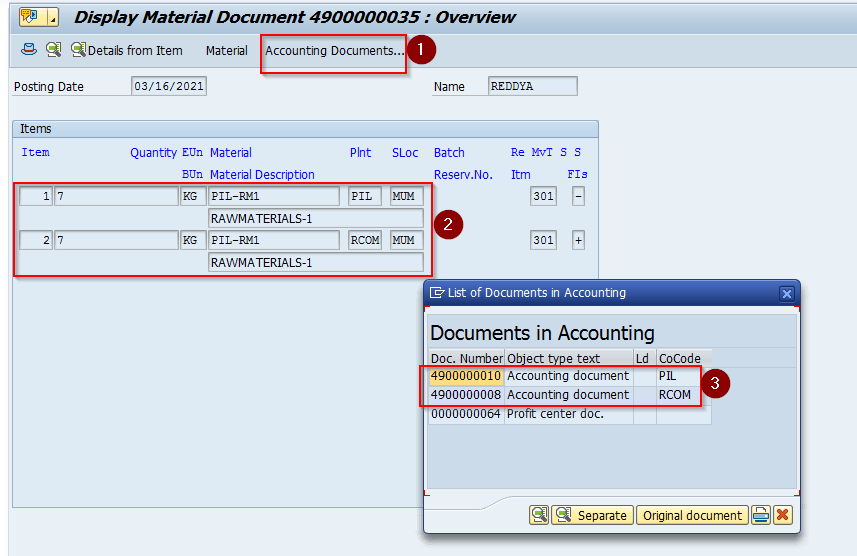
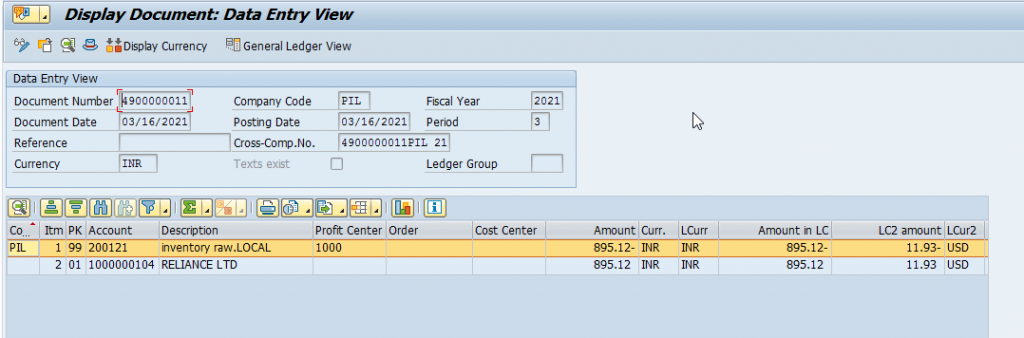
Accounting document under ‘PIL’ Plant/PIL Co. Code
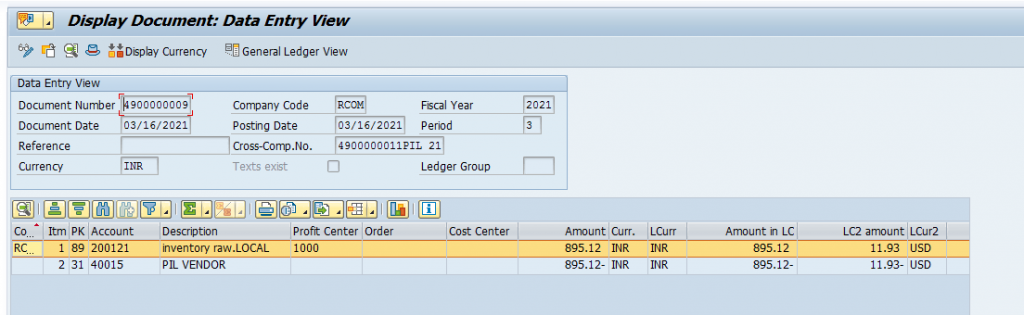
Accounting document under ‘RCOM’ Plant/RCOM Co. Code
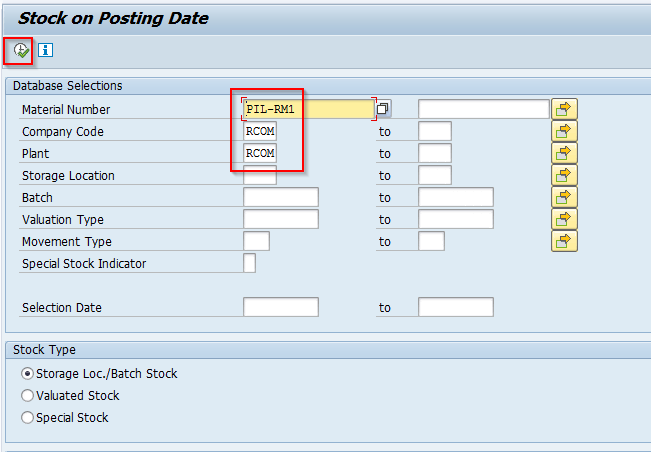
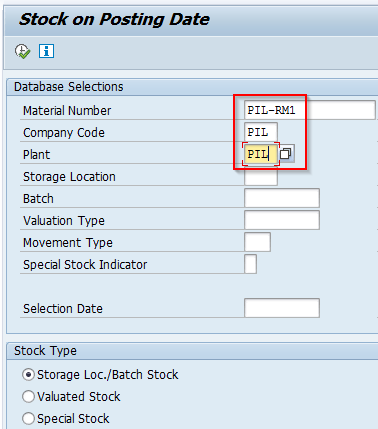
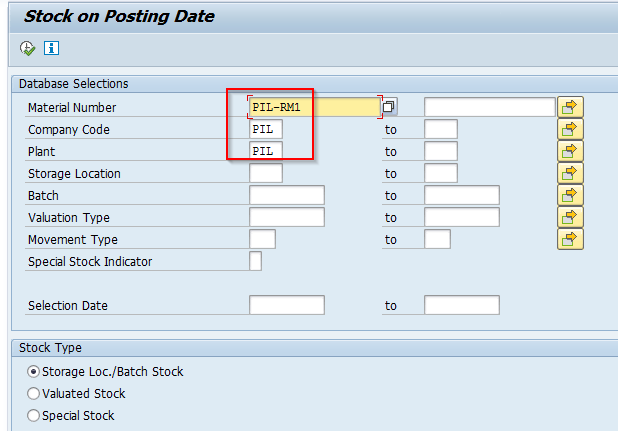
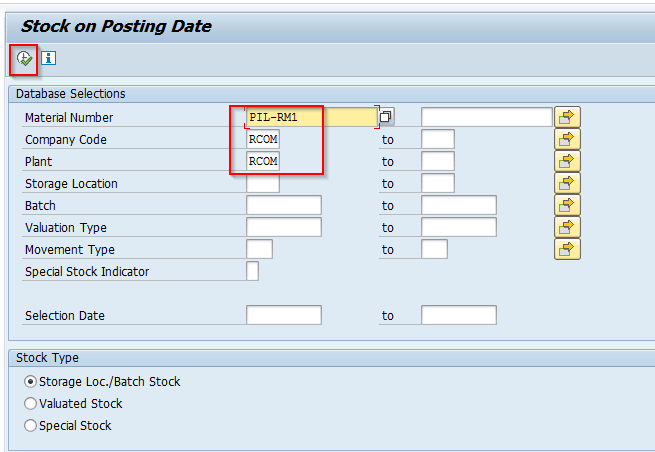
6.2 Verify the Material Report (T-Code-MB5B)
Material Report (MB5B) in the RCOM Plant/RCOM Co. code (Receiving Plant)
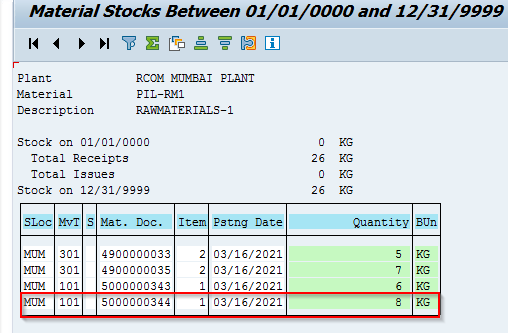
Enter Required information for below screen and Execute. The system will update the ‘7’ quantity of stock in the below screen you can see.
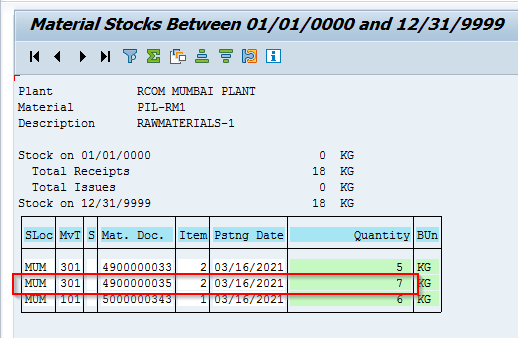
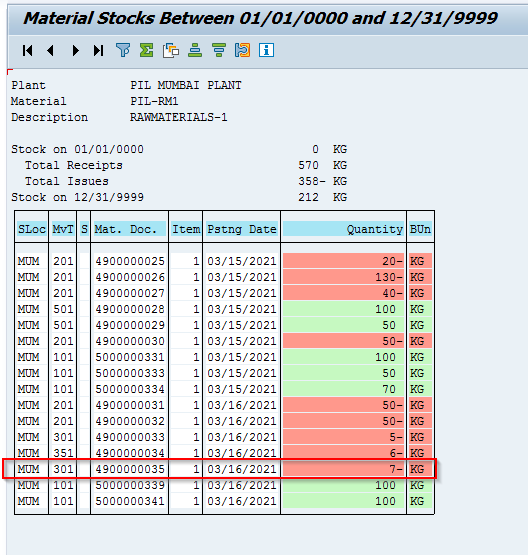
Material Report – (MB5B) in the PIL Plant/PIL Co. code (Sending Plant). Enter Required information for below screen and Execute. The system will update the ‘7’ quantity of stock that has been Consumed. So, in the below screen you can see.
7. Stock Transport Thru Purchase Order(One Plant to other Plant)-ME21N
In the below screen, In the Header part, Select the Purchase Order type, 1) Stock Transp. Order, 2) Supplying Plant (Sending or from Plant), 3) Receiving Plant’s Purch. Org, Purch, Group, and Company code details. In the line item level, 4) Receiving Plant’s Material, Quantity, delivery Date, Plant, and Storage location information.
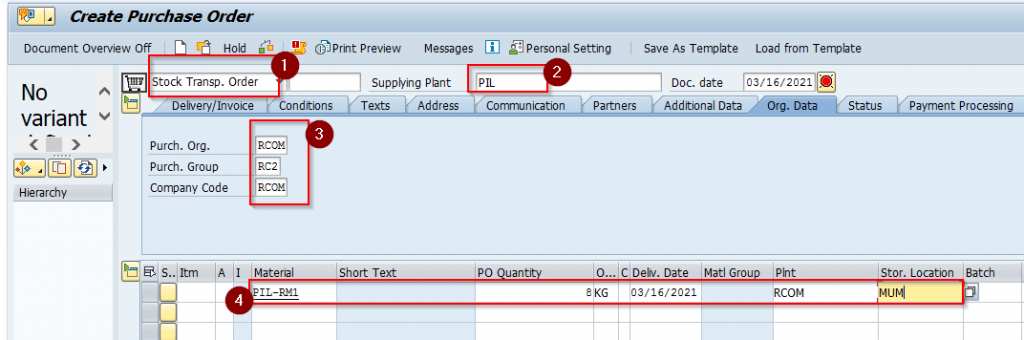
Click on enter, and the System generated the below Stock Transported Purchase Order Number.

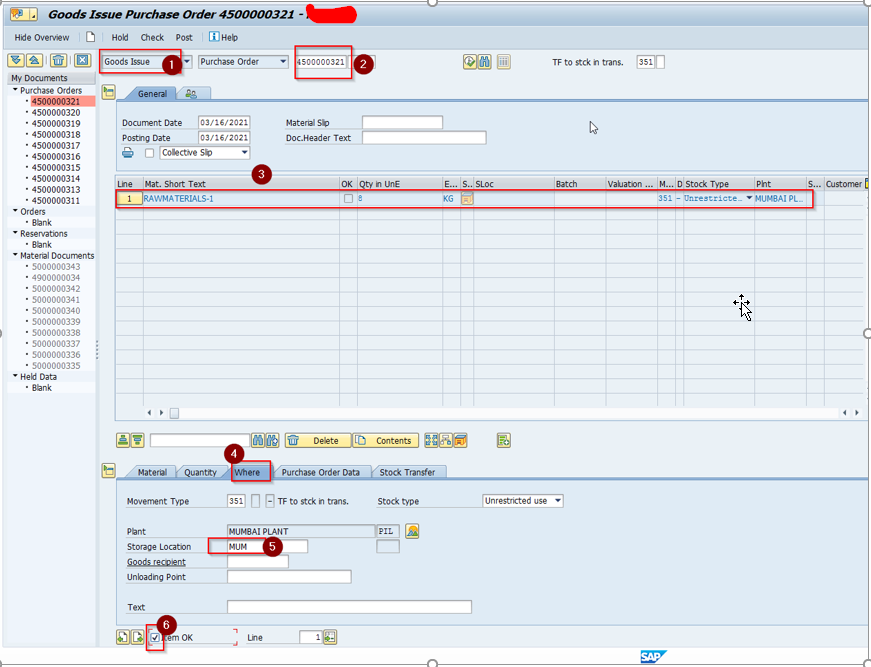
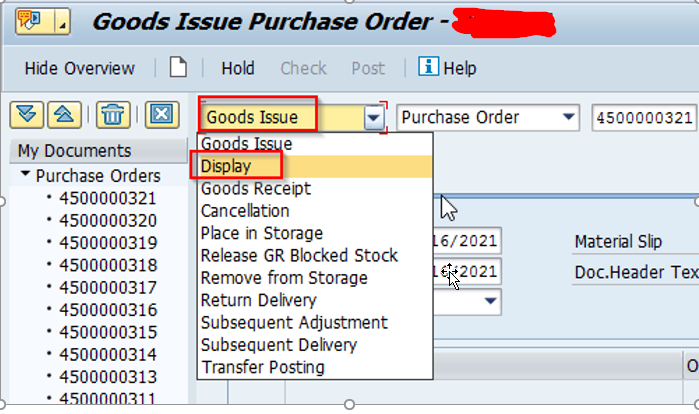
7.1 Goods Issue-MIGO
In the below screen, Issue the Goods against the Purchase Order.

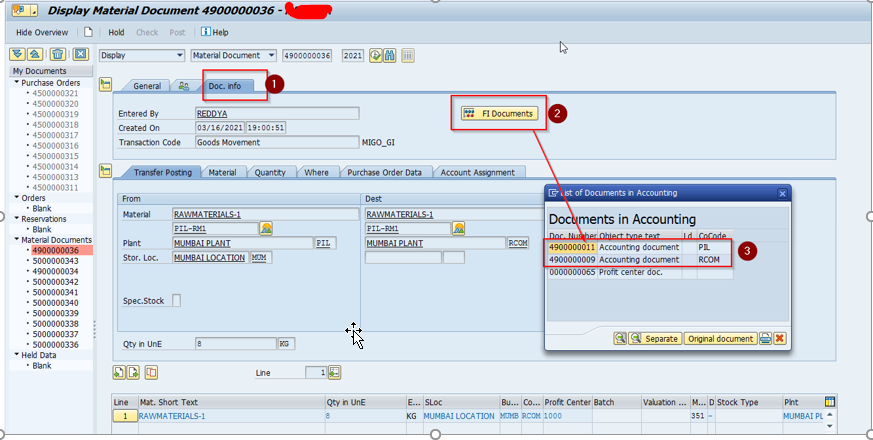
Display Document in the same screen
In the below screen, the system has been generated the Documents in both the Plants. Double click on Accounting Documents in each Company code.
Accounting document under PIL Plant/PIL Company code (Sending Plant)
Accounting document under RCOM Plant/RCOM Company code (Receiving Plant)
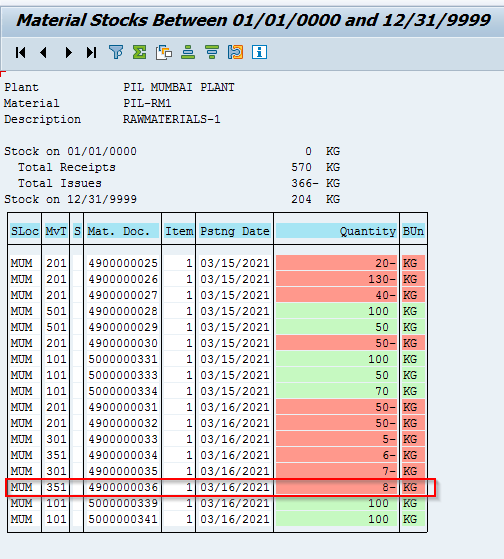
7.2 Material Report-MB5B (Co.Code PIL / PIL Plant- Sending Plant)
In the below screen, Enter the Required information and Execute
In the below screen, you can able to see ‘8’ quantity of stock has Consumed in the PIL Plant (Sending Plant).
Note: We cannot see the Material Report in the Receiving Plant (RCOM) until we do the Goods Receipt.
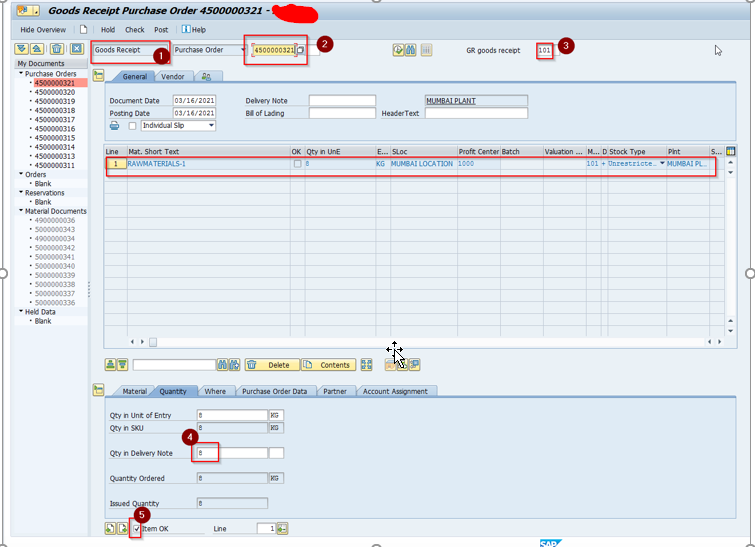
7.3 Goods Receipt-MIGO
To get the Material Report for the Receiving Plant, we should do Goods Receipt. In the MIGO screen, we need to select Goods Receipt against the PO.

Display Document- Goods Receipt- Display in the same screen
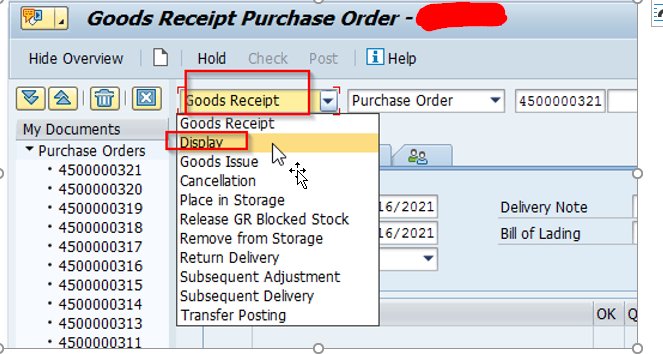
Double click on Accounting Documents. The System does not create any FI- Document for Goods Receipt because there is no financial impact. But we can see the material report for Receiving plant.
7.4 Material Report for Receiving Plant/Co.Code-MB5B
In the below screen, system updated ‘8’ quantity of stock has been added in the plant (Receiving Plant)
8. Down – Payment against to Purchase Order
It is common in many organizations to pay some advance to the vendor before the delivery of goods and services. I am showing the same in the below steps.
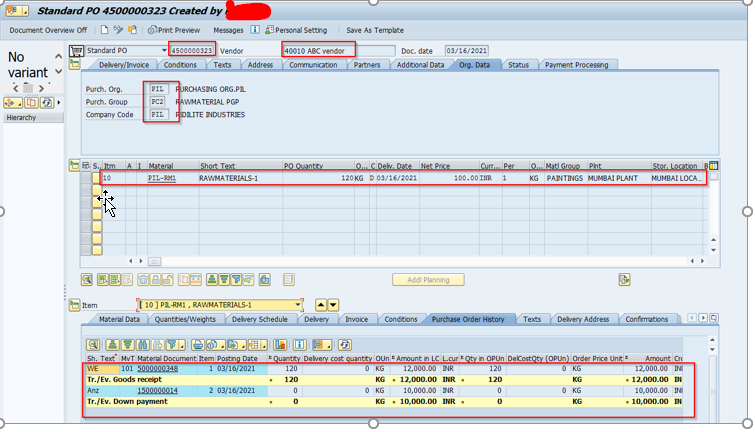
8.1 Creation of Purchase Order-ME21N
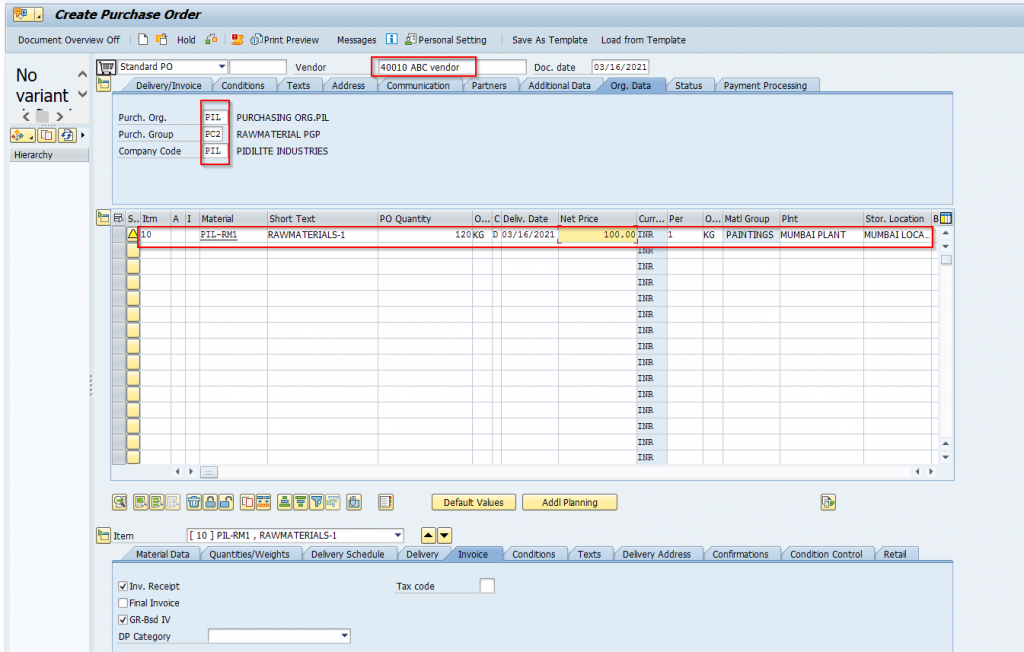
Click on save

8.2 Down-payment to Vendor-F-48
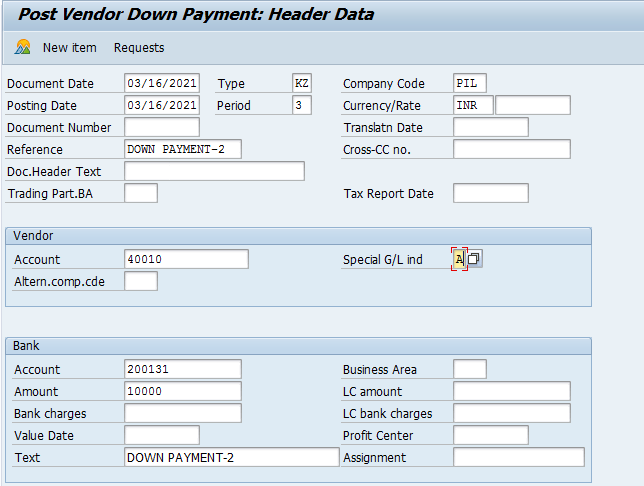
Make sure to enter the Purchase order number and item details below. Click on Save to post the down payment.

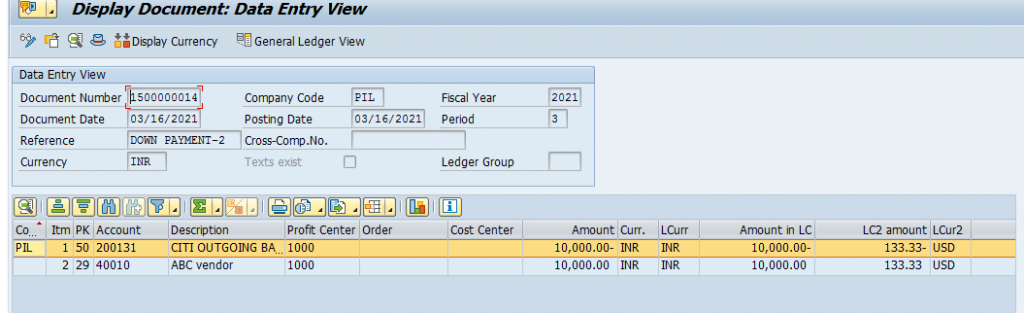
Display Down Payment Document after posted
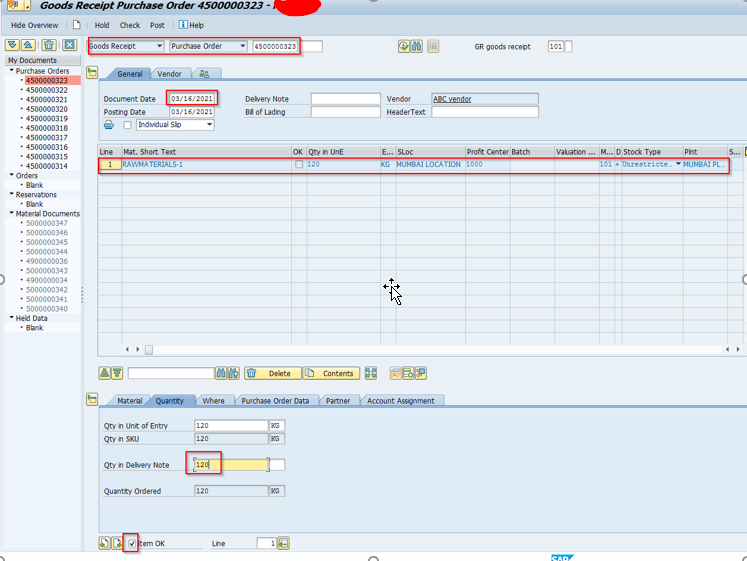
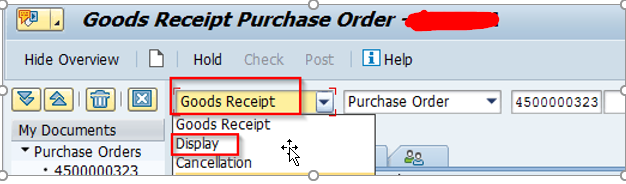
8.3 Goods Receipt-MIGO

Display Goods Receipt Document
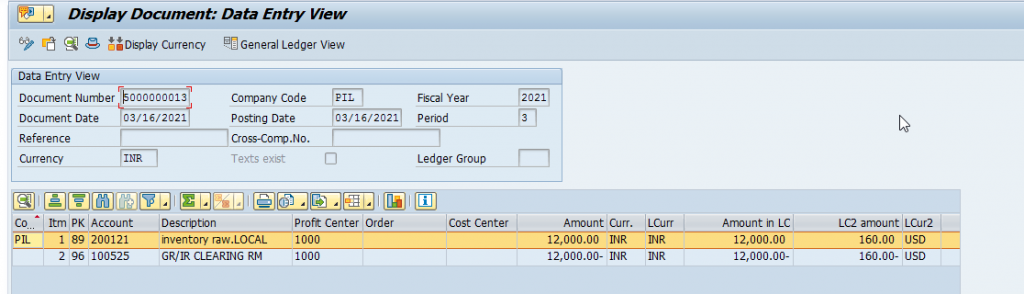
Double click on Accounting Document
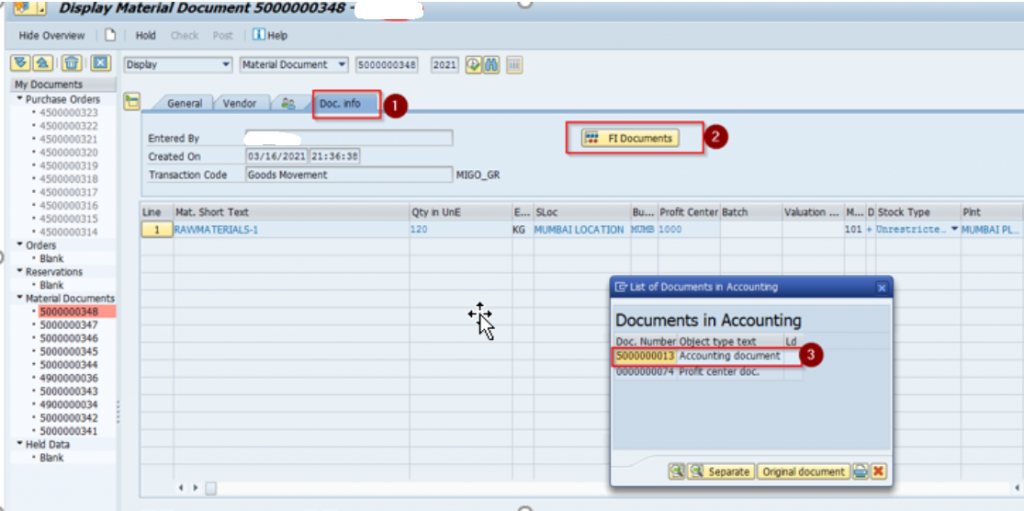
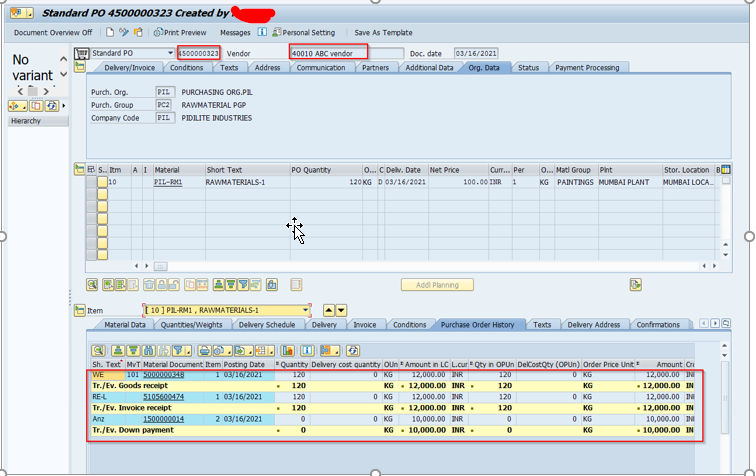
8.4 Display Purchase Order History- ME23N
Go to the purchase order display screen and click on purchase order history to see the Down Payment Document as well as the goods receipt document. You can double-click on each document to see the accounting entries.
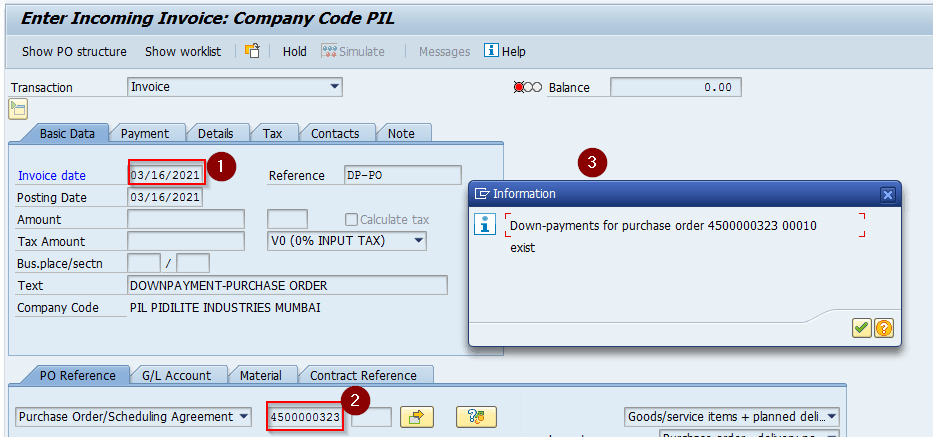
8.5 Invoice Receipt-MIRO
Enter the Invoice date, PO Document Number, and enter
The system shows a pop-up window- Down Payments for this PO Order, Click on enter.
In the below screen, enter 1) Amount-12000, 2) System shows pop-up window – Message about Down Payments for PO Order. Click on enter
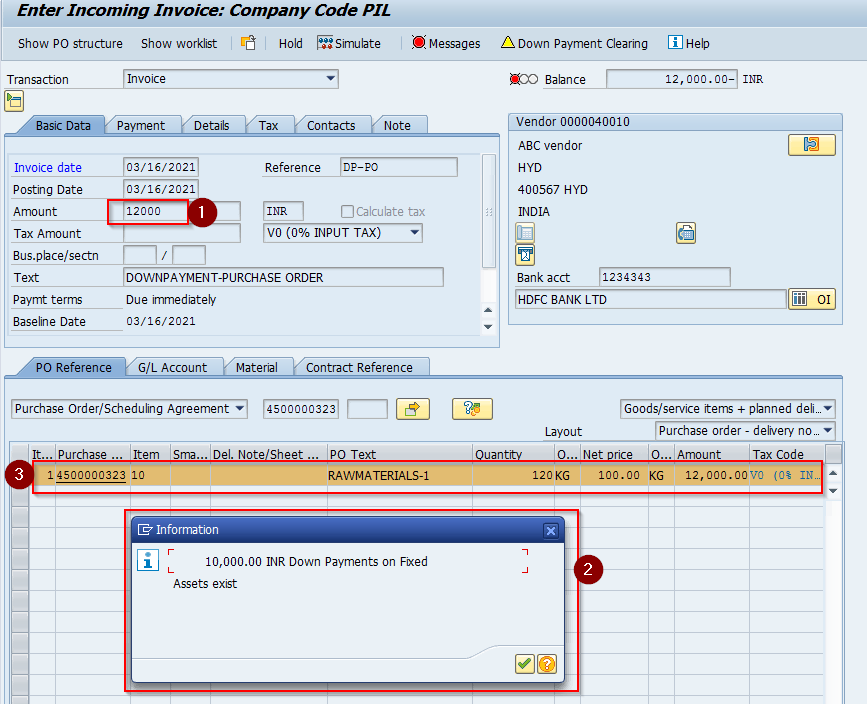
Click on Simulate, you can able to see the Accounting entries. If everything is okay, then save. The system will generate the Invoice document with blocking status.


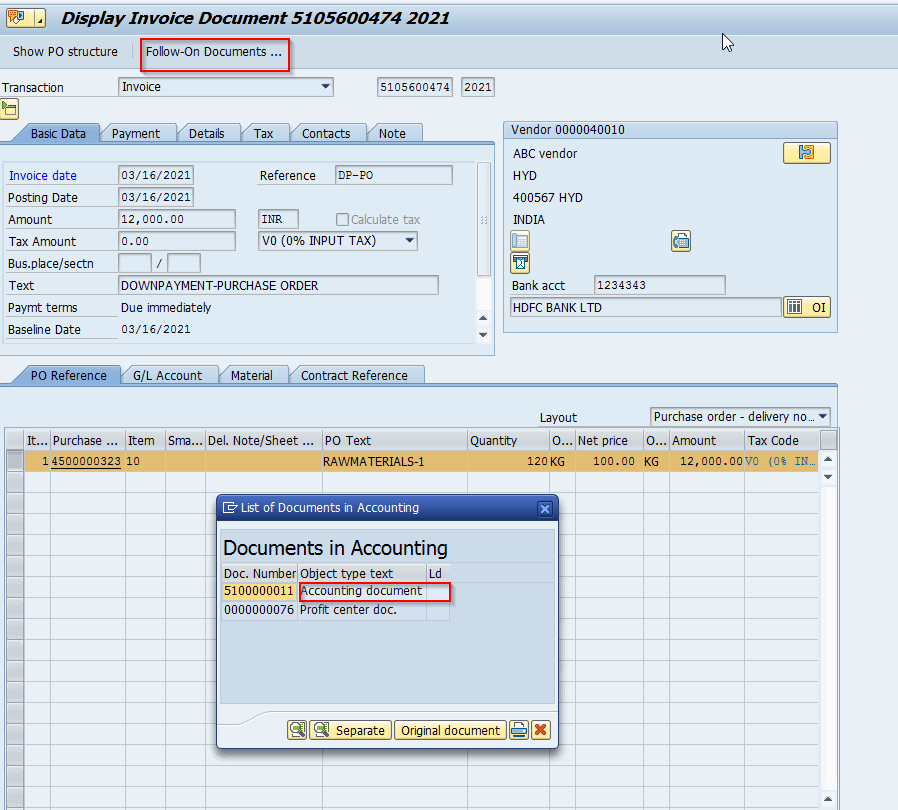
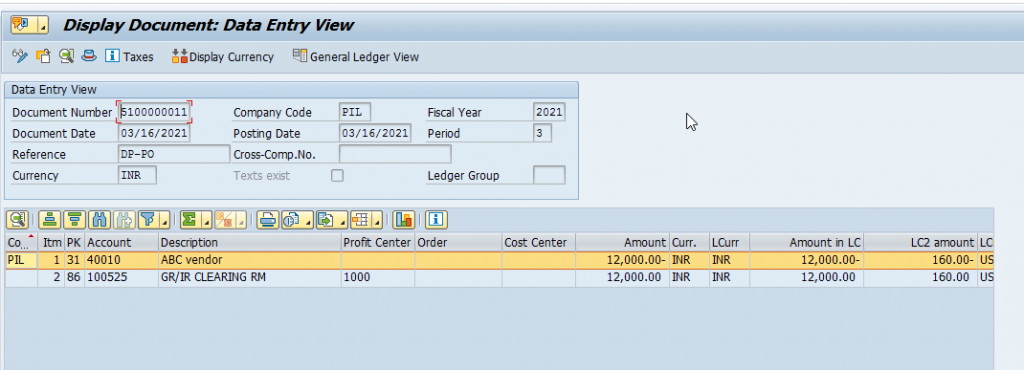
Display Invoice Document- Display- Follow-on- Documents. Double click on Accounting Document and see the Invoice Document.
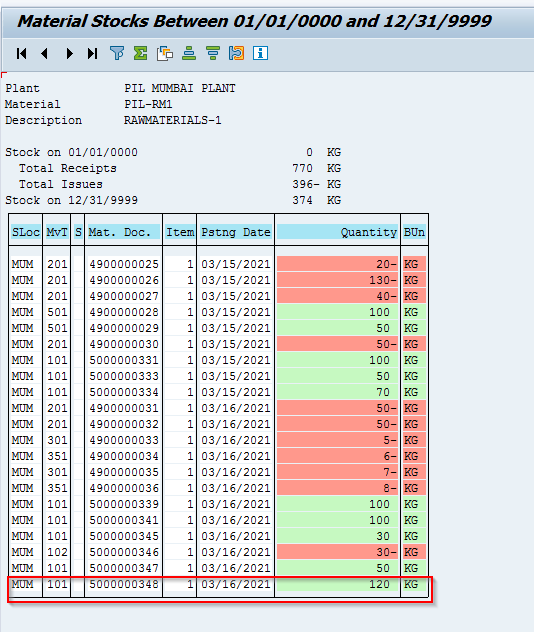
8.6 Material Report-MB5B
Enter the required information in the below screen and Execute.
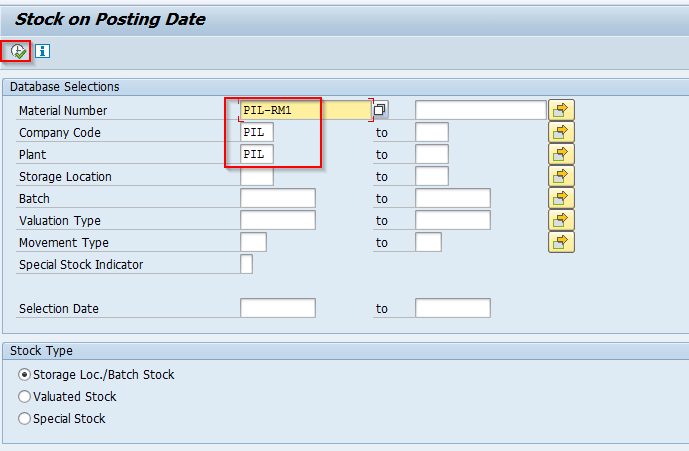
You can see the Stock or Material added to the Respected Plant.
8.7 Verify purchase Order History-ME23N
In the below screen, you can able to see down payment, GRN, and IV Documents.
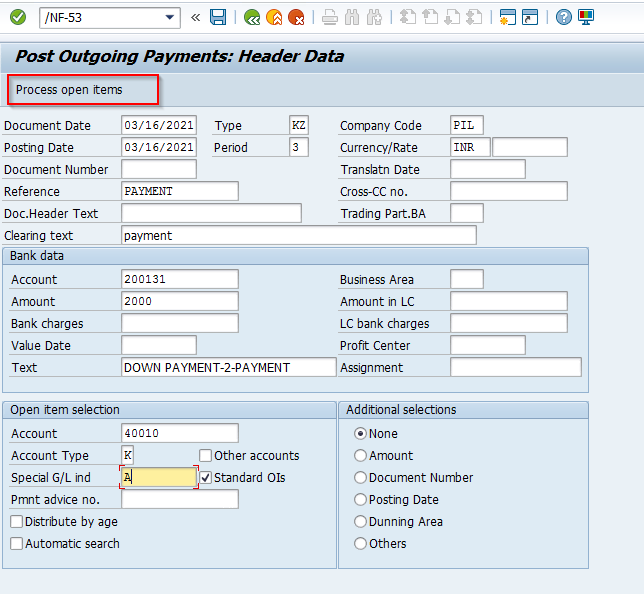
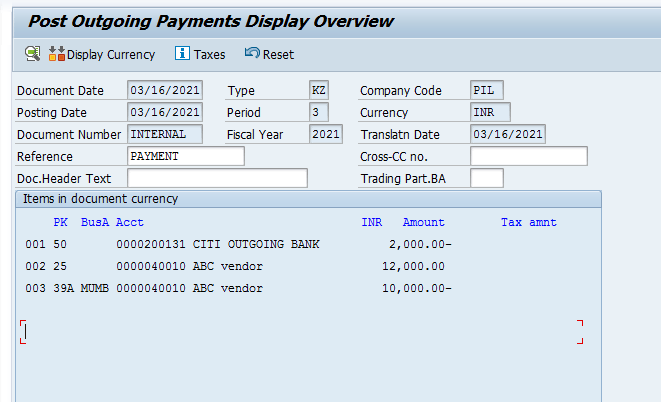
8.8 Vendor Payment-F-53/F110
I am doing Manual Payment-T-Code-F-53. Click on Process Open Items, System will generate the Accounting entry.

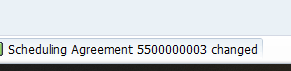
9. Scheduling agreement Process PO
A scheduling agreement (SA) is a long-term agreement with the Vendor by predefined conditions. It has certain validity and specific quantity. We can create the SA with or without a Material Number.
SA can be created with reference to PR (Purchase Requisition), Outline agreement, RFQ, or another Scheduling agreement.
Scenario: We have created a Scheduling Agreement with the Vendor for a total of 25 Quantities, and we have split these 25 quantities into 10 and 15 respectively, as per our requirement. So, we need to ask our vendor to dispatch 10 quantities on 03/17/2021 and balance 15 quantities on 03/20/2021.
Advantages of SA: It reduces the processing time and paperwork as it replaces the traditional creation of standard PO. It enables negotiations with the vendor for more favorable conditions. Available Item Categories for Scheduling Agreement:
- Standard
- Consignment
- Third-party
- Text
Document types for scheduling agreement:
- LP- Without Release Documentation- It is used to transfer the message to the vendor once SA created.
- LPA- With Documentation
9.1 Creating a Scheduling agreement – ML31L
In the below screen, enter Vendor number, Agreement type (LP-Scheduling Agreement without release), and Agreement Date. Enter the Purch. Organization and Purchasing Group. Click on enter.

In the below screen, Enter the validity start and end dates
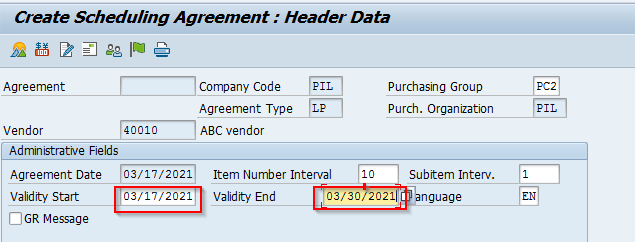
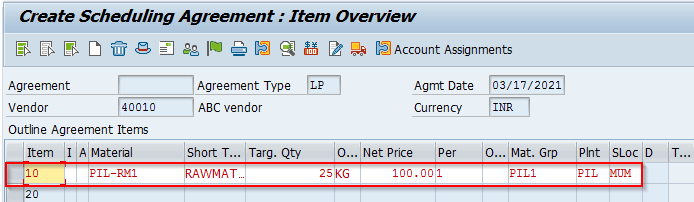
In the below screen, enter Material, quantity, net price, material group, plant, and storage location. Save it. The system has created the Scheduling Agreement number.

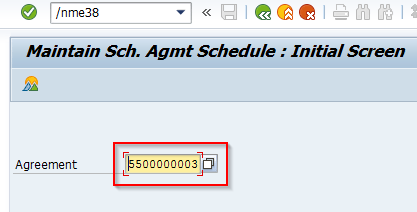
9.2 Maintain Delivery Schedules-ME38
Enter the SA Number
In the below screen, Double click on the line item
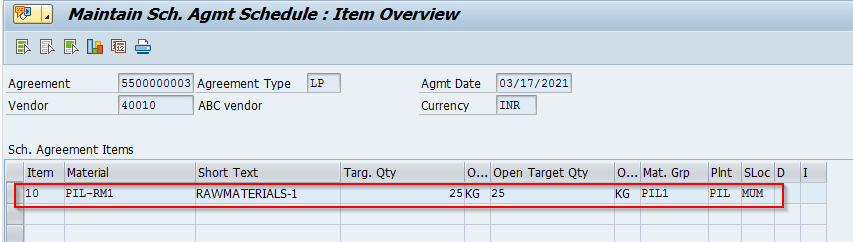
In the below screen, specify the Delivery dates and quantities respectively. Click on enter and save. The system will Save the Delivery dates under the scheduling Agreement number.

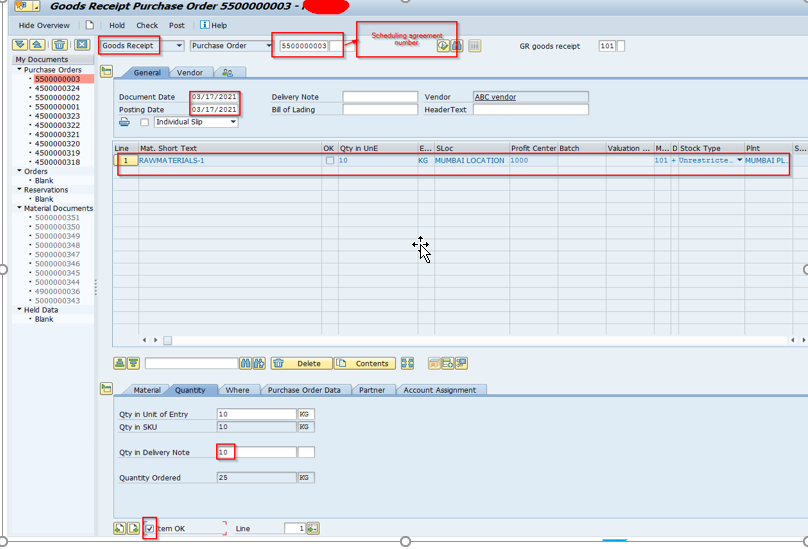
9.3 Goods Receipt-MIGO
In the below screen, Enter the Scheduling Agreement number against the Goods Receipt, enter the quantity received, and select Item ok. then save

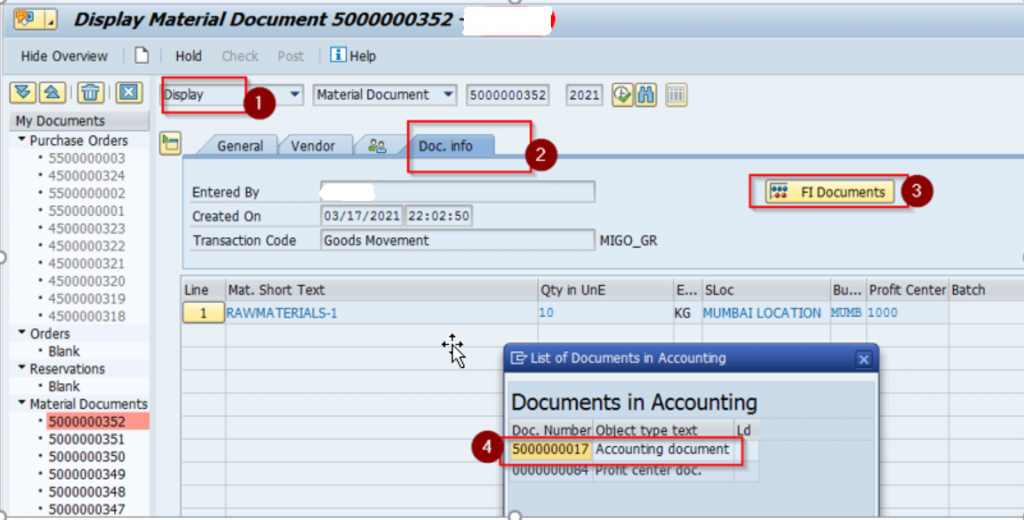
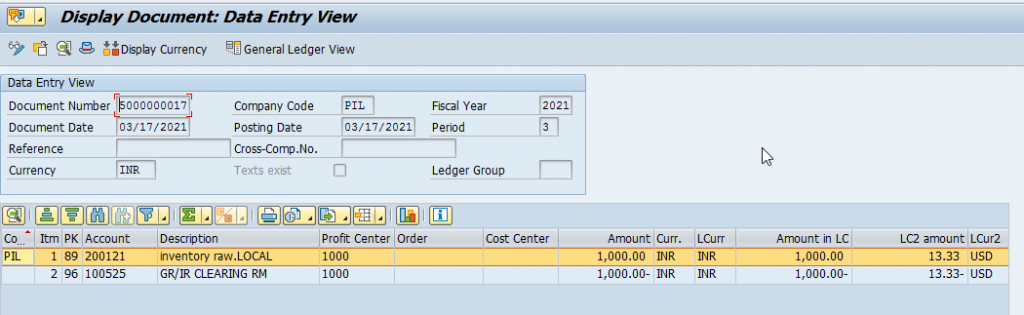
Display Document, In the below screen, Select the Display field from the Executable Action in MIGO
9.4 Invoice Receipt-MIRO
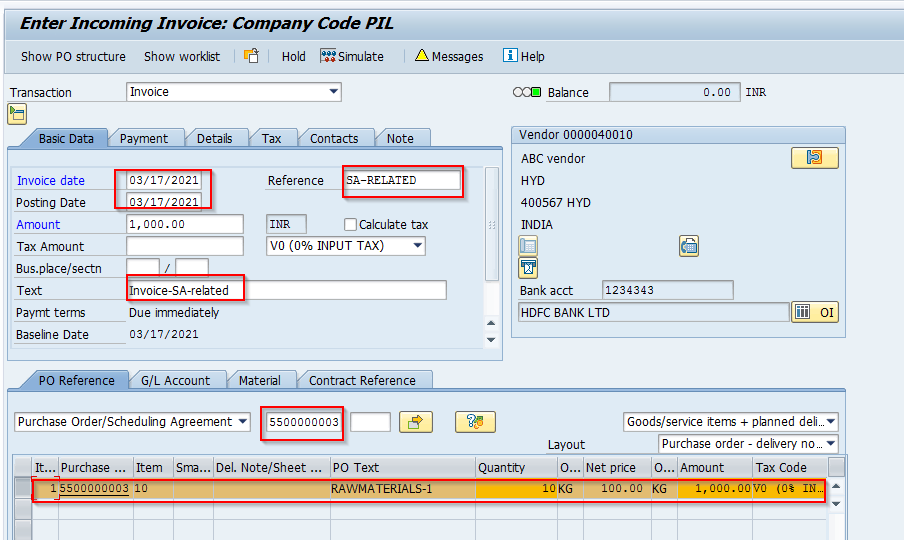

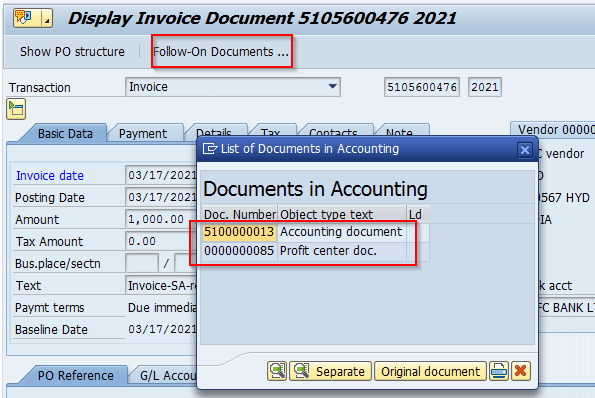
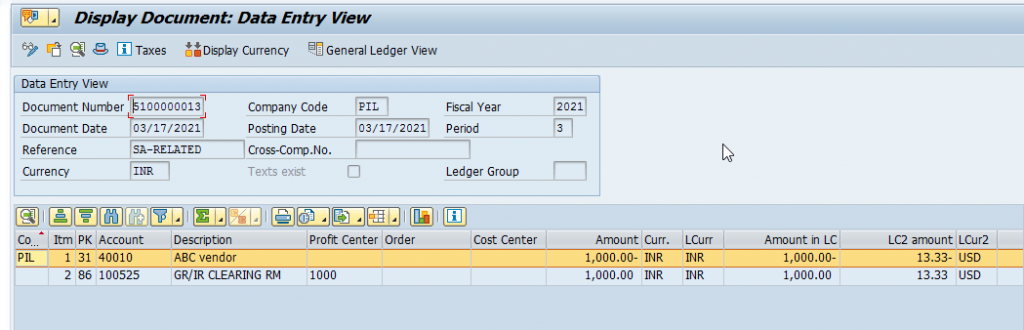
Display Invoice Documents
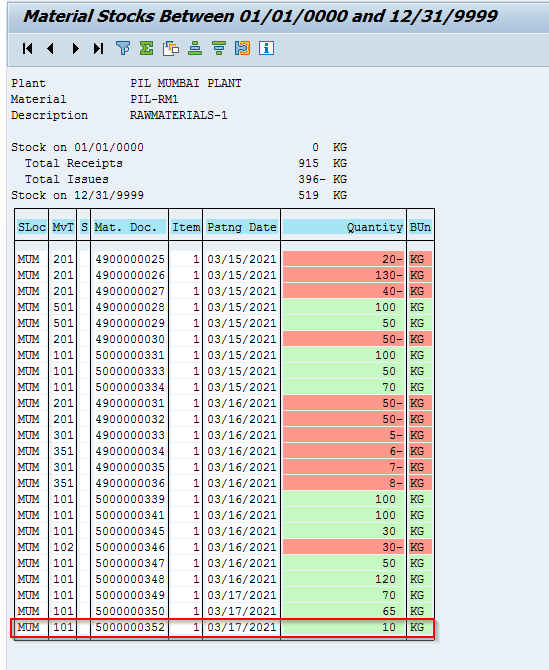
9.5 Verify Material Report-MB5B

10. Capex PO using Internal Order
The business is building an asset in the company and wanted to capture all expenses belongs to the in-house asset. So we have to create AUC Asset (AS01), Create Internal Order (KO01), and link AUC Asset in the Internal order. Below are the Pre-requisites for Capex PO Process
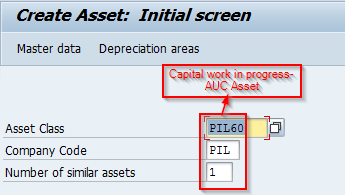
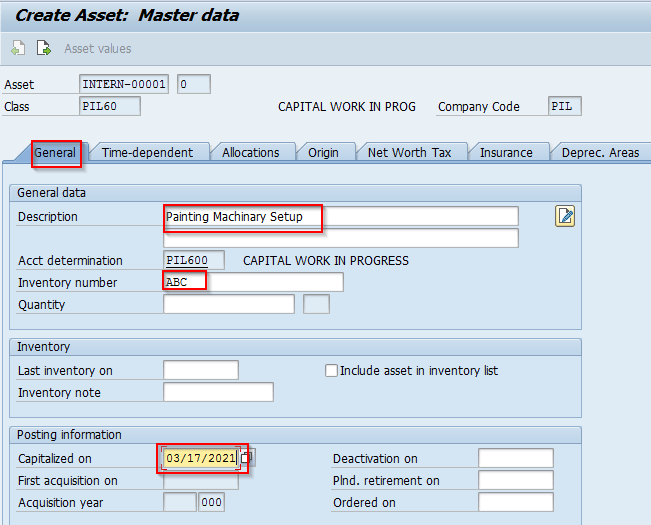
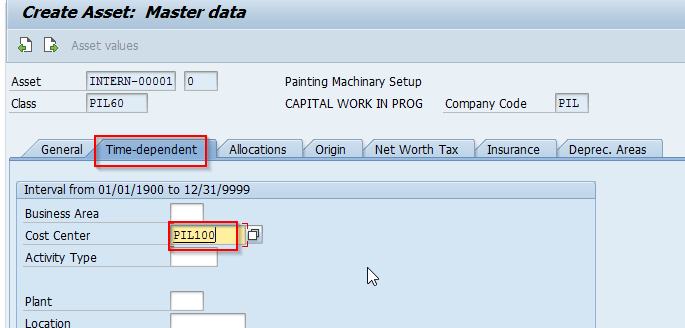
10.1 Creation of AUC Asset-AS01
Enter the correct Asset Class, Co. code and number of assets. Click on enter

10.2 Creation of Internal Order-KO01
Before creating Internal Orders, we must Create the below Configurations.
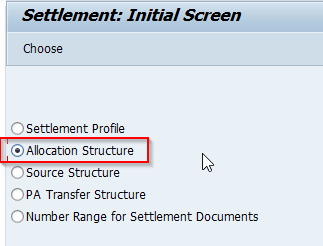
Creation of Allocation Structure: T.Code-OKOA.
I have explained below configuration steps for quick understanding. It is not relevant for the Non-FICO team and you may directly go to step 10.3.
In the Allocation structure, We need to specify the “Source Cost element”, “Receiving Cost element” and “Settlement cost element”. And also, we assign this Allocation structure in the Settlement profile.
Select the radio button Allocation Structure and click enter
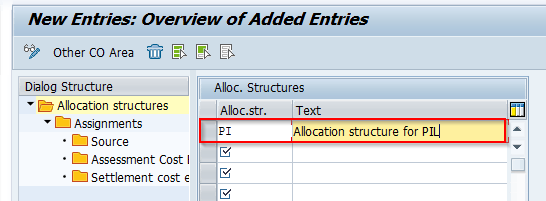
Click on new entries, Enter Allocation structure and Text.
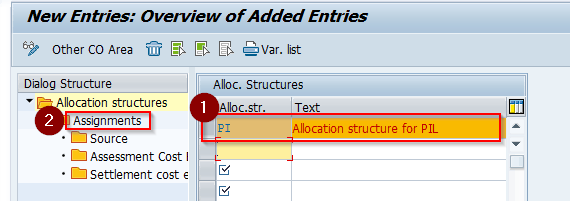
Select Allocation Structure ‘PI’ and double click on the Assignments folder
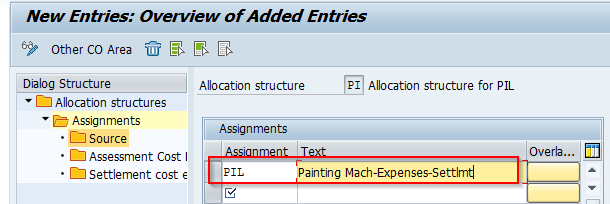
Enter Assignment name and Text. Click on enter

Select Assignment item ’PIL’ and double click on Source
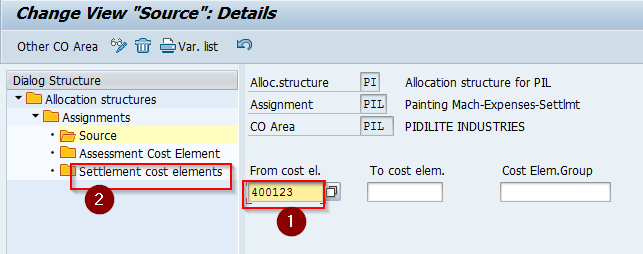
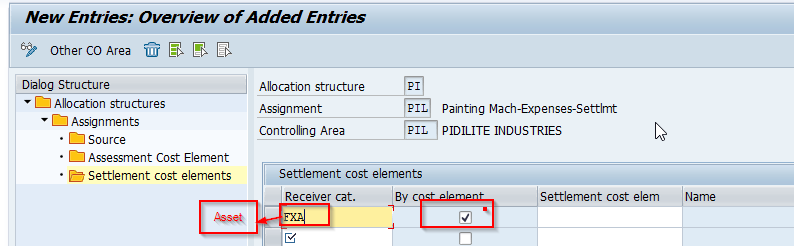
specify the Source Cost element and double click on Settlement cost elements in the below screen
Click on new entries in the below screen.Enter Receiver Account Assignment Category and select by cost element. Save
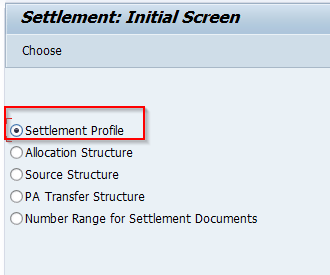
Creation of Settlement Profile-OKOA – Select the radio button Settlement profile and click enter then click on new entries
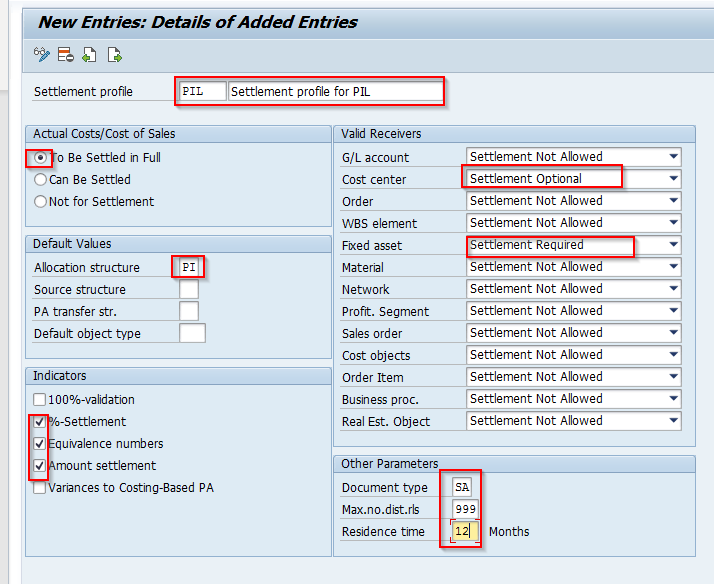
Enter the below information and save and save in your TR.
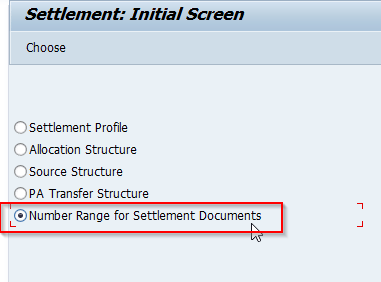
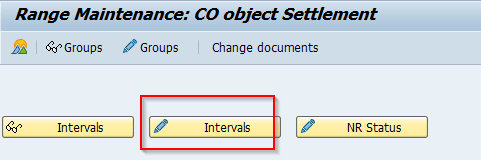
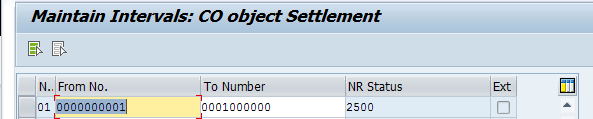
Define number ranges for Settlement documents-OKOA Select the radio button Number range for settlement Document, and click enter
In the below screen, Click on Change intervals and enter number ranges and save.
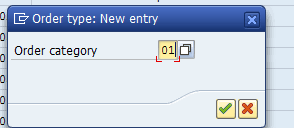
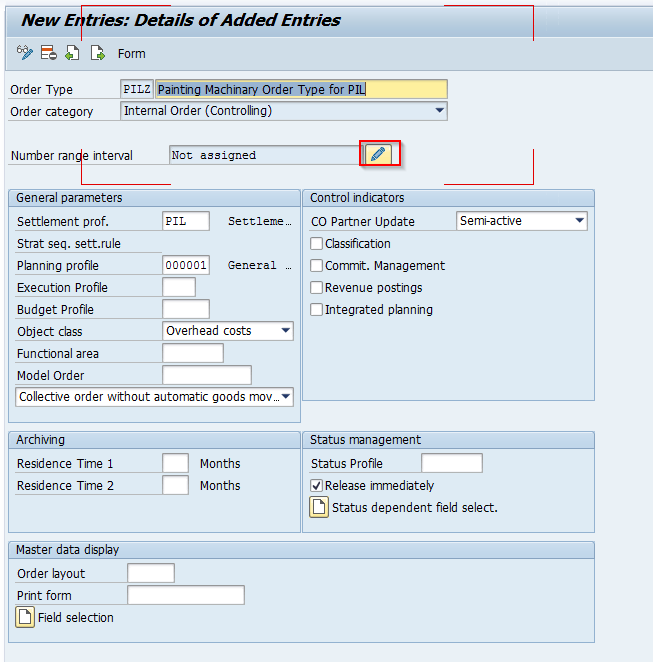
Creation of Order type- T-Code-KOT2 Select Order category 01 and enter
Enter the below information and save.
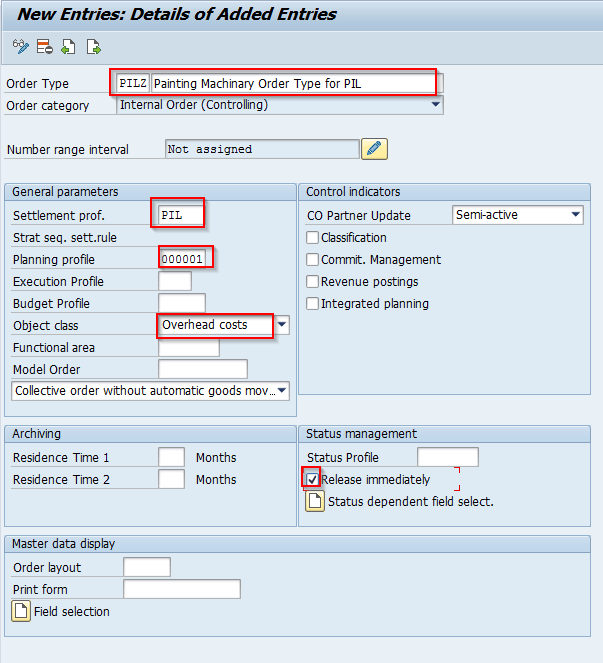
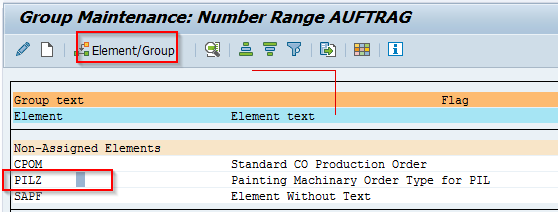
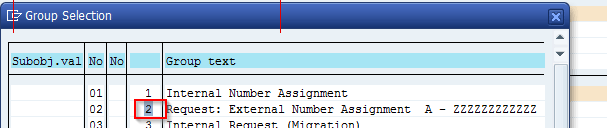
In the below screen, keep the cursor on ’PILZ’ and click on Element/Group. Keep the cursor on ‘2’ click enter

Ignore the warning message, enter, and save it.
In the same above screen, click on the Number range interval change icon
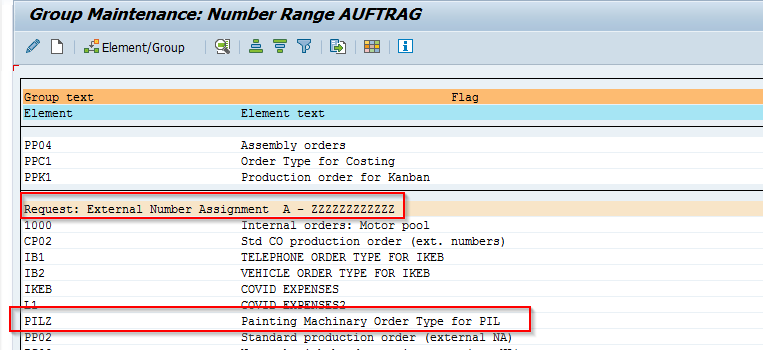
In the below screen, keep the cursor on ’PILZ’ and click on Element/Group. Keep the cursor on ‘2’ click enter
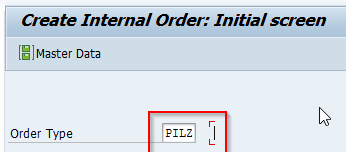
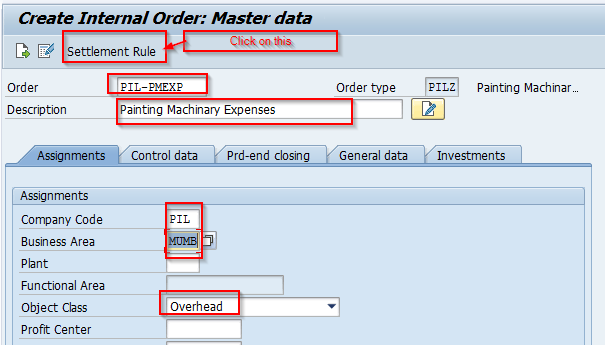
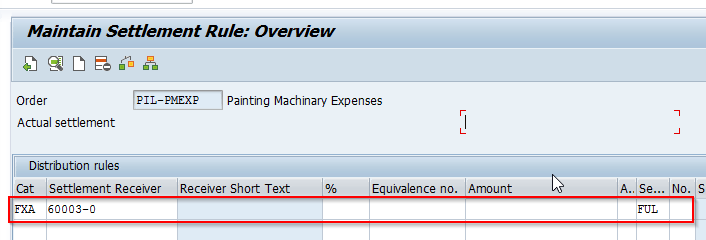
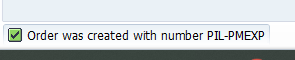
Creation of Internal Order-T-Code-KO01 Select Order type and enter
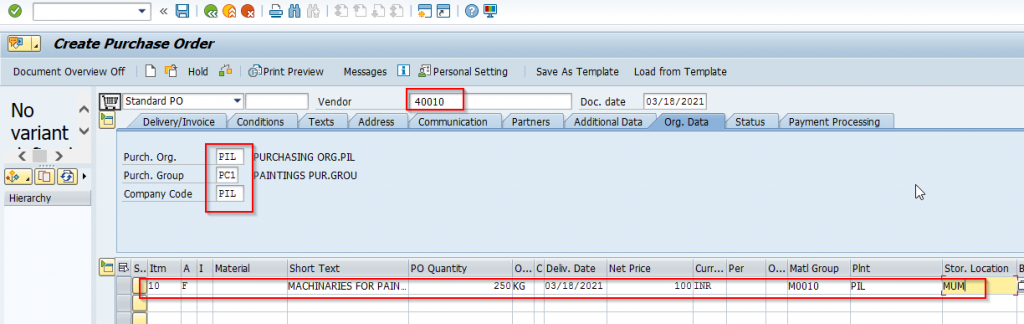
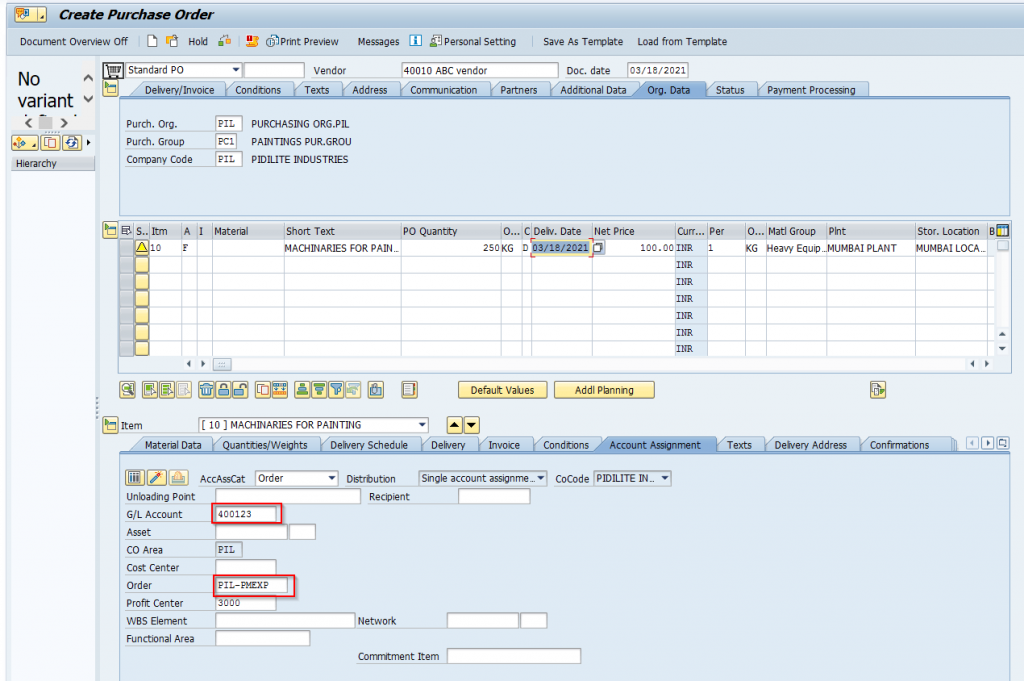
10.3 Purchase Order Creation using Internal Order-ME21N

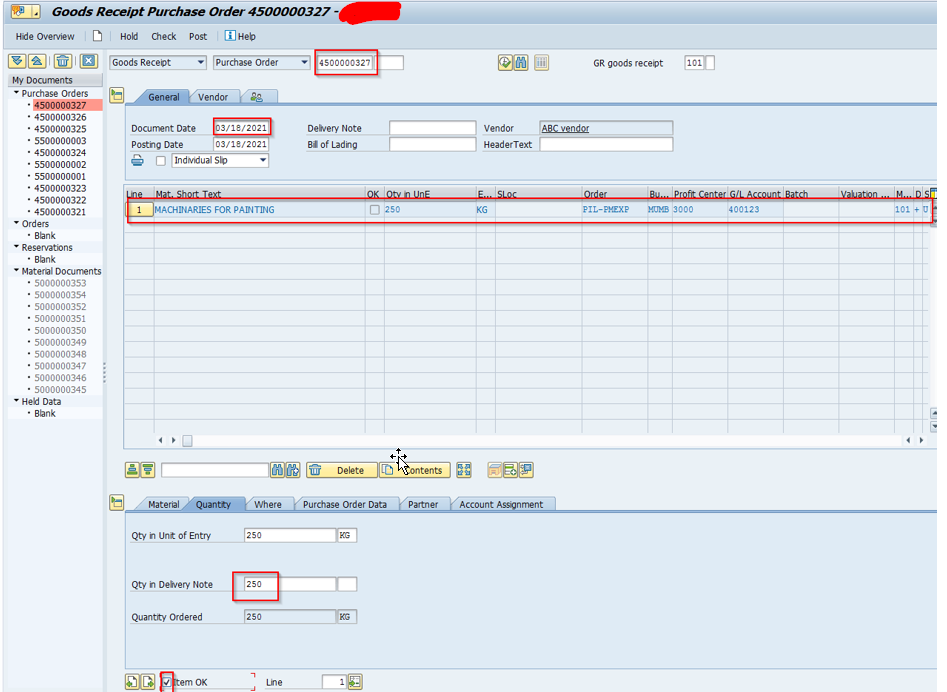
10.4 Goods Receipt-MIGO

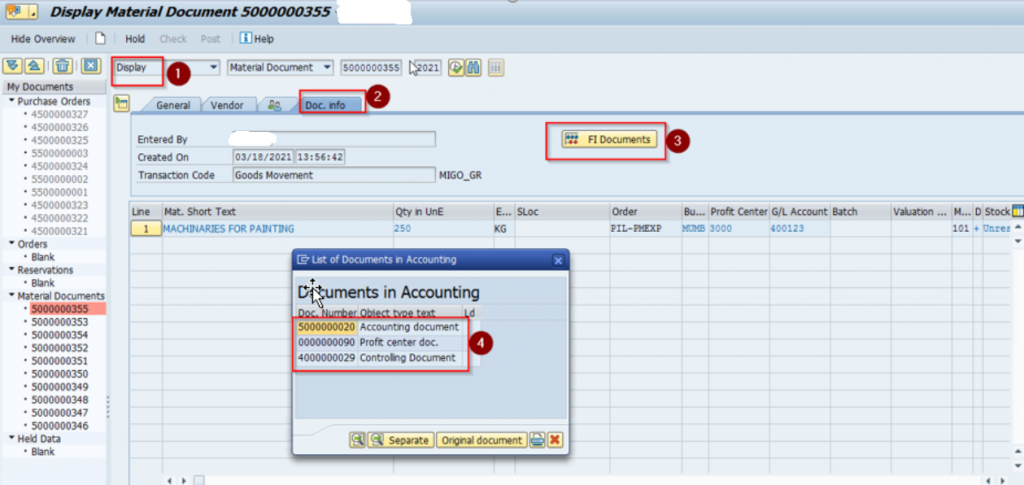
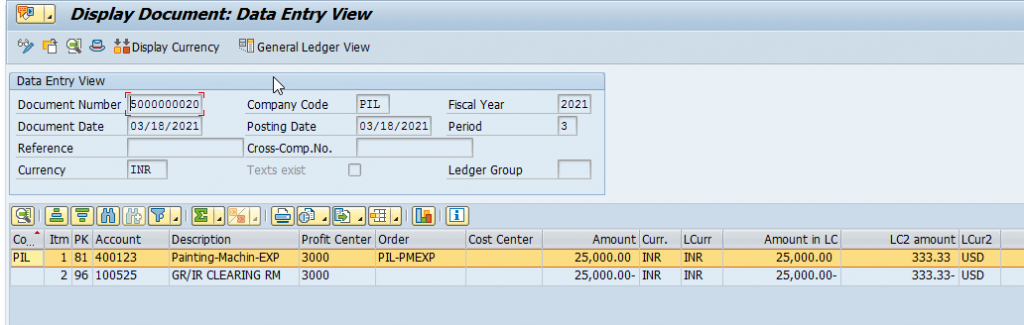
Controlling Document
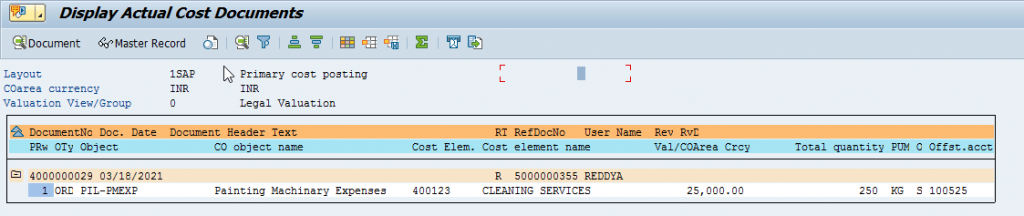
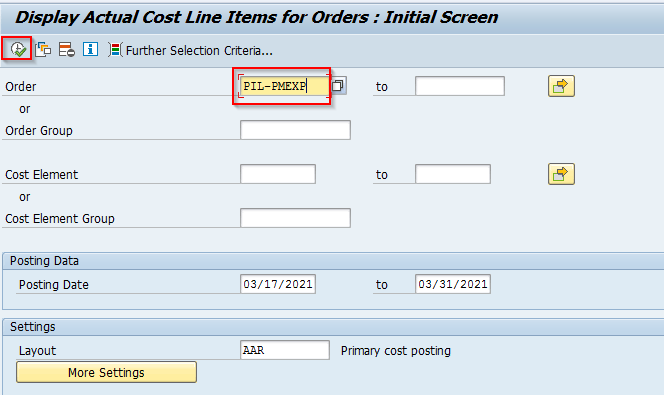
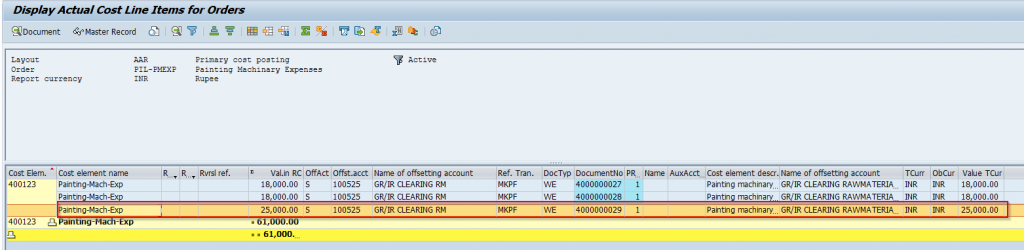
Internal Order Report-KOB1
10.5 Invoice Receipt-MIRO
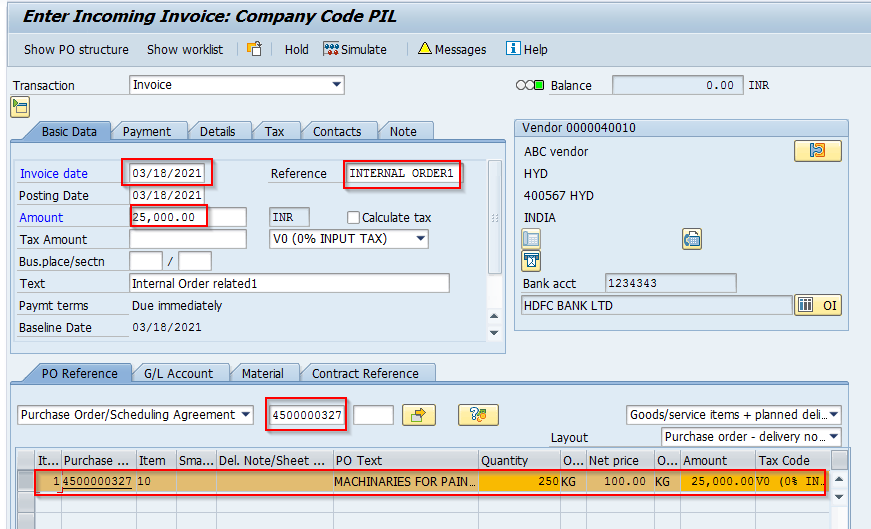

Display Invoice Document