Introduction
SAP Cloud Integration version 6.27.**, one of the capabilities of SAP Integration Suite, comes with addition of Master Data Integration – MDI – adapter, to integrate your scenarios with SAP Master Data Integration service. SAP Cloud Integration version 6.27.** software update is planned on end of May 2022 or beginning of June 2022 (date subjected to change).
This enables the integration scenarios, especially 3rd party integrations, to communicate with SAP Master Data Integration service via SAP Cloud Integration through the MDI Adapter for their master data synchronisation.
Availability of this feature depends upon the SAP Integration Suite service plan that you use.
Prerequisite
Before working with MDI adapter, the relevant subscription process to SAP Master Data Integration service should be completed and understanding of One Domain Model (ODM) entities is required.
MDI adapter
In SAP Cloud Integration, MDI adapter is available as receiver/outbound adapter to communicate to MDI service.
In this blog, 4 different kind of sample scenarios will be described.
- MDI Scenario 1 – Passthrough scenario to submit change request to MDI
- MDI Scenario 2 – Scenario to query data from MDI service
- MDI Scenario 3 – Scenario with 3rd party data mapping to ODM entity and submit change request to MDI service
- MDI Scenario 4 – Scenario to query data from MDI service with pagination
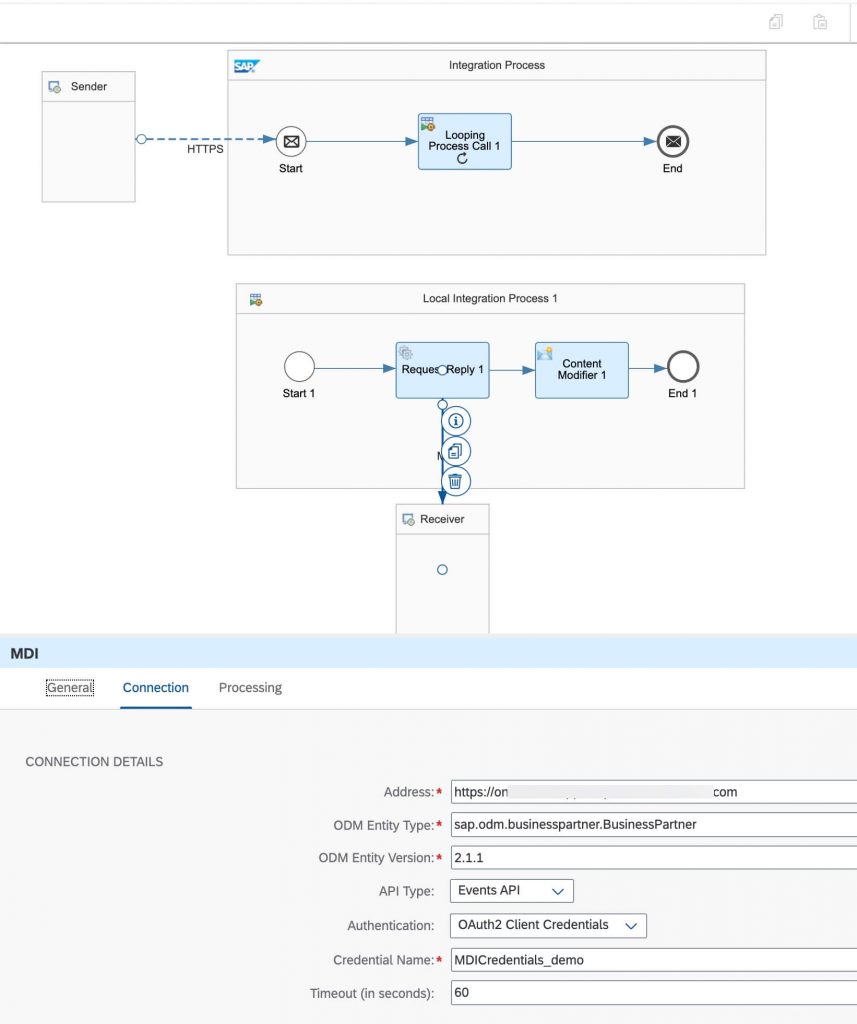
MDI Scenario 1 – Passthrough scenario to submit change request to MDI
Consider the below sample integration flow. It is used for submitting change request to MDI service.
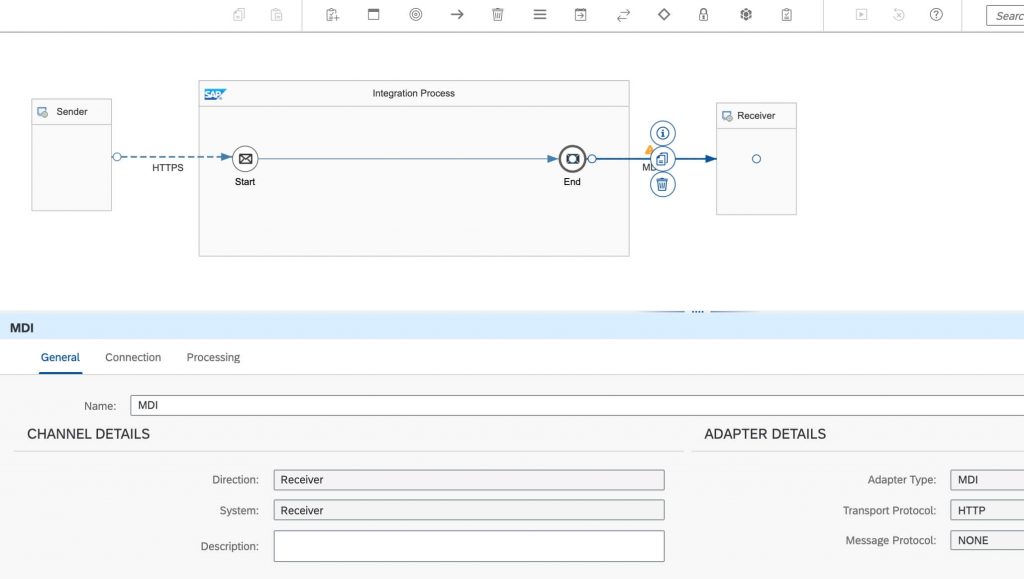
From the picture,
General Tab
General tab contains generic information about MDI adapter.
Connection Tab
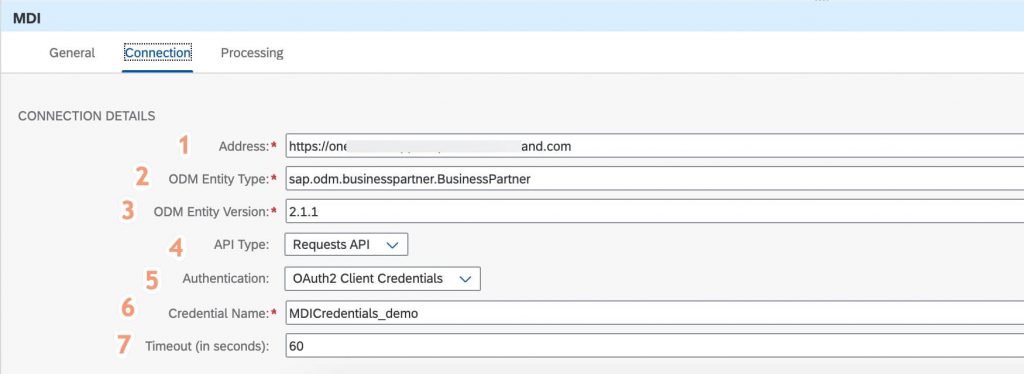
- Address of the MDI host instance has to be provided, which can be found in the subscribed MDI service instance details
- ODM Entity Type e.g. sap.odm.businessparterner.BusinessPartner
- ODM Entity version, provide version of the ODM entity
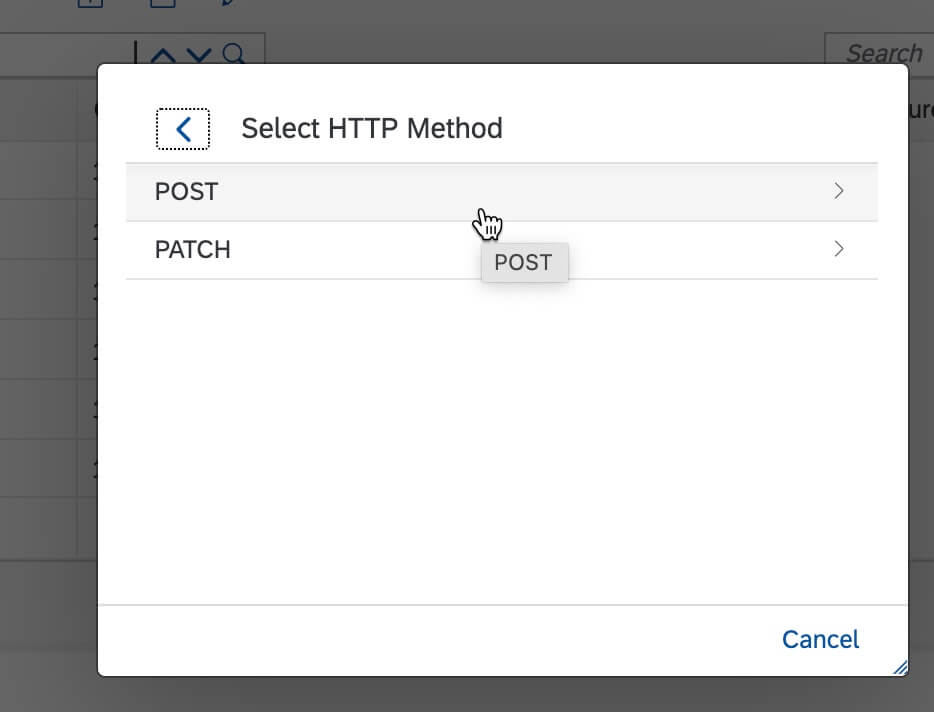
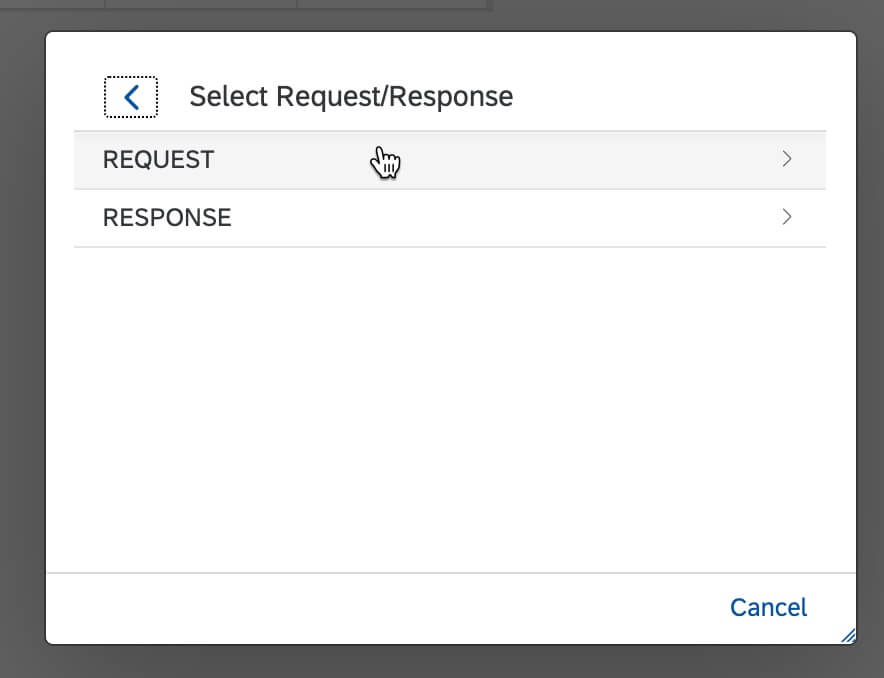
- API Type: This drop down control has two entries, Requests API, to submit the change request to MDI service instance, and Events API to query information from MDI service instance. As MDI adapter uses MDI API version V1, we use Requests and Events API and not Change and Log APIs which are part of MDI V0 version.
- Authentication : Currently only supported with OAuth2 Client Credentials.
- Credential Name : The name of the credentials, also called as alias, which you deployed. Let’s cover on what to deploy in “Deploying OAuth2 Client Credentials for MDI adapter” section below
- Connection timeout mentioned in seconds, defaulted to 60 seconds
Processing Tab
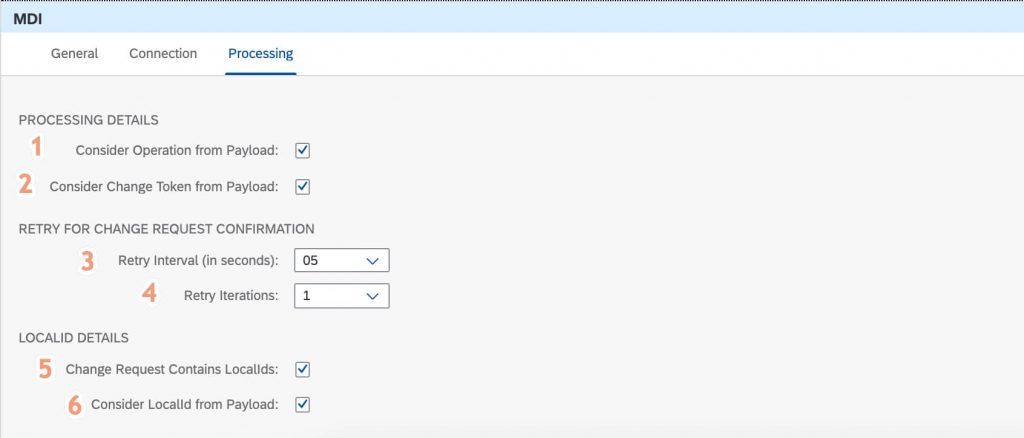
Processing Details
1. Option to provide operation name/configuration to tell MDI adapter from where the operation to be considered. Let the default be selected for the mentioned scenario example as operation name we will be passing would be via the payload
2. Options to provide change token information, let the default setting be as is, as we are passing the change token from payload
Retry for Change Request Confirmation
This section provides inbuilt option to retry for commit confirmation for the change request you submitted to MDI backend. In conventional way, when an application submits a change request to MDI, the application has to fire Events API to check whether the change request is committed successfully at MDI side. The MDI adapter does this internally, i.e., when the change request is submitted, after receiving 202 Accepted by MDI server, MDI adapter fires an Events API internally. If there is no confirmation, then MDI adapter uses the configured retry option to fire Events API to check commit confirmation.
3. Retry intervals has been provided in 5, 10, 15 and 20 seconds
4. Retry iterations you can configure in options of 1 to 5
Local ID Details
MDI protocol doesn’t mandate the Local IDs usage in an integration scenario. Hence, in Cloud Integration MDI adapter, we have provided to tell adapter whether your scenario makes use of Local IDs. Though MDI adapter doesn’t mandate local Ids, we assume most of the business scenarios makes use of it, hence by default, UI check box is selected for this configuration.
5. To inform MDI adapter whether scenario contains Local IDs or not. If this check box is selected, Cloud Integration MDI adapter fires key-mapping API to check whether such a ODM instance already exists or not
6. To inform MDI adapter where the Local Ids details are available. As the mentioned example scenario has local IDs in payload, let the default selection be as is.
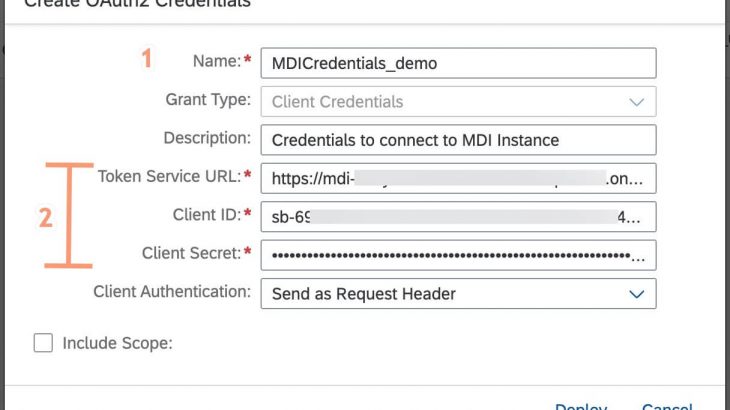
Deploying OAuth2 Client Credentials for MDI adapter
To deploy OAuth2 client credentials, you need to navigate from Cloud Integration Monitoring tab -> Security Material UI tile -> Create button -> OAuth2 Client Credentials
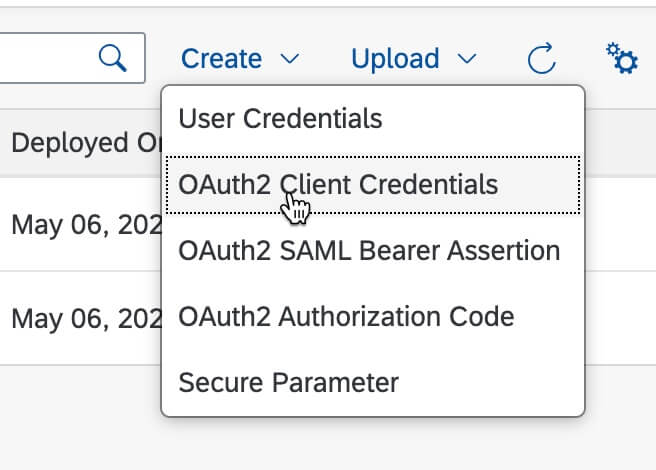
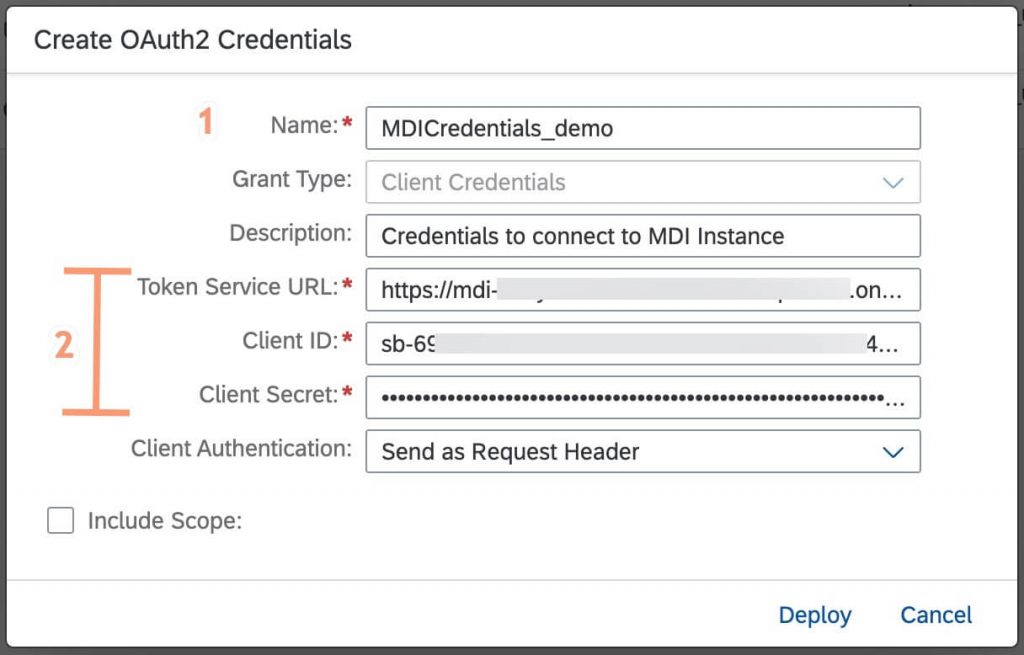
- Provide name of the credentials. This name should be used in the Credentials Name property of the MDI adapter
Token service URL, Client ID and Client Secret, this information you will get from your MDI instance service key which - you created as part of MDI subscription process, add the same information in these fields.
Running the scenario
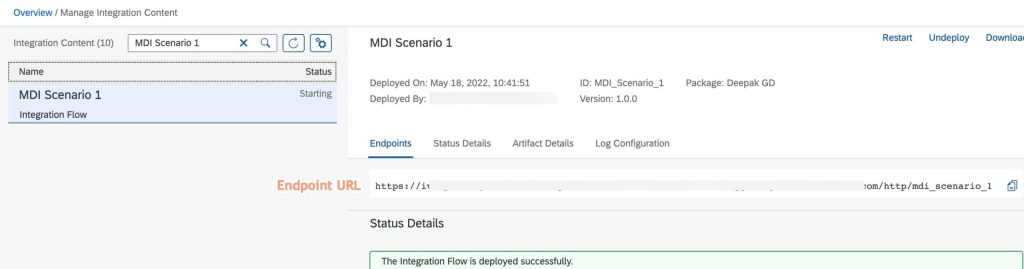
Once you deploy the above integration flow, since it contains the HTTPS sender adapter, the endpoint will be created, which you find in the Monitoring -> Manage Integration Content.
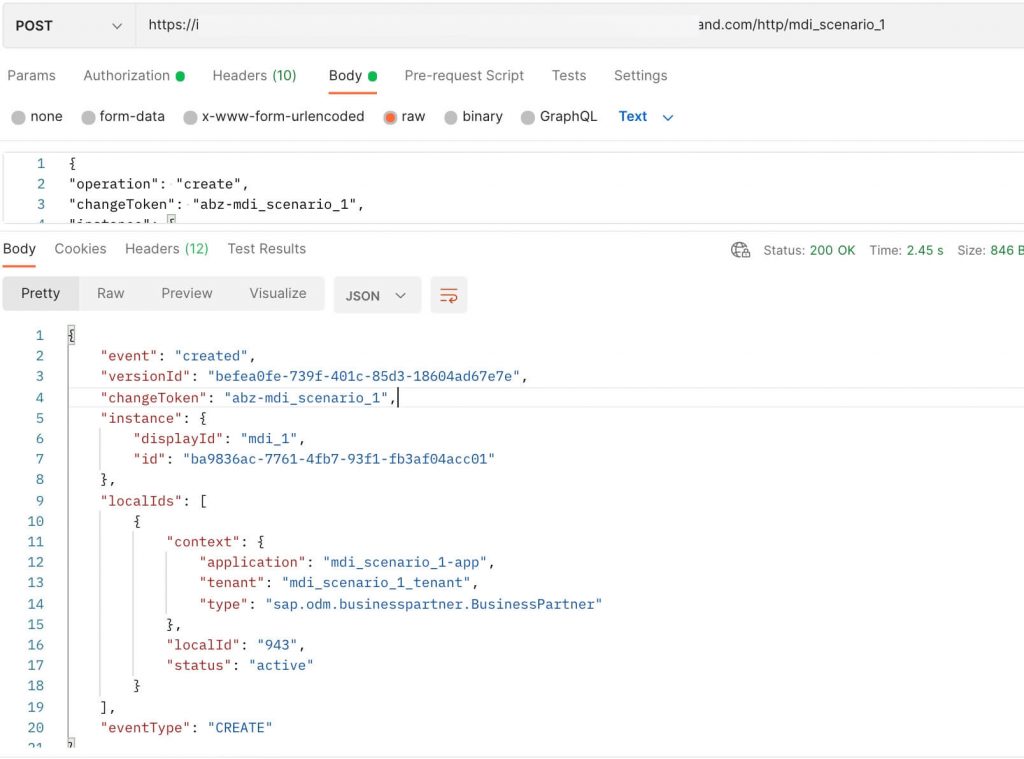
Copy the URL into the any REST Client application. Since we mentioned that payload has all the details like operation, change token etc. in MDI adapter configuration, we provide the complete payload in request body and fire a POST call.
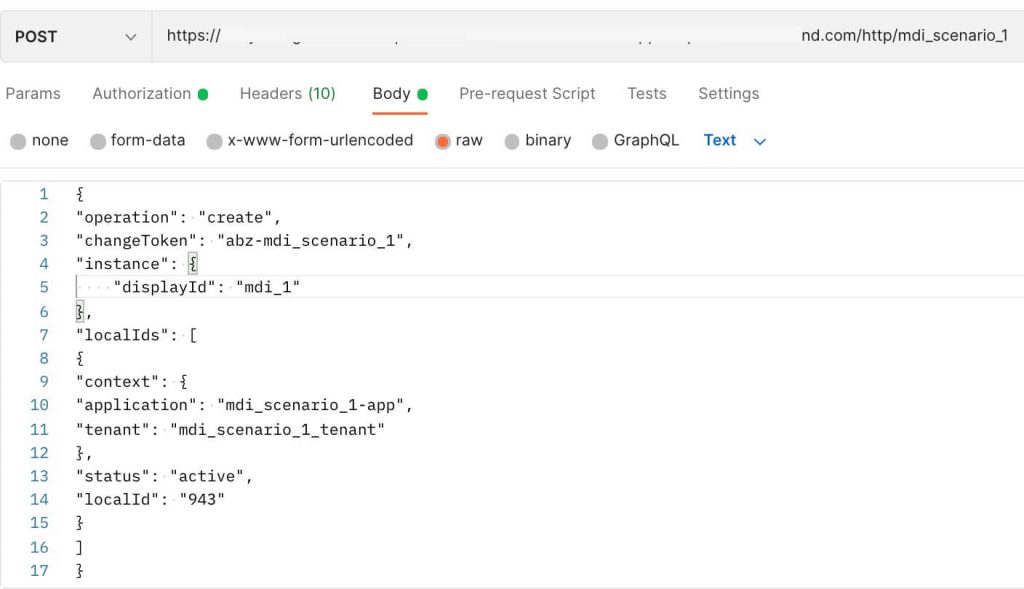
After triggering the request, integration flow executes and internally the MDI adapter submits the change request (via Requests API) payload, triggers another call (via Events API internally) to verify for the commit confirmation. If no confirmation received, the retry configuration will be used to fire Events API, again internally within the adapter, to check on commit confirmation. If there is a positive confirmation, successful response will be shared to the caller, else an error information will be send back to caller. Sample response snippet is below
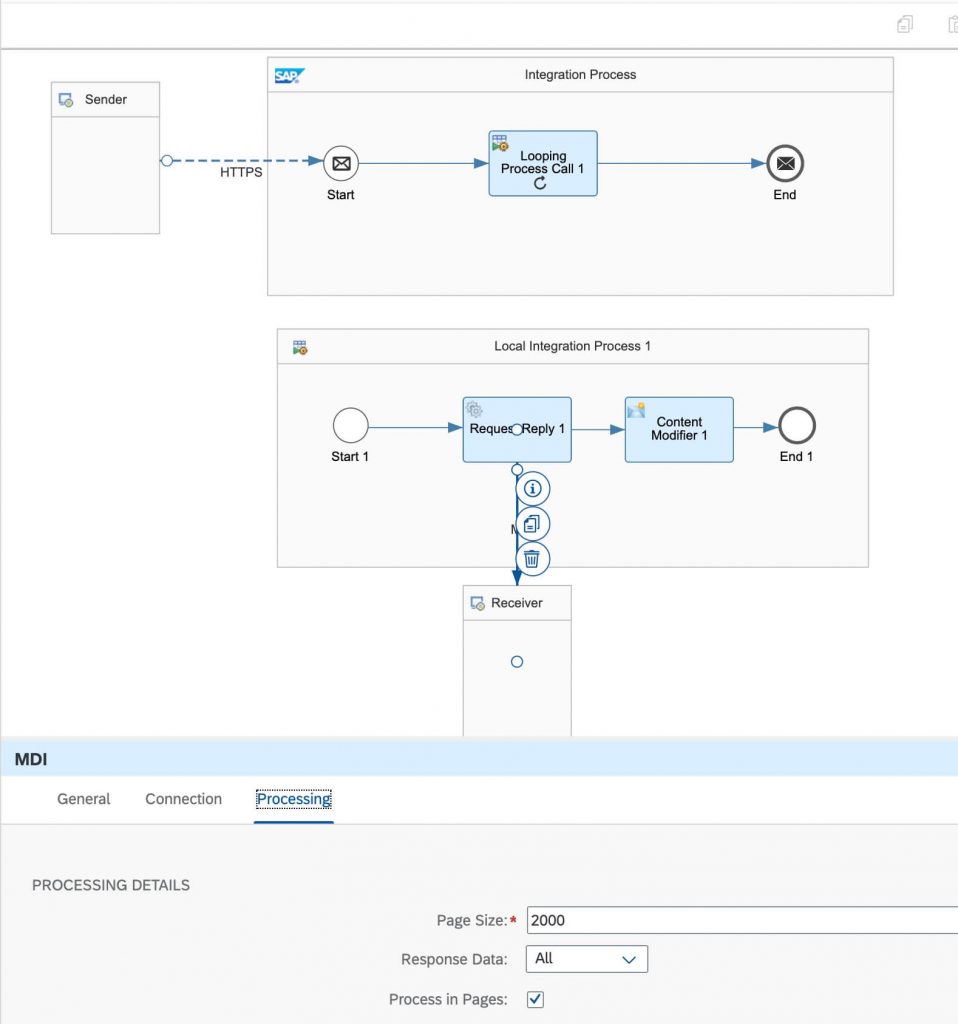
MDI Scenario 2 – Scenario to query data from MDI service
Consider the below sample integration flow. It is used for querying content from MDI service.
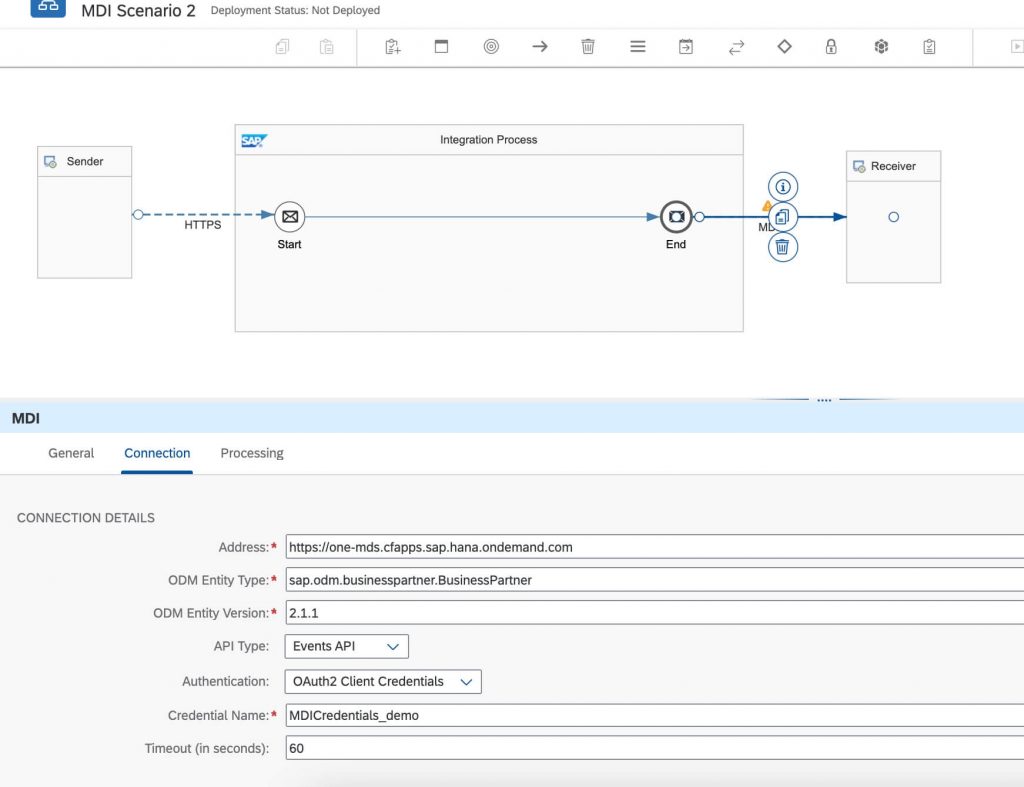
From the picture,
Connection Tab
What changes is only the API Type and Events API to be selected to query data from MDI service.
Processing Details
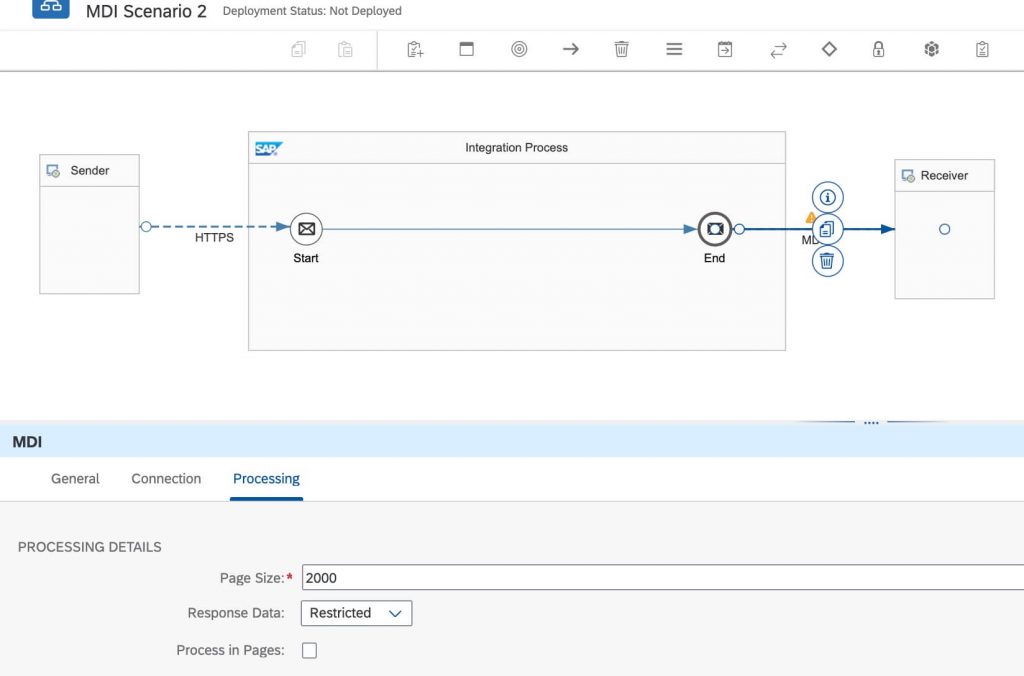
When the API Type is selected with Events API, the processing details will change.
Processing Tab
- The default page size of 2000 has be added by the tool
- Response Data : This configuration option is to handle the large amount of data getting pulled out of MDI service instance and creating memory issues in the integration tenant runtime. This has two entries in the drop down control, Restricted and All. By default, Restricted option is selected in the drop down control. In case if you are just trying to see how MDI adapter works for data query scenarios, we recommend to use this Restricted option which gives you 2 page of records, as per the availability. And if you have productive scenarios, then you need to choose All option along with Process in Pages option checkbox selected with a Looping Process call. This shall be explained in “MDI Scenario 4” section below.
Running the scenario
Once you deploy the above integration flow, since it contains the HTTPS sender adapter, the endpoint will be created, which you find in the Monitoring -> Manage Integration Content.
Copy the URL into the any REST Client application.
After triggering the GET request, integration flow executes MDI adapter executes Events API and data from MDI service will be queries and returned to caller. Note that Delta token is persisted internally, such that if you re-execute this integration scenario later point in time, only delta changes are fetched.
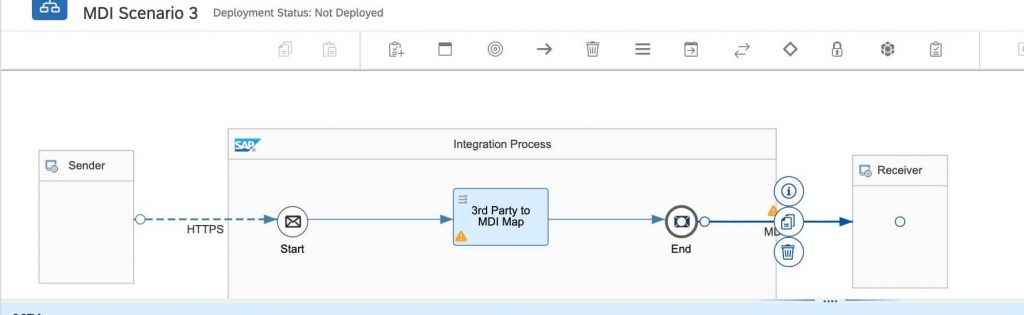
MDI Scenario 3 – Scenario with 3rd party data mapping to ODM entity and submit change request to MDI service
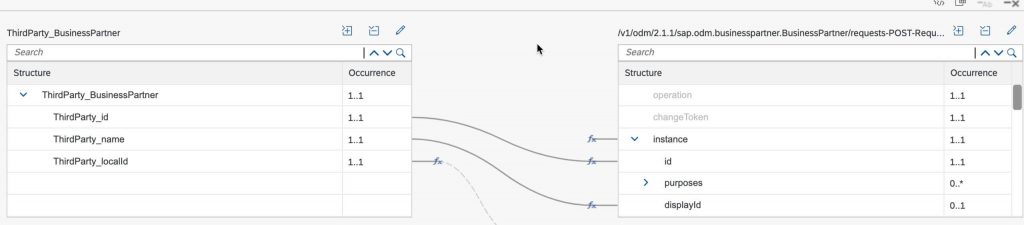
In this scenario, let’s consider that you are trying to integrate a 3rd party system with MDI, where you have your data/payload in your application native format adhering to 3rd party system, and you want to map it to ODM equivalent instance and then push the data to MDI service. In such case, the Cloud Integration Message mapping comes handy to map these two different structure.
Below is the scenario snippet and message mapping.
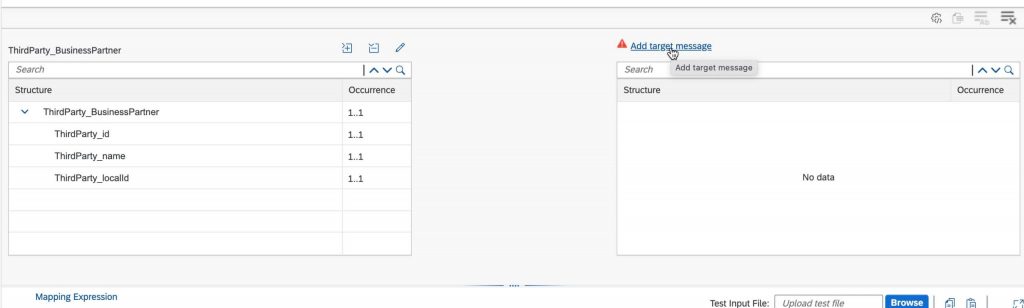
For message mapping, as shown below, we load the 3rd party schema in the left hand side, and start importing the JSON schema for BusinessPartner ODM entity.
Note : How to get JSON schema for ODM objects? Details will be added here.
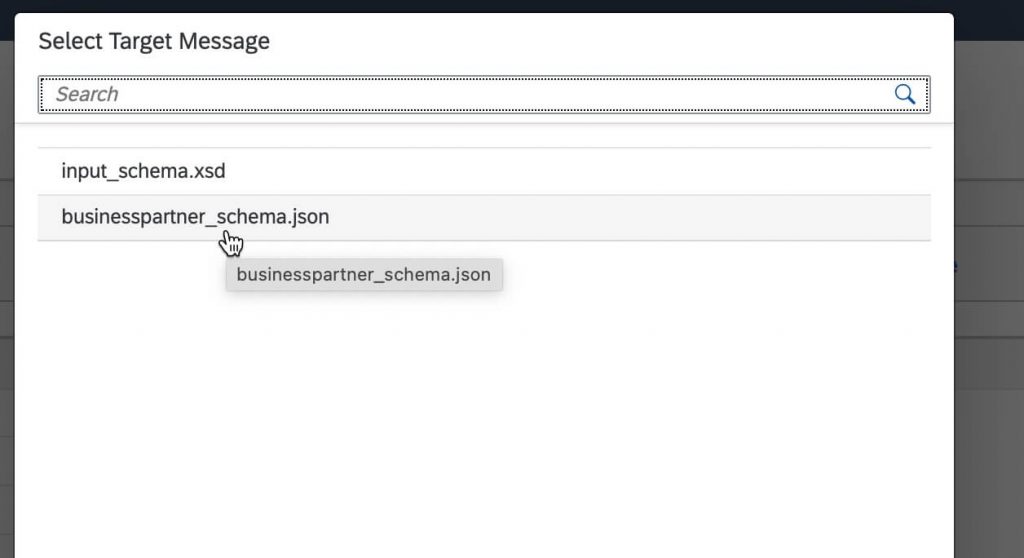
Add target message and select BusinessPartner JSON file. This JSON file will be in the Open API Spec format.
Note: If there is an error while uploading stating allof/oneof type are not supported, it is due to the limitation in message mapping that these types are not supported. One has to remove such content manually from the file to get the API Spec JSON schema uploaded successfully in to message mapping. We will be working on to fix this limitation.
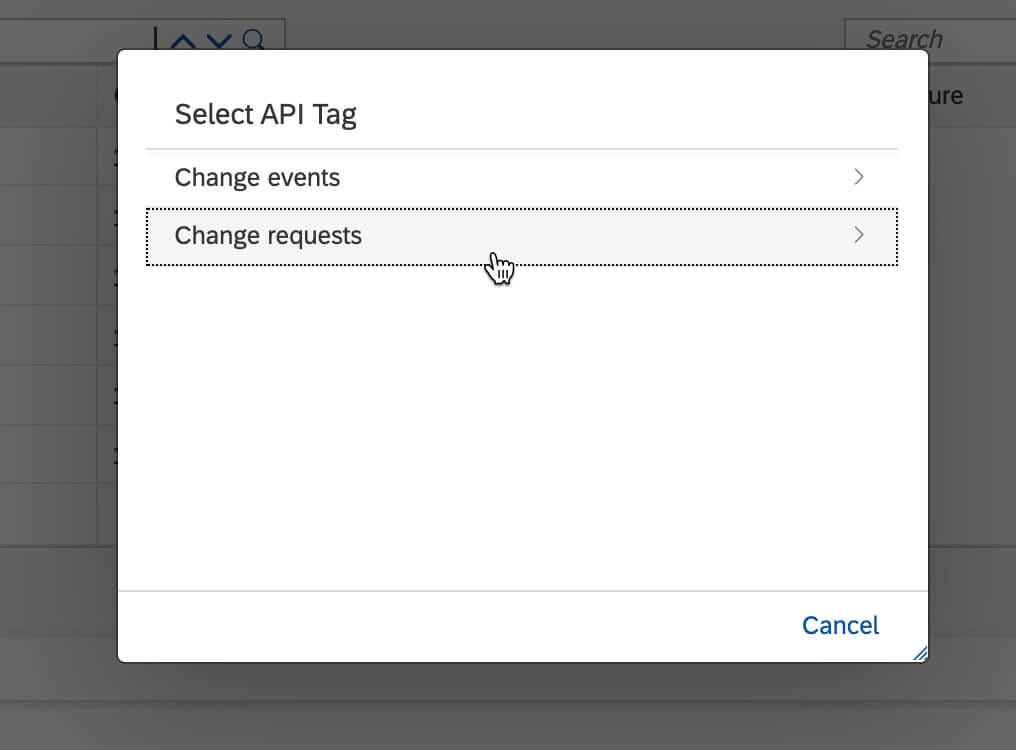
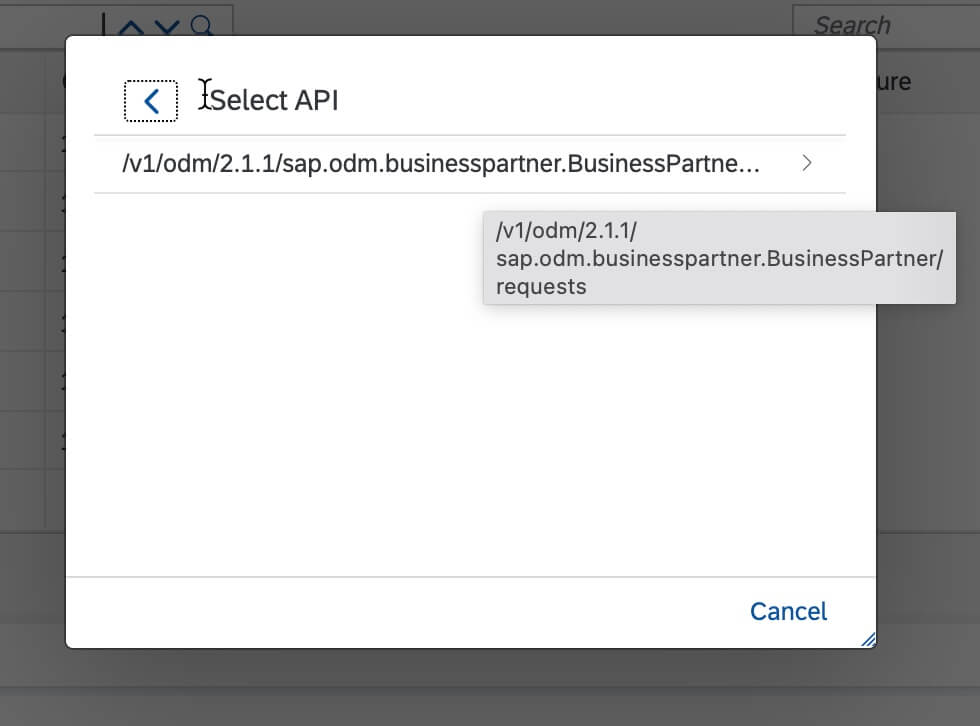
Select the API tag, and proceed as per the screenshots below.
For the mapping purpose, the operation and changeToken elements in the target have disabled because information for these will be passed in the MDI adapter configuration properties. The instance have been mapped to a random constant, because its cardinality is 1..1 and we can’t skip the mapping or disable it, because, disabling instance will disable all the child elements.
Note: How to disable a mapping element?
One has to hover the mouse on mapping element, and click on the button, and then click on Disable Field. Sample screenshot below

ThirdParty_id has been mapped to id and ThirdParty_name has been mapped to displayId.
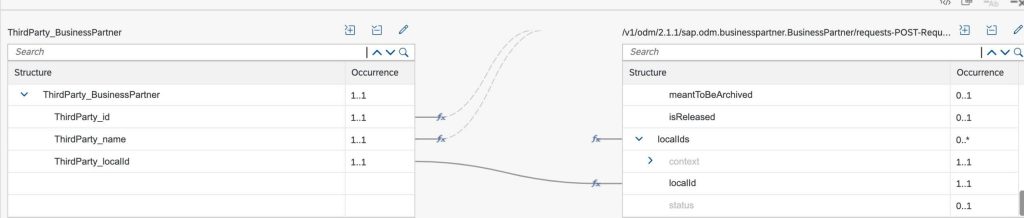
Continuing the mapping, localIds node have been mapped with a dummy constant, context node, which will have nodes like application, type and tenant ect, is disabled because information on these will be provided in MDI adapter properties.
Now, the Connection tab configuration remain same, and what we need to change is the Processing tad configuration details.
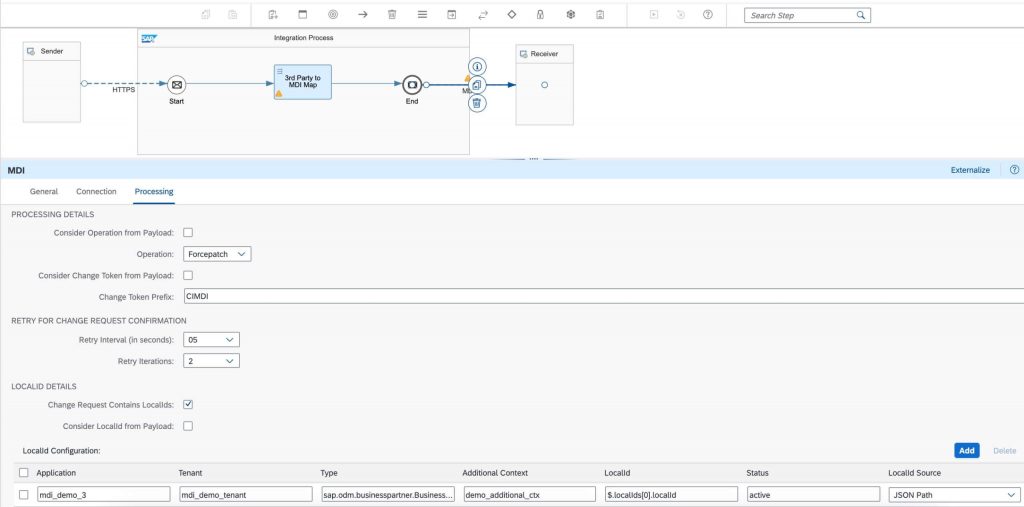
- Consider Operation from Payload has been deselected, which opens up an explicit selection option for the operation, because we are only passing the business data/payload from the mapping output. This operation drop down defaulted to Forcepatch, because with Forcepatch, upsert kind of a scenario can be achieved when “Instance Id” provided and maintained by the client or mapping. We recommend to use the Forcepatch when provided the Instance Id by the client explicitly in the scenario. You have the other operations to choose like Create, Update, Patch and Delete as per your scenario.
- Consider Change token from Payload is deselected, which gives an optional text field to add a change token prefix of 5 characters length. If provided, it will be used a prefix and the rest of the change token content will be generated with timestamp and a unique number by MDI adapter internally.
- For Local Id details, we still choose the option of Change request contains Local Ids, and deselect Consider Local Ids from Payload, because business data/payload doesn’t completely hold the information about local Ids like application, tenant etc. For which, a table will be shown in the UI upon deselecting Consider Local Ids from Payload. And, you can provide information about Application, Tenant etc, in the table. You have the option to inject LocalId information from the JSON path, header, property or it may be a constant as well. In the example scenario, I have provided a JSON path which is the path of message mapping target output schema.
Running the scenario
Once you deploy the above integration flow, since it contains the HTTPS sender adapter, the endpoint will be created, which you find in the Monitoring -> Manage Integration Content.
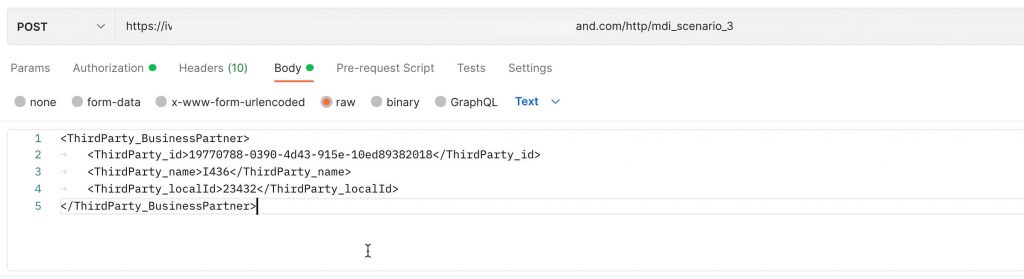
Copy the URL into the any REST Client application. We provide the payload structure of the 3rd party data in request body and fire a POST call.
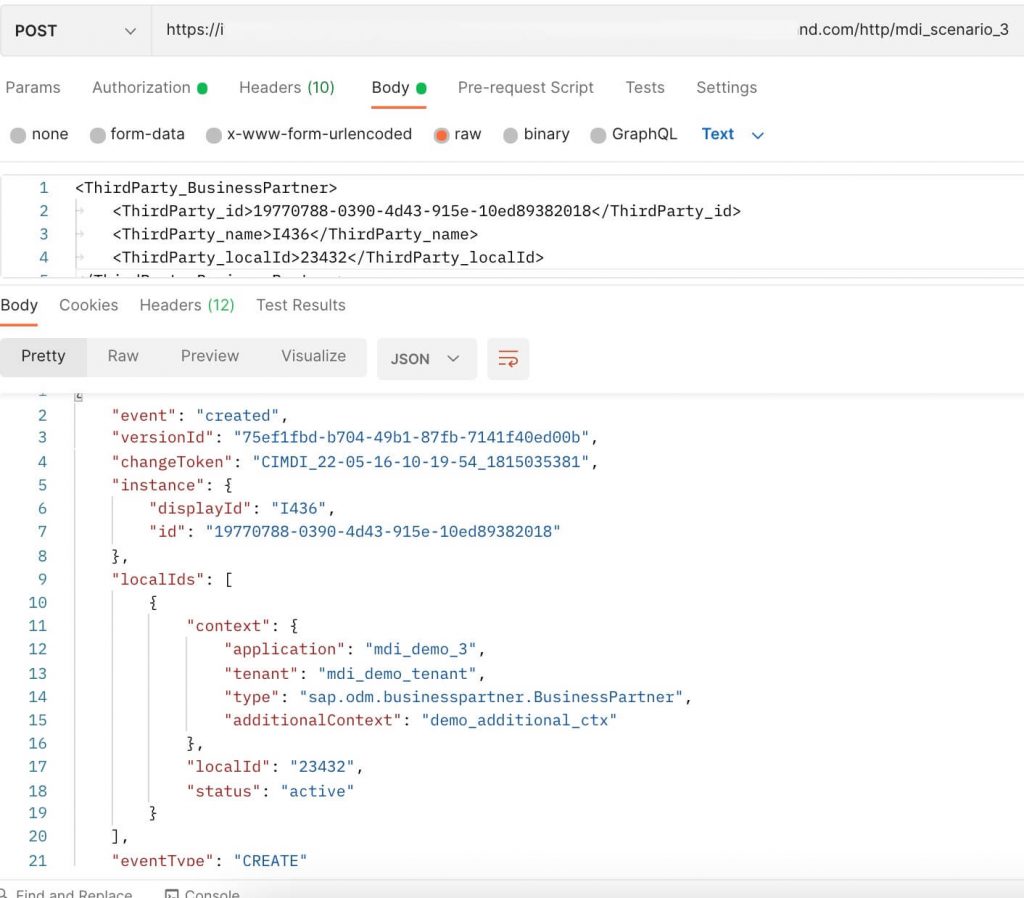
After triggering the request, integration flow executes and internally the MDI adapter submits the change request (via Requests API) payload, triggers another call (via Events API internally) to verify for the commit confirmation. If no confirmation received, then retry configuration will be used to fire Events API, again internally within the adapter, to check on commit confirmation. If there is a positive confirmation, successful response will be shared to the caller.
As in the below screenshot, since the first request was a new request, the Forcepatch created a new entry in the backend MDI service.
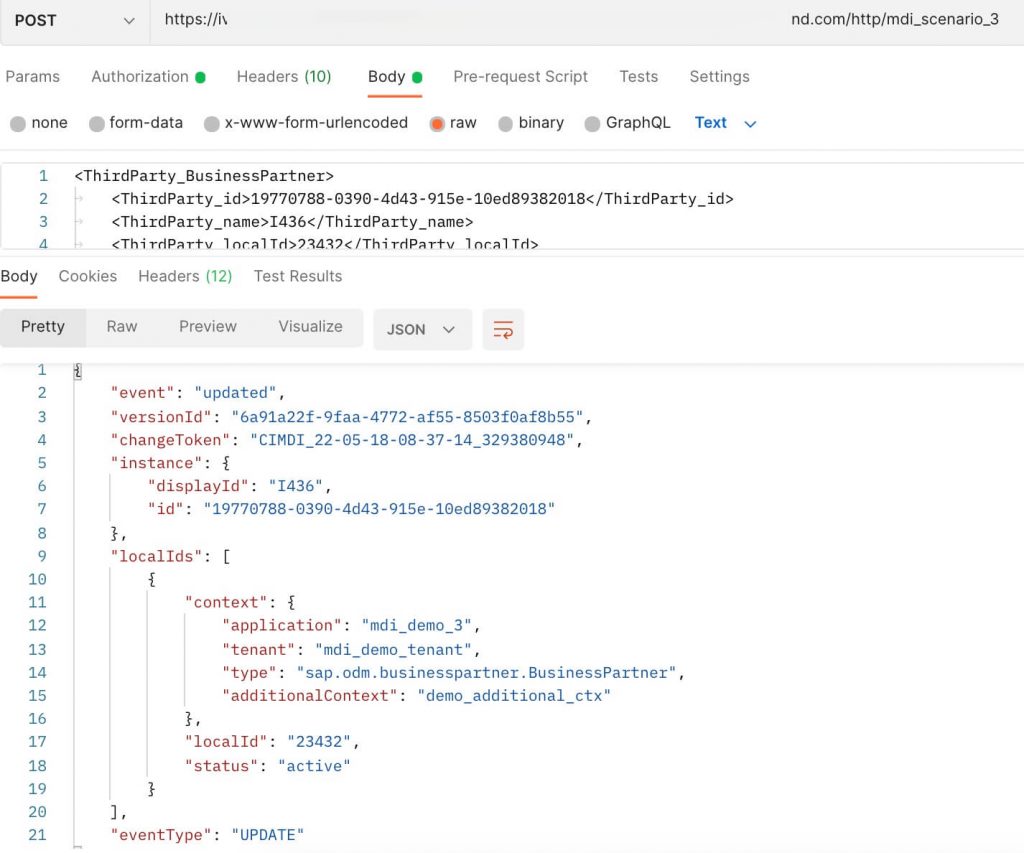
Trigger the same request again from the REST client, you will notice that the Forcepatch has updated the record, screenshot below.
MDI Scenario 4 – Scenario to query data from MDI service with pagination
Consider the below sample integration flow. It is used for querying content from MDI service with Response Data set to All and integration flow is modelled inside the Looping Processing call.
From the picture,
Connection Tab
What changes is only the API Type and Events API to be selected to query data from MDI service.
When the API Type is selected with Events API, the processing details will change.
Processing Tab
- The default page size of 2000 has be added by the tool
- Response Data : Set to All.
- Process in Pages : Checkbox is selected and the MDI adapter is used inside local integration process connected via Looping Process call.
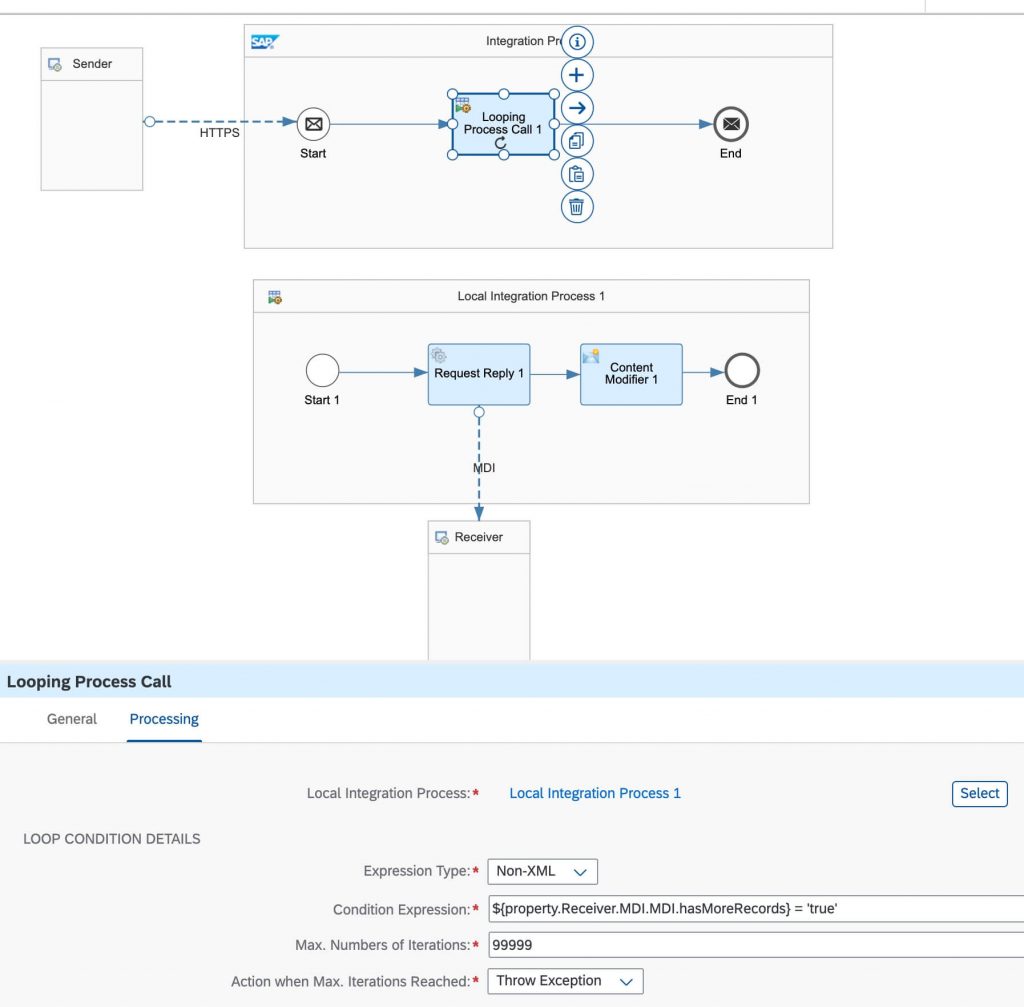
Looping Process call Expression Type property should be selected with Non-XML and expression in the format of ${property.<receivername>.<channelname>.<componentType>.hasMoreRecords} = ‘true’, which is ${property.Receiver.MDI.MDI.hasMoreRecords} = ‘true’ in the above example, with setting the looping iterations to max 99999
Running the scenario
Once you deploy the above integration flow, since it contains the HTTPS sender adapter, the endpoint will be created, which you find in the Monitoring -> Manage Integration Content.
Copy the URL into the any REST Client application.
After triggering the GET request, integration flow executes and MDI adapter executes Events API inside the local integration process in looping. Note that Delta token is persisted internally, such that if you re-execute this integration scenario, only delta changes are fetched.


