
In the last post, ‘SAP HANA from Space Level’, we figured out who is eligible for HANA and who not. In fact we conferred that HANA is for everyone. You choose the area of HANA as per your interest, expertise and also as per the career progression you want to traverse.
Finally you are somewhat clear as to what you want to do in HANA. Now a greater hurdle. Neither your employee organization nor your current project client has HANA database. So, how would you explore the tremendous power and innovation of HANA? Is it end of the road? Was your acquaintance with HANA only till here?
Do not worry, there is always a way around. You just need to have the zeal to learn and find out the alternatives.
“When a person really desires something, the whole universe conspires to help that person to realize his dream.”
The easiest option (and a better one, if you can afford) is to enroll in the authorized SAP Classroom/Online HANA training session. Consider it as an investment for your future.
But, if you do not want to shell out some $$$ right now or you want to have some bare minimum knowledge in HANA and then you plan to take proper formal training, you have another free alternative.
Remember, in the concluding lines of previous post, I mentioned that we can get access to HANA database using SAP HANA Cloud Platform. There is nothing called a “free lunch” in this world, but SAP HANA Cloud Platform is an exception. Yes, it is absolutely free!!! Thanks to SAP.
This flowchart would give you the high level steps which we need to perform to get the free account and play in HANA.
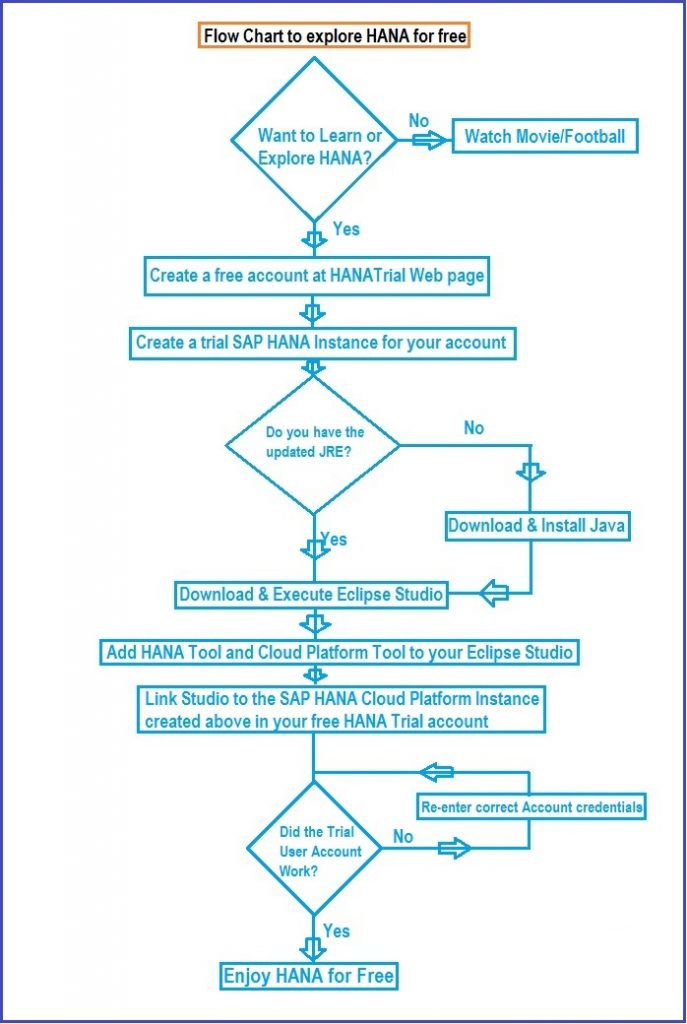
Let us create an SAP HANA Cloud Platform Account.
Step 1. Go to HANATrial web page.
https://account.hanatrial.ondemand.com/
If you have SAP S_USER ID (the same id which you use in service.sap site to search SNotes) or SCN ID, hit Log On. If you do not have these IDs, hit Register. Fill up the short form and you will get a link at your email to activate it.
Assuming, now you have your user id and password. Click on the Log On button.

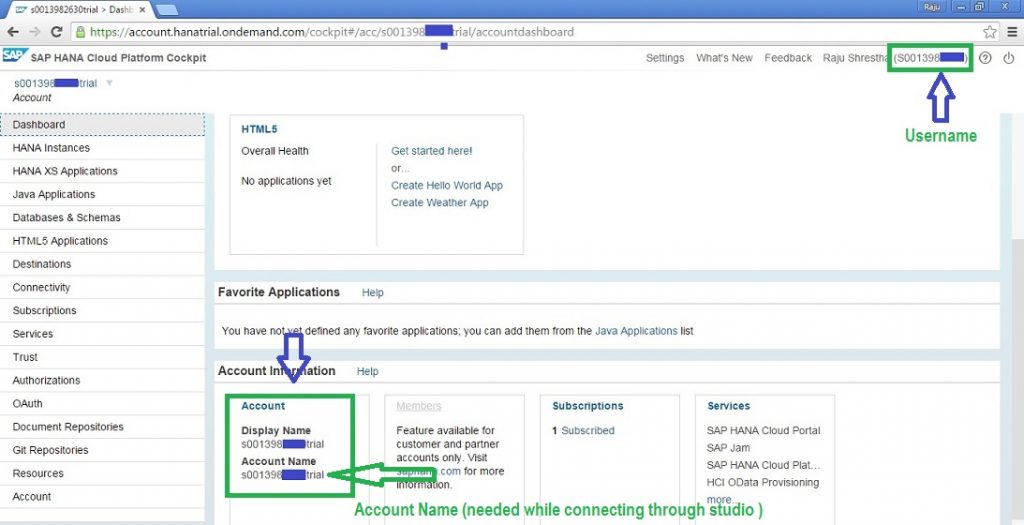
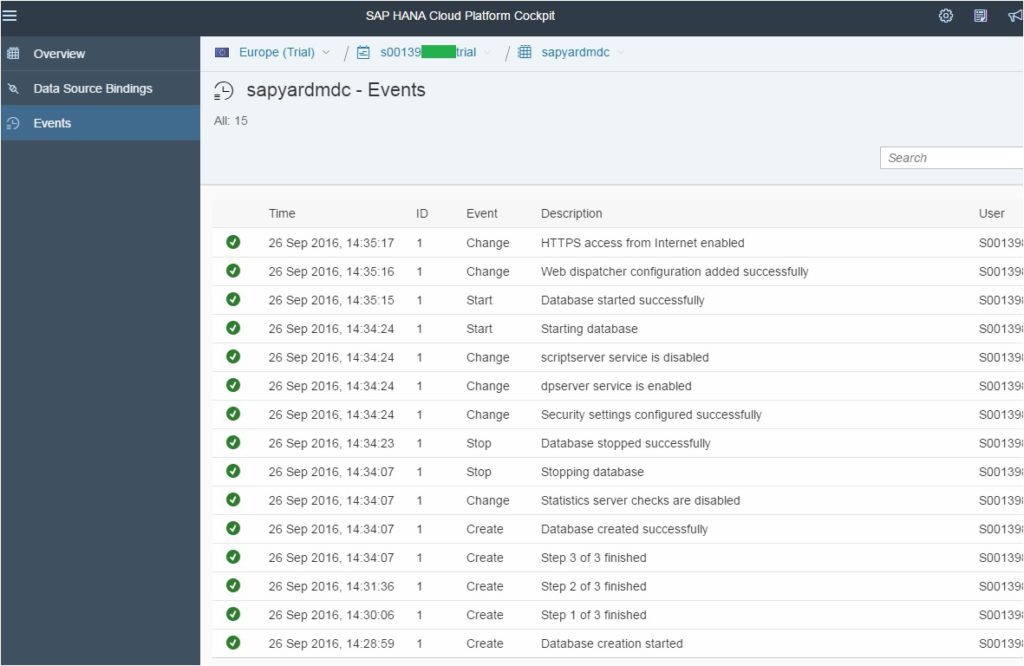
Here you are at the HANA Cloud Platform Cockpit. Ready to fly guys??
Hold on!!
Check your User name and Account name. Note it down. You will need it later to access the platform from the studio.
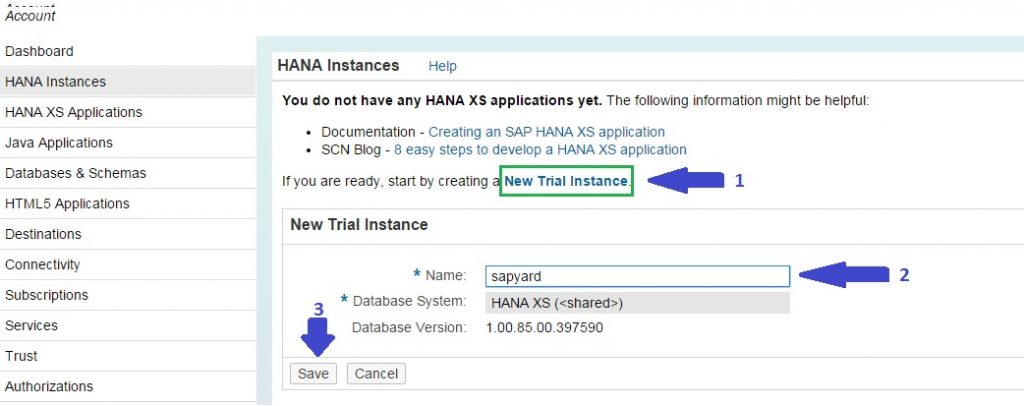
Step 2. Create a trial SAP HANA Instance.
You can create just one. Consider SAP HANA instance as a database schema with database property HANA XS. Click on New Trial Instance, give a name you like and hit SAVE.
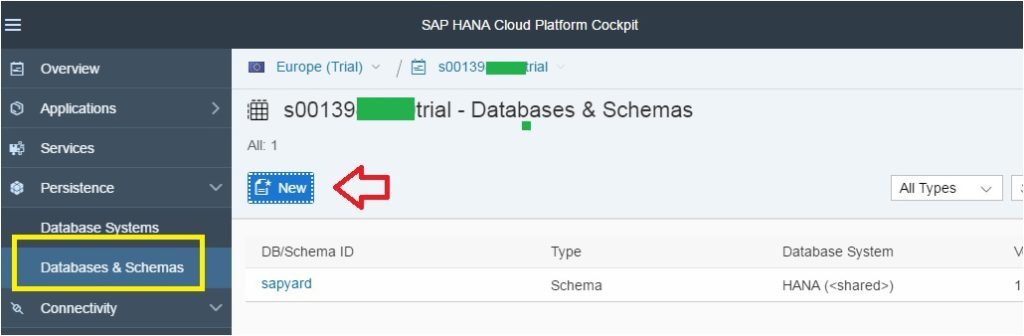
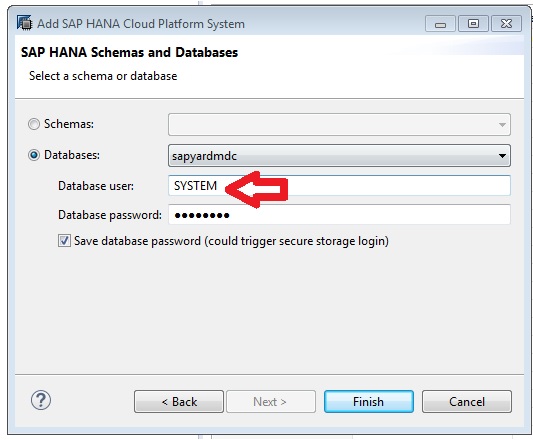
HCP has changed over time. New users would not see the Dashboard, HANA Instances menu on the left side of the panel. It would look something like below. Just hit the Databases & Schema and create New DB/Schema instance. I have used HANA MDC() Multitenant Database Containers DB System.
Make the note of the Password you enter.
Please note: When you add Cloud System, the Database User Id would be “SYSTEM” and password is the one which you just set above.
Done, your cloud platform account is all set. Wasn’t it simple?
But the dependent set up is not complete yet. Have patience guys. These are only one time activity. Do not leave hope yet..
Pre-requisite to play in SAP HANA Cloud Platform: You need HANA studio and client or you should have Eclipse Studio. In this post, you will see how to download and use Eclipse. HANA Studio/Client!! you need to wait for some other time buddy..
And the pre-requisite for Eclipse is, you need to have the updated Java Runtime Environment (JRE). If you are not sure whether you have an updated JRE or not, just download a new one and install it.
Step 3. Download the Java Runtime Environment (JRE).
Our google drive for JRE. Click here to download JRE.
You can also go to the official site to get the JRE
http://www.oracle.com/technetwork/java/javase/downloads/index.html
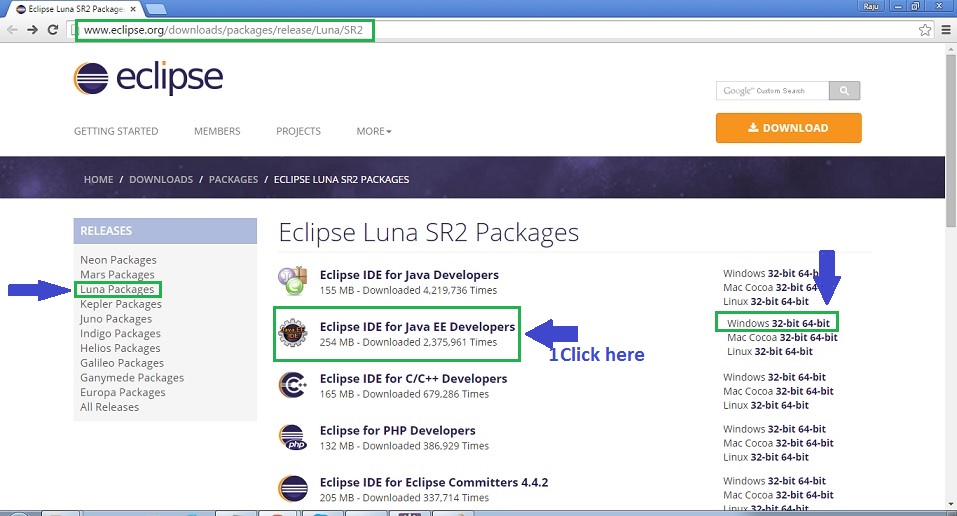
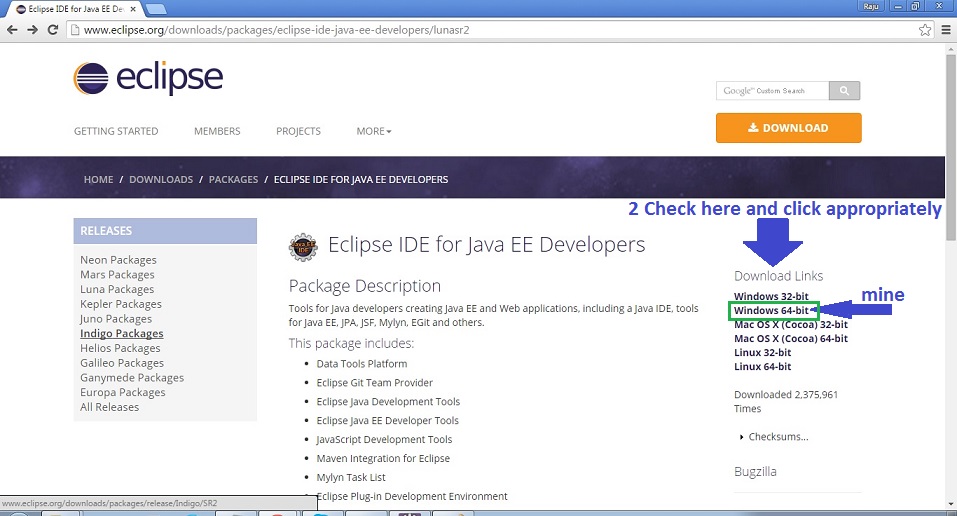
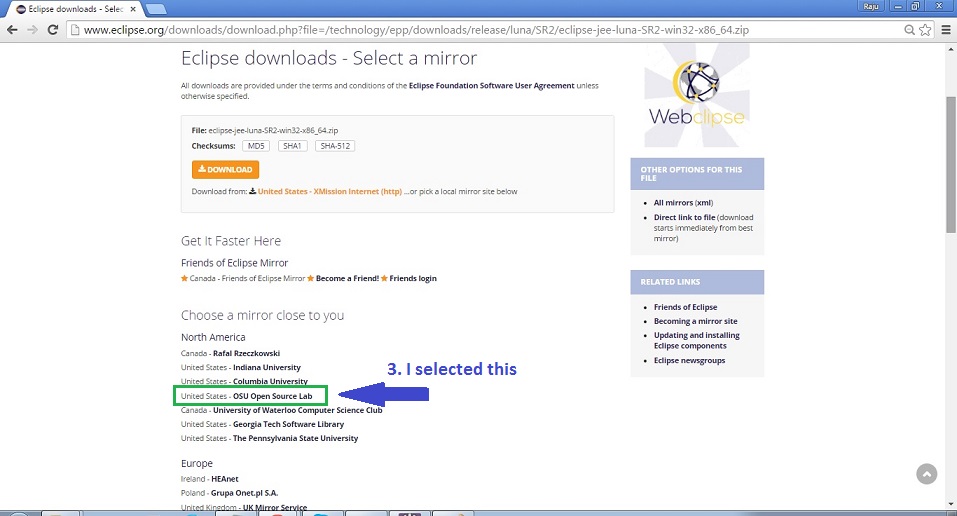
Step 4. Download Eclipse.
Our google drive for Luna eclipse. Click here to download Eclipse.
You can also go to the official eclipse site and download it.
http://www.eclipse.org/downloads/packages/release/Luna/SR2
If you plan to go by the official site, the following screens would assist you.
Whether you download from our drive or from official site, make sure you extract JRE and install JAVA first. After JAVA is installed, extract the Eclipse zip folder.
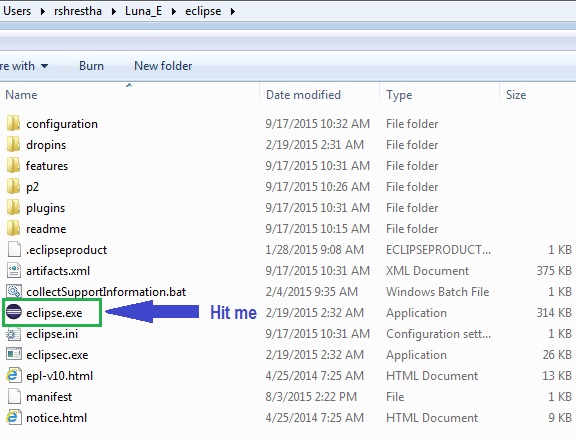
Click on the eclipse.exe. It would ask for default workspace. Hit ok.
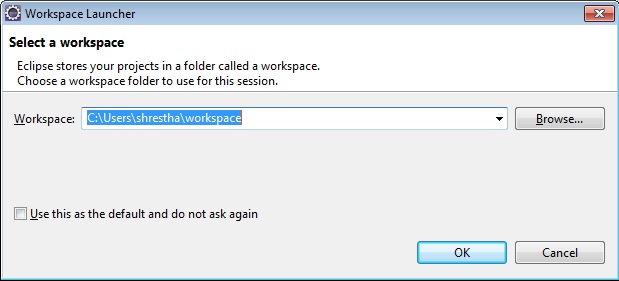
When the Eclipse opens, it would take you to the Welcome Page.
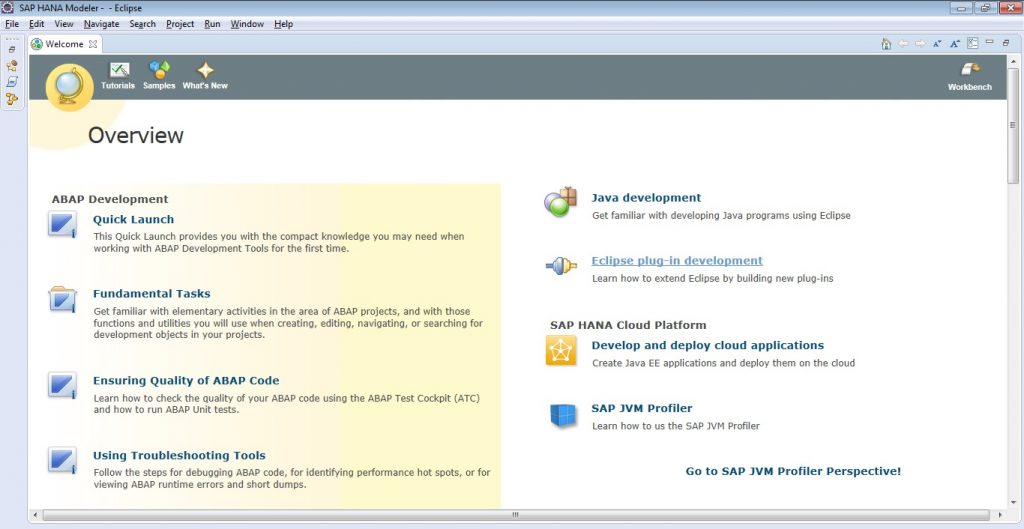
You can close the welcome page and check with eclipse. But how can you go to HANA?
Buddy, your eclipse is still not equiped to access HANA. Your eclipse still does not have the HANA Tools. You need to add the HANA Tools. Not againnnn!!! :O
Trust me guys, this is the last step of the set up process. I can feel and ampathize with you. I had the same feeling.. But, once you are done, you will enjoy the smooth HANA ride.
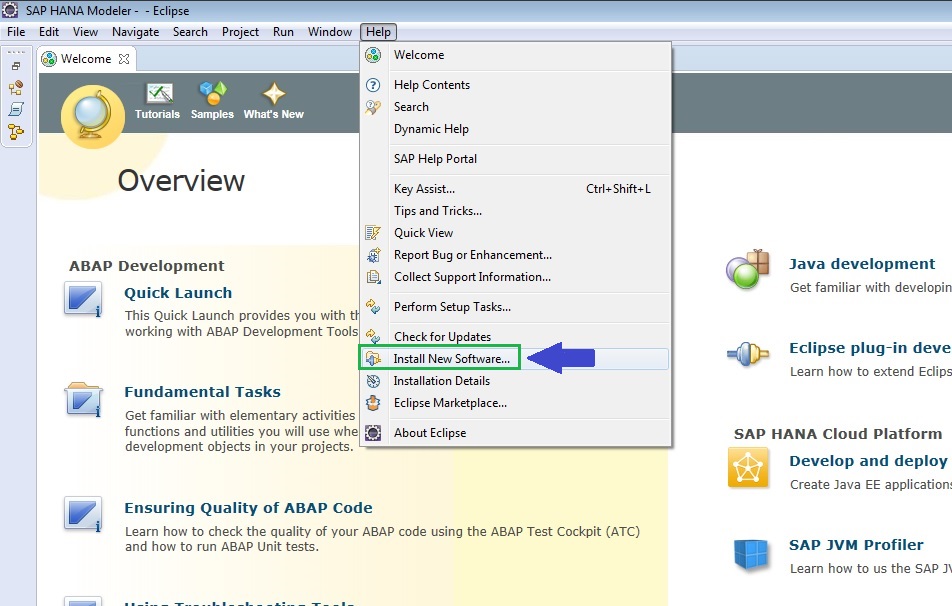
Step 5. Add HANA Tool and HANA Cloud Platform Tool.
In the Eclipse, you need to add New Software to access HANA Cloud Platform. Go to Help menu and Install New Software as shown below.
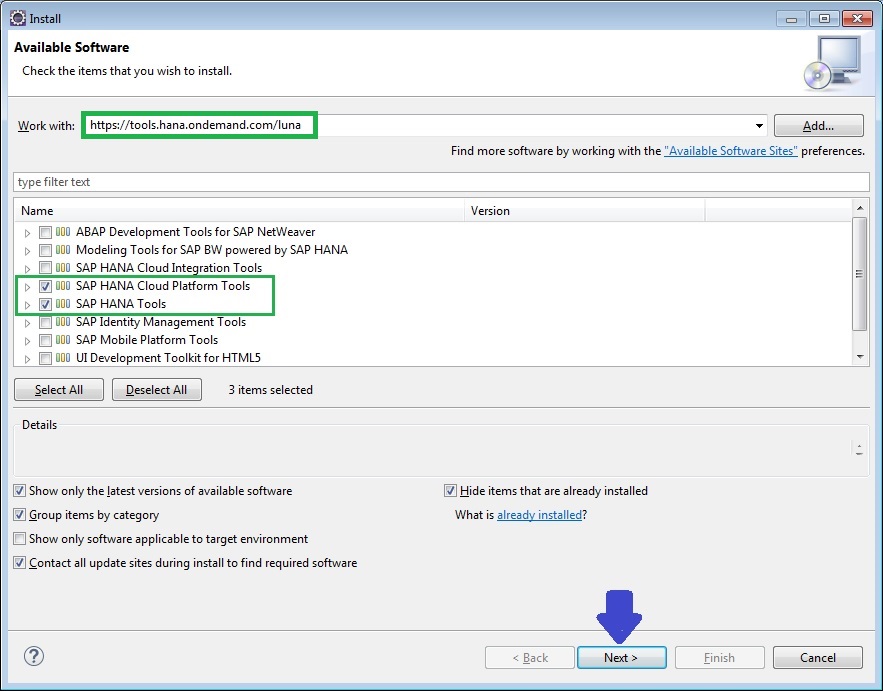
Put the url https://tools.hana.ondemand.com/luna/ and hit ADD/Enter to get the Tools.
Select HANA Tools and Cloud Platform Tools. Hit Next, accept T&C and Finish. Your eclipse would restart.
Get ready for Fun now.
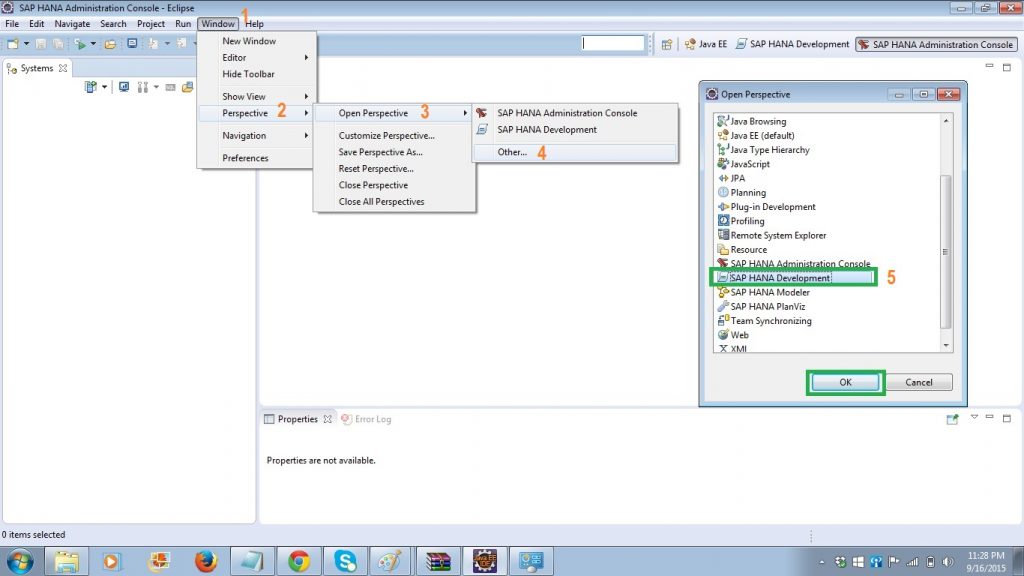
Go to Window menu -> Open Perspective -> Other -> SAP HANA Development.
Step 6. Link Studio to SAP HANA Cloud Platform Instance
You have a fresh studio. Link the studio to the SAP HANA Cloud Platform instance which you created earlier. Hit the Add Cloud System as shown below.

Provide the Cloud Account name (with suffix trial). System would prompt you for hanatrial landscape host (hanatrial.ondemand.com). Select it. Give your user name and password.
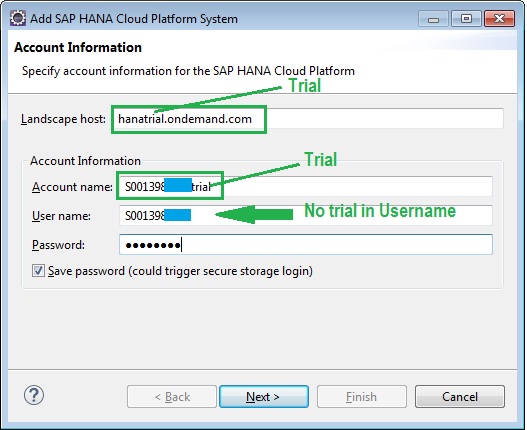
Caution: I mis-spelled the “trial” to “trail” and I got the below error.
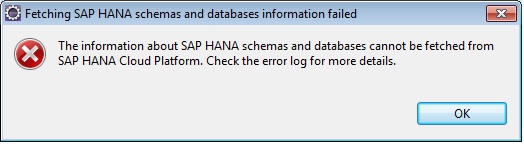
Message: ‘The information about SAP HANA schemas and databases cannot be fetched from SAP HANA Cloud Platform. Check the error log for more details’.
I wasted a day to figure out what went wrong. If you get the above pop up error message, you know, you need to correct your username and account name.
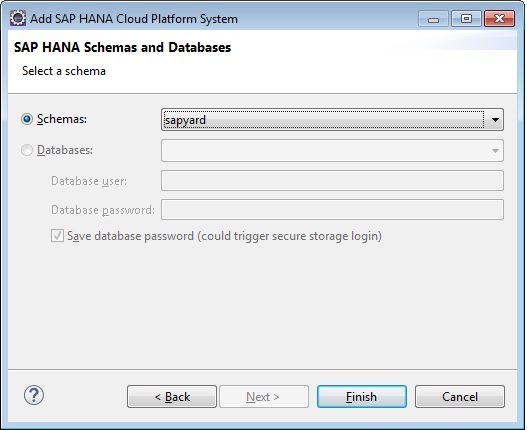
Updated 26th Sept 2016: Multitenant Database Containers (MDC)
Hit next. Select the Schema from drop down which you created in the free cloud account and hit Finish.
OLAAA!! Your HANA genie is ready for your service. Make her work for you.. Have fun!!
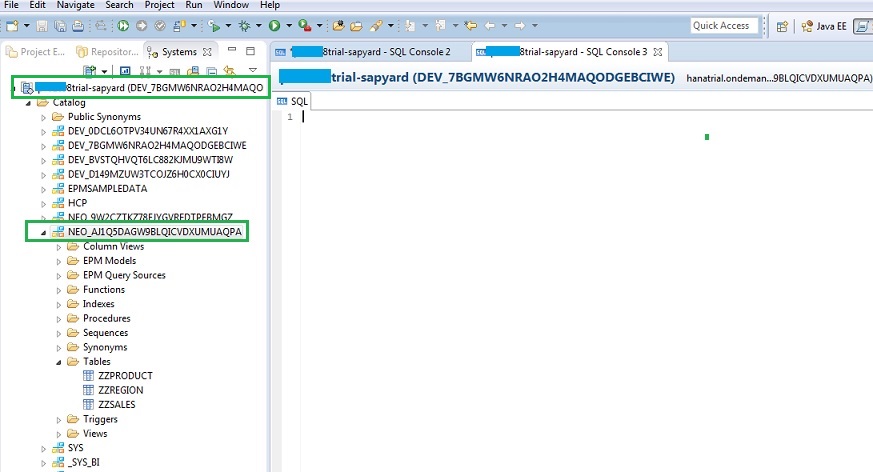
PS: Please work on Schema starting with NEO_ . SAP HANA on Cloud Platform has some limitation which can be reduced by working in NEO_ Schema. In the next post, I would show the limitation and how we can go pass it. So, for now, work only in NEO and do not create anything in DEV_ Schema.
NEO_ = Yes Yes. Play on it.
DEV_ = No No. Do not create anything in DEV Schema.
Let’s Practice HANA
I was tempted to end this post here as it is already too late in the night.
But, since you stood patiently installing each and every component, software and tools, how can you close, before writing your first statement in HANA. Let us create our first custom table in HANA, populate some data and view them. Buckle your seat belt!!
What are we going to practice now?
- Create custom table in HANA using SQL (in the next post, I will show you how to create custom table without SQL code. Just like SE11)
- View table definition
- Add data in the custom table using SQL.
- Display the data entries saved in HANA.
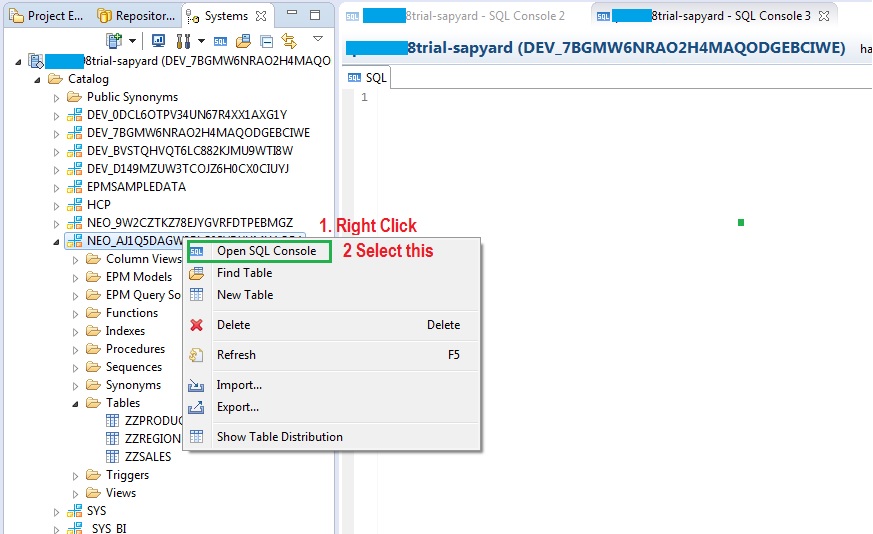
Since we are going to write some SQL statements, right click on your schema and select ‘Open SQL Console’. Trust me, you do not need prior SQL knowledge. Just couple of keywords which I will provide.
Practice 1: Create custom table.
SQL Code: Self explanatory
CREATE COLUMN TABLE ZM_MARA (
   MATERIAL      INTEGER,
   CREATED_ON    DATE,
   CREATED_BY    VARCHAR(12),
   MATERIAL_DESC VARCHAR(40),
   PRIMARY KEY (MATERIAL)
);
Put the above code in the SQL console, change the fields and types if you want your own field names and hit the Execute arrow Icon. It would save and create your first HANA custom table.
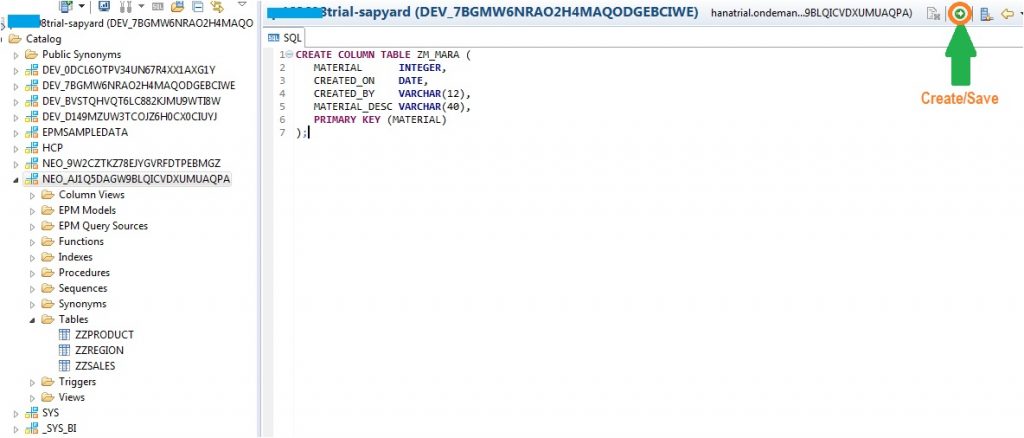
Please note: your table name need not start with Z. Since I am an ABAPer, old habit die hard.
Practice 2: View table definition
Right click on the table name and hit Open Definition. If you do not see your custom table below Tables, right click and hit refresh.
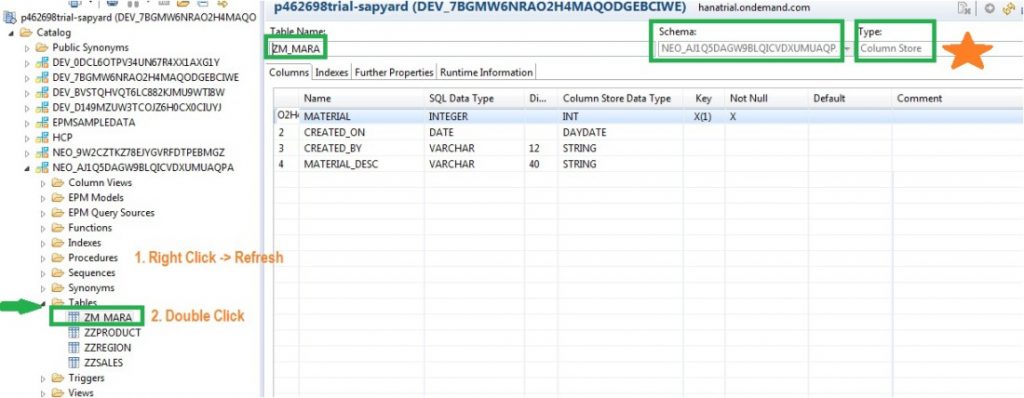
Check, Column Store table type is created. We can change this type. We will discuss them in subsequent posts.
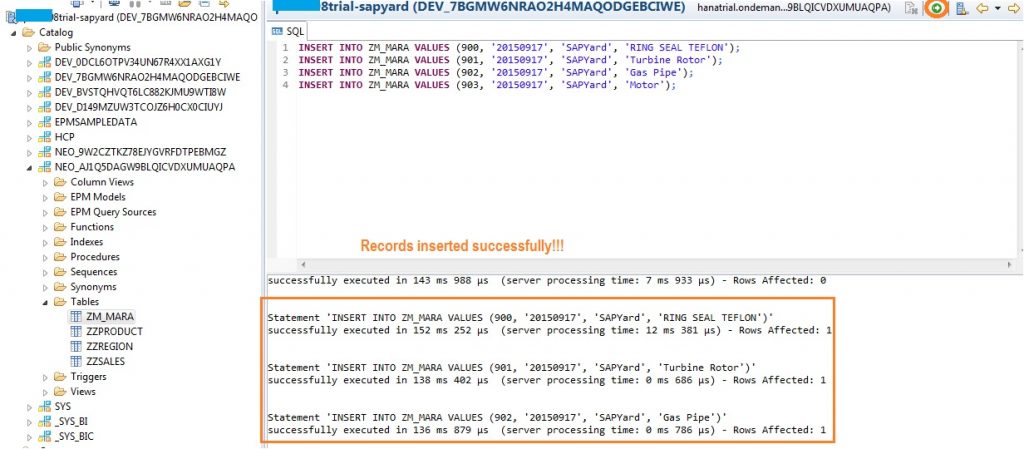
Practice 3: Add data to the custom table using SQL.
SQL Code: Self explanatory
INSERT INTO ZM_MARA VALUES (900, '20150917', 'SAPSPOT', 'RING SEAL TEFLON');
INSERT INTO ZM_MARA VALUES (901, '20150917', 'SAPSPOT', 'Turbine Rotor');
INSERT INTO ZM_MARA VALUES (902, '20150917', 'SAPSPOT', 'Gas Pipe');
INSERT INTO ZM_MARA VALUES (903, '20150917', 'SAPSPOT', 'Motor');
Put the above code in the SQL editor and hit Execute button. Check the log below says success.
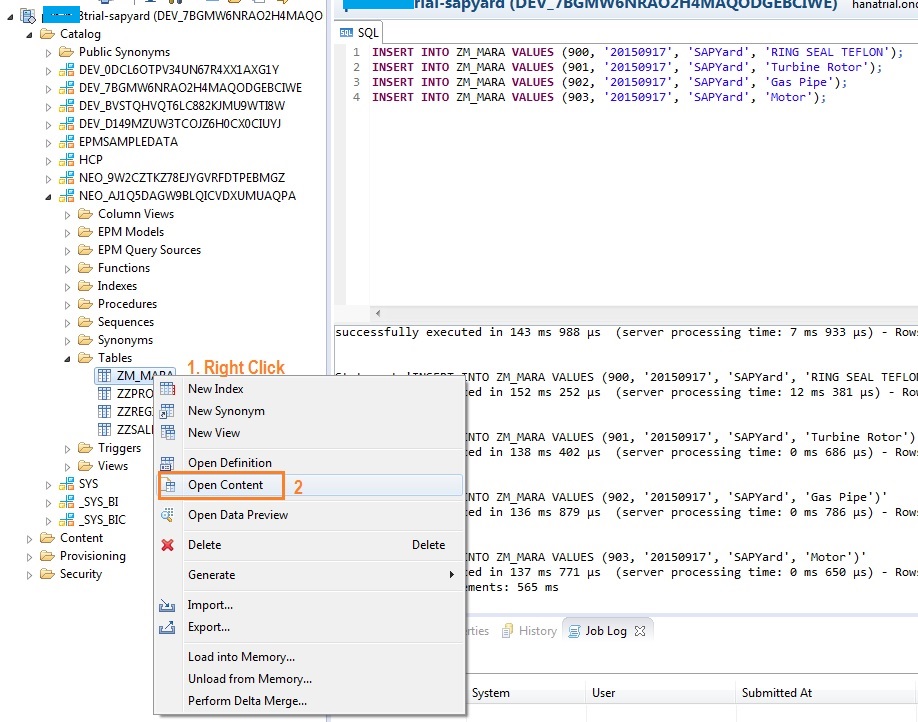
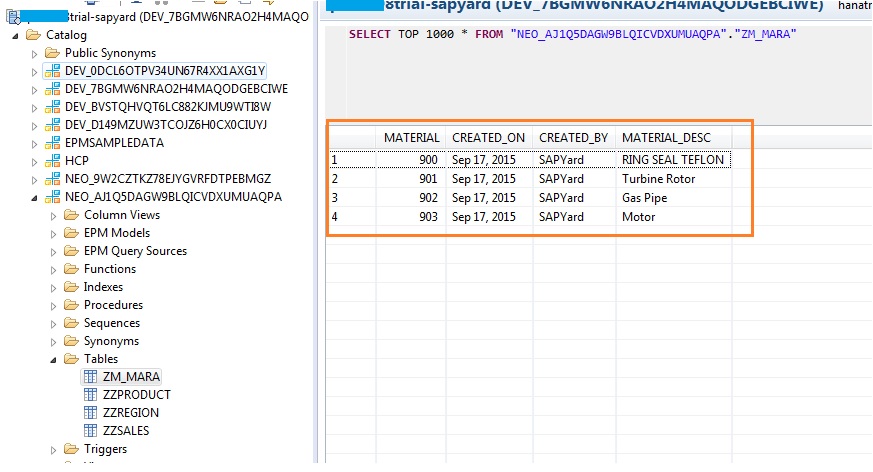
Practice 4: View your entries
Right click on the table name and hit Open Content. Check the table has all the entries you added above using SQL INSERT statement.
That was all SQL you needed to create and populate tables in HANA. Now, do you agree, SQL is not a must? You can always learn it..
Congratulations!!! You achieved a lot today. Created you Free HANA Cloud account, Connected to HANA from Eclipse and completed 4 hands on practice on HANA. .. Pat your back. You are making good progress. You can treat yourself for this hard work. Have fun.. Keep exploring!!
Brownie for guys who are a step ahead in practice session.
CALL “HCP”.”HCP_GRANT_SELECT_ON_ACTIVATED_OBJECTS”;
If you get error while calling the above piece of statement, it means you have created some objects in DEV_ Schema. Delete everything ( tables/ views etc) from DEV_ Schema. Do the same exercise in NEO_ Schema. Believe me, the above statement would execute successfully and schema _SYS_BIC would be created for you.


