
Steps to Create Fiori Role Matrix
- In this blog, I am going to describe step to create a Fiori Role Matrix for capturing both positive and negative testing for SAP delivered Business Role starting with SAP_BR* by a functional consultant within an organization for a given landscape (DEV, QA & TST) Environments
- This testing is performed across the landscape to ensure that apps will be working correctly as they are designed for.
- The blogs will help Functional and Security professional within an organization to create and develop Fiori Role Matrix.
- In my project we were using SAP Best Practice Business Roles concepts starting with nomenclature SAP_BR* for e.g., SAP_BR_GL_ACCOUNTANT, SAP_BR_GL_MANAGER etc. and any Add-on roles which contains Apps
- Business Role is a role which contains abstract of Apps/Tiles within the role, which represent a job function within a company that a person does relate to his/her Job Position. The business roles contain almost everything a Job Function that is needed to be performed within the organization by respective users
- Note: Sometimes a Business Role (Single Role) does not represent a user complete job responsibility. For example, in smaller Companies a single person may be performing multiple job functions and would require multiple or additional SAP Business Roles (Lean Organization)
- The Business Roles is combination of Apps/Tiles where user can display, change, create or update any functions related to the Job function
- Business Role can contain different types of Tiles/Apps such as:
- UI5 (SAP Fiori App)
- GUI (GUI Transaction)
- WDA (ABAP Web Dynpro Application)
- WCF (Web Client UI Framework)
- URL (URL)
- UI5 (SAP Fiori App)
- Business Role have wide access and sometimes the function team may not need all Apps within the role for example SAP_BR_GL_ACCOUNTANT have 32 Catalogs and 116 combination of Tiles / Tile Mapping (TM+TM) which is homogenous
- Having that many Apps will cause confusion in mind of user. Hence a need arose how to determine which Apps within the role is needed to perform certain Job functions
- This blog gives a comprehensive step-by step instruction how to generate Role Text Matrix with associated role name, Role description along with associated attributes where a functional team can decide which apps is needed or not during initial stage of development
- This matrix became very useful in the project during testing where the Security team could go back an update the Custom Business Role and update the Custom Business Catalog as needed
- Note: When copying the Business role into custom role name space, make sure all Business Catalogs within the role are also copied to proper naming convention, because if the same is not then during upgrade SAP might update the same by adding, removing, or updating the Apps. In short Do not do Soft Copy of SAP Custom Business Catalogs within the role
- Here, we will be using the Business Role SAP_BR_GL_ACCOUNTANT role copied into your company name space depending upon the naming convention
- Role Name: ZSAP: XXXXXX:BR_GL_ACCOUNTANT
- Role Description: CBR:FI: RTR:GL: MASTER: UPDATE: – General Ledger Accountant
- Role Name: ZSAP: XXXXXX:BR_GL_ACCOUNTANT
- Use T-Code: PFCG to copy and create the new role as mentioned above
- It is assumed that the required OData Services and ICF Services have been activated by the Basis team
- Also, the SAP delivered business role has been activated by using the T- code: STC01 and the task List: SAP_FIORI_FCM_CONTENT_ACTIVATION and the same has been generated
- The generated role will have open fields whose value the functional team needs to provide
- Functional team would also get beside the Test matrix the AGR_1251 data of the roles which list all objects and its related values
- Objects within the roles and its description can also be provide by using T-Code: SE16 and table TOBJ
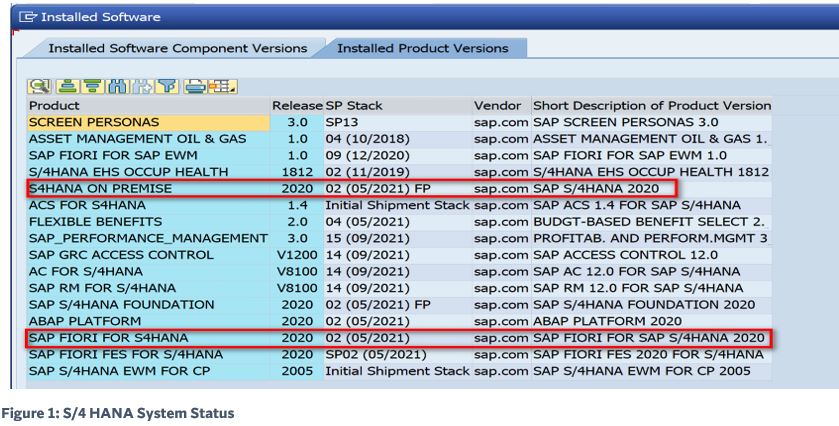
STEP 1: Check the System Status
- The embedded System is details are as follows:
- S/4 HANA ON PREMISE 2020 is SP02
- SAP FIORI FOR HANA 2020 SP02
- S/4 HANA ON PREMISE 2020 is SP02
STEP 2: Check the role for activated service
- It is assumed that the required OData and ICF services have been activated
- It is a good practice to check before creating the matrix, if necessary, service is activated
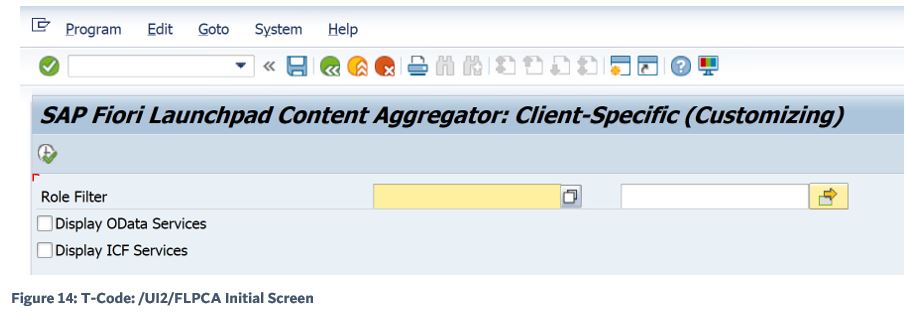
- Go to T-Code: /N/UI2/FLPM_CUST
- Under the tab >> Role >> Enter Role name and click >> Go >> as shown in figure below:
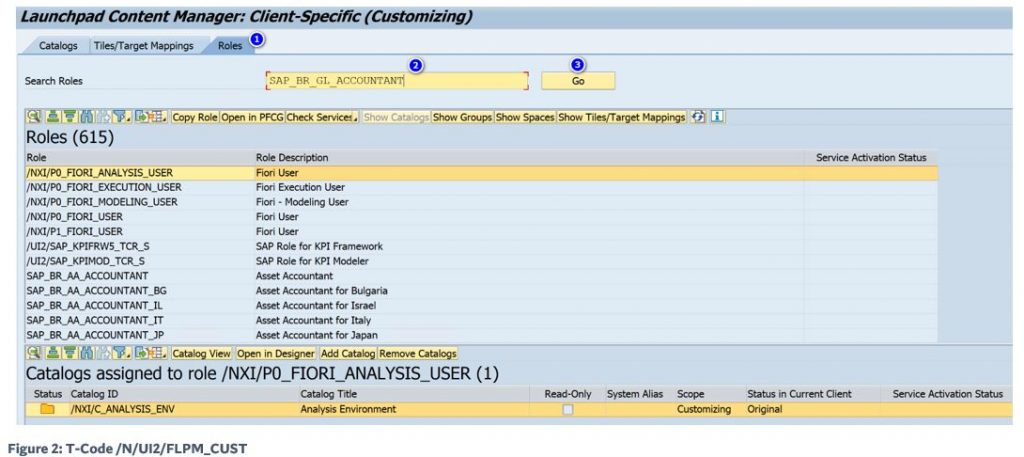
- Now click >> Go >>
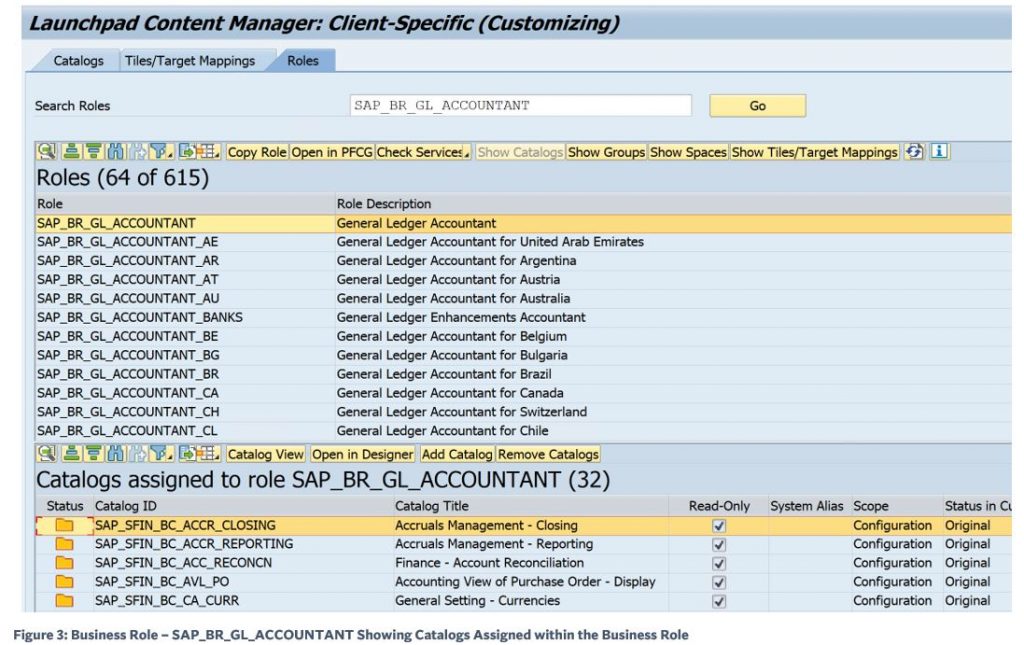
- The above screen shows that SAP_BR_GL_ACCOUNTANT has 32 Business Catalogs assigned to the same and can be seen in below part of the above screen
- To check if related services for all the apps within the roles are activated select the option >> Check Services
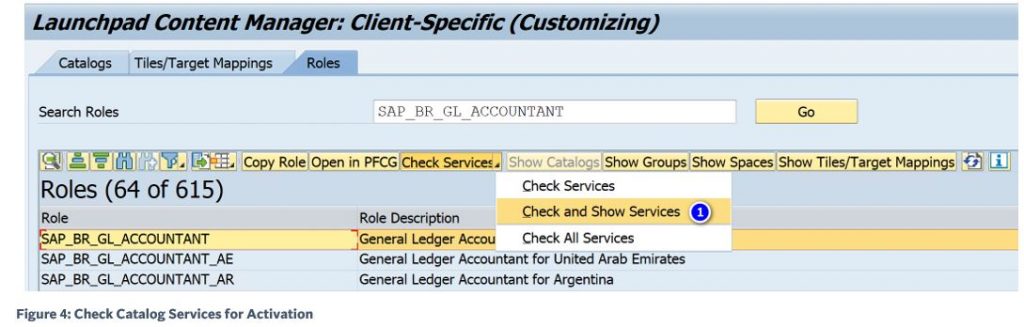
- Expand >> Check Service >> and select the option >> Check and Show Services
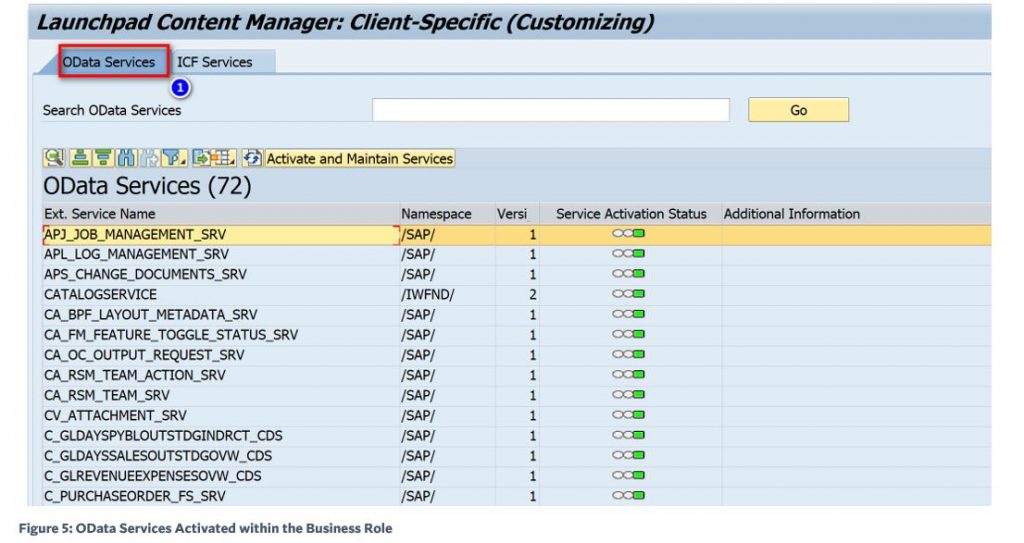
- The above figure displays all the OData services within the role s which are needed, which should be all green, if any item is not green the same can be activated by using the option button >> Activate and Maintain Services >>
- For business role SAP_BR_GL_ACCOUNTANT 72 OData Services have been activated
- Similarly, check ICF Services for activation and they should be all green
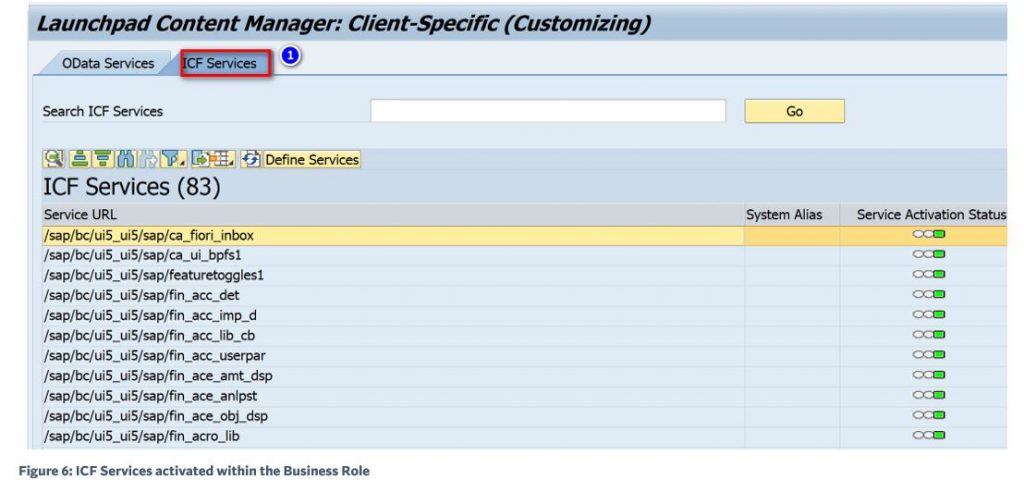
- There are 83 ICF Services which have been activated
STEP 3: Check number of Business Group
- Select the button >> Show Groups >> option
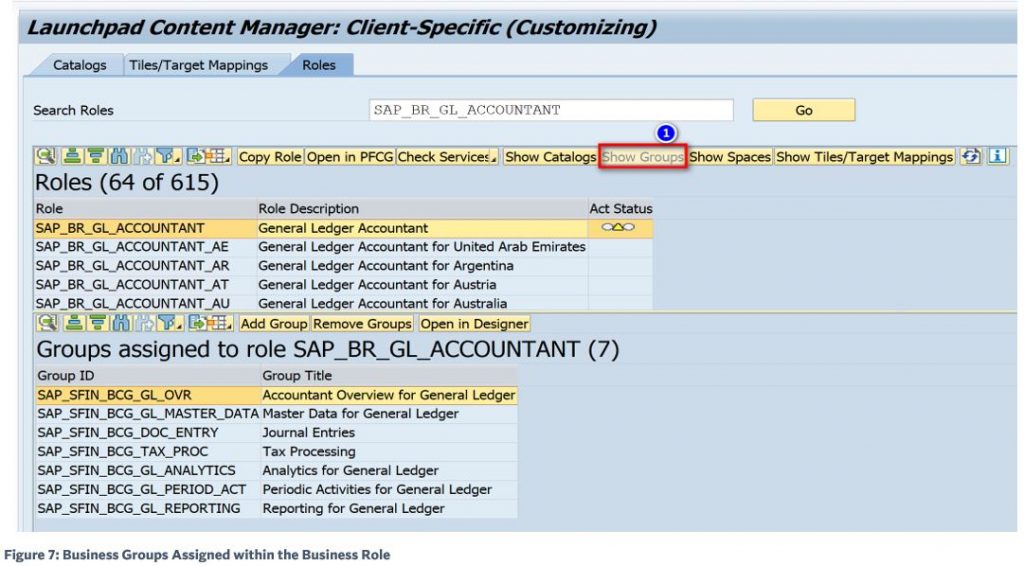
- The required business role has Seven Business Groups assigned
STEP 4: Check Spaces
- Select the option >> Show Spaces >>
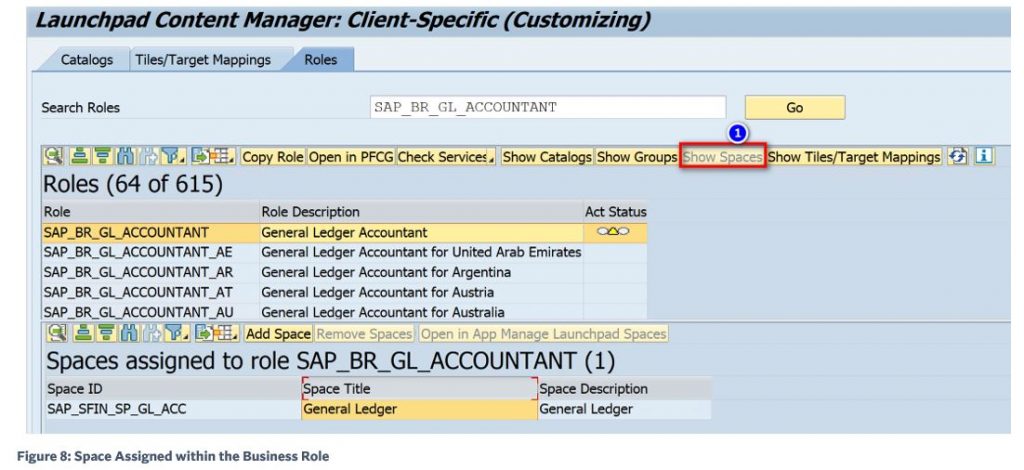
There is only One Space assigned to the required business role
STEP 5: Check Tiles and Target Mapping
- Select the option >> Show Tiles/Target Mappings >>
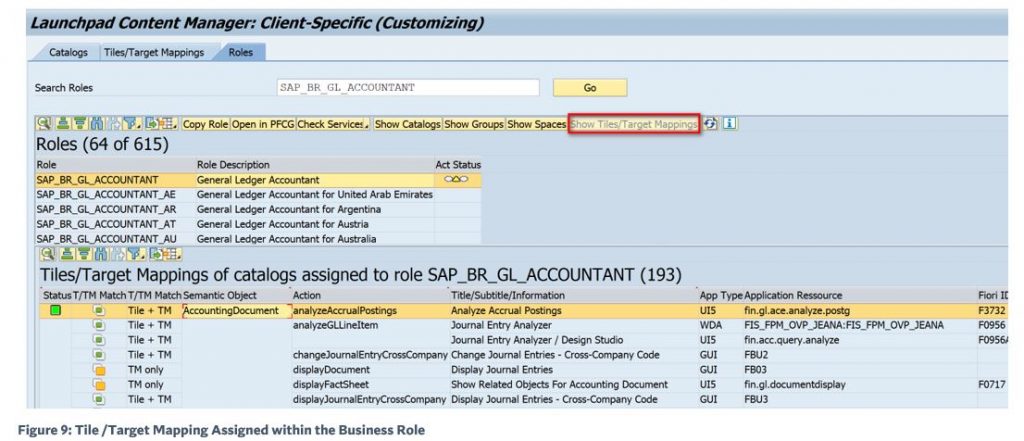
- Here there are 193 Tiles /Target Mapping assigned from the 32 Catalogs
STEP 6: Details of Business Roles
- The Role Details are as follows:

- Check the role content in T-Code: PFCG
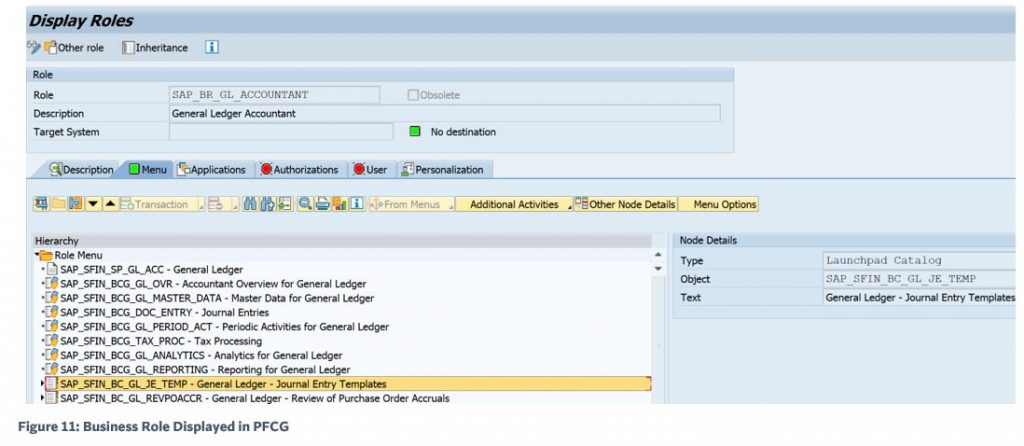
- Expanding any Launchpad Catalog to view the content, in our case expanding SAP_SFIN_BC_GL_JE_TEMP
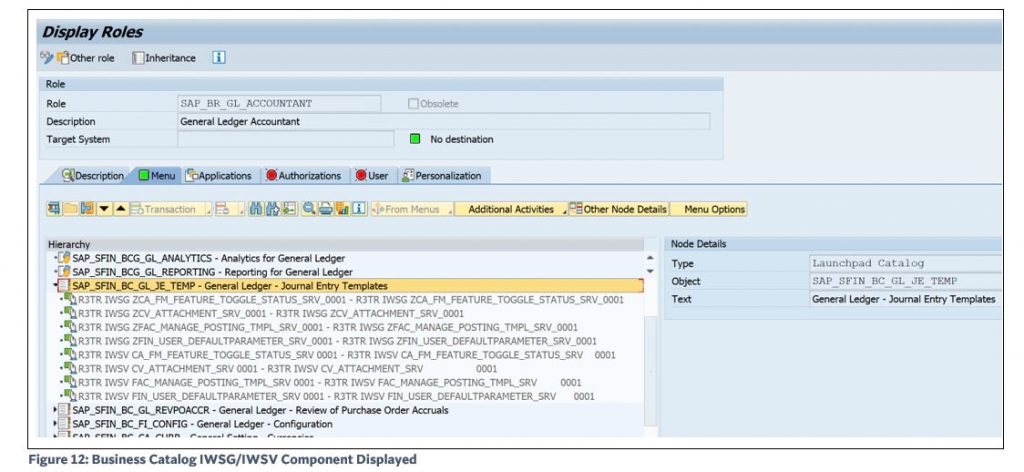
- The above screen displayed the relevant IWSG/IWSV component of apps within the select Business Catalog SAP_SFIN_BC_GL_JE_TEMP
- Check the Authorization tab
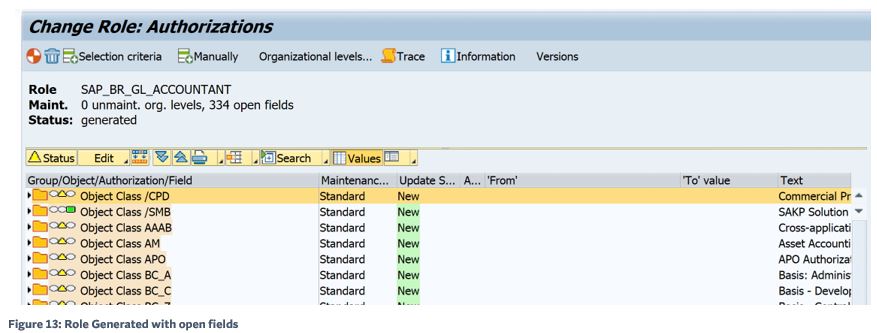
- The above role is in generated mode as can be seen >> Status generated >> with some open authorization fields
- Now in the next step, we need to download the Role Details
STEP 7: Download role details using T-Code: /UI2/FLPCA
- Using SAP GUI T-Code: /UI2/FLPCA, which is also called the Launchpad Content Aggregator, we can download role and it is attributes
- This T-Code gives an aggregated overview of all the Launchpad Content Maintained within the SAP Fiori Launchpad Content Manager
- This transaction is used to find all content assigned to a business role – which includes SAP Fiori Apps, SAP GUI Apps, ABAP Web Dynpro application, Web Client UI Framework, and URLs
- By using this option, we can confirm beforehand what the user will visualize and see in APP Finder via what is assigned in the Business Role
- This blog will now provide step-by-step instruction to create Fiori Role Test Matrix
- This T-Code gives list of all the apps seen by the end-user as seen in the APP Finder of Fiori Launchpad
- This T-Code can also be used to see all relevant OData and ICF SERVICES for any given SAP Business Roles
- This T-Code will list wherever possible the associated SAP Fiori ID associated with the Apps/Tiles
- This T-Code will list and indicate all types of apps like shown below with nomenclature:
- UI5 = SAP Fiori App
- GUI = GUI Transaction
- WDA = ABAP Web Dynpro Application
- WCF = Web Client UI Framework
- URL = URL
- UI5 = SAP Fiori App
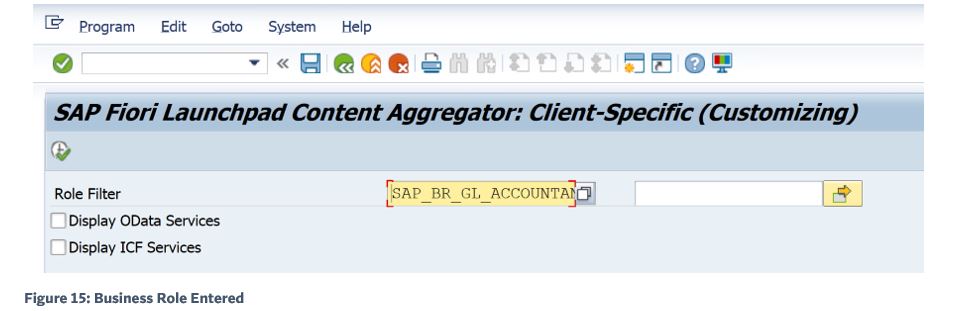
- Here, we can enter a single or more business roles as desired
- In one of the projects, I worked the company had 102 Business Role in scope, which were all entered in the selection screen to create the Test Matrix. Note: It takes few minutes for output to be generated
- Enter the role name and do not select anything else, as shown below:
- Now, click the icon >> Execute
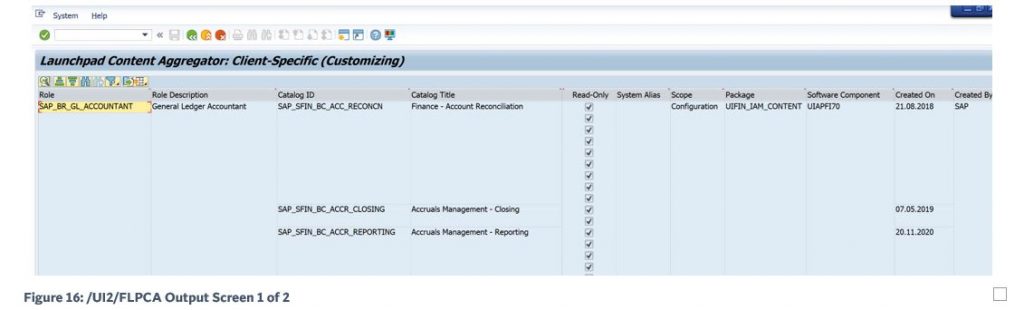
- The output screen shows the desired roles and along with its attribute
- Scroll to the right to see more attributes listed
- The above output can be exported to a Spreadsheet as it and will give many columns of data by using the icon >> Export
- SAP provided the option to choose the data to be exported and its layout by giving you various option to adjust columns and the order
- Choose the option >> Change Layout >> as shown below:
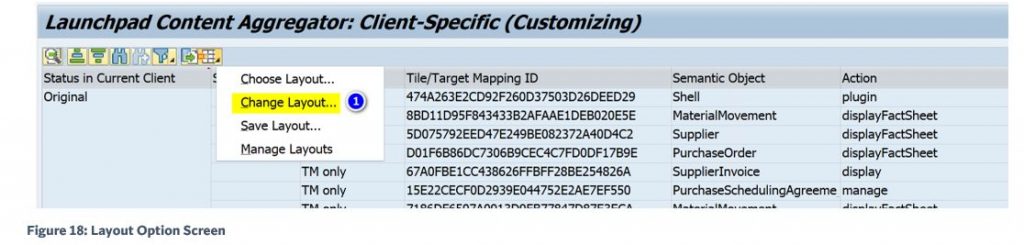
- The Change Layout Box has five options, and we will use some of these options to fine tune our output matrix, the options are:
- Column Section
- Sort Order
- Filter
- View
- Display
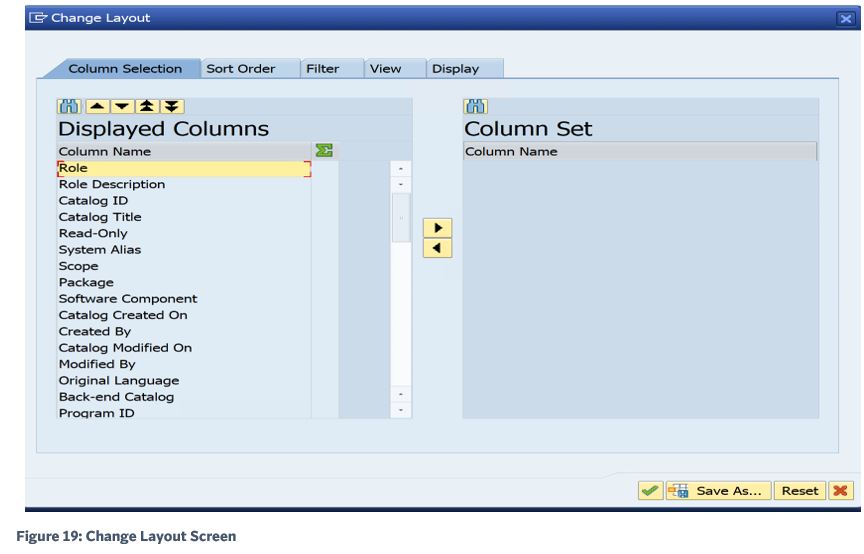
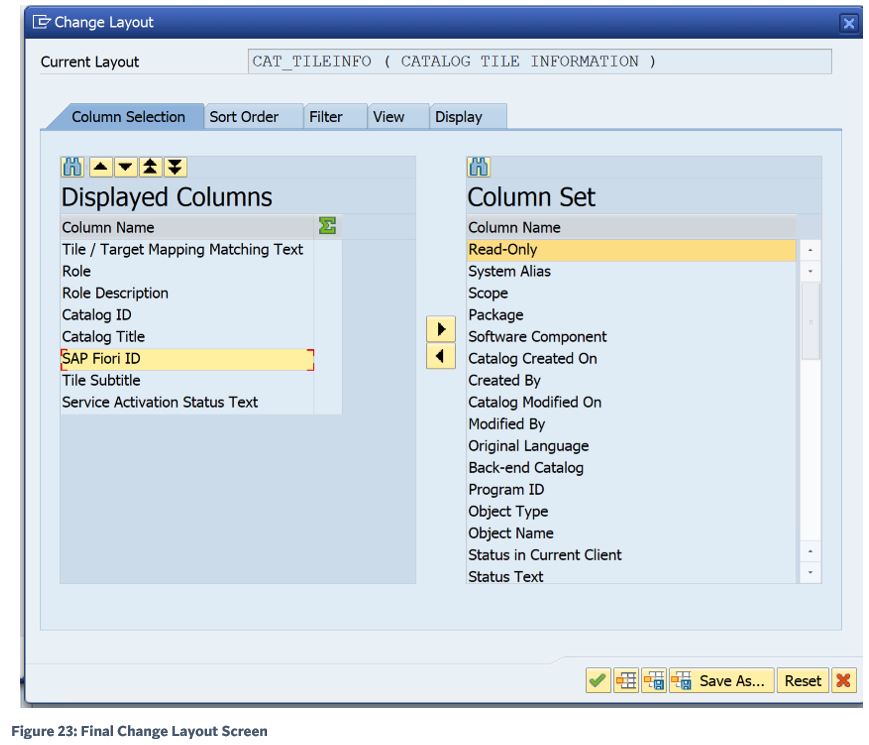
- Column Section
- In the above figure under Column Section two option are provided Displayed Column and Column Set
- Displayed Column will display what is selected in the output
- Column Set attributes will not be Displayed
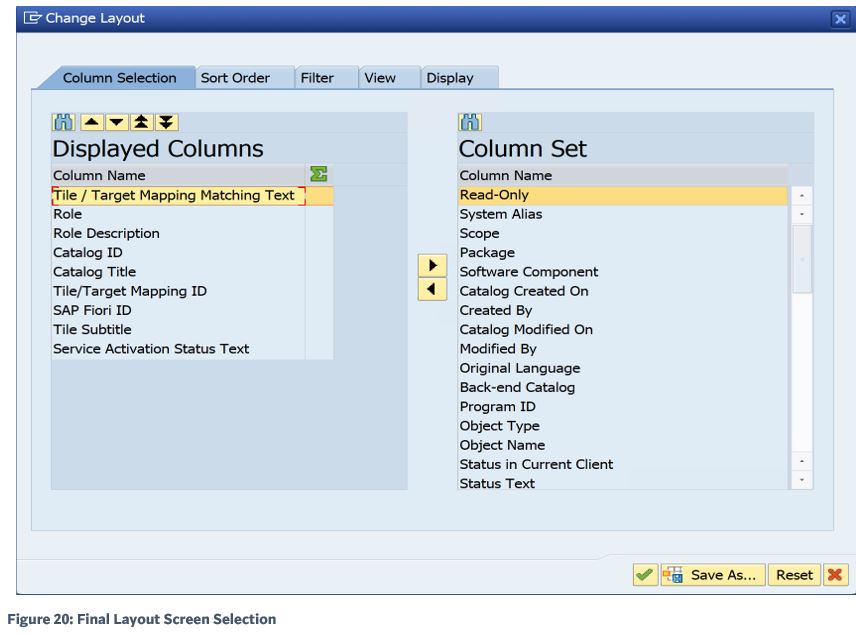
- By using left, Right, Up and, Down arrow arrange the Column, the final layout should be as shown below:
- The Once Displayed Column is what you want to see, save the layout for future use by selecting the option >> Save As.

- Enter the details as shown below:
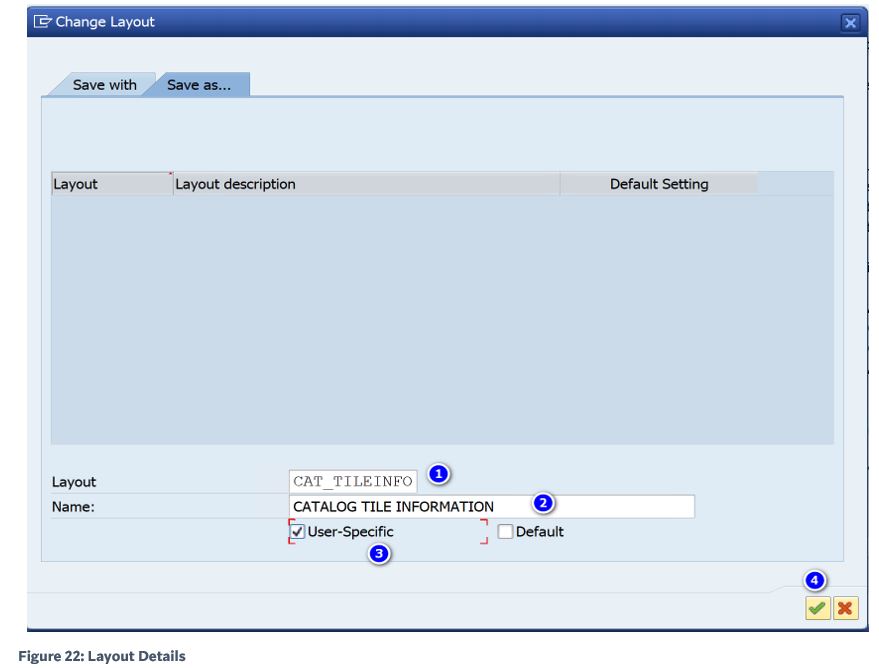
- Click the icon >> Continue
- Note: Once the layout is saved you can use the option >> Change Layout >> for other roles by re-running or using the T-Code /UI2/FLPCA, but first we need to select the desired data which is listed below:
- Click the icon >> Continue >> the output screen is changed
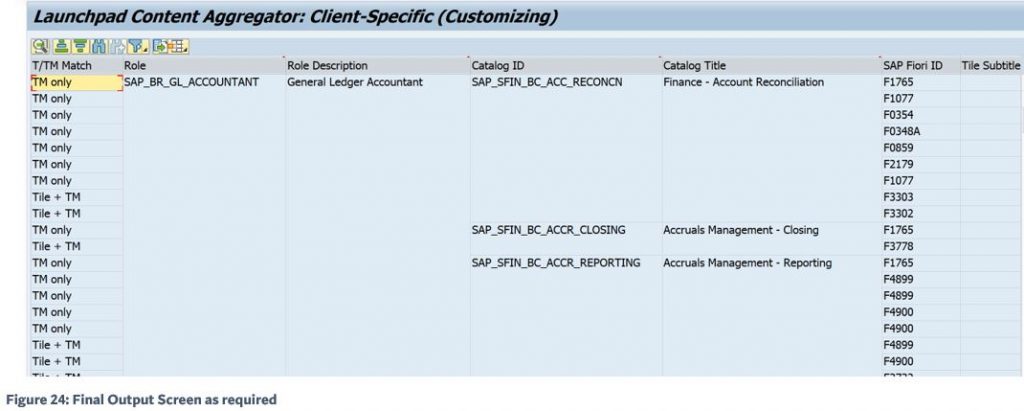
- The above figure displays the output data in the format selected
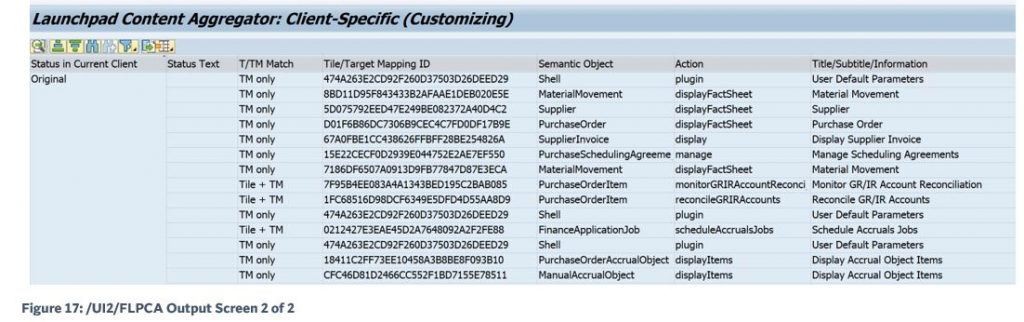
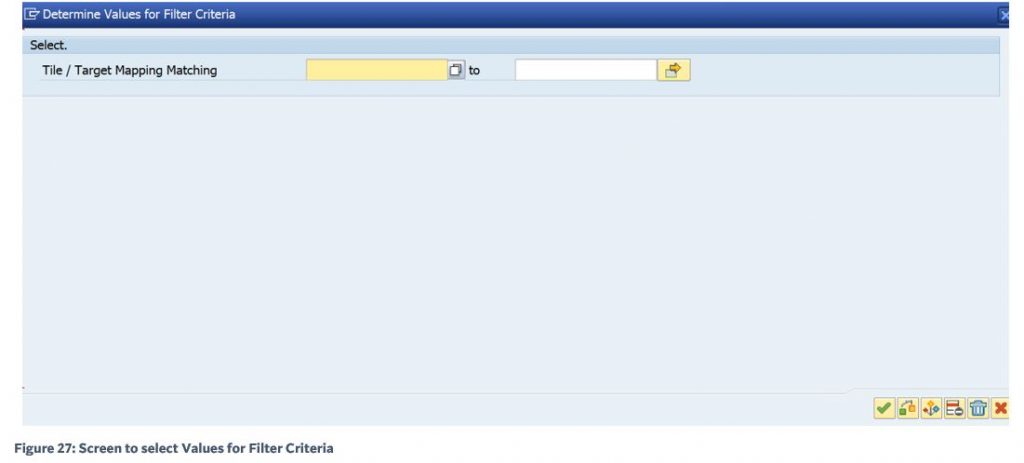
- In the above data displayed, we only require the data under the tab >> T/TM Match >> followed by >> Tile + TM >>, to achieve this, we need to apply the filter option
- Now, click the option >> Choose Layout >> and select >> Change Layout >> and then click tab >> Filter
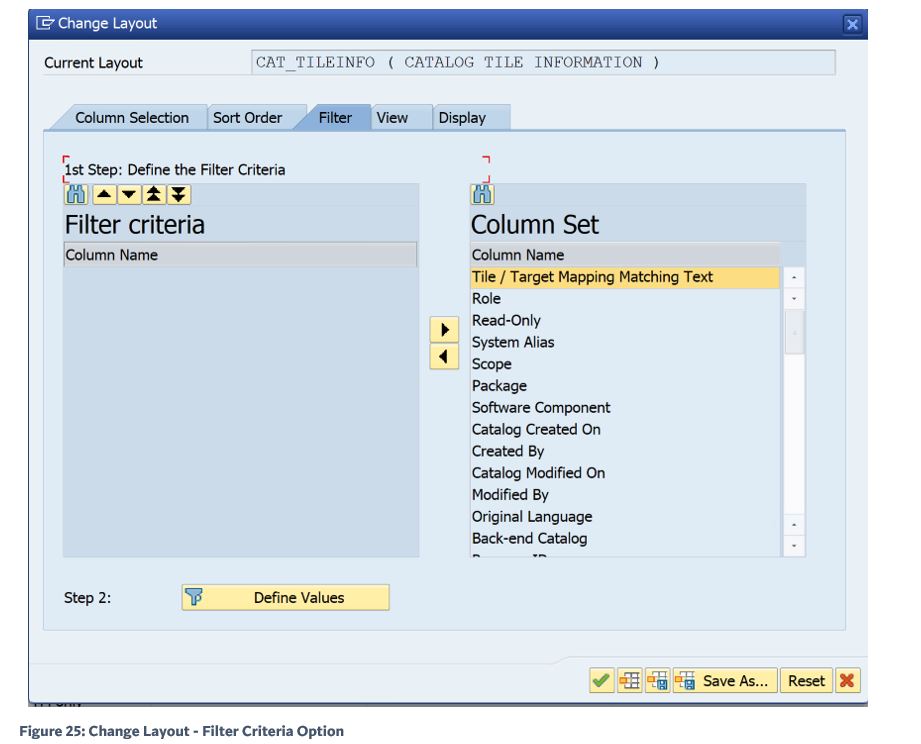
- Choose >>Tile / Target Mapping Matching Text >> >> and move it into tab >> 1st Step Define the Filter Criteria >> as shown below:
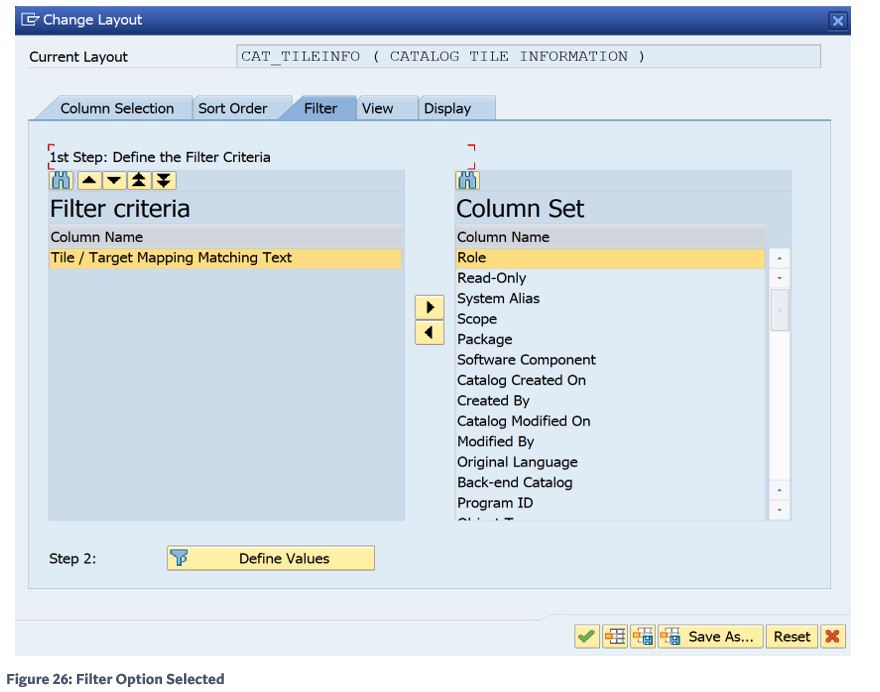
- Now at the bottom click >> Step 2: Define Values >>
- Use the >> Search >> Option
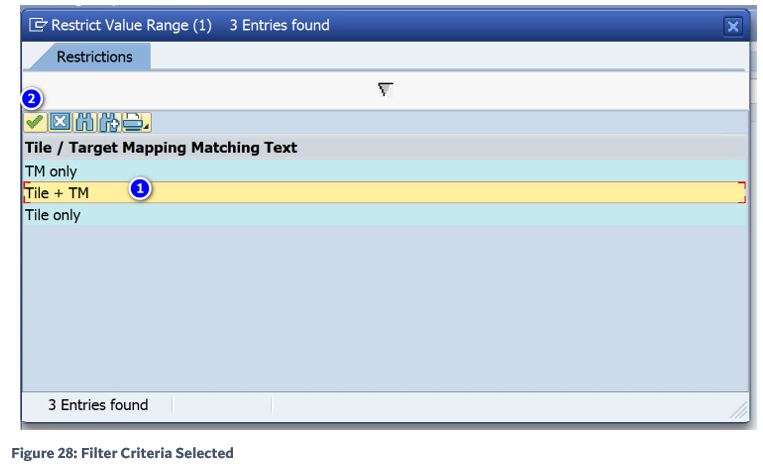
- For Filter chose >> Tile + TM and click >> Continue
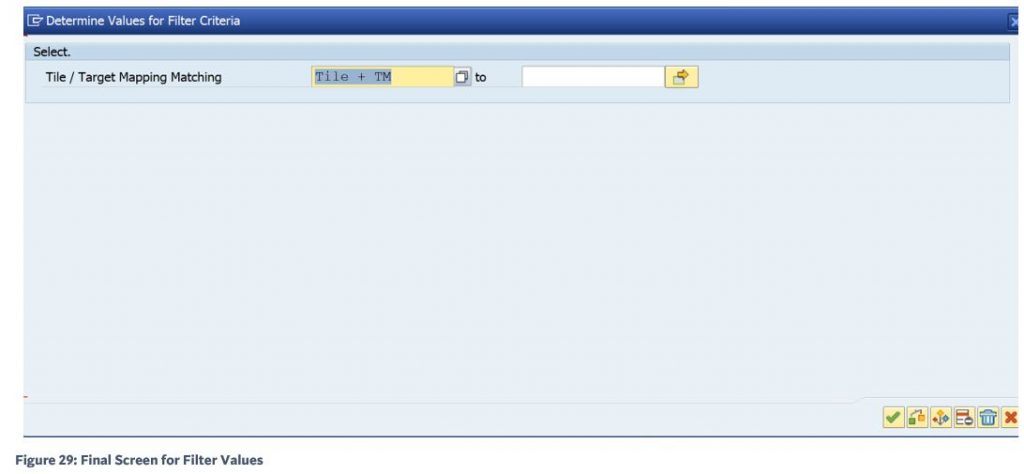
- Click the icon >> Continue >>
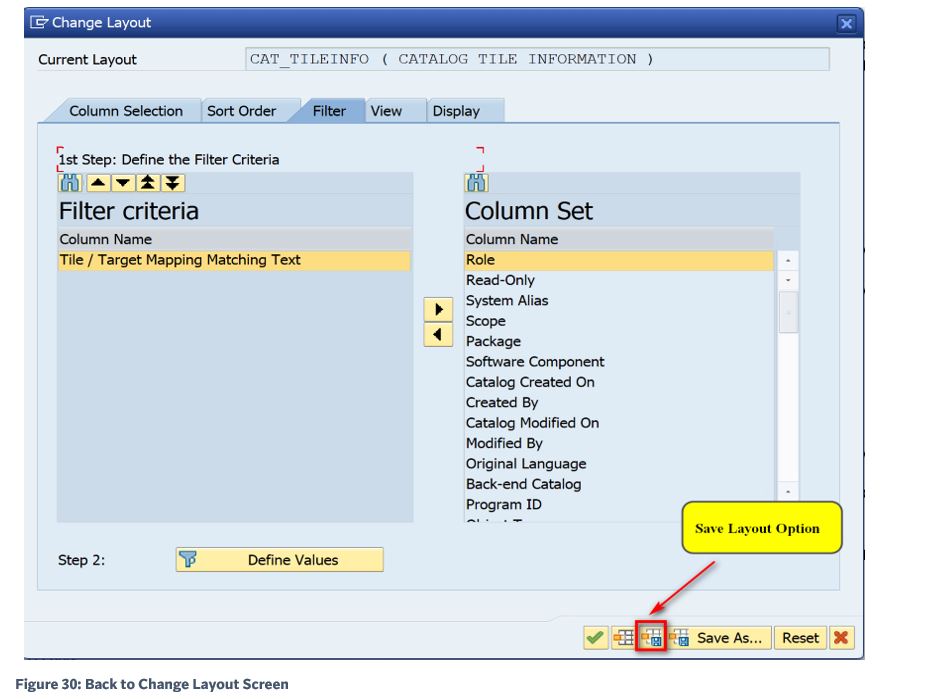
- Click at the bottom of the screen, the Save icon
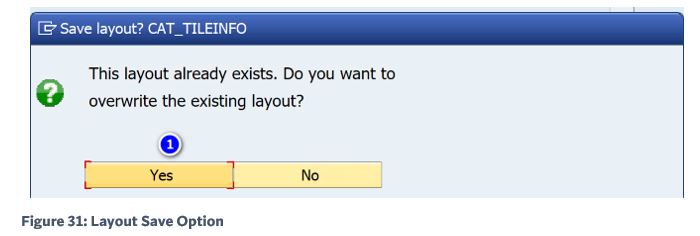
- Click the option >> Yes
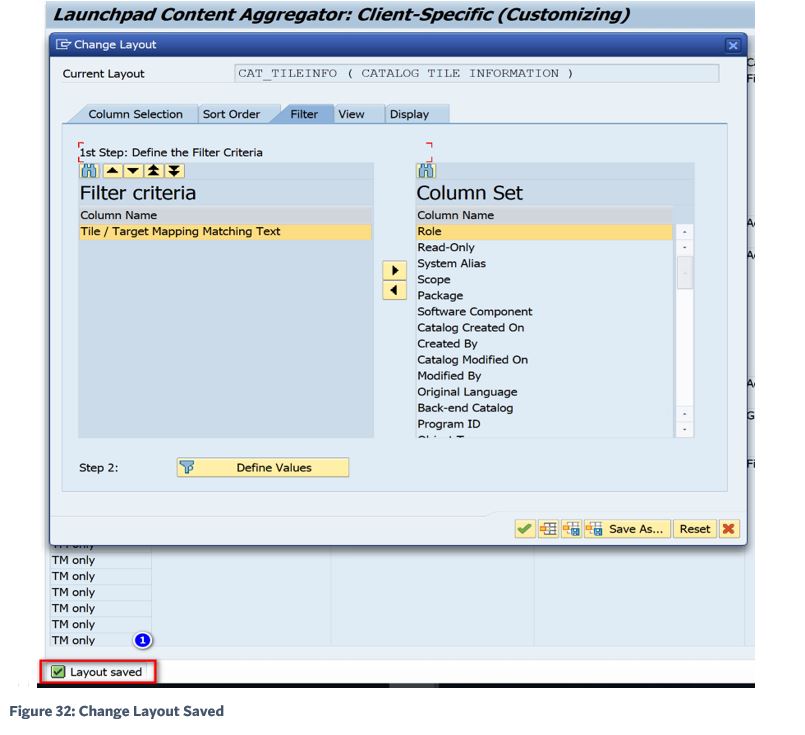
- At the bottom of the screen, it shows that Layout has been saved >> Layout saved
- Now, select the tab >> View >> from >> Change Layout >> Screen and it gives you the three Preferred View
- SAP List Viewer
- Microsoft Excel
- Crystal Reports
- SAP List Viewer
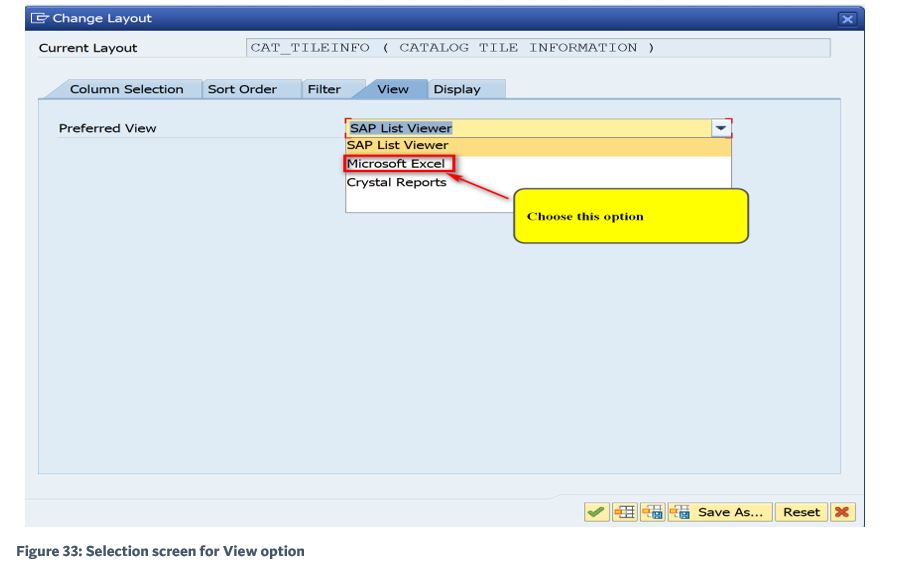
- Select the option >> Microsoft Excel
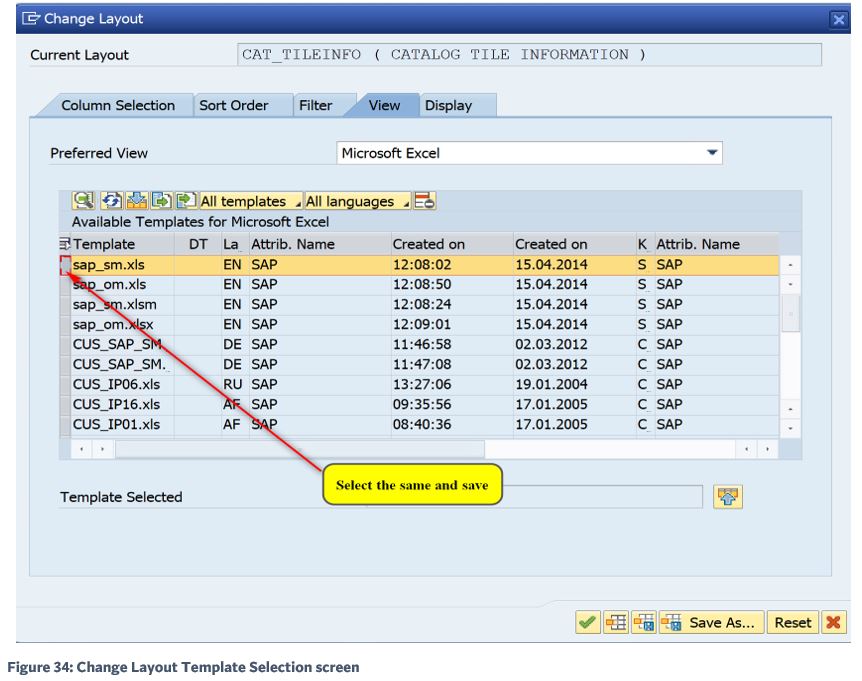
- Select the template >> sap_sm.xls
- Click the save icon >> >> and click >> Yes
- In order to save all option, we selected, it is better to save periodically and at bottom of screen it will show >> Layout saved
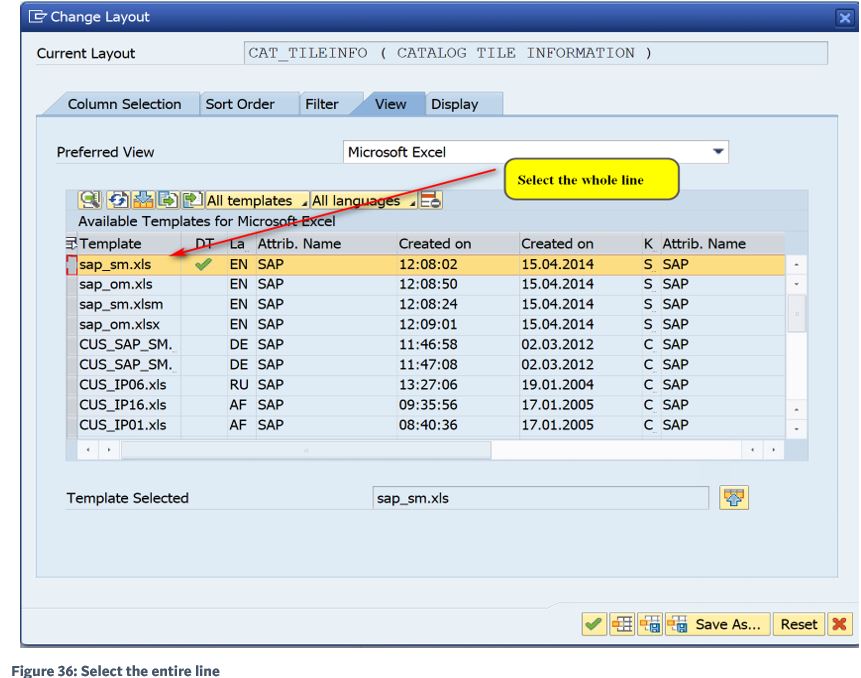
- Double Click >> sap_sm.xls >> and the template gets selected as shown in screen below:
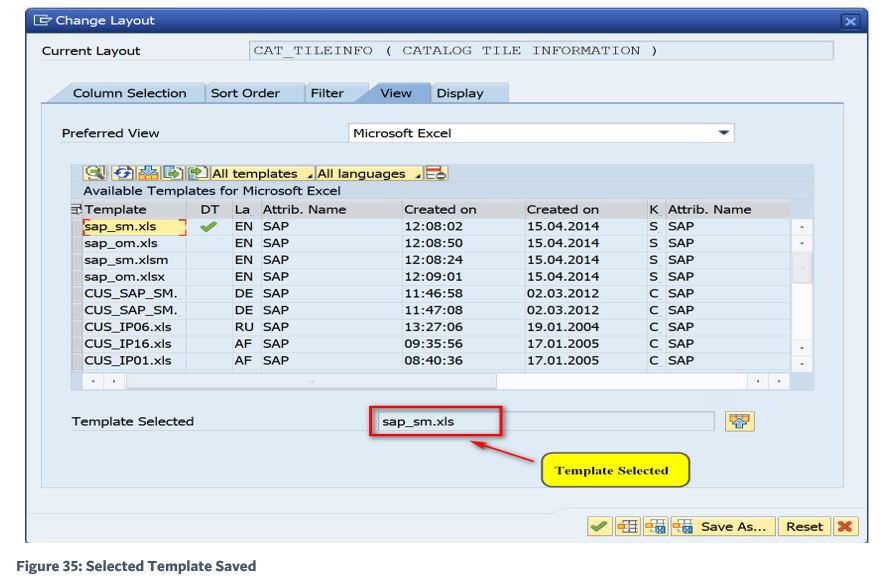
- Click the icon >> Save Template
- The, click >> Continue >> and Excel file will open automatically
- Note: Make sure you save the Excel file
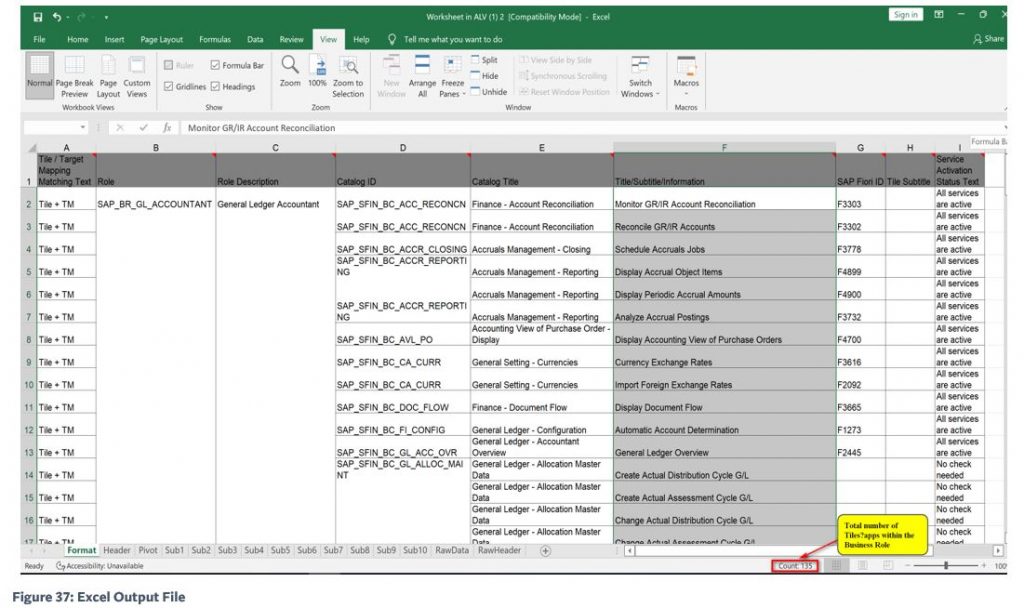
- The required Output Files shows there are about 135 Tiles/Apps within the Business Role
- SAP also gives a sheet called RawData which can be customized to visualize number of Tiles/apps within the Business Catalog and will provide data consistency check also
- It also creates a sheet called Pivot, where you can create Pivot table of data, in our case I used Rawdata sheet to generate custom pivot table
- Select the sheet RawData and click from menu option >> Insert
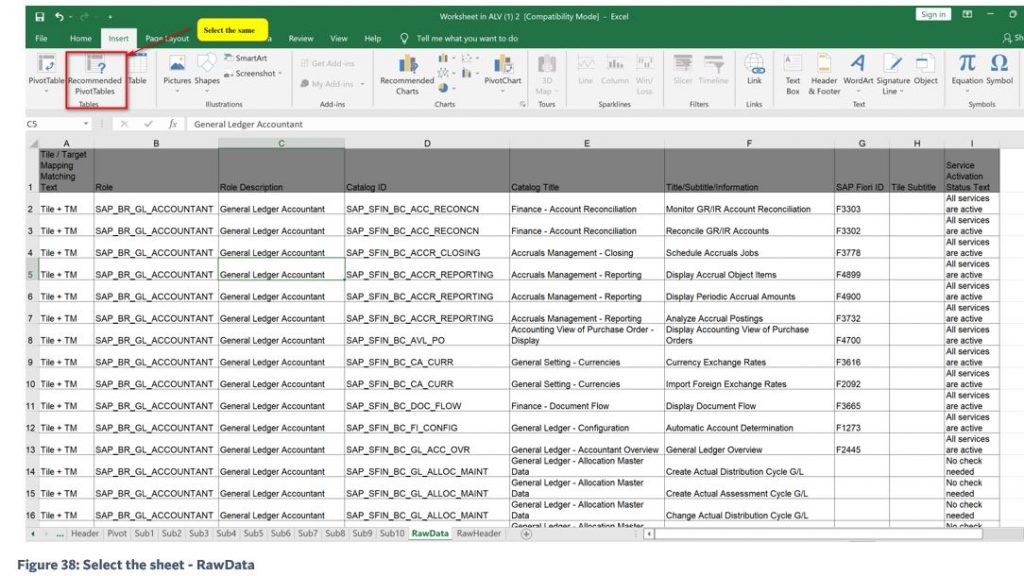
- Select the menu option as shown above >> Recommended PivotTables >> and Excel will show various data options
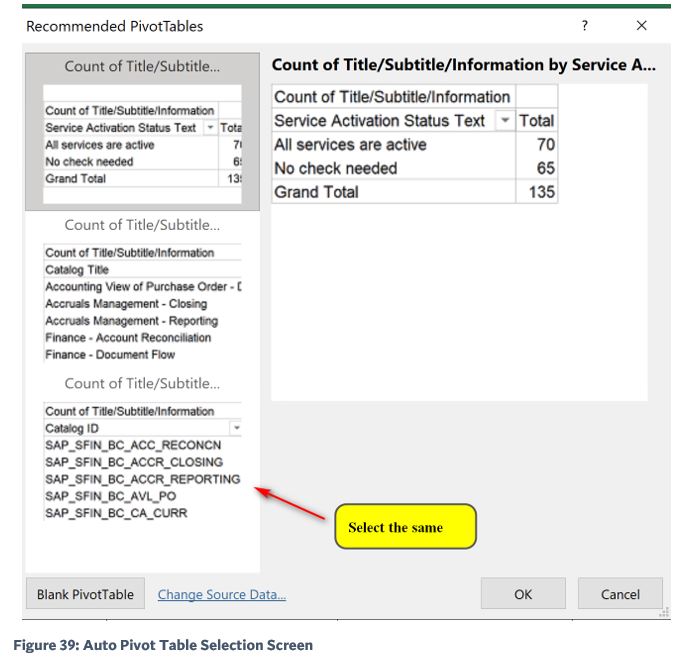
- Select the chart as shown above
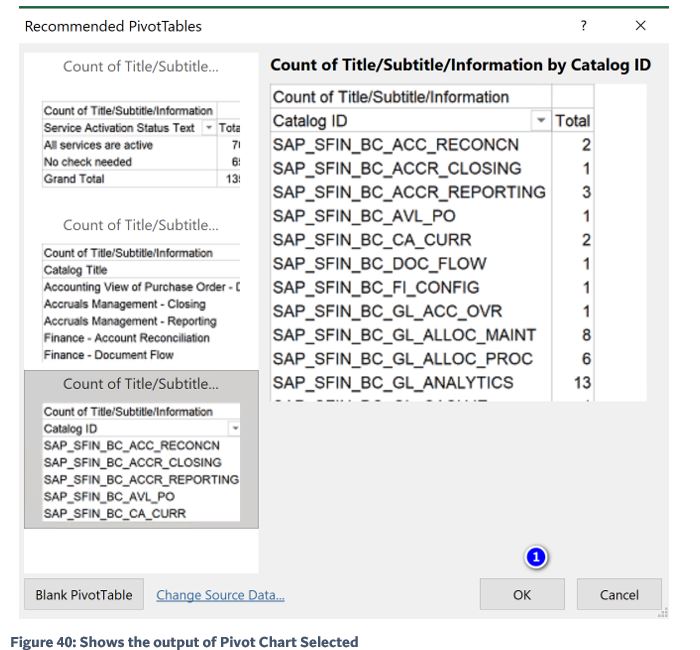
- Click >> OK
- Save the Excel File >> FLPCA DATA – SAP_BR_GL_ACCOUNTANT.xls
- Arrange the option on the right Side
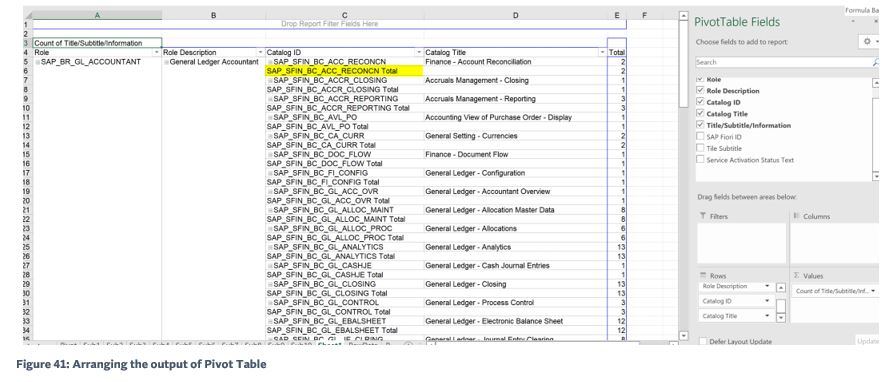
- Update as shown under >> PivotTable Fields the >> Rows as shown above
- Right click the first option where it shows Total
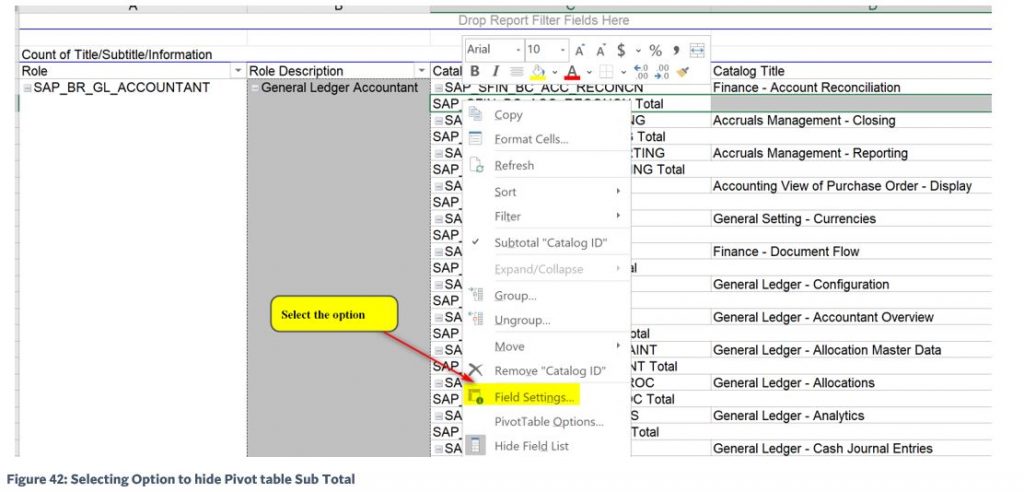
- Select the option >> Field Setting
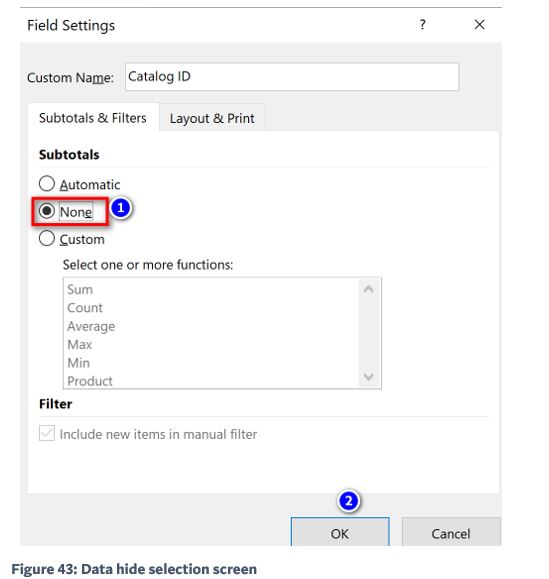
- Select the option >> None >> and select >> OK
- Similarly hide >> General Ledger Account Total >> and Pivot table is updated
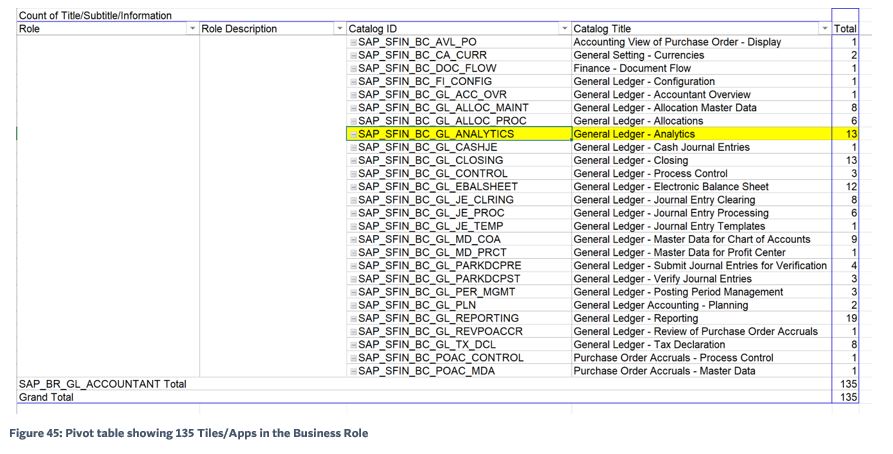
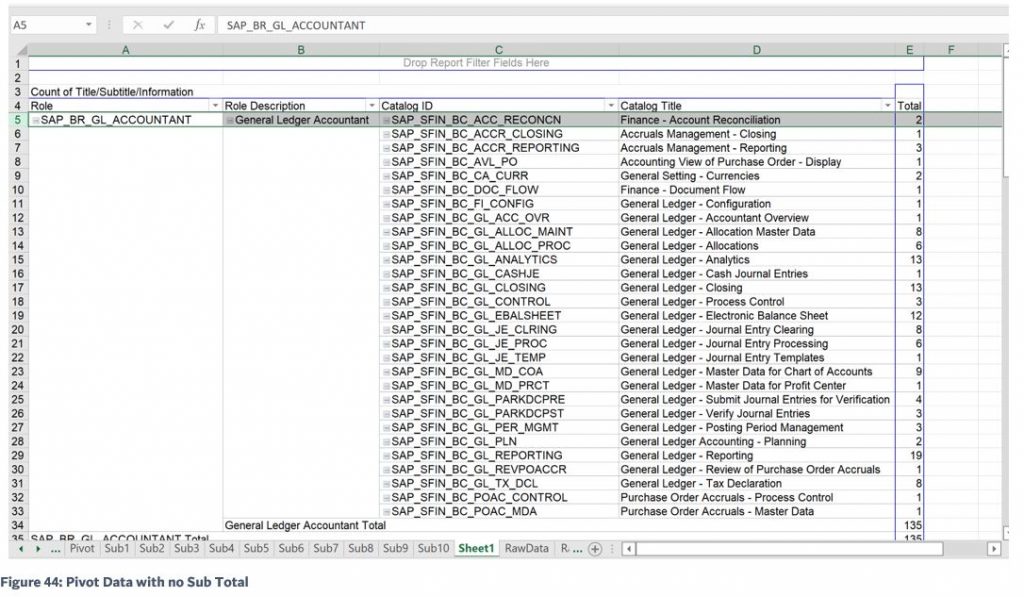
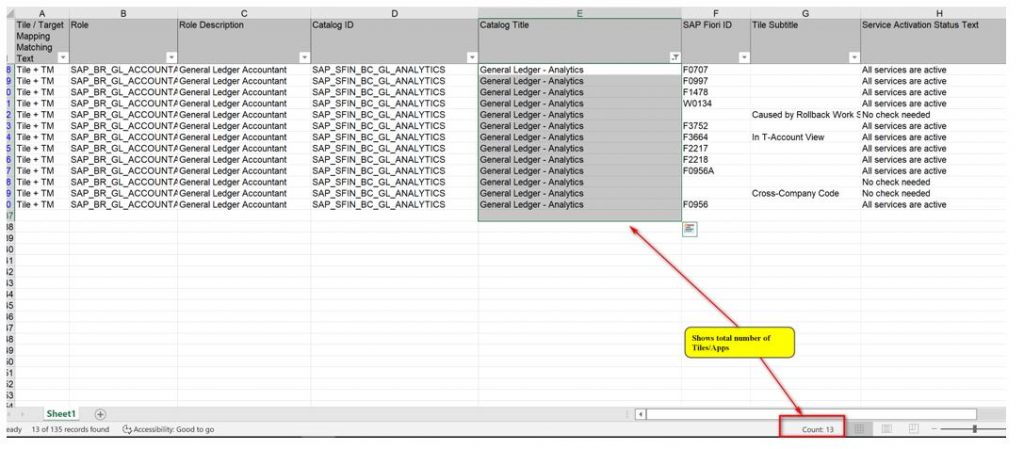
- It shows SAP_BR_GL_ACCOUNTANT has 135 Tiles/Apps
- For example, General Ledger – Analytic have 13 Tiles/Apps
- Go to sheet Header and check by applying Filter on Catalog ID for SAP_SFIN_BC_GL_ANALYTICS
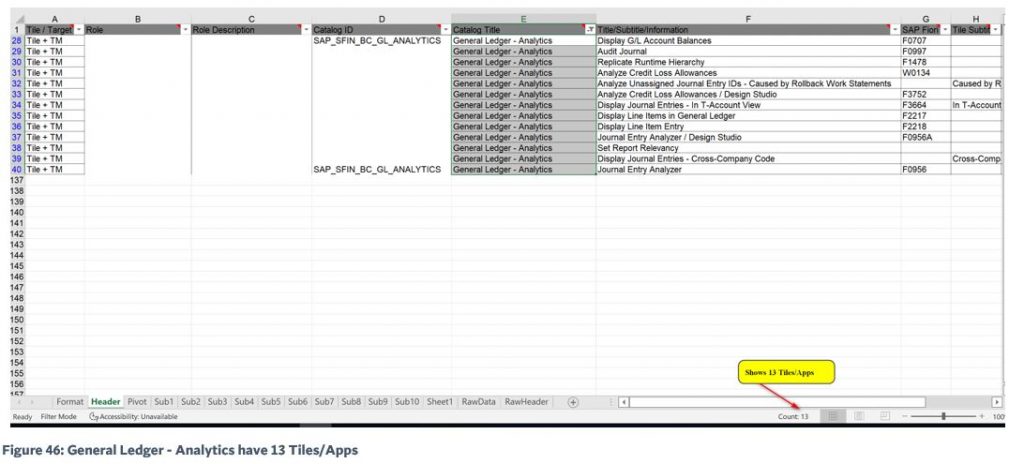
- The catalog >> General Ledger – Analytics >> has 13 Tiles/Apps, and it matches and is validated
- The above data can be used to create Custom Fiori Text Matrix
STEP 8: Create Fiori Role Matrix
- Copy data from above and put into the template matrix
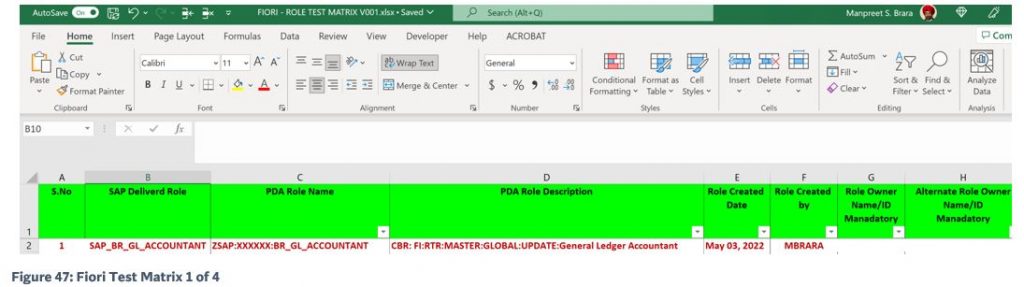
- Scroll to the right
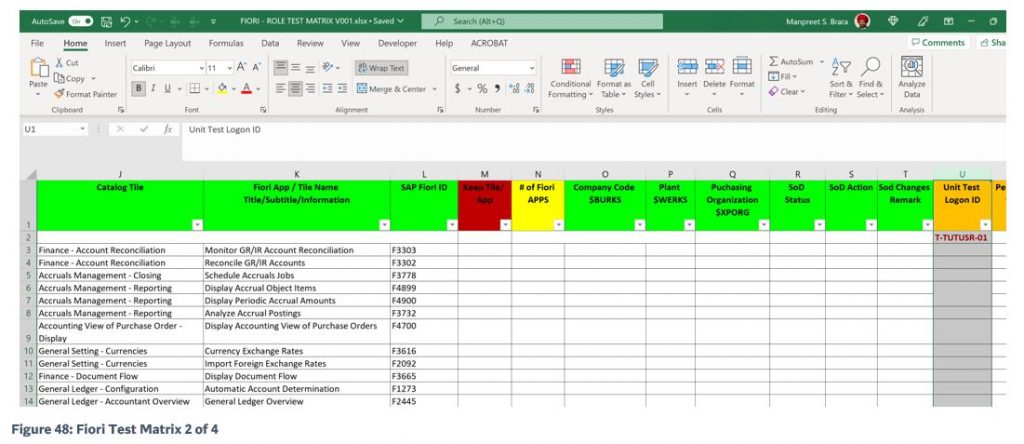
- Scroll more to the right
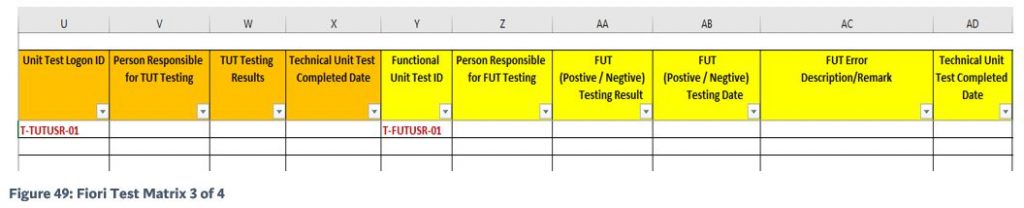
- Scroll more to the right
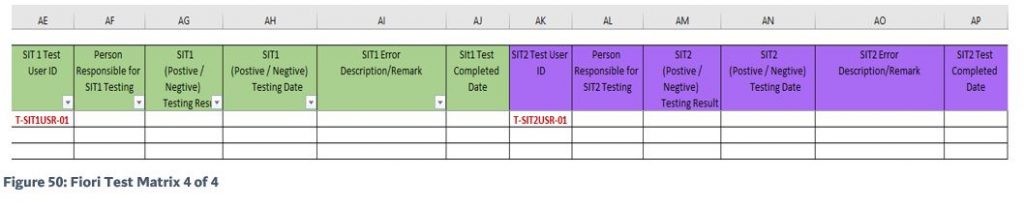
- The above matrix along with AGR_1251 data for the roles along with all the Object Description (Table: TOBJ) within the Business Role should be provided to functional Consultant to test the role and update the Role Matrix
STEP 9: Confirm the Apps available in the Business Role Match
- Now confirm the apps matches per Business catalog when the test user log in using the URL or T-Code: /N/UI2/FLP
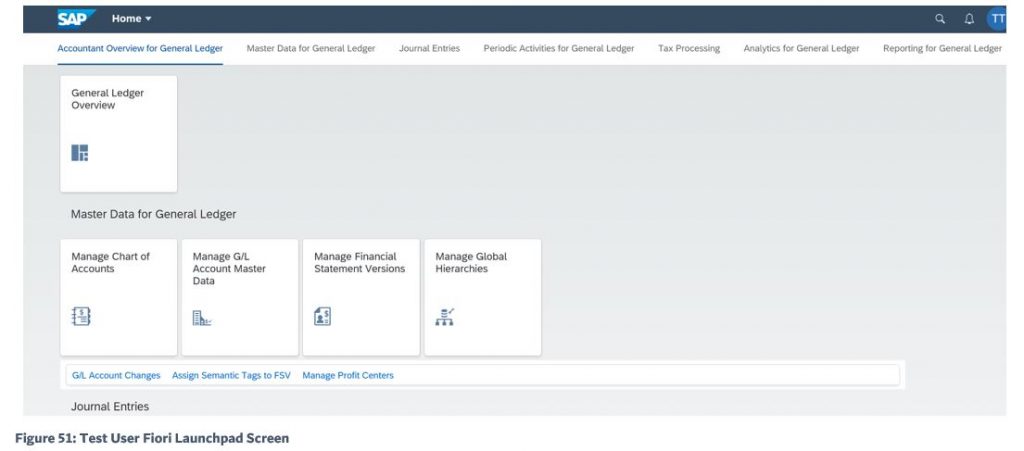
- Expand the symbol >> TT >> which is short for the test username
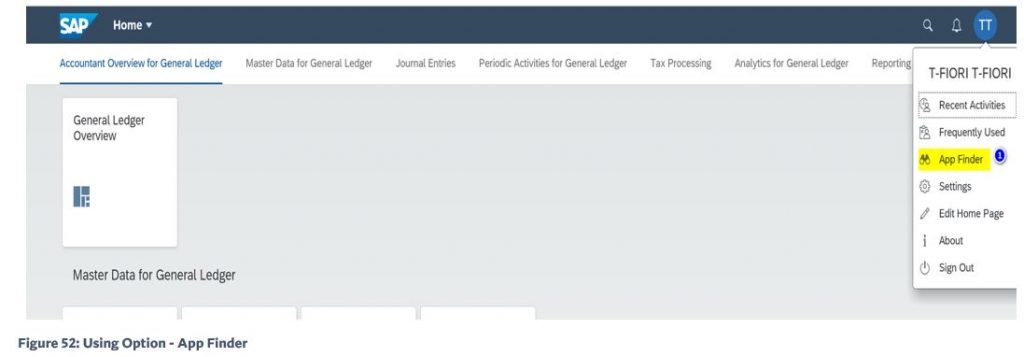
- Select the option >> App Finder
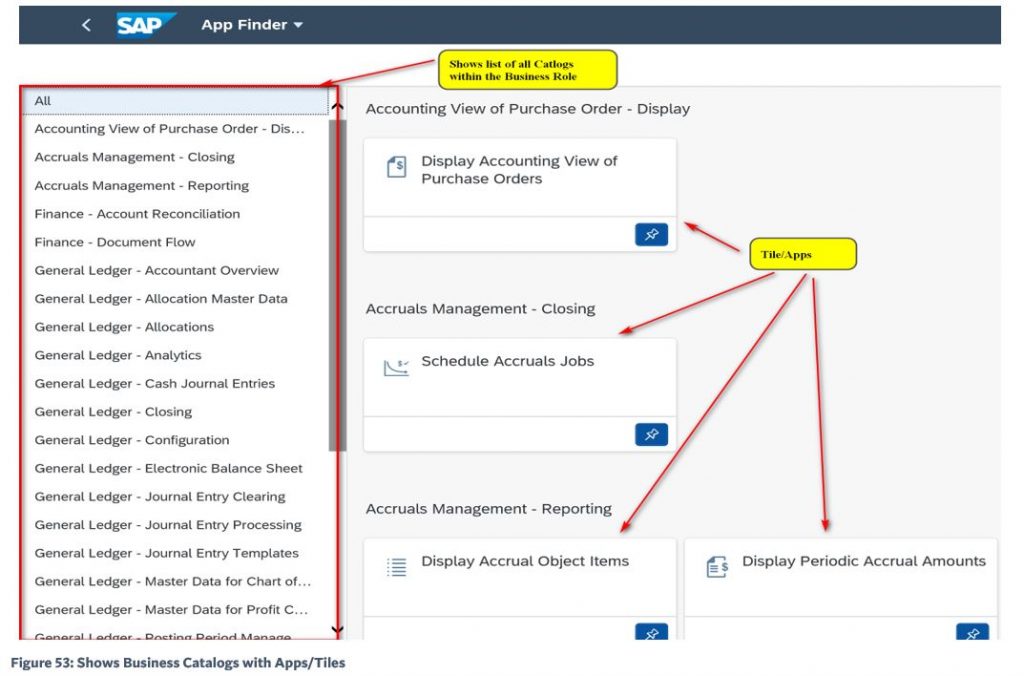
- The above figure shows respective Business Catalogs and associated Tiles/Apps within the role
- Here we will check the catalog >> General ledger – Analytic >> and its associated Tiles/Apps
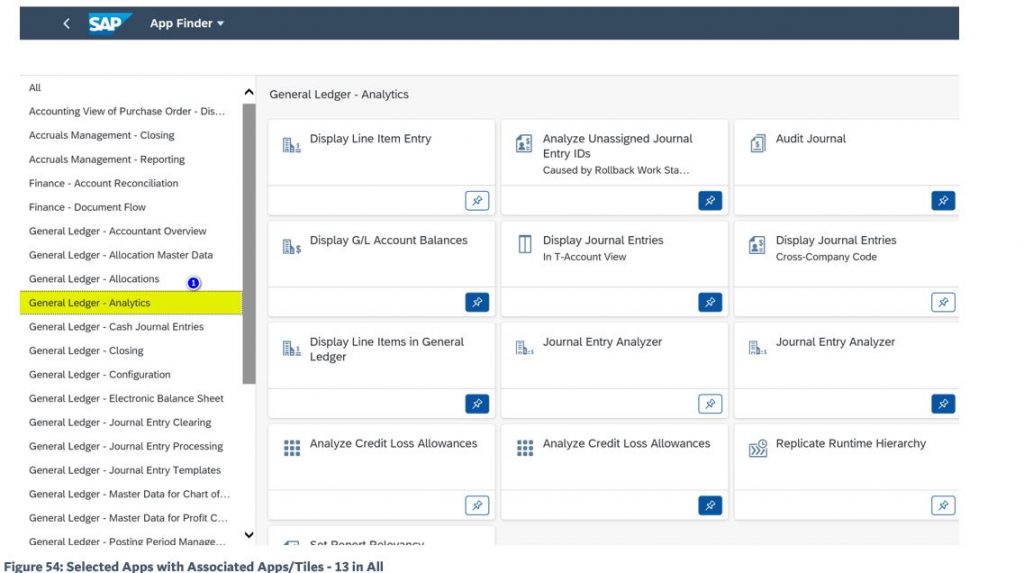
- The above catalog has 13 Tiles Apps, and we need to check the same in the matrix
- Filter the data under tab “Catalog Tile”
- The total number of Apps (13) matches with the output matrix when the test user logs into the Fiori Launchpad URL
Rating: 0 / 5 (0 votes)


