In Part I of our SAP Fiori Step by Step Guide, we learned about System Configuration and Installation. You now know how to check if your SAP Landscape System is ready for SAP Fiori Implementation and Deployment. In this article, we would take a closer look at the Fiori App related Configurations. System Configuration check is more of Basis/Admin related activity but Fiori App related configuration and design definitely come in the purvue of an ABAPer and Front-end developer. So, ABAPers, sharpen your concentration power and keep your mind open to learning this useful topic of exploring the SAP Fiori Library, checking the Add-Ons for the chosen Standard Fiori Apps (two examples), activating the Services (UI and OData) of Standard Fiori Apps, design and launch the Fiori Launchpad.
The following are the Fiori App specific Configurations and points which we would try to understand, assimilate and cover today.
- Fiori Library
- Activation of front-end UI Service and back-end OData Service
- Authorizations (Admin & End Users)
- Fiori Launchpad Designer
- Start the Fiori Launchpad
B) Fiori App specific Configuration
Step 1) Fiori Library
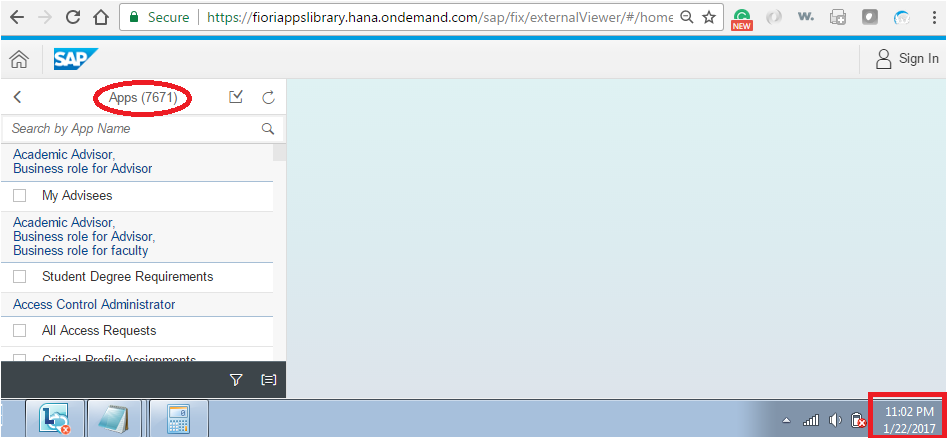
Please bookmark the below link to the standard SAP Fiori Library. As of today, 11:02 PM CST (see, how late in the night our SAPSPOT Team work), 22nd Jan 2017, there are 7671 Apps released by SAP. For every Fiori Implementation, we would need to refer to this Fiori Library.
https://fioriappslibrary.hana.ondemand.com/sap/fix/externalViewer/#/home
Que: Why do we need to visit the SAP Fiori Library?
Ans: Library is the temple of information. Isn’t that enough?
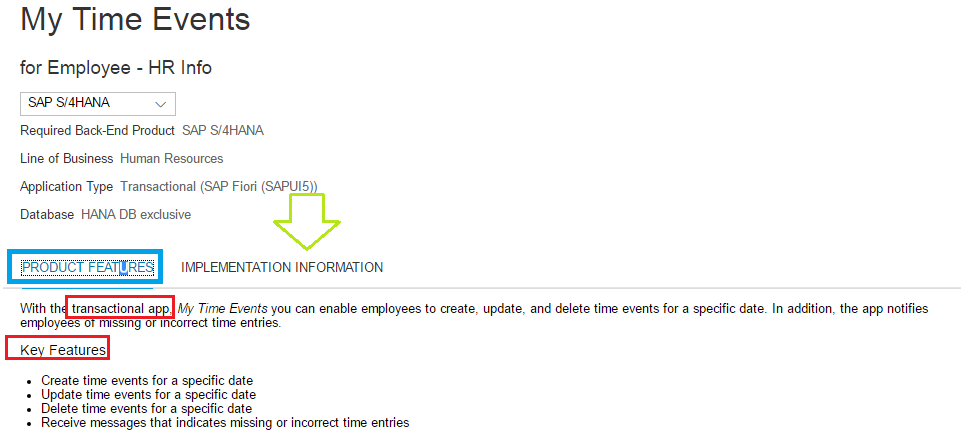
Before deciding to build any custom App, you need to browse through the library if SAP has provided any standard App(so that you do not re-invent the wheel). If you already know the Apps name to implement, you can get more information regarding the Key features of the standard App as what type of App is it (Transactional /Fact /Analytical) and what the App is supposed to do.
The library also serves as the guide to technical folks like us. It has all the required information needed for Installation, Configuration, Extension and Support.
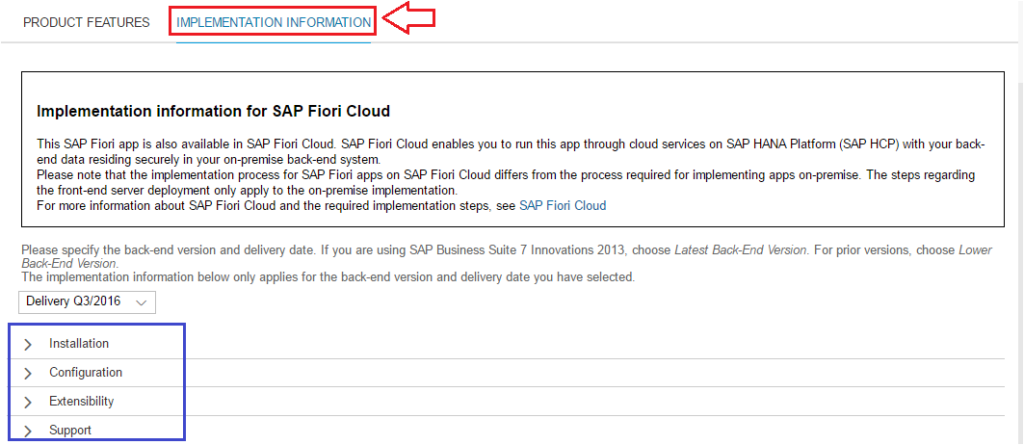
Let us see, what is under Installation section.
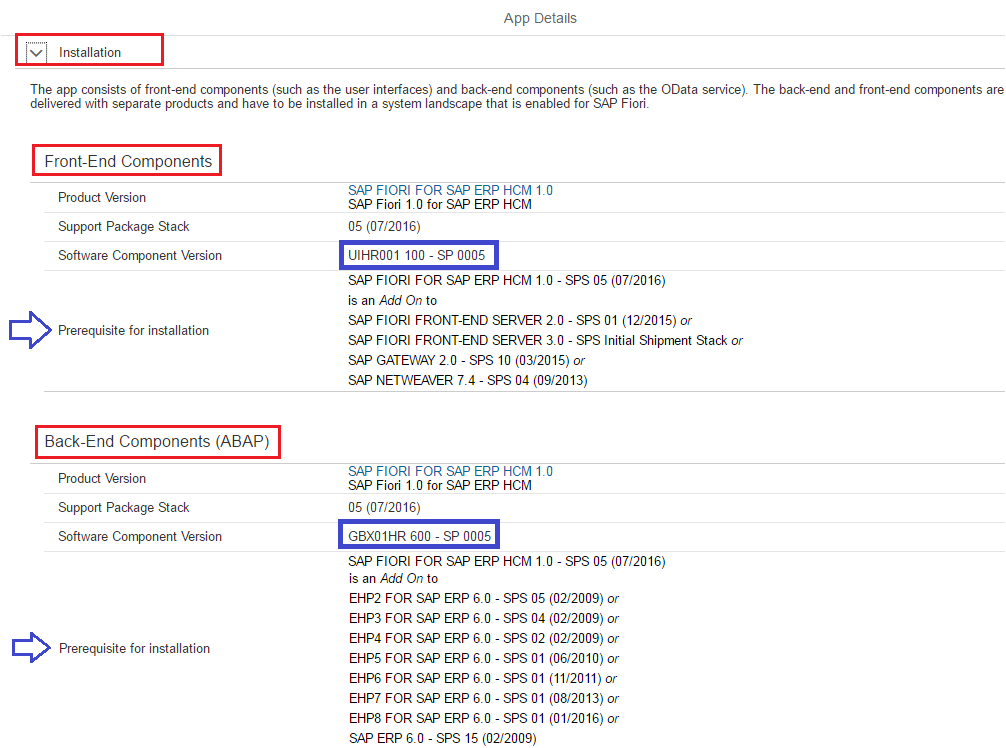
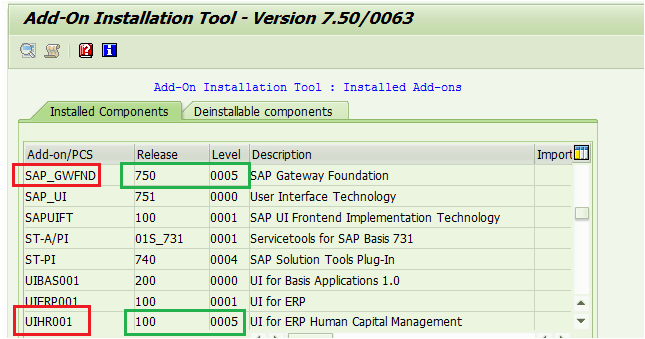
Check the Software Component Version and Pre-requisite for Installation section for both Front-End and Back-End Components in the Installation section of the Library (image above). UIHR001 100 – SP0005 is the Front-end Software Component Version and Pre-requisites as shown above. Now, let us go to our SAP Front-End (Gateway) system and check our version (image below). Luckily, both, Software Component Version UIHR001 and Pre-requisites are met in our Landscape as shown below.
Go to t-code SAINT to check your Components/Add-ons and service pack levels.
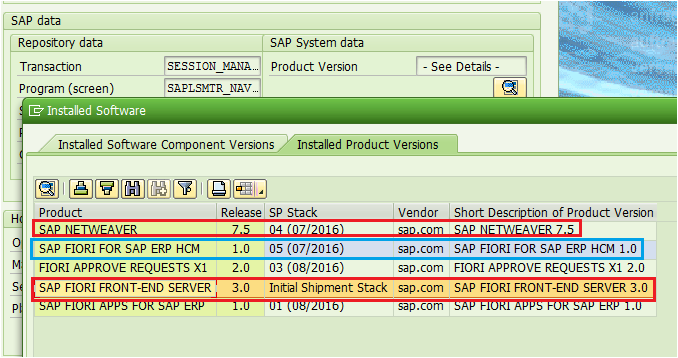
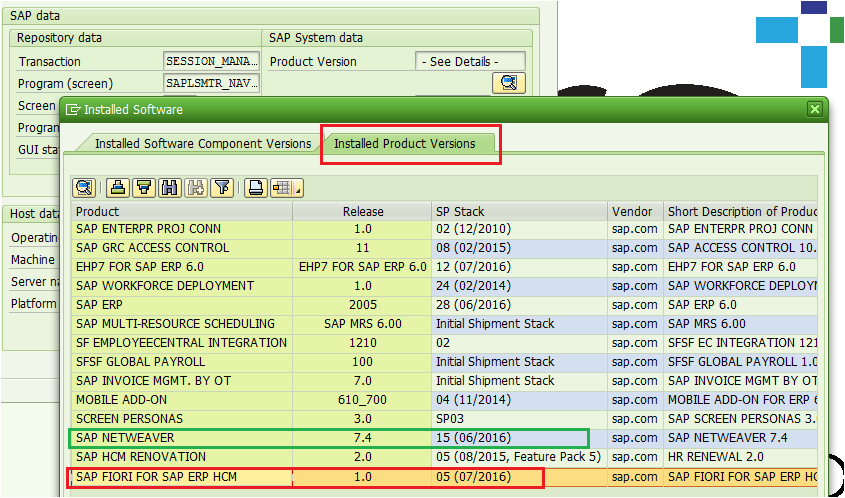
If you do not have access to t-code SAINT or if you want more information regarding your system, go to any t-code, from System Menu > Status > Product Version Component details.
Check the Installed Product Versions. It meets all the requirements mentioned in the Installation Section of the Fiori Library.
Similarly, check the Product and Component Versions and Pre-requisites in SAP Back-End system. As per the Fiori Installation guide in the Library shown above, GBX01HR is the Software component and Release 600 SP 0005. Look below, our system has the component (GBX01HR) installed and has the right version.
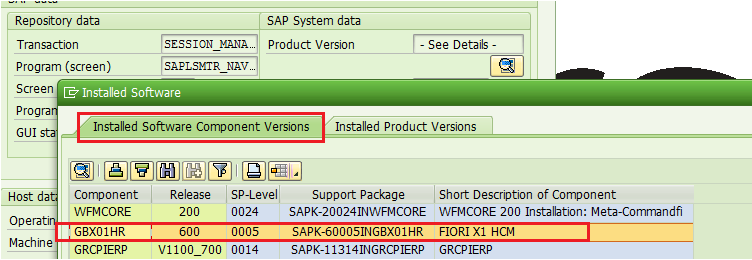
SAP FIORI FOR SAP ERP HCM 1.0 – SPS 05 (07/2016) is the Prerequisite for installation and since we saw that the Software Component with right Version is already installed in our system, the pre-requisite had to be met (below image).
Hope by now we were able to justify the importance of referring to the Fiori Library. If still not convinced, look at the Configuration Section for jewels of technical information.
Configuration Section:
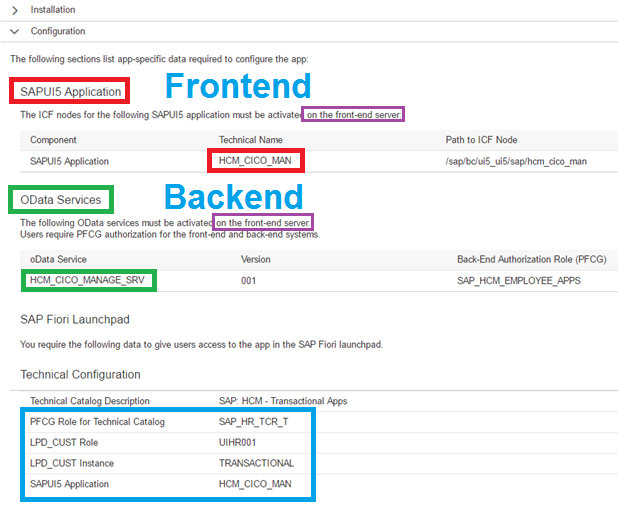
The configuration section is the one which most ABAPer and Front-End Developers need to refer. It has App-specific data required to configure the App i.e. the technical names of SAPUI5 Application Service (front-end), Back-end OData Service, Launchpad related information (Catalog/Group/Role/Target Mapping) etc.
In the Library, do check the Extensibility and Support section. Whenever we need to do any modification to the standard Fiori App, we would need to refer to this section to look for the extension points in views and hooks for custom code in controllers. When you need to raise OSS request to SAP for their support in case of any issue in standard App, you would need to type in the Application Component and Type from the Support section of the library for the right team from SAP to pick your ticket and work on it.
In the previous article, we revealed that the IT director wanted to implement My Time Event App for Employees and Approve Timesheets for Managers. So please do not be surprised if you see information and screen prints of those two standard Apps in today’s presentation. ?
Step 2) Activation of frontend UI Service and backend OData Service
We will configure “My Time Event” App and “Approve Timesheets” (Version
2) App simultaneously. We would show step by step for My Time Event and you need to do the same steps for Approve Timesheets as well (hands-on for you). All the screen shots above were for My Time Event App.
Hand-On Exercise # 1: Go to the Fiori Library and check the Installation and Configuration section for Approve Timesheets App.
i. Active the SAPUI5 Application (service) In the Front-end system
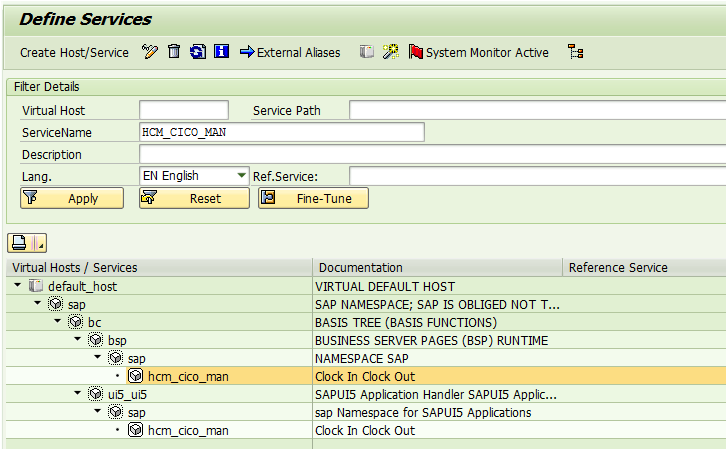
Go to t-code, SICF. Provide service name HCM_CICO_MAN (we got this service name from Fiori Library) and execute. Right-click on the service name and Activate it (if not active). If you do not have access or authorization for SICF, please take help of your company’s SAP Admin or Basis Team.
Path to ICF Node is /sap/bc/ui5_ui5/sap/hcm_cico_man
Do the same step for Approve Timesheets App UI Service: HCM_TSH_APV. How did we get this Service name? From the Fiori Library buddy. Go the library and search for Approve Timesheets and get the information.
ii. Activation of back-end OData Services
If you have embedded system, your front-end and back-end services need to be activated in the same one system. But if you have Central Hub System (separate front-end and back-end), you need to add and activate the back-end OData Service on the front-end server (even though it is back-end OData service). In the beginning, I thought the OData Service had to be added to the back-end system but I was wrong. I had some confusion initially so thought of pointing this out.
a) Go to t-Code /IWFND/MAINT_SERVICE
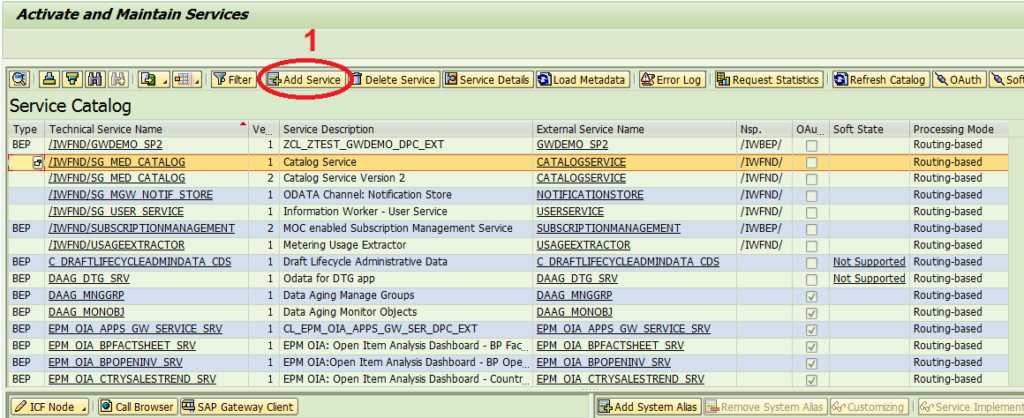
b) Provide the System Alias and Technical Service Name (HCM_CICO_MANAGE_SRV)
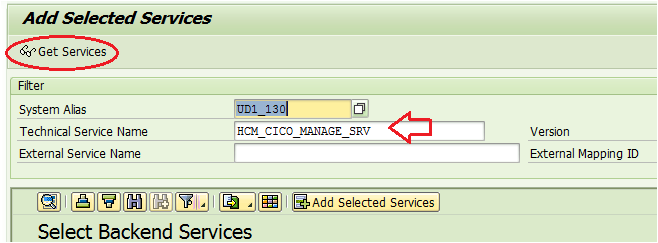
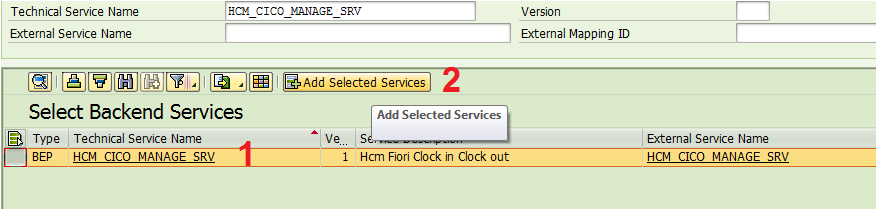
c) Select the row and hit Add Selected Services
d) Keep the default Technical Service Name or change the name as per Project naming convention
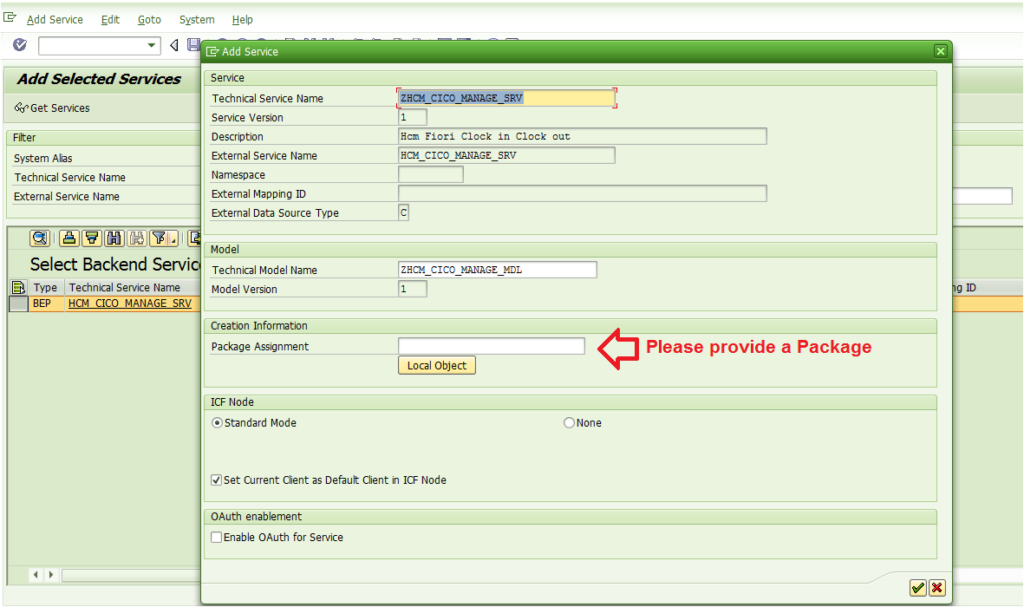
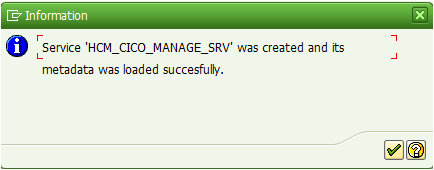
e) This Pop-Up Message would come
f) Go back to t-code IWFND/MAINT_SERVICE. The added service should be available.
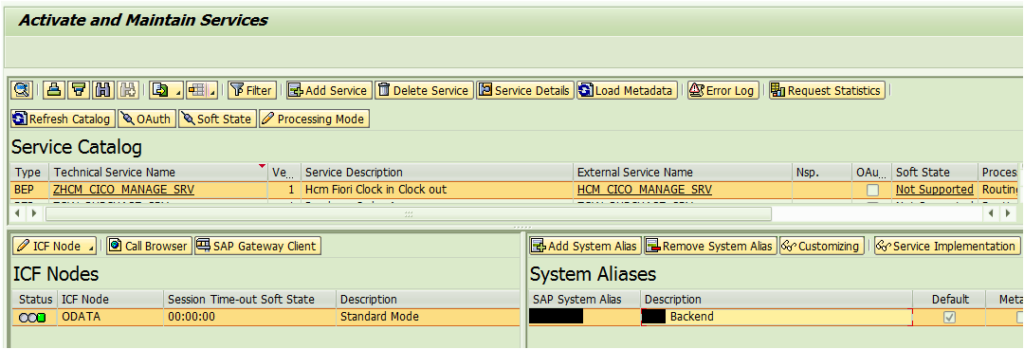
When you select the added service and hit the Call Browser on the above screen, an XML page should open up. Assuming the System Aliases and other configurations mentioned in Part I is done correctly. If the browser shows any error, fix the error first before you proceed to next step.
Hand-On Exercise # 2: Please follow the same steps and activate the OData Service HCM_TIMESHEET_APPROVE_SRV for Approve Timesheet App.
Step 3) Authorizations (Admin & End Users)
Authorization object S_RFCACL should be assigned to Fiori App users so that they can use a trusted connection.
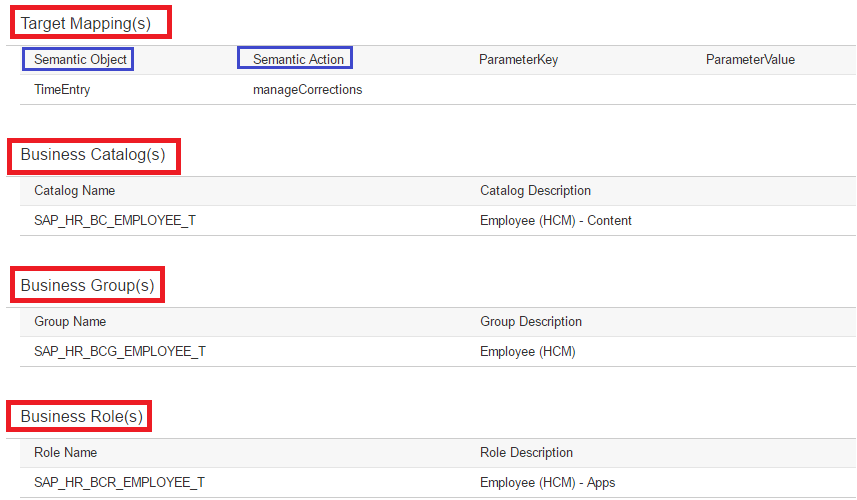
As per the Configuration section of the Fiori Library, standard PFCG role ‘SAP_HR_BCR_EMPLOYEE_T‘ is needed for My Time Event App.
Users also need the below two Roles as per their job duty:
Standard Role SAP_UI2_USER for Fiori Launchpad User
Standard Role SAP_UI2_ADMIN for Fiori Launchpad Designer
In addition to the above roles, Fiori User who intend to use the My Time Event App, should be provided access to the Service Object generated in t-code /IWFND/MAINT_SERVICE. Go to t-code PFCG, Menu Tab > Authorization Default > TADIR Service:
a. Program ID: R3TR
b. Object Type: IWSG
Maintain the newly added Service Object Name ZHCM_CICO_MANAGE_SRV_0001.
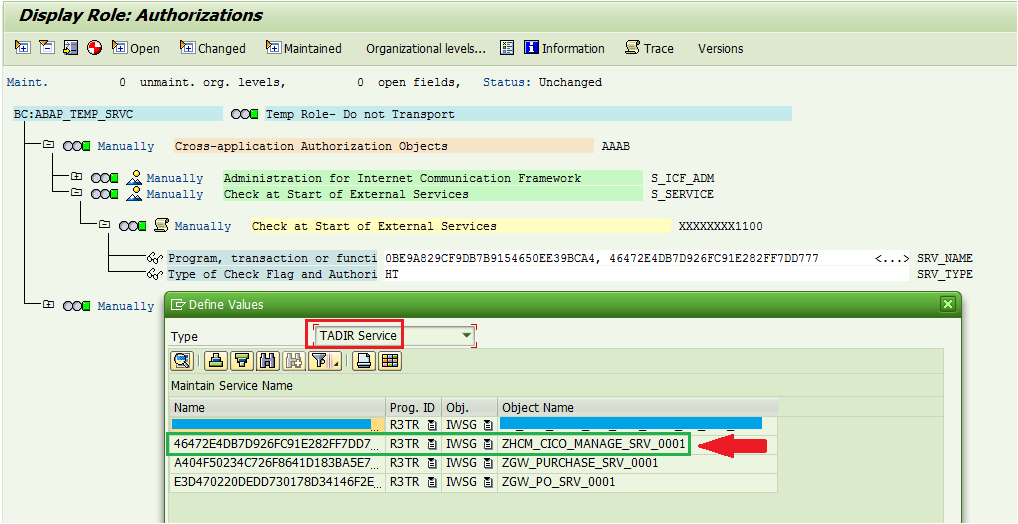
How did we come to know about the ZHCM_CICO_MANAGE_SRV_0001 name? Do a F4 in the PFCG while adding it, you can find it. Or go to Maintenance View ‘/IWFND/V_MGDEAM’ (Assign SAP System Aliases to OData Service) to get the exact Service Document Identifiers.

Hand-On Exercise # 3: What is the standard Business PFCG Role name for Approval Timesheet App? Hint: Check the Fiori Library.
Step 4) Fiori Launchpad Designer
The default URL for the Fiori launchpad is:
https://:/sap/bc/ui5_ui5/ui2/ushell/shells/abap/FioriLaunchpad.html
The default URL for the Fiori launchpad designer is:
https://:/sap/bc/ui5_ui5/sap/arsrvc_upb_admn/main.html
Que: How do we know the Hostname and Port number of our SAP System?
Ans: Please check Part I for it. Or just execute t-code /UI2/FLP for SAP Fiori Launchpad and t-code /UI2/FLPD_CUST for Fiori Launchpad Designer (client-spec.)
i. Create Custom Catalog and Add Standard Catalog Tiles to Custom Catalog Tiles
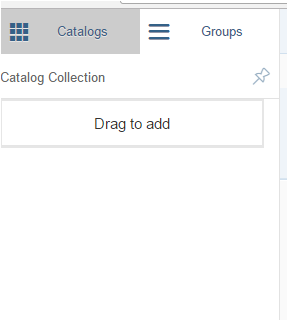
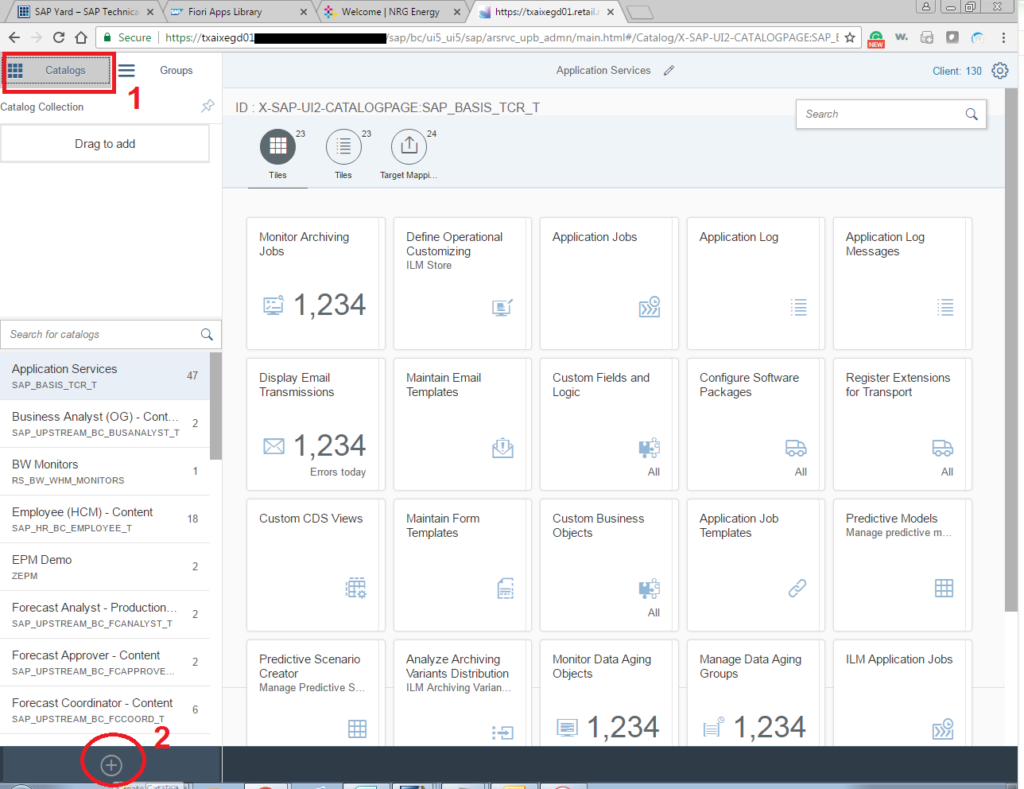
Go to your Fiori Launchpad Designer link or execute t-code /UI2/FLPD_CUST. You should see a blank screen like below.
Select the Catalog Menu and hit the + icon at the bottom.
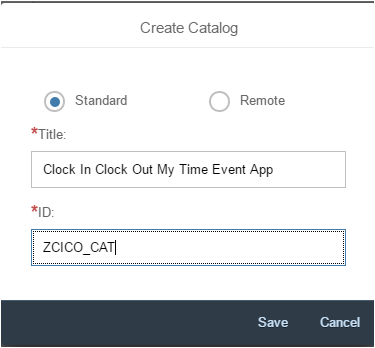
Provide a suitable Title and Id. You can change the title anytime but the Id cannot be edited. So give the id as per the naming convention of your project.
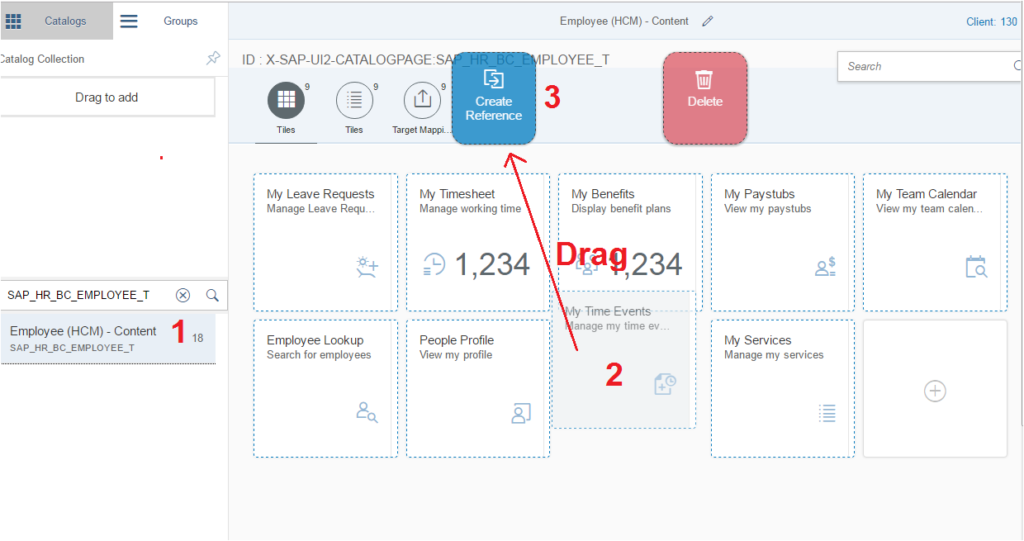
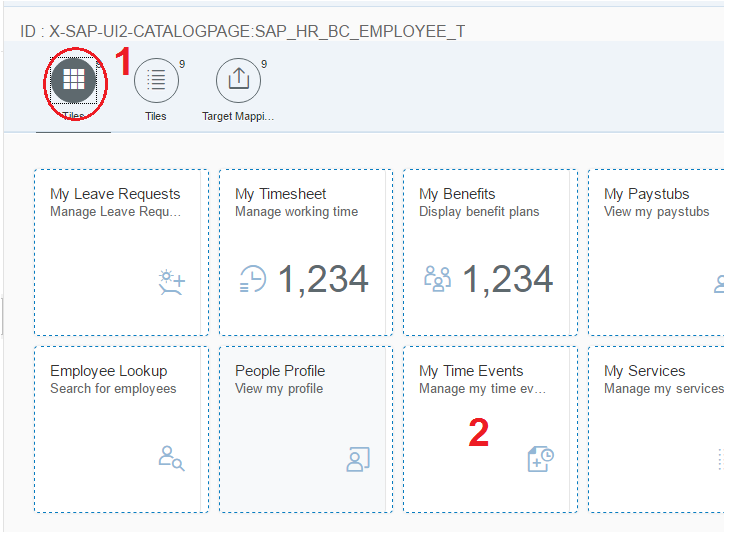
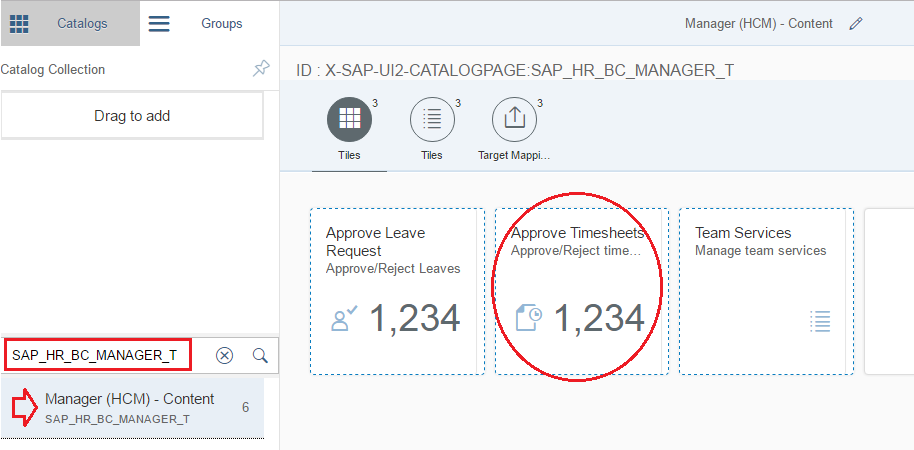
Now search for the standard catalog which we want to move to the new custom catalog. For our case, we are using Employe (HCM) SAP_HR_BC_EMPLOYEE_T catalog. Check the Fiori Library Configuration section for the Catalog name for My Time Events App.
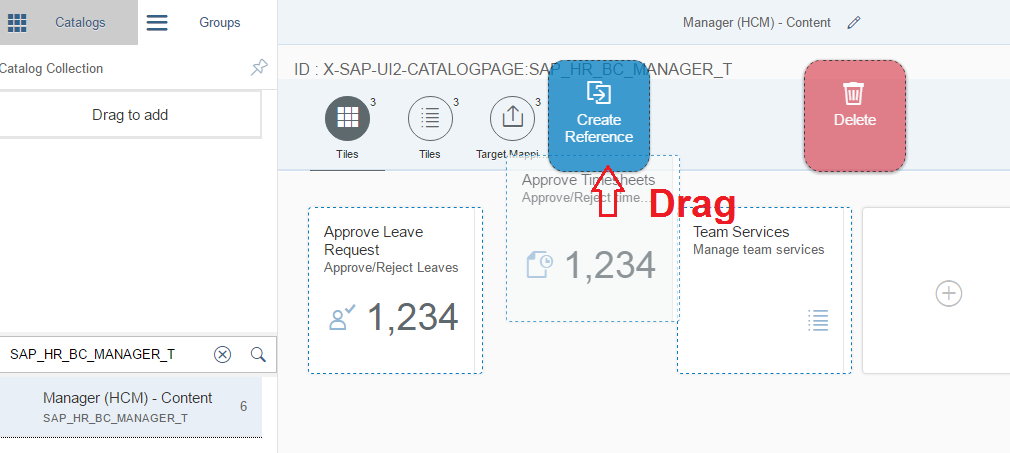
The moment you hold any tile, Create Reference and Delete options show up. Hold the My Time Event App and drag and drop it to Create Reference icon.
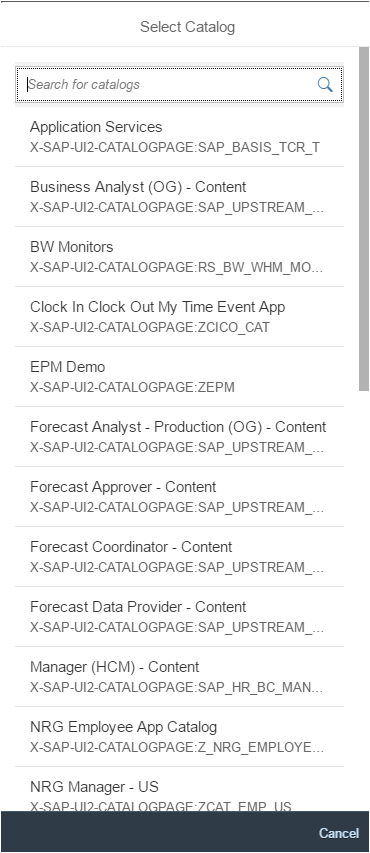
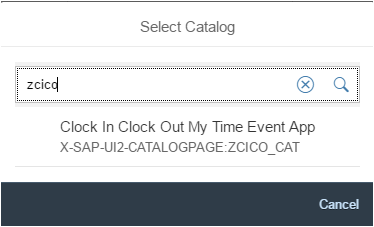
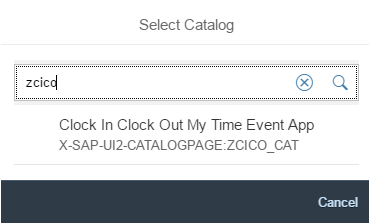
It would ask for the Catalog where you want to put. Search for the new Catalog which you just created.
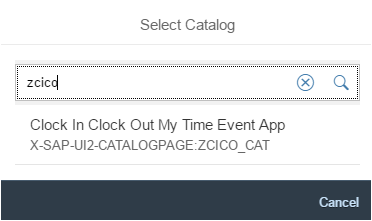
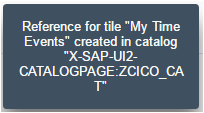
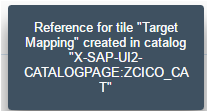
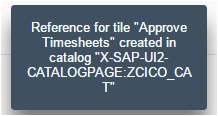
You would see the below message at the bottom of the screen.
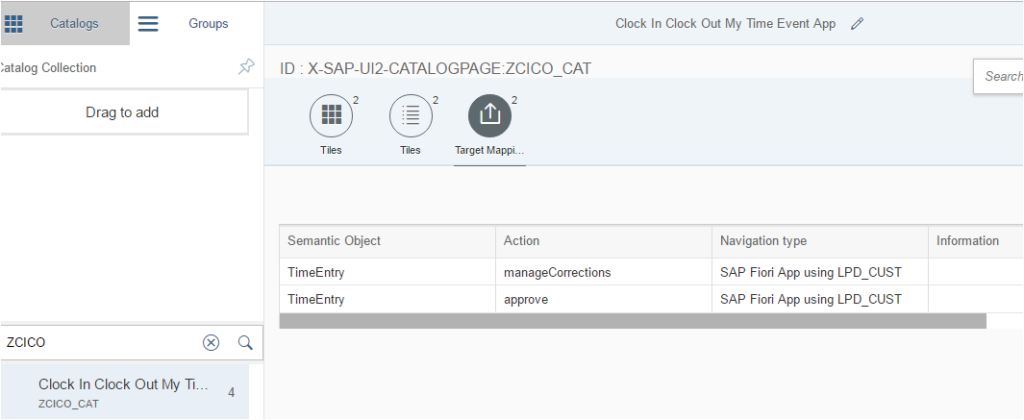
Along with tiles, we also need to move the Target Mapping.
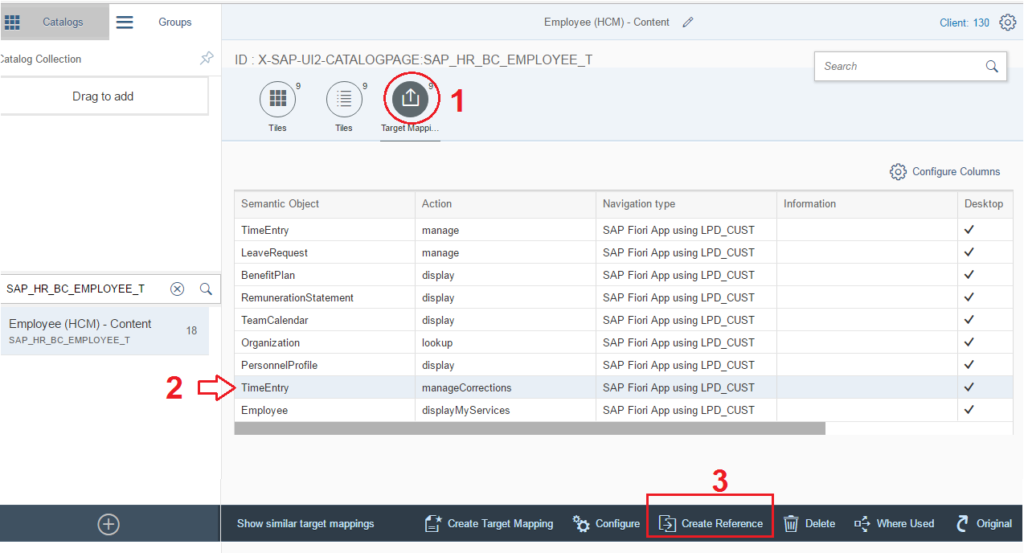
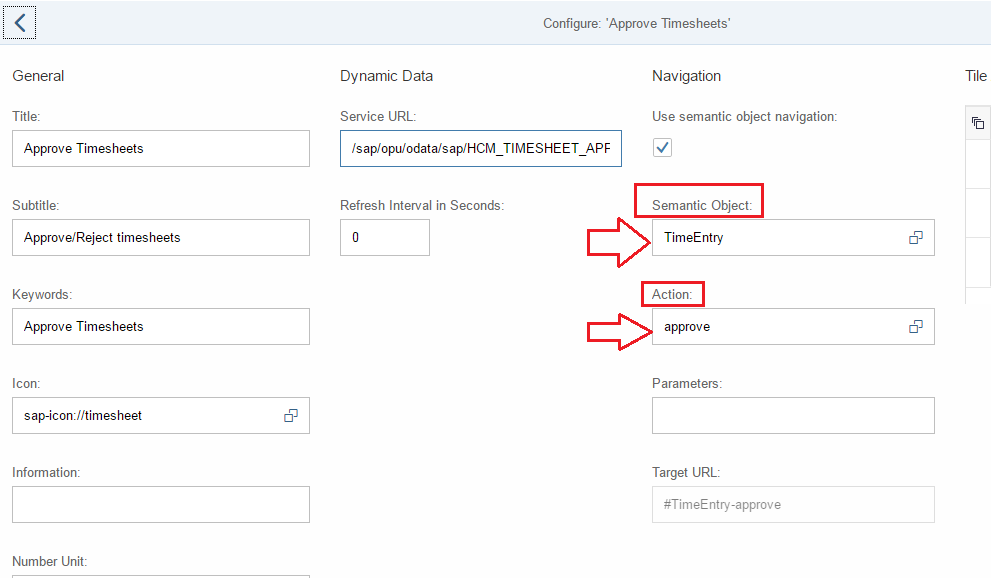
Click on the Tile of the App (My Time Events) for which we want to move the Target Mapping. Take note of the Semantic Object and the Action.

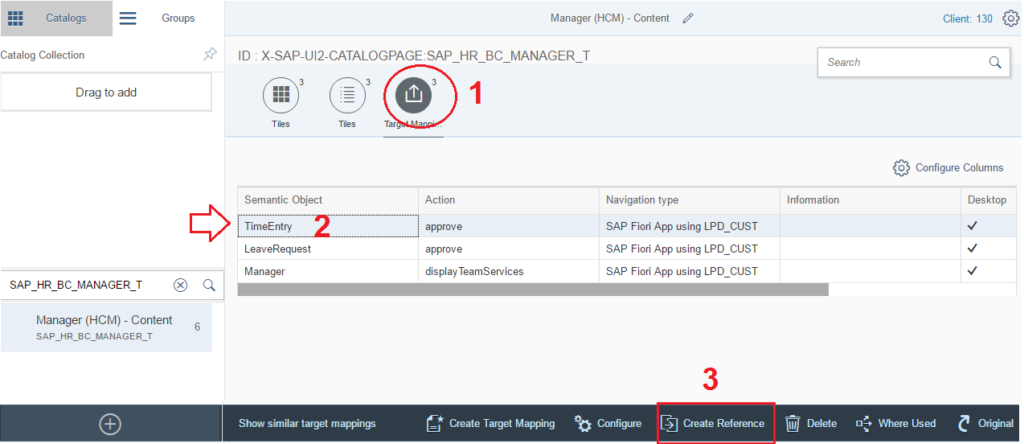
Go back. Select the Target mapping Icon. Choose the Semantic Object and Action which we noted above. Once you select the line, buttons become active at the bottom.
Hit on Create Reference. We are just creating the reference (link) from standard to our custom Catalog.
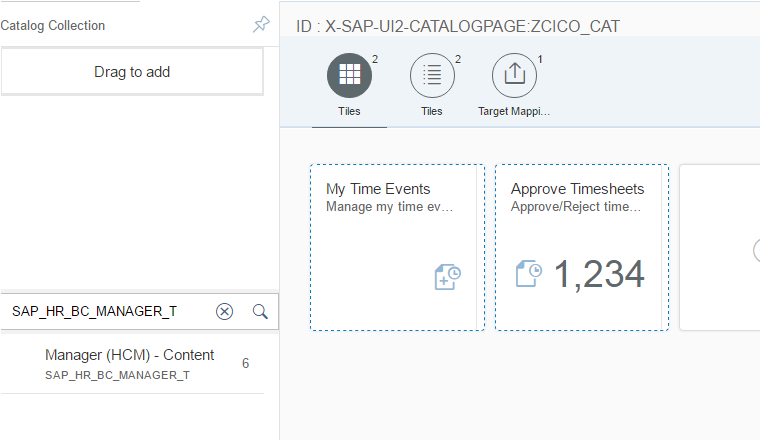
Search for your custom catalog where you want to save it.
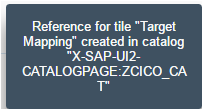
You should see the confirmation message like below.
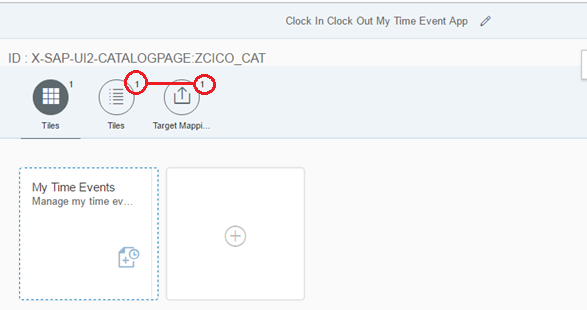
Please note: The custom catalog has number 2 beside it. Hope you guessed it correctly. One is for the tile and another one is for the target mapping which we just added. The number would grow as we keep adding tiles and target mappings.

Tip: Usually, the number of Tiles and Target Mapping should be same. Always check the numbers. If you forget to configure the Target Mapping correctly, then your Launchpad would have an issue.
Now, let us assume our launchpad needs to be available for the approvers as well. So let us configure the standard launchpad for Timesheet Approve App.
Hand-On Exercise # 4: Configure the standard catalog of Timesheet Approve App into the custom catalog created above.
Hint screenshots below.
At this point, let us check how our Custom Catalog looks like.
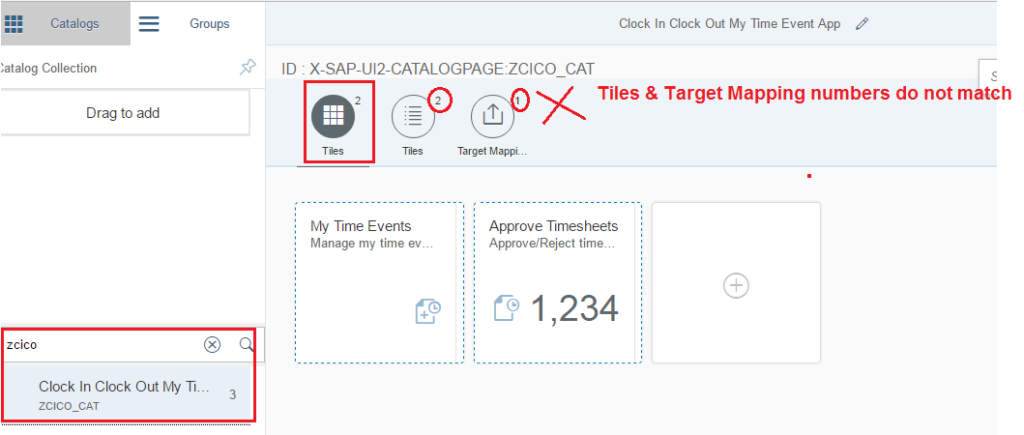
We mentioned earlier, Tiles and Target Mapping numbers should be same. But it is not matching in this case. So, let us add our target mapping.
Take the note of Semantic Object and Action.

Let us check our custom catalog again. This time Tiles and Target Mapping matches.
Check the Tiles are still Referenced.
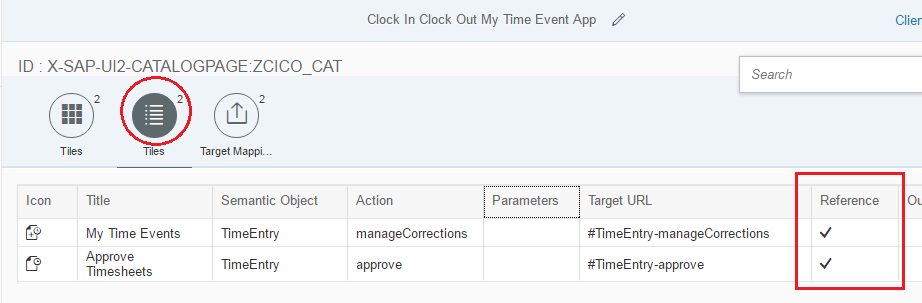
It means, the Tiles are referenced and the original tile or application resides somewhere else.
How to break the Reference of the Tiles/Apps?
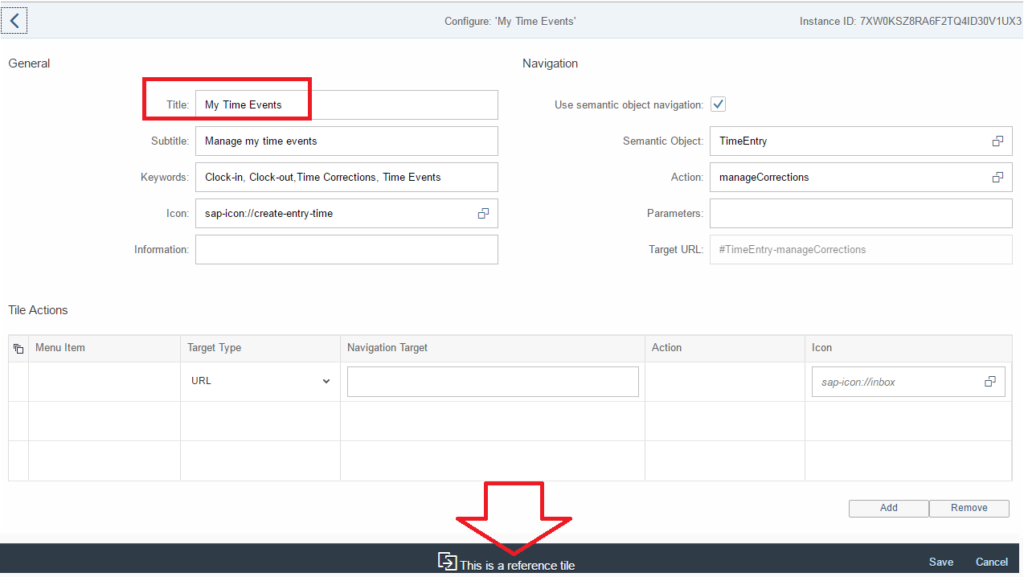
There is a message which says, it is a reference tile.
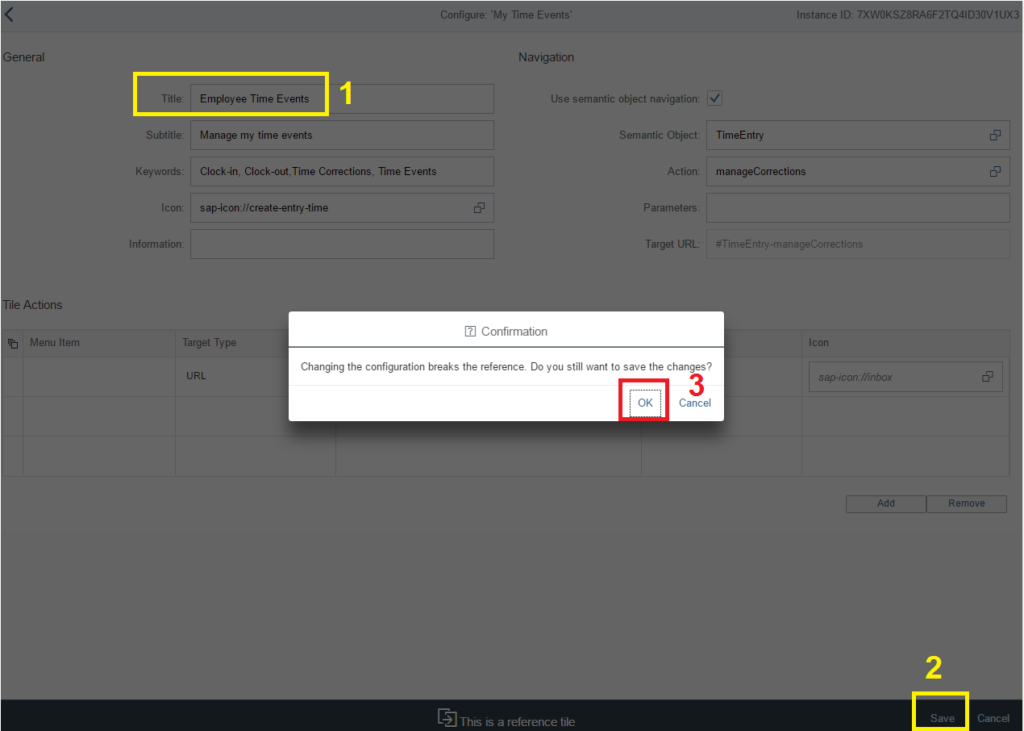
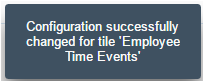
Any change in the Tile would break the reference. We will change the Title from My Time Events to Employee Time Events and save it. Pop up message confirms it would break the reference.
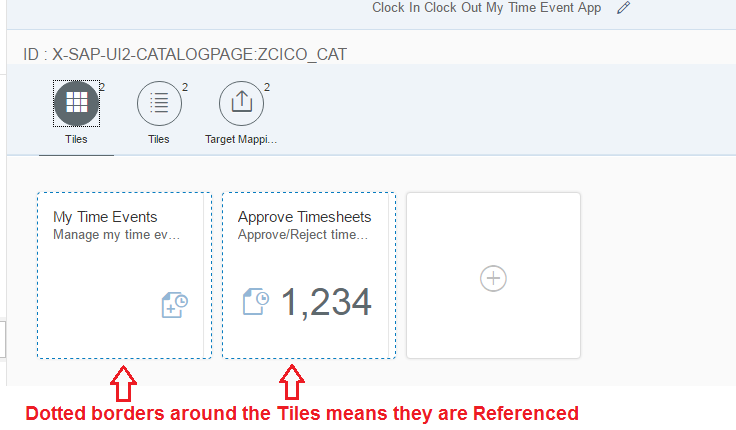
Let us check the custom catalog tile again.
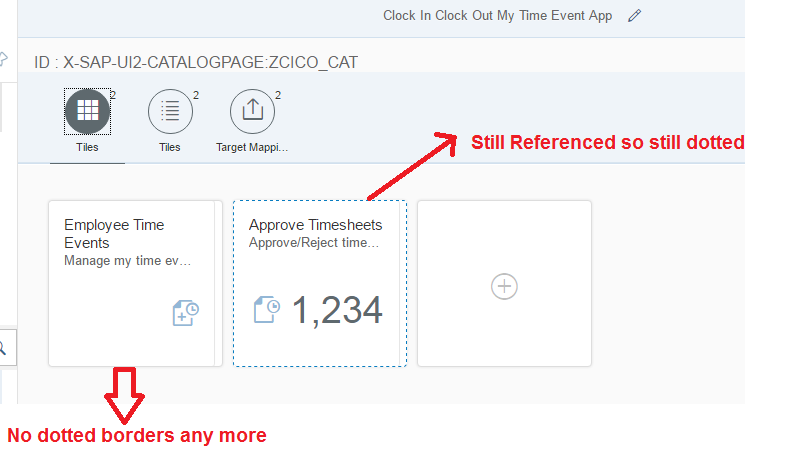
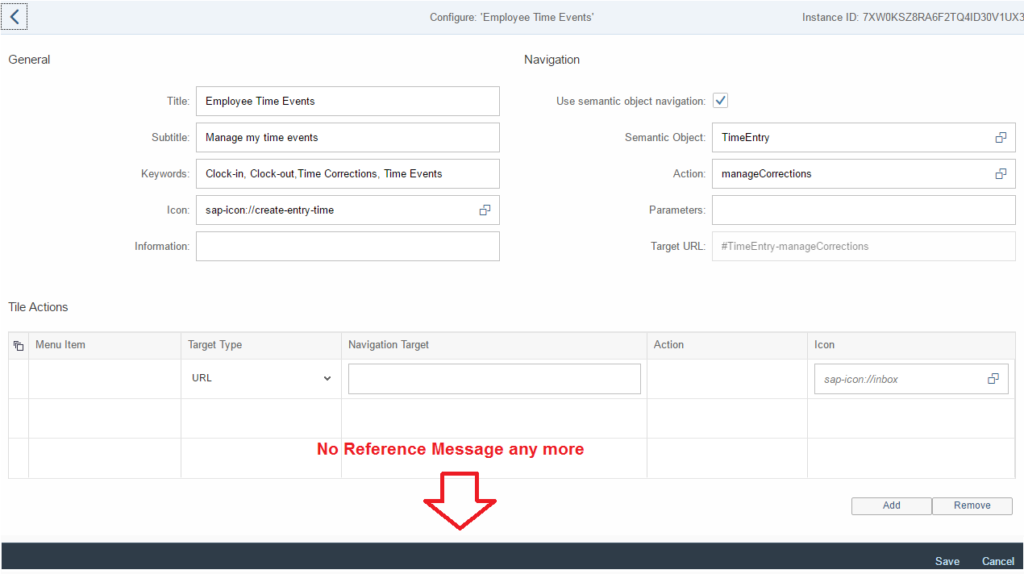
Now, if you click on Employee Time Events tile, you would not see any Reference Message. Did you notice on the above image, the dotted border is vanished from non-reference tile but exists on the reference one?
Hand-On Exercise # 5: Following the above steps, break the reference of Approve Timesheets Tile/App.
ii. Create Custom Group and Add Tiles
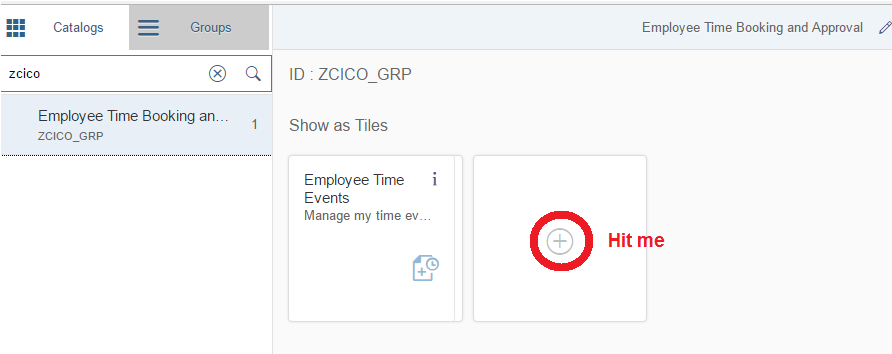
Go to the Groups menu, hit the + icon, give the Title and Id and hit Save.
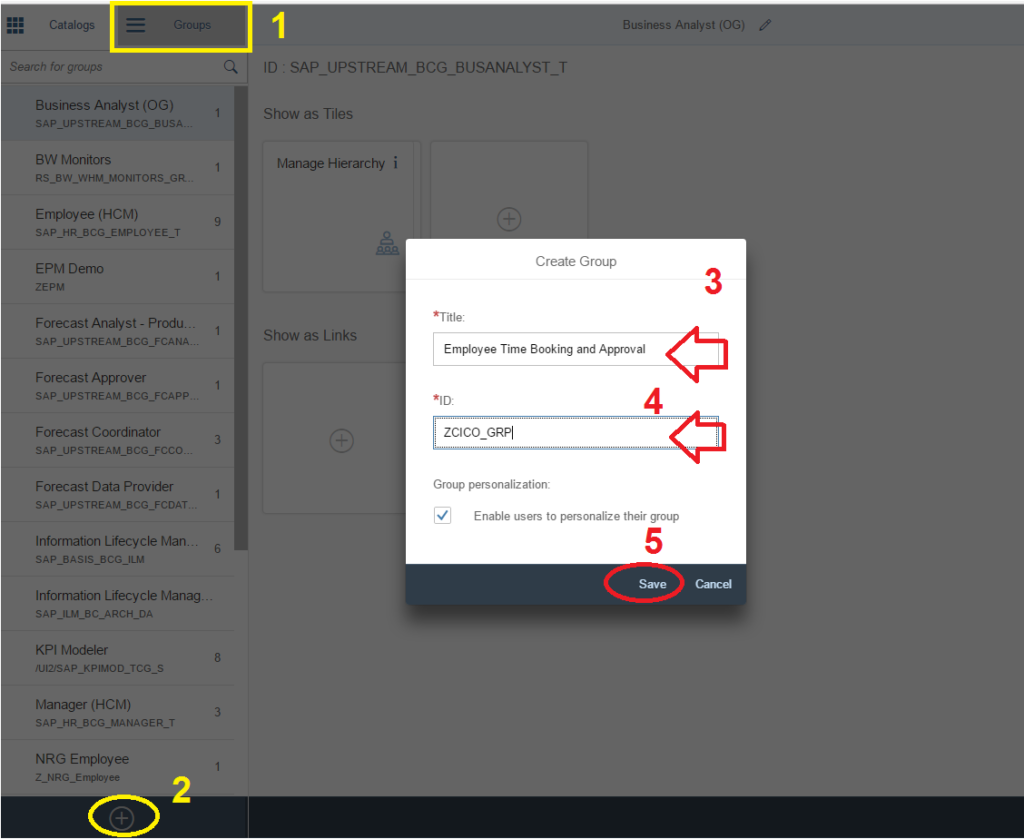
Now let us add the custom Catalog to this group.
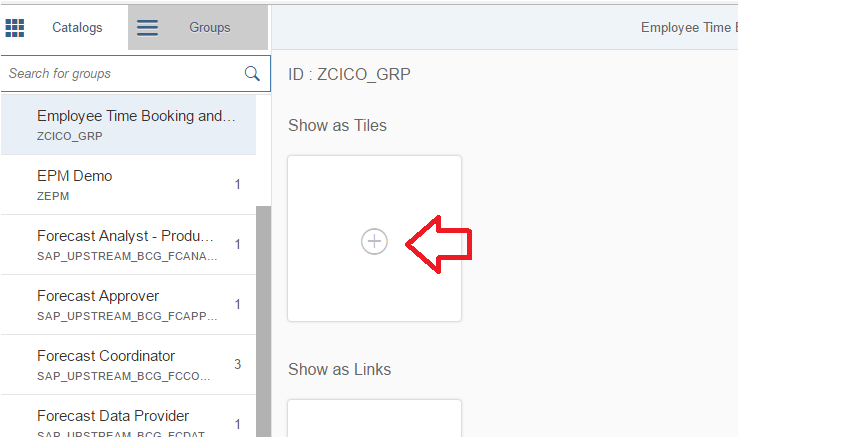
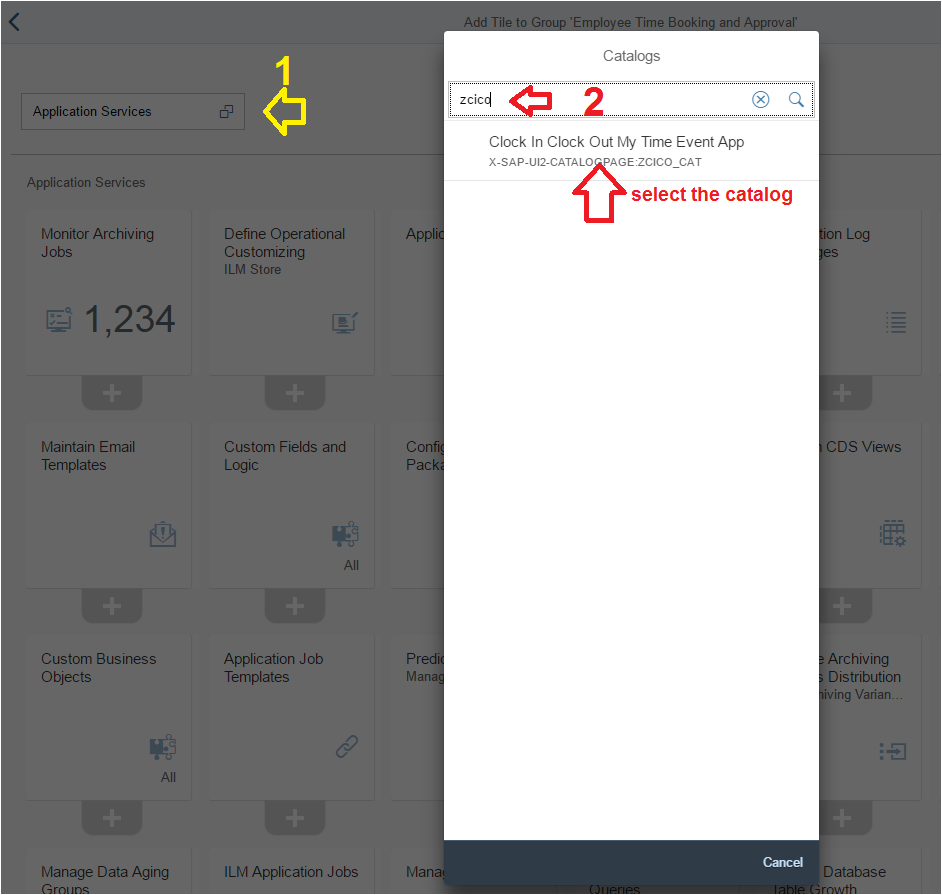
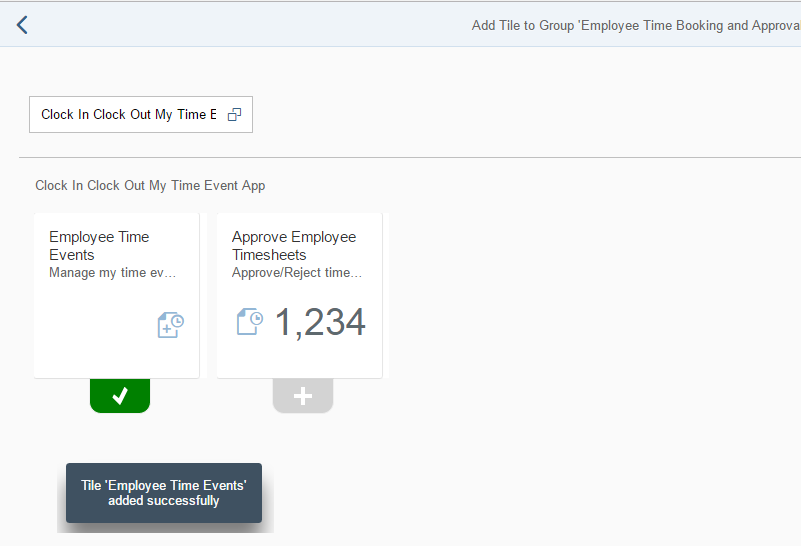
Since we added two Tiles in the Custom Catalog, we have two available for the group.
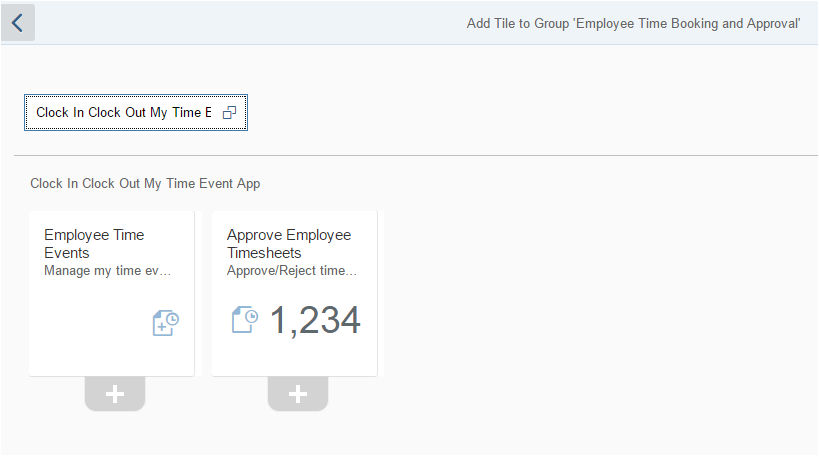
Hit the + icon below the tile icon to add the tile to the Group. It would turn green and you would get a message.
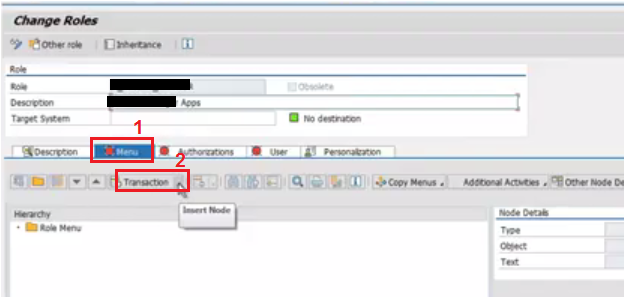
Que: How to assign the new Catalog and Group to SAP User?
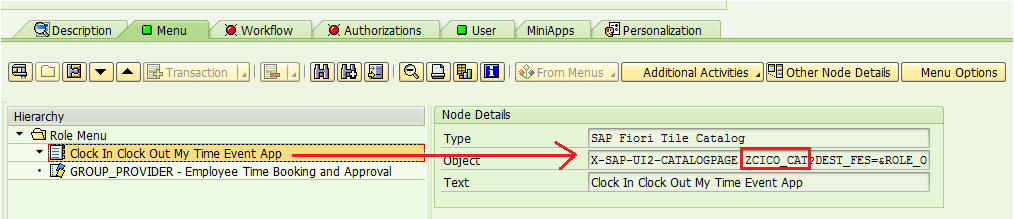
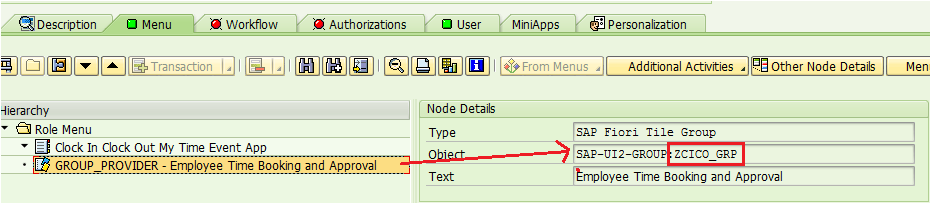
Ans: Go to t-code PFCG and create a Role. Hit Menu and then Insert Node and add SAP Fiori Tile Catalog and Group one by one.
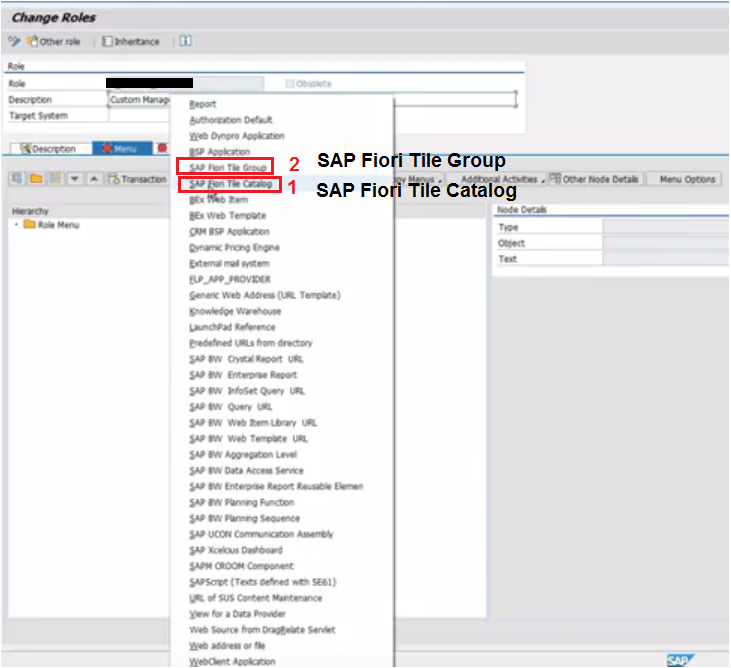
After you select SAP Fiori Tile Catalog, choose the Catalog Id you want the user to have.
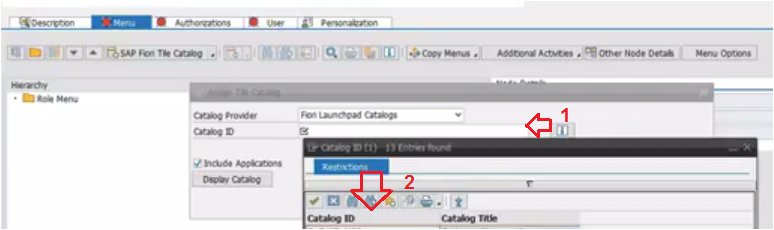
(please pardon us for the low quality of the above three images)
Hand-On Exercise # 6: Following the steps mentioned above, add Catalog Group to SAP User Id’s role.
After both Catalog and Group are added, it should look like this.
Step 5) Start the Fiori Launchpad
http://hostname:port number/sap/bc/ui5_ui5/ui2/ushell/shells/abap/FioriLaunchpad.html
or
https://hostname:port number/sap/bc/ui5_ui5/ui2/ushell/shells/abap/FioriLaunchpad.html
If you are wondering how to remember the link for every other client. Just remember the t-code /UI2/FLP. This would take you to the SAP Fiori Launchpad.
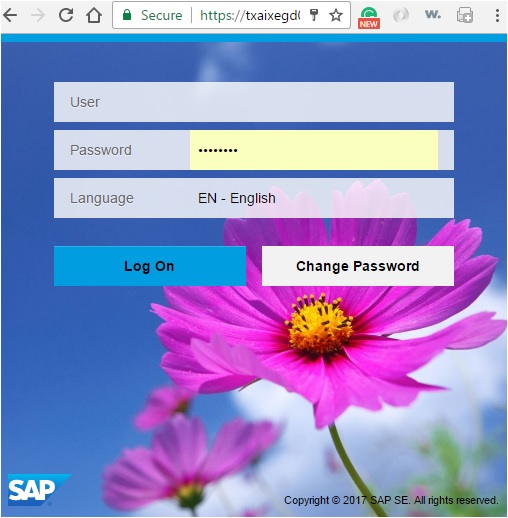
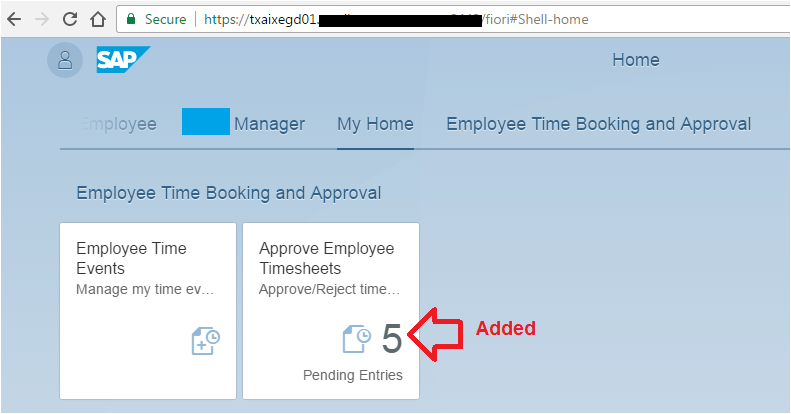
After the role is assigned to the user, the Fiori login should show you the Group we create above. For our exercise, we created the Group 3 (Employee Time Booking and Approval).
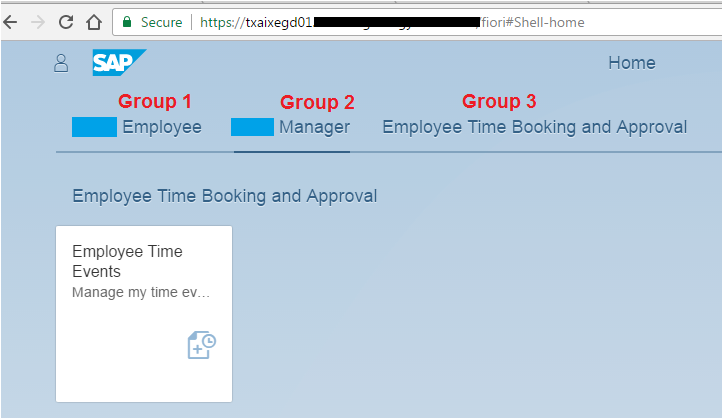
Remember, we added only Employee Time Events Tile on the Group. Therefore only one tile is visible when we log into the Fiori Launchpad. The Approve Employee Timesheet tile is not visible as of now. Let us add Approve Employee Timesheet Tile as well to the Group. When we re-login, we should be able to see two tiles on the Employee Time Booking and Approval Group.
Steps to add the second tile to the custom Group: Go to the custom group we created. Add the Approve Employee Timesheet Tile.
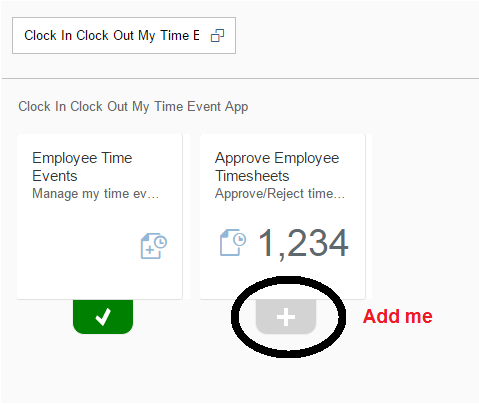
All Green.
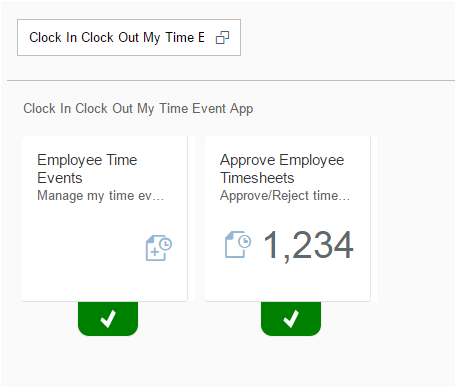
We just added the second tile to the Group. Let us log into the Fiori link again. We would see the second tile as well. Hope this clarifies that the catalog tiles need to be added to the group in order it to be visible to the user.
Let us test the two Apps which we just configured and implemented as delivered by SAP, without a single line of custom code.
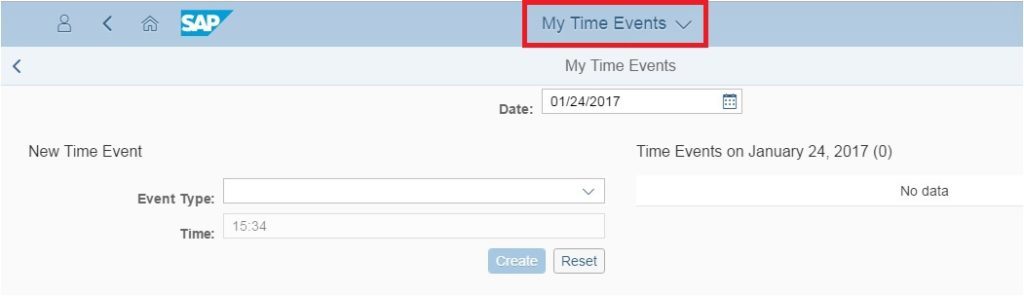
My Time Event App
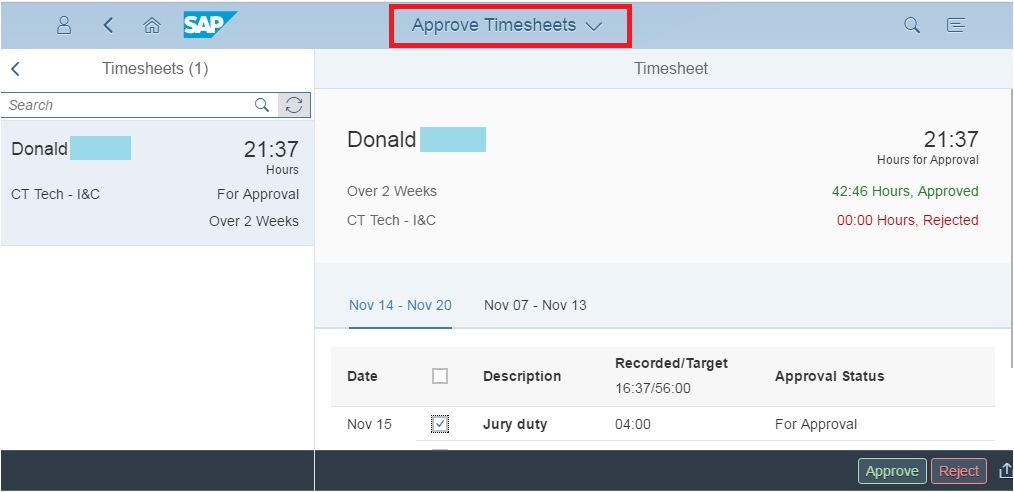
Approve Timesheets
Congratulations, you have successfully implemented two standard Fiori Apps end to end.


