One fine morning the Director of your IT Team decides to get ready for a better user-friendly interface for employees and vendors. He is looking for an enhanced user experience and better look and feel. He also wants applications to be accessed seamlessly on desktops, mobiles and tablets. He wants to present a strong case to the upper management and show them the standard Fiori Apps and its ease of usage. So he comes to your manager and the manager gives you a task. In the next 3 weeks, we need to get our landscape ready for Fiori implementation and demonstrate at least two standard Apps in working state. Huh!! That is a very tough timeline.
All the IT team is startled by this announcement. There is no one with previous Fiori Implementation and Deployment experience. On one hand, you are excited to have received this opportunity to learn new technology, at the same time, on the other hand, you do not know where to start with.
Do not worry. You do not need to look for any other vendors to come to your office and do the work for you. 3 Weeks has 15 working days. That is more than enough for you to make two standard Fiori Apps up and working in your landscape (assuming no customization).
Of all the uncertainties, your Director is clear on one thing i.e. he wants My Time Event App for employees and Timesheet Approve App for managers for demonstration. He has narrowed down these two Apps for the prototype. You are still wondering, from where in the whole universe did your director get the names of these two Apps. My friend, he is the Director. Never underestimate the knowledge of your Director, even though he has never worked in SAP Fiori Apps. He surely has better contacts than you.
If you are one of those IT team members or if you are a beginner in SAP Fiori, you have landed on the correct page. We, Team ERPQNA, would hand hold you through the steps and guide you to the finish line well ahead of 3 weeks hard time line.
FYI: Fiori is an Italian word meaning Flower.
Without wasting any more time, let us start. For the easy of understanding, we would break our topic into the following parts:
A) System Configuration and Installation
- Check system readiness by looking into Patches and Add-ons and Installing the missing items
- Activation of SAP NetWeaver Gateway
- Create a trusted RFC between Backend system and Gateway
- Creation of the SAP System Alias for Applications
- Activate OData and ICF Services
- PFCG Roles and Authorizations
B) Fiori App specific Configuration
- Fiori Library
- Activation of frontend UI Service and backend OData Service
- Authorizations (Admin & End Users)
- Fiori Launchpad Designer
- Start the Fiori Launchpad
C) Fiori App Enhancement (optional for now)
In today’s article, we would look the first part i.e. System configuration and Installation. Please note, all these activities are supposed to be performed by the SAP Basis Team or the SAP Fiori Admin (usually a Basis person). But if you are an ABAPer or the Front-end Developers, it is always good to know these steps. After all, you have to do the development and answer everybody in the case of any issue.
ABAPers and Front-end Developers also need to know the below steps to have a quick bird’s eye’s view of the system and tell the management if their SAP Landscape is ready for Fiori Installation or not.
A) System Configuration and Installation
i. Check Add-Ons and Profile Parameters for System Readiness for Fiori Implementation
Add-Ons:
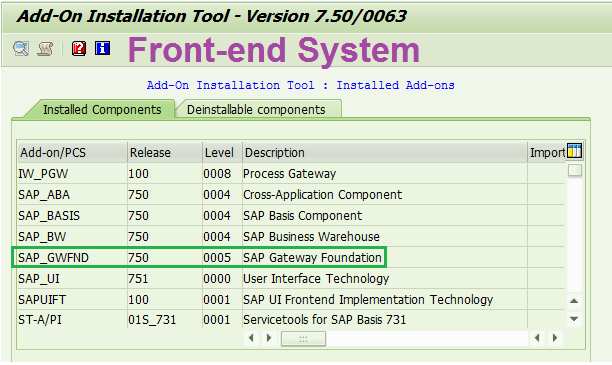
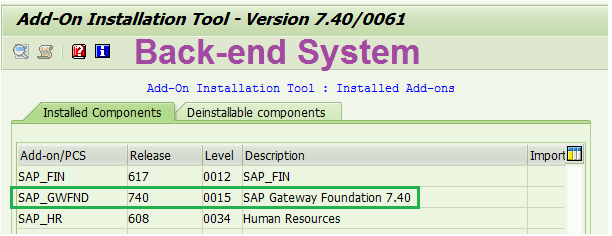
If your system is lower than SAP Netweaver 7.4, you need to have at least these three Add-ons viz: IW_BEP, GW_CORE and IW_FND.
Go to t-code SAINT and check the Components. If you do not find the above three Add-ons, get it installed.
For SAP Netweaver 7.4 and higher, the above three components GW_CORE, IW_FND and IW_BEP are replaced by a new software component for the SAP NetWeaver Gateway foundation, SAP_GWFND. These three components are included by default in the SAP Netweaver installation. We do not need to check the Add-On as the software component SAP_GWFND is deployed as part of SAP Basis.
Below is t-code SAINT screen print from our landscape.
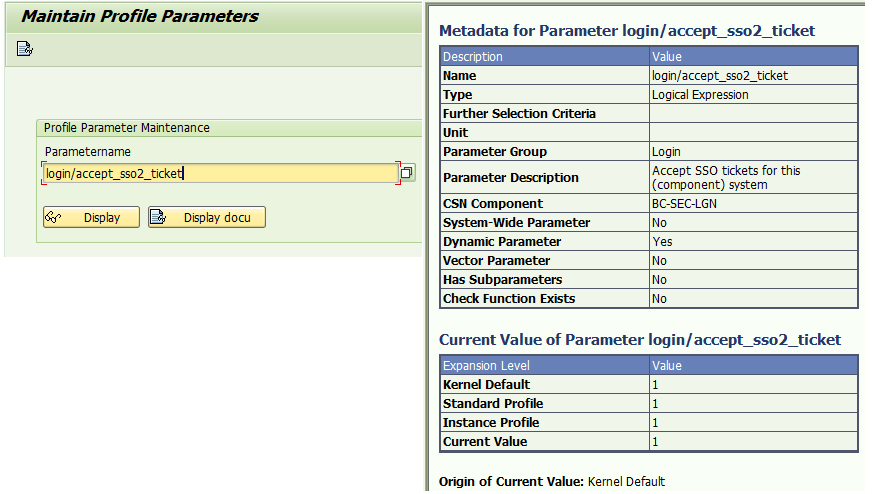
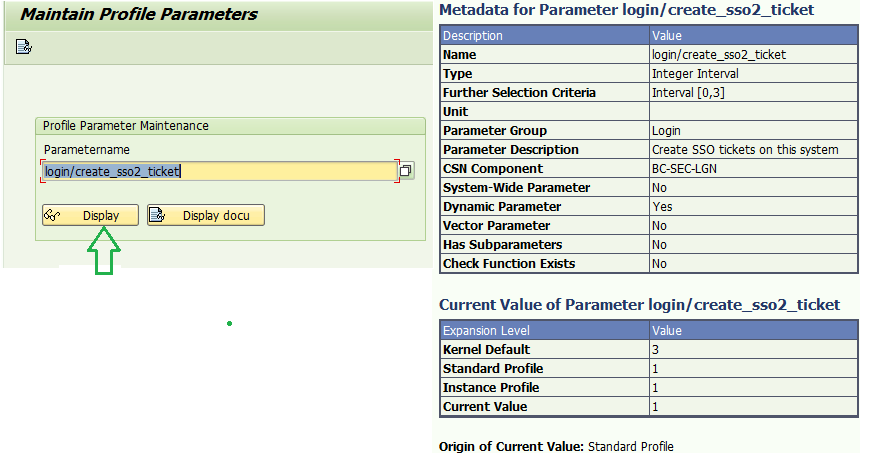
Profile Parameters:
In t-code RZ11, check the below two profile parameters are maintained correctly.
login/accept_sso2_ticket = 1
login/create_sso2_ticket = 2
The screen would look like as shown below:
ii. Activation of SAP NetWeaver Gateway
SAP Transaction SPRO > SAP NetWeaver > Gateway > Odata Channel> Configuration > Connection Settings > Activate or Deactivate SAP NetWeaver Gateway
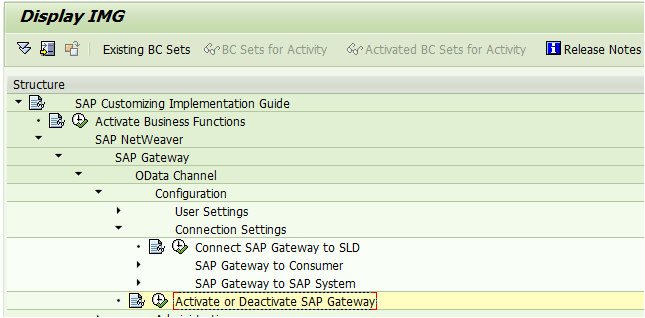
Here we have to choose “Activate” on the pop up confirmation window.
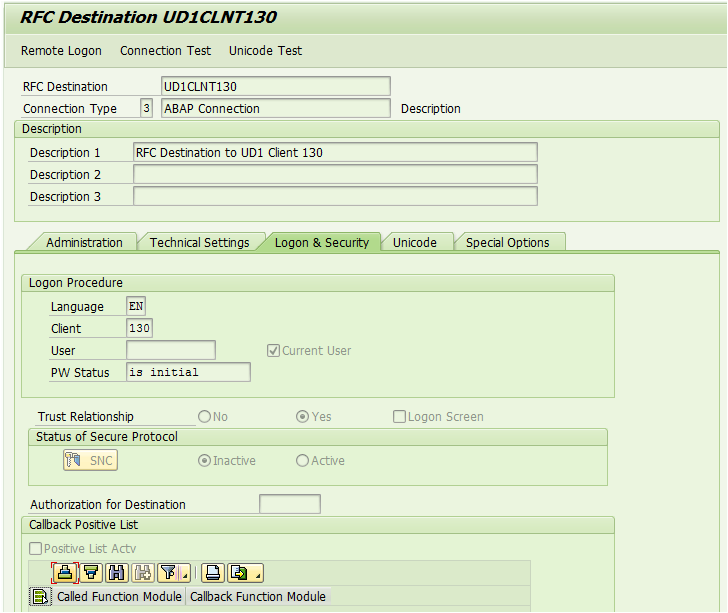
iii. Creation of Trusted RFC between Backend system and Gateway
Front-end App would often need to connect to the back-end to fetch data or even start SAP GUI Transactions or Web Dynpro Transactions from the App. In order to allow the user to seamlessly perform the activity, we need to set up an RFC connection between the frontend (Launchpad) and the back end server.
In the case of Central Hub Deployment (different front-end and back-end system), create an RFC destination to the other system and make it trusting via transaction SMT1.
If we have a combined front-end and back-end system setup (Embedded Deployment), then only create one RFC connection to itself in t-code SM59.
In the case of Central Hub Deployment, do not forget to provide the end users same role in both front-end and back-end.
An example of RFC in front-end system pointing to the back-end system.
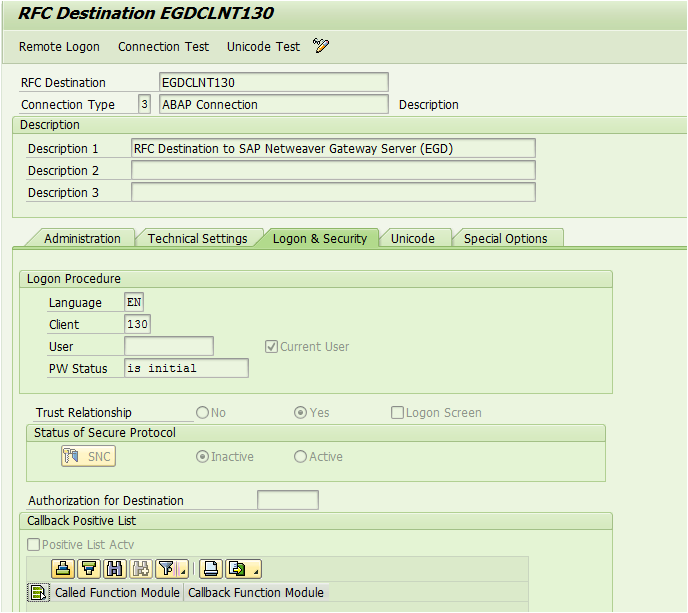
RFC in Back-end system pointing to front-end system.
iv. Creation of the SAP System Alias for Applications
SAP System Alias is the logical name for the system connection. It adds an additional layer to the RFC destination to allow for the decoupling of SAP Gateway service and the RFC Destination.
Depending on whether you have embedded system or Hub with development in backend or Hub with development in the front-end, your system alias setting would change.
SAP Transaction SPRO > SAP NetWeaver > Gateway > Odata Channel > Configuration > Connection Settings > SAP NetWeaver Gateway to SAP System > Manage SAP System Aliases
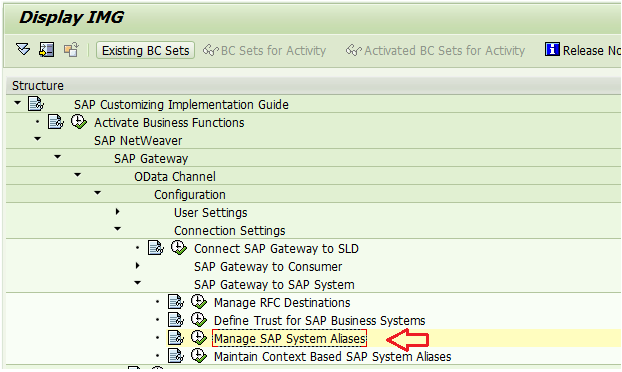
You can also go to t-code SM30 and maintain view /IWFND/V_DFSYAL (Manage SAP System Aliases). Please note, we need to maintain the alias in the front-end systems if you have Central Hub Deployment.
a) Aliases in Hub Deployment with development in backend (Front-end GW + Back-end separate)
UD1 Backend is the alias which points to the backend RFC. (Row 2 in the above pic). LOCAL system points to itself (row 1).
SAP recommends maintaining two System Aliases. One for normal back-end applications and another for backend workflow apps.
Check the third row. The “For Local App” is checked. It indicates that the System Alias is to be used by BEP. The UD1_PGW is for Backend Work Flow. Please take note of Software Version. It is by default /IWPGW/BWF.
Fyi: BEP = Business Enablement Provisioning.
BEP functionality comes from component IW_BEP to handle the actions and events triggered in the SAP system and to publish these actions and event through SAP NetWeaver Gateway.
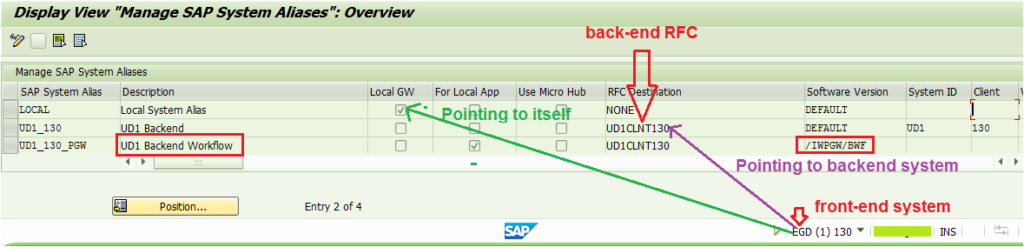
b) Aliases in Embedded System (Front-end + Back-end together)
v. Activate OData and ICF Services
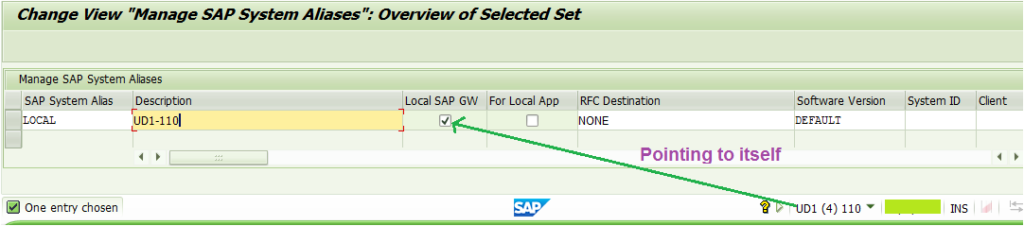
The below five OData Services need to be activated in order to set up the SAP Fiori Launchpad and Designer correctly.
Go to t-code /IWFND/MAINT_SERVICE or go to SPRO, SAP NetWeaver > Gateway > OData Channel > Administration > General Settings > Activate and Maintain Services
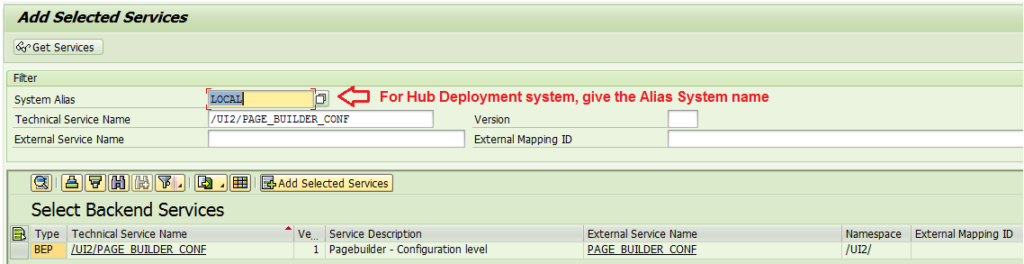
Click on the line and hit Add Selected Services. It would pop up the below screen with default names. You can keep as it is or give your own custom names as per project naming convention. Normally, the default names are taken in most clients.
Do not forget to assign it to the package. After all, you want to move it to your production box.
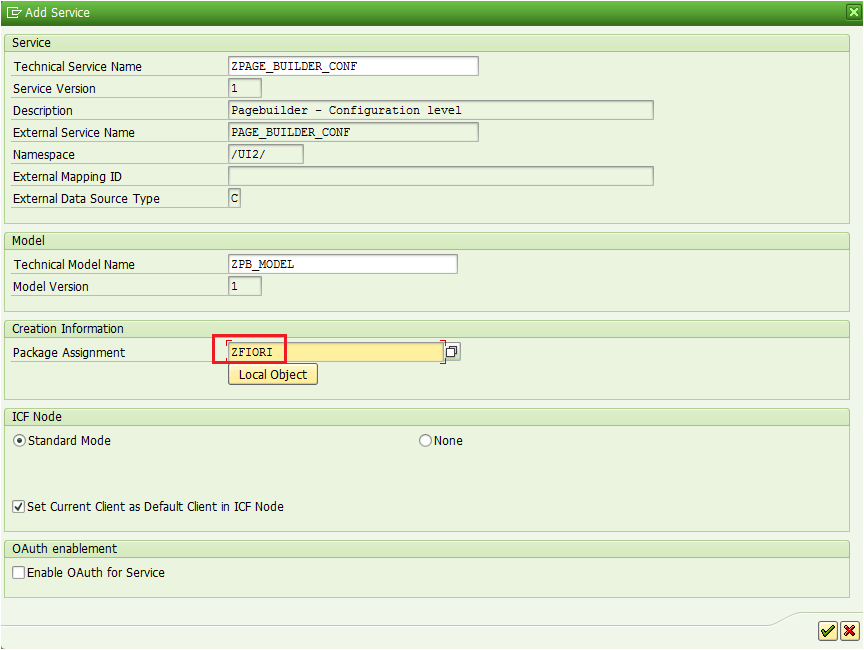
Hit the green tick button and save the added service.
Do the same step for rest 4 services.
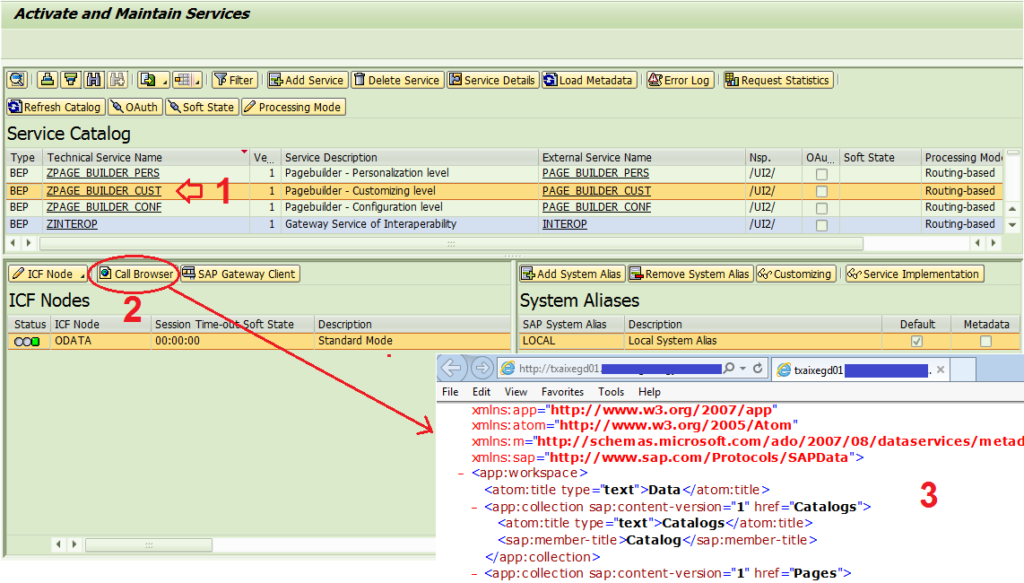
Now, Go to t-code SICF and confirm if they are active. If not, activate them manually by right-clicking and hitting Activate or select the service and go to Menu >Service/Host >Activate.
Validate step to check the OData Services are activated properly.
Go back to t-code /IWFND/MAINT_SERVICE. Select one of the services just added and hit the Call Browser button. It would ask for user id and password. Enter your front-end user id and password in case of Central Hub Deployment system. For Embedded system, provide your SAP user id and password. You should be able to see XML document. If the document is not displayed, there is some issue. You need to troubleshoot it and fix it before proceeding forward.
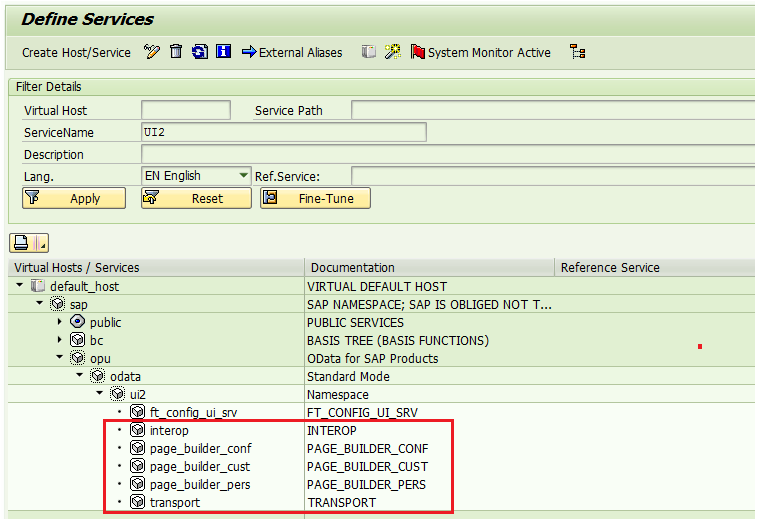
Go to t-code SICF and Activate the below ICF Services for SAP Fiori Launchpad
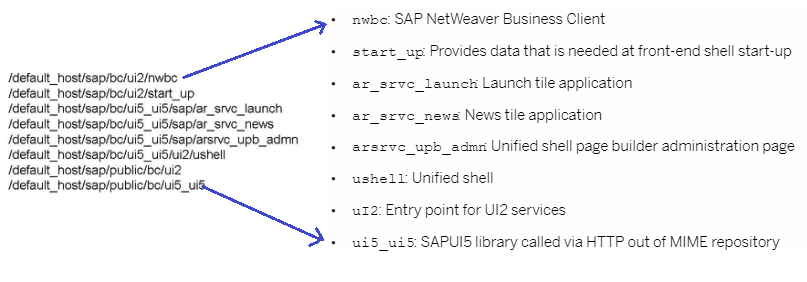
Of all the services above, the below two are to Activate HTTP Services for UI5
/sap/bc/ui5_ui5/ui2
/sap/public/bc/ui5_ui5
vi. PFCG Roles and Authorizations
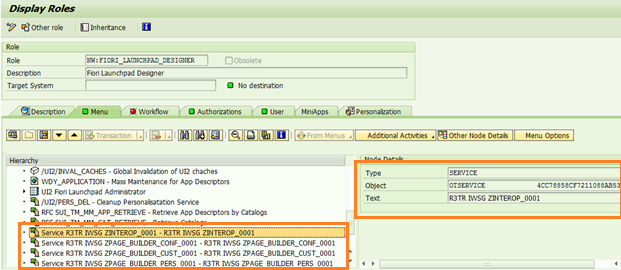
Standard PFCG Role SAP_UI2_ADMIN has the authorization needed to perform SAP Launchpad Designer activity. Leverage this standard role to custom and add the five TADIR services which we generated above.
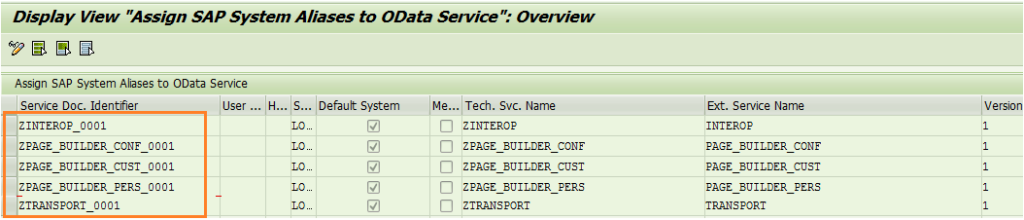
Go to Maintenance View ‘/IWFND/V_MGDEAM’ (Assign SAP System Aliases to OData Service) to get the exact Service Document Identifiers.
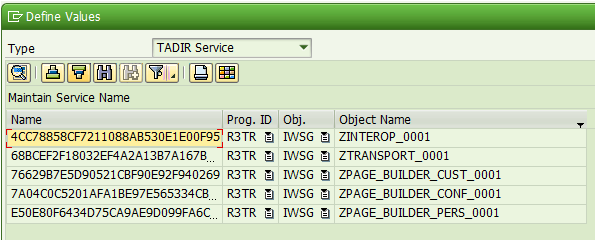
In t-code PFCG, Menu Tab > Authorization Default > TADIR Service:
a. Program ID: R3TR
b. Object Type: IWSG
Add all the five custom OData Services Objects which we activated in the above step.
The role, which is a copy of standard role SAP_UI2_ADMIN, should look something like below.
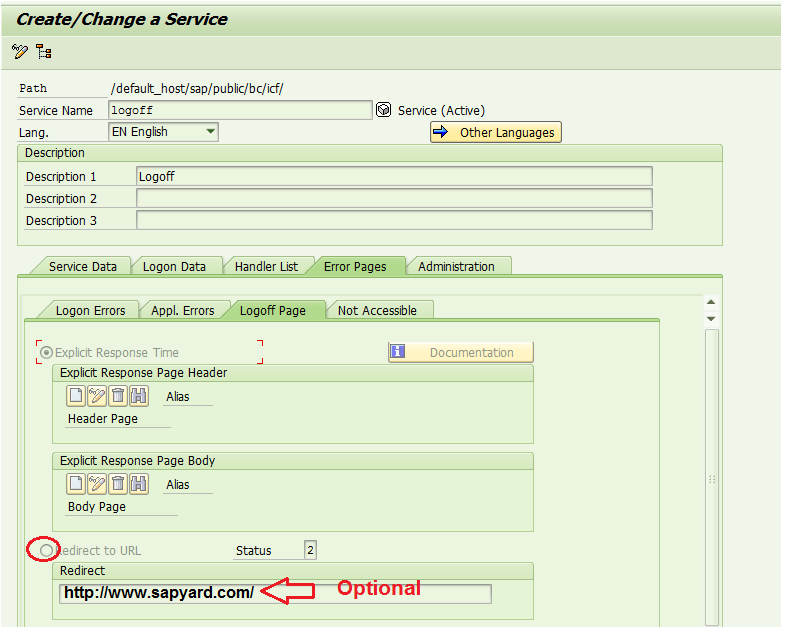
vii. Log off re-direct (optional)
When the user logs off from Fiori Launchpad, by default it would show ‘you logged off from system message’. If you do not look closely, you would confuse it to be an error message.
In order to avoid confusion to users, you can configure to direct your user to log in page or you can direct them to any other corporate link as well.
Go to t-code SICF and choose the service name logoff and maintain the ‘Redirect to URL’ option.
Que: Why did we perform the above SAP Gateway and Services (OData/ICF) activations?
Ans: Because:
The infrastructure for OData service is provided by SAP Gateway and these OData services are used by the SAP Fiori Launchpad and Fiori Apps.
The SAP Fiori Launchpad and the SAP Fiori Launchpad Designer can be set up correctly only after the OData and ICF services are activated properly.
The mapping between the technical OData service name and the corresponding back-end service can only be established after the OData service is enabled in the SAP Gateway.
Que: There are too many manual steps. Isn’t there a better automatic process?
Ans: Yes, there are automatic task lists which SAP has provided. Basis Team can execute the below task lists if your SAP System is on 7.4 SP 6 or higher. These standard task lists created by SAP can replace the manual steps explained above and make the configuration work efficient.
Go to t-code STC01, pull the below task lists one by one and Generate Task List Run (F8).
- Task list SAP_GATEWAY_BASIC_CONFIG to perform basic configuration steps for SAP Gateway.
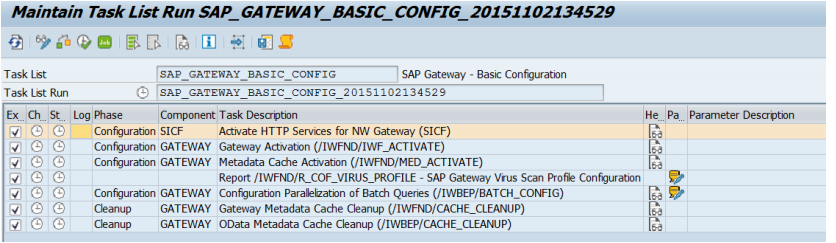
The following activities are performed.
- Gateway Activation (/IWFND/IWF_ACTIVATE)
- Metadata Cache Activation (/IWFND/MED_ACTIVATE)
- Report /IWFND/R_COF_VIRUS_PROFILE – SAP Gateway Virus Scan Profile Configuration [Parameter
maintenance] - Configuration Parallelization of Batch Queries (/IWBEP/BATCH_CONFIG) [Parameter maintenance]
- Gateway Metadata Cache Cleanup (/IWFND/CACHE_CLEANUP)
- OData Metadata Cache Cleanup (/IWBEP/CACHE_CLEANUP)
2. Task list SAP_SAP2GATEWAY_TRUSTED_CONFIG to create a trusted connection from an SAP system to SAP Gateway System. In the case of Embedded Scenario of Gateway deployment, this task can be ignored.
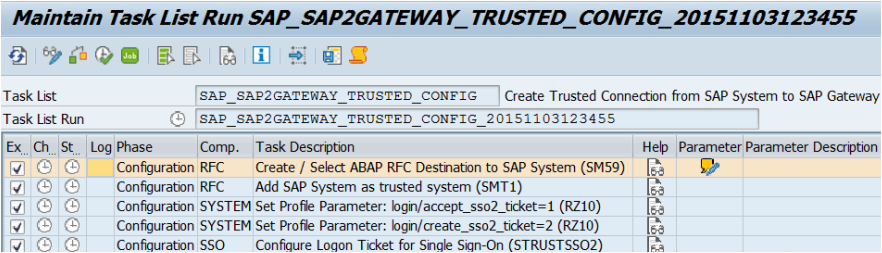
The following activities are performed.
- Create/Select ABAP RFC Destination to SAP System (SM59) [Parameter maintenance]
- Add SAP System as trusted system (SMT1)
- Set profile para RZ10 login/accept_sso2_ticket=1
- Set profile para RZ10 login/create_sso2_ticket =1
- Configure Logon Ticket for SSO (STRUSTSSO2)
3. Task list SAP_GATEWAY_ADD_SYSTEM to connect an SAP system (back-end) to an SAP Gateway system (front-end).
k list SAP_GATEWAY_ADD_SYSTEM to connect an SAP system (back-end) to an SAP Gateway system (front-end).
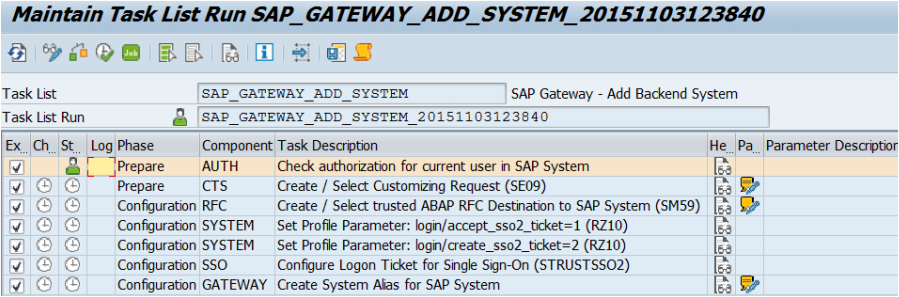
- Check authorization for current user in SAP System [Manual step ]
- Create / Select Customizing Request (SE09) [Parameter maintenance]
- Create / Select trusted ABAP RFC Destination tSAP System (SM59) [Parameter maintenance]
- Set Profile Parameter: login/accept_sso2_ticket=1 (RZ10)
- Set Profile Parameter: login/create_sso2_ticket=2 (RZ10)
- Configure Logon Ticket for Single Sign-On (STRUSTSSO2)
- Create System Alias for SAP System [Parameter maintenance]
4. Task list SAP_BASIS_SSL_CHECK to perform a basic SSL check.
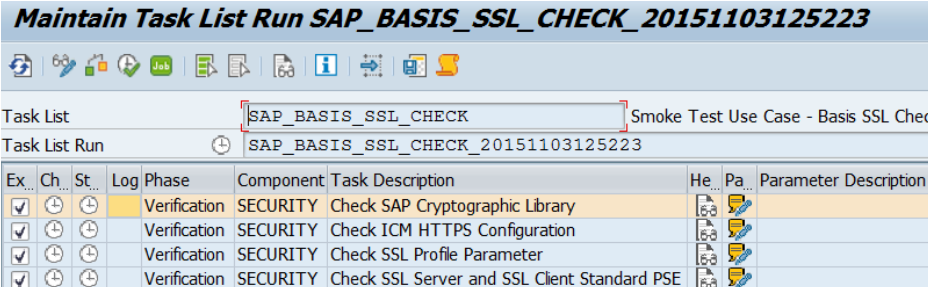
- Check SAP Cryptographic Library [Parameter maintenance]
- Check ICM HTTPS Configuration [Parameter maintenance]
- Check SSL Profile Parameter [Parameter maintenance]
- Check SSL Server and SSL Client Standard PSE [Parameter maintenance]
5. Task list SAP_FIORI_LAUNCHPAD_INIT_SETUP to activate Launchpad OData and HTTP services on an SAP Gateway system (frontend).
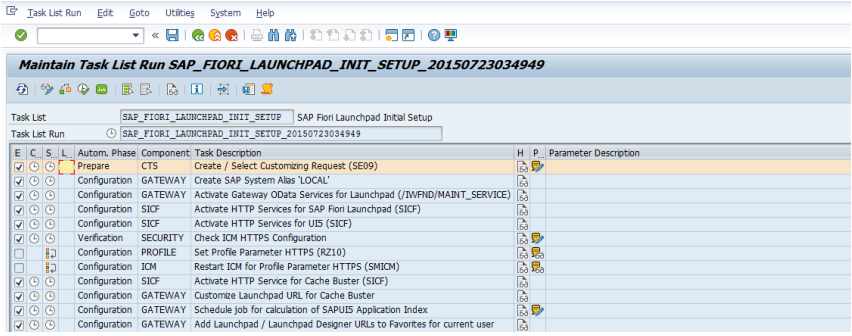
The following services are activated by this task list.
In T-Code: /IWFND/MAINT_SERVICE
- /UI2/INTEROP
- /UI2/PAGE_BUILDER_PERS
- /UI2/PAGE_BUILDER_CONF
- /UI2/PAGE_BUILDER_CUST
- /UI2/TRANSPORT
In T-Code: SICF (Activate HTTP Services for SAP Fiori Launchpad)
- /sap/bc/ui2/nwbc
- /sap/bc/ui2/start_up
- /sap/bc/ui5_ui5/sap/ar_srvc_launch
- /sap/bc/ui5_ui5/sap/ar_srvc_news
- /sap/bc/ui5_ui5/sap/arsrvc_upb_admn
- /sap/bc/ui5_ui5/ui2/ushell
- /sap/public/bc/ui2
- /sap/public/bc/ui5_ui5
In T-Code: SICF (Activate HTTP Services for UI5)
- /sap/bc/ui5_ui5/ui2
- /sap/public/bc/ui5_ui5
Assuming, you have completed all the pre-requisites and installations, let us try to see our Fiori Launchpad page for the first time in this Fiori virgin system. Below is the generalized FioriLaunchpad for any company. Just provide the correct server/hostname and port and it would be good for you.
http:// <server/hostname>: <port number> /sap/bc/ui5_ui5/ui2/ushell/shells/abap/FioriLaunchpad.htmlBut, where can I find the host name and port number of my SAP Netweaver Gateway?
Ans: Go to t-code SICF > Execute. GoTo menu > Port Information.

ABAPers, if you do not want to save the Fiori Launchpad link to your already crowded browser favorite list, then add the below t-code in your SAP favorite. This will also take you to the Fiori Launchpad. No need to remember the long URIs.
The transaction code for SAP Fiori Launchpad is /UI2/FLP. It would take you to the log in page of Fiori.
Let’s test if we did all our configurations are correct.
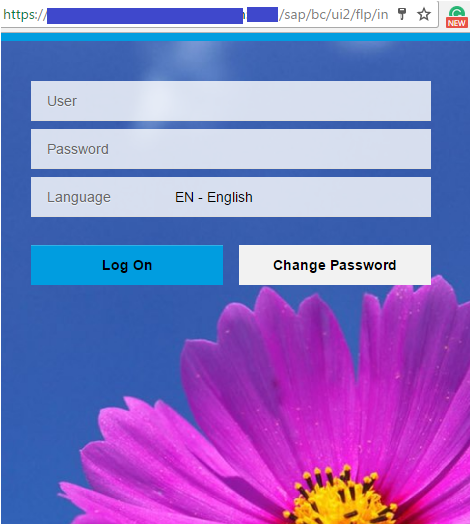
Ooh la !! The flower looks beautiful.
We would stop here today. Hopefully, now you know how to check the SAP system and tell if it is ready for SAP Fiori or not. The system needs to have GW_CORE, IW_FND and IW_BEP components or it has to have SAP_GWFND component installed (7.4 and higher). Gateway Activation, Trusted RFC, System Alias, OData and ICF Services Activation and PFCG roles are the other quick pre-requisites before implementation of SAP Fiori Applications in the system.
If any one of the above points is not there in the system, you or your Basis Team need to do the needful before you proceed forward to the next part, i.e. Fiori App specific configuration.


