
We prepared a flow chart showing the steps to follow if we need to enhance any standard SAP Fiori Application. We assumed ABAPers have learned the trade of Fiori development and we did not pursue to post the detailed tutorial. But in the last few weeks, we started getting requests for the step by step process to extend any standard Fiori Application both at front-end and back-end sides.
So here we come. In this article, we would see the steps to extend a standard Fiori application. There may be times when process for a particular customer can deviate from the process used in Standard Fiori application. Hence, to suffice the customer requirements, we may need to extend standard Fiori Application.
We understand, standard app will not suffice all business process of the clients. But clients should also consider that if we try to put all custom business logic to the Fiori App, eventually it will turn into a monster. We should always try to follow the 5 basic principles of Fiori App i.e. Role-based, Simple, Delightful, Coherent and Responsive.
Having said that, let come back to our tutorial. We will be extending My Timesheet Fiori application. Our goal today is to meet the below two requirements.
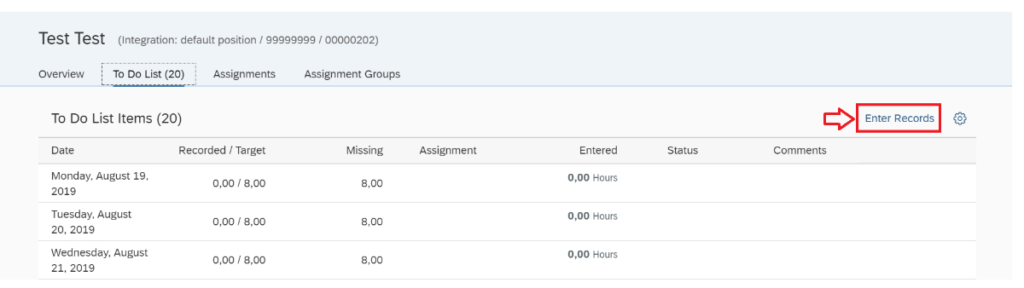
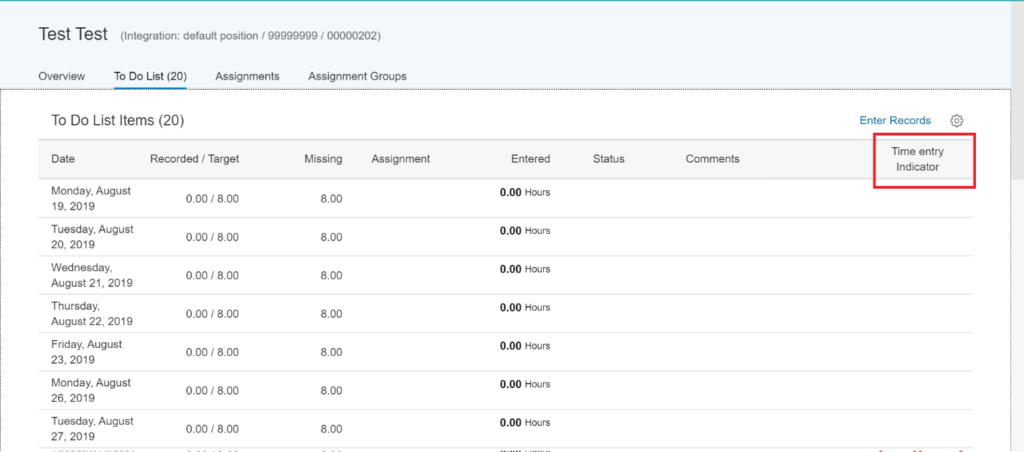
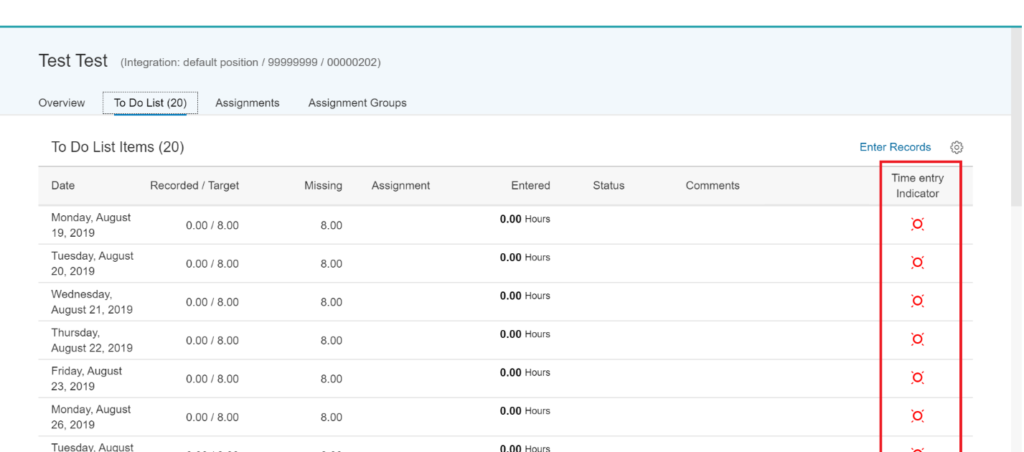
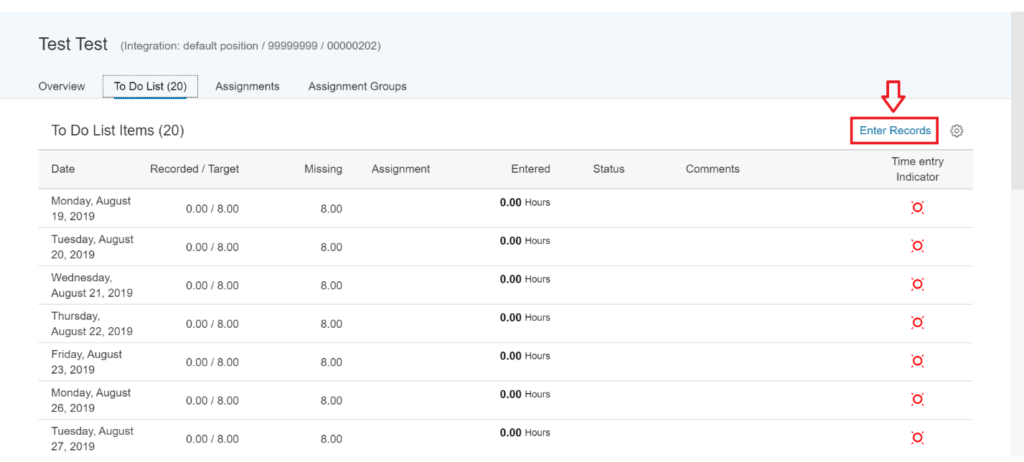
1. Add a New Column called “Time Entry Indicator” to the “To Do List” table which will indicate a red icon if the Actual Entered Hours are less than the Target hours expected.

2. We will remove “Enter Records” button from “To Do List” table toolbar
If you are an ABAP developer working on Fiori project or the UI developer in the Fiori project, you need to understand that to meet the above two goals, we need to enhance backend OData to pull the information and calculate and also we need to extend the frontend UI screen to display the output.
Following steps will be carried out to make the two changes mentioned above.
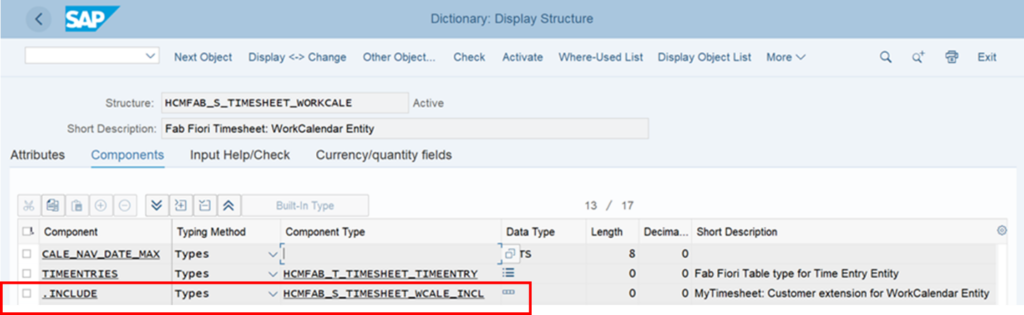
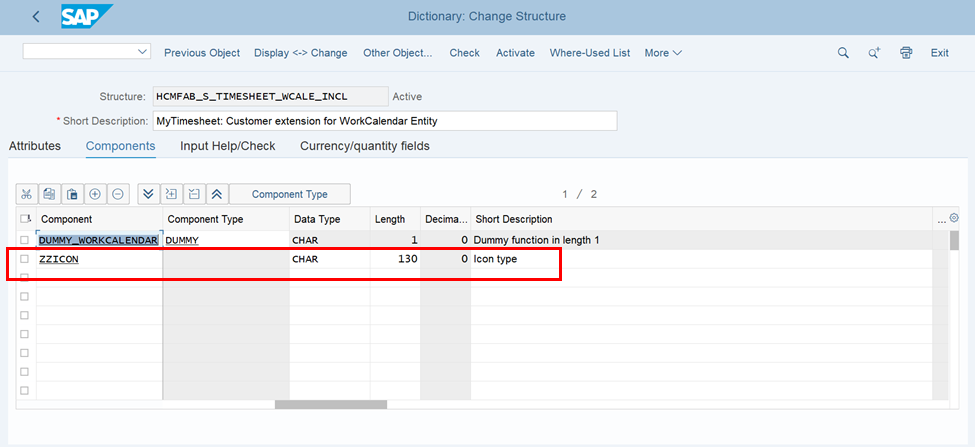
- We will add custom field “ZZICON” to Include structure “HCMFAB_S_TIMESHEET_WCALE_INCL” which is present in the structure “HCMFAB_S_TIMESHEET_WORKCALE” as this structure is used to create OData entity “ActionItem” for To Do List table.
- Redefine OData service “HCMFAB_TIMESHEET_MAINT_SRV” to include custom field in OData entity “ActionItem”.
- Enhance the Standard Data provider class and implement Overwrite-Exit of method “ACTION_ITEMS_GET_DEEP_ENTITY” to include custom field as there is no BADI available to add custom field logic.
- Extend standard “My Timesheet” fiori application “HCMFAB_MY_TIME” to include the custom field on the UI and hide the “Enter Records” button.
Let’s start our journey of Extending the standard Fiori App or should we say, evolution of Fiori to Big Foot, Yeti? ?
Part 1. Steps to Enhance ABAP Backend OData Service
Step 1. Enhance Structure with New Custom Field(s)
Add custom field “ZZICON” to Include structure “HCMFAB_S_TIMESHEET_WCALE_INCL” which is present in the structure “HCMFAB_S_TIMESHEET_WORKCALE” as shown in below screenshot.
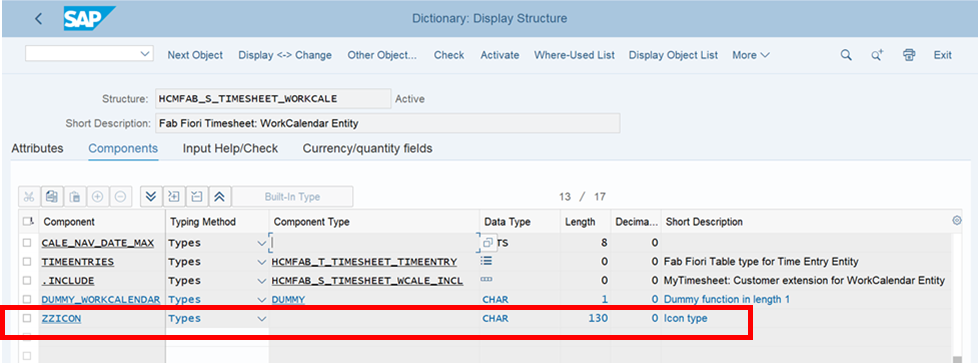
We can see now in below screenshot that custom field “ZZICON” is available in the structure HCMFAB_S_TIMESHEET_WORKCALE.
Step 2. Redefine Standard OData Service
Now we will Re-define the standard OData service “HCMFAB_TIMESHEET_MAINT_SRV” to include custom field in OData entity “ActionItem”.
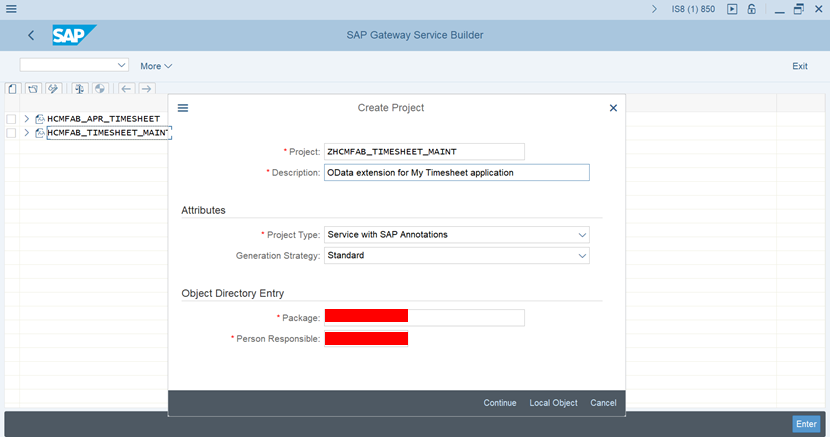
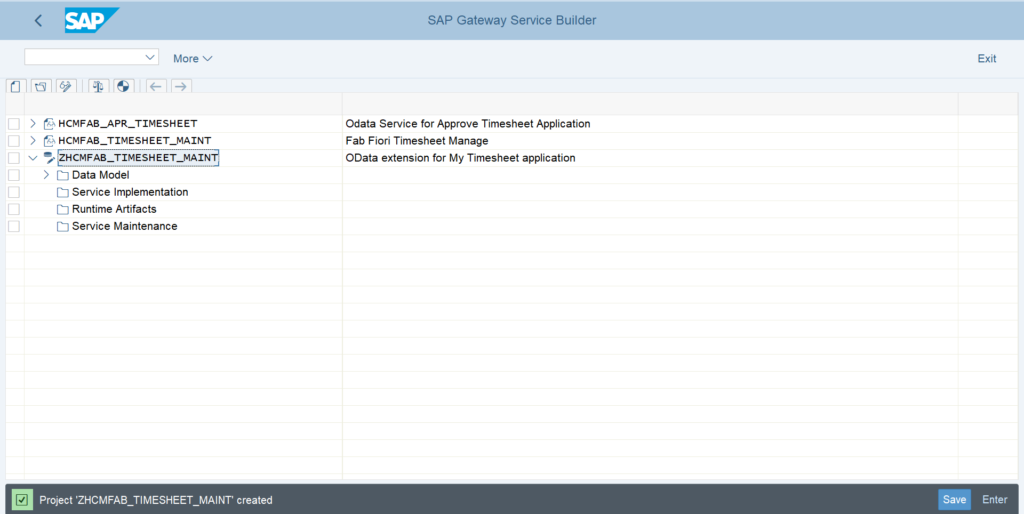
Create a new project using SEGW with details as provided in below screenshot.
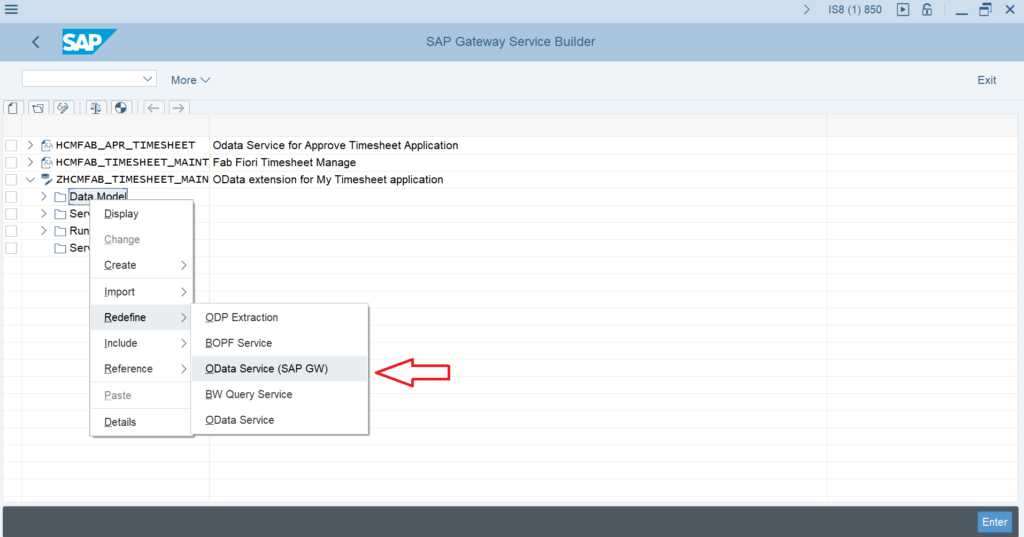
Right click on “Data Model” folder. Select Redefine and then select “OData Service (SAP GW)” to select Standard OData service to be re-defined.
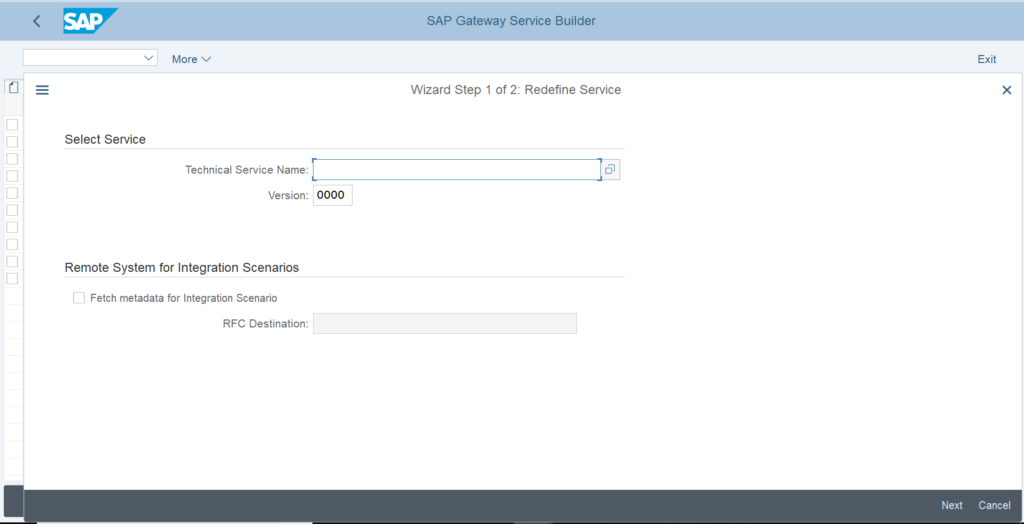
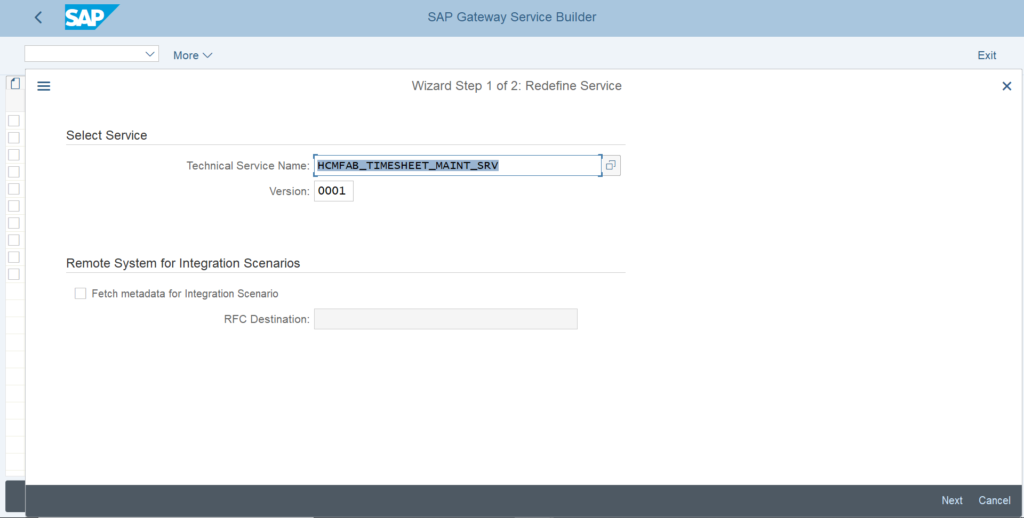
Click on F4 Help on “Technical Service Name” field to select the OData service “HCMFAB_TIMESHEET_MAINT_SRV” and its version as shown in below screenshots.
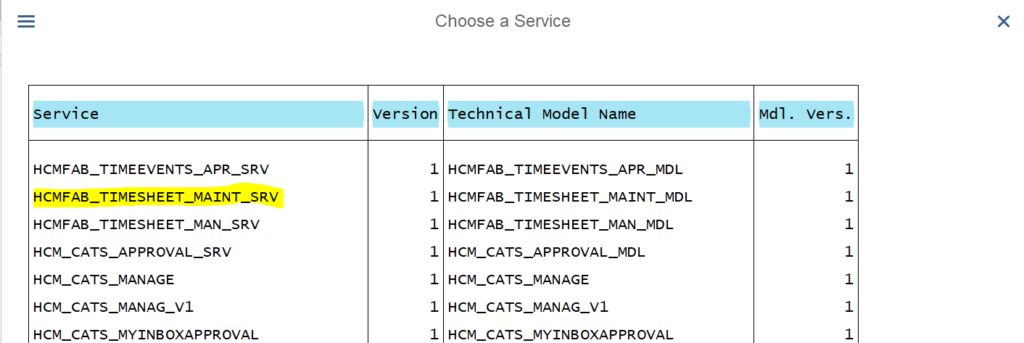
Once the service is selected, click on “Next” button to select the entities of the standard OData service.
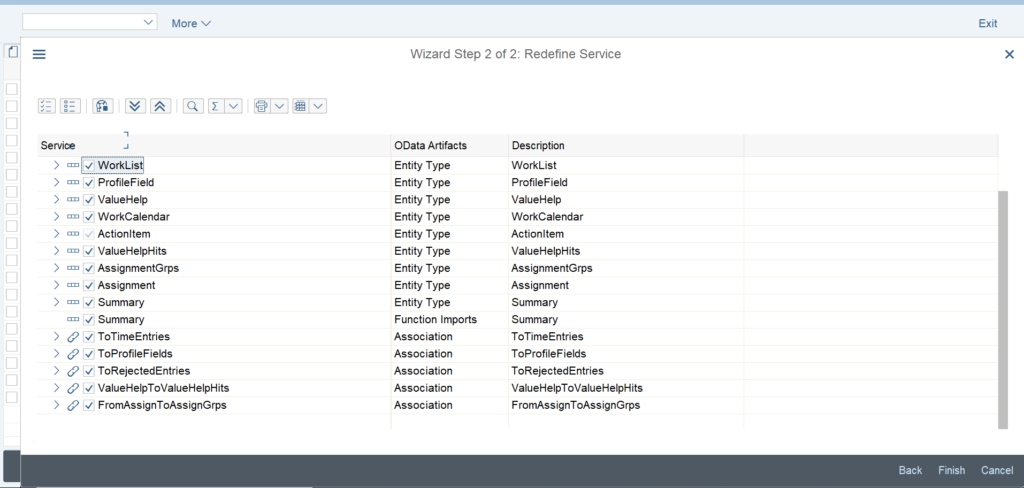
Select all the entities and click on “Finish”.
Important: Here we will have to select all the entities, but we will change only “ActionItem” entity to add our custom field.
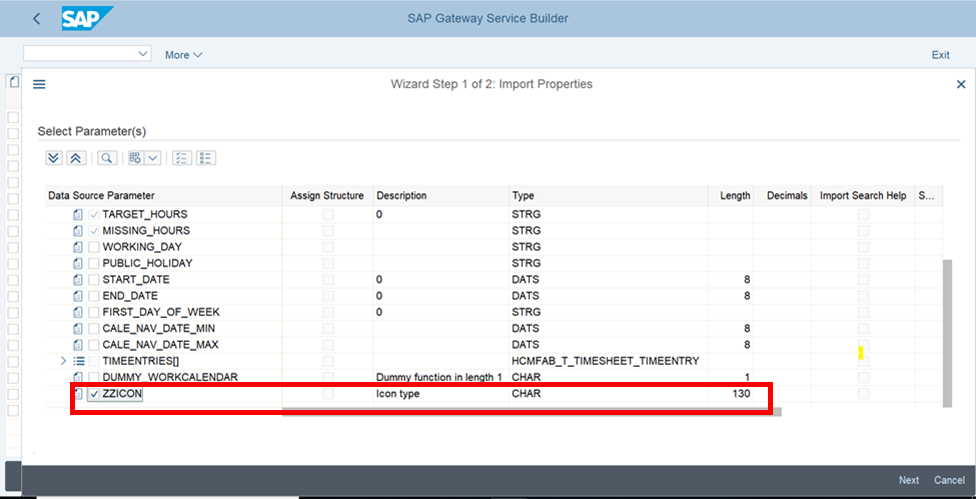
Right click on “ActionItem” entity. Select “Properties” under the “Import” option.
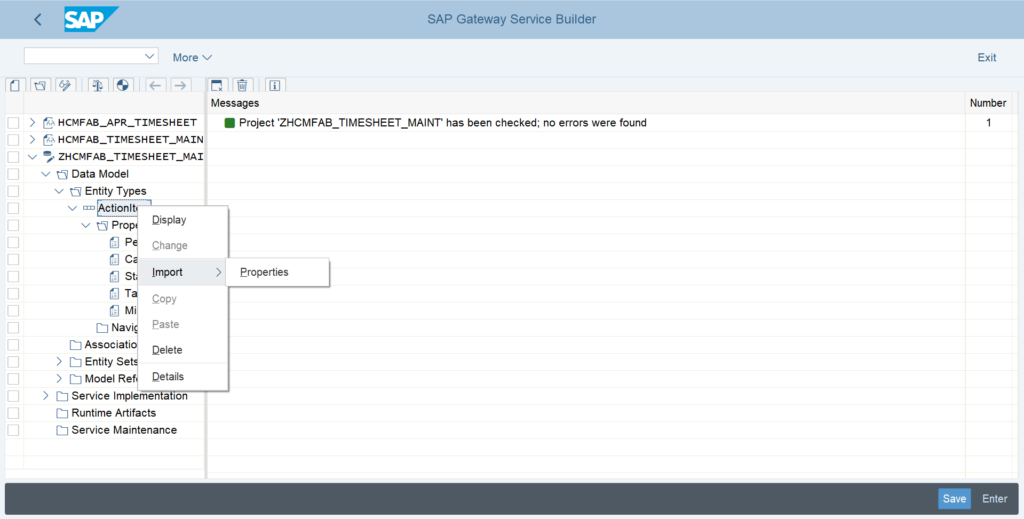
Now we can see our custom field “ZZICON” that we added to the custom include of standard structure “HCMFAB_S_TIMESHEET_WORKCALE”. Select the custom field “ZZICON” and press “Next”.
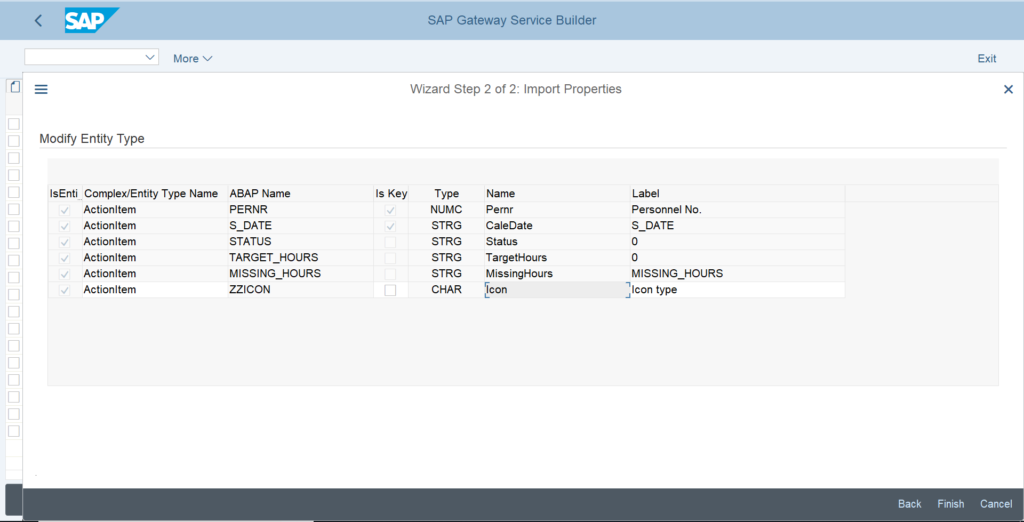
Now change the property name of our custom field to “Icon” from automatically suggested property name by the tool as shown in below screenshot.
We changed to Icon, as we want to show it. If you do not want Icon, you may leave it as it is.
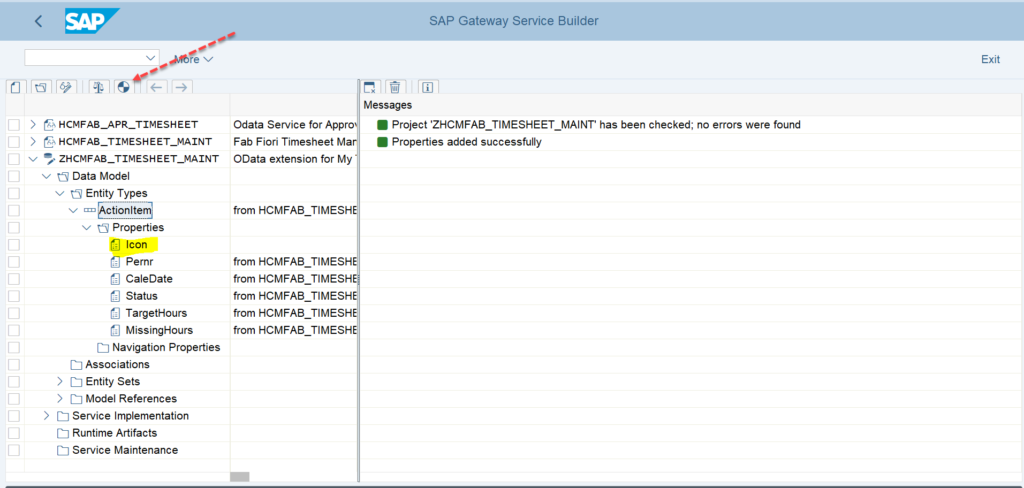
We can see in the below screenshot that custom property “Icon” is added to “ActionItem” entity highlighted in yellow.
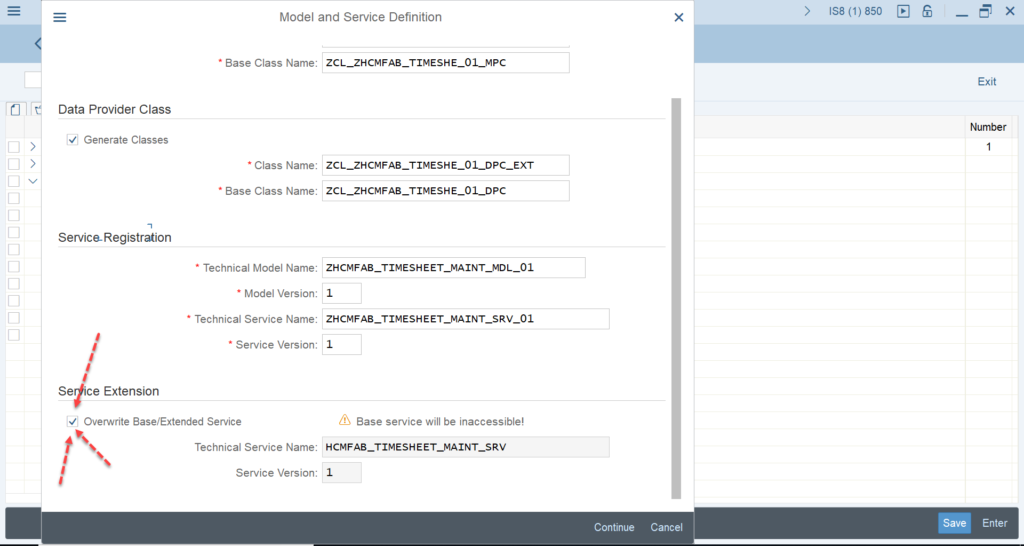
Click the button to generate the runtime objects of OData service. Below pop-up will be come suggesting data provider class names, model name, service name. Tick the “Overwrite Base/Extended Service” checkbox and click continue to generate runtime objects.
Step 3. Enhance Standard DPC_EXT Class for Custom Field Logic
We will now enhance the standard class “CL_HCMFAB_TIMESHEET_CR_DPC_EXT” to include logic for custom field as no BADI is available to add logic for custom field. Click on “Enhance” button to create an Enhancement implementation
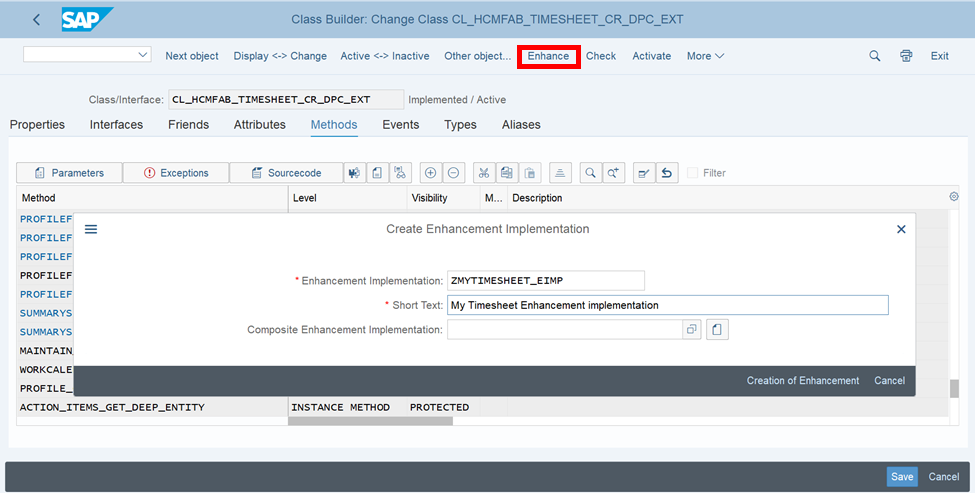
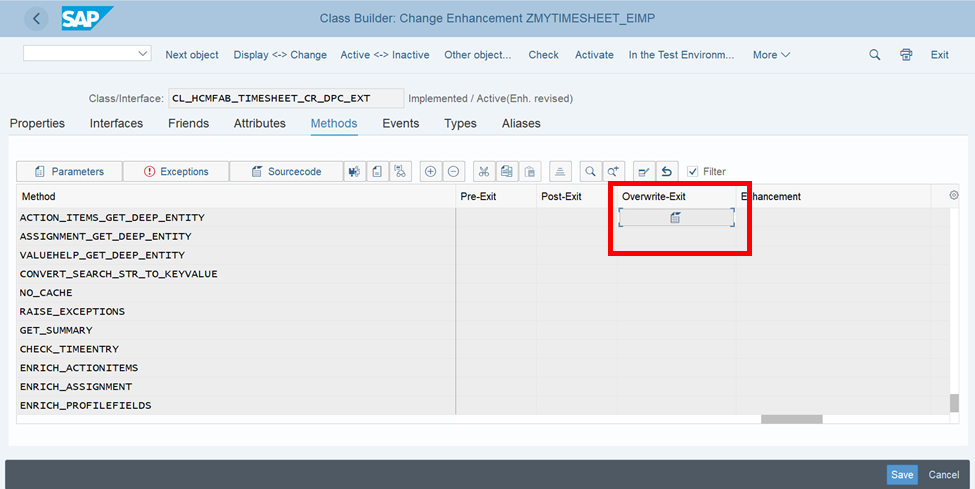
Create Overwrite-Exit for method “ACTION_ITEMS_GET_DEEP_ENTITY” to add logic for custom field
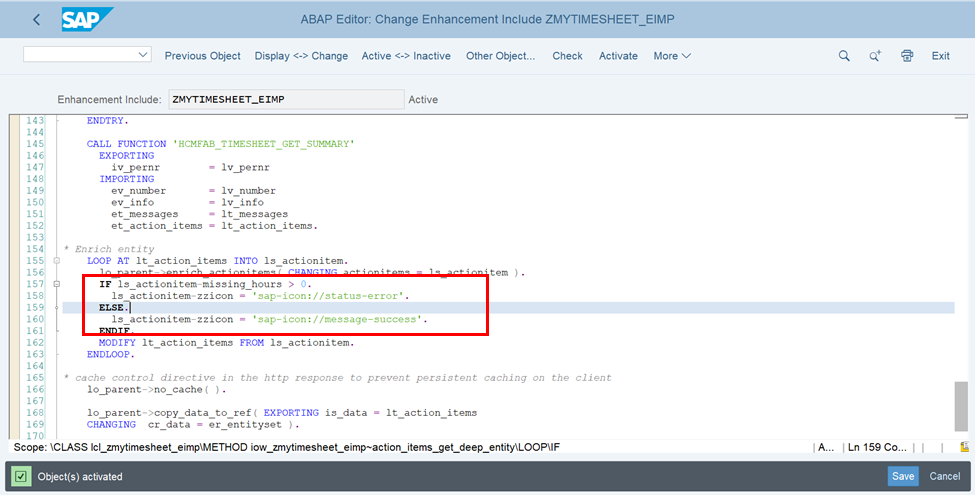
We will add the error icon if missing hours are greater than 0 else, we will add the success icon as shown in below screenshot.
Step 4. Register the Custom Enhanced OData Service
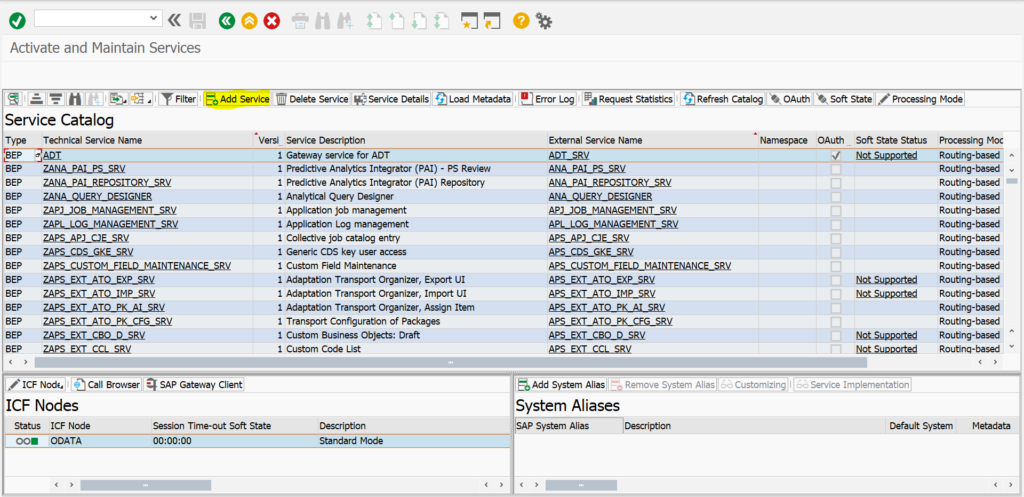
Backend development for adding custom field is now completed. We will now register our customer service using transaction “/IWFND/MAINT_SERVICE”. If “Centralized Hub” architecture is used in the project, login to the Frontend Server and register the service else for “Embedded System” register the service in the same server.
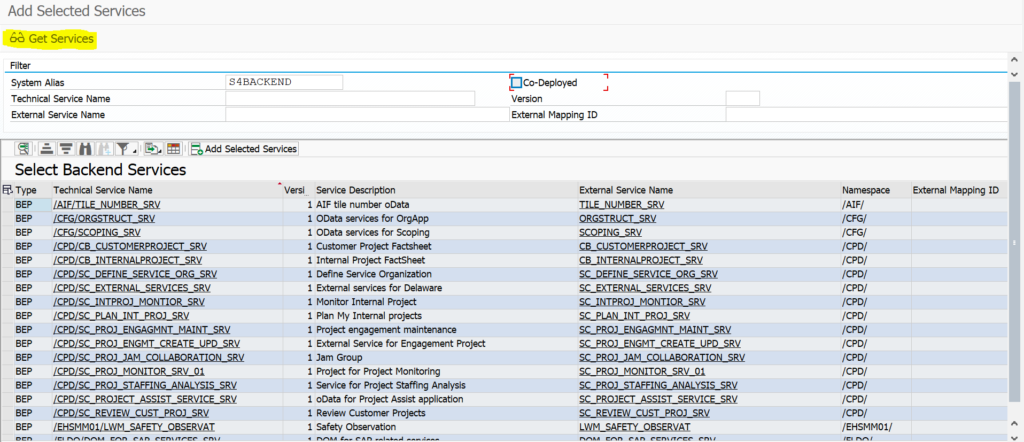
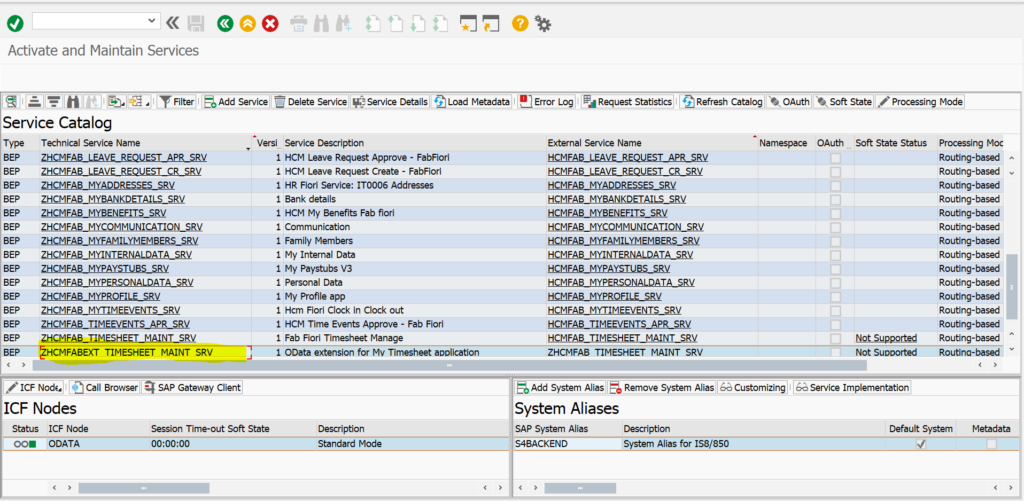
Go to transaction code “/IWFND/MAINT_SERVICE”. Click on “Add Service” button highlighted in yellow as shown in the screenshot.
Select the system alias pointing to backend server and click on “Get Services” button to get all the backend services which are not registered.
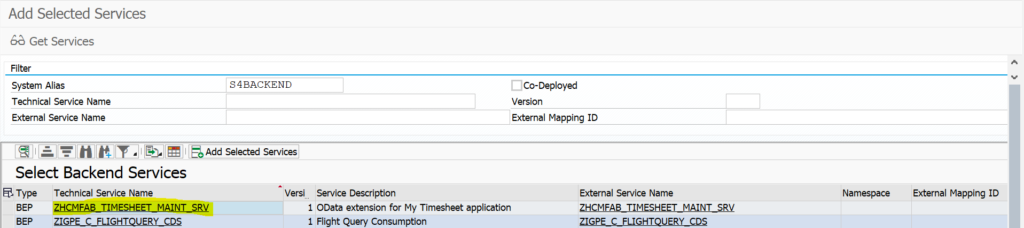
Filter on our custom service which we earlier created and click on “Add Selected Services” button to register in the frontend server.
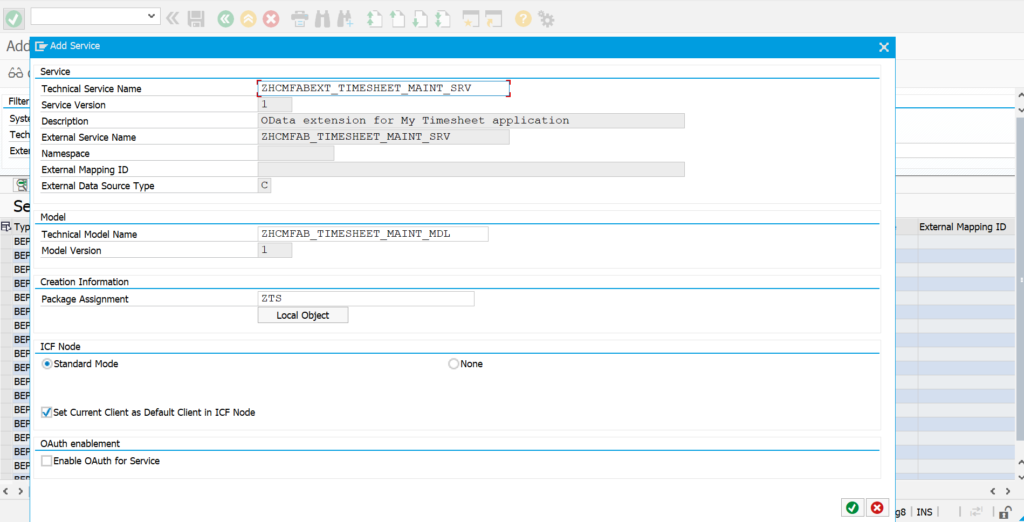
Popup will be opened with the service details. By default, Technical service name, Technical Model name will be auto-populated. You can modify these values if you want and press OK to register the service.
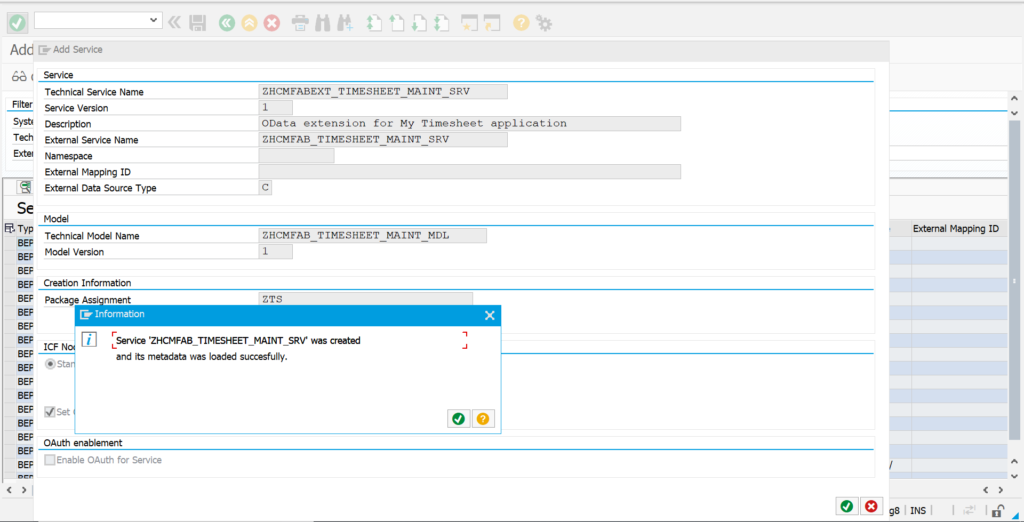
Once service is registered successfully, we will get the message that service is created and metadata loaded successfully as shown in below screenshot.
We can see that service is now shown as registered with backend system alias.
Part 2. Steps to Enhance Frontend UI Service
OData extension is completed. We will start with extending UI5 application “HCMFAB_MY_TIME”. How did we find out the UI Service name? Fiori Library is the Bible.
Step 1. Enhance the Fiori UI Service using Extensibility Pane
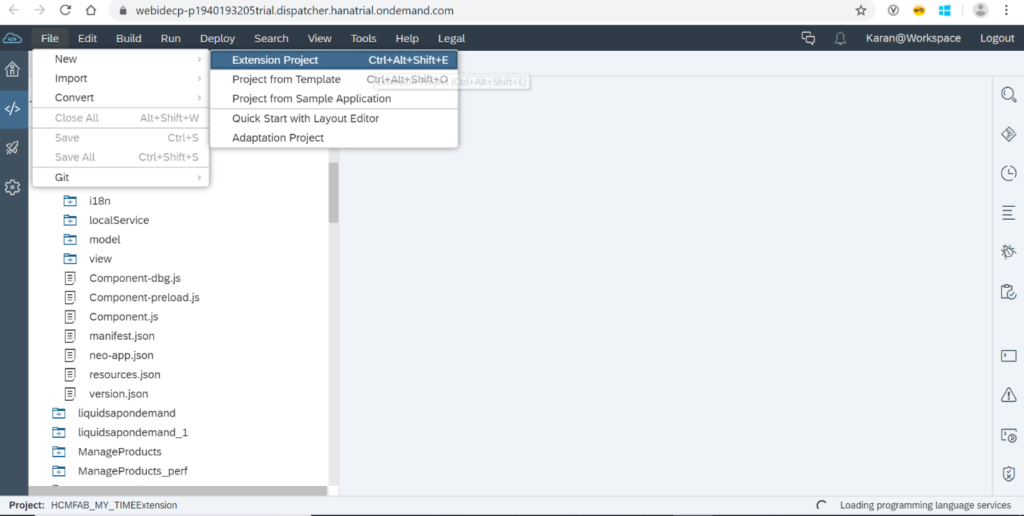
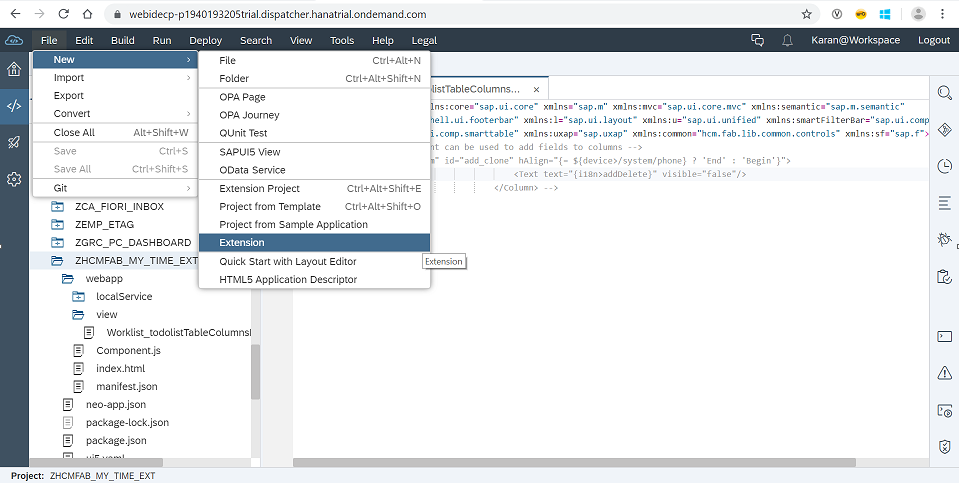
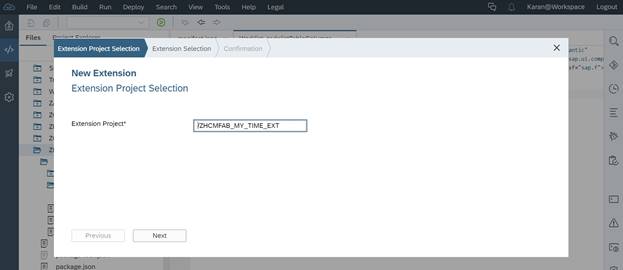
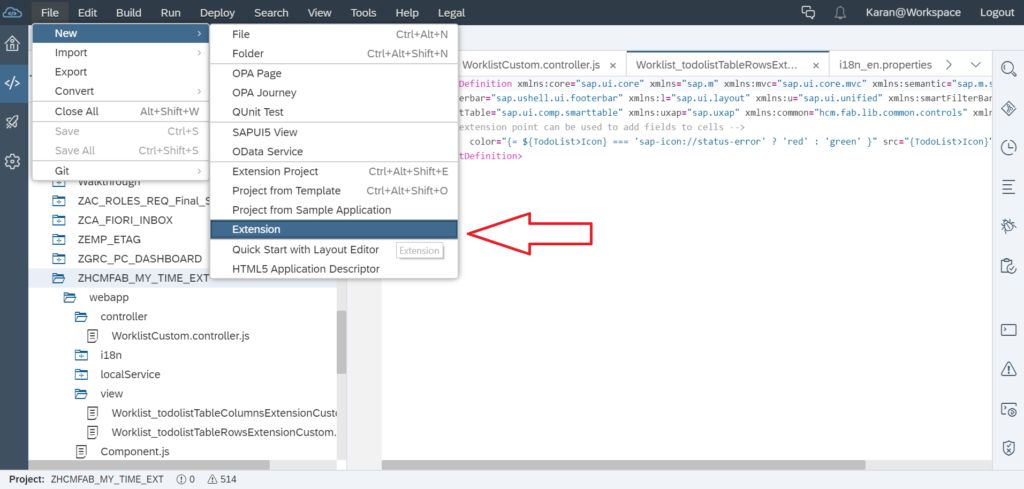
Login to WebIDE on SAP Cloud platform. Click on “New” option from “File menu” and select “Extension Project” as shown in below screenshot.
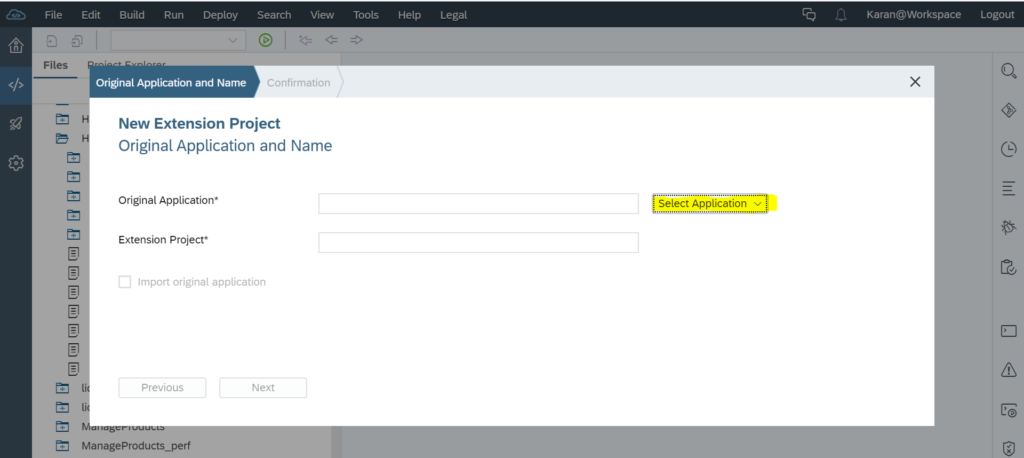
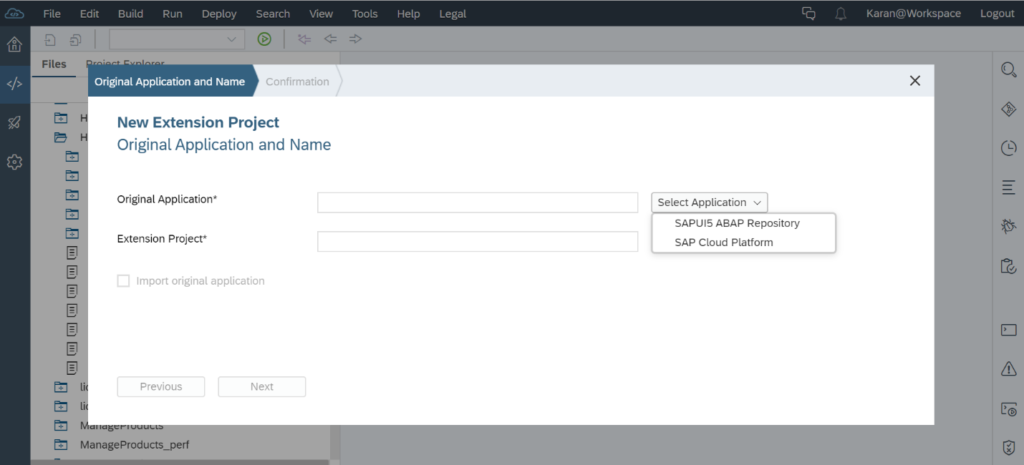
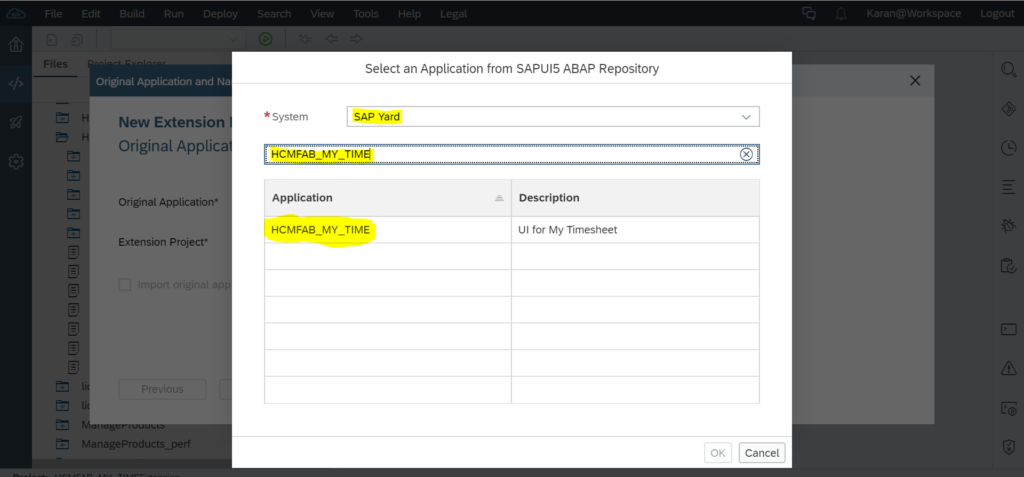
Click on “Select Application”. It will show 2 options. “SAPUI5 ABAP Repository” and “SAP Cloud Platform”. For our scenario as application resides in “SAPUI5 ABAP Repository”, this option is selected.
Now search for the UI5 application “HCMFAB_MY_TIME” from the ABAP repository to be extended.
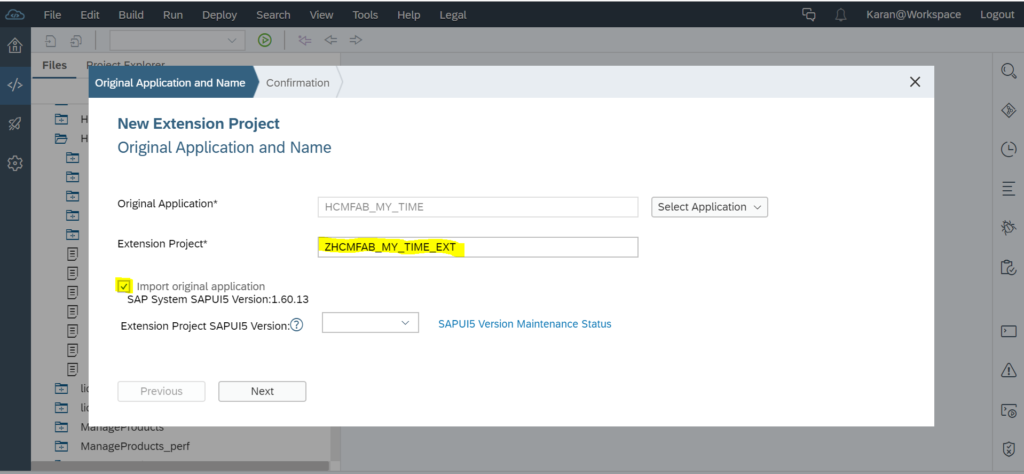
Provide a name for extension project. Tick the checkbox if you want the extended SAPUI5 application to have the same version as SAPUI5 ABAP Repository version.
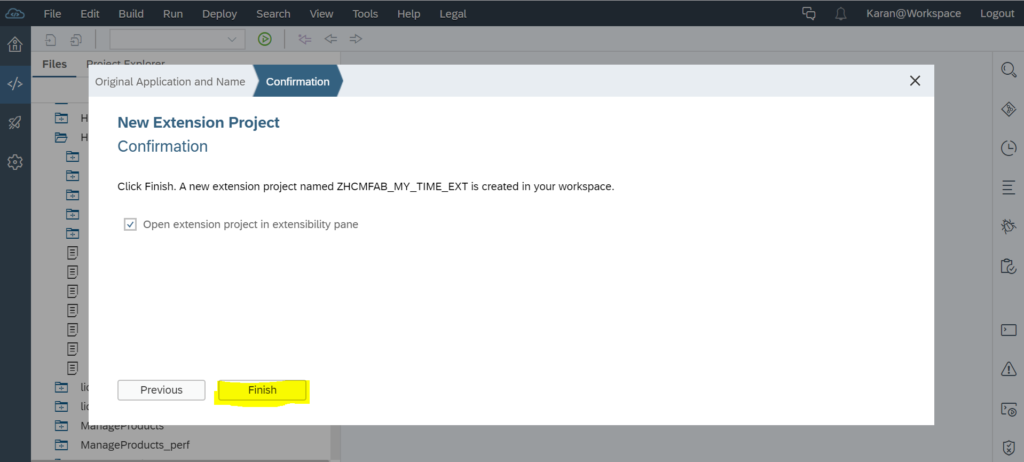
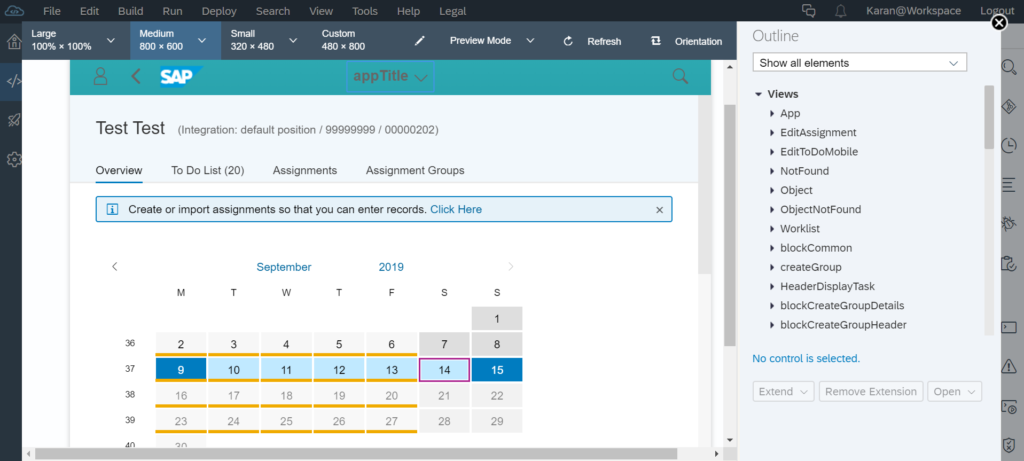
Select the option “Open extension project in extensibility pane” and click on Finish. New project which we created will now be opened in extensibility pane.
Step 2. Check Fiori Library for Extension Points
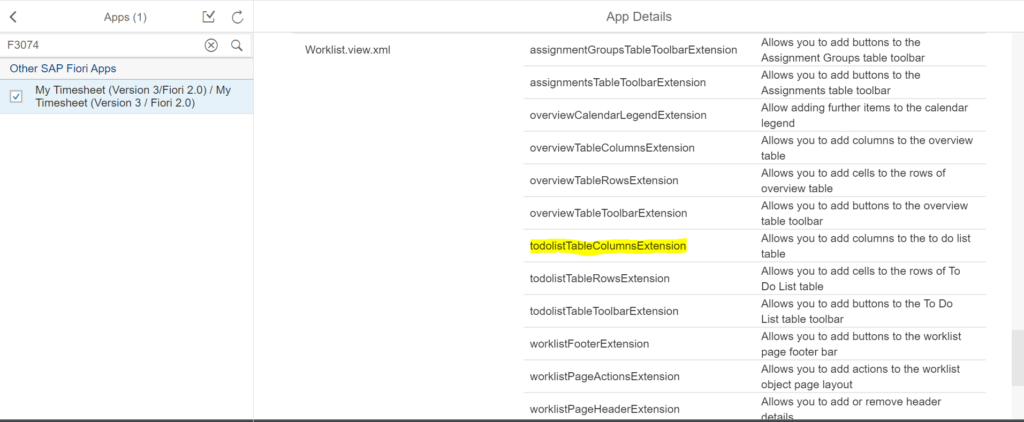
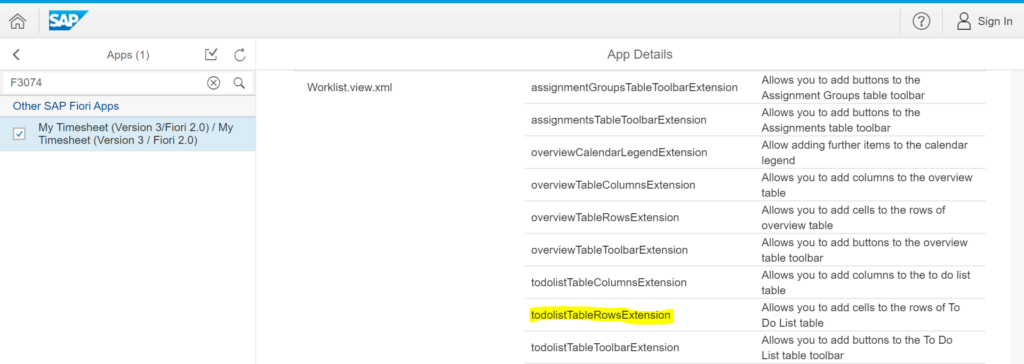
We now must add the custom column to the To Do List table. We will now check in Fiori App Library, if extension points are available to add custom column to the standard application. As shown in below screenshot, we do have the extension available highlighted in yellow to add the custom column.
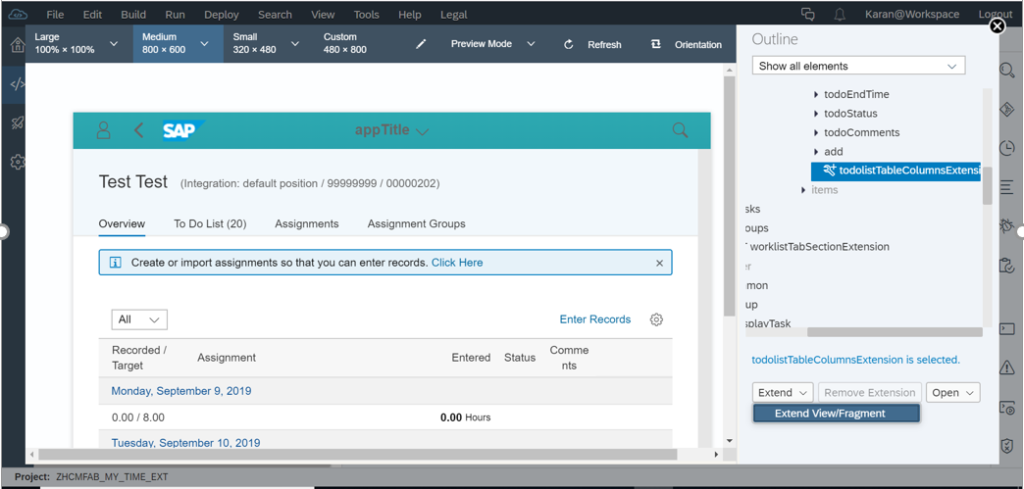
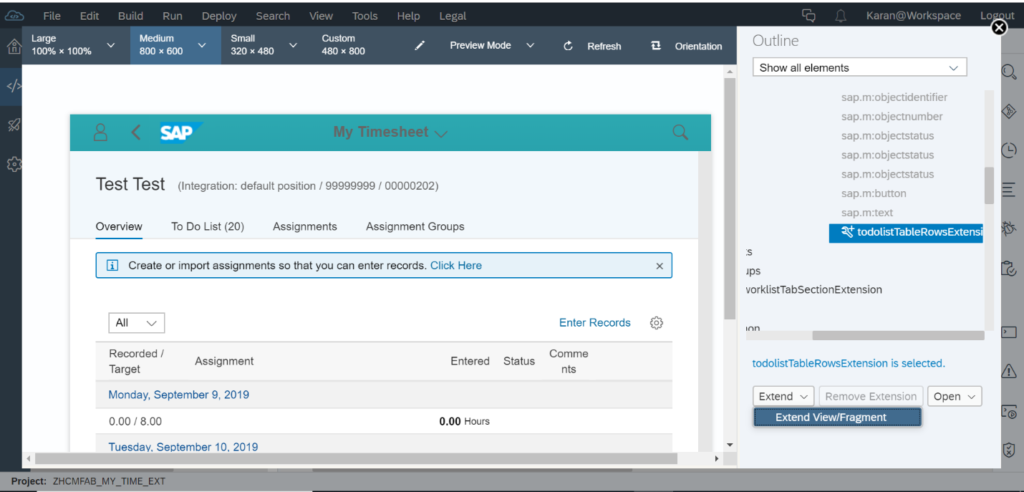
We will now find the extension point in the extensibility pane and select that extension. Now select the “Extend View/Fragment” option inside the “Extend” option.
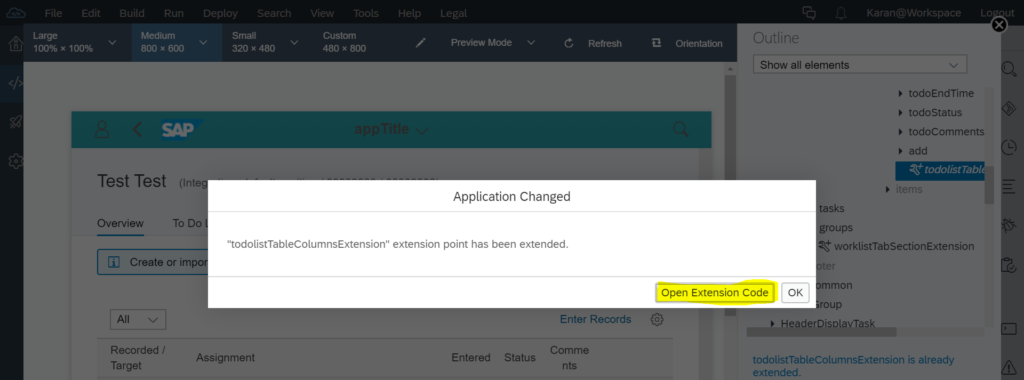
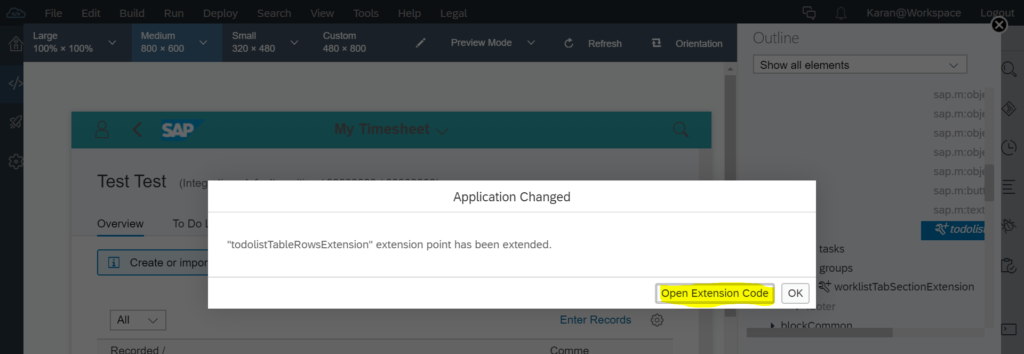
Click on the “Open Extension Code” option to see the extended code in the new project we created.
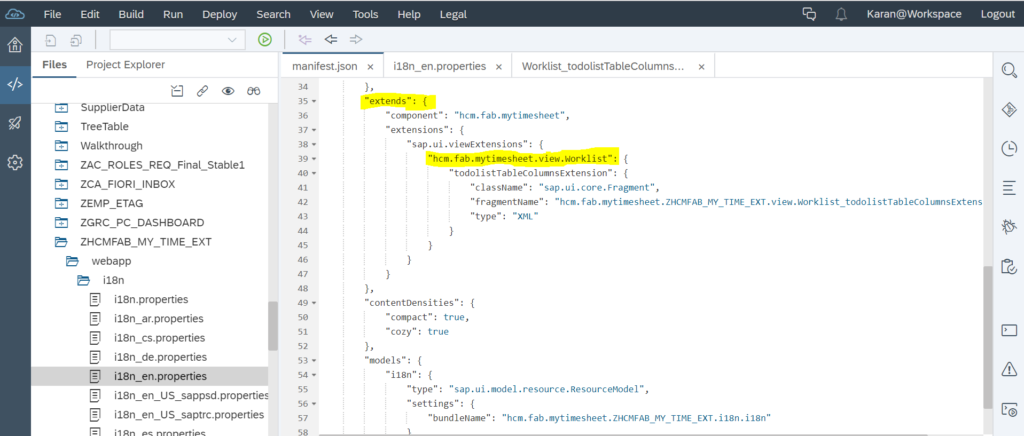
There is a new entry with “sap.ui.viewExtensions” in manifest.json file for the extension point as shown in below screenshot.
We will now add a custom column called “Time Entry Indicator” in the fragment which was created with extension.

Step 3. Extend i18n File
Text for column name is maintained in i18n file. As we are extending standard application, we will now have to extend i18n model of standard application to add our column name text in i18n file. Below screenshots shows the process to extend i18n model of standard Fiori application.
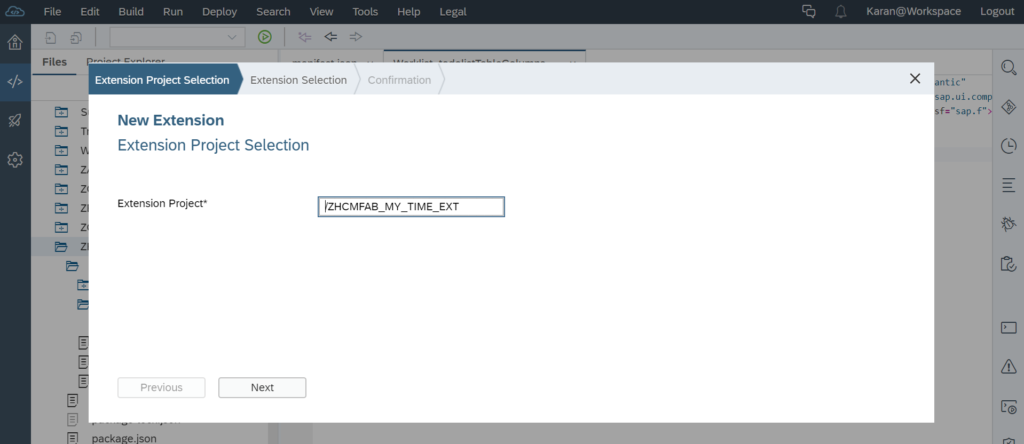
Select the extension project and click on File -> New-> Extension.
Keep the project name as it is. Click on “Next” .
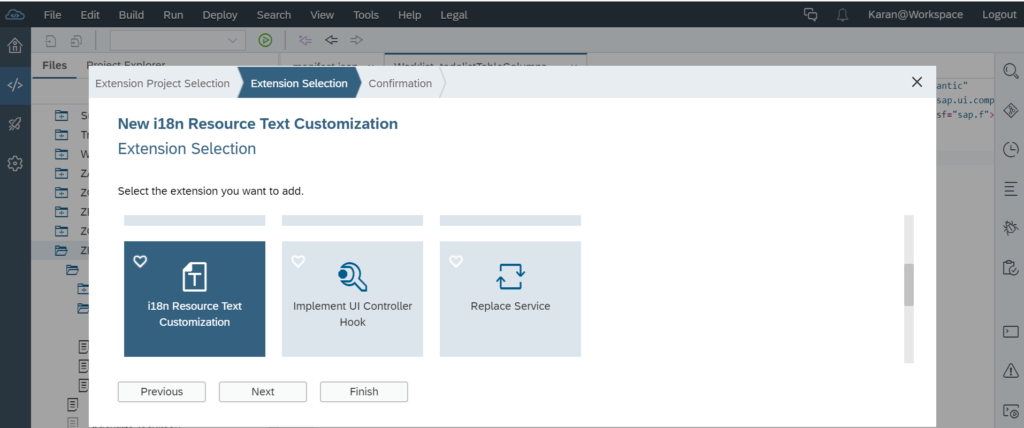
Select “i18n Resource Text Customization” option and click on “Finish”.
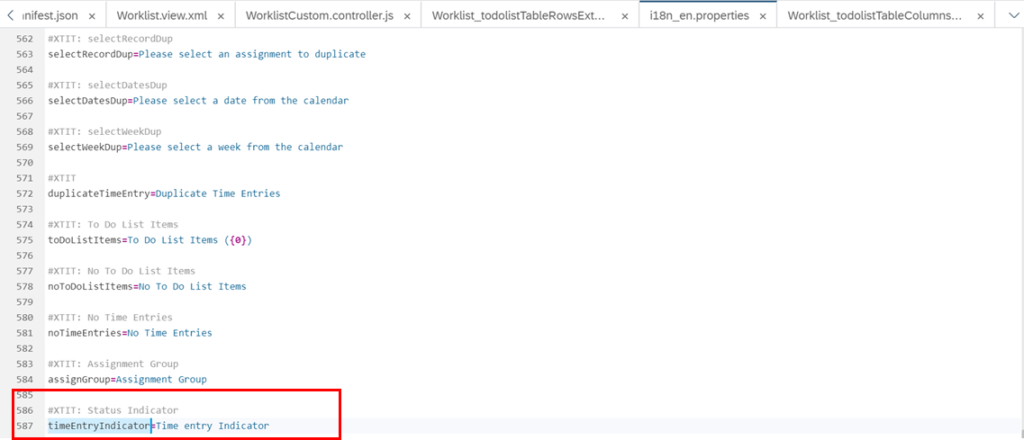
We can now add text of column name in i18n file.
We can now see standard application is now extended and custom column is added to the application.
We now must add the custom cell to row of the To Do List table. We will now check in Fiori App Library, if extension points are available to add cells to the row of To Do List table in the standard application. As shown in below screenshot, we do have the extension available highlighted in yellow to add the custom column.
We will now find the extension point in the extensibility pane and select that extension. Now select the “Extend View/Fragment” option inside the “Extend” option.
Application is now extended to add custom Cell to the row of To Do List table. Click on “Open Extension Code” to see the extended code.
We can now see in manifest.json file that a new extension is added to “sap.ui.viewExtensions” section as shown in below screenshot.
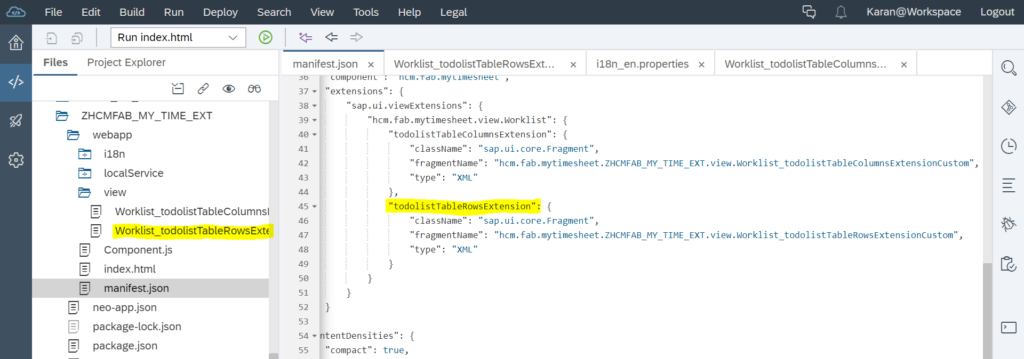
Add a “Icon” control from “sap.ui.core” library to the column cell. Bind the property “Icon” of OData entity “ActionItem” to the src attribute of Icon control to bind the icon name.

Step 4. Extending Controller to Add Logic for Custom Field
We will first check if model binding on UI will automatically display the value in custom column. This may depend on how the code has been written in the controller of the application. For our case, the value for the custom field doesn’t pull up on the screen. We should now check for controller extension in the Fiori App Library. These are called as Hook Methods in SAPUI5 terminology.
We don’t have any hook methods for this application. Only option we now have is replacing the controller with our custom controller and add additional logic in the relevant method. We will now replace the Worklist Controller with our Custom Controller to add the logic for “Icon” field. After having a look at controller code, we found a method “getToDoList” and adding our OData custom property to the “TodoList” model which we bound to the XML view in the previous step will solve our purpose.
Now let’s see how to extend the controller.
We will now find the Worklist Controller in the extensibility pane. Select the “Extend with a Copy of Original Controller” option inside the “Extend” option.
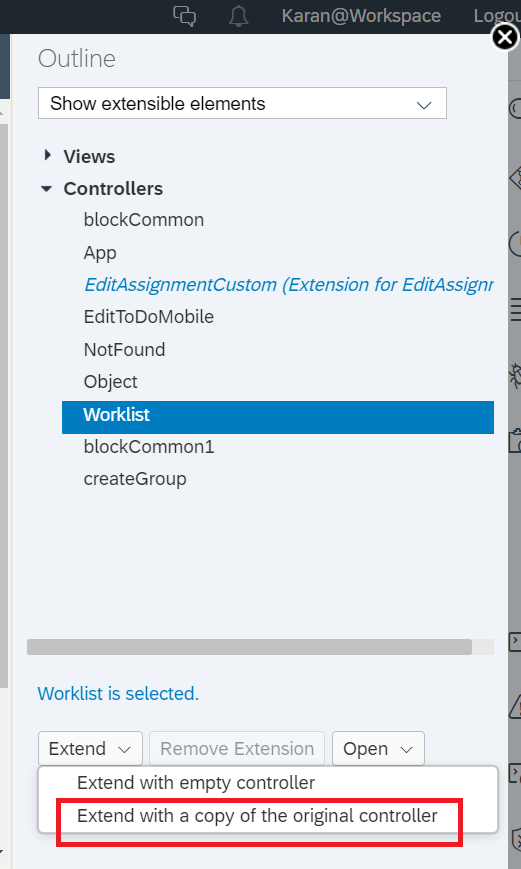
Worklist Controller is now extended to add custom our custom field. Click on “Open Extension Code” to see the extended code.
Caution: As shown in popup, there are implications in replacing the original controller. Future upgrades to the original controller will not automatically reflect in our custom controller. We suggest keeping Controller replacement as the last resort if no extensible methods are available in standard controller.

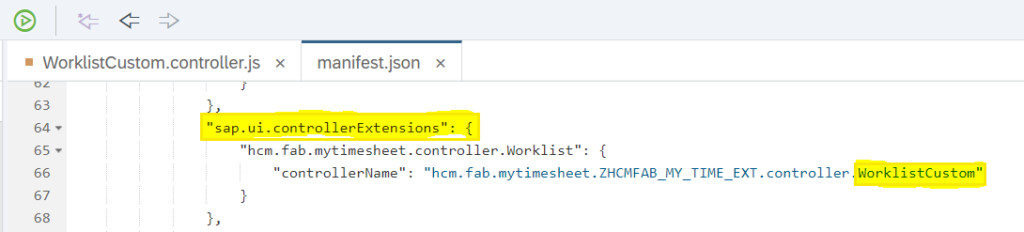
We can now see in manifest.json file that a new extension is added to “sap.ui.controllerExtensions” section as shown in below screenshot.
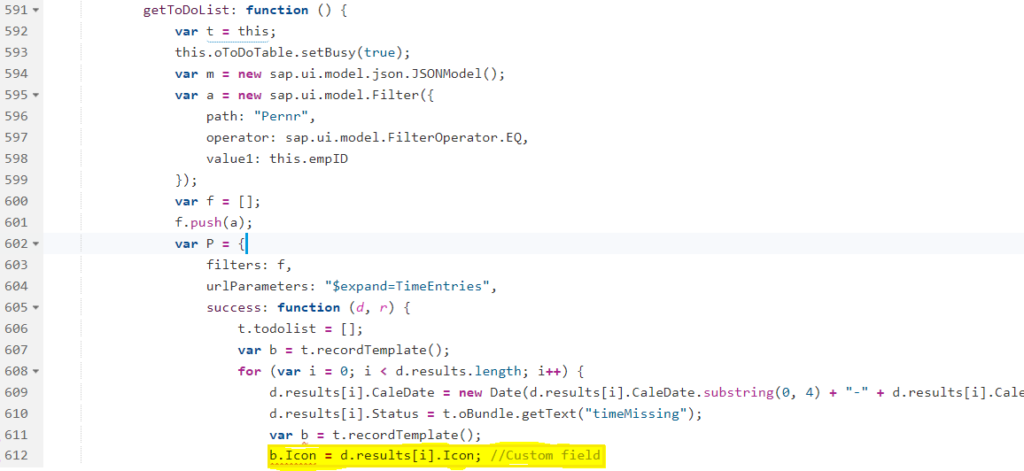
As discussed earlier, we found a method “getToDoList” which will be modified to add our custom property to the model. We will now assign “Icon” attribute of OData entity to the newly created “Icon” property in the “ToDoList” model as shown below highlighted in yellow.
Step 5. Replace the Standard Service with Custom Extended OData Service
Next step is to replace the standard service with the new service which we have created earlier. Click on File->New->Extension. Popup will be shown.

Keep the project name as it is and click on “Next”.
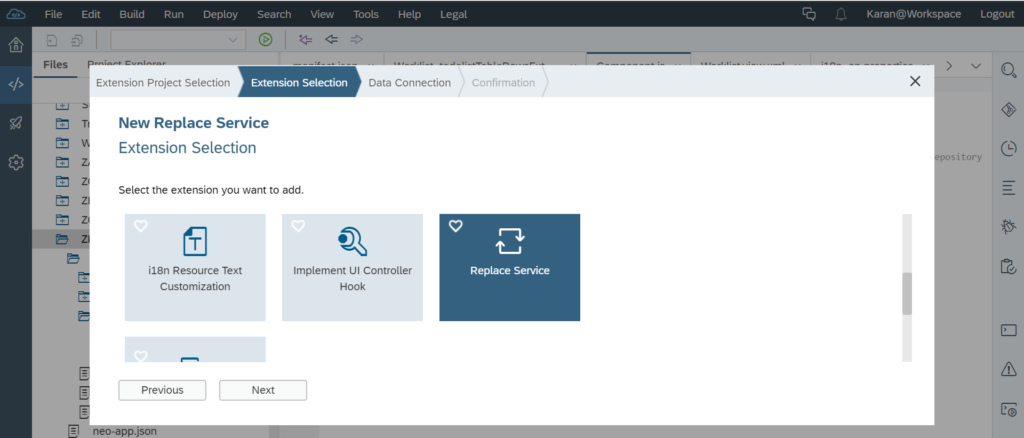
Select “Replace Service” option and click on “Next”.
Search for the new service created and select the service. Click on “Finish”.

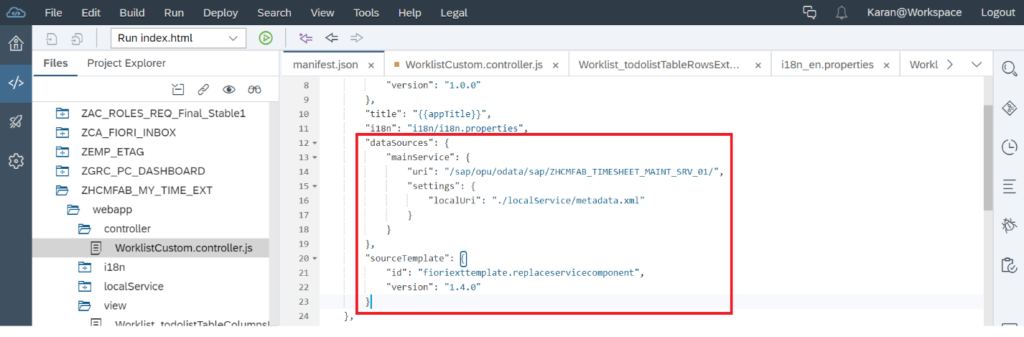
“dataSources” section is now added in manifest.json with our custom OData service.
We can now run the application. Icon’s are now displayed in the “Time Entry Indicator” column and are displayed in “Red” color as “Missing hours” are greater than 0.
Step 6. How to Hide any Control in Standard Fiori App?
We will now see how to hide any control of the standard Fiori application. For our scenario, we will hide “Enter Records” button in the toolbar of “To Do List” table.
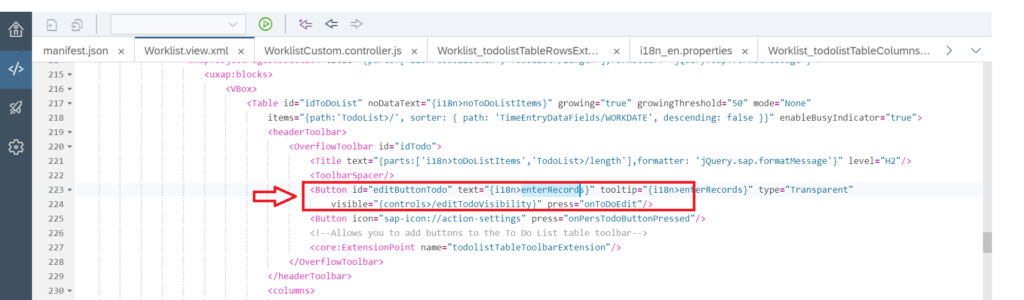
Pre-requisite to hide any control of standard Fiori application is that controls should be associated with id’s.
We can see from below screenshot that “Enter Records” button has id as “editButtonTodo” in Worklist XML view.
Click on File->New->Extension. Popup will be shown.
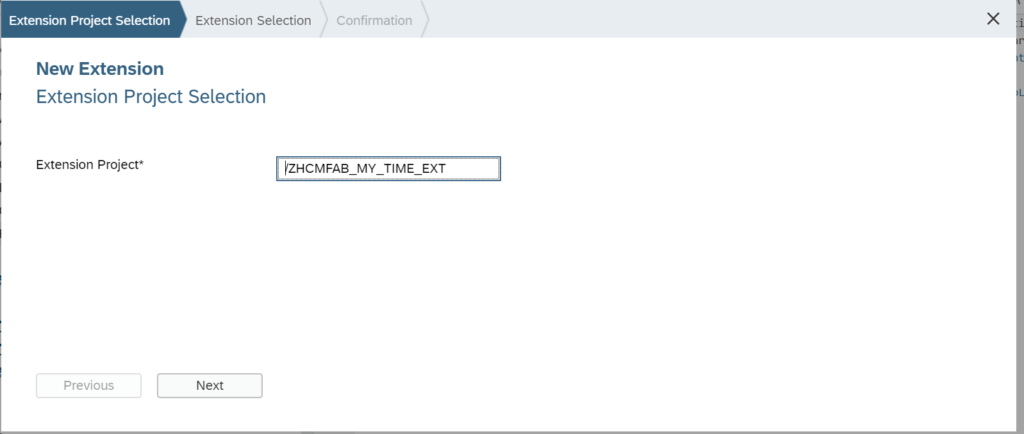
Keep the Project name as it is and click on “Next”.
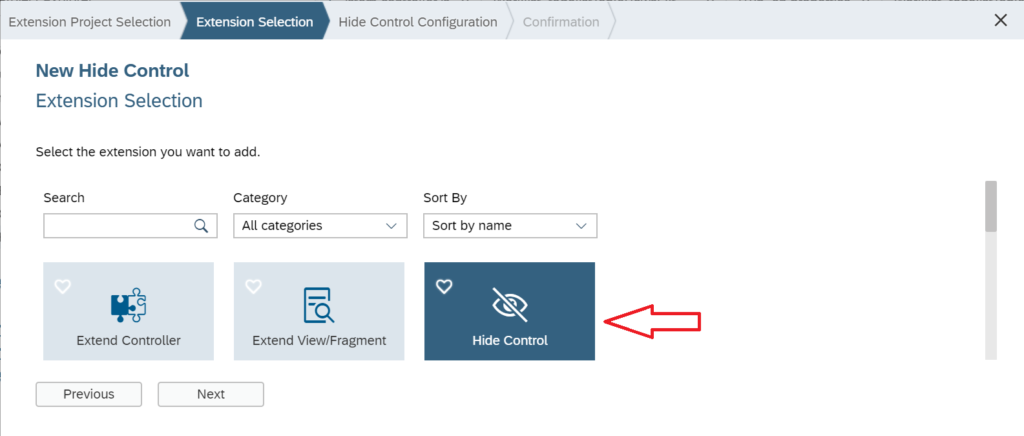
Select the “Hide Control” option and click on “Next”
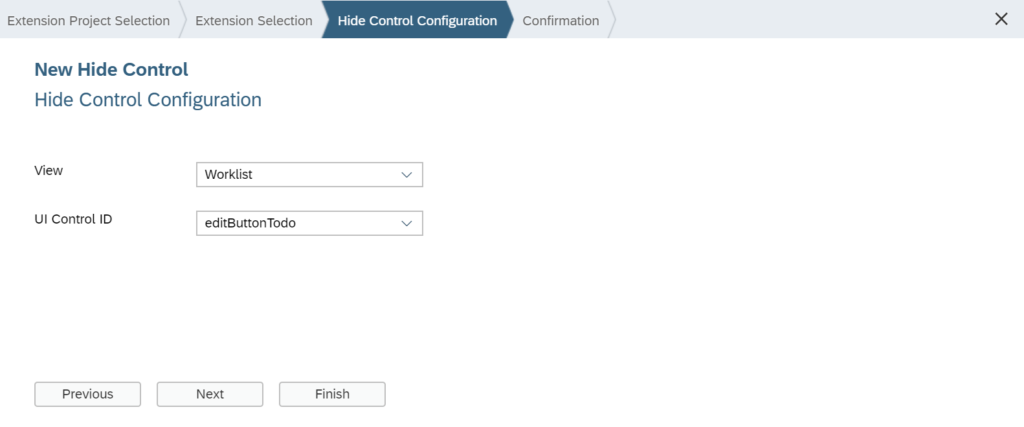
Select the view where control has to be hidden. In our case, we will select “Worklist” as view and UI control id as “editButtonTodo” which we identified earlier and click on “Finish”.
We can now see a new entry “sap.ui.viewModifications” is added in manifest.json file with the control that needs to be hidden.
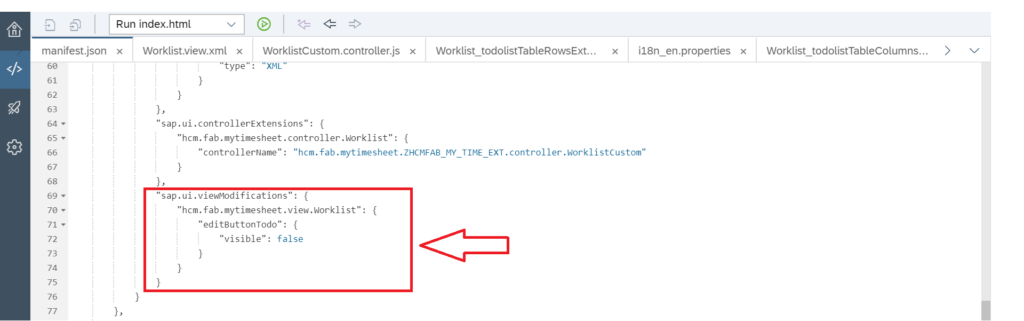
With this we have hidden the button “Enter Records” in “To Do List” table. We can now see that button is hidden from the toolbar of “To Do List” table.

I have tried to show all the tricks you need to extend/enhance any Fiori App. Most of the Fiori extension requirements would be to show new field on the header or new column in the table. You might also need to hide or display some texts or buttons. Usually, client would not come up to you and say, give me a brand new Tab or completely new Screen in the standard Fiori App. If they have that requirement, probably then it is a good candidate for custom SAPUI5 App development.


