In this blog, we will discuss an approach to activate SAP delivered Best Practice Business Role (SAP_BR*) using Task-List SAP_FIORI_CONTENT_ACTIVATION. This is a shell role with links to Spaces and Pages, Groups, and Catalogs. This Task-List when used will create a copy of Business role and will bring in all related components. In this blog I will outline comprehensive approach (Step-by-Step) to activate the Business Role SAP_BR_GL_ACCOUNTANT as an example. This blog will be very useful for Basis and security team members within an organization.
SAP has provided various Task-List to simplify creating and maintain roles within Fiori. These Task-List have made things very easy for security team members to manage role development task. In this blog I will cover the Task-List which are primarily used to convert SAP delivered Best Practice Business Roles with nomenclature starting with SAP_BR*. SAP have given more than 500 Business role which companies can adapt to a given requirements. These are pre-configured Roles given by SAP and can be adapted as required. This Task-list involves first copying SAP delivered Role into Z naming standard followed by activation of the required associated OData and ICF services automatically and generating the role with option to create test user for testing the role. This process also eliminates issue faced during developing like missing authorization, OData services etc. In one of my projects, we used this process to create over 150 roles within a day. To do the same, we had to create an Excel File which detailed the SAP delivered Business Role name and all the attributes which were copied into Custom Roles. Once the required Business roles were activated, SAP GUI script was developed to update the custom Business Role Descriptions to match the given. requirements.
Note: The SAP_BR*consists of both Groups plus Spaces and Pages concepts. Following S/4HANA 2020 SAP has announced deprecation of SAP Group concept and have introduced more refined Spaces and Pages concept which adheres to orders of tiles as it appears in Fiori Launchpad.
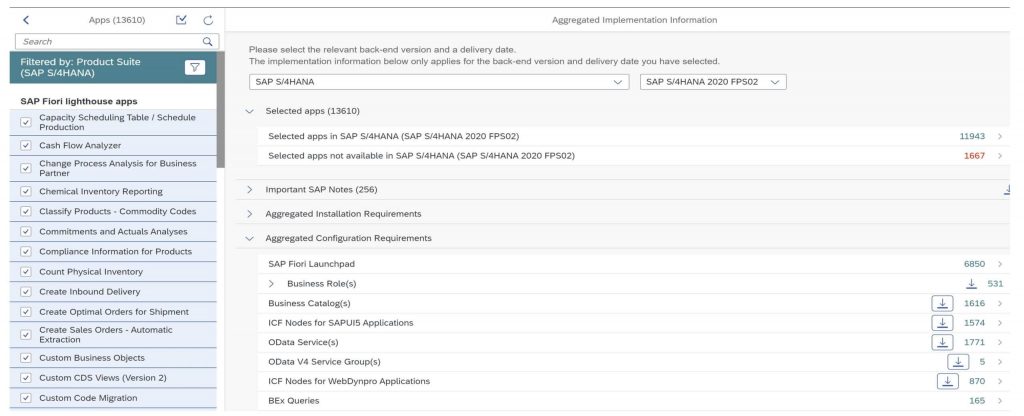
In our case we have embedded SAP S/4 HANA 2020 FSP02 installed, for which SAP has given the following information from SAP Fiori Library.
The SAP provide two task-List for activation of Business Role as shown below:
- SAP_FIORI_CONTENT_ACTIVATION (Used for SAP Delivered Content SAP_BR*)
- SAP_FIORI_FCM_CONTENT_ACTIVATION (Used for custom content roles)
For this blog, we will be using the Task-List SAP_FIORI_CONTENT_ACTIVATION.
Furthermore, I will also be publishing another blog for using Task-List SAP_FIORI_HCM_CONTENT_ACTIVATION soon.
Pre-Requisite
It is assumed that basis team have already implement the Task-List SAP_FIORI_FOUNDATION_S4. This will enable to activate all apps within the Business Roles. In this task list you can use single or multiple Business Roles to be activated. For easier maintenances, in our project we clubbed all Functional related Business roles together, like RTR, PTP team etc., This method provides tremendous saving time with no error. This Task-List can activate all the following types of Apps:
- UI5 (SAP Fiori App)
- UI5 (SAP Fiori App)
- GUI (GUI Transaction)
- WDA (ABAP Web Dynpro Application)
- WCF (Web Client UI Framework)
- URL (URL)
Note: Task-List can be run multiple times until everything is activated. If there is an error the Task-List can be run again till everything is green. For initial development in Sandbox the task list SAP_FIORI_CONTENT_ACTIVATION is very handy as this activated all associated Authorization objects which are maintained in SU24 and populated the Org hierarchy with * values. This Task-List also activate all the associated OData and ICF services automatically. The roles are generated automatically and if required it will create a unique Test User ID also. This task list works only with SAP_BR* Business Roles only and not Custom Roles. Rather Custom roles do not show in the filter option.
For this to work Basis team needs to generate a Package (SE80) and the respected Transports (SE10), in our case we will be using Local Object option.
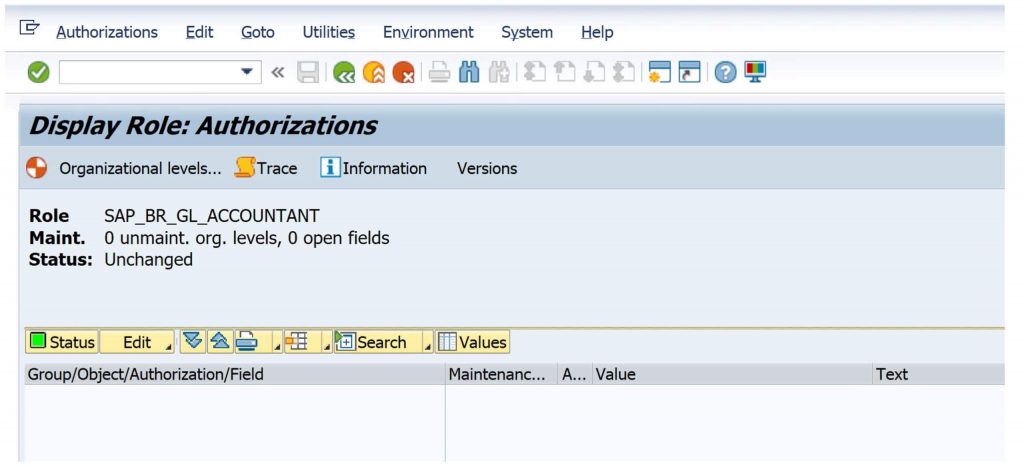
In our case, we will use an example of SAP delivered role SAP_BR_GL_ACCOUNTANT. This role is basically a Shell role with reference to associated Tiles/Apps, Groups along with Spaces and Pages. No authorization is maintained as seen below screen shot.
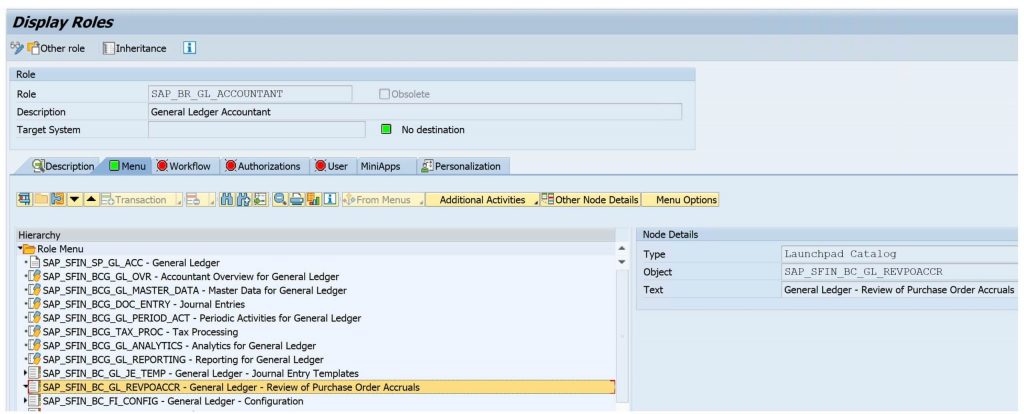
The launchpad Catalog SAP_SFIN_BC_GL_REVPOACCR highlighted above does not have any underlying IWSG/IWSV components visible, when the same is expanded. The Authorization tab is also empty and is red and nothing is maintained as shown below:
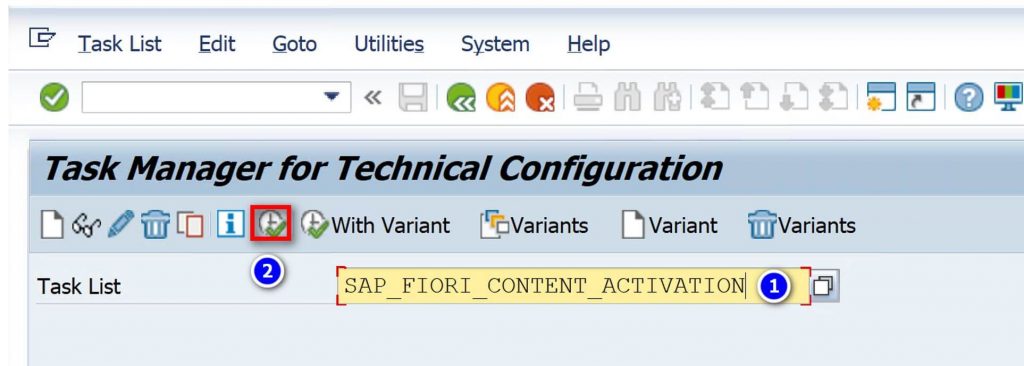
Case 1: Task-List SAP_FIORI_CONTENT_ACTIVATION
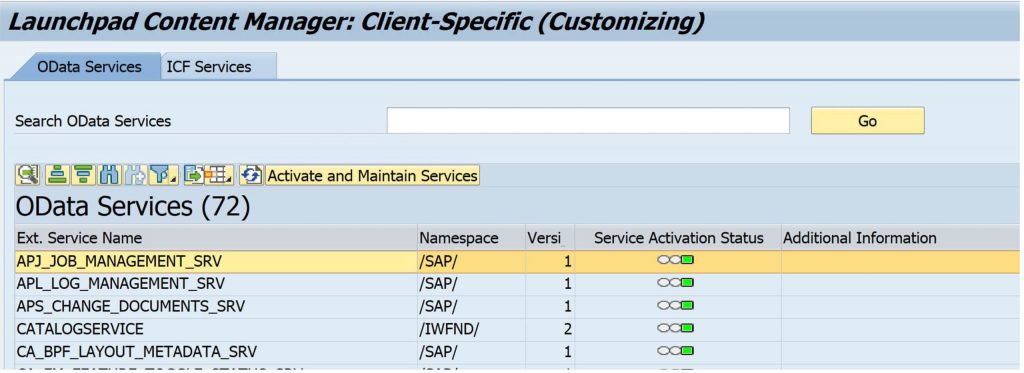
Use the T-Code STC01 to activate the Task-List. But before using the task-list, it is good practice to check if relevant OData and ICF services have been activated. In our project Basis team had activated most of the services. To check the underline services, use the T-code: /N/UI2/FLPCM_CUST.
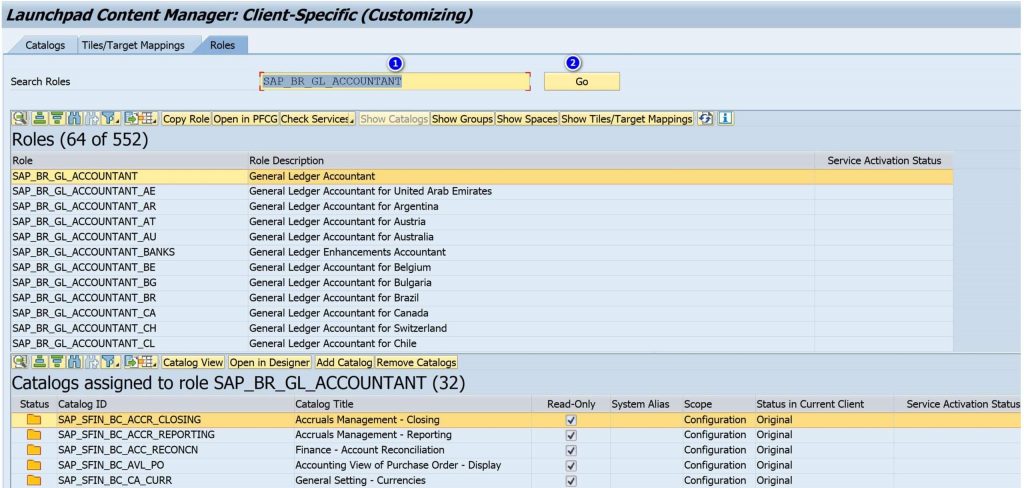
Enter the desired role name and click >> Go >>.
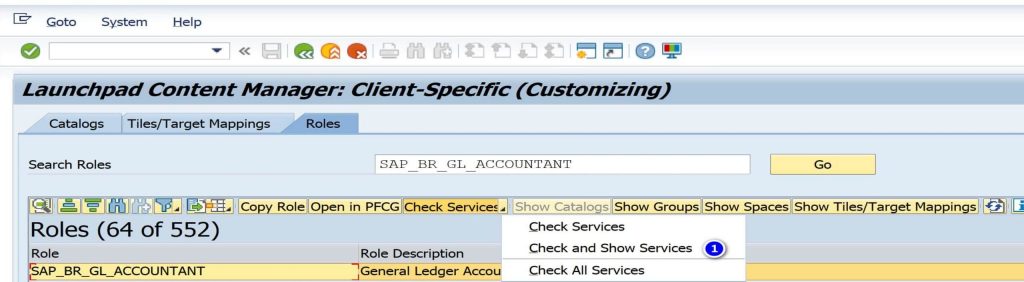
Now, check the service by clicking as shown below:

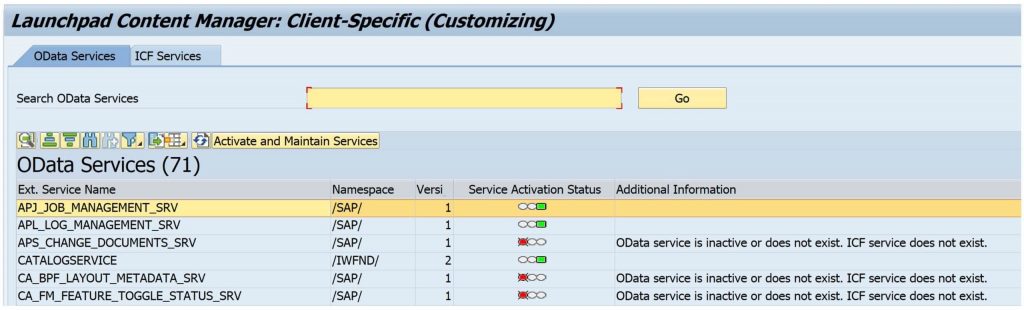
Many OData Services are not activated and the same can be downloaded by using the icon into Excel File and remove duplicate.
Similarly Check ICF service by selecting the Tab >> ICF Services
All ICF Service are maintained and green.
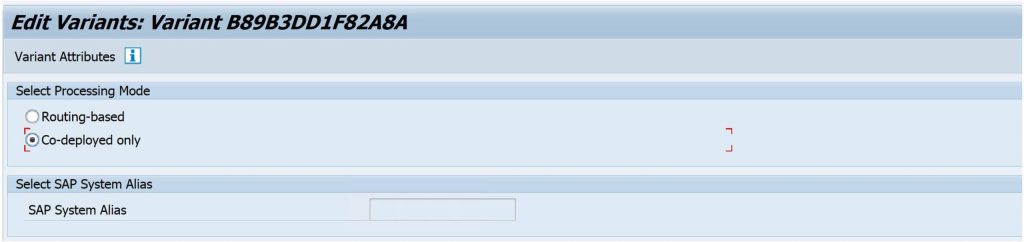
Tip: It is recommended to activate all the associated OData service before proceeding with activating the role. This can be done by using Mass update of ODATA Service of OData service via a task list called SAP_GATEWAY_ACTIVATE_ODATA_SERV.

The Final Screen is as follows:
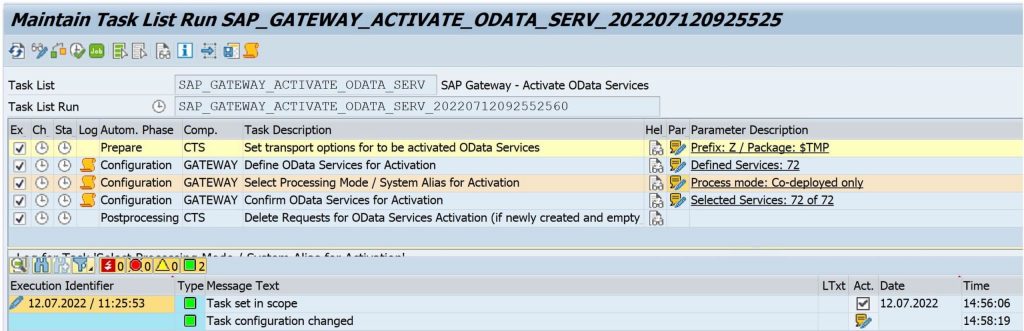
Now Execute and all OData services are activated and green.
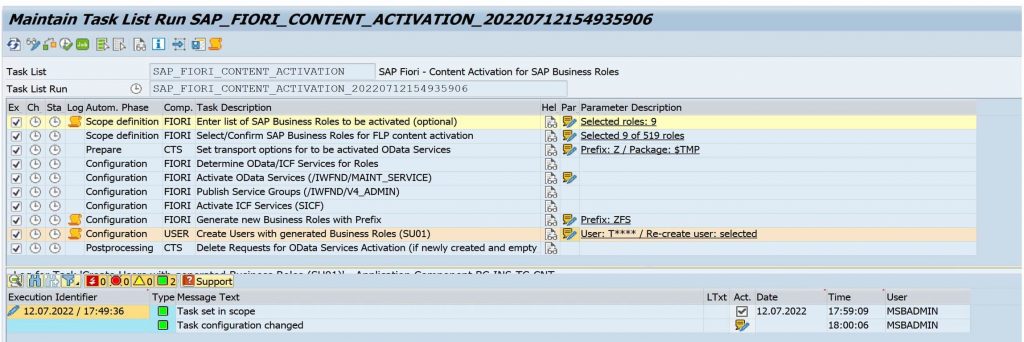
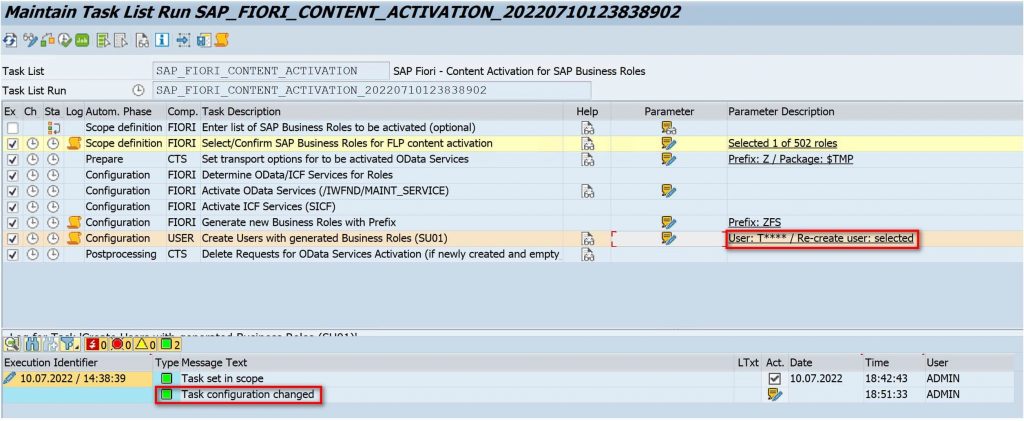
All the services are green we can now use the T-Code: STC01 to activate the Task-List SAP_FIORI_CONTENT_ACTIVATION.
When executed the initial screen appears which needs to be maintained. Here we can use single or multiple roles to be activated at a given instance.
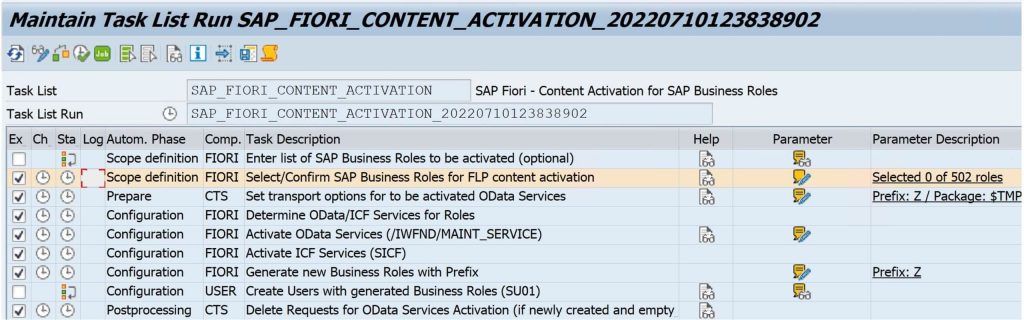
For every Task within the Task-List to be performed SAP has provided couple of options like Help, Parameter and Parameter Description. It is a good practice to read the documentation. The options under the Parameter tab needs to be defined and populated.
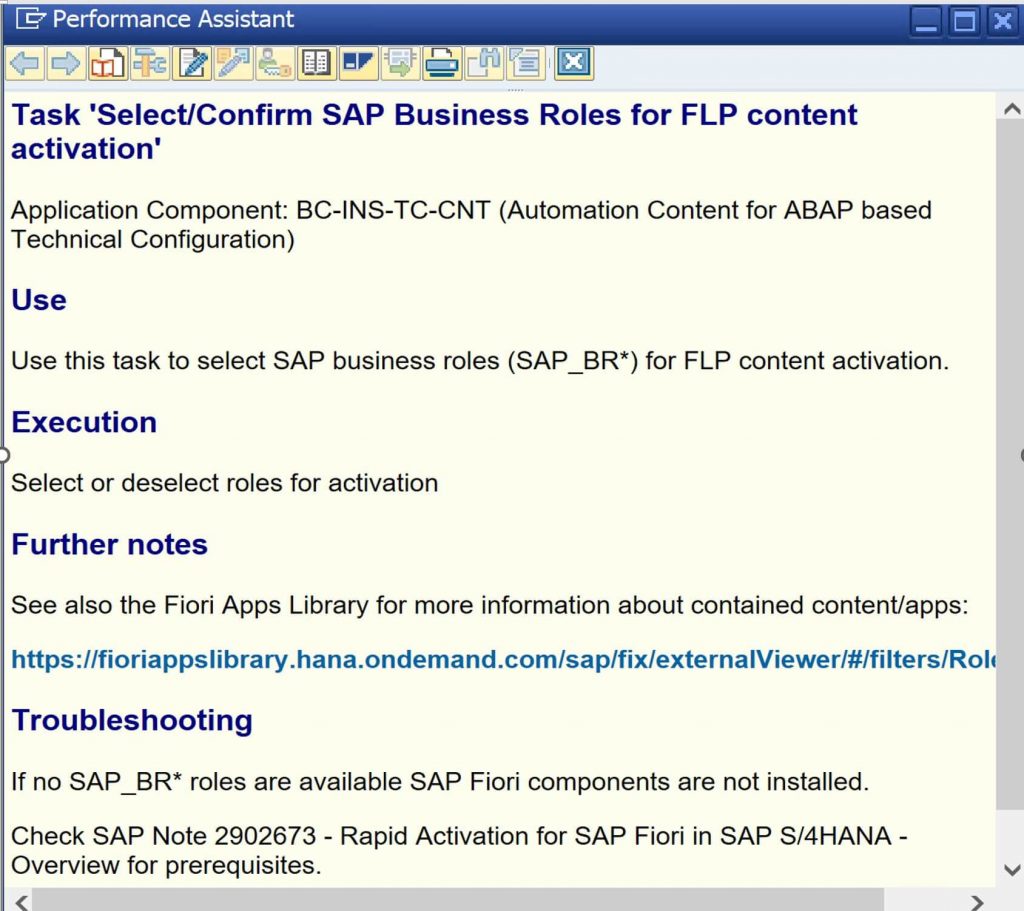
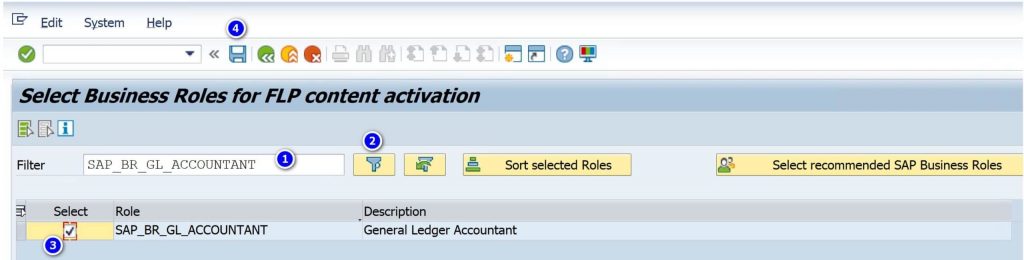
For example, Under the Task Description >> FIORI Select/Confirm SAP Business Roles for FLP content activation >> we can select the help option >> Display Icon >> to review documentation and it also shows under Parameter Description under the given system there are 502 roles.
Here we can select are roles for activating by selecting the >> Parameter Option Icon >> entering the role name and using the >>filter option>> icon.
Note: We can select multiples roles here, for our example we are using single roles.
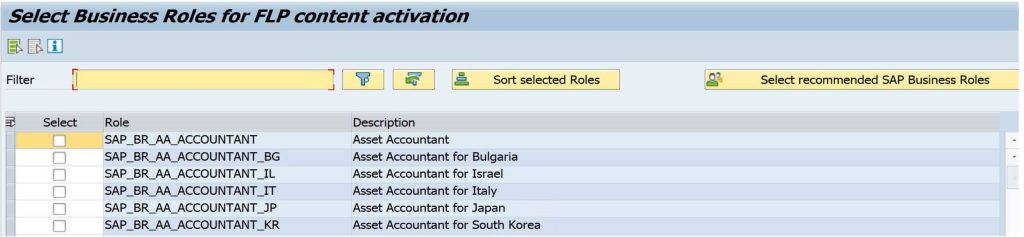
Select the desired role:
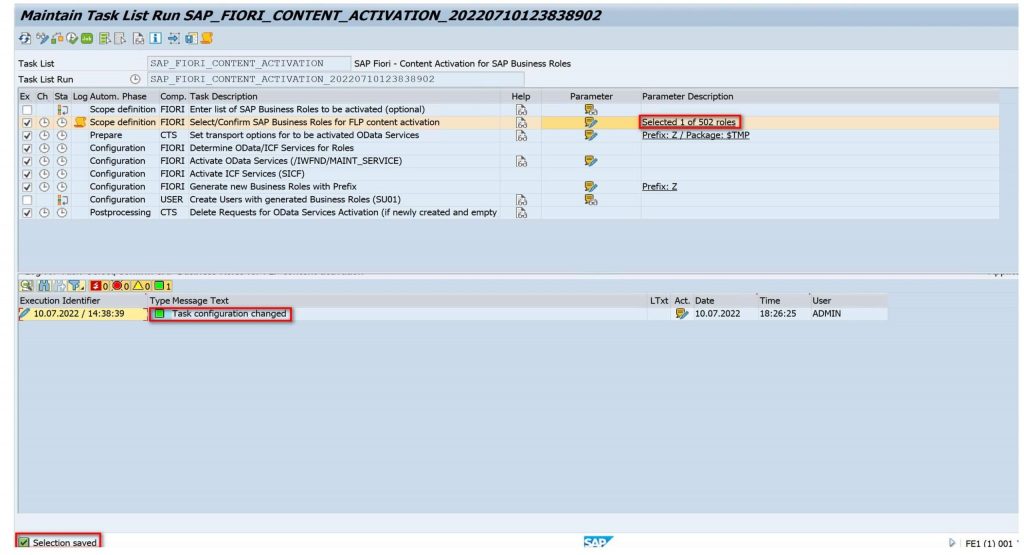
Now click save icon and go back will give you option to save the selection.
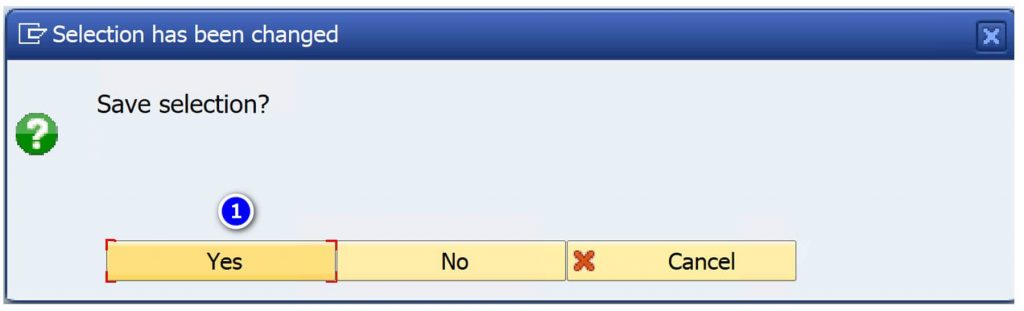
By clicking >> Yes>>, the role is selected.

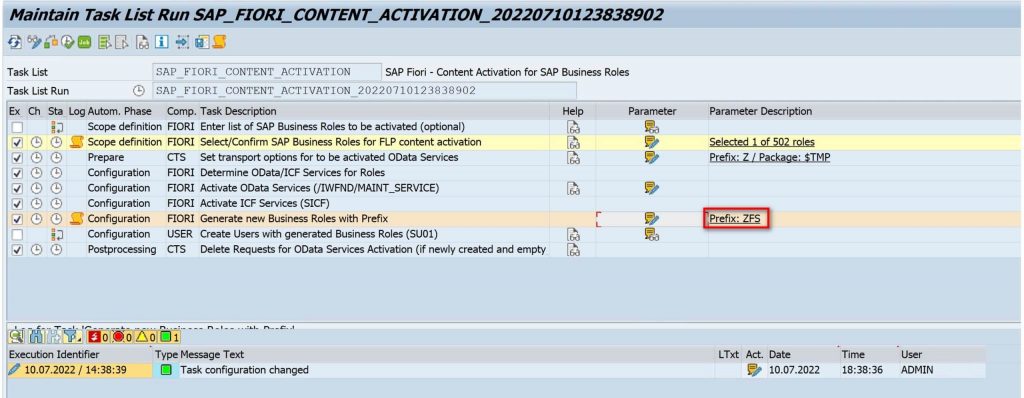
We need to create role in proper naming convention, under task Description >> Generate new Business Roles with Prefix >> the prefix to be added to the role has already been defined by SAP >> Prefix: Z >> the same can be maintained by clicking the icon under the Parameter
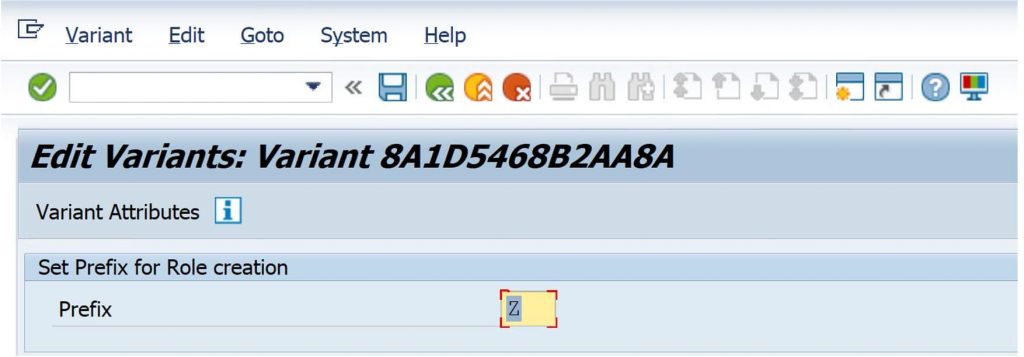
Enter ZFS for prefix. It is limited to only three characters:
- Z >> Custom Name Space
- F >> Fiori Role
- S >> Single role
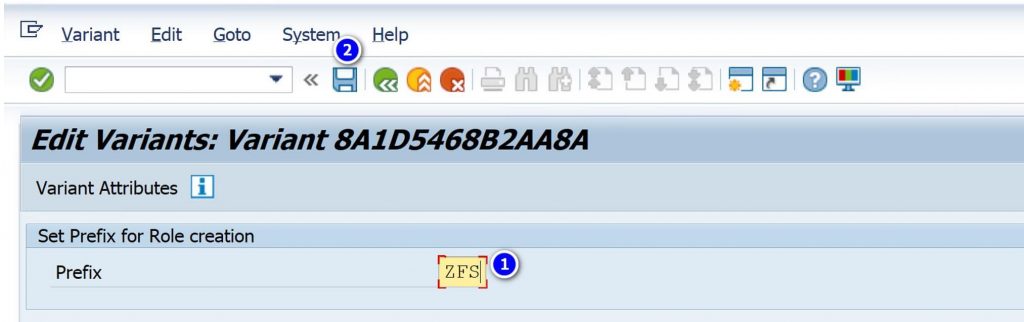
Click go back option and the Prefix option is updated.

Click go back option and the Prefix option is updated.

- Enter the prefix and the package how the OData services should be created (Leave as it for now).
- By default, the services are created with prefix Z in package $tmp. (Leave as it for now).
- If a transportable package is chosen, a workbench request and a customizing request are necessary.
- The workbench request records data for the OData and ICF service while the customizing request records the system alias assignment to the OData service.
- You can either create new request and task for your user or select an existing.

Note: Here package needs to be already existing to be used, no action needs to be taken on this screen.
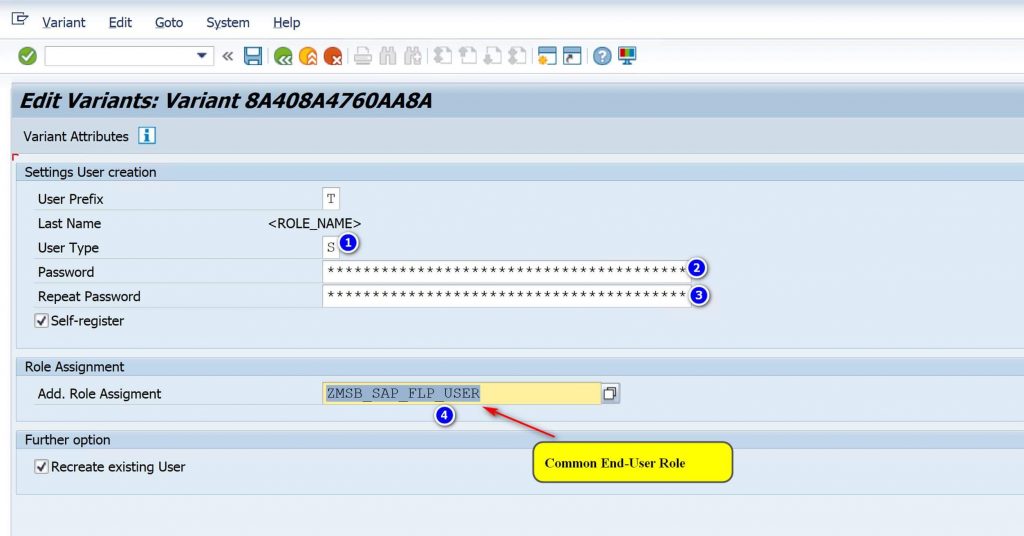
Now, select the option >> Create Users with generated Business Roles (SU01)>>.
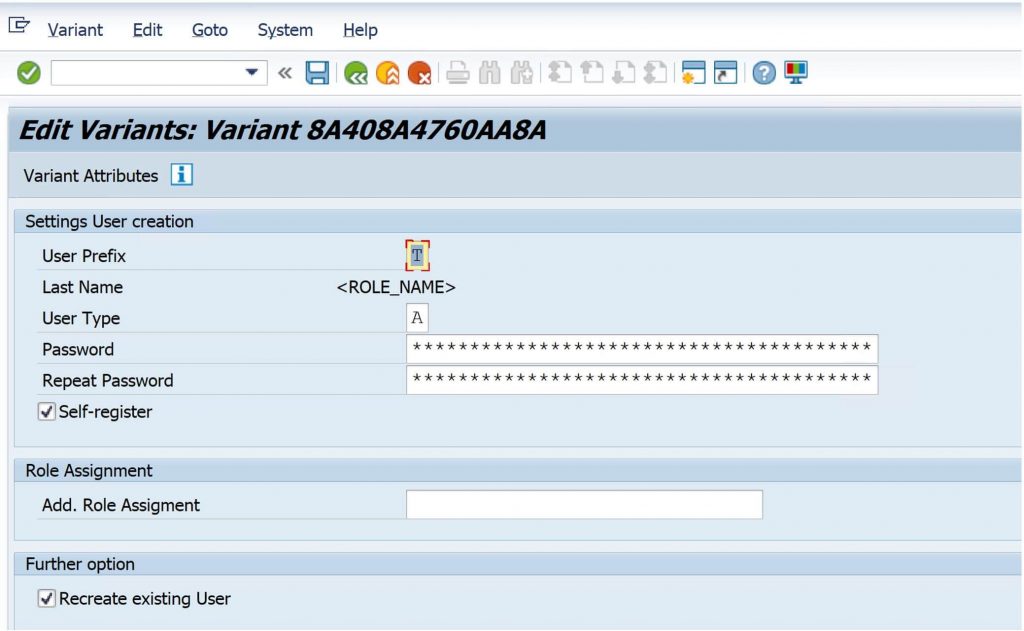
Here we can maintain the User Type, Password, and Add. Role Assignment.

In the option >> FIORI Activate OData Services (/IWFND/MAINT_SERVICE >> leave as it because we have already activated the desired OData and ICF Services.
The final screen is as shown above. After completing the configuration, the task list can be executed by clicking execute. Since we have only one role, we use dialog mode to execute for many roles a background of execution can be adopted. You can run the task list in dialog or background mode.
Once again check the logs to see if everything was successful, or if any errors have occurred. If you do see any errors or warnings, check the composite note which might give a hint on the root cause.
Click Execute and at bottom of the screen it shows that the task is running.


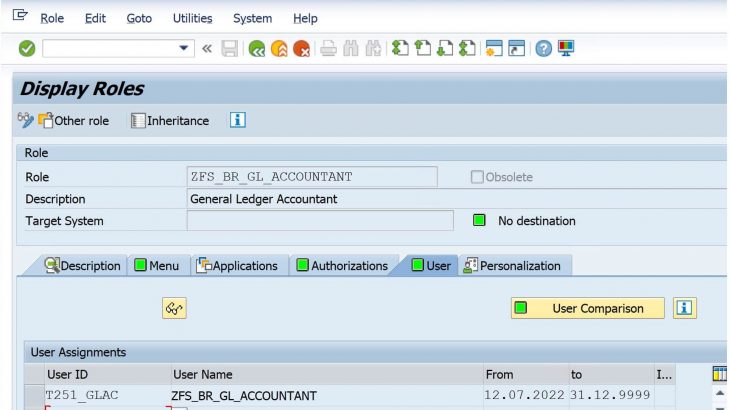
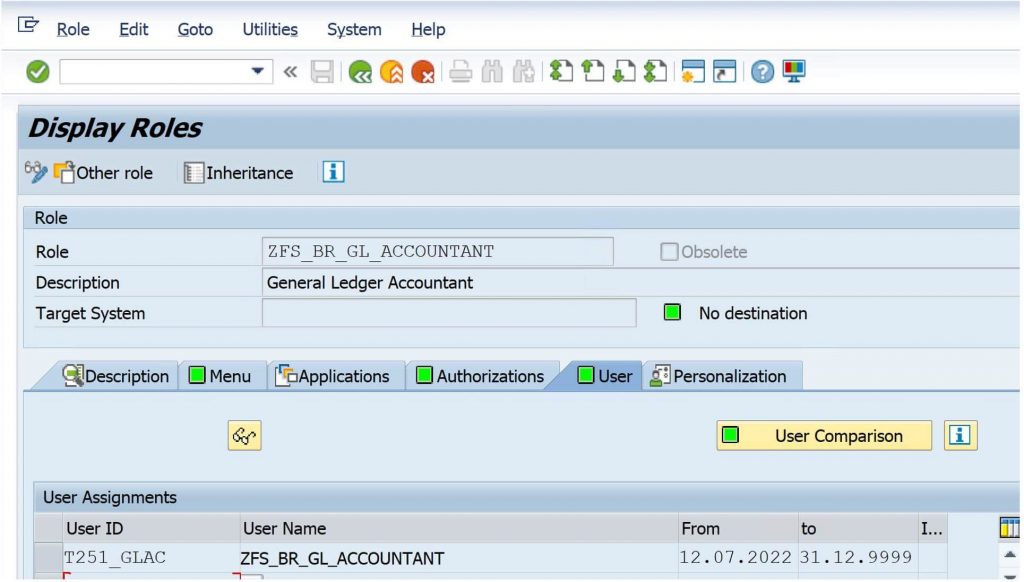
Since the role ZFS_BR_GL_ACCOUNTANT got created need to check and validate the role in PFCG to determine, if the desired IWSG/IWSV components show up.
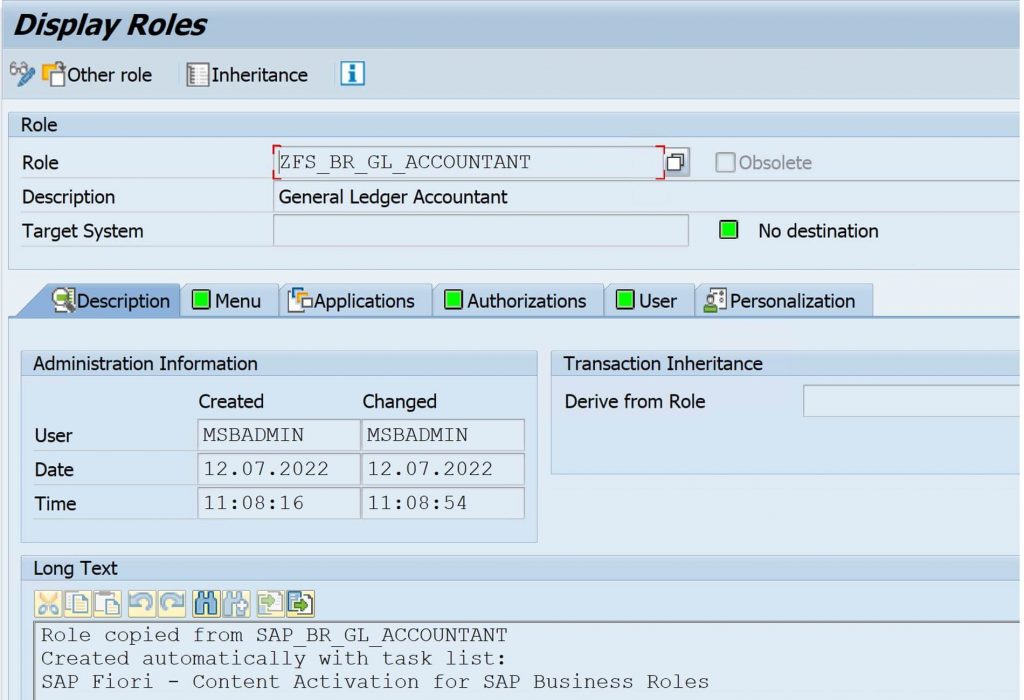
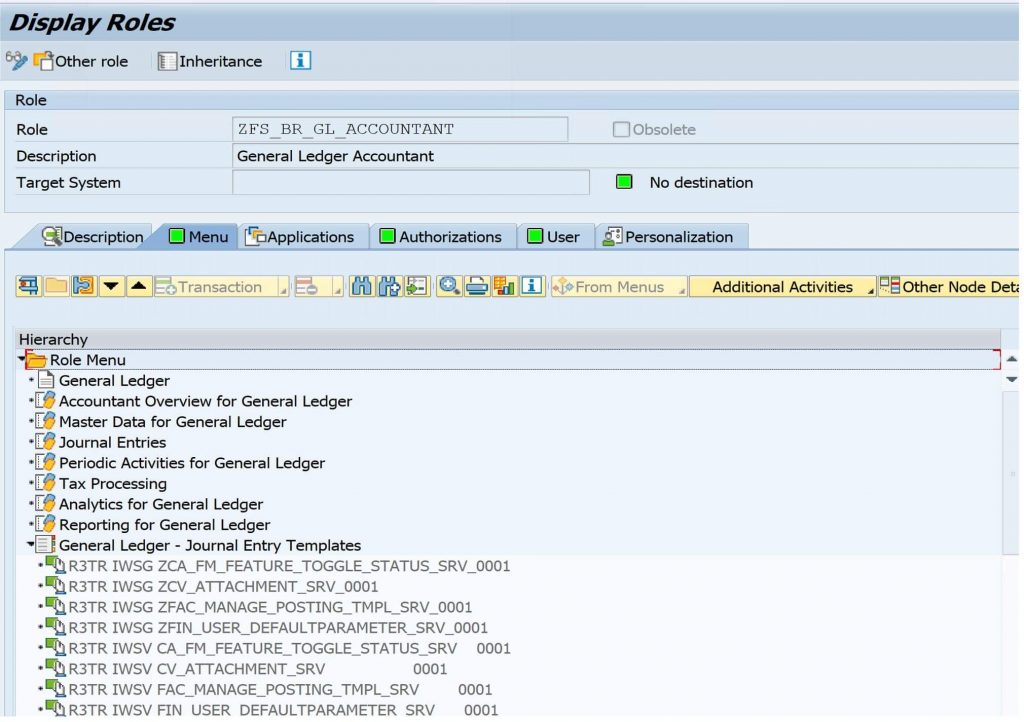
The role description highlights the role information, and all tabs are green. Expanding the tab >>Menu >> shows the Catalogs that have been activated with the desired IWSG/IWSV components which are needed for Tiles/Apps to function properly.
Checking the tab >> Authorization >> everything has been maintained and activated and S_SERVICE object is also seen as shown below:
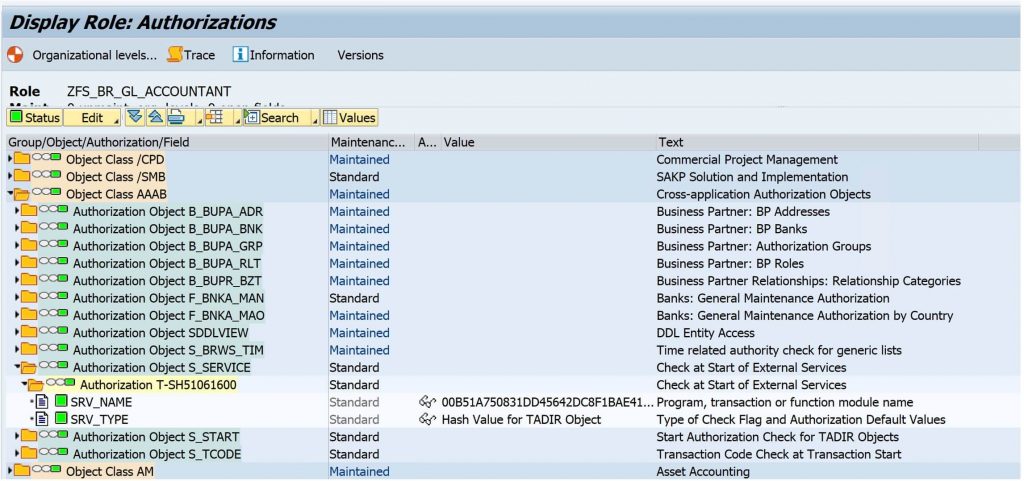
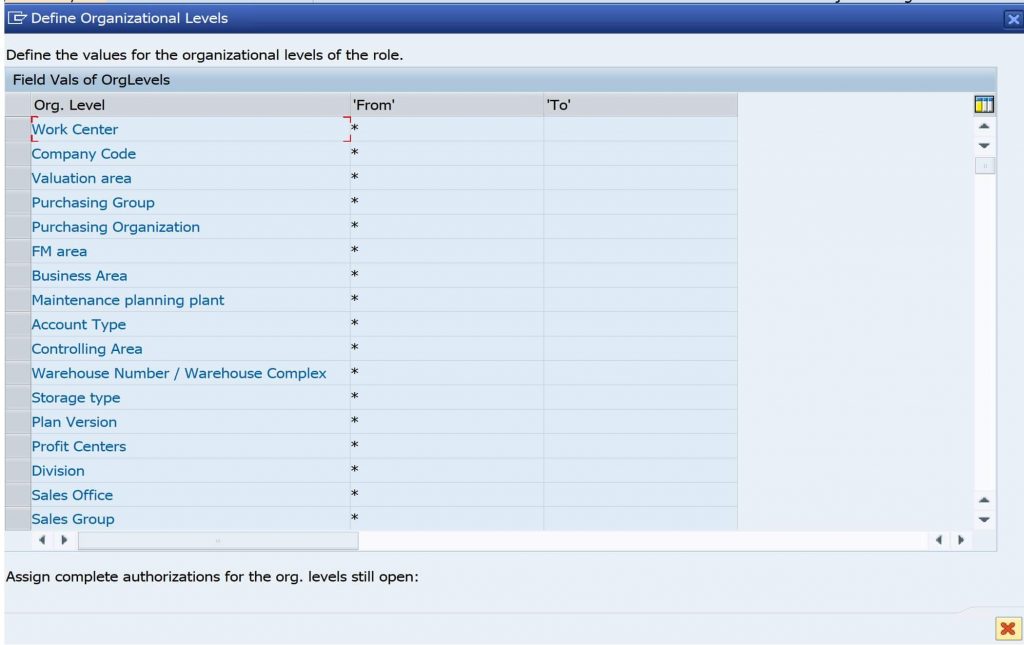
In the above screen any open value for any object has been maintained with * value. Select the option >> Organization levels ..>> the Org values are maintained * in the screen below:
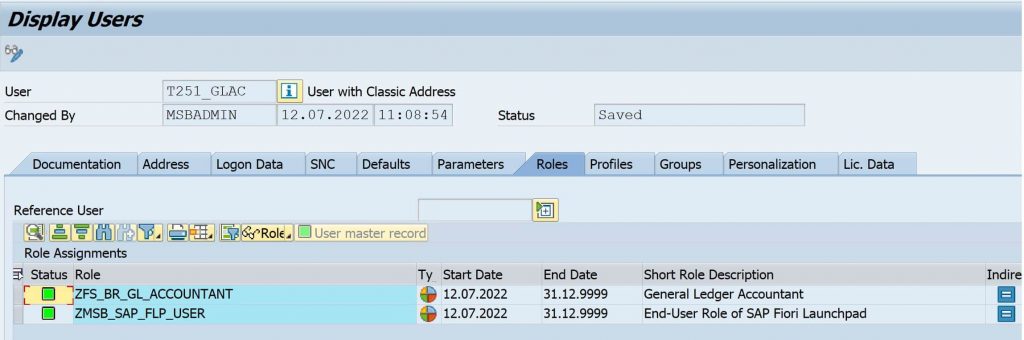
Now check for the user in the tab >> User >> it created the user.
Verify and validate the user has two roles assigned in T-Code: SU01.
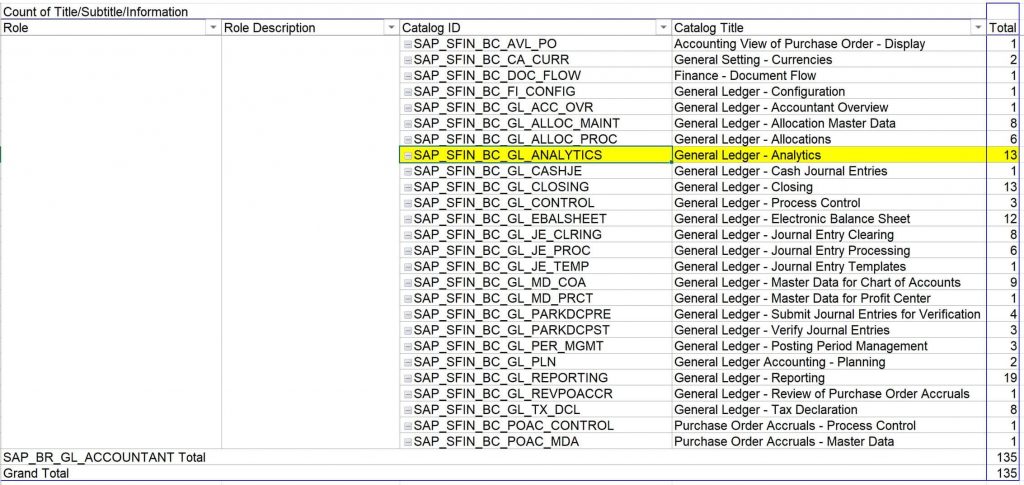
Now, log in as the test user T251_GLAC to check if the desired Catalog and Tiles show up using T-Code: /N/UI2/FLP and launching Fiori Launchpad
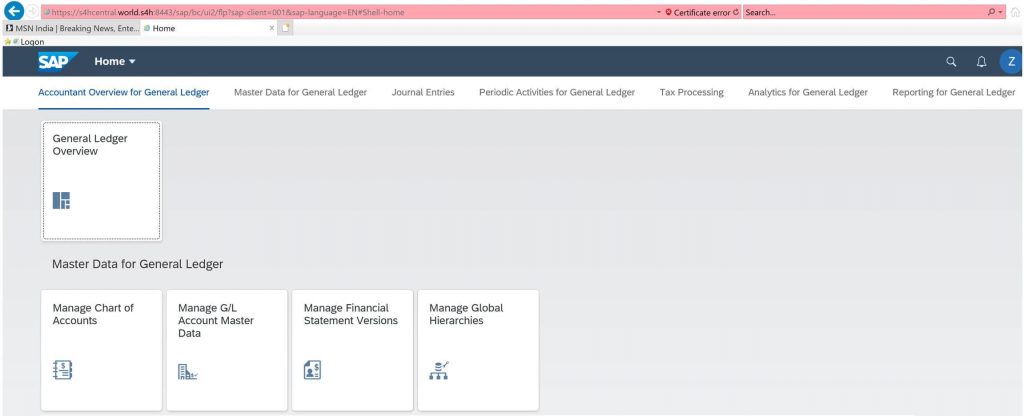
The Tiles/Apps are visible for the test user T251_GLAC. The role has 135 Tiles/Apps.
By Selecting >> APP Finder >> option, the user can see related Catalogs and associated Tiles/Apps.
Note:
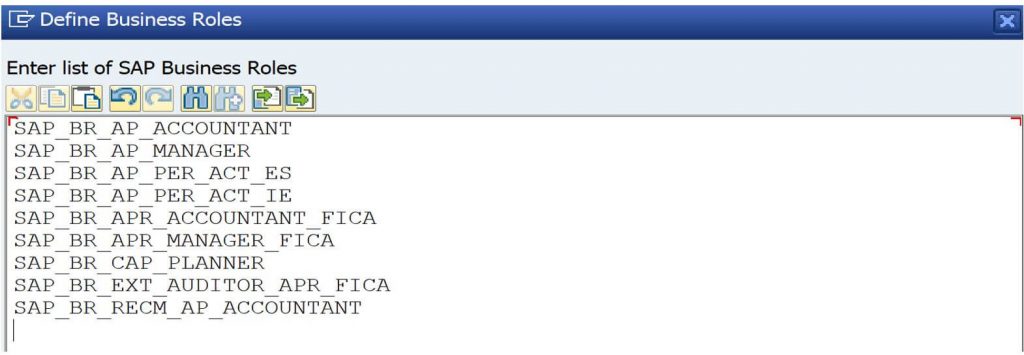
In our project we did club roles based on scope together to activate the roles. This is done by selecting the option >> FIORI Enter List of SAP Business Roles to be activated (Optional)>>. Here we can add as many roles needed by cutting and pasting and using the icon >>Upload from Clipboard>>.
The Final screen will look like below: