This is blog how to connect with SFDC via REST adapter using SFDC bulk API concept. (without BPM)
When to use Bulk API?
Bulk API is based on REST and is optimized for loading or deleting large sets of data. We can query, insert, update, upsert, or delete many records asynchronously by submitting batches. Salesforce processes batches in the background. Bulk API is designed to make it simple to process data from a few thousand to millions of records.
Objective:
In salesforce, there are multiple standard SFDC objects for example Contact, Account. The objective of this blog is to create a generic solution to integrate with SFDC API 1.0 through SAP PO. This generic solution can be used to call different-different SFDC objects. Only we need to change the structure corresponding to the SFDC object. We can use this approach to call any SFDC object (standard/custom) using the bulk API concept.
Record processing through Bulk API Calls: Steps are defined below:
- Create job
- Add batch to job
- Close job to start processing
- Retrieve Batch Result
Firstly, we will understand the concept using POSTMAN. Let’s see how to send required requests using the POSTMAN tool. Please note that in this example, I am going to use :
SFDC custom object: LOM_Tender__c (It’s a custom SFDC Object)
externalIdFieldName: Reference__c
Operation: upsert
1) Create a job: Create a job by sending a POST request to this URI. The request body identifies the type of object processed in all associated batches.
URI : /services/async/APIversion/job
Example XML request body:
<?xml version="1.0" encoding="utf-8"?>
<jobInfo xmlns="http://www.force.com/2009/06/asyncapi/dataload">
    <operation>upsert</operation>
    <object>LOM_Tender__c</object>
    <externalIdFieldName>Reference__c</externalIdFieldName>
    <contentType>XML</contentType>
</jobInfo>
In Request XML, XML field <Object> is SFDC object name.
externalIdFieldName is noting but a primary field in SFDC object.
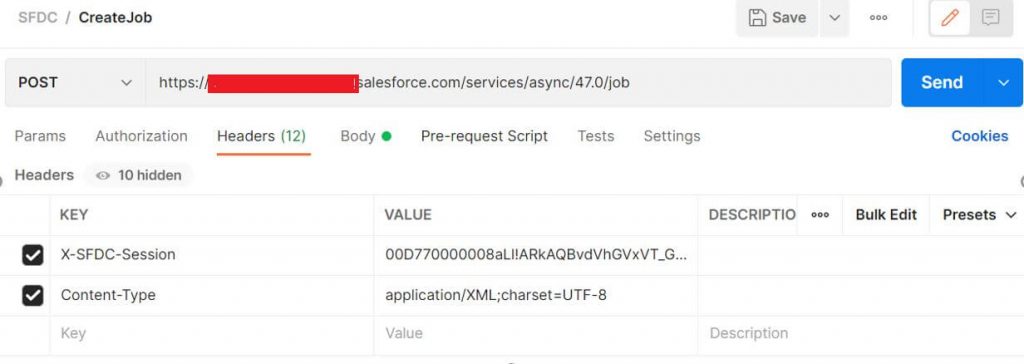
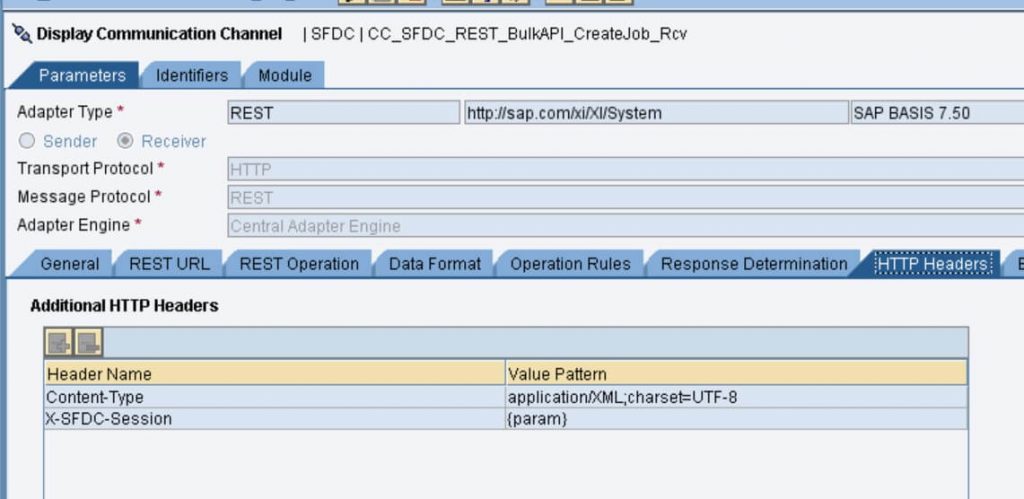
HTTP Header:
X-SFDC-Session: is an Access token which needs to be retrieved first using Login API. There are multiple blogs available on how to get session ID using SOAP call to SFDC.
ContentType: application/XML;charset=UTF-8
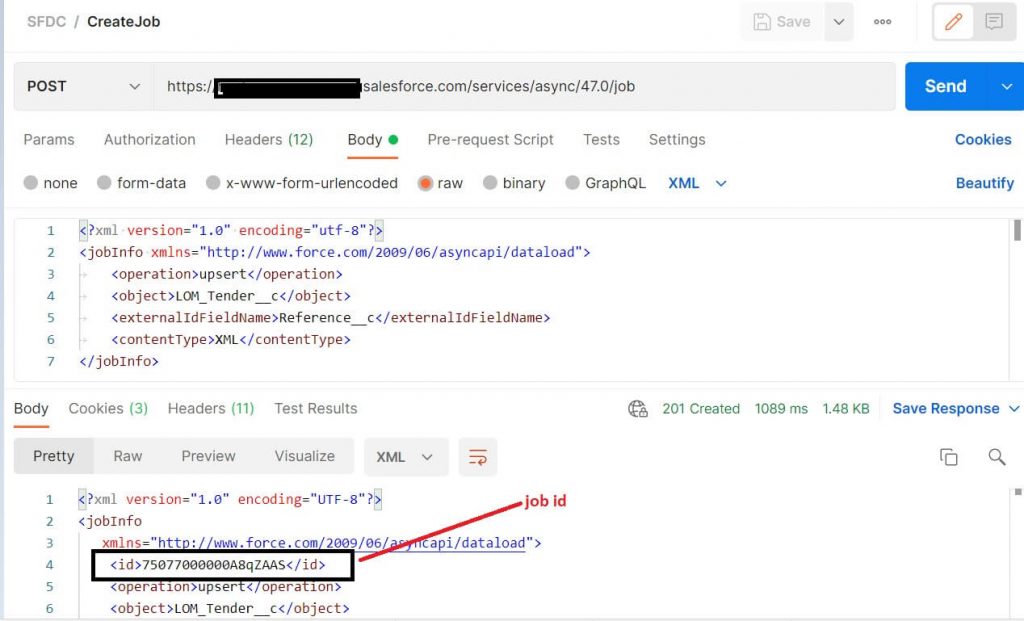
In Response, a job ID needs to be retrieved that would be passed as a query string in subsequent calls. In this case, Job Id is “75077000000A8qZAAS”
<?xml version="1.0" encoding="UTF-8"?>
<jobInfo
   xmlns="http://www.force.com/2009/06/asyncapi/dataload">
    <id>75077000000A8qZAAS</id>
    <operation>upsert</operation>
    <object>LOM_Tender__c</object>
    <createdById>005G0000002kHpQIAU</createdById>
    <createdDate>2021-12-30T05:05:31.000Z</createdDate>
    <systemModstamp>2021-12-30T05:05:31.000Z</systemModstamp>
    <state>Open</state>
    <externalIdFieldName>Reference__c</externalIdFieldName>
    <concurrencyMode>Parallel</concurrencyMode>
    <contentType>XML</contentType>
    <numberBatchesQueued>0</numberBatchesQueued>
    <numberBatchesInProgress>0</numberBatchesInProgress>
    <numberBatchesCompleted>0</numberBatchesCompleted>
    <numberBatchesFailed>0</numberBatchesFailed>
    <numberBatchesTotal>0</numberBatchesTotal>
    <numberRecordsProcessed>0</numberRecordsProcessed>
    <numberRetries>0</numberRetries>
    <apiVersion>47.0</apiVersion>
    <numberRecordsFailed>0</numberRecordsFailed>
    <totalProcessingTime>0</totalProcessingTime>
    <apiActiveProcessingTime>0</apiActiveProcessingTime>
    <apexProcessingTime>0</apexProcessingTime>
</jobInfo>
2) Add batch to job:
Add a new batch to a job by sending a POST request to this URI. The request body contains a list of records for processing. We need to pass Job ID in URL which is received in the previous call.
URI: /services/async/APIversion/job/jobid/batch
In Body, Actual data would be transferred to SFDC.

Header Parameters are the same as the previous request.
Request XML: In this step, we will upload the actual business data which needs to be processed. We can upload multiple records by repeating this step. The maximum limit of records is 10,000 with the bulk API concept.
<?xml version="1.0" encoding="UTF-8"?>
<ns1:sObjects xmlns:ns1="http://www.force.com/2009/06/asyncapi/dataload">
    <ns1:sObject>
        <ns1:Store_Count__c>527</ns1:Store_Count__c>
        <ns1:Store_Trans_Amount__c> 2736.55</ns1:Store_Trans_Amount__c>
        <ns1:Date__c>2013-06-22T00:00:00.000Z</ns1:Date__c>
        <ns1:Card_Type__c>Cash                </ns1:Card_Type__c>
        <ns1:Reference__c>31</ns1:Reference__c>
        <ns1:Retail_Location__r>
            <ns1:sObject>
                <ns1:Location_Number__c>2202</ns1:Location_Number__c>
            </ns1:sObject>
        </ns1:Retail_Location__r>
    </ns1:sObject>
    <ns1:sObject>
        <ns1:Store_Count__c>48</ns1:Store_Count__c>
        <ns1:Store_Trans_Amount__c> 1685.03</ns1:Store_Trans_Amount__c>
        <ns1:Date__c>2013-06-22T00:00:00.000Z</ns1:Date__c>
        <ns1:Card_Type__c>Master Card         </ns1:Card_Type__c>
        <ns1:Reference__c>332</ns1:Reference__c>
        <ns1:Retail_Location__r>
            <ns1:sObject>
                <ns1:Location_Number__c>2102</ns1:Location_Number__c>
            </ns1:sObject>
        </ns1:Retail_Location__r>
    </ns1:sObject>
</ns1:sObjects>
Here payload would get differ based on SFDC object name.
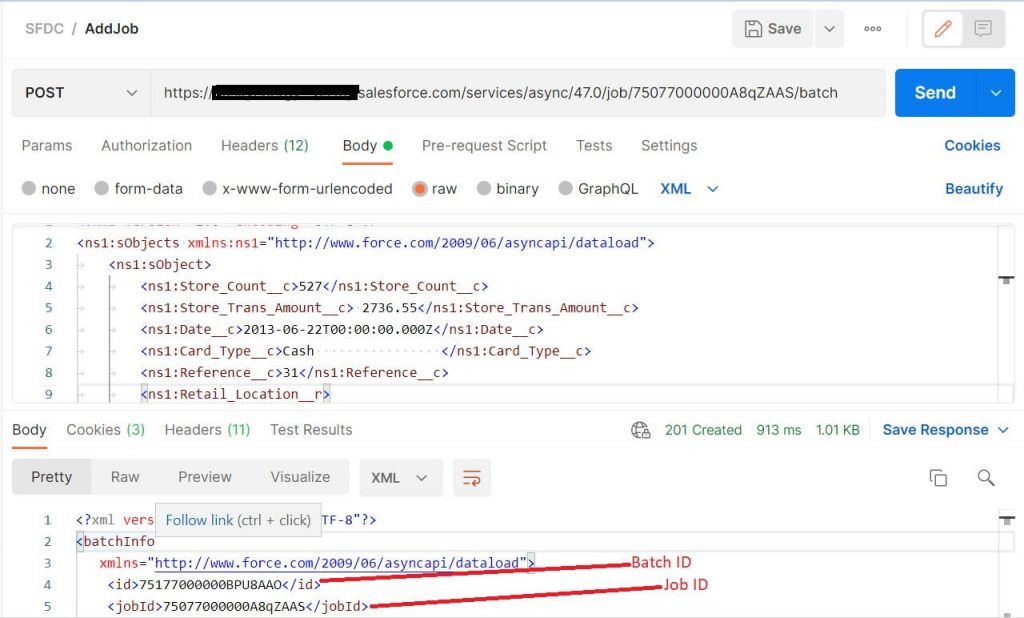
In Response, we will receive a job ID & Batch ID.
3) Close Job: Close a job by sending a POST request to this URI. Once the record is uploaded, we must close the job so that record processing will be started. This API request also informs Salesforce that no more batches will be submitted. To close the job, the below detail will be required.
URI : /services/async/APIversion/job/jobId
Header Parameters are the same as the previous request.
Request Payload:
<?xml version="1.0" encoding="UTF-8"?>
<ns0:jobInfo xmlns:ns0="http://www.force.com/2009/06/asyncapi/dataload">
    <ns0:state>Closed</ns0:state>
</ns0:jobInfo>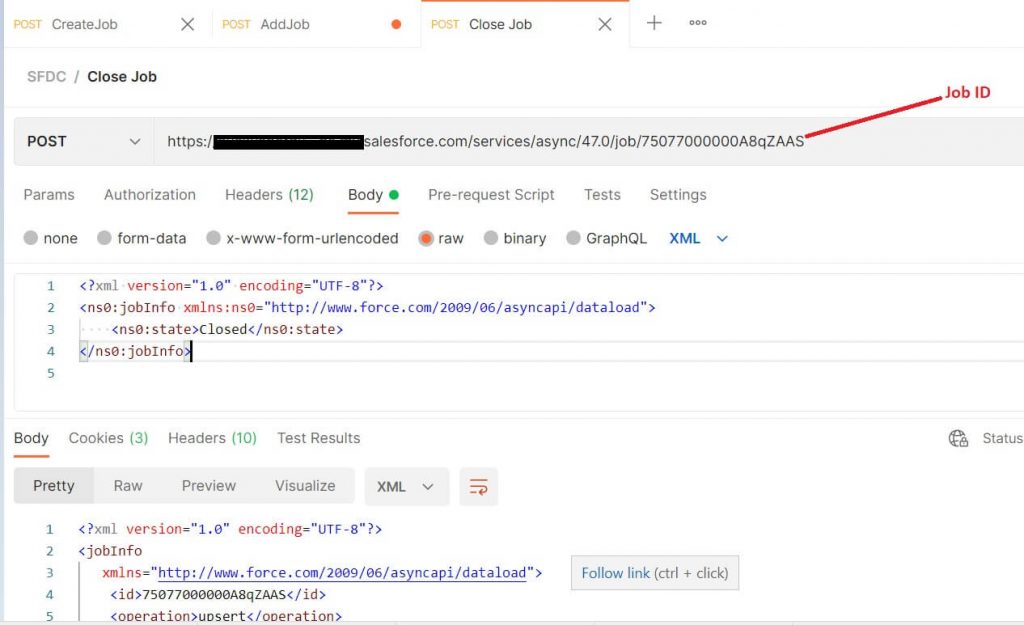
Response Payload:
<?xml version="1.0" encoding="UTF-8"?>
<jobInfo
   xmlns="http://www.force.com/2009/06/asyncapi/dataload">
    <id>75077000000A8qZAAS</id>
    <operation>upsert</operation>
    <object>LOM_Tender__c</object>
    <createdById>005G0000002kHpQIAU</createdById>
    <createdDate>2021-12-30T05:05:31.000Z</createdDate>
    <systemModstamp>2021-12-30T05:05:31.000Z</systemModstamp>
    <state>Closed</state>
    <externalIdFieldName>Reference__c</externalIdFieldName>
    <concurrencyMode>Parallel</concurrencyMode>
    <contentType>XML</contentType>
    <numberBatchesQueued>0</numberBatchesQueued>
    <numberBatchesInProgress>0</numberBatchesInProgress>
    <numberBatchesCompleted>1</numberBatchesCompleted>
    <numberBatchesFailed>0</numberBatchesFailed>
    <numberBatchesTotal>1</numberBatchesTotal>
    <numberRecordsProcessed>2</numberRecordsProcessed>
    <numberRetries>0</numberRetries>
    <apiVersion>47.0</apiVersion>
    <numberRecordsFailed>0</numberRecordsFailed>
    <totalProcessingTime>157</totalProcessingTime>
    <apiActiveProcessingTime>80</apiActiveProcessingTime>
    <apexProcessingTime>0</apexProcessingTime>
</jobInfo>
4) Retrieve Batch Results: When a batch is completed, you must retrieve the batch result to see the status of individual records.
HTTP Method: Get
URL: https://instance.salesforce.com/services/async/53.0/job/jobId/batch/batchId/result

Job id and batch id are part of URL.
jobId is the job ID that was returned when you created the job. batchId is the batch ID that was returned when you added a batch to the job. Here in this example, batch id is 75177000000BPU8AAO
In response, if the XML field <Success>is true, that means the record is successfully processed on the SFDC side. In case of error, the value would be false.
Now we will see how to design this concept in SAP PO using a REST adapter.
High-level Diagram: This is a high-level design that will be implemented in SAP PO. In this requirement, SFDC sends back the response to Sender to let it know the status of each record.
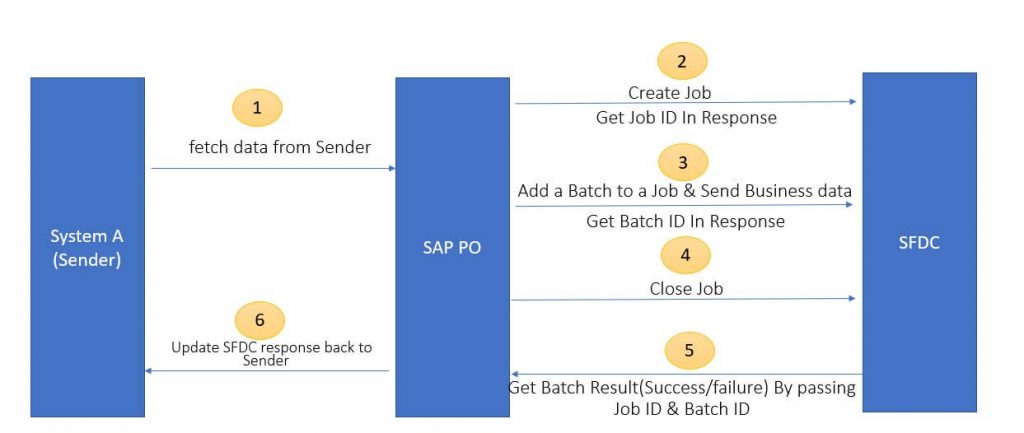
In SAP PO, we will implement this scenario using 4 different ICOs which will be called one after one using the Async-Sync bridge. (Using Module Request Response Bean and Response One way bean). Let’s move to interface designing in SAP PO.
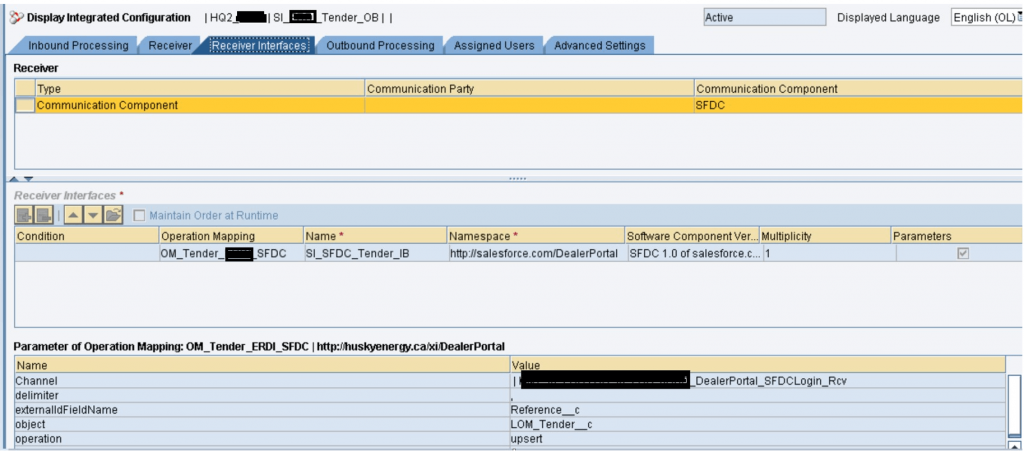
1. First ICO: System A (Sender) to SFDC :
This first ICO will do the below tasks:
- Firstly, it will get data from Sender.
- Lookup to login API to get Session ID which needs to be transferred in subsequent calls to SFDC as part of HTTP header.
- Create Target SFDC Structure
- Create a job again via Lookup to SFDC. (Create Job API call)
- Will send business data to SFDC which is received from the Sender side. (Add batch to job API call)
- Receive Data from Sender: Firstly we receive data from Sender which is actual business data via any method (JDBC/SOAP/REST). Data can be fetched via any transport protocol.
- Retrieve Session ID: Once it is received in SAP PO, we will first call Login API via SOAP lookup. There are multiple blogs available already on how to call Login API via lookup.
Operation Mapping: Here in Operation mapping, we have one Message mapping and then Java mapping to be executed.
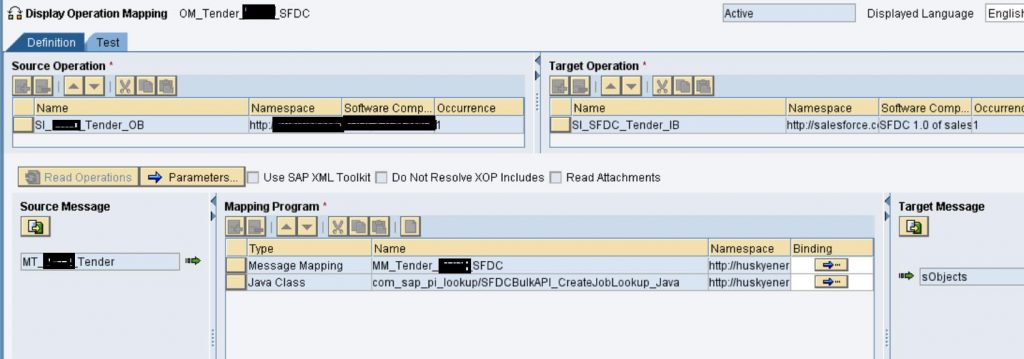
Message Mapping: Here we create a Target SFDC structure based on the SFDC object.

On root element sObjects, we have SOAP lookup
SOAP lookup java code to retrieve Session ID:
AbstractTrace trace = container.getTrace();
String sessionId = "";
String serverUrl = "";
try {
	//instance the channel to invoke the service.
	Channel channel = LookupService.getChannel("SFDC","CC_SFDC_SOAP_Login_Rcv");
	SystemAccessor accessor = null;
	accessor = LookupService.getSystemAccessor(channel);
	// The Request message in XML. THIS IS THE LOOKUP SERVICE

	String loginxml = "<login xmlns=\"urn:enterprise.soap.sforce.com\"> <username>"
	+ UserName
	+ "</username> <password>"
	+ Pass
	+ "</password> </login>";

	InputStream inputStream = new ByteArrayInputStream(loginxml.getBytes());
	Payload payload = LookupService.getXmlPayload(inputStream);
	Payload SOAPOutPayload = null;

	//The response will be a Payload. Parse this to get the response field out.
	SOAPOutPayload = accessor.call(payload);

	/* Parse the SOAPPayload to get the SOAP Response back */
	InputStream inp = SOAPOutPayload.getContent();

	/* Create DOM structure from input XML */
	DocumentBuilderFactory factory = DocumentBuilderFactory.newInstance();
	DocumentBuilder builder = factory.newDocumentBuilder();
	Document document = builder.parse(inp);
	//Node node=null;
	NodeList list = document.getElementsByTagName("serverUrl");
	NodeList list2 = document.getElementsByTagName("sessionId");

	//NodeList list = document.getChildNodes();
	int len=list.getLength();
	//String sessionId="";
	for(int i=0;i<len;i++)
	{
		Node     node = list.item(i);
		Node node2=list2.item(i);
		if (node != null && node2 != null)
		{

			node = node.getFirstChild();
			node2= node2.getFirstChild();
			if (node != null && node2 != null)
			{
				serverUrl = node.getNodeValue();
				sessionId = node2.getNodeValue();
			}
		}
	}
}

catch(Exception e)
{e.printStackTrace();}
return (sessionId) ;
Once session ID is received, set it to one of the Header attribute using Dynamic Configuration:

UDF Code to set attribute “sessionID”:
String NameSpace = "http://sap.com/xi/XI/System/REST" ;
DynamicConfiguration conf = (DynamicConfiguration) container.getTransformationParameters().get(StreamTransformationConstants.DYNAMIC_CONFIGURATION);
DynamicConfigurationKey key  = DynamicConfigurationKey.create( NameSpace, "sessionID");
conf.put(key,sessionID);
return sessionID;
Now Session is set to one of Dynamic config attribute.
- Create Target Structure:
With simple Message Mapping, we can pass source data to the target. However In target structure, if you compare the target structure which is shown above in the 2nd API call (Add batch to a Job), we created one extra segment with a name (“AdditionalSegment”) that is actually not a part of the SFDC object.
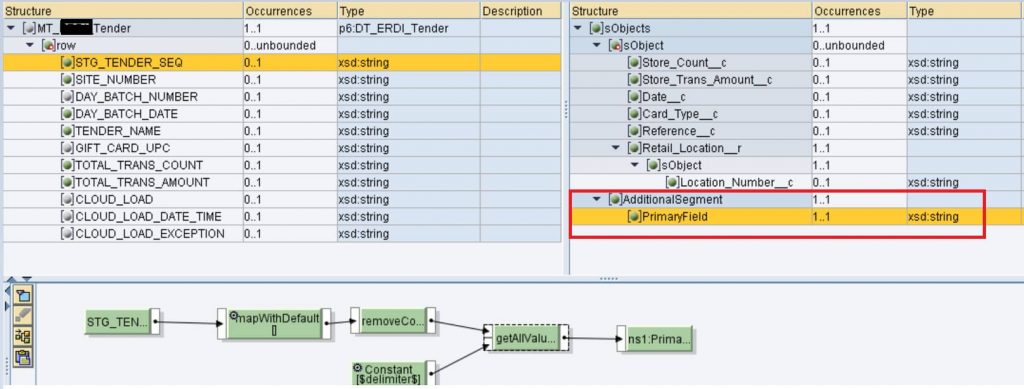
Question: Why “AdditionalSegment” is required?
Answer: Here in this requirement, we are supposed to send the status of each record to the sender system whether that particular record is successfully processed to SFDC or not.
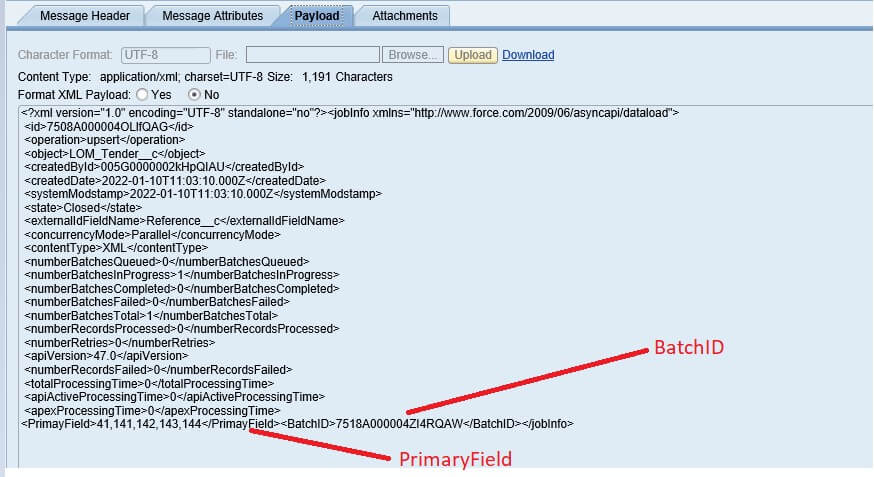
However, when we make the last call to SFDC (Retrieve Batch Results API), There is no primary field returned by SFDC based on which SAP PO needs to update the status on the sender side.
The primary field on the sender side is STG_TENDER_SEQ. This is mapped to Reference__c on SFDC side which is externalIdFieldName(primary field in SFDC object)
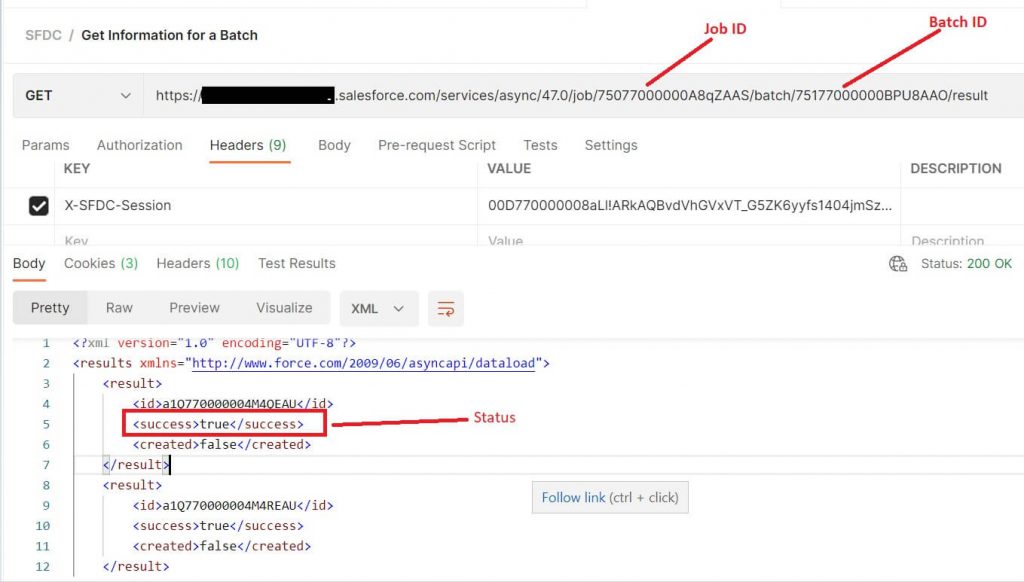
As per the above screenshot, the status of each record (<Success>) is present in the API response. Field “Success” is a flag that has the possible value true & false. It provides us information that whether a record is successfully processed or not using flag true/false. However, there is no primary field or external ID field name returned in each record to know which record belongs to which primary field record.
As per Salesforce documentation:
Results are returned in the same order as the records in the batch request. It’s important to track the record number so that SAP PO can identify the associated success/failed record in the batch request If the Success field is false, the row wasn’t processed successfully. Otherwise, the record was processed successfully.
Reference link :
So to solve this, we can create a field with the name “PrimaryField” in which we can keep a track of primary field values separated by a delimiter.
Value of “PrimaryField“ would be transferred to the next ICO using GetPayloadValueBean & PutPayloadValueBean modules.
Once the value is transferred, we will remove this extra segment before passing it to SFDC using the Custom module.
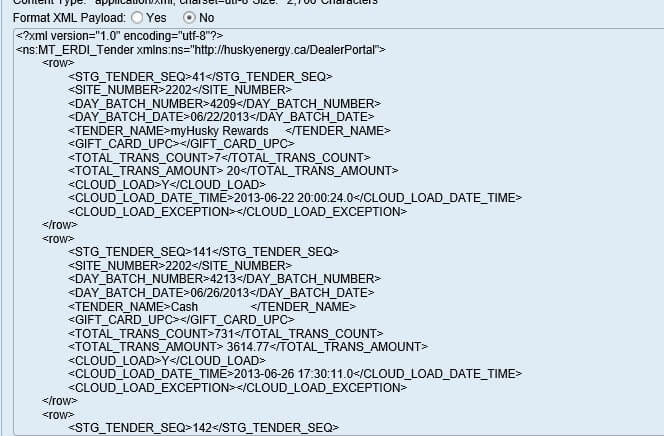
After Mapping Payload:
<?xml version="1.0" encoding="UTF-8"?>
<ns1:sObjects xmlns:ns1="http://www.force.com/2009/06/asyncapi/dataload">
    <ns1:sObject>
        <ns1:Store_Count__c>7</ns1:Store_Count__c>
        <ns1:Store_Trans_Amount__c> 20</ns1:Store_Trans_Amount__c>
        <ns1:Date__c>2013-06-22T00:00:00.000Z</ns1:Date__c>
        <ns1:Card_Type__c>myHusky Rewards     </ns1:Card_Type__c>
        <ns1:Reference__c>41</ns1:Reference__c>
        <ns1:Retail_Location__r>
            <ns1:sObject>
                <ns1:Location_Number__c>2202</ns1:Location_Number__c>
            </ns1:sObject>
        </ns1:Retail_Location__r>
    </ns1:sObject>
    <ns1:sObject>
        <ns1:Store_Count__c>731</ns1:Store_Count__c>
        <ns1:Store_Trans_Amount__c> 3614.77</ns1:Store_Trans_Amount__c>
        <ns1:Date__c>2013-06-26T00:00:00.000Z</ns1:Date__c>
        <ns1:Card_Type__c>Cash                </ns1:Card_Type__c>
        <ns1:Reference__c>141</ns1:Reference__c>
        <ns1:Retail_Location__r>
            <ns1:sObject>
                <ns1:Location_Number__c>2202</ns1:Location_Number__c>
            </ns1:sObject>
        </ns1:Retail_Location__r>
    </ns1:sObject>
    <ns1:sObject>
        <ns1:Store_Count__c>57</ns1:Store_Count__c>
        <ns1:Store_Trans_Amount__c> 2022.9</ns1:Store_Trans_Amount__c>
        <ns1:Date__c>2013-06-26T00:00:00.000Z</ns1:Date__c>
        <ns1:Card_Type__c>Master Card         </ns1:Card_Type__c>
        <ns1:Reference__c>142</ns1:Reference__c>
        <ns1:Retail_Location__r>
            <ns1:sObject>
                <ns1:Location_Number__c>2202</ns1:Location_Number__c>
            </ns1:sObject>
        </ns1:Retail_Location__r>
    </ns1:sObject>
    <ns1:sObject>
        <ns1:Store_Count__c>108</ns1:Store_Count__c>
        <ns1:Store_Trans_Amount__c> 4249.31</ns1:Store_Trans_Amount__c>
        <ns1:Date__c>2013-06-26T00:00:00.000Z</ns1:Date__c>
        <ns1:Card_Type__c>Visa                </ns1:Card_Type__c>
        <ns1:Reference__c>143</ns1:Reference__c>
        <ns1:Retail_Location__r>
            <ns1:sObject>
                <ns1:Location_Number__c>2202</ns1:Location_Number__c>
            </ns1:sObject>
        </ns1:Retail_Location__r>
    </ns1:sObject>
    <ns1:sObject>
        <ns1:Store_Count__c>9</ns1:Store_Count__c>
        <ns1:Store_Trans_Amount__c> 514.52</ns1:Store_Trans_Amount__c>
        <ns1:Date__c>2013-06-26T00:00:00.000Z</ns1:Date__c>
        <ns1:Card_Type__c>American Express    </ns1:Card_Type__c>
        <ns1:Reference__c>144</ns1:Reference__c>
        <ns1:Retail_Location__r>
            <ns1:sObject>
                <ns1:Location_Number__c>2202</ns1:Location_Number__c>
            </ns1:sObject>
        </ns1:Retail_Location__r>
    </ns1:sObject>
    <ns1:AdditionalSegment>
        <ns1:PrimaryField>41,141,142,143,144</ns1:PrimaryField>
    </ns1:AdditionalSegment>
</ns1:sObjects>
As above after mapping payload, the Primary field contains Primary field (Reference__) values separated by a comma.
- Create a job via Lookup to SFDC and capture JobID. (Create Job API call)
In this step, we call Create Job API to SFDC.
Below is java mapping which is used to call Create Job API:
Java Mapping read parameters from the ID part as below.
It calls Lookup Channel which makes SFDC call. In return, once we receive a response from SFDC (Create Job API response), it extracts JobID and puts this value to ASMA attribute jobID to pass it to subsequent calls.
Java Class: SFDCBulkAPI_CreateJobLookup
import java.io.*;
import javax.xml.parsers.*;
import org.w3c.dom.*;
import com.sap.aii.mapping.api.*;
import com.sap.aii.mapping.lookup.Channel;
import com.sap.aii.mapping.lookup.LookupService;
import com.sap.aii.mapping.lookup.Payload;
import com.sap.aii.mapping.lookup.SystemAccessor;

public class SFDCBulkAPI_CreateJobLookup_Java extends AbstractTransformation  {

	public void transform(TransformationInput InputObj, TransformationOutput OutputObj)
	{
		try{

		// Reading Session ID
		DynamicConfiguration conf= InputObj.getDynamicConfiguration();
		String NameSpace = "http://sap.com/xi/XI/System/REST" ;
		DynamicConfigurationKey key_sessionID  = DynamicConfigurationKey.create( NameSpace, "sessionID");
		String sessionID = conf.get(key_sessionID);

		DynamicConfigurationKey key_jobID  = DynamicConfigurationKey.create( NameSpace, "jobID");

		InputStream in = InputObj.getInputPayload().getInputStream();

		//Reading ICO Parameters
		String operation = InputObj.getInputParameters().getString("operation");
		String object = InputObj.getInputParameters().getString("object");
		String externalIdFieldName = InputObj.getInputParameters().getString("externalIdFieldName");

		OutputStream out = OutputObj.getOutputPayload().getOutputStream();
		execute(in , out, operation, object, externalIdFieldName, conf, key_jobID, sessionID);
		}
		catch(Exception e)
		{
			System.out.println(e);
		}
	}
	void execute(InputStream in , OutputStream out, String operation, String object, String externalIdFieldName, DynamicConfiguration conf, DynamicConfigurationKey key_jobID,  String sessionID)
	{
		try{

		// Craete Target Structue
		String requestPayload = "<?xml version=\"1.0\" encoding=\"utf-8\"?><jobInfo xmlns=\"http://www.force.com/2009/06/asyncapi/dataload\"><operation>"
		+ operation + "</operation><object>" + object + "</object><externalIdFieldName>" + externalIdFieldName + "</externalIdFieldName>"
		+ "<contentType>XML</contentType><sessionID>" + sessionID + "</sessionID></jobInfo>";

		String jobID = "";
		  //perform the rest look up
		  Channel channel = LookupService.getChannel("SFDC","CC_SFDC_REST_BulkAPI_CreateJob_Rcv");
		  SystemAccessor accessor = null;
		  accessor = LookupService.getSystemAccessor(channel);

		  InputStream inputStream = new ByteArrayInputStream(requestPayload.getBytes());
		  Payload payload = LookupService.getXmlPayload(inputStream);
		  Payload SOAPOutPayload = null;
		 SOAPOutPayload = accessor.call(payload);

		 // Retrieving Job ID using DOM Pareser
		  InputStream inp = SOAPOutPayload.getContent();
		 DocumentBuilderFactory factory = DocumentBuilderFactory.newInstance();
		  DocumentBuilder builder = factory.newDocumentBuilder();
		  Document document = builder.parse(inp);
		  NodeList nl_jobID = document.getElementsByTagName("id");
		  Node node = nl_jobID.item(0);
		if (node != null)
		  {
		  node = node.getFirstChild();
		  if (node != null)
		  {
			 jobID = node.getNodeValue();
		  }

		 // Setting Dynamic attribute with Job ID
		conf.put(key_jobID, jobID);
		  }
		 copypayload(in, out);
		}
		catch (Exception e)
		{
		  e.printStackTrace();
		}

	}
	// Copy Payload
	void copypayload(InputStream in , OutputStream out )
	{
		try{
		int size = in.available();
		byte buffer[] = new byte[size];
		in.read(buffer);
		out.write(buffer);
		}
		catch(Exception e)
		{
		}
	}
}
Please note that in the above java mapping, the Payload structure which is created has one extra field with the name “sessionID” as below. We will see in the next step why it is created.
Output structure from Java mapping :
<?xml version="1.0" encoding="utf-8"?>
<jobInfo xmlns="http://www.force.com/2009/06/asyncapi/dataload">
<operation>upsert</operation>
<object>LOM_Tender__c</object>
<externalIdFieldName>Reference__c</externalIdFieldName>
<contentType>XML</contentType>
<sessionID>00D770000008aLl!ARkAQBvdVhGVxVT_G5ZK6yyfs1404jmSzfh8HMyo5MOtP<sessionID>
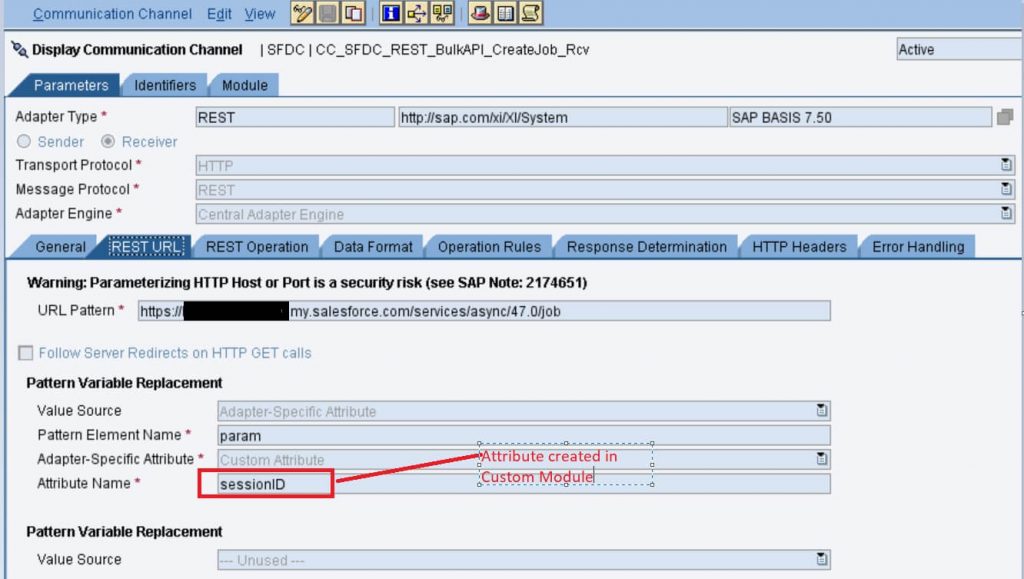
</jobInfo>After this java mapping, there is one custom module written with the name SetSFDCSessionIDHeader.
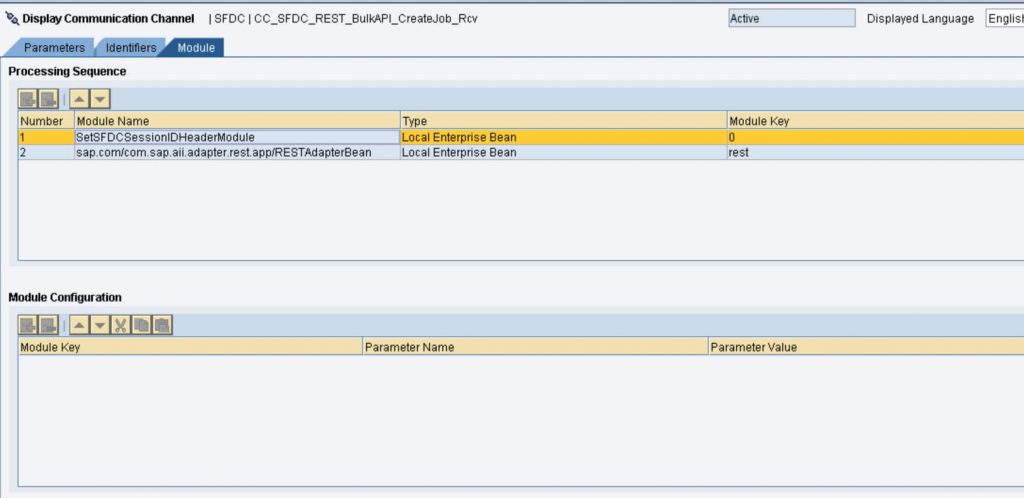
Question: Why custom module SetSFDCSessionIDHeader is required?
Answer: This module is written to get the sessionId value from the payload (created above in Java mapping) and set it as HTTP header while doing a lookup to SFDC.
While doing the lookup, I didn’t find any way to pass the ASMA attribute(sessionID) as HTTP header to the lookup channel. To solve this, the SessionID field which is created in java mapping, would be passed to the custom module. In the custom module, SessionID field value would be used to create ASMA attribute and that would be used in the lookup channel to set it as HTTP header.
Module : SetSFDCSessionIDHeader
import java.io.*;
import javax.xml.parsers.DocumentBuilder;
import javax.xml.parsers.DocumentBuilderFactory;
import javax.xml.transform.Transformer;
import javax.xml.transform.TransformerFactory;
import javax.xml.transform.dom.DOMSource;
import javax.xml.transform.stream.StreamResult;
import org.w3c.dom.Document;
import org.w3c.dom.Element;
import org.w3c.dom.NodeList;
import javax.ejb.Local;
import javax.ejb.LocalHome;
import javax.ejb.Remote;
import javax.ejb.RemoteHome;
import javax.ejb.Stateless;
import com.sap.aii.af.lib.mp.module.Module;
import com.sap.aii.af.lib.mp.module.ModuleContext;
import com.sap.aii.af.lib.mp.module.ModuleData;
import com.sap.aii.af.lib.mp.module.ModuleException;
import com.sap.engine.interfaces.messaging.api.Message;
import com.sap.engine.interfaces.messaging.api.MessageKey;
import com.sap.engine.interfaces.messaging.api.MessagePropertyKey;
import com.sap.engine.interfaces.messaging.api.Payload;
import com.sap.engine.interfaces.messaging.api.PublicAPIAccessFactory;
import com.sap.engine.interfaces.messaging.api.XMLPayload;
import com.sap.engine.interfaces.messaging.api.auditlog.AuditAccess;
import com.sap.engine.interfaces.messaging.api.auditlog.AuditLogStatus;

@Stateless(name="SetSFDCSessionIDHeaderModule")
@LocalHome(value=com.sap.aii.af.lib.mp.module.ModuleLocalHome.class)
@Local(com.sap.aii.af.lib.mp.module.ModuleLocal.class)

public class SetSFDCSessionIDHeader implements Module {

private AuditAccess audit;
@SuppressWarnings("deprecation")
MessagePropertyKey messagepropertykey;

public ModuleData process(ModuleContext moduleContext, ModuleData inputModuleData) throws ModuleException
{
try{
audit = PublicAPIAccessFactory.getPublicAPIAccess().getAuditAccess();
String CLASS_NAME = getClass().getSimpleName();
Message msg = (Message) inputModuleData.getPrincipalData();
MessageKey key = new MessageKey(msg.getMessageId(), msg.getMessageDirection());
audit.addAuditLogEntry(key, AuditLogStatus.SUCCESS, CLASS_NAME + ": SetSFDCSessionIDHeader Module Called");

messagepropertykey = new MessagePropertyKey("sessionID" , "http://sap.com/xi/XI/System/REST");

// Reading payload values created using Java mapping
Payload payload = msg.getDocument();
byte [] bytePayload = payload.getContent();
   String stringPayload = new String(bytePayload);
   InputStream  in = new ByteArrayInputStream(stringPayload.getBytes());
   DocumentBuilderFactory dbFactory = DocumentBuilderFactory.newInstance();
   DocumentBuilder documentbuilder = dbFactory.newDocumentBuilder();
   Document doc = documentbuilder.parse(in);

   NodeList nl_operation = doc.getElementsByTagName("operation");
   NodeList nl_object = doc.getElementsByTagName("object");
   NodeList nl_externalIdFieldName = doc.getElementsByTagName("externalIdFieldName");
   NodeList nl_sessionID = doc.getElementsByTagName("sessionID");

   String operation = nl_operation.item(0).getFirstChild().getNodeValue();
   String object = nl_object.item(0).getFirstChild().getNodeValue();
   String externalIdFieldName = nl_externalIdFieldName.item(0).getFirstChild().getNodeValue();
   String sessionID = nl_sessionID.item(0).getFirstChild().getNodeValue();

   //Setting SessionID ASMA attribute, would be used in Lookup channel to pass this value in HTTP Header
   msg.setMessageProperty(messagepropertykey, sessionID);
   audit.addAuditLogEntry(key, AuditLogStatus.SUCCESS, CLASS_NAME + ": Setting ASMA sessionID:" +sessionID );

   //creating Payload required for Create Job API
   String outputPayload = "<?xml version=\"1.0\" encoding=\"utf-8\"?><jobInfo xmlns=\"http://www.force.com/2009/06/asyncapi/dataload\"><operation>" + operation + "</operation><object>" + object + "</object><externalIdFieldName>" + externalIdFieldName + "</externalIdFieldName><contentType>XML</contentType></jobInfo>";
   audit.addAuditLogEntry(key, AuditLogStatus.SUCCESS, CLASS_NAME + ": Calling end Point:" +outputPayload );
   payload.setContent(outputPayload.getBytes());
   msg.setDocument((XMLPayload) payload);

   inputModuleData.setPrincipalData(msg);
   audit.addAuditLogEntry(key, AuditLogStatus.SUCCESS, "Module executed successfully");
   return inputModuleData;
}
catch (Exception e) {
throw new ModuleException(e.getClass() + ": " + e.getMessage());
}
}
}
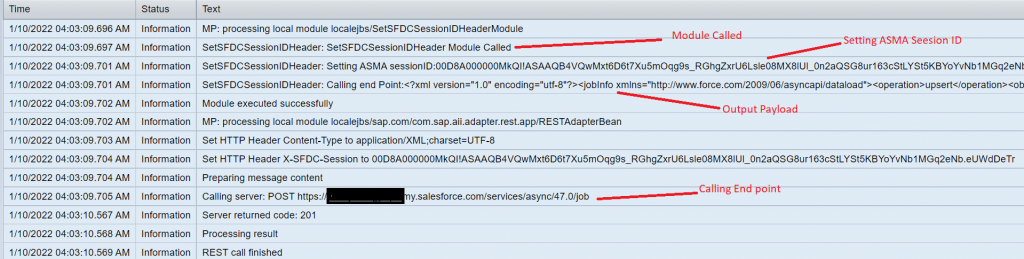
So CreateJob call is successful to SFDC and in return, we receive JobID which passed as ASMA attribute (via Java class SFDCBulkAPI_CreateJobLookup_Java ) to make our next call on the receiver channel.
Message Attribute after Mapping: It has JobID and sessionID values.

- Send Output Payload to SFDC (via Add batch to job API call) :
In the above step, an output payload is created which needs to be passed to SFDC. Along with payload, SeesionID needs to be passed as HTTP header and Jobid would be part of the URL.
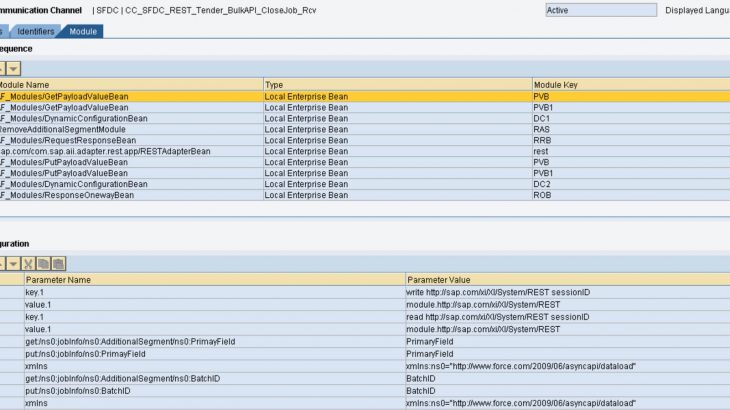
Module Parameter: In the Receiver channel, there is a sequence of module parameters.

AF_Modules/GetPayloadValueBean: In Output payload, There is one extra segment with name “AdditionalSegment” which has XML field “PrimaryField”. It contains a sequence of Primary field values.

Using the GetPayloadValueBean module, a parameter called PrimaryField is created which holds the value of XML field “PrimaryField”. This is a parameter value that is nothing but a full XML path to the corresponding XML field.
“get:/ns1:sObjects/ns1:AdditionalSegment/ns1:PrimaryField”
We will use PutPayloadValueBean to use this parameter in order to pass this parameter value to our next flow.
AF_Modules/DynamicConfigurationBean: Dynamic Configuration Bean module is used to pass the value of SessionID to our next flow.
RemoveAdditionalSegmentModule: Output payload which is created in the above step has one extra segment with the name “AdditionalSegment” which is not at all required by SFDC. (Add batch to job call). This extra segment was created just to hold the values of the Primary field and pass it to the next ICO. So now the Primary field value is already being held by parameter using GetPayloadValueBean, so we are good to remove this additional segment now.
So there is one custom module written to remove additional segment:
RemoveAdditionalSegmentModule :
package com.sap.pi;
import java.io.*;
import javax.xml.parsers.DocumentBuilder;
import javax.xml.parsers.DocumentBuilderFactory;
import javax.xml.transform.Transformer;
import javax.xml.transform.TransformerFactory;
import javax.xml.transform.dom.DOMSource;
import javax.xml.transform.stream.StreamResult;
import org.w3c.dom.Document;
import org.w3c.dom.Element;
import org.w3c.dom.NodeList;
import javax.ejb.Local;
import javax.ejb.LocalHome;
import javax.ejb.Remote;
import javax.ejb.RemoteHome;
import javax.ejb.Stateless;
import com.sap.aii.af.lib.mp.module.Module;
import com.sap.aii.af.lib.mp.module.ModuleContext;
import com.sap.aii.af.lib.mp.module.ModuleData;
import com.sap.aii.af.lib.mp.module.ModuleException;
import com.sap.engine.interfaces.messaging.api.Message;
import com.sap.engine.interfaces.messaging.api.MessageKey;
import com.sap.engine.interfaces.messaging.api.MessagePropertyKey;
import com.sap.engine.interfaces.messaging.api.Payload;
import com.sap.engine.interfaces.messaging.api.PublicAPIAccessFactory;
import com.sap.engine.interfaces.messaging.api.XMLPayload;
import com.sap.engine.interfaces.messaging.api.auditlog.AuditAccess;
import com.sap.engine.interfaces.messaging.api.auditlog.AuditLogStatus;

@Stateless(name="RemoveAdditionalSegmentModule")
@LocalHome(value=com.sap.aii.af.lib.mp.module.ModuleLocalHome.class)
@Local(com.sap.aii.af.lib.mp.module.ModuleLocal.class)

public class RemoveAdditionalSegment implements Module{

private AuditAccess audit;
@SuppressWarnings("deprecation")
MessagePropertyKey messagepropertykey;
public ModuleData process(ModuleContext moduleContext, ModuleData inputModuleData) throws ModuleException
{
try{
audit = PublicAPIAccessFactory.getPublicAPIAccess().getAuditAccess();
String CLASS_NAME = getClass().getSimpleName();
Message msg = (Message) inputModuleData.getPrincipalData();
MessageKey key = new MessageKey(msg.getMessageId(), msg.getMessageDirection());
audit.addAuditLogEntry(key, AuditLogStatus.SUCCESS, CLASS_NAME + ": RemoveAdditionalSegmentModule Module Called");

//Reading Module Parameters "SegmentName" which needs to be removed from payload
String SegmentName = moduleContext.getContextData("SegmentName");

Payload payload = msg.getDocument();
InputStream in = (InputStream)payload.getInputStream();
DocumentBuilderFactory documentbuilderfactory = DocumentBuilderFactory.newInstance();
documentbuilderfactory.setNamespaceAware(true);
DocumentBuilder documentbuilder = documentbuilderfactory.newDocumentBuilder();
Document document  = documentbuilder.parse(in);
document.normalize();
Element element  = document.getDocumentElement();
Element additional_element = (Element)document.getElementsByTagName(SegmentName).item(0);
audit.addAuditLogEntry(key, AuditLogStatus.SUCCESS, "Removing additional element: "+SegmentName );
//Removing Additional segment
element.removeChild(additional_element);
document.normalize();

//After removing extra segment, passing remaining payload.
ByteArrayOutputStream byteArrayOutputStream = new ByteArrayOutputStream();
   TransformerFactory.newInstance().newTransformer().transform(new DOMSource(document), new StreamResult(byteArrayOutputStream));
   byte[] bytes = byteArrayOutputStream.toByteArray();
   payload.setContent(bytes);
   msg.setDocument((XMLPayload) payload);
   inputModuleData.setPrincipalData(msg);
   audit.addAuditLogEntry(key, AuditLogStatus.SUCCESS, "RemoveAdditionalSegmentModule executed successfully");
   return inputModuleData;
}
catch (Exception e) {
throw new ModuleException(e.getClass() + ": " + e.getMessage());
}
}
}
AF_Modules/RequestResponseBean: This module is used to make async/sync bridge.
AF_Modules/PutPayloadValueBean : In the Previous step, In GetPayloadValueBean module, One parameter is created PrimaryField to hold the value of the Primary field.
Now PutPayloadValueBean is used to put that parameter value to the response structure which would be passed to the next ICO.
Parameter value is nothing but the XML path put:/ns0:batchInfo/ns0:PrimaryField where this value would be placed in output/response structure.
AF_Modules/ResponseOnewayBean: This module is used to pass the response of SFDC (Add batch to job API call). This response needs to be passed to the next flow. In parameter values, details of the next ICO are given.


2) Second ICO: SFDC to SFDC: (Close Job API call)
In our first ICO, basically, we covered the first two SFDC call, i.e. create Job & Add batch to Job API call.
In this ICO, we cover the next call i.e. Close Job.

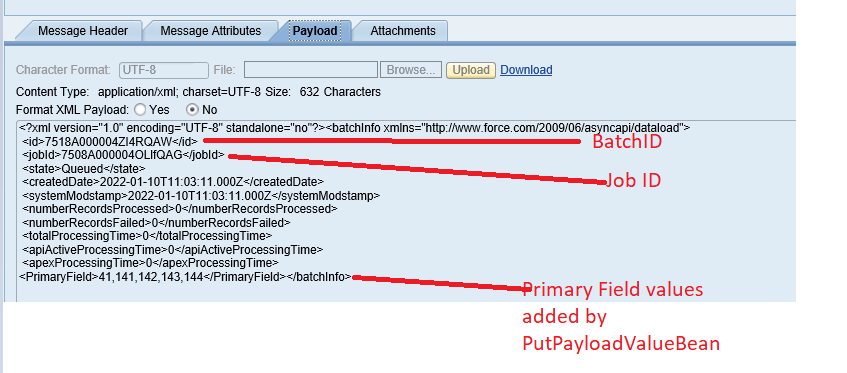
As we see above, This payload is nothing but the response of Add Batch to Job API call along with one extra field PrimaryField which is added by module PutPayloadValueBean in the previous ICO receiver channel.
Message Attribute: Session ID is passed from the previous ICO using DynamicConfigurationBean.

Here in Operation Mapping, we have simple message mapping which creates the structure of the Close Job API call.
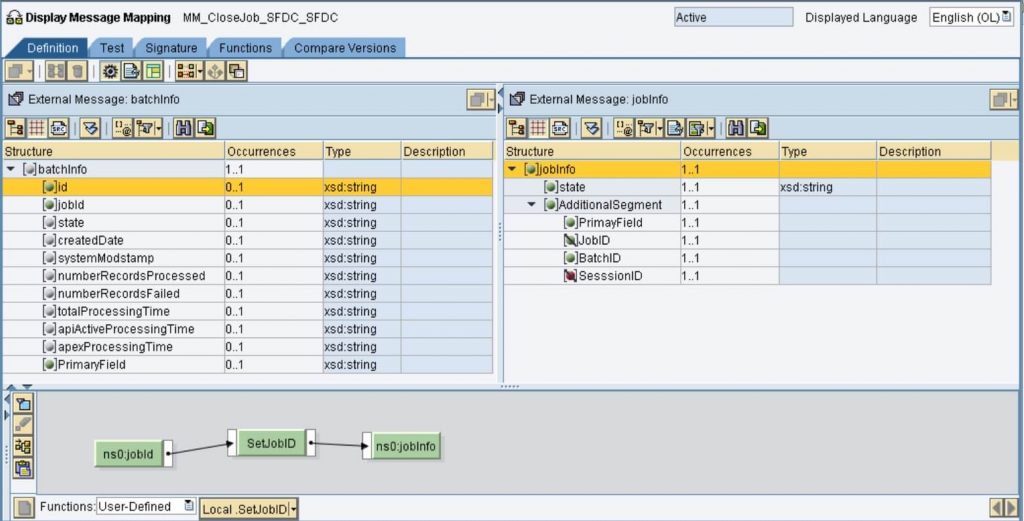
There is only one UDF to create JobID (because it is not passed from the Previous flow). JobID is being received in the input payload. This value needs to be passed to the receiver channel to close the Job as part of the URL.
UDF:
String NameSpace = "http://sap.com/xi/XI/System/REST" ;
DynamicConfiguration conf = (DynamicConfiguration) container.getTransformationParameters().get(StreamTransformationConstants.DYNAMIC_CONFIGURATION);
DynamicConfigurationKey key  = DynamicConfigurationKey.create( NameSpace, "jobID");
conf.put(key,var1);
return var1;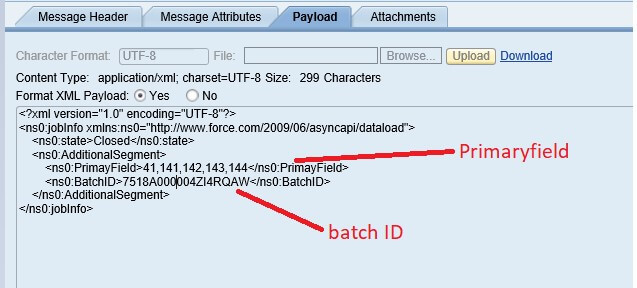
Here we pass State as “Closed” as required by SFDC Close Job API call.
Apart from it, in an extra segment “AdditionalSegmet”, there are two extra values i.e. Primaryfield and Batch ID. Both these values are required in our next 3rd flow.
Message Attribute after mapping: It contains JobID & SessionID field values.

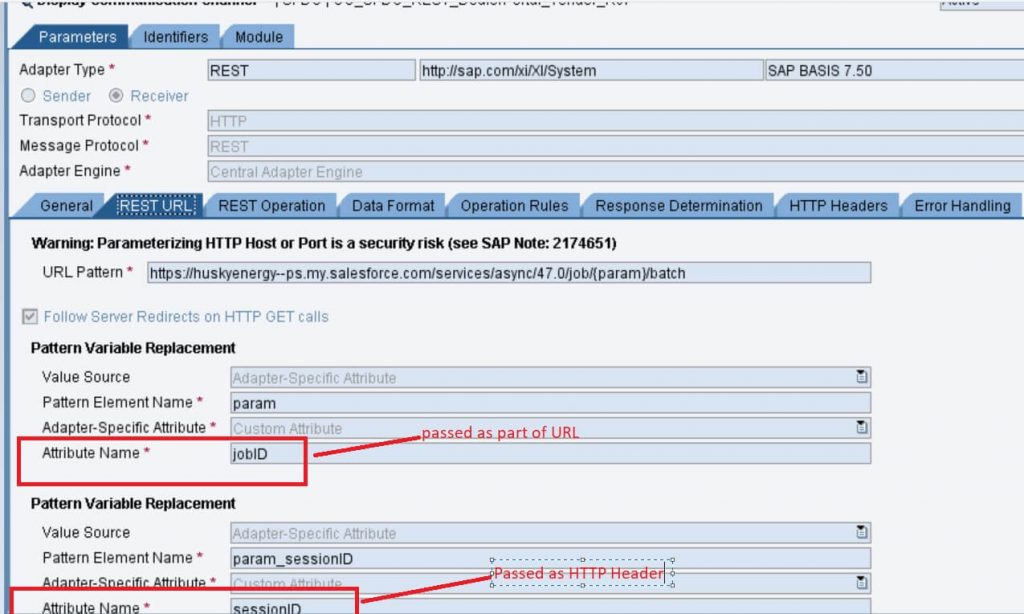
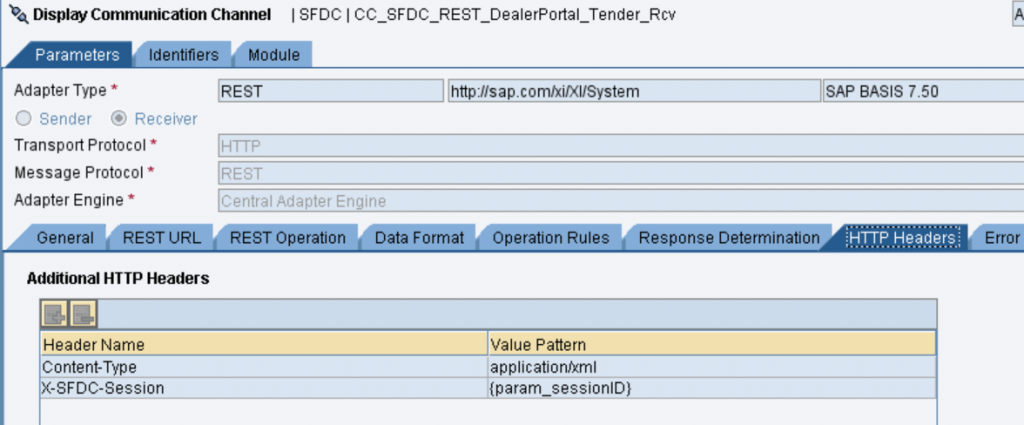
Receiver Channel Close job:
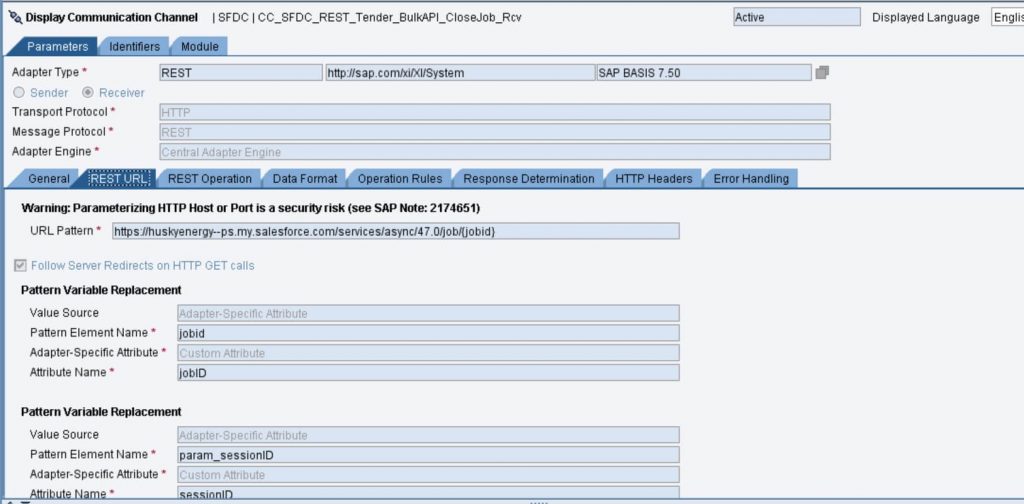
jobID & sessionID values are present in HTTP Header.
JobID needs to be passed as part of URL and sessionID needs to be passed as part of HTTP header.
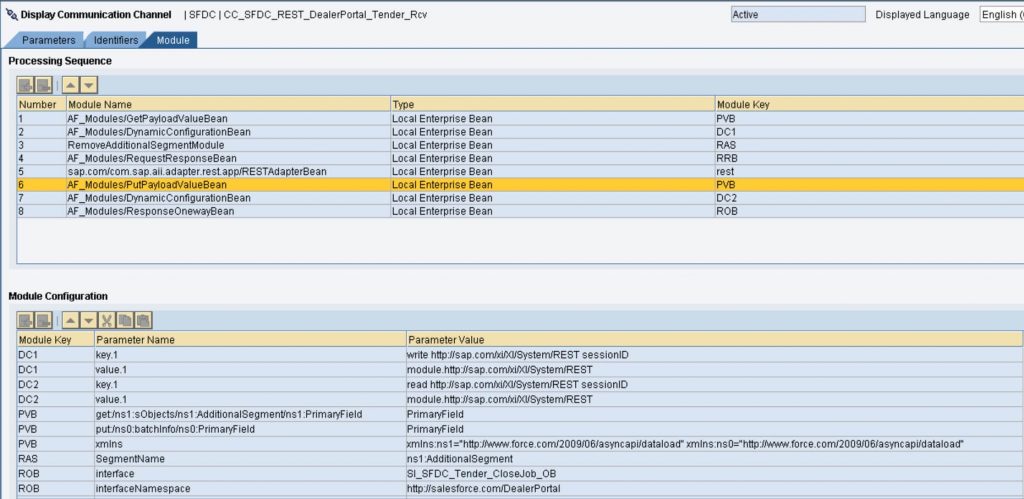
Module Tab:
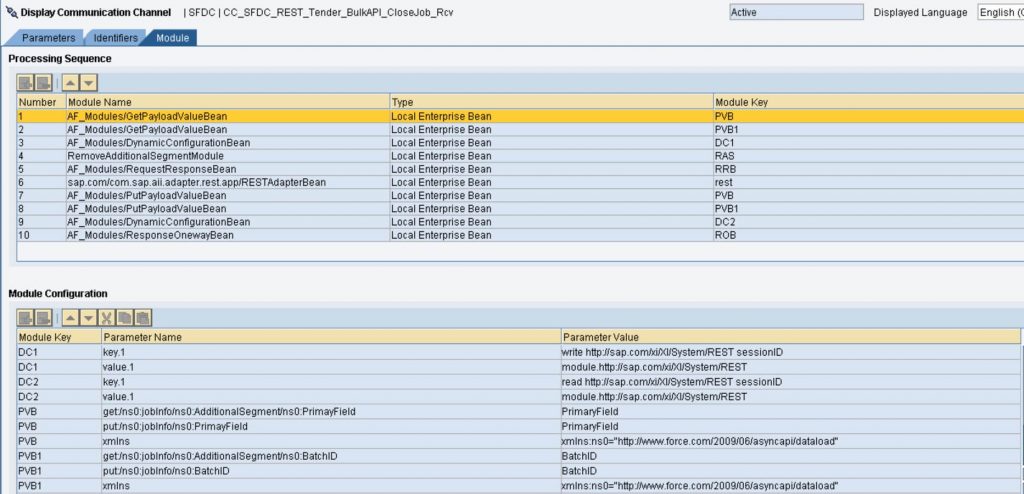

AF_Modules/GetPayloadValueBean : In Output payload, There is one extra segment with name “AdditionalSegment” which has XML field “PrimaryField” & BatchID.
This module is being used two times here to create two parameters that hold the value of PrimaryField & BatchID. Here Parameter value is the full XML path to the corresponding XML field.
get:/ns0:jobInfo/ns0:AdditionalSegment/ns0:PrimayField
get:/ns0:jobInfo/ns0:AdditionalSegment/ns0:BatchID
We will use PutPayloadValueBean to use these parameters in order to pass these parameter values to our next flow.
AF_Modules/DynamicConfigurationBean: Dynamic Configuration Bean module is used to pass the value of SessionID to our next flow.
RemoveAdditionalSegmentModule: Output payload which is created in the above step has one extra segment with the name “AdditionalSegment” which is not at all required by SFDC. (Close job API call). This extra segment was created just to hold the values of the Primary field & BatchID and pass it to the next ICO. So now Primary field value & BatchID are already being held by parameters using GetPayloadValueBean, so we are good to remove this additional segment now.
AF_Modules/RequestResponseBean: This module is used to make async/sync bridge.
AF_Modules/PutPayloadValueBean: In Previous step, GetPayloadValueBean module, two parameters are created PrimaryField & BatchID.
Now PutPayloadValueBean is used two times, to put these parameter values into a response structure which would be passed to the next ICO.
Parameter values are nothing but the XML path where this value would be placed in output/response structure.
put:/ns0:jobInfo/ns0:BatchID
put:/ns0:jobInfo/ns0:PrimayField
AF_Modules/ResponseOnewayBean: This module is used to pass the response of SFDC (Close Job API call response). This response needs to be passed to the next flow. In parameter values, details of the next ICO are given.


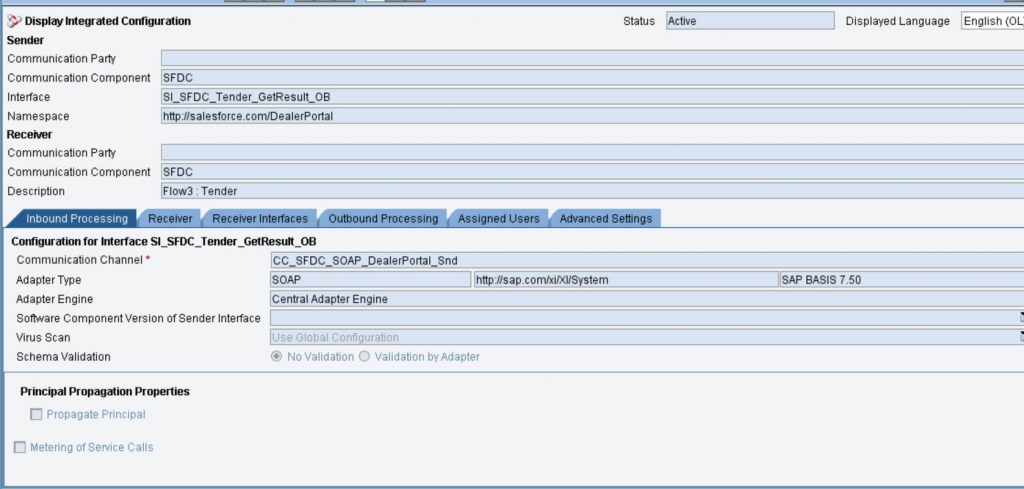
3) Third ICO: SFDC to SFDC: (Retrieve Batch Results)
So far, a job is created, and a batch is added to the job. After that Job is closed in the previous step. Now in this step, we retrieve batch results to get to know the status of each record whether the record is successfully updated in SFDC or not.
This payload is a response of Add Batch to Job API call along with two extra fields PrimaryField & BatchID which is added by module PutPayloadValueBean in the previous ICO receiver channel.
Now we need to call Retrieve Batch Results API on the SFDC side which is actually a HTTP Get call so we are concerned about Payload which gets passed to SFDC.
At the level of operation mapping, there is simple One to One mapping along with a small UDF which is putting some delay of around 1 minute. So, the question is why this delay is needed? This delay is needed because whenever we close the job, record processing gets started which may take some time to get processed on the SFDC side. So on the previous ICO receiver channel, Job is closed, and after that here in Operation mapping, we are putting some delay before we retrieve the batch result.
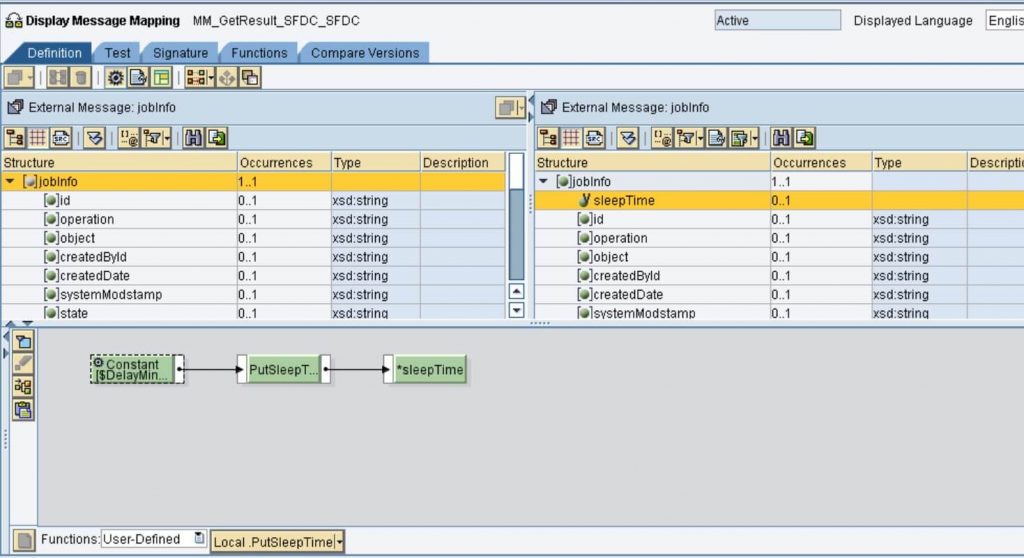
long l_DelayTimeMinutes = Long.parseLong(DelayMinutes);
try {
TimeUnit.MINUTES.sleep(l_DelayTimeMinutes);
}
catch (InterruptedException e) {
e.printStackTrace();
}
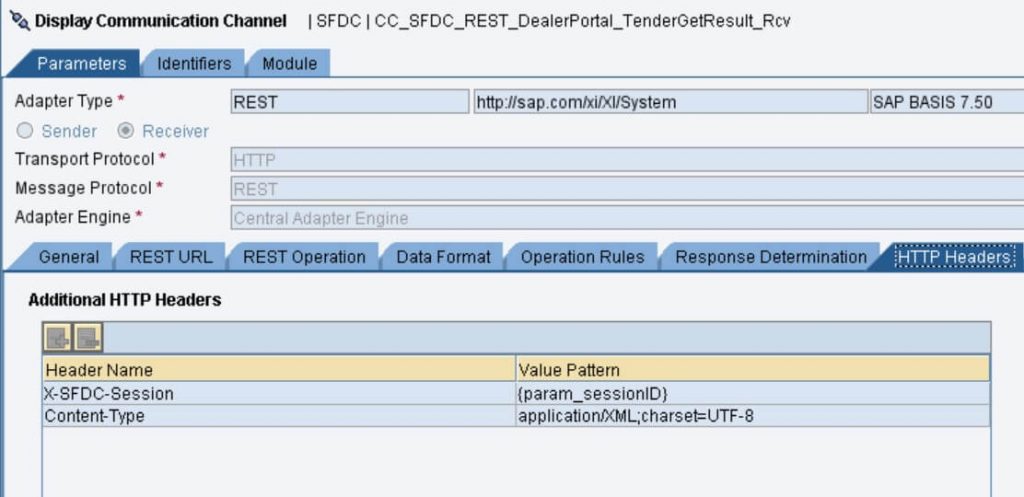
return "";Receiver channel to call retrieve Result
Here jobid element refers to the <id> field from the payload. It is used in getting payload as part of URL as a query string.
BatchId element refers to BatchID field from payload. It is used in getting payload as part of URL as a query string.
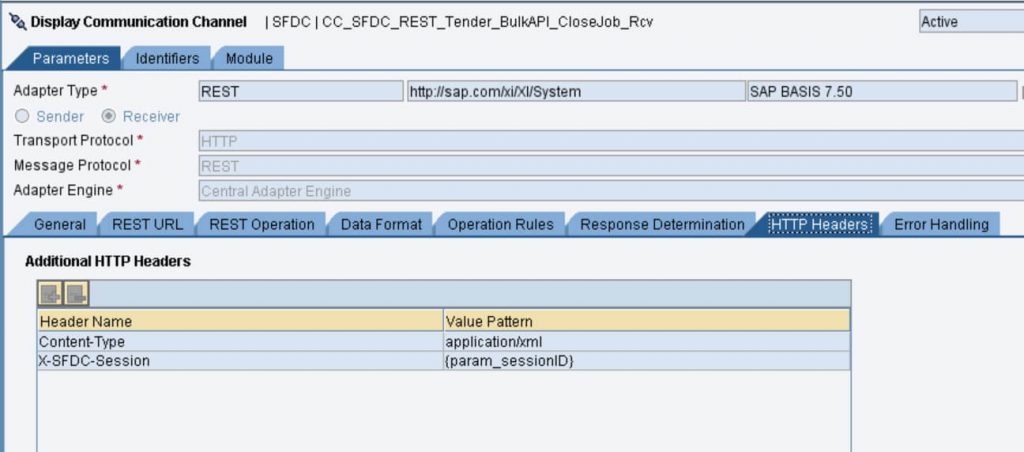
sessionID is used in the HTTP header parameter.
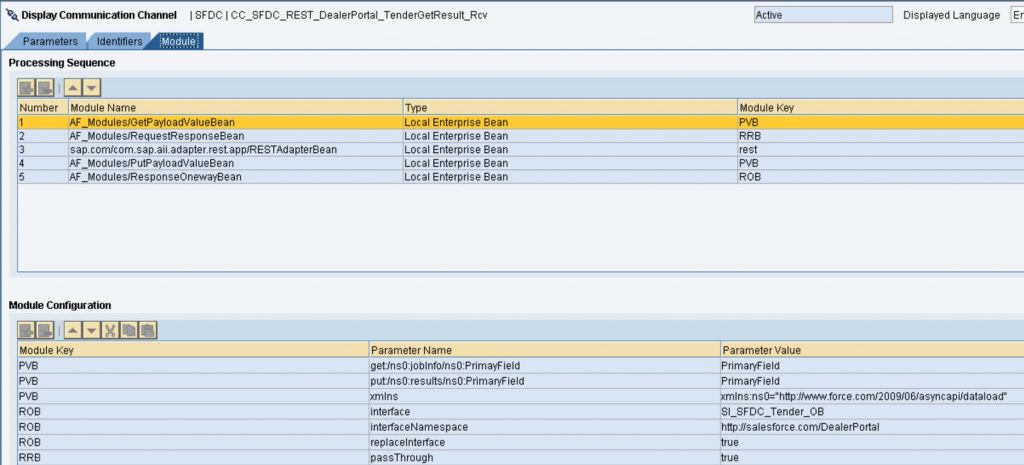
Here again, AF_Modules/GetPayloadValueBean is used to pass XML field value “PrimaryField” from the current ICO to the next ICO.
This module creates a parameter that hold the value of PrimaryField .
We use PutPayloadValueBean to pass this parameter value to the next flow. It put this parameter value into the response structure which would be passed to the next ICO.
AF_Modules/ResponseOnewayBean: This module is used to pass the response of SFDC (Retrieve result API result response). This response needs to be passed to the next flow. In parameter values, details of the next ICO are given.
Message Monitoring: Message processing took around 1 minute time due to delay put at mapping level.

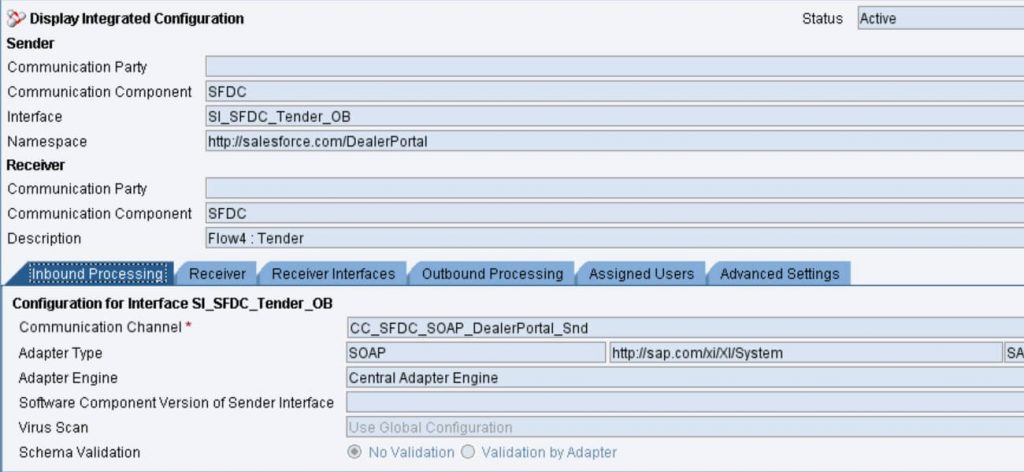
4) Third ICO: SFDC to Sender: (update SFDC Result back to Sender)
So, in the previous step, we made a SFDC call to Retrieve Batch results via HTTP Get method. So, In this ICO, we get batch results.
Incoming Payload: This incoming payload is the response to API “Retrieve batch result API”. As we sent a total of five records to SFDC so here there are five <result> tags are received. Along with API response, <PrimaryField> is added by module tab PutPayoloadValueBean.
In Response, if the XML field <Success> is true, that means the record is successfully processed on the SFDC side. In case of error, the value would be false.
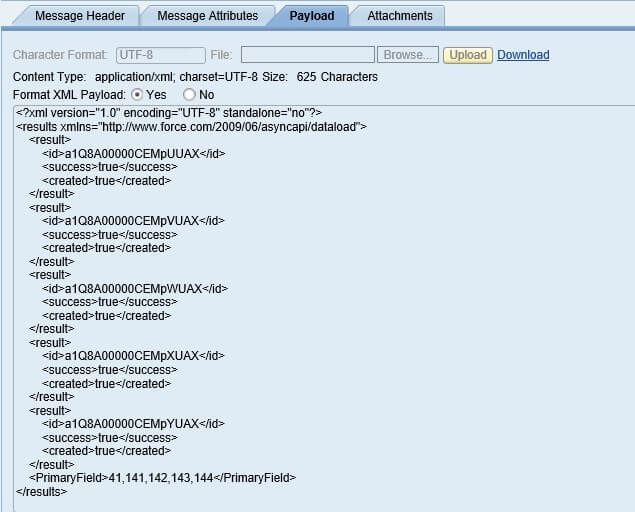
As discussed previously, as per SFDC note, Results are returned in the same order as the records in the batch request. So this was the reason to track the record number in <PrimaryField>.
Here at the mapping level, there is a simple UDF to put the primary field value in each <result> segment in the same order which is returned from SFDC.
UDF :
String primayfield = var1[0];
String pf[] =  primayfield.split(“,”);
		for(int i = 0 ; i < pf.length ;  i++)
		{
		result.addValue(pf[i]);
		}
Output Payload from mapping: Below is the output payload which has the status(<Success>) & Primary field(KeyField) of each record sent to SFDC along to know whether that primary field is successfully updated on the SFDC side. Now, this payload is good to update to the sender.
<ns0:results xmlns:ns0="http://www.force.com/2009/06/asyncapi/dataload">
	<ns0:result>
		<ns0:id>a1Q8A00000CEMpUUAX</ns0:id>
		<ns0:success>true</ns0:success>
		<ns0:created>true</ns0:created>
		<ns0:KeyField>41</ns0:KeyField>
	</ns0:result>
	<ns0:result>
		<ns0:id>a1Q8A00000CEMpVUAX</ns0:id>
		<ns0:success>true</ns0:success>
		<ns0:created>true</ns0:created>
		<ns0:KeyField>141</ns0:KeyField>
	</ns0:result>
	<ns0:result>
		<ns0:id>a1Q8A00000CEMpWUAX</ns0:id>
		<ns0:success>true</ns0:success>
		<ns0:created>true</ns0:created>
		<ns0:KeyField>142</ns0:KeyField>
	</ns0:result>
	<ns0:result>
		<ns0:id>a1Q8A00000CEMpXUAX</ns0:id>
		<ns0:success>true</ns0:success>
		<ns0:created>true</ns0:created>
		<ns0:KeyField>143</ns0:KeyField>
	</ns0:result>
	<ns0:result>
		<ns0:id>a1Q8A00000CEMpYUAX</ns0:id>
		<ns0:success>true</ns0:success>
		<ns0:created>true</ns0:created>
		<ns0:KeyField>144</ns0:KeyField>
	</ns0:result>
</ns0:results>


