
Welcome to Part 2 of Navigation and Routing in SAPUI5 Theoretical Explanation. But this would not be a pure theory. We would see some codes and try to grasp the concept. Many of our ABAPer friends who do not have prior JavaScript programming experience, find it difficult to read data and manipulate them in SAPUI5 applications (although they see it in the console). In this article, I would explain how to see the data at runtime and also how you can traverse to the deep structures of the data and fetch the value you want and play around with it.
If you have not gone through the Part 1 of Routing and Navigation yet, please read: Routing and Navigation in SAP UI5 – Theoretical Explanation Part 1
In Part 1, we explained how to configure routes and the respective targets in manifest.json file. It was also briefed to navigate from one view to another using navTo() method of Routing class. However, it was not exclusively shown how this method worked and what the parameters of this method were.
Let us assume the below scenario:
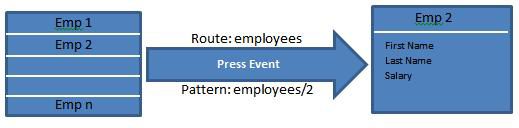
A list of employees is being shown on the page by way of clickable list, technically sap.m.List of type Active. The user then clicks on a link (that means on Employee), which redirects the user to another page where some additional details about the employee are shown.
This would be the perfect scenario for implementing Routing and Navigation concept in the application.
So, according to the scenario, we need to call the navTo() method in press event of sap.m.List. Assume the next route name is “employees” and we are passing the employee id in the route. The route configuration in the manifest.json file will be as follows.
{
“pattern”: “employees/{employeeId}”,
“name”: “employee”,
“target”: “employee”
}
The navTo() method must be executed in the following manner.
This.getRouter().navTo(“employees”,{ employeeId: “2” });
Value of employeeId is to be passed here. Name of this segment must match the segment declared in a pattern in the manifest.json file.
Manifest.json: “pattern”: “employees/{employeeId}”
Controller: This.getRouter().navTo(“employees”,{ employeeId: “2” });
Otherwise we will see the below error.

Upon the execution of this method, URL gets changed to www.*/employees/2.
Everything is perfect until now. The navTo() method gets executed and next view gets loaded in the control aggregation defined in manifest.json file. But where to listen to this event? Technically, where should the listener be implemented?
You may have a question before this. Why should we listen to this event at all? We have to implement the listener because we need to read the employeeId passed via the route and bind the respective employee data on the next view to display his details.
Now, my answer is, we have to implement the listener in onInit() method of the controller of employeedetails view. So that I can read the employeeId value while the view is getting initialized and ready with the binding path for the certain employee. Makes sense? Then let’s implement it now.
onInit: function () {
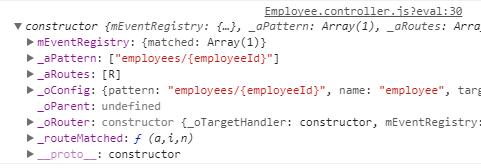
this.getRouter().getRoute(“employee”).attachMatched(this._onRouteMatched, this);
}
this.getRouter() – should actually be this.getOwnerComponent().getRouter(). This command is shortened by implementing it in Base Controller. I will explain the use of the Base Controller in one of the future articles.
this – now what could be the use of this parameter? It specifies the object on which the callback function should be called. Value of “this” is our controller here. Technically, we are binding the value of ‘this’ inside the callback function to our controller instance. This parameter is optional but very important. If empty, that value, default, refers to Router object. Confused?? Let’s see it in action.
Case 1: ‘this’ is passed
oRouter.getRoute(“employee”).attachMatched(this._onRouteMatched, this);
_onRouteMatched : function (oEvent) {
Console.log(this);
}
I am now printing the values of this on the console. It’s a controller object.

Case 2: ‘this’ is empty
oRouter.getRoute(“employee”).attachMatched(this._onRouteMatched);
_onRouteMatched : function (oEvent) {
Console.log(this);
}
What does it look like?? Route?? Yes, it the Route object.
I am passing the value of this in my code. Because I need to perform the binding in the employeedtails view.
How do I bind?
I use bindElement() method.
Where do I bind?
On to the View.
How do get the view Instance in the controller?
From the controller instance. (oController.getView())
What is the controller instance here?
this
this.getView()
Hope you understood it now.
Apart from it, I also have other variables declared in onInit method of my controller. So I badly need the controller instance inside my callback function.
I hope you understood both the parameters on my call back function. Now let’s start implementing it.
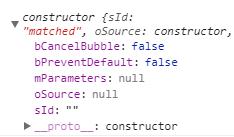
Every event carries an event instance and so this event. Let me print the event instance on my console and see what’s there in it.
_onRouteMatched : function (oEvent) {
Console.log(oEvent);
}
Bubbling and PreventDefault feature – these topics I will try to explain in future articles.
Let me now show you what parameters are carried by the event instance in this case.
_onRouteMatched : function (oEvent) {
console.log(oEvent.getParameters());
}

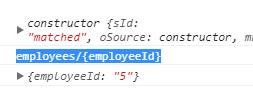
This event is carrying arguments and config details. The employeeId we passed via route is stored in arguments. We will see how to capture this value. First of all, we have to capture the ‘arguments’ object. Then we will be able to access its property. (employeeId)
Let me print the arguments now.
oArgs = oEvent.getParameter(“arguments”);
console.log(oArgs);
The above two statements will print all the arguments on the console.
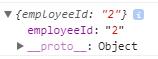
We passed only one value, so we find only one value inside the arguments. We saved arguments in the oArgs variable. Now access employeeID value. You can just focus on the employeeId and find how it can be accessed.
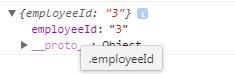
Now let’s see what the below statement will print. I click on the second employee in the list.
Console.log(oArgs.employeeID);

Now it prints the employeeId.
This is what we wanted. Now we can use it for building my binding path for employee details. Something like this.
path : “/Employees(” + oArgs.employeeId + “)”;
Employees is the EntitySet.
In a similar way, we can get the configuration information by using the below syntax.
console.log(oEvent.getParameter(“config”).pattern);
If you are confused with the single line command above. You can break it as below to simplify it in two steps.
oConf = oEvent.getParameter(“config”);
console.log(oConf.pattern);
This article is getting stretched now. I always like short and informative articles. So, I would like to stop it here and continue the below topics in Part 3.
- Annotations used in the route pattern
- Common errors occur while using navTo and display methods.


