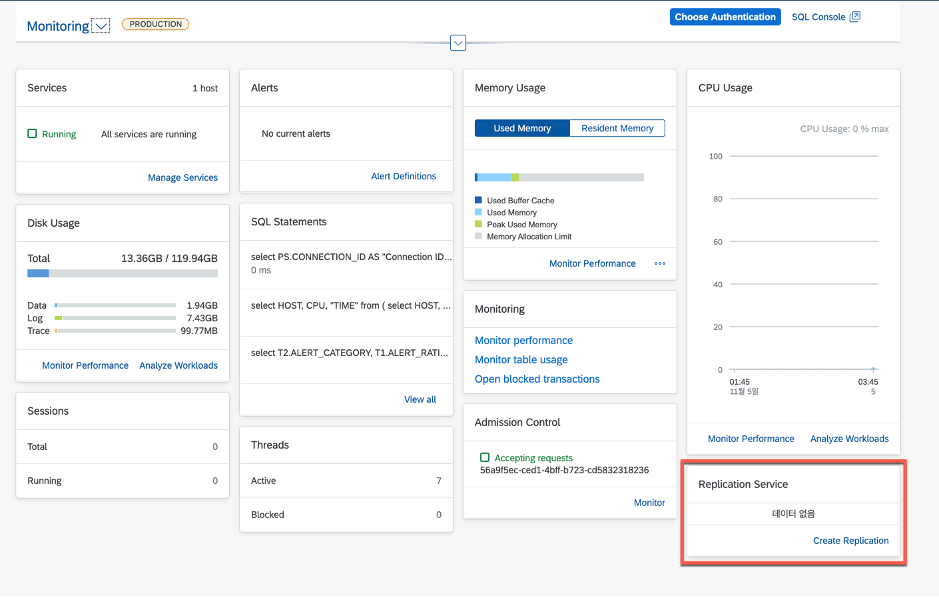
A new Replication Service is now available in SAP HANA Cockpit as a Service. You can find this application as part of the monitoring view which allows creation and monitoring of replication jobs using Smart Data Integration. You can easily setup a new remote source and database object replication as the UI is a step-by-step wizard based.
I have installed SAP HANA, express edition VM and DP Agent inside the VM but this can be applied to any SAP HANA on-premise or even other SAP HANA running on different hypervisors.
SAP HANA on-premise setup
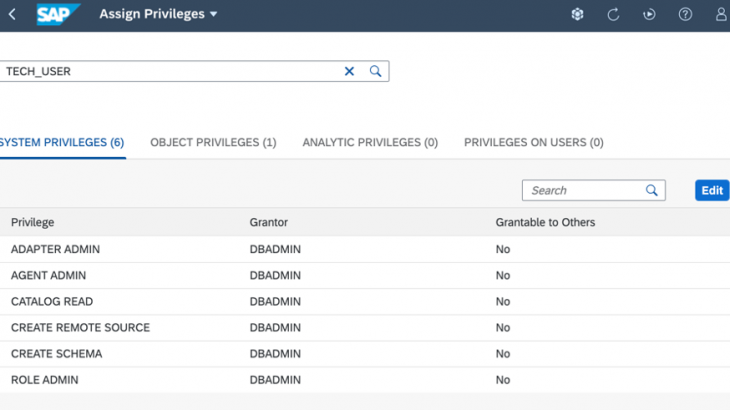
The replication service will need to connect to the remote system and requires a technical user the following privileges as explained in the official documentation.
- CATALOG READ for the wizard ui to list the objects to be selected for replication.
- SELECT, DROP, and CREATE ANY on the schemas of users to be replicated for replicating users other than the technical user.
- SELECT, DROP, and CREATE ANY on schemas with objects to be replicated objects to be replication assuming different from the user above.
- SELECT on any other objects to be replicated, and TRIGGER if these objects need to be replicated in real-time. Trigger is needed as it is the means of real-time replication.
I have created TECH_USER for the technical user and WORKSHOP for the user and schema for replication. I will grant the following privileges to TECH_USER
grant select, drop, create any on schema workshop to tech_user;One thing to keep in mind is for the object to be replicated, the owner needs to be other than SYSTEM and SYS as these objects are not allowed to be setup for replication.
Now for testing the replication, I have created WORKSHOP user and schema and a table named TEST_TABLE. Just insert the first record as the initial state prior to the replication.
create table test_table
(col_pk int, col_1 nvarchar(50), primary key(col_pk));

insert into test_table values (1, ‘First Row’);
SAP HANA Cloud setup
In addition to the source side, we need to create a technical user that DP Agent will use to connect to SAP HANA Cloud with the following privileges.
Replication Service in Cockpit
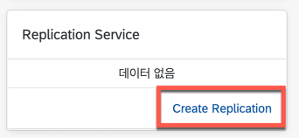
Now, let’s try to setup the replication from the Cockpit. In the Replication Service card, you can click on ‘Create Replication’ link on the bottom right to start the replication setup.
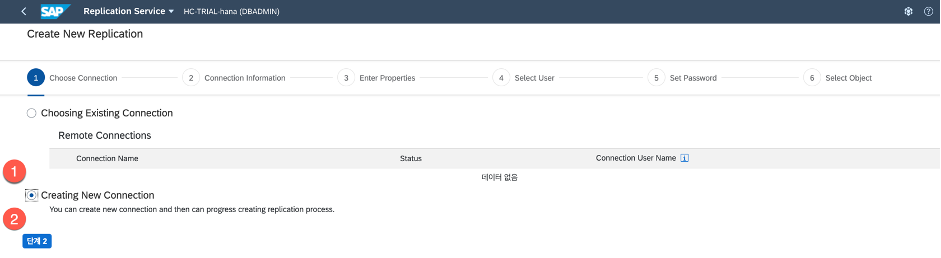
This will start the wizard for setting up the replication. The first step is to either select an existing remote source if already configured or create a new connection. As this is a new trial instance, I don’t have any existing remote source connection and will have to create a new one.
Since there is no existing connection, we will select ‘Creating New Connection’ which displays the parameters to setup a remote source and advance to step 2.
For step 2, setup a remote source name and select the DP agent that is registered with SAP HANA cloud.

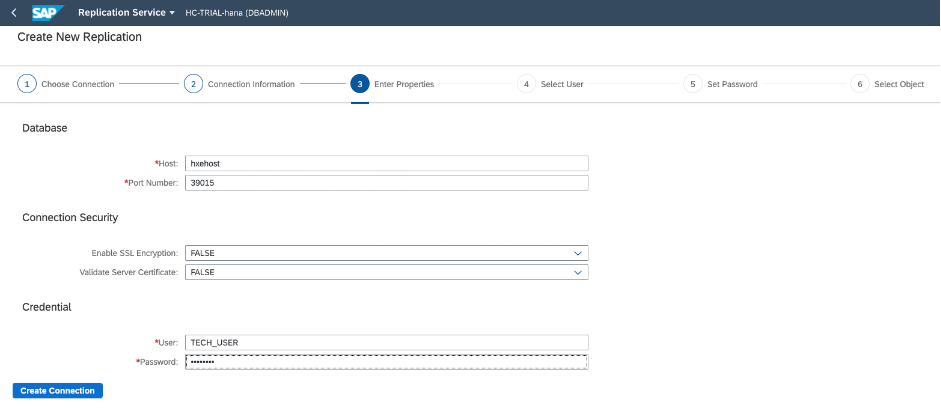
For step 3, enter the host and port information with technical user and password. For this example, I will skip SSL encryption and validate server certificate but for production use both should be enabled. (Please refer to the official SDI documentation of how these can be configured for SDI)
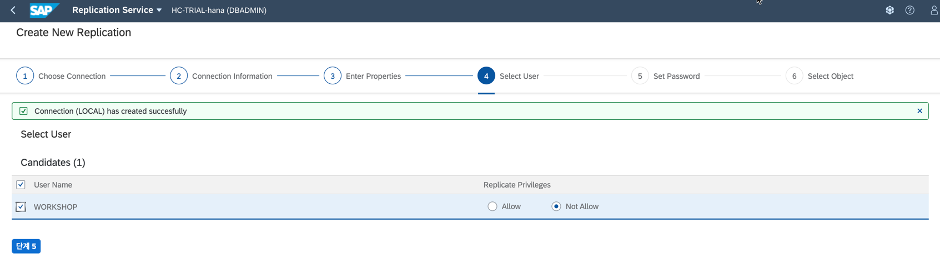
In step 4, a new remote source should be created and a list of users that was granted to tech_user will be listed for replication. I will select WORKSHOP user and also replicated any database privileges granted to this user as this user will be created in SAP HANA Cloud with the same username and privileges. Advance to step 5.
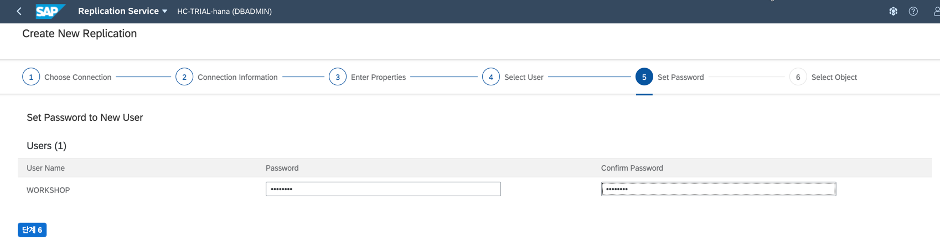
In step 5, we would need to enter the password for the WORKSHOP user as the password cannot be automatically extracted from the source systematically and need to be entered manually. The password needs to be entered twice to make sure there is no mistake in the password. Enter password twice and advance to step 6.
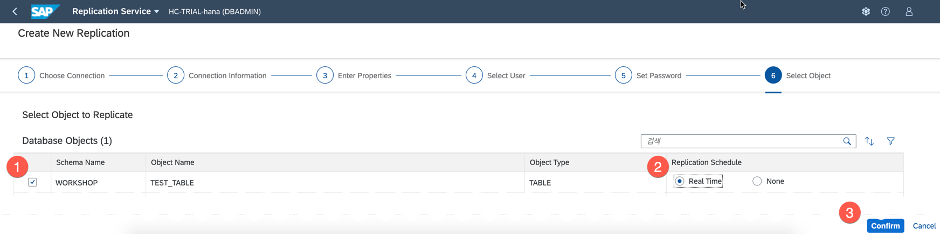
In step 6, we select the table to replicate and then select if the replication is just initial load or real-time replication. Click confirm to finish the setup.
Now, the UI will be transitioned to the monitoring UI as follows showing the status of replication. The status will show ‘Initializing’ for a short time and then switch to ‘Loading’. The ‘Loading’ is the state where the replication is happening in real-time. The data is replicated to a column loadable table which stores the data in memory.
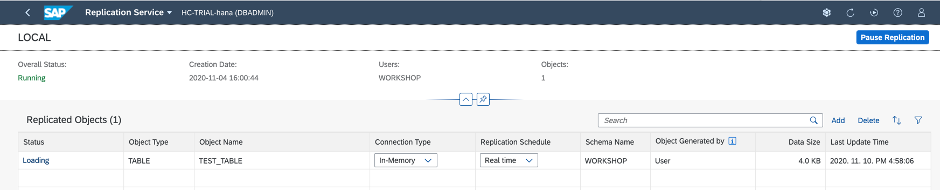
To pause the replication, the button on the top right can be clicked to pause all the replication jobs running against the remote source LOCAL. This can be very useful for any maintenance work to pause the entire replication and resume the replication once finished.
The default connection type is ‘In-Memory’ but can be changed to ‘Disk’ which is the page loadable column table (or NSE). For the replication schedule, it can be changed to None which will remove the subscription and stop the real-time replication. The opposite is also possible to change from None to Real time, but for this case, the data will be fully loaded again to sync the data with the remote source.
The Replication Service also supports SQL views to be selected for replication, which will replicate all base tables defined in the SQL view. If the view is nested with another view, it will configure all objects within the hierarchy definition of the view.
Now, let’s go back to the top level of the cockpit with the Monitoring View layout and check the Replication Service application card.
If another table needs to be replication, this can be done from the monitoring by clicking the ‘Add’ menu. Also, ‘Delete’ will remove the selected object from replication.
You can now see the remote source LOCAL is listed with 1 object in real-time replication mode. Click on it, will move directly to the monitoring of the replication mentioned previously.
Test real-time replication
Finally, let’s enter more data to the source table to check if the real-time replication.
insert into test_table values (2, ‘Second Row’);
insert into test_table values (3, ‘Third Row’);
insert into test_table values (4, ‘Fourth Row’);
Check the table in the target to validate the data was replicated in real-time.


