Intro
Nowadays Apple MacBooks (and iPads) are based on the Apple M1 chip, which has an arm64 (a.k.a. aarch64) processor architecture. It seems that since 2021 Apple is phasing out its Intel-based MacBooks (i.e. those which run on amd64 (a.k.a. x86_64) processor architecture).
SAP offers two kinds of free SAP systems for use by the SAP Community. We will look at the older one of these, called SAP NetWeaver Developer Edition, which is obtainable here:
https://developers.sap.com/trials-downloads.html?search=752
Note: the ASE license file is only valid until the day of writing, 31.03.2022 – hopefully SAP provide a new valid license file soon, as this is needed for installation to succeed.
Read More: SAP Certifications
This should be possible to run on Apple M1 machines via Docker Desktop… but currently (March 2022) this image is in “disabled” state as it awaits patching for a security vulnerability, so I will wait until that patching has been done before testing this].
Now the SAP NetWeaver Dev Edition runs solely on amd64 architectures, and all the tutorials and blogs showing how to install it assume that the host machine and/or guest VM (Virtual Machine) has amd64 processor architecture. This blog might be the first tutorial which shows how to install and run SAP NetWeaver Dev Edition on arm64 architecture, using a technique called emulation. Specifically we will use the emulation capabilities of the excellent UTM app.
There are good tutorials offered by SAP showing how to setup SAP NetWeaver Developer Edition on an openSUSE Leap VM using e.g. VMware Workstation Player or Oracle VirtualBox, myself I used this tutorial as a reference:
https://www.sap.com/documents/2019/09/c86f9218-687d-0010-87a3-c30de2ffd8ff.html
If you are new to the topic, the SAP tutorial is worth reading through so you can get the main ideas of how SAP NetWeaver Dev Edition gets installed. Despite the title referring to VirtualBox, the SAP tutorial in question uses VMware Workstation Player on Windows. In this blog, we are using instead an emulator called UTM, with the host machine being an M1 MacBook.
Before we get started, the usual disclaimer: I don’t run a Helpdesk and don’t work for SAP, Apple, or UTM, so you might well need BYODS (Bring Your Own Debugging Skills) if things get tricky. However if you see any mistakes in the explanations of this blog, feel free to propose improvements via the Comments section, I will look at those. And with that, let’s get started…
UTM – a Hypervisor-Emulator
Although it is possible to try using Apple’s implementation of QEMU yourself, that can get quite complicated. (It’s sometimes possible to use QEMU to start scripts and preface function calls etc, e.g. using “qemu-x86_64” commands… but this would be a lot of work, and maybe not even possible for calls inside already compiled C/C++ code such as the SAP installation media contains). Luckily for M1 MacBook users, there is a product called UTM which does pretty much all the hard work of emulation on our behalf, so that we can run an OS itself in emulated mode, and then trust the OS<->QEMU communications to work out. Here is the UTM website for their Hypervisor-Emulator:
As the UTM people say in their product description:
“Under the hood of UTM is QEMU, a decades old, free and open source emulation software that is widely used and actively maintained. While QEMU is powerful, it can be difficult to set up and configure with its plethora of command line options and flags. UTM is designed to give users the flexibility of QEMU without the steep learning curve that comes with it.”
Worth reading the manual also:
Up to you if you use the free version downloadable .dmg from the website, or the non-free version available in the App Store…only difference is App Store version offers automatic updates – happy to support open-source development so I got the App Store version . In any case, you install UTM using one of these paths. [It might be you need Administrator rights to your MacBook in order for UTM to be set up, I cannot remember now. If so, then if it is your own home MacBook, no problem; if it belongs to some other entity e.g. an organisation you work for, then you might need to ask for Administrator rights].
Install emulated amd64 openSUSE Leap 15 VM
Next thing we need is an openSUSE Leap 15 distro for the x86_64 (amd64) architecture. Although other Linux distros are also usable, openSUSE is convenient as it is the Linux distro that SAP themselves use when building and testing SAP NetWeaver Dev Edition; also, the installation runs quicker on openSUSE than on e.g. Ubuntu.
You can get the .iso file needed from:
Choose Leap, choose Download of the latest stable release (15.3 in March 2022, might be different by the time you read this), and choose the x86_64 architecture and offline ISO:
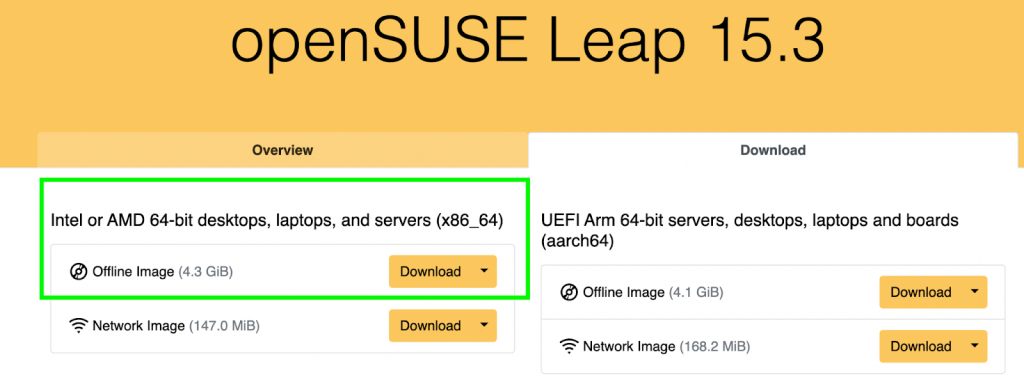
Note that although SUSE are offering Leap on arm64 architecture – and I have tested that such a version runs fine on the UTM Hypervisor (well, you might want to choose Console Only during the install phase, and then switch to Full Graphics mode after installation) – still the thing is, that we need the x86_64 version, because that is the only architecture the SAP NetWeaver Dev Edition runs on at the time of writing. So, download the x86_64 Offline Image .iso file.
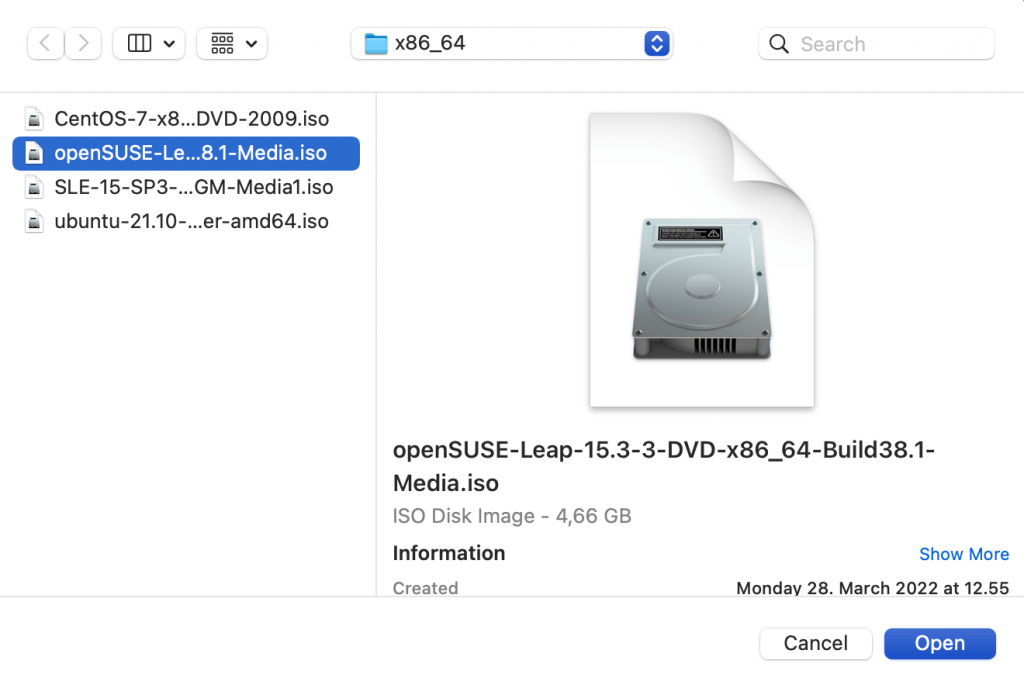
Open the UTM app. Choose the ‘+’-button to start creating a VM. Choose Emulate -> Linux -> Boot ISO image -> Browse … import your .iso for openSUSE x86_64:
Click forwards to the Hardware section. We keep the Architecture to be the suggested x86_64, and I kept the suggested System “PC” as I assume it is suitable. Increase the RAM to 8192 MB, and I suggest increasing the number of cores to 4:
For Storage, although the SAP tutorial recommends 100GB of hard disk storage, I put 120GB as enough space on the host. Skip past the Shared Directory screen, we will use the scp command to move stuff from host machine to guest VM. Give your VM a name, for example “opensuse-leap-15-amd-01” and Save the VM to create it.
If you want to edit the Settings of the VM, then right-click on the VM in the left-hand menu and choose “Edit..”. Note that you can only go to the Settings when the VM is not up and running.
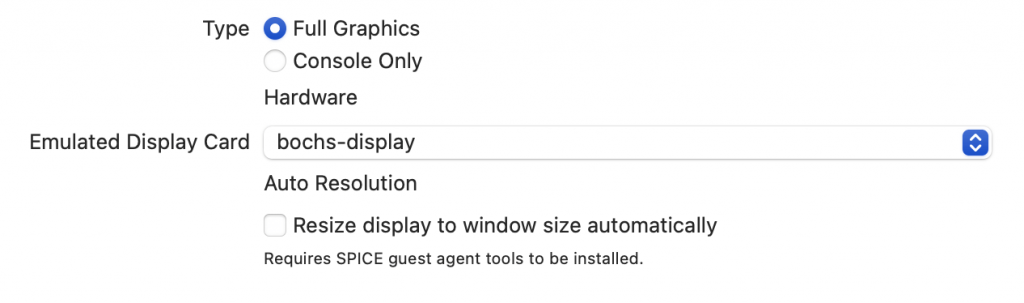
In the Settings, under Display section, change Emulated Display Card to “bochs-display” and uncheck “Resize display to windows size automatically” (as openSUSE does not have such guest agent tools available in March 2022). And Save. The bochs-display is good because it allows display of the UTM-Console for the “tty”, in addition to the traditional SSH access to server VMs.
If you like, you can change the Interface Type of the main drive (the one called “data.qcow2”, not the CD/DVD drive) to a “newer” type, for example I chose “NVMe” instead of “IDE”. Although in real life, NVMe (around since 2011) is much more modern than IDE (ATA) (around since the 1980s), however here we are dealing with software representations not actual hardware, so I didn’t notice any performance difference between identical drives depending on their (virtual) Interface Type.
I decided that it is easier to let UTM provide the VM with an IPv4 address on its default NAT network (called “Shared Network” in the Settings), which in my case is 192.168.64.0/24, as this is nice and easy for the installation of OS phase. Later we will reconfigure the VM from inside openSUSE, to use a static IP. So for now, no UTM Settings for Networking should be changed. [BTW I’m assuming that your host machine has an Internet connection, that’s convenient so that we can ensure we get all the stuff we need from online repos and that the packages can be kept up to date. Maybe the exercise can be done without any Internet connection, but I haven’t tested that].
Now we press the Play-icon to start the VM. It should find the installer DVD (the .iso file) and then you choose “Installation”.
The warmup is quite slow, so be patient.
Choose your keyboard layout. I suggest keeping the language as English (US) since unfortunately they do not offer English (SCO) as an option, and also because diverging from the default language could have negative consequences later (we will need to ensure that in localectl we have the right LANG setting and so on). So that’s why I recommend keeping the default language.
Say “yes” to Online repos and choose the ones you like, I kept the default suggestions. IMHO it’s good practice to keep the packages up to date.
Next we will choose for System Role “Server”. Although I like the various GUI Desktop variants, for our use case, where due to emulation the VM runs slower, then we want to minimise the effects on performance that a Desktop GUI brings. So “Server” it is.
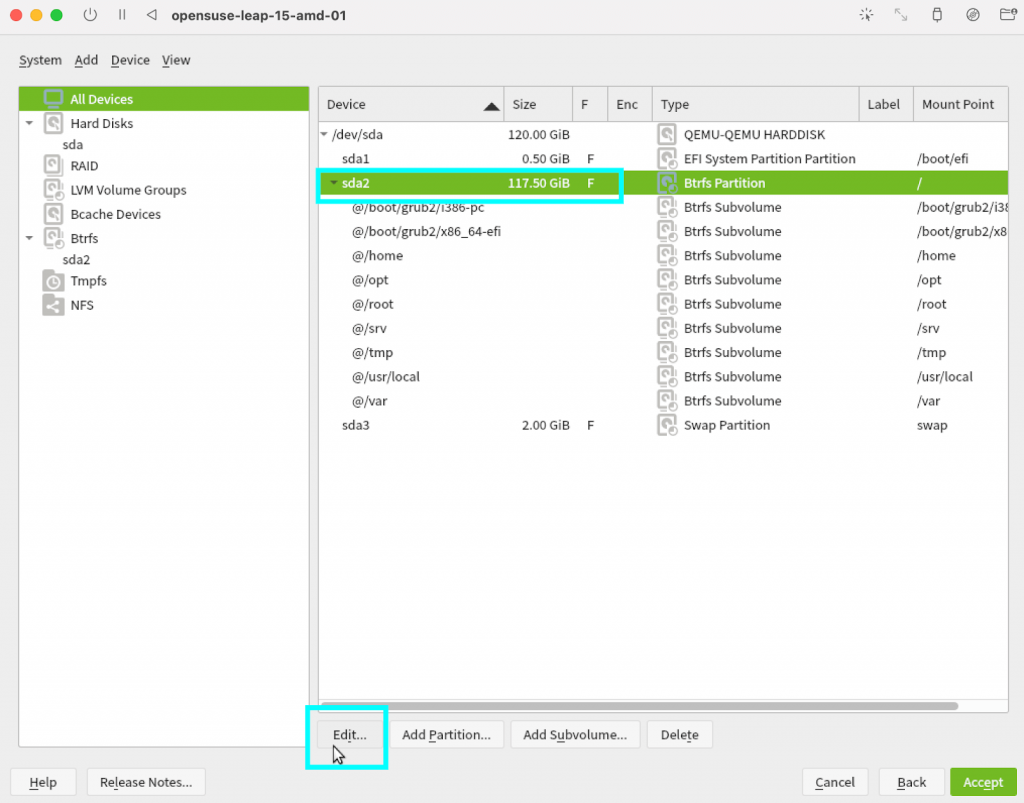
The disk layout proposal that the Installer makes, will use Btrfs for the largest partition. We need to change that for installing SAP later. So choose Current Proposal, find the largest partition (which may be sda2), and press Edit..
Change partition to Ext4:
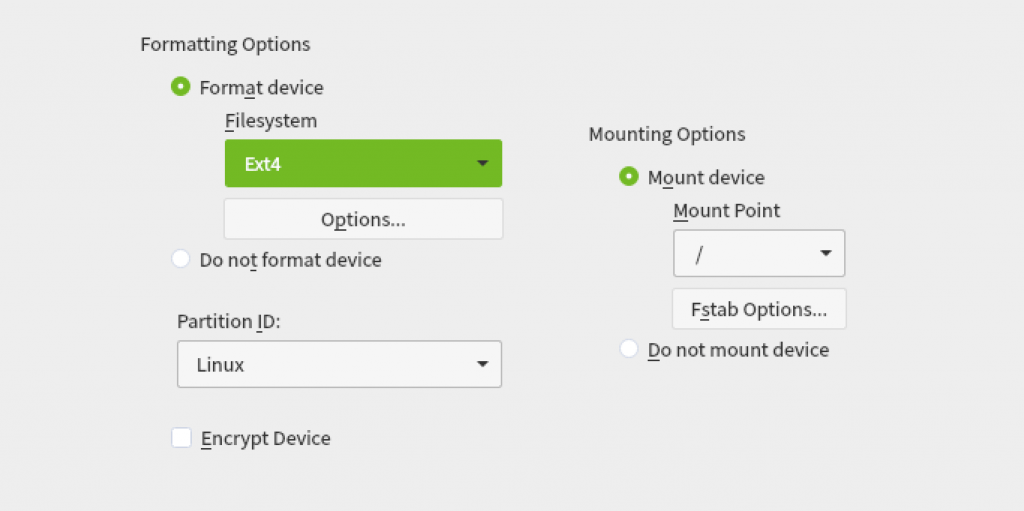
Next… Accept.
Choose your time zone. I usually go to Other Settings and Synchronise Now, just to be sure that the time is right and the config gets saved.
Then create a user, and password, and make sure “Use this password for system administrator” is checked (just more convenient).
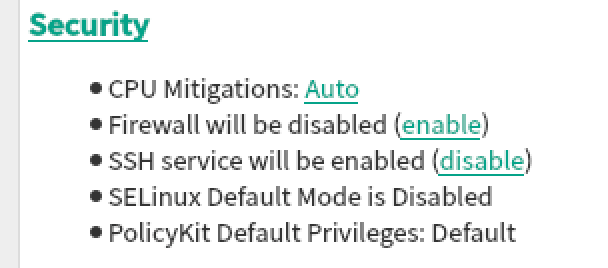
Summary screen.. Remember to set/check: Firewall to disabled, SSH service to enabled. Although usually (in real life situations) we would keep the FIrewall enabled, still for the installation of SAP later it might be better to leave the firewall disabled on our toy VM, so that when the SAP installer is testing for its favourite ports, those are open. Up to you. If setting Firewall enabled, later you need to open at least port 3200 in the Firewall (potentially also ports 3300, 44300, 8000 depending on whether you intend to use RFCs, Fiori, Webgui etc), not difficult but not shown in this blog either; also for Firewall enablers, in this Summary screen make sure that the SSH port is set to open, as SSH access is very useful, especially if you need to e.g. copy-paste logs from install and so on.
Optionally, you can also go to the Booting section from Summary screen, and in Kernel Parameters remove the option “quiet” that is provided as default:
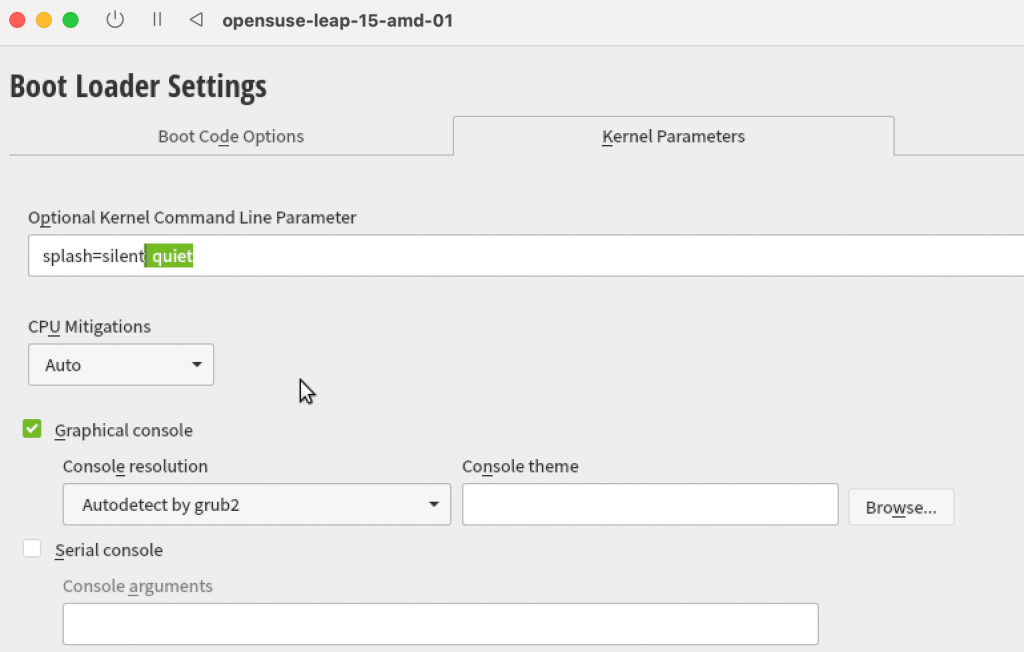
So I like to see that if something is happening, stdout is showing something, as those seconds or minutes of blank screen always worry me “is something broken?”. By removing the “quiet” option, you get more screen output. Up to you.
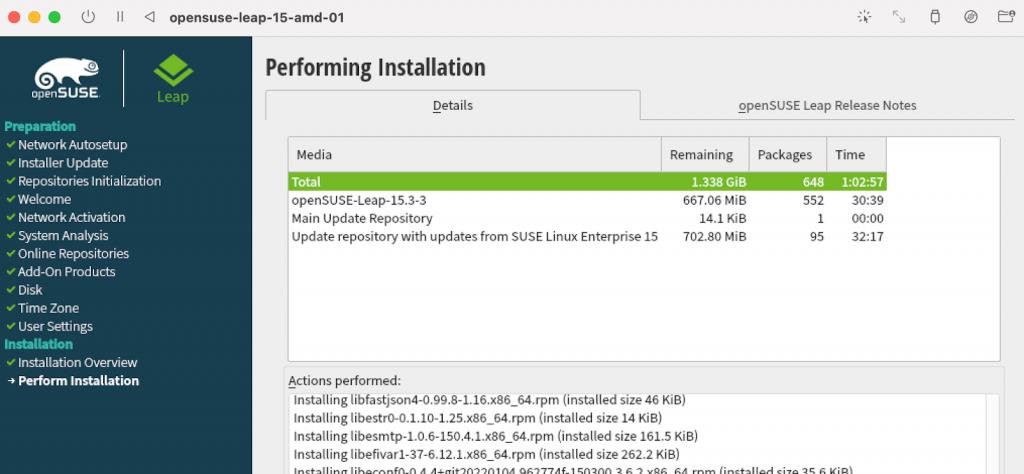
So back at the Summary screen, from there you can start the Installation proper… this might take about an hour, or more… the Installer gives you some “time remaining estimates”, usually at the start they are overestimates, so for this case it took about 45 minutes…
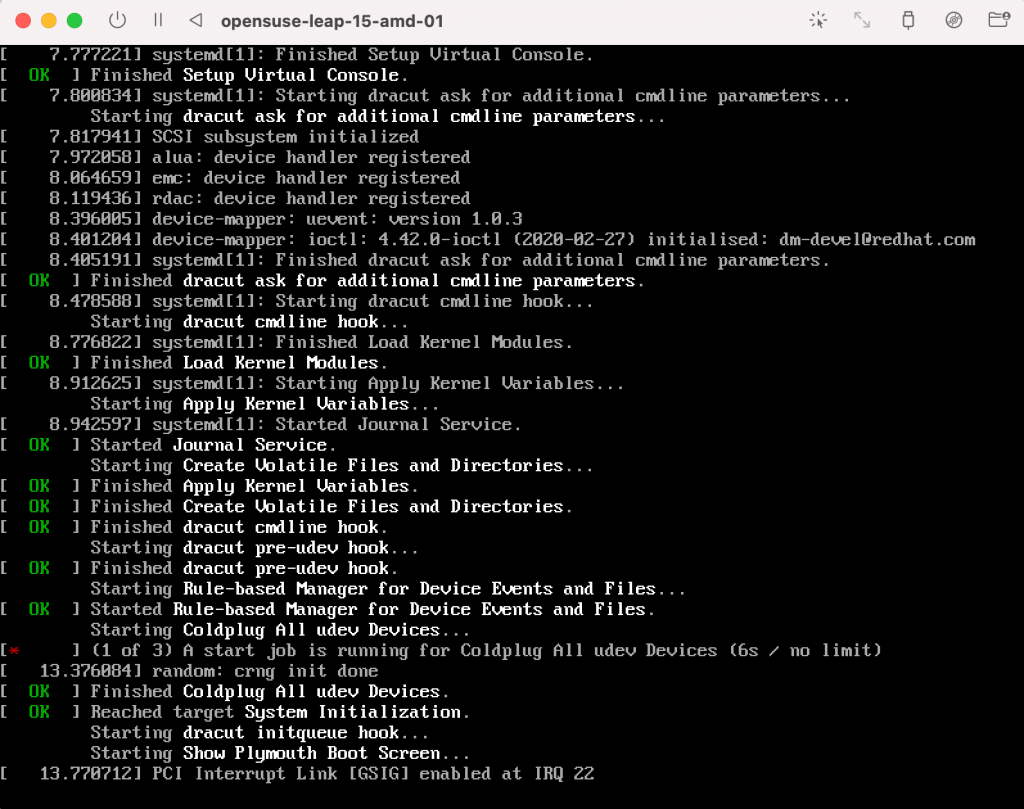
Once the installation is done, you reboot the VM from the popup prompt. After rebooting, the option “Boot from hard disk” should be available. Choose that. If you switched “quiet” off from Kernel Parameters, you see something like this:
Then you get some kind of “loading console” screen:
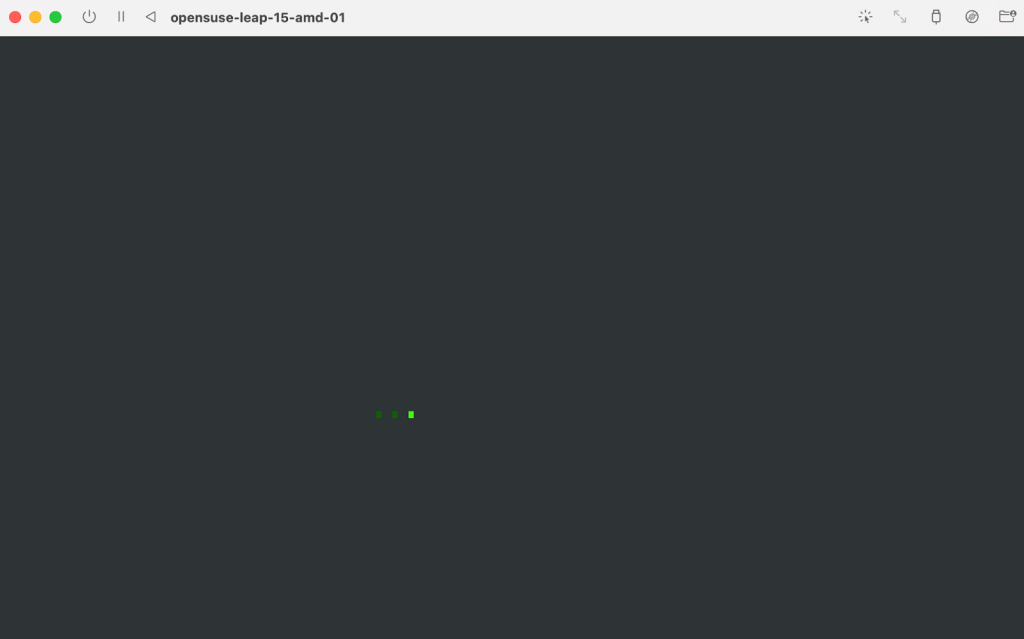
… and finally, the login console appears:
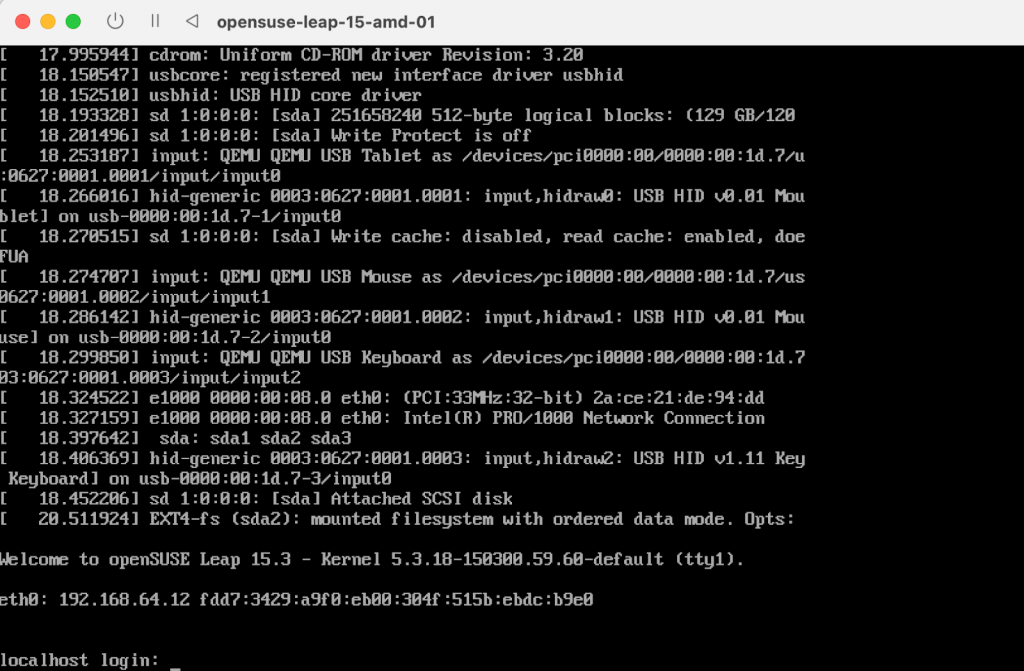
So now you can login using the user you created during the installation process.
Static IP
It’s better for servers to have static IPs; even though in practice Hypervisors tend to re-assign the same DHCP address to the same DHCP clients as a rule of thumb, still this is not the same certainty as static IP provides.
Since (for my UTM installation) the DHCP starts with 192.168.64.2 and counts upwards, our static IPs can be in the same 192.168.64.0/24 subnet, and we can define them, say, starting with 192.168.64.151 and counting upwards. But before we assign a static IP address, let’s find out what are the addresses of the default gateway and of the DNS server on the UTM “Shared Network”.
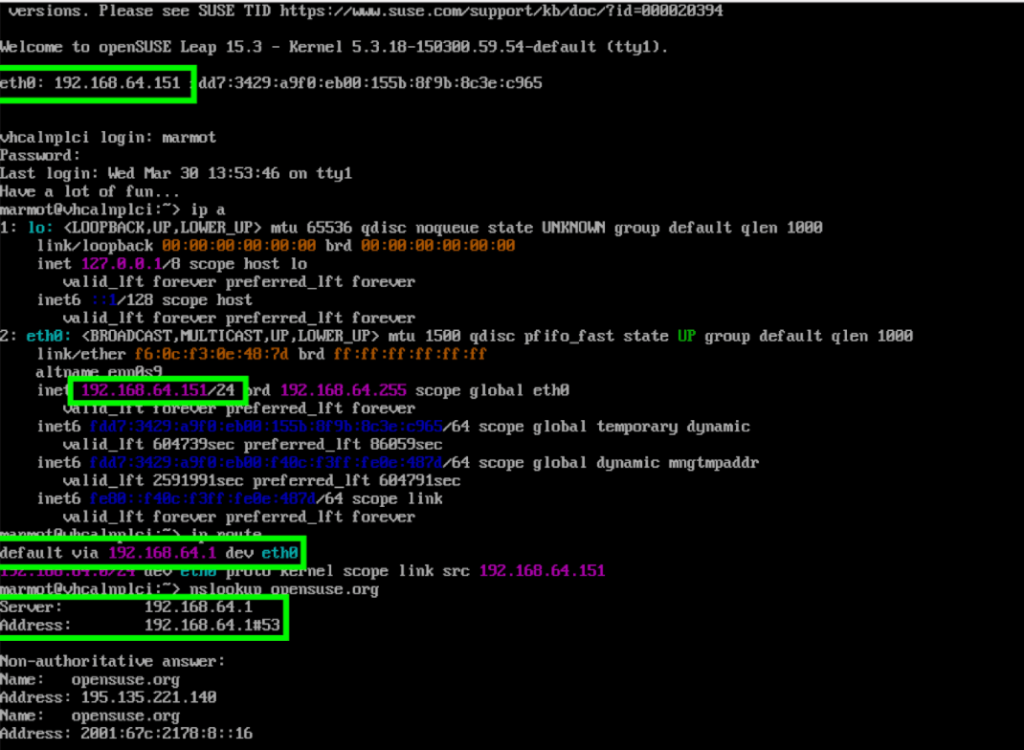
So to find the default gateway, for that we use:
ip route

So it’s 192.168.64.1 in our case (which is also by the way the MacBook host machine’s address on the UTM-network).
To find the DNS server, let’s just do a dig of some actual internet address, any old one will do:
dig opensuse.org
or
nslookup opensuse.org
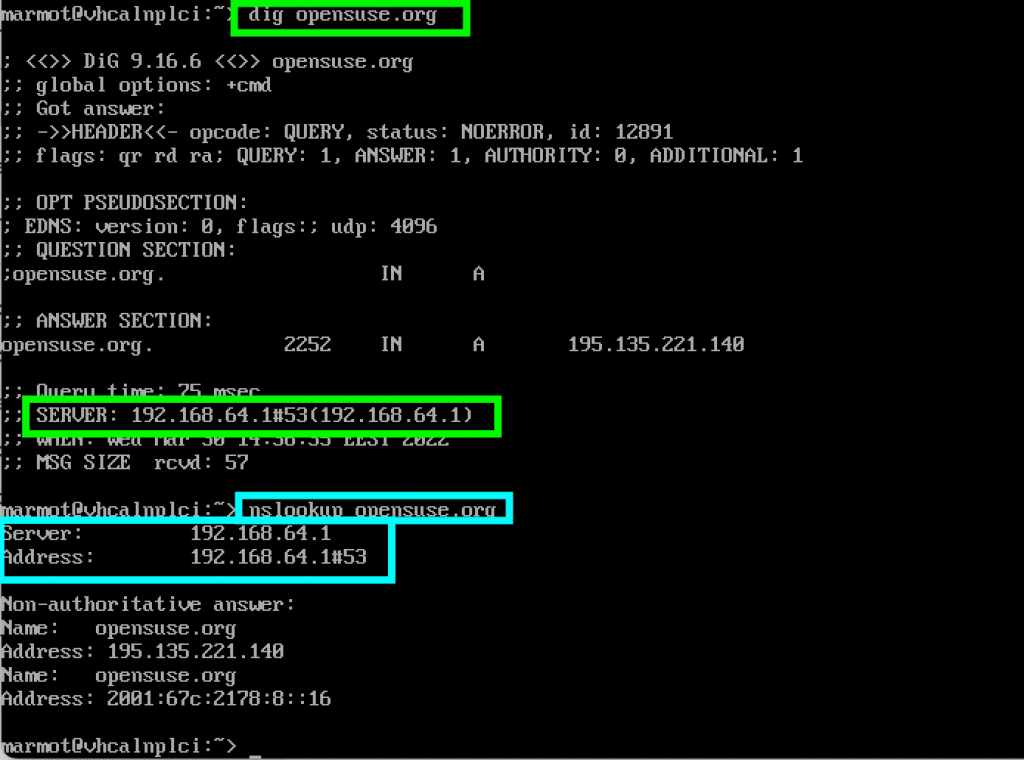
So there you go, the DNS server is also in effect the host machine, at 192.168.64.1
Now we can do some reconfiguring of our network settings. The tool we need here is called Yast..
sudo yast
System -> Network Settings -> Overview.
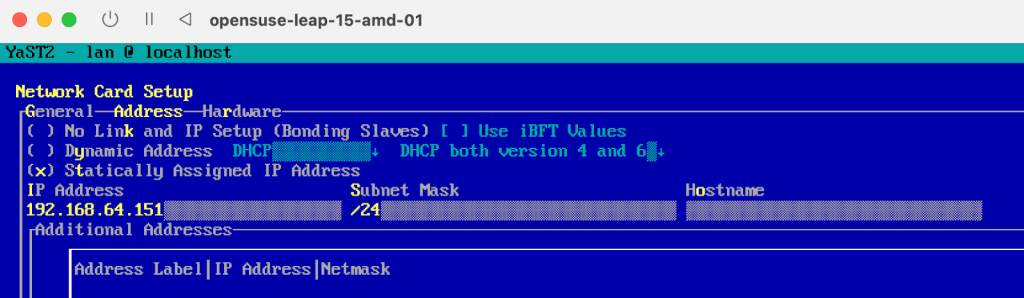
Tab down to Edit then <Enter>, or use <option>+’i’, to enter Network Card Setup:
By checking the “Statically Assigned IP Address”-radiobutton we thereby also uncheck the “Dynamic Address”-radiobutton. Then specify the Static IPv4 Address and the Subnet Mask.
IP Address: 192.168.64.151
Subnet Mask: /24
Hostname: I suggest keeping this particular field empty:
https://doc.opensuse.org/documentation/leap/reference/html/book-reference/cha-network.html
“Optionally, you can enter a fully qualified Hostname for this address, which will be written to the /etc/hosts configuration file.”
[If you decide to fill in this Network Card Setup -> Hostname field, then later when manually modifying /etc/hosts, use the automatically created line for the static IP and just add the FQDN to it].
So anyway, we have:
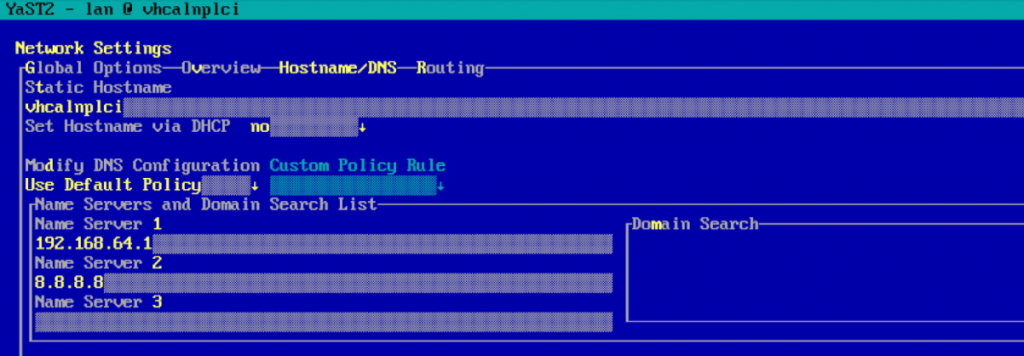
Then “Next” returns us to the Overview tab. Move to the Hostname/DNS tab and here we set
Static Hostname: vhcalnplci
Set Hostname via DHCP: no
Main DNS server (Name Server 1):192.168.64.1
Optionally we can set auxiliary DNS servers, e.g. I set Name Server 2 to be Google DNS server 8.8.8.8 as a backup, just in case:
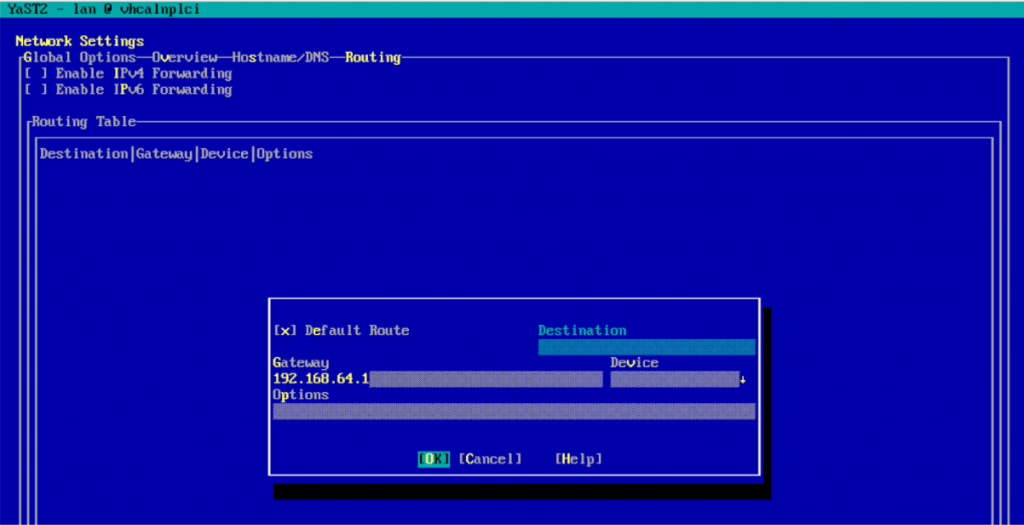
Now move to the Routing tab. We see there are no routes statically added as yet, so press Add, then since it is the first route to be added, the “Default route” checkbox should be pre-checked on, if not then check it to be on. Add the default gateway IP to “Gateway”, no need to limit by Device as it applies to all NICs. Then OK:
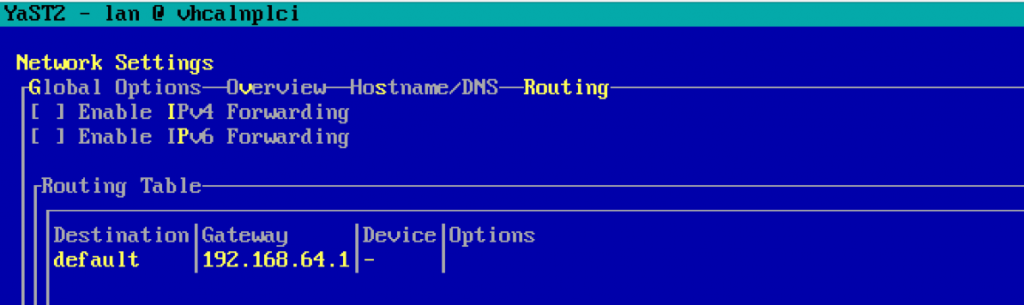
Then OK to save the settings. And after that quit Yast.
Next thing to do is modify hosts file, so that it contains a line mapping the static IP address to vhcalnplci and to the fully qualified hostname vhcalnplci.dummy.nodomain – so, using our favourite text editor, which is nano:
sudo nano /etc/hosts
Add the line (or modify any existing line beginning with the static IP) to get:
192.168.64.151 vhcalnplci vhcalnplci.dummy.nodomain
Ctrl+O, Ctrl+X to save and quit.
There are less dramatic ways maybe to get the VM to start using the new Network Settings, but since this is our own toy VM so we can just reboot the VM and see if everything works out as planned… First we can shutdown:
sudo shutdown -h now
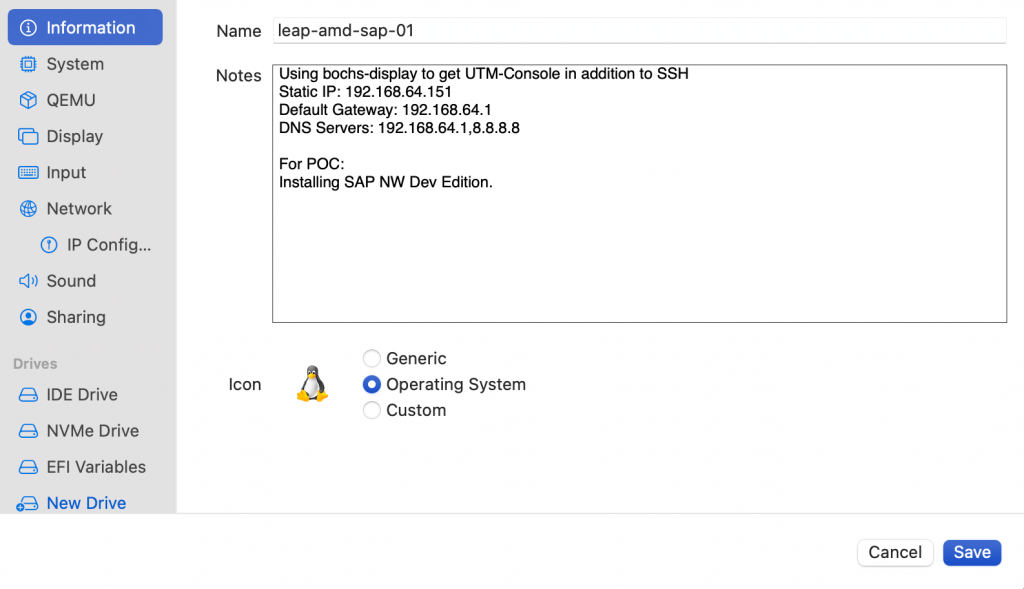
… and then in VM Settings add the networking info to the Notes, and Save.
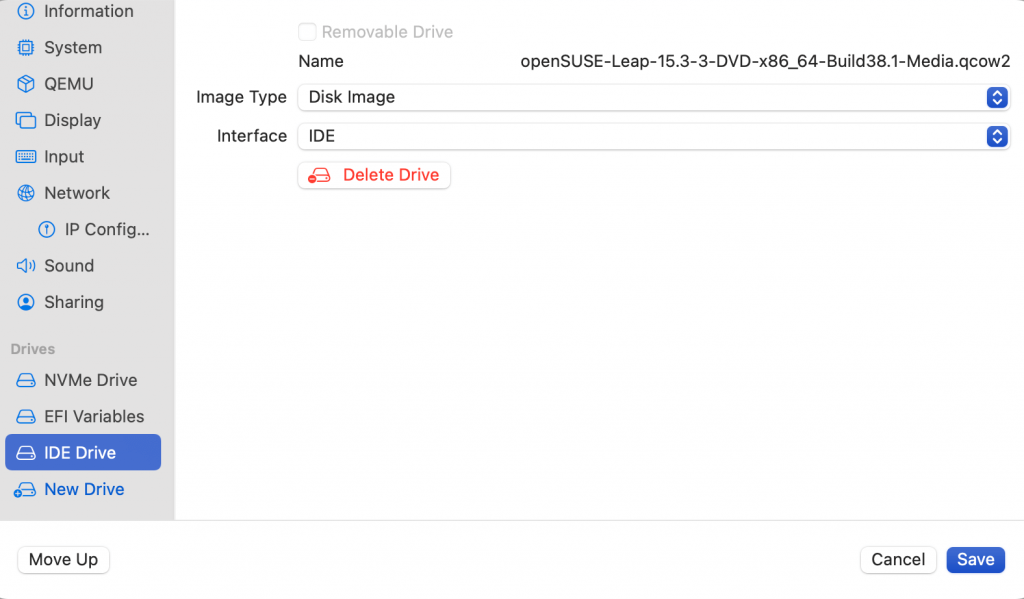
Also in Settings, you might want to move the CD/DVD Drive down to 3rd place in the order of drives (careful – after “Move Down” from top rack, the first button changes to “Move Up” and the “Move Down” button moves to the right) – so doing this then puts the main hard drive at the top of the drive oder, and it is this ordering which determines the order the VM looks for drives when booting up. And Save.
Now let’s boot up the VM, and check that our network config changes worked…
One more check, can we ssh into the VM from MacBook:
ssh marmot@192.168.64.151
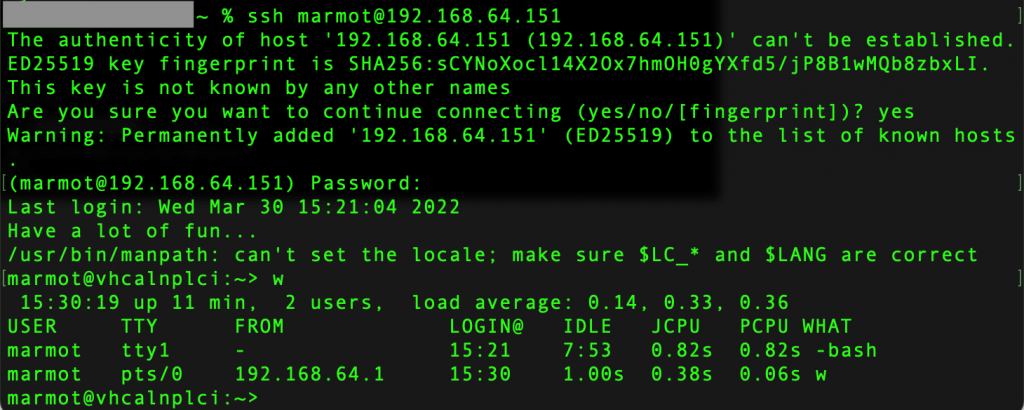
Yep, all good. Now a detour to get some installation media from SAP…
Get the SAP installation media and unrar
So the installation media is currently here:
https://developers.sap.com/trials-downloads.html?search=752
You need to login to download stuff, so for that you need a so-called P-user, which is like an SAP Community ID for Private individuals (i.e. not linked to an SAP Customer or Partner number as the S-users are) – go to https://account.sap.com and register there for a P-user.
It’s a bit time-consuming as those are large .rar files mostly, and each one has a popup to confirm window. Make sure also to download the license.rar file.
I recommend unrarring on the MacBook. So for that, you need The Unarchiver:
Freeware, and very good as well. So then you right-click on part1 and Open with.. The Unarchiver, then it unrars all the parts and you get the installation directory with all files and subdirectories.
Also you should unrar the license.rar, and check if it is still valid from the info.txt file that comes with it. (On 31.03.2022 the license was set to expire after 31.03.2002, I emailed some insiders at SAP and one of them said they will get the renewed license onto the website soon… once SAP does that, then it will be possible to install SAP NetWeaver Dev Edition again).
So if the license is valid, rename it to SYBASE_ASE_TD.lic – but, unlike what the info.txt says (as you cannot put it into a directory that doesn’t even exist yet) instead do as follows: copy and paste the SYBASE_ASE_TD.lic to subdirectory TD752SP04/server/TAR/x86_64/ (where TD752SP04 is the top directory of the unrarred files).
More VM preparation
Ok, back in the VM install some things, First maybe refresh and update
sudo zypper refresh
sudo zypper update
We need uuidd for SAP installation:
sudo zypper in uuidd
Something we need to remember after each reboot (until installation of SAP Dev Edition is done), before running the install.sh script, is:
sudo systemctl start uuidd
And check it is running:
sudo systemctl status uuidd
or
sudo service –status-all | grep uuidd
Check which libaio is installed:
rpm -qa | grep libaio
So libaio1 was found, Though to be on the safe side we can install it anyway (if already there and latest version it wouldn’t be reinstalled). Also we will need csh (the SAP <sid> adm user uses csh) so nowadays that works by installing tcsh (which csh is symbolically linked to; actually csh as link and tcsh binary itself are already pre-installed)..

sudo zypper in libaio1 tcsh
Ok, highest available versions of those had already been installed.
Check the hostname:
hostnamectl
If the static hostname is not vhcalnplci, then we can set it to be so:
sudo hostnamectl set-hostname vhcalnplci
Since I already extracted (unrarred using The Unarchiver app) on MacBook, so it’s convenient to just scp all those files from host directory TD752SP04 into the openSUSE VM and create a new directory /home/marmot/TD752SP04 to contain all the stuff:
scp -r ./TD752SP04 marmot@192.168.64.151:/home/marmot/TD752SP04
(Using the “-r” flag ensures recursive content-transfer through the subdirectories etc).
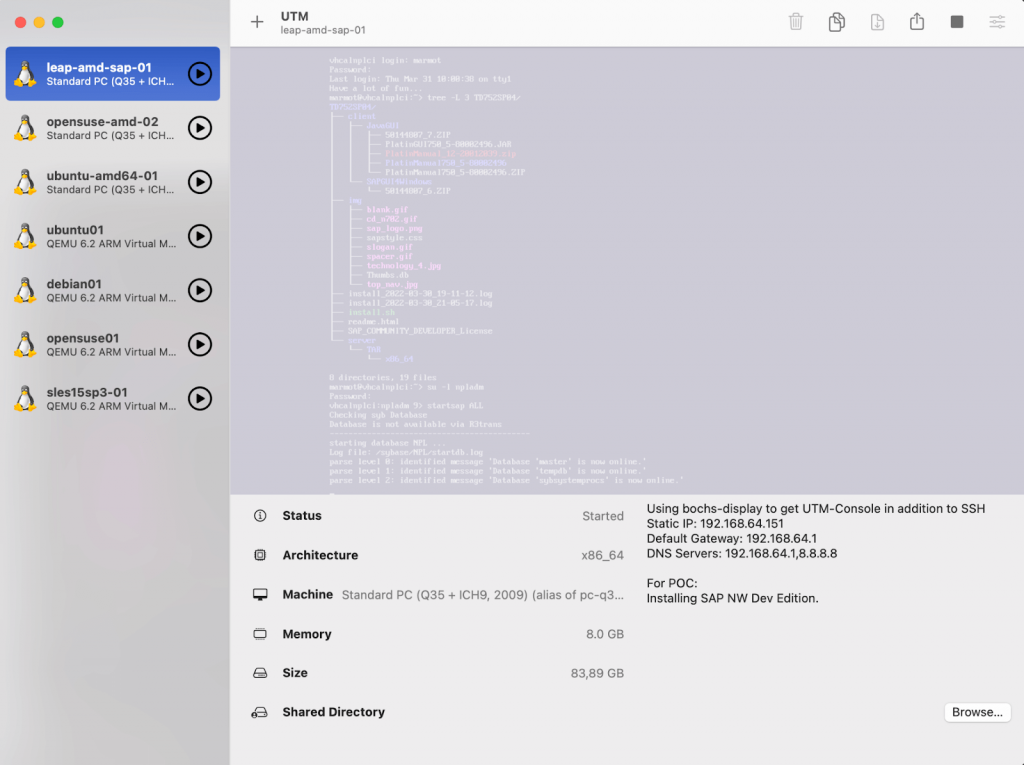
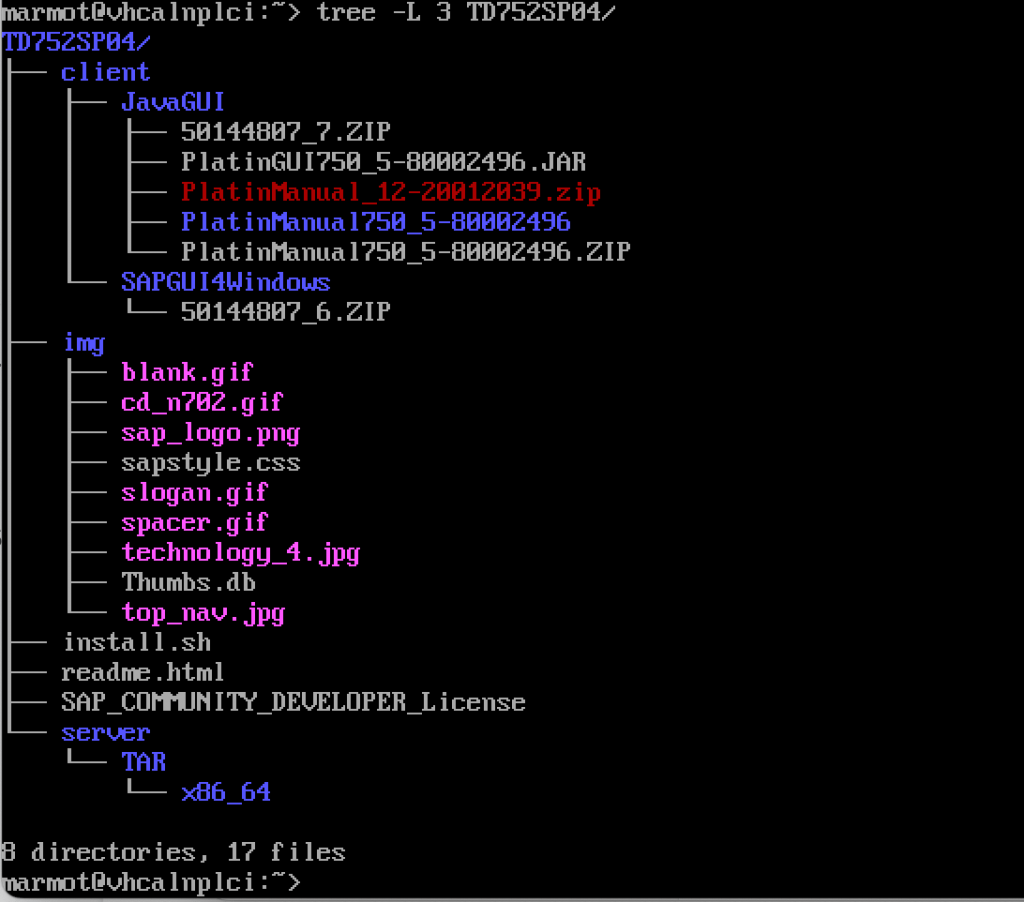
We can use the excellent utility called tree to check we got the stuff across ok, enough to check, say, three levels down (“-L 3”):
sudo zypper in tree
tree -L 3 TD752SP04/
uname -r

Ok we have 5.3.18-150300.59.54-default, which is less than 5.4.x, so we don’t need to adjust our installer bash script.
We also need to check from localectl that LANG=en_US.UTF-8
localectl
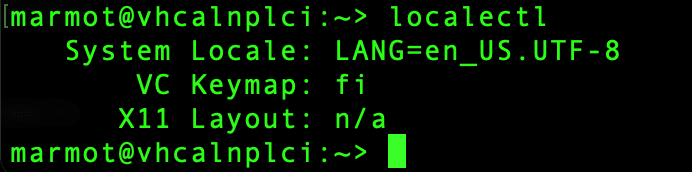
If not, we can set it:
sudo localectl set-locale LANG=en_US.UTF-8
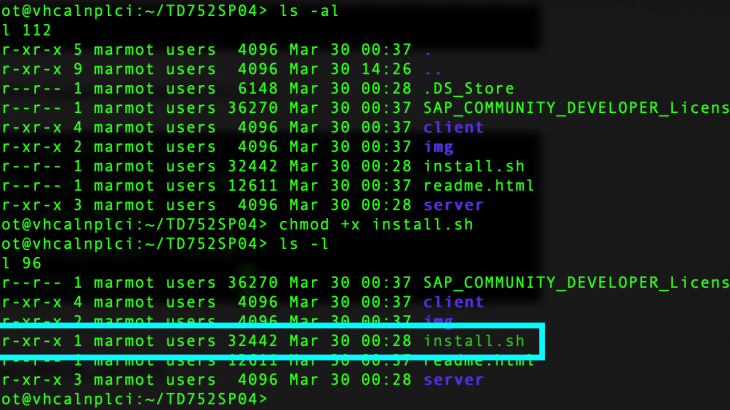
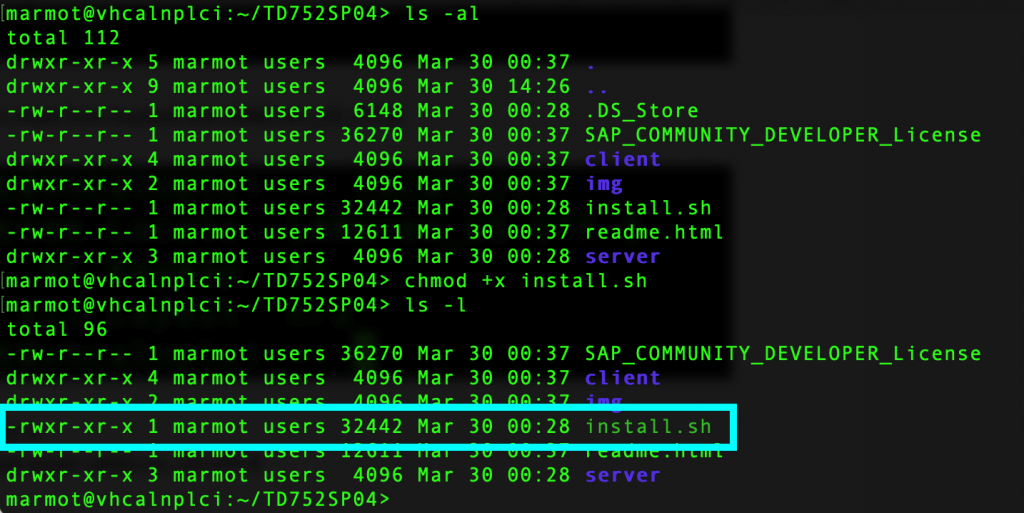
We need to set the install.sh file to executable:
cd /home/marmot/TD752SP04
ls -l
chmod +x install.sh
ls -l
Should now be executable.
[At this point we may want to take a snapshot of our VM, in case the installation goes badly. Actually UTM doesn’t seem to have snapshots… but we could clone the VM. If you don’t want to be bothered with making clones, then if an install.sh run fails, you can do an easy “reset” by deleting all the relevant installed material of the failed run:
sudo rm -rf /sapmnt /sybase /usr/sap
After that you can then do a new install.sh run].
Install SAP…
Remember to check the status of the uuidd service:
sudo systemctl status uuidd
To start the service if needed:
sudo systemctl start uuidd
Then become the root user:
sudo -i
Move to the directory containing install.sh:
cd /home/marmot/TD752SP04
Start the installation script:
./install.sh
ESC-key and/or hit ‘q’ a couple of time, to stop reading all the stuff (or scroll through all 167 lines), then when asked you need to accept the license by typing
yes <Enter>
Then you need to define what will become the password of the npladm OS user, so create some good password and enter it twice as prompted. Then the installation of the SAP system begins… it took about 45 minutes in my tests… if the installation fails, there will be error messages directing you to check the logs. In that case good luck with debugging and config changes; if the installation succeeds, you will see something like this:
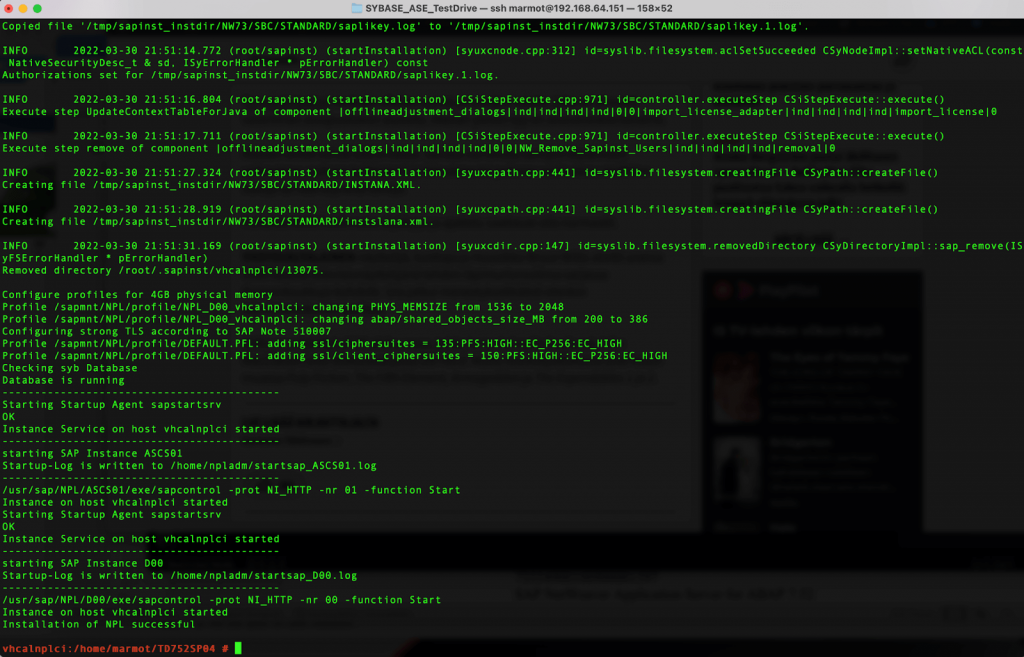
Checking syb Database
Database is running
——————————————-
Starting Startup Agent sapstartsrv
OK
Instance Service on host vhcalnplci started
——————————————-
starting SAP Instance ASCS01
Startup-Log is written to /home/npladm/startsap_ASCS01.log
——————————————-
/usr/sap/NPL/ASCS01/exe/sapcontrol -prot NI_HTTP -nr 01 -function Start
Instance on host vhcalnplci started
Starting Startup Agent sapstartsrv
OK
Instance Service on host vhcalnplci started
——————————————-
starting SAP Instance D00
Startup-Log is written to /home/npladm/startsap_D00.log
——————————————-
/usr/sap/NPL/D00/exe/sapcontrol -prot NI_HTTP -nr 00 -function Start
Instance on host vhcalnplci started
Installation of NPL successful
So there we have it, that’s an x86_64 emulated SAP system installed (and running) on an M1 arm64 host machine.
Let’s do some checks… since the SAP system has SID “NPL”, so the main OS user is called npladm, we need to become that user to do npl-admin stuff…
marmot@vhcalnplci:~> su -l npladm
Password:
vhcalnplci:npladm 2> sapcontrol -nr 00 -function GetProcessList
30.03.2022 21:58:57
GetProcessList
OK
name, description, dispstatus, textstatus, starttime, elapsedtime, pid
disp+work, Dispatcher, GREEN, Running, 2022 03 30 21:53:35, 0:05:22, 789
igswd_mt, IGS Watchdog, GREEN, Running, 2022 03 30 21:53:35, 0:05:22, 790
gwrd, Gateway, GREEN, Running, 2022 03 30 21:53:38, 0:05:19, 894
icman, ICM, GREEN, Running, 2022 03 30 21:53:38, 0:05:19, 895
vhcalnplci:npladm 3>
Excellent.
SAPGUI Logon to NPL and get License Key
To get much use out of SAP NetWeaver Dev Edition, you will need a SAPGUI client. Check the SAP Community pages for advice on getting those… the unrarred directory itself has SAPGUI client installation media for Windows, MacBook, and Linux, though at least for MacBook the offered client is a bit out of date. But good luck if you want to try and install that one.
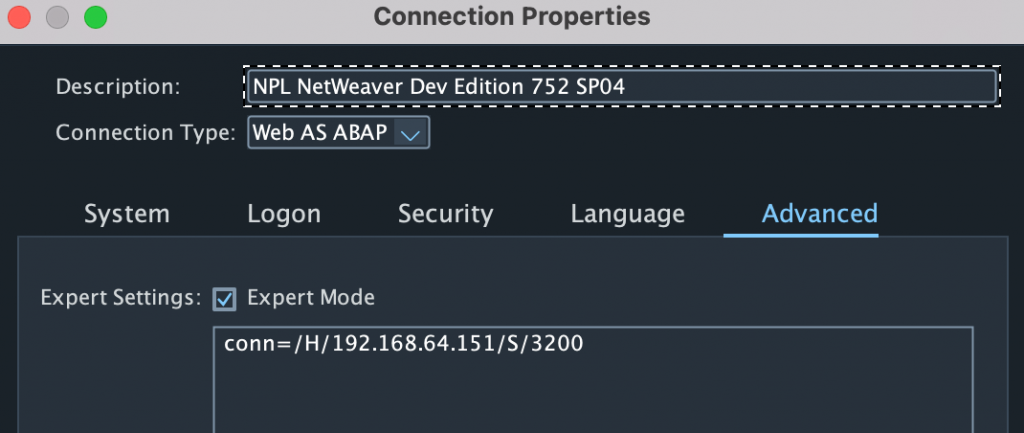
If/when you have a working SAPGUI client for MacBook, next step is to set up a new Connection Item, using the IPv4 address and the knowledge that since the main AS instance has instance-number 00, so the SAPGUI port is 3200 i.e. 32nn, where nn=instance-number:
[If you have openSUSE Firewall enabled, then remember you need to explicitly allow the port 3200 to be open, e.g. using Yast].
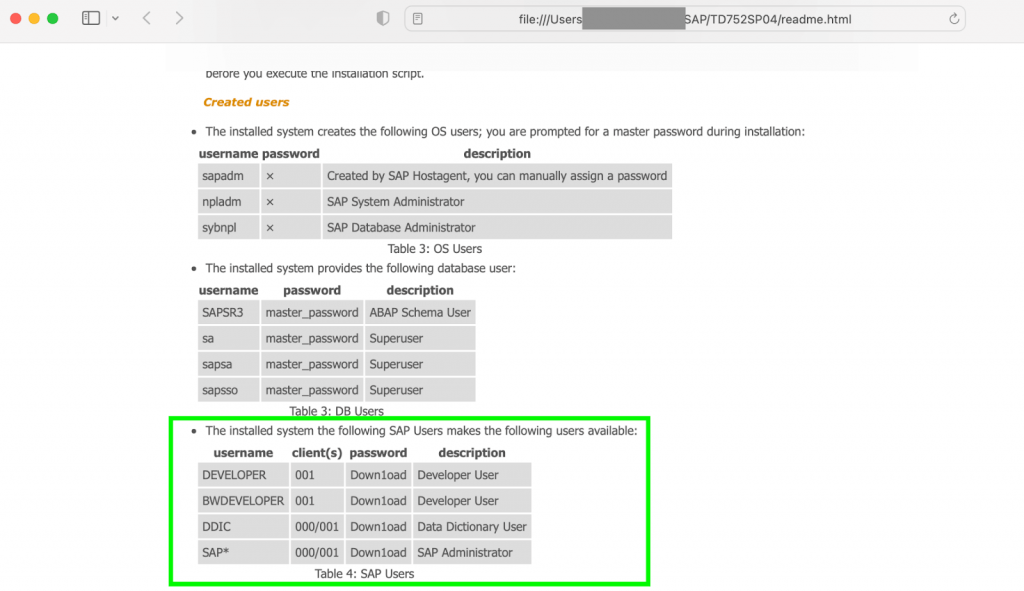
Then logon to SAP – follow the SAP instructions, using client 000, user SAP* and provided password (see readme.html in TD752SP04 directory for up to date passwords).
In the tcode box near the top-left of the screen, enter the tcode SLICENSE and hit <Enter>. From there you can copy the Hardware Key. Then go to:
https://go.support.sap.com/minisap/#/minisap
Scroll to find: “NPL – SAP NetWeaver 7.x (Sybase ASE)” line and check the radiobutton. Scroll down to section “Personal Data & Info”, enter relevant data including Hardware Key, check the box agreeing to License Agreement, then press “Generate”, to download the license as a text file to your local machine, probably it is called “NPL.txt”.
Then back in your SAPGUI screen, first delete any existing temporary licenses (important for some reason to do this step before installing a new license). Highlight license, Edit -> Delete license.
The order matters… first delete the 2 temporary licenses, and only then install the permanent (well, valid for 3 months) license you got from the website. Once those are deleted, go to Edit -> Install License. You might need to go up to nearer the root folder then descend again to get to your Downloads folder where the NPL.txt license sits. (When uploading (“Install License”) the license file NPL.txt, you might need to give SAPGUI the right to access some folder(s)).

Then you can log off as the SAP* user from SAP (the SAP* user is only for “special activities”).
Developer-user can now logon…
Now logon to client 001, as user DEVELOPER; the list of SAP userIDs and their default passwords is in “readme.html” in the installation directory TD752SP04:
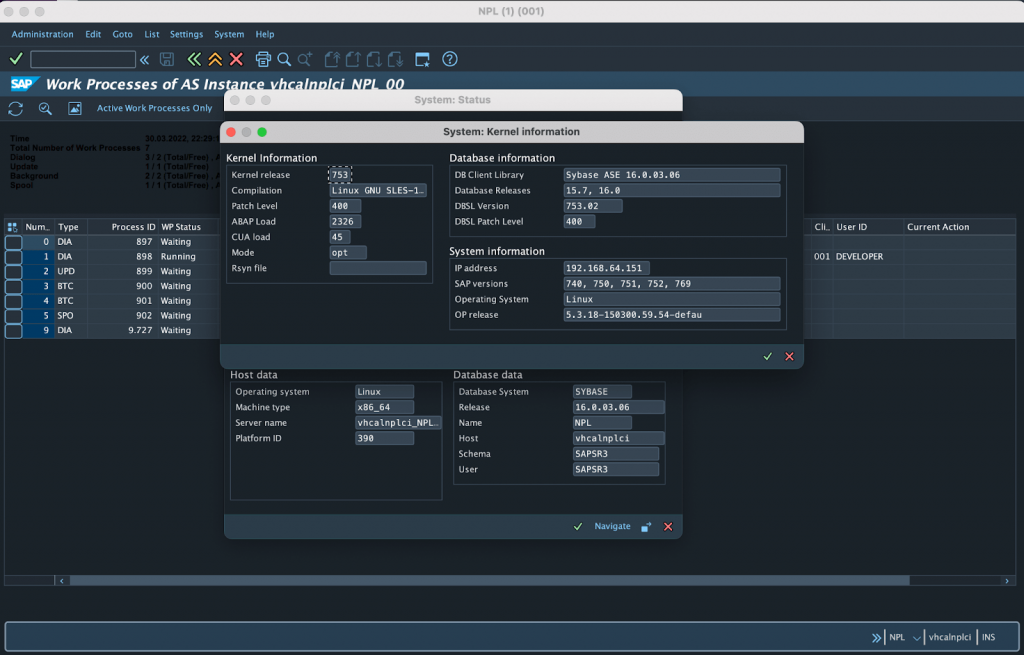
So yes, here we are then, logged on to SAP, which thinks it is running on x86_64 architecture, though we know it is actually being powered by the host M1 MacBook:
We can make the obligatory – well, optional, gratuitous – custom Abap program to remind ourselves that once upon a time we too knew how to program computers… tcode is SE38 or /nSE38 if you are away from the landing screen. Not going to show here how to create and write an Abap program, but anyway here is ZTESTMARMOT001 as source code and at runtime:
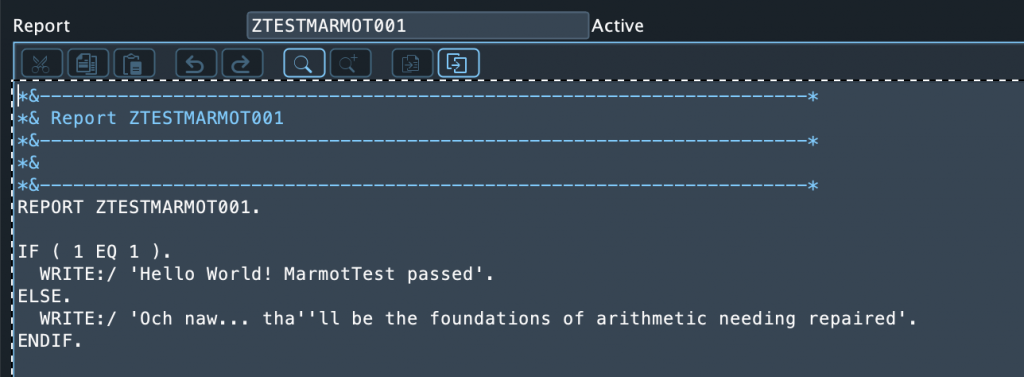
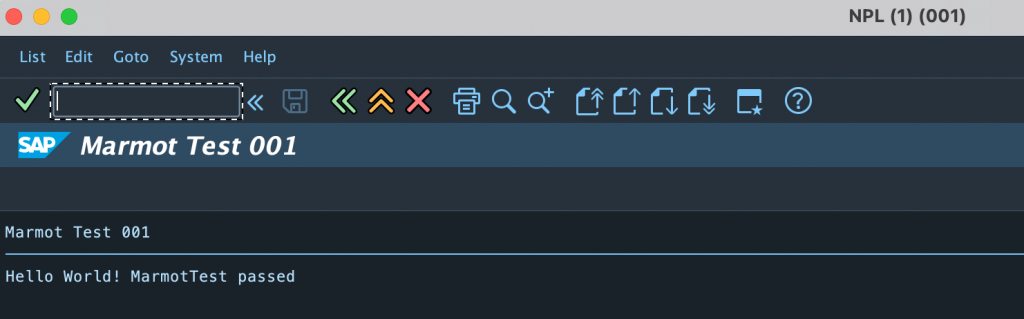
Well maybe it’s not the best code ever, essentially half of it can never be executed, but the point is you can do most Abap and Basis activities and experiments using this SAP NetWeaver Dev Edition.
Now we can log off SAP. Then as the OS npladm user we can shutdown the SAP system:
stopsap ALL
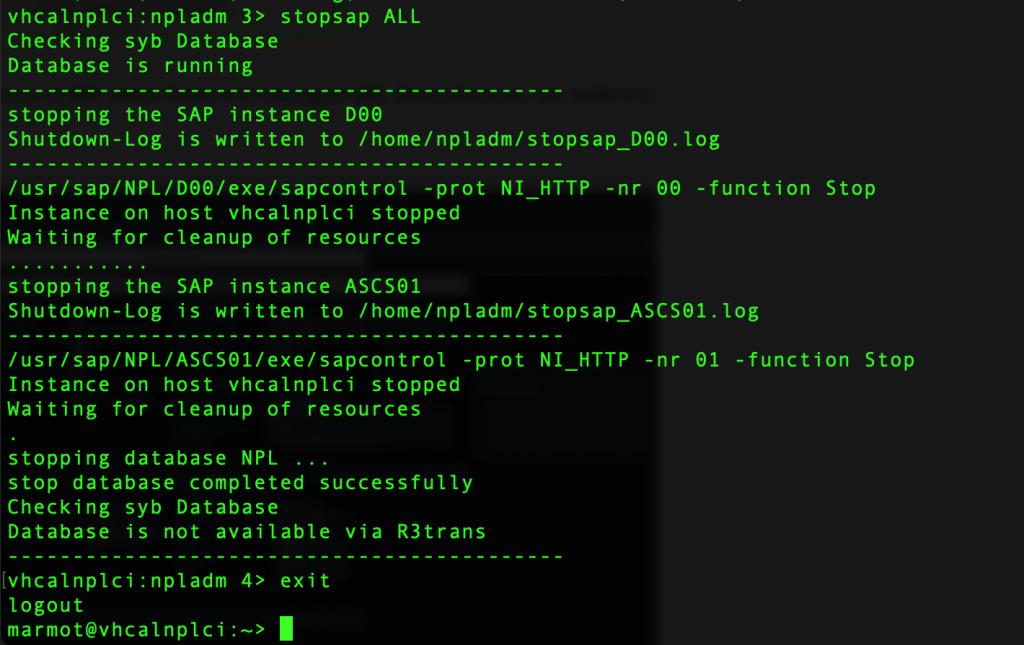
Once the SAP system has shut down, you can drop out of npladm to being plain old marmot paws again:
exit
And then you can shut the VM down using sudo powers as normal
sudo shutdown -h now
Next time you need to use NPL…boot the VM; login as marmot; become npladm; start NPL:
su -l npladm
startsap ALL
Might take about five minutes or so to be properly up and running.
To check all the important SAP processes are healthy, use (as npladm):
sapcontrol -nr 00 -function GetProcessList
If they don’t all look right, e.g. couple of YELLOW status processes, try waiting for a minute or two and checking again.
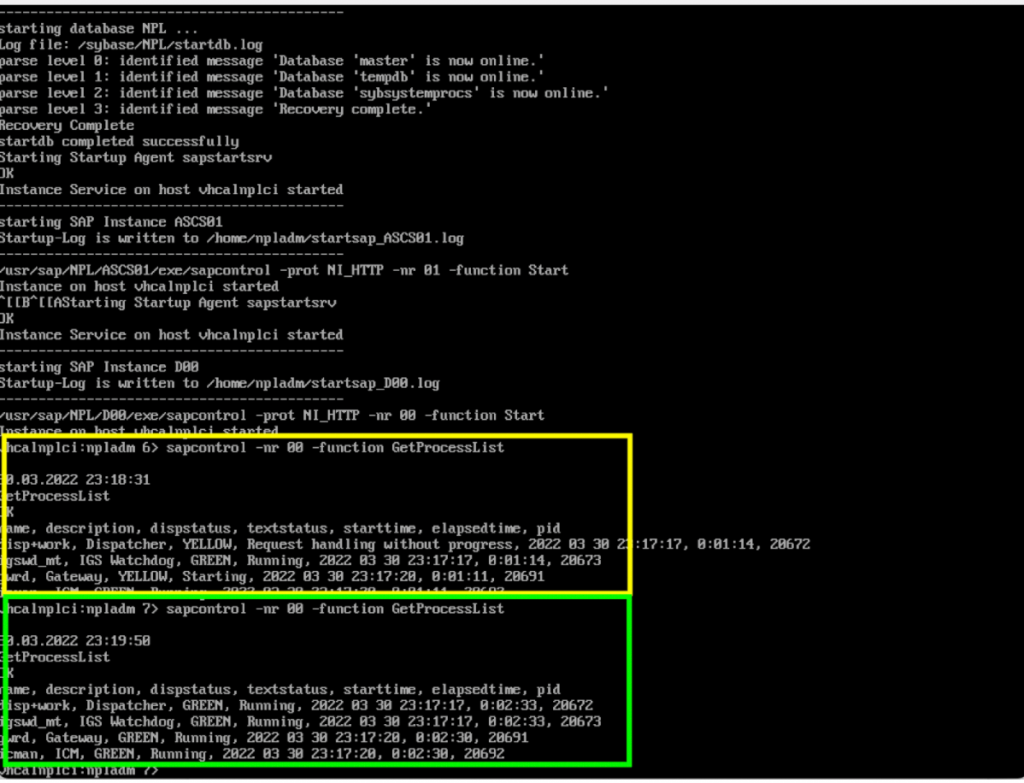
If that still doesn’t work, try stopping SAP and then starting SAP again
stopsap ALL
startsap ALL
When all the SAP processes are in GREEN status, you can logon to NPL via SAPGUI.


