Introduction
Companies, both large and small, will come across a moment when processing mass changes is necessary. Especially in the current environment, where organizations have to adapt to be able to handle their ever-changing workforce. Transactions such as mass transfers, splitting departments or updating holiday calendars, are now more critical than ever.
Learning how to handle mass changes properly is a key practice that organizations must be ready to perform. As a starting point, there is a need to fully understand if these changes affect solely the employees, the organizational units or both.
SuccessFactors provides multiple tools to process these changes, but which one best fits your specific needs? Not to worry, we are here to provide guidance.
Veritas Prime alongside SAP have gathered a set of Best Practices to effectively manage these transactions according to the type of action and consideration to keep in mind for example if Position Management is enabled. This blog to summarizes the recommended approach to follow on some key scenarios, especially those when Position Management is enabled.
The scenarios used in this example will be easy to follow along that can be repeatable for like use cases.
- Foundation Object Label Change and its translations
- Mass Terminations
- Employee’s Holiday Calendar Update
- Closing a location and transferring all employees to a new one
- Changing Job Relationships like HR Managers and Matrix Managers
Let’s review some prerequisites……
Pre-check: Conceptual and system prerequisites before making a Mass Change
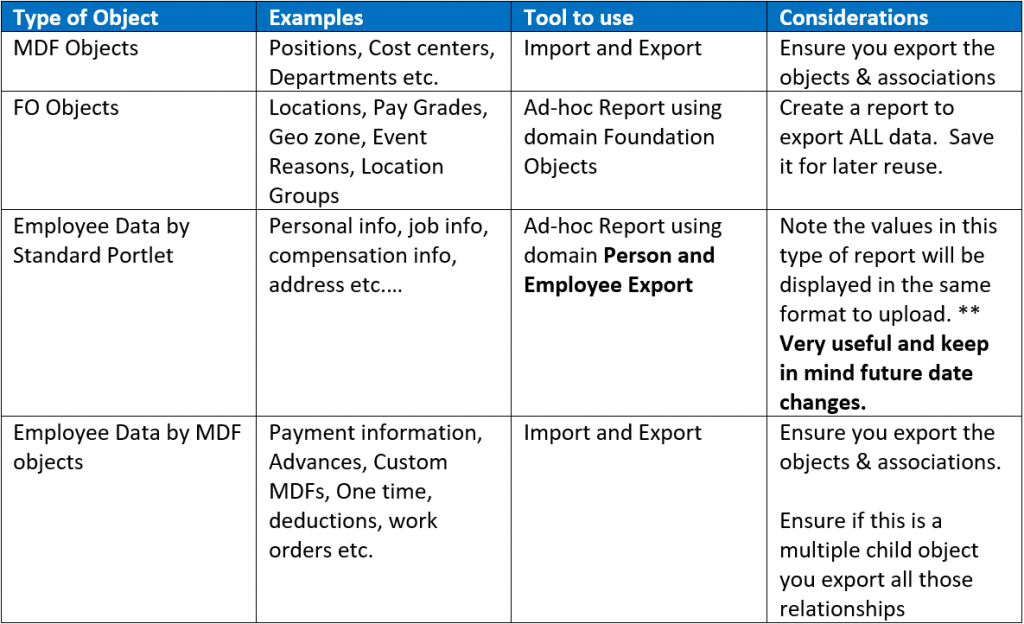
- Tools: The Different tools that can be used to manage Mass Transactions by type of object:

- Data Back-up: Always ensure you have a backup of your data PRIOR to making any mass change. SuccessFactors is very easy to undo or reverse out if you have a backup copy. If you don’t, then you could be in trouble ☹️
Use the chart below to obtain guidance by object:
- Position Management Considerations: To ensure the user’s position and Job Information are aligned there are a few things to check:
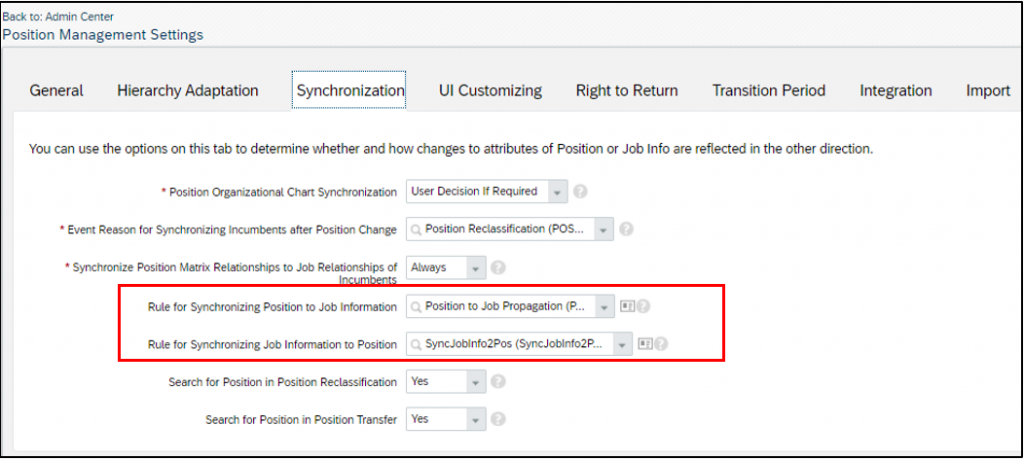
i. Validate the Position to Job Sync Rule as well as the Job to Position rule are set up in the Synchronization tab of Position Management Settings.
ii. In Position Management Settings > Import > Execute Reclassification or Transfer During Job Information section make sure the “Execute Reclassification or Transfer” option is set to “Yes” and the “Event Reason for Position Assignment Change” option is set to the desired Event Reason that will trigger the Job Information to Position sync

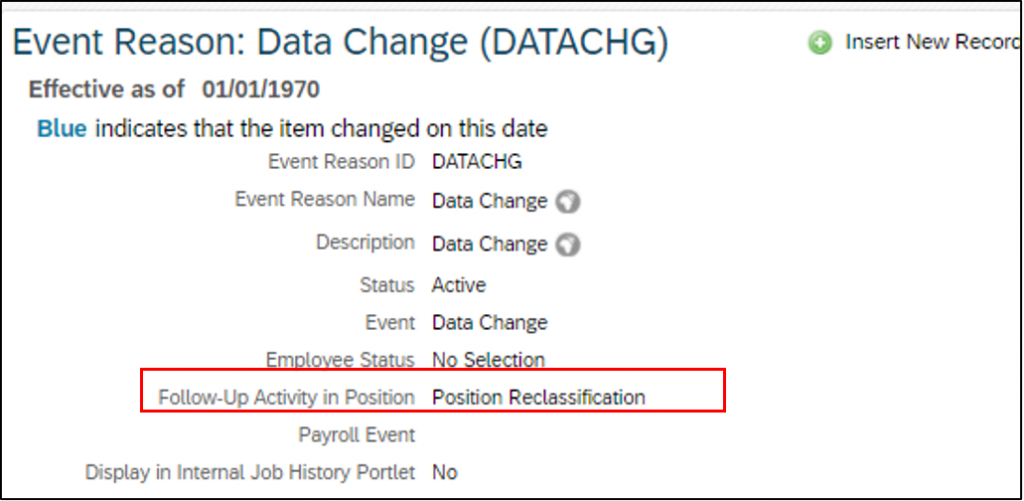
iii. Make sure to set the Follow-up-activity flag in the event reason you will be using
- Security Considerations: For employee changes, there might be scenarios where you might want to consider:
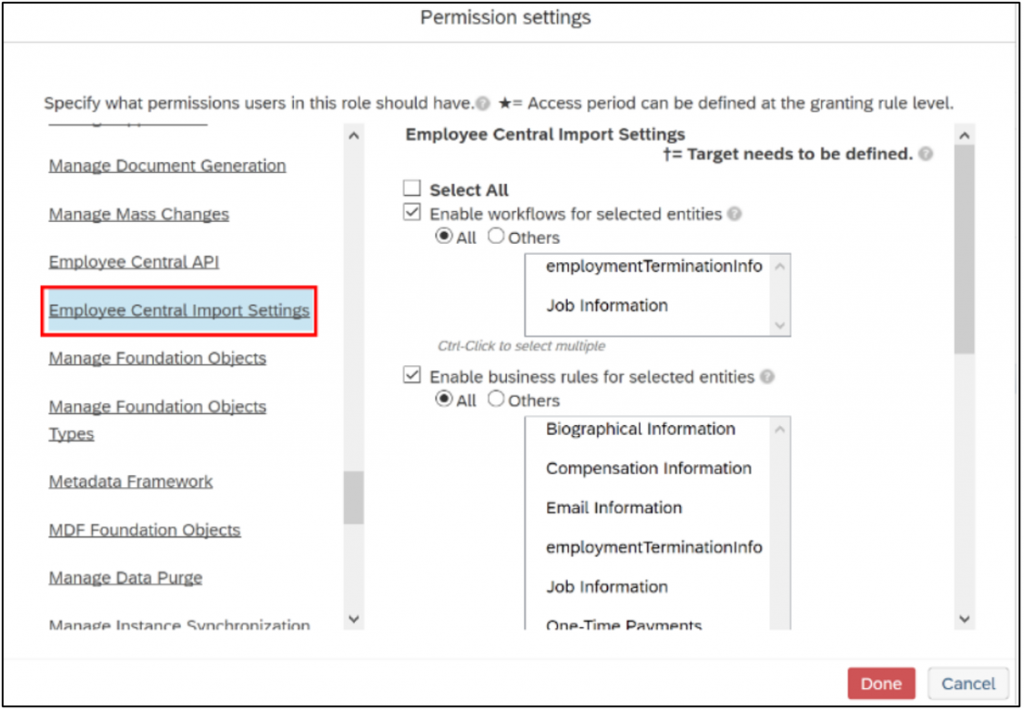
i. Should workflows be or not be triggered?
ii. Should rules be triggered to ensure proper defaulting based on my import?This is controlled under Permission Roles ⇒Permissions ⇒ Employee Central Import Settings as shown below. Prior to running your tests, feel free to update these settings depending on your answers above.
- Rehearsal: Best recommendation is to always perform your changes in a non-productive environment. This ensures that you have
- Reviewed impact of your changes
- Performed an executed plan
- Allows for testing with downstream systems
- Provides an end to end testing
- For foundational data updates, it keeps your various systems all updated
- Reviewed impact of your changes
Once you have finished reviewing all the mentioned considerations, you are ready to perform your changes!
Detailed Solution
1. Foundation Object Label Change and its translations
In this use case, you get the opportunity to experience two modes of updates for one object!! We will be using a Pay Grade label change for multiple languages!! You are in for a treat as updating in mass translations is a bit unique.
? Reminders and Tips:
1. If multiple language packs are enabled, translations will also need to be updated.
2. Determining the date: If your change should overwrite the existing value, then ensure you use the most recent start-date which has the Status A for active. If your change should be effective as of a certain date, then ensure you update the start-date to reflect this. This option will create a 2nd entry for this date.
⭐ Recommended Process:
1. Run a Foundation Object ad-hoc report ? on Pay Grade to get all the Pay Grade values in one file.
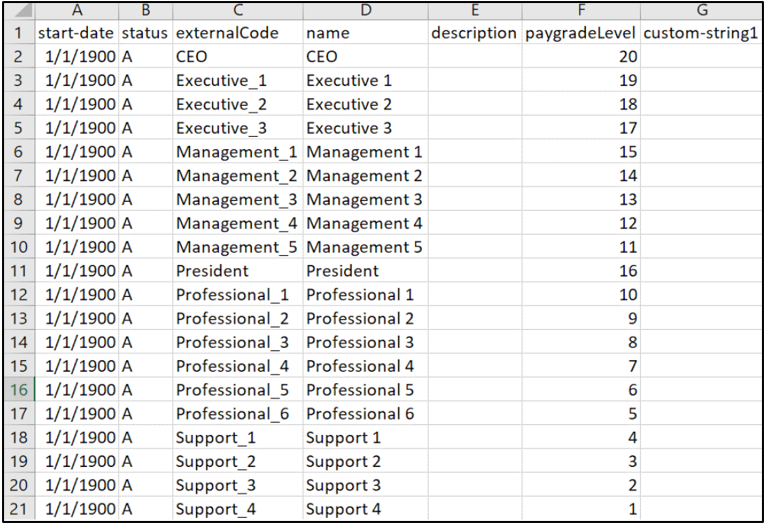
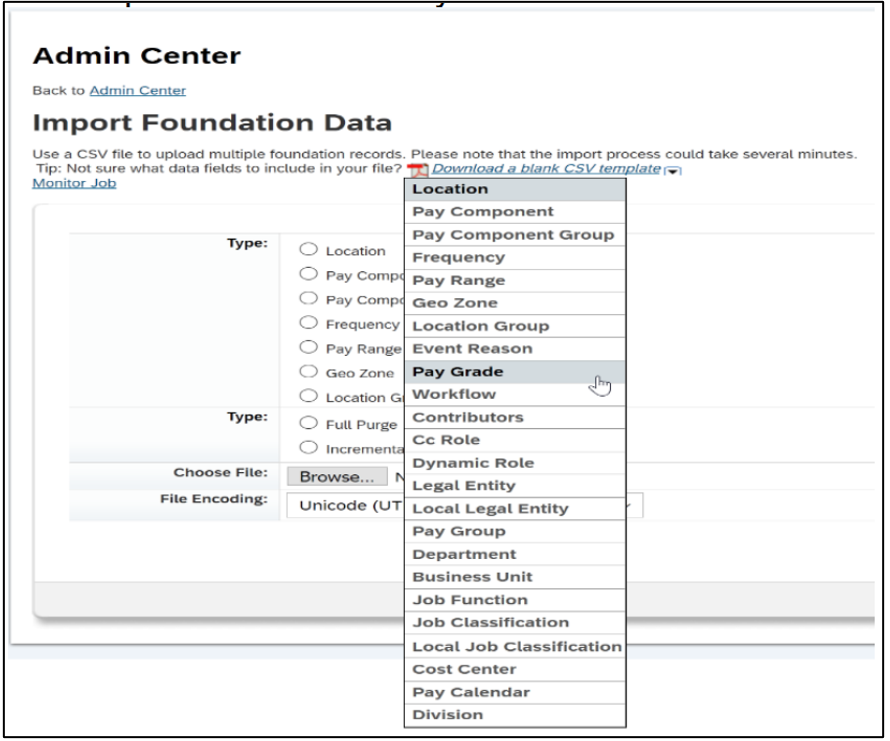
2. Go to Import Foundation Data and download a blank template for Pay Grade. Use the data from the report on step (i) to fill out this template. Once the file validates without any errors, import the template back into the system.
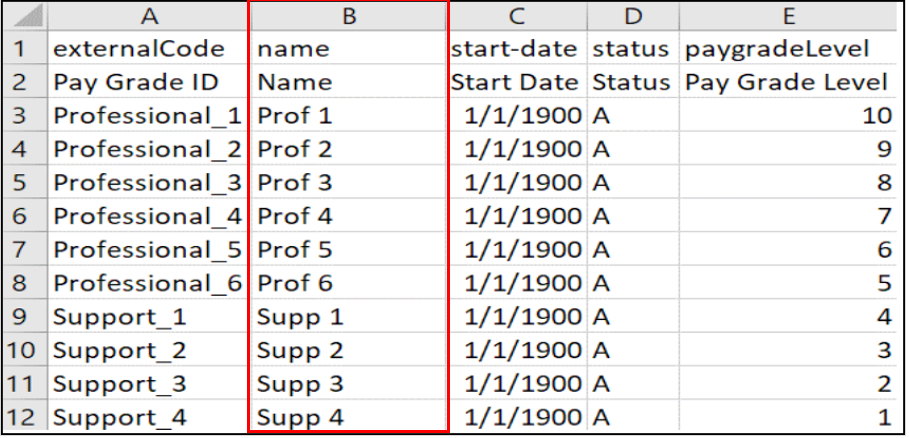

3. After importing, notice that the names of the Pay Grades were updated but not the translations.


Pay grade in US language was not updated
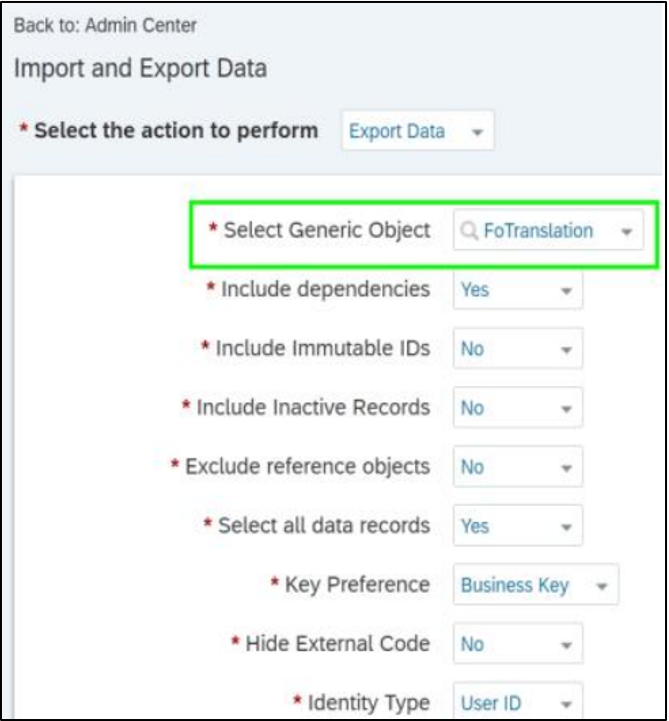
4. To fix this, go to Import and Export Data and export the “FO Translation” object. In the file, filter and search for the translations you need to update
5. Open a new excel file, make the necessary translation updates, and import this back into the system through Import and Export Data.
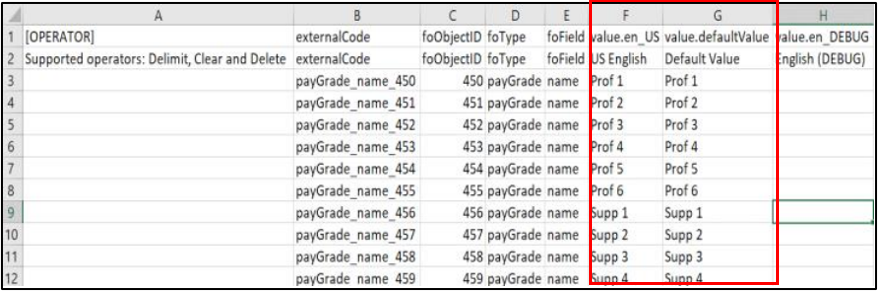

6. Check to see the translations and labels are updated and match.

2. Mass Terminations
This type of transaction is best performed via import as not all direct reports will be handled the same way. Furthermore, by using imports, it is also easier to skip potential workflows and there is a “Termination Details import” specifically for this mass transaction.
? Reminders and Tips:
- All direct reports will need a new Manager. This can be handled in Position Management Settings (Hierarchy adaptation) or via employee imports prior to the termination details import.
- If Positions need to be made inactive after termination, an additional Position import has to be done after the employee import.
- Ensure you have a backup of your data❗
⭐ Recommended Process:
- After identifying the employees to be terminated, download the Termination Details template form Import Employee Data
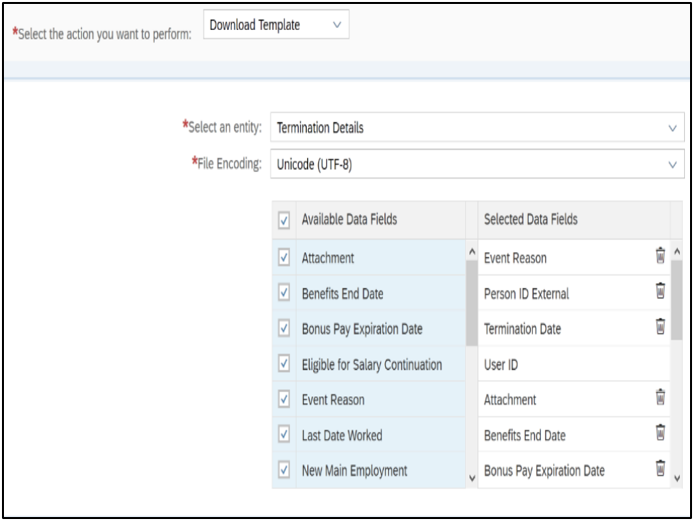
2. Fill out the import file with the appropriate dates and User IDs of employees.

3. Validate, review, and correct any errors in Monitor Job, then import the template.

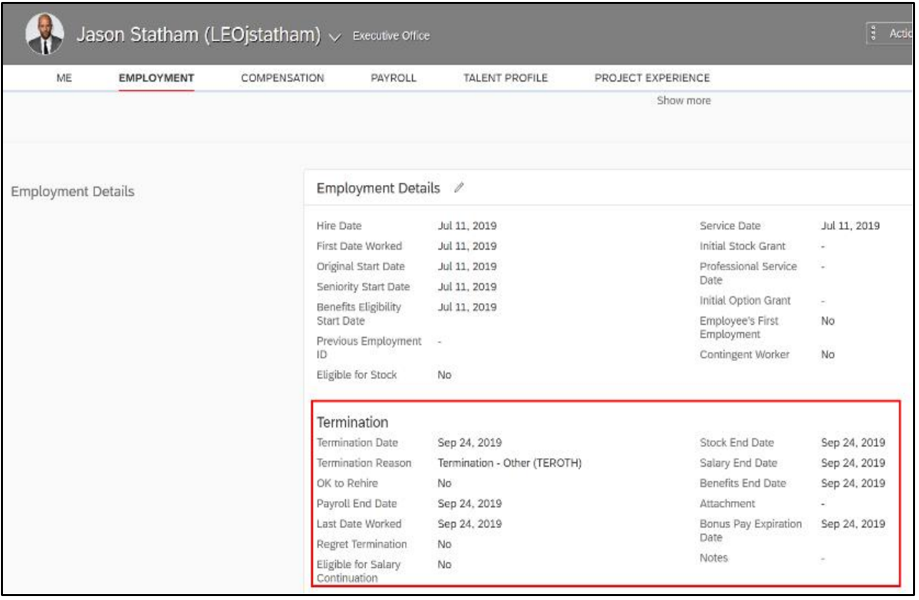
4. Verify the terminations imported into the system properly by navigating to an employee’s profile.
3. Employee’s Holiday Calendar Update
Next, we will demonstrate a change using the Manage Mass Changes tool. This tool is very useful for changes such as updating a group of employee’s Holiday Calendar all to a different Holiday Calendar.
? Reminders and Tips:
- When using the Manage Mass Change tool, the updates will only go through for employees that have clean data (associations, filters). Considering this, we will need to ensure all bad data is corrected before starting a mass change.
- Always have a back-up of your data❗❗
⭐ Recommended Process:
1. Navigate to Manage Mass Changes and click Create New

2. Fill out a name and effective date for this change and identify a group of employees by clicking “Create” next to the field.
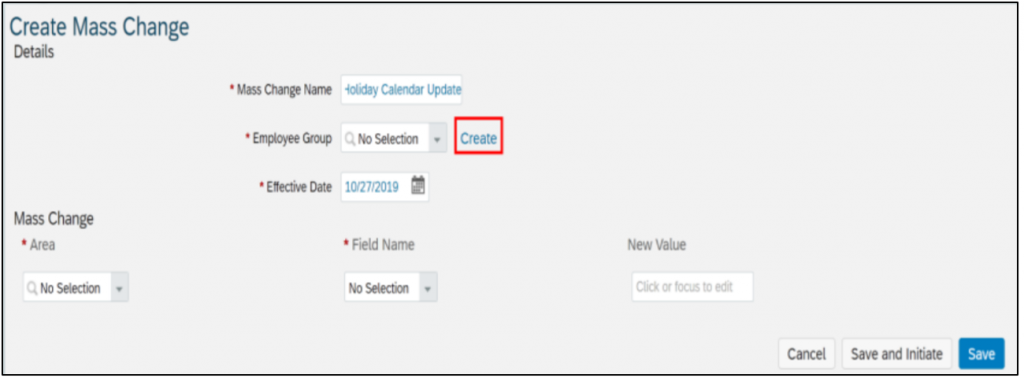
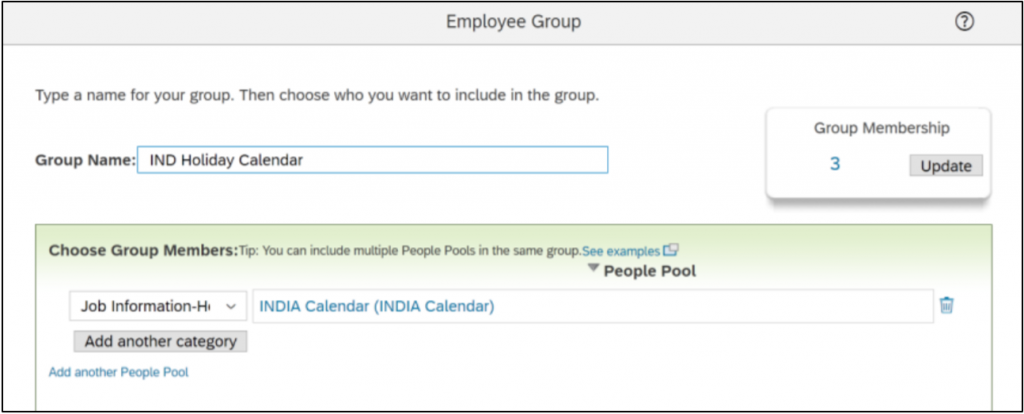
3. Create a group to specify the employees that need the update. Considering you have already identified the current value for Holiday Calendar you want to change, we recommend using that as your driving category for the group.
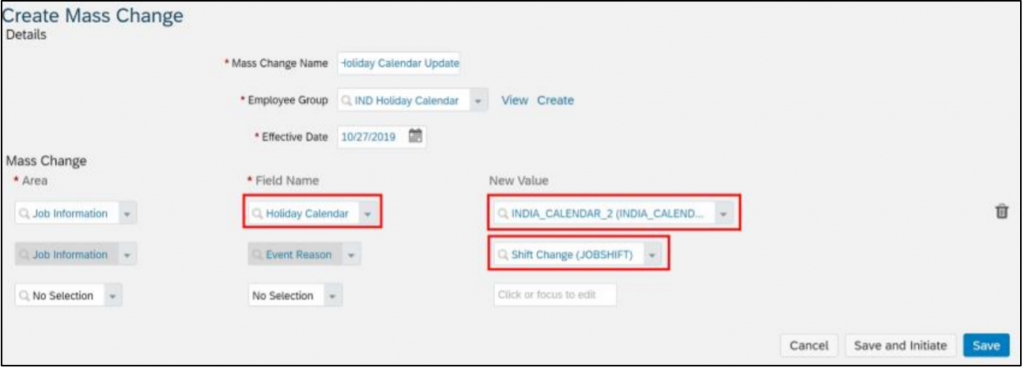
4. After creating a group, select the Holiday Calendar field and the new value the employees will have. You will also have to select the Event Reason that will be used for this update.
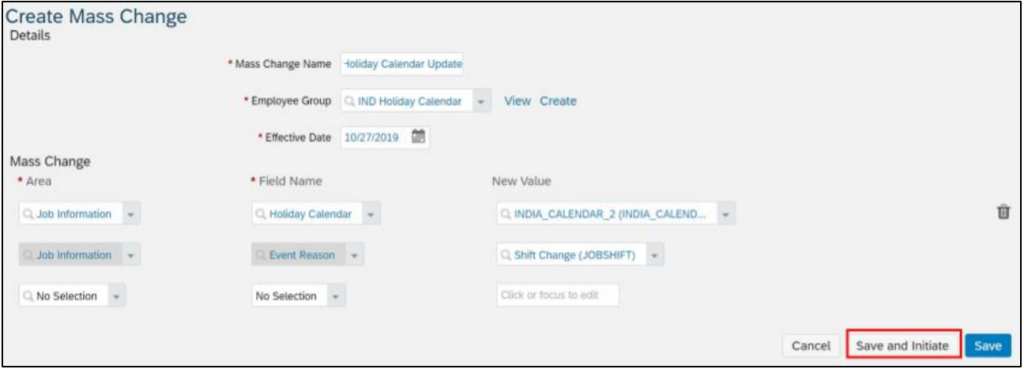
5. Click Save and Initiate to start the Mass Change job.
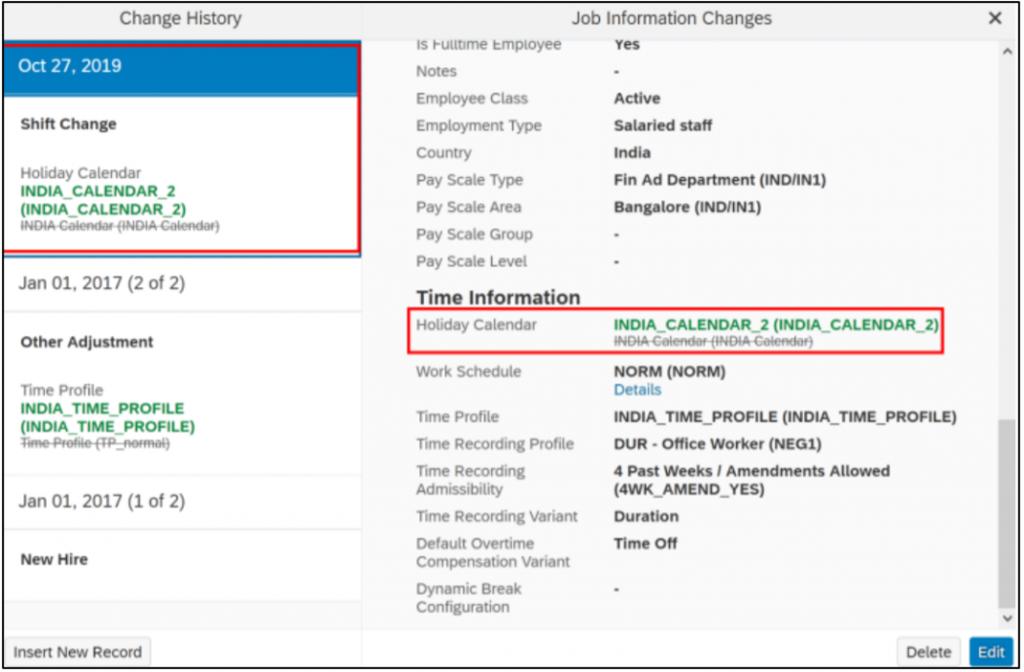
6. Once completed, verify the change was successful by navigating to the profile of a user that was included in the change group.
4. Closing a Location and transferring all employees to a new Location
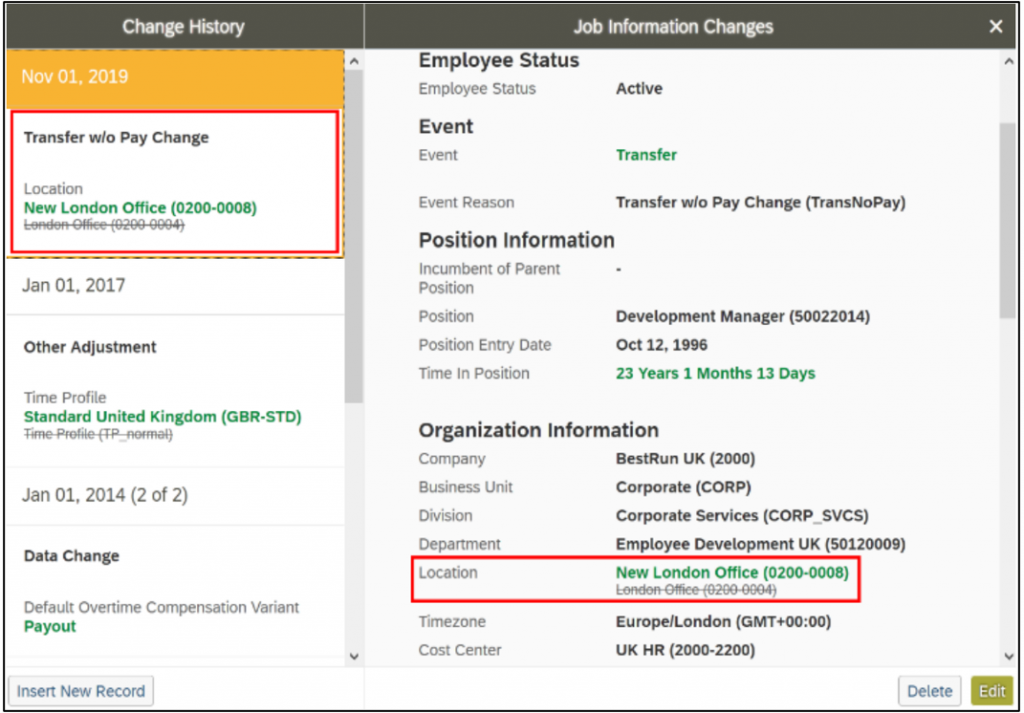
This next use case is set around a location closing and all employees in that location are now being transferred to the same new location. Additional to this, for this example we will consider that Position Management is in scope. Taking all of this into account, we recommend using the Mass Changes for MDF tool.
? Reminders and Tips:
- Do not delete any objects that are currently in use by employees.
- Choose a date that makes sense for the “Start Date” of the Location.
- Have a back-up for both your MDF objects and your Employee’s information❗❗
⭐ Recommended Process:
1. Run a report to see which employees are currently using the location value that is closing.

2. Go to Manage Organization, Pay, and Job Structures > Location and search for said value.
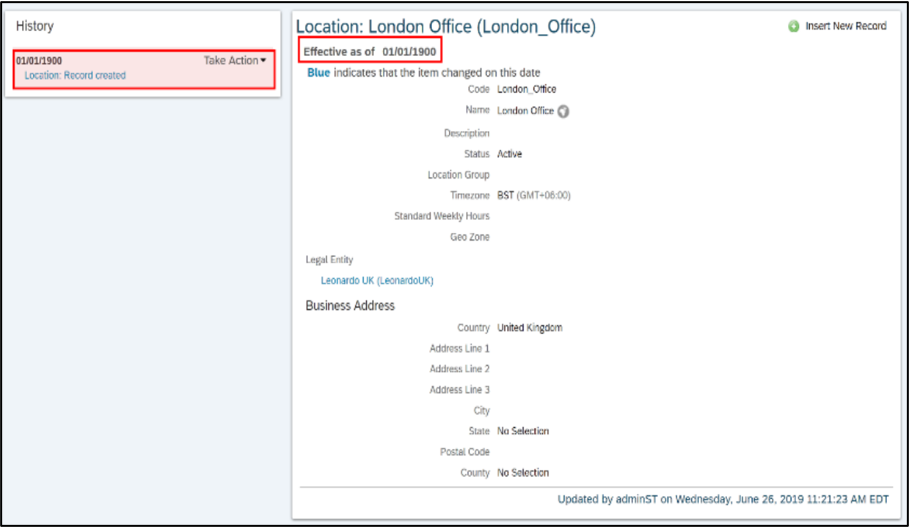
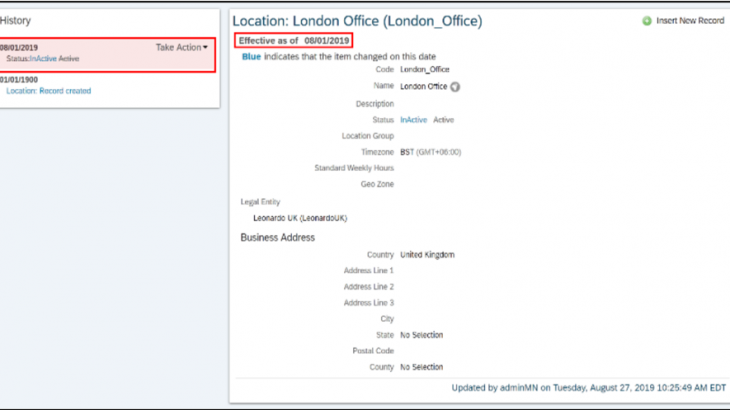
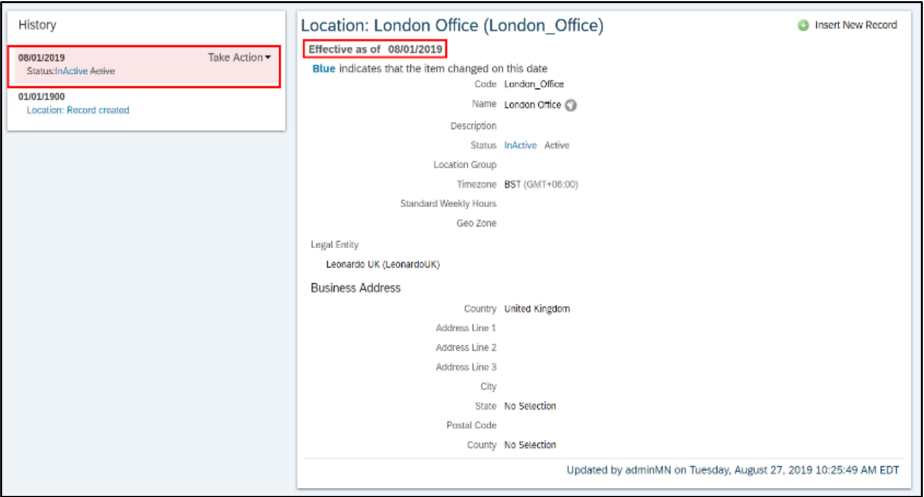
3. Choose the date this Location will become inactive in the system. Insert a new record with this effective date.
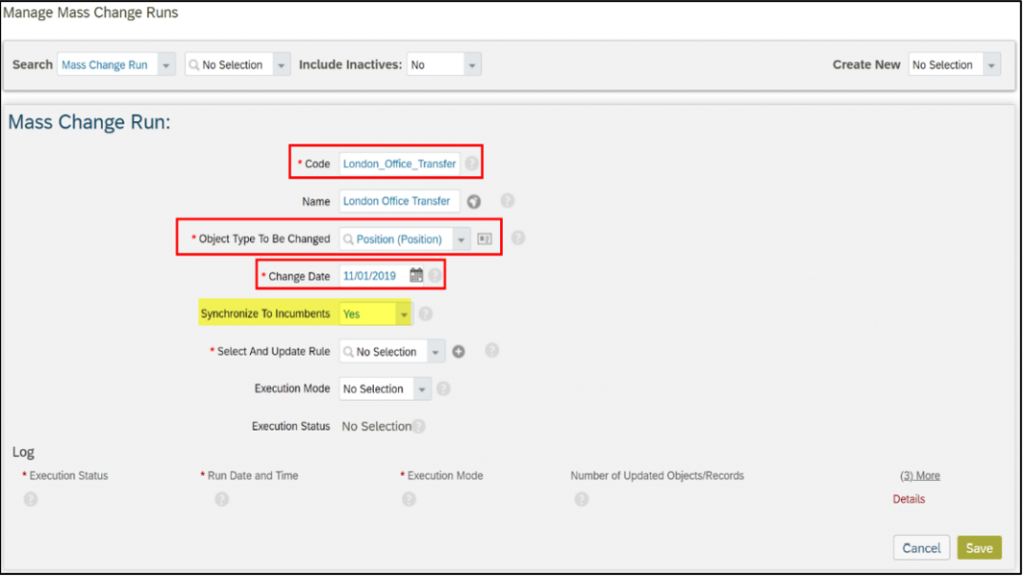
4. Navigate to Manage Mass Changes for Metadata Objects and fill out the required information. It is important that Synchronize to Incumbents is set to Yes because this is what will sync the new Location back to employees. (Location has to be included in the sync in Position Management Settings)
5. Select the sign ➕ next to “Select and Update Rule”. In the scenario list select Update Rule for Mass Change Run. Enter rule and ID information.
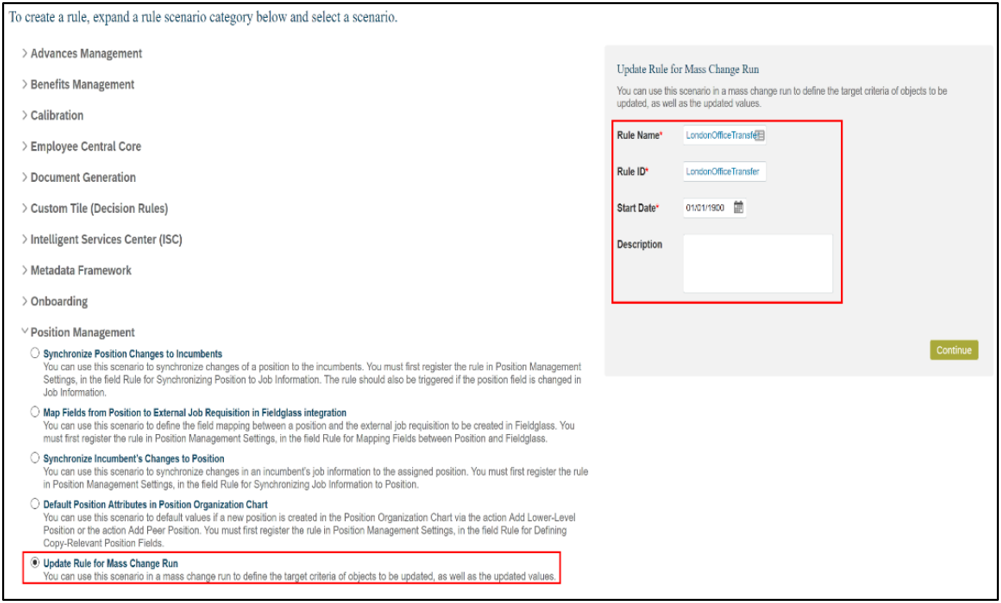
6. Create a rule that defines the specific target criteria needed to update the object.
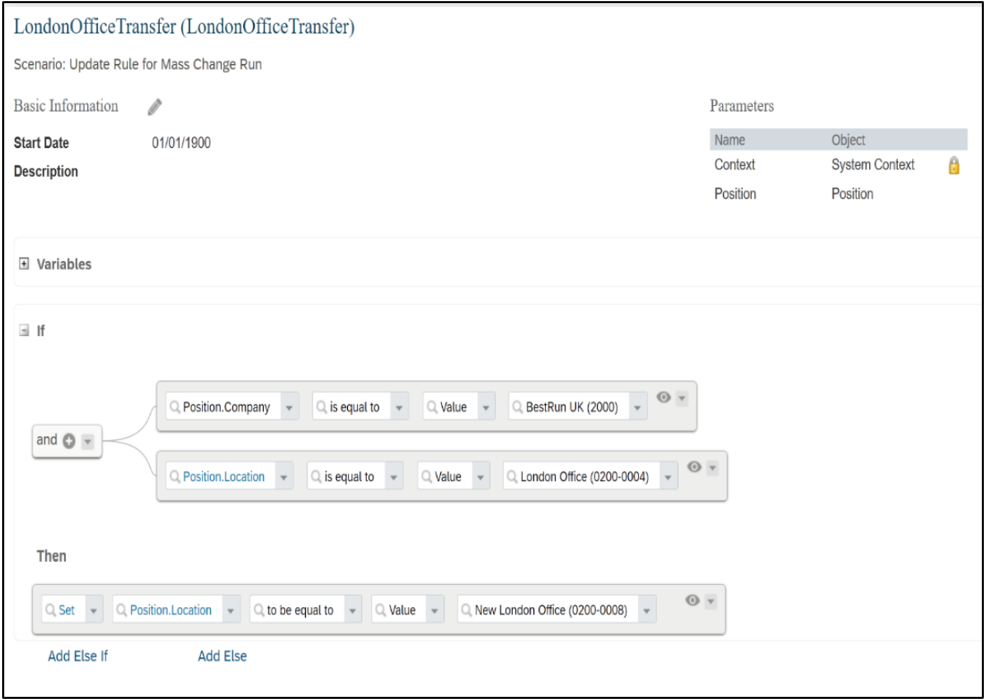
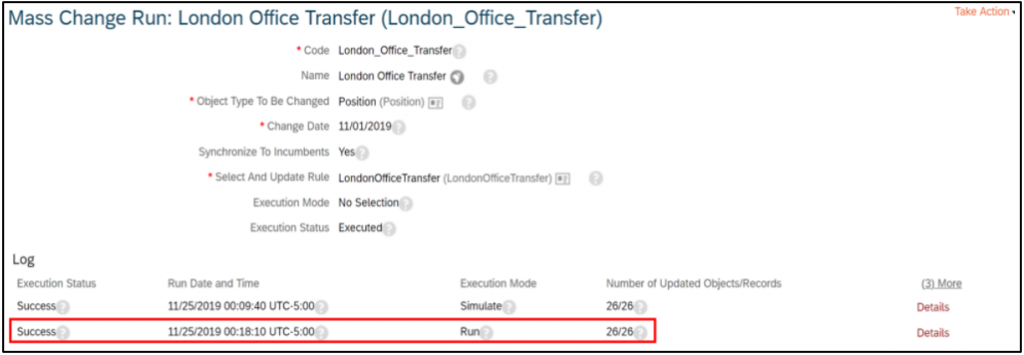
7. Select the newly created rule in the Select and Update Rule field. Select Simulate as the Execution Mode, and press Save. The simulate option will provide the results of the Mass Change as if it were to run for real. This way, we can ensure that all the appropriate records are getting updated. Once we confirm it all looks fine, we can run the Mass Change again with Run as the Execution Mode.
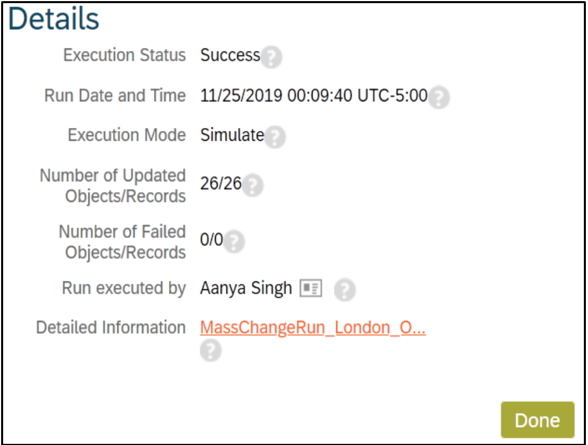
8. After the Mass Change has successfully Ran, validate the changes in the system.

5. Changing Job Relationships like HR Managers and Matrix Managers with position management
Finally, we will review changes in matrix relationships. These can be maintained at the position object and then synced to the Job Relationship portlet of the incumbents automatically.
Considering this, when there are changes related to matrix positions, it is recommended to do so in the position object via the Import and Export Data tool.
? Reminders and Tips:
- The sync is only automatic for creating or changing the matrix relationship but not when deleting a relationship.
- For more details on the matrix relationship at the position object, please refer to the position management handbook.
- Have a back-up for both your Position-Matrix relationship association and you Employee’s information❗❗
⭐ Recommended Process:
- Run a Job Relationships report to get the desired group of employees for these changes. Save the file. (This is file will be used to verify that the changes are correct).
- Make the list of positions for which the matrix relationships must be changed.
- Navigate to the Import and Export Data tool to download the file for Position-Matrix Relationship.
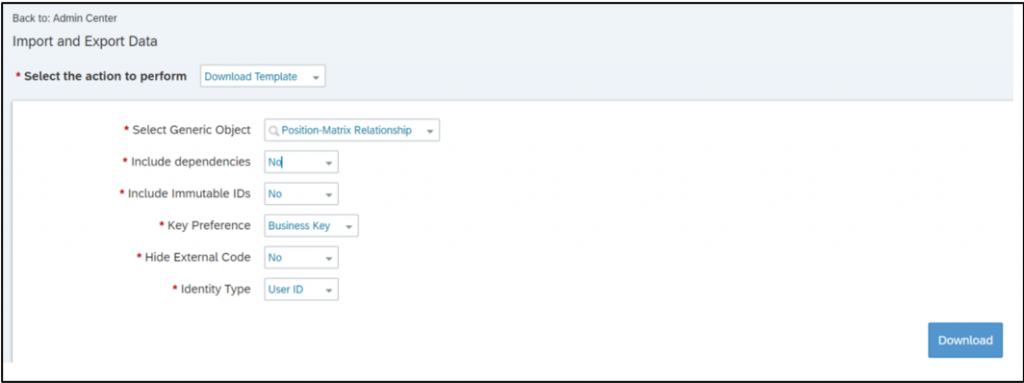
4. Fill the csv. file with data and import the file with the changes. Validate and then Import the file once there are no more errors

5. Run a second Job Relationship report after the import is completed and compare it with the one that was saved as part of step 1.
