Introduction
In this blog, we will discuss how to set up a principal propagation scenario between SAP Integration Suite in Cloud Foundry to the Successfactors system.
Overview
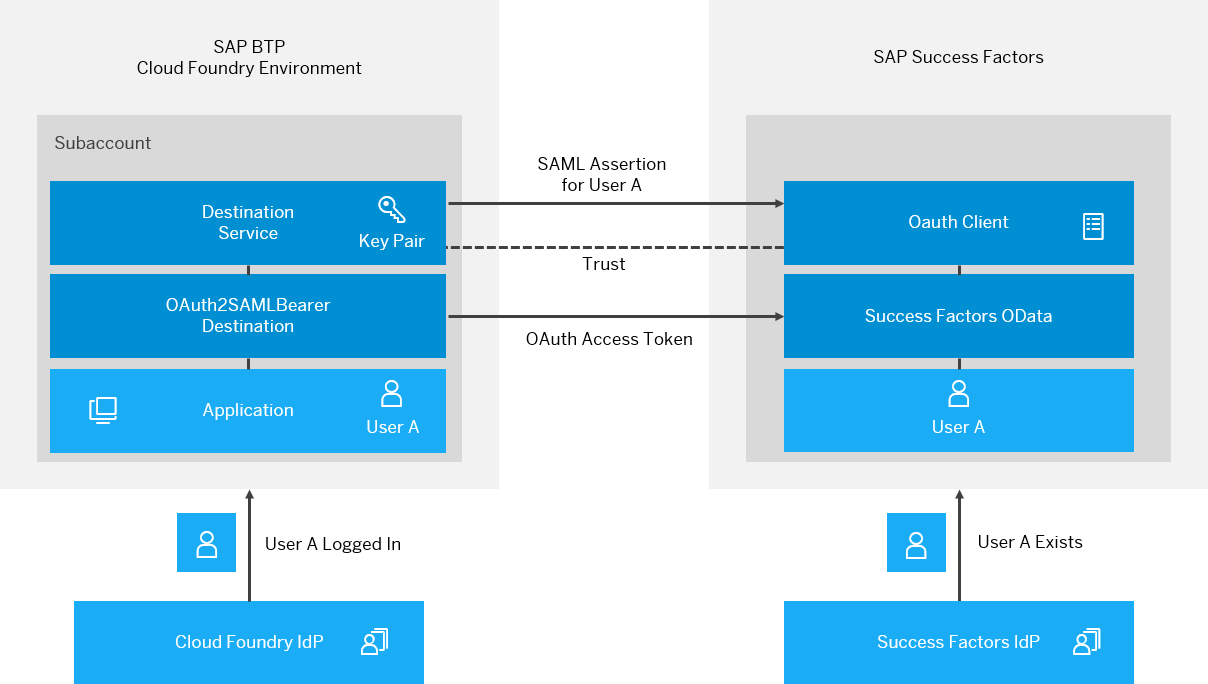
A user logs in to the Cloud Foundry application. Its identity is established by an Identity Provider (IdP). This could be any trusted IdP.
When the application retrieves an OAuth2SAMLBearer destination, the user is made available to the Cloud Foundry Destination service by means of a user exchange token, represented by a JSON Web Token (JWT). The service then wraps the user identity in a SAML assertion, signs it with the Cloud Foundry subaccount private key, and sends it to the token endpoint of the SuccessFactors OAuth server.
To accept the SAML assertion and return an access token, a trust relationship must be set up between SuccessFactors and the Cloud Foundry subaccount public key. You can achieve this by providing the Cloud Foundry subaccount X.509 certificate when creating the OAuth client in SuccessFactors.
Users that are propagated from the Cloud Foundry application, are verified by the SuccessFactors OAuth server before granting them access tokens. This means users that do not exist in the SuccessFactors user store will be rejected.
For valid users, the OAuth server accepts the SAML assertion and returns an OAuth access token. In turn, the Destination service returns both the destination and the access token to the requesting application. The application then uses the destination properties and the access token to consume SuccessFactors APIs.
1. SetUp
1.1 Deploy the WebApp and Approuter
- Create a sample Servlet/Web Application, and deploy it on the Cloud Foundry subaccount. This custom web application is responsible for initiating the principal propagation. for creating a simple application and deploying it on your CF account, please complete all the steps mentioned in this blog
- Modify the servlet in the web application from the previous blog to print the Authorization header as shown below
package com.sap.cloud.sdk.tutorial;

import org.slf4j.Logger;
import org.slf4j.LoggerFactory;

import javax.servlet.ServletException;
import javax.servlet.annotation.WebServlet;
import javax.servlet.http.HttpServlet;
import javax.servlet.http.HttpServletRequest;
import javax.servlet.http.HttpServletResponse;
import java.io.IOException;

@WebServlet("/hello")
public class HelloWorldServlet extends HttpServlet
{
    private static final long serialVersionUID = 1L;
    private static final Logger logger = LoggerFactory.getLogger(HelloWorldServlet.class);

    @Override
    protected void doGet( final HttpServletRequest request, final HttpServletResponse response )
        throws ServletException, IOException
    {
        String authToken = request.getHeader("authorization");
        response.getOutputStream().println("authToken : " + authToken);
    }
}- Create an app router. an application router (app router) is the main entry point.
The App Router can serve a static web page (e.g. homepage), or just redirect to the web application itself. The big advantage is: the app router can be used for Authentication.
2. SetUp Custom IDP
To make this happen, the IdP and the service provider (SP) have to exchange security metadata, i.e., the IdP has to import the metadata of the SP and vice versa.
You can retrieve the metadata from your XSUAA tenant by following the pattern https://<subdomain>.authentication.<region_id>.sap.hana.ondemand.com/saml/metadata, e.g. https://p123456trial.authentication.eu10.sap.hana.ondemand.com/saml/metadata. This downloads the metadata as an XML file.
Secondly, you need to import the metadata into your IdP.
- Within the IdP, you have to create a new application called MyApp where you select the SAML 2.0 Configuration.
- Import the SP’s metadata and click Save.
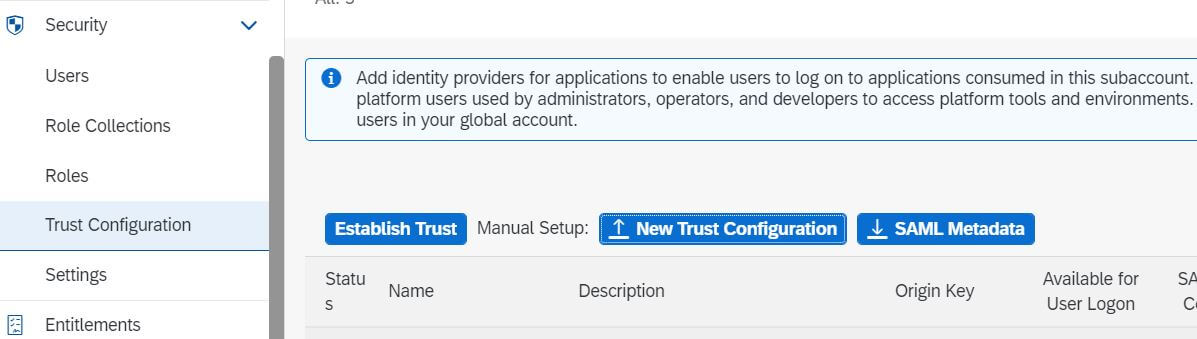
- Back in the BTP account cockpit, you need to add the IdP’s metadata in the same manner.
- Click New Trust Configuration and add the metadata from the IdP and click Save.
3. Assign users to scopes
To regain access to your secured endpoint, you need to get the Display OAuth scope assigned. This is done using the BTP cockpit.
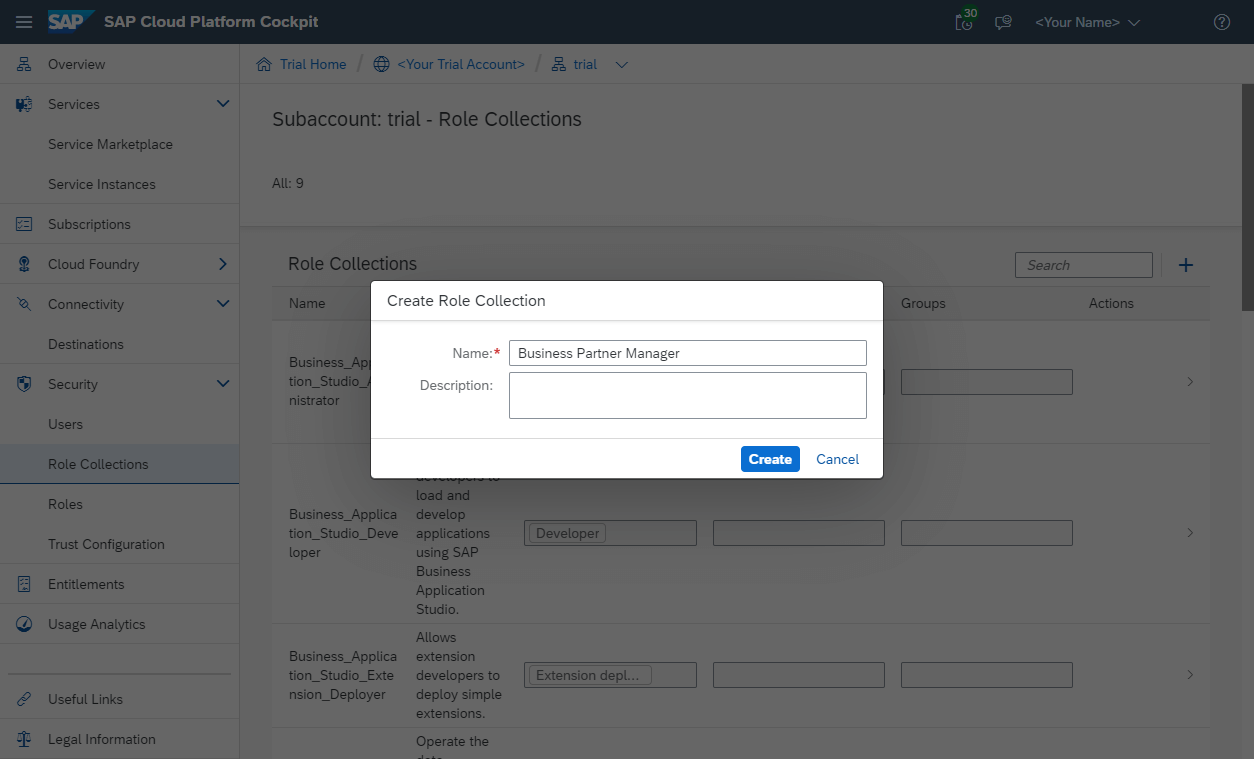
- First, go to your account on Cloud Foundry and find the Role Collections menu under the Security module.
- Second, create a new role collection in which you can give an arbitrary name. For example, you might call the role collection Business Partner Manager.
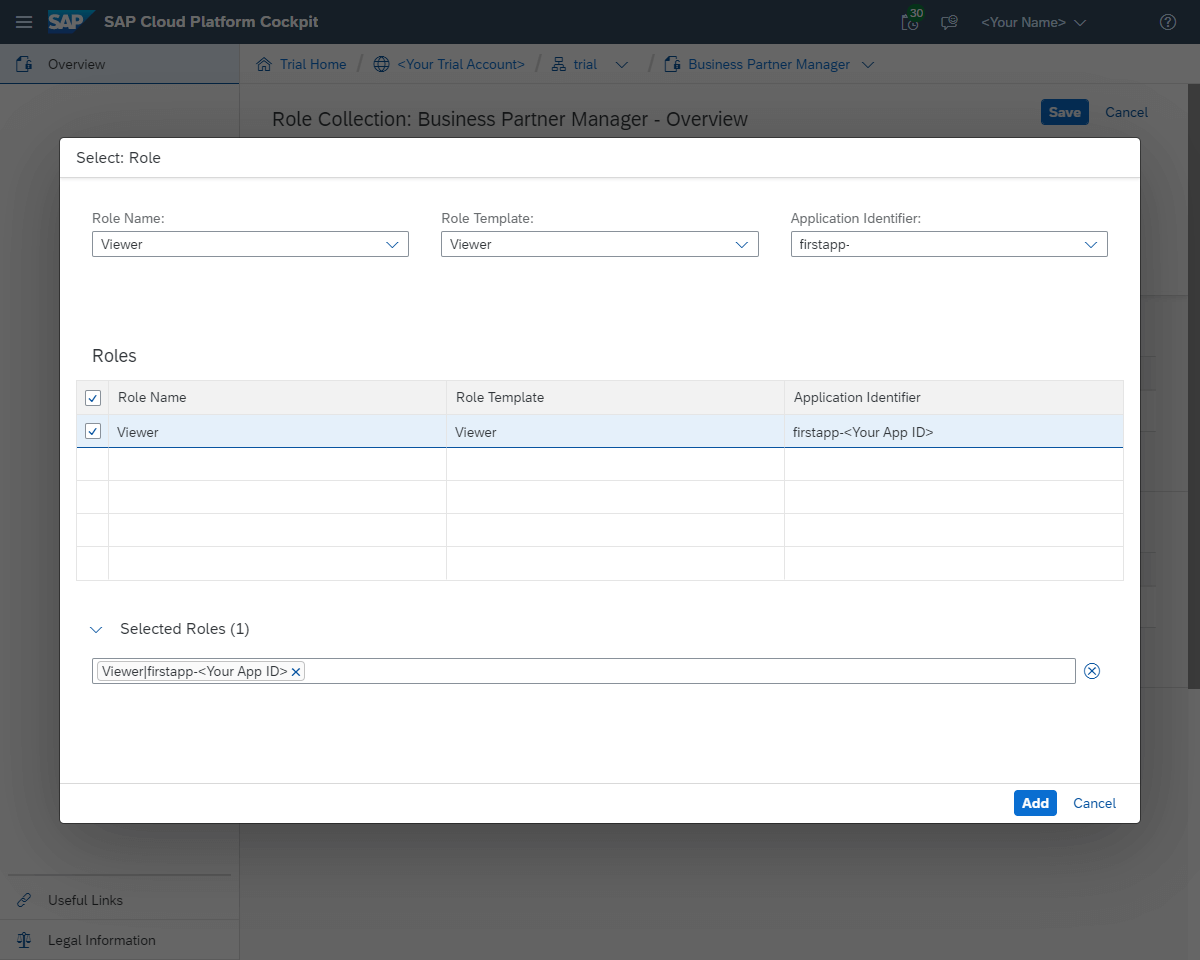
- Afterward, select the role collection Business Partner Manager, select Edit, and add a new role. From the menu, select your application and the corresponding role template and role. Finish up the process by adding the newly created role and saving the Business Partner Manager role collection.
- Afterward, the user has to be assigned to the newly created Business Partner Manager in order to receive the Display scope. To do this, select Users from the security menu and select the user that should receive the permissions from the list.
- On the right-hand side, under the Role Collections headline, select Assign Role Collection and choose the Business Partner Manager collection. Confirm the selection by clicking on the Assign Role Collection button.
Afterward, you have the Display OAuth scope is assigned to your user, which allows you to access the secured endpoints again.
4. Establishing Trust
- Since the Source and the Destination subaccount used to explain the scenario in this blog is the same we will be uploading the metadata download in section 2 above in the same subaccount.
- In the subaccount navigate to Connectivity -> Destinations.
- Click on New Trust Configuration now click on Upload and select the metadata downloaded in section 2.
- Click on Save.
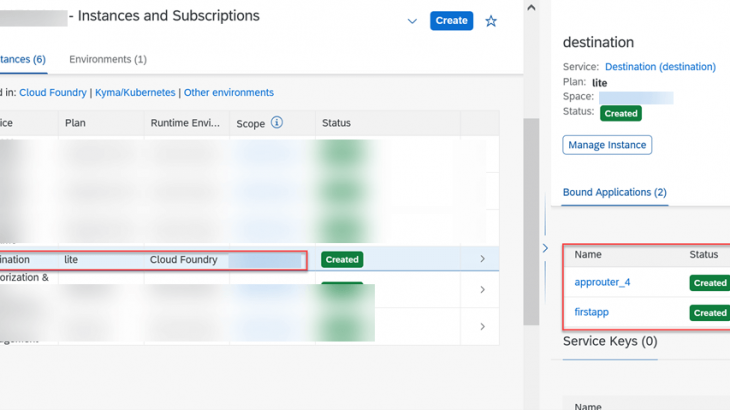
5. Creating Destination Service Instances in CF Sub-account
- In the Subaccount cockpit, navigate to the Instances and Subscriptions tab.
- Create an Instance of type Destination as below:
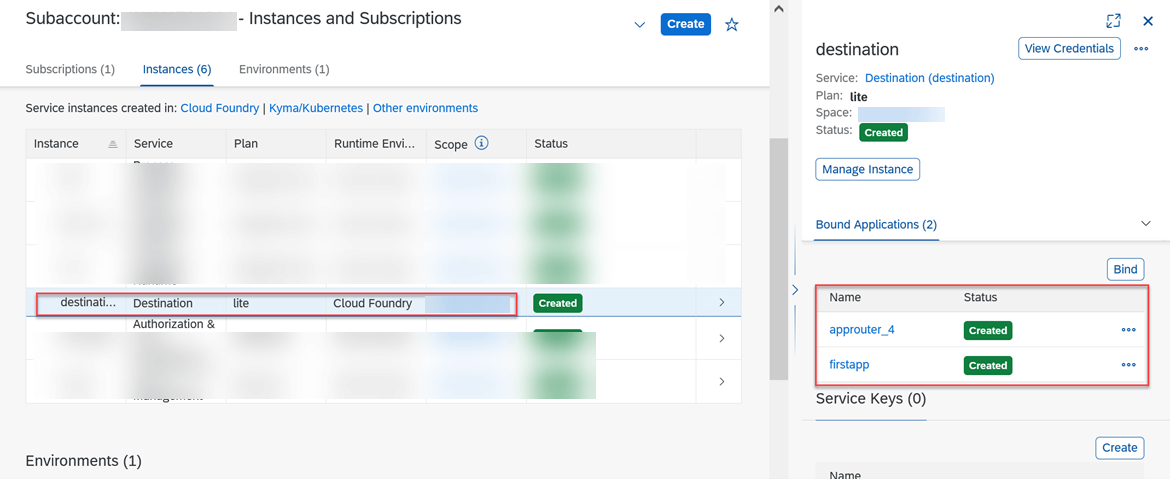
- Bind the web app to this instance.
- Create a key as below:

- Bind this Destination Service to the web application that you had deployed in the SetUp. make sure to restart the web application after binding the Destination Service.
6. Creating Process Integration Runtime Service Instances in CF Sub-account
- In the Subaccount cockpit, navigate to the Instances and Subscriptions tab.
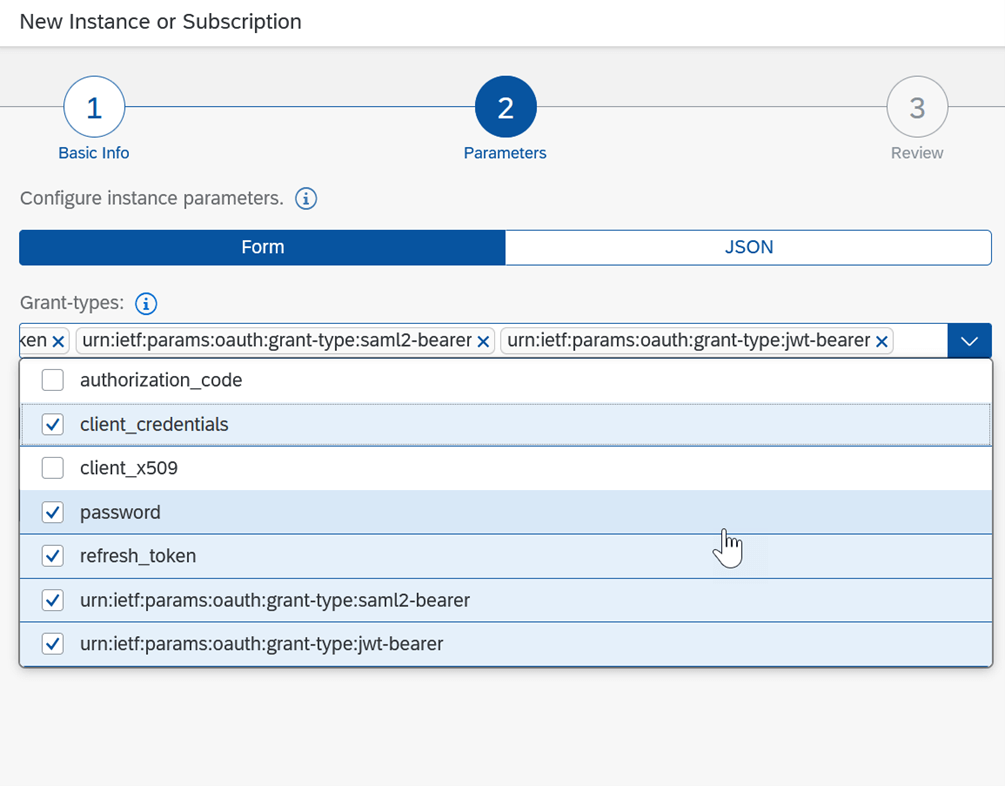
- Create an Instance of type Process Integration Runtime.
- Select the plan as integration-flow
- Select the grant type as shown below
- Create a Service Key.
- The client id and client secret generated here will be used in next step.
7. Create an OAuthSAMLBearerAssertion Destination in the Subaccount
- In the cockpit, navigate to the overview page for subaccount.
- Here you can see the landscape domain, subaccount ID and subdomain of subaccount. Below, we refer to the landscape domain as ${LANDSCAPE_DOMAIN}, to the subaccount ID as ${SUBACCOUNT_ID} and to the subdomain as ${SUBDOMAIN}.

- In your browser, call https://${SUBDOMAIN}.authentication.${LANDSCAPE_DOMAIN}/saml/metadata and download the XML file. Within the XML file, you can find the following structure. It contains the <audience> and the <alias> variables:
Sample Code
<?xml version="1.0" encoding="UTF-8"?>
<md:EntityDescriptor entityID="<audience>" ...>
...
    <md:AssertionConsumerService Binding="urn:oasis:names:tc:SAML:2.0:bindings:URI" Location="https://${S2_SUBDOMAIN}.authentication.${S2_LANDSCAPE_DOMAIN}/oauth/token/alias/<alias>" index="1"/>
...
Below, we refer to the value of <alias> as ${ALIAS} and <audience> as ${AUDIENCE}.
- In cockpit, navigate to subaccount 1.
- From the left panel, select Connectivity Destinations.
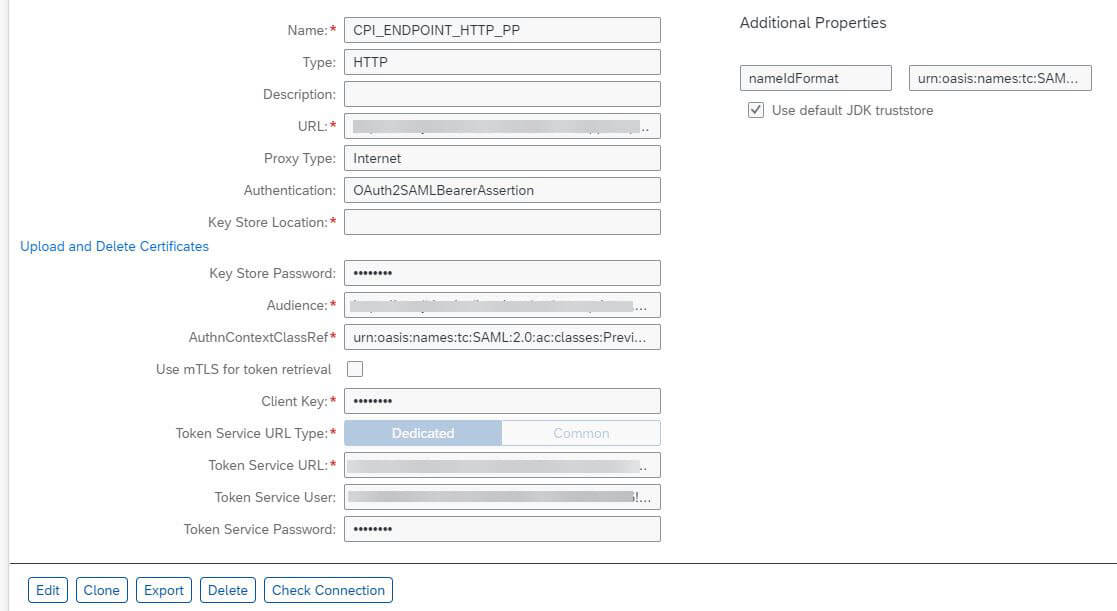
Choose New Destination and configure the values as described below. Replace the ${…} placeholders with the values you determined in the previous steps and sections.
| Property | Value |
| Name | Choose any name for your destination. You will use this name to request the destination from the Destination service. |
| Type | HTTP |
| URL | The URL of application, identifying the resource you want to consume. |
| Proxy Type | Internet |
| Authentication | OAuth2SAMLBearerAssertion |
| Audience | ${AUDIENCE} |
| Client Key | The clientid of the XSUAA instance in subaccount. client id from the section 6 |
| Token Service URL | https://${SUBDOMAIN}.authentication.${LANDSCAPE_DOMAIN}/oauth/token/alias/${ALIAS} |
| Token Service URL Type | Dedicated |
| Token Service User | The clientid of the XSUAA instance in subaccount. client id from the section 6 |
| Token Service Password | The clientsecret of the XSUAA instance in subaccount. client secret from the section 6 |
| authnContextClassRef | urn:oasis:names:tc:SAML:2.0:ac:classes:PreviousSession |
Additional Properties
| Property | Value |
| nameIdFormat | urn:oasis:names:tc:SAML:1.1:nameid-format:emailAddress |
Example
- Choose Save.
8. Create an OAuth Client in SAP SuccessFactors
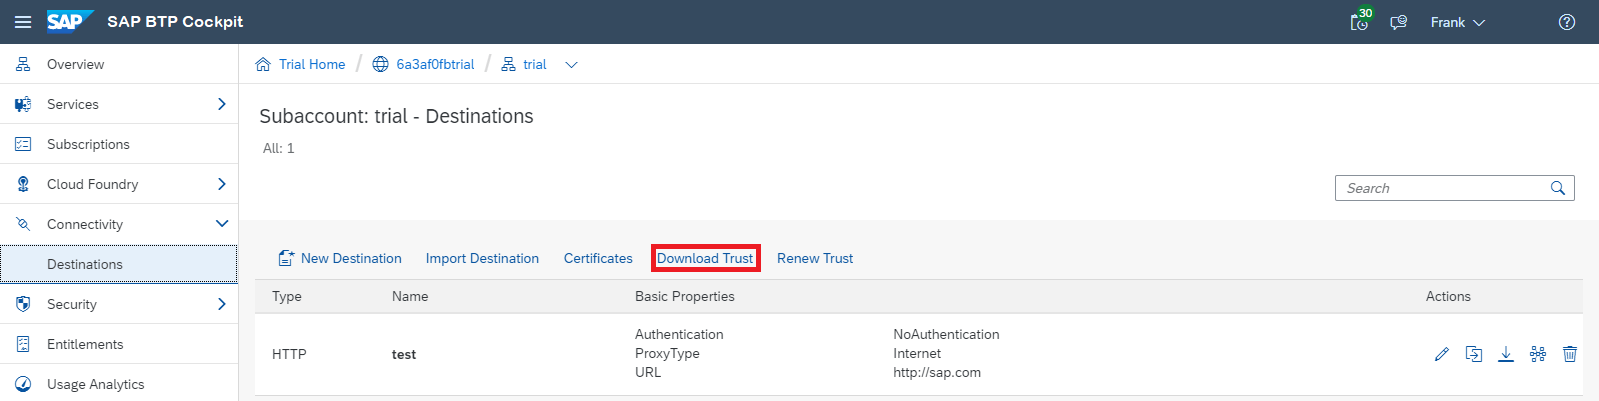
- Download the X.509 certificate from your Cloud Foundry subaccount: In the cloud cockpit, navigate to your Cloud Foundry subaccount, and from the left-side subaccount menu, choose Connectivity Destinations. Choose Download Trust to get the certificate for this subaccount.
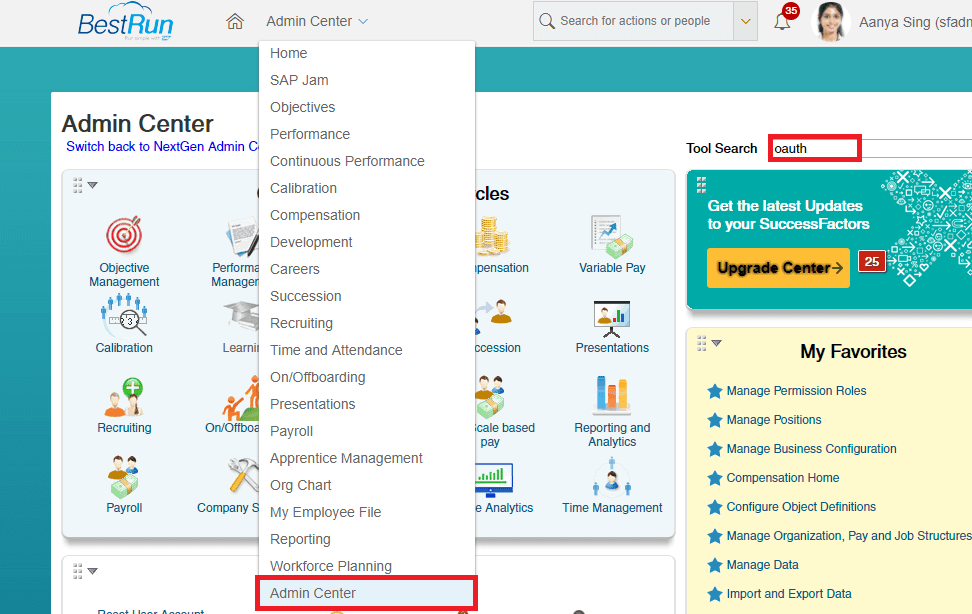
- Create a SuccessFactors OAuth Client in SuccessFactors, go to the Admin Center, and search for OAuth. Choose Manage OAuth2 Client Applications.

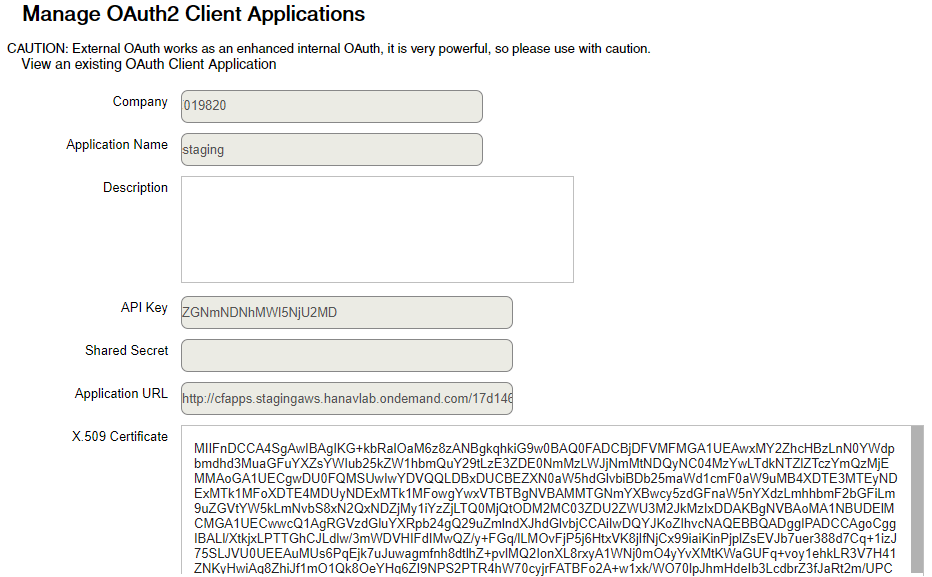
- Press the Register Client Application button on the right. In the <Application Name> field, provide some arbitrary descriptive name for the client. For <Application URL>, enter the Cloud Foundry host of the application, followed by the subaccount GUID, for example cfapps.stagingaws.hanavlab.ondemand.com/17d146c3-bc6c-4424-8360-7d56ee73bd32. This information is available in the cloud cockpit under subaccount details:

- In the field <X.509 Certificate>, paste the certificate that you downloaded in step 1.
- Choose Register to save the OAuth client.
- Now, locate your client in the list by its application name, choose View in the Actions column and take note of the <API Key> that has been generated for it. You will use this key later in the OAuth2SAMLBearer credential deployment.
9. Integration Flow Design and Deployment
Now, we will design the integration flow which talks to SuccessFactors OData V2 endpoint with OAuth2 authentication. We will start with the deployment of OAuth2 credentials for SAML bearer assertion.
Credentials Deployment
Below are the steps which explain how to deploy the required OAuth2 SAML bearer assertion credential
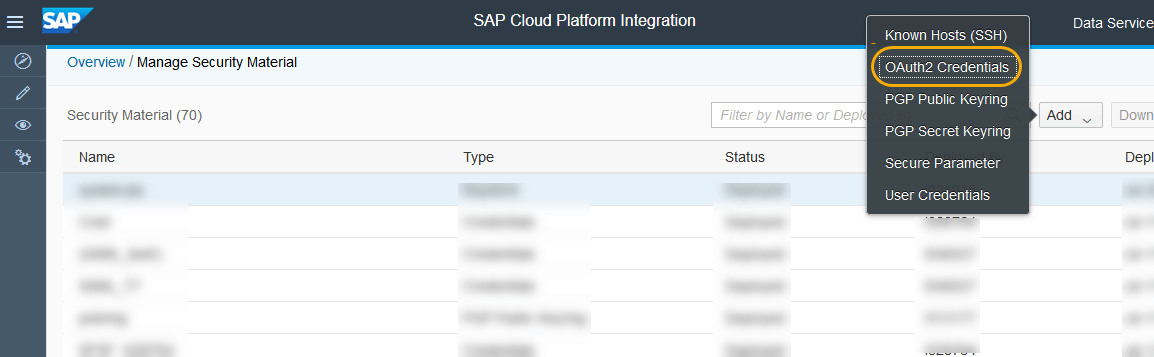
- In the Web UI of your SAP Cloud Integration instance, go to the monitoring and click on Security Material.
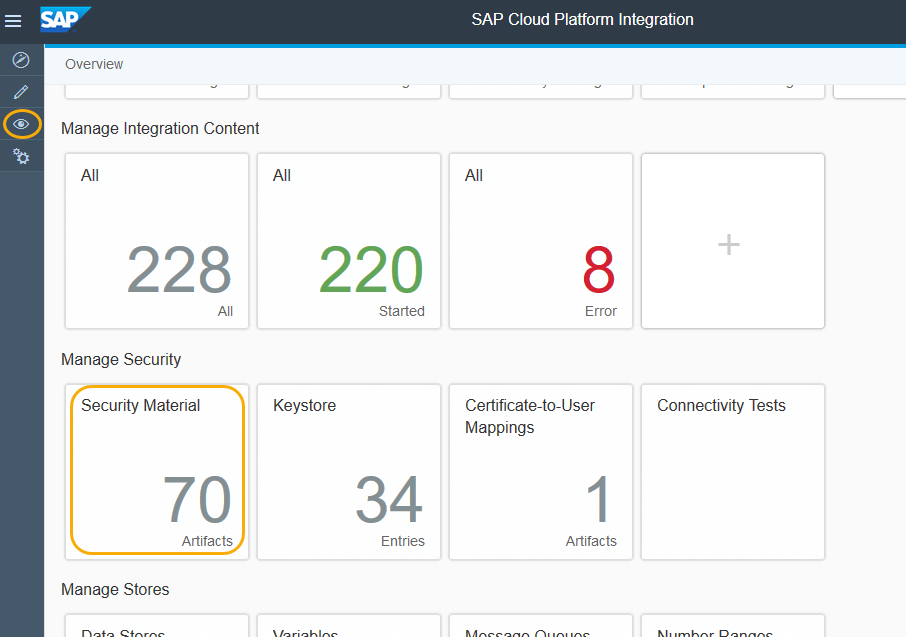
- It opens the security materials page where you can add the security artifacts. Click on Add->OAuth2 Credentials.
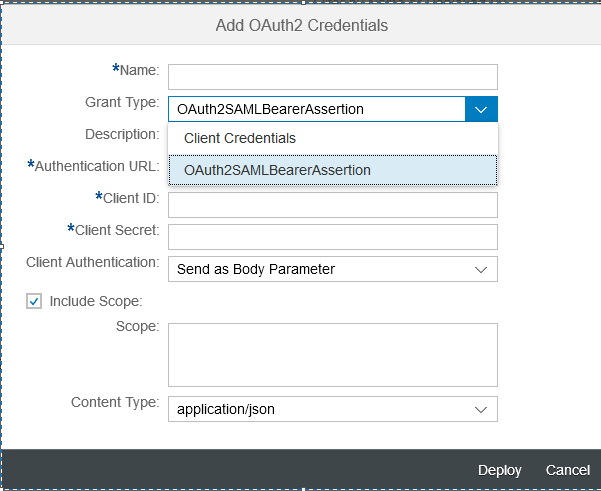
- Select the OAuth2SAMLBearerAssertion grant type
- Now, you need to add the required parameters for the OAuth2SAMLBearerAssertion credential artifact
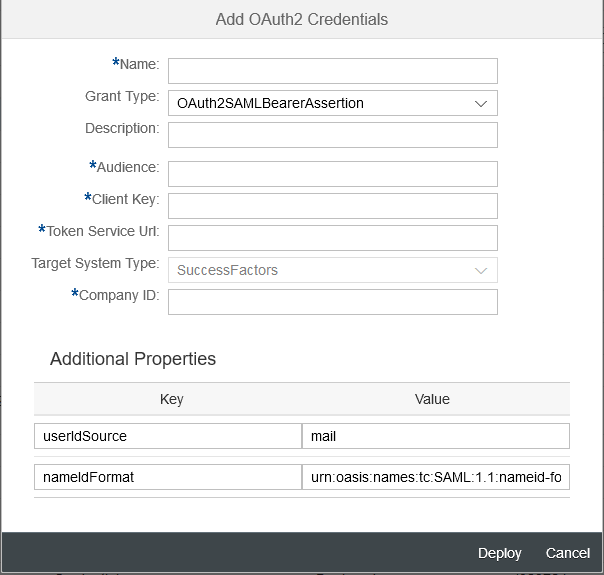
Parameters details:
- Name: Name of your choice, this shall be used as an alias name for the whole of this security artifact. This name must be provided under the Credential Name in SuccessFactors OData V2 connector/adapter properties inside the integration flow.
- Description: Any description of your choice
- Audience: Since the communication is with SuccessFactors, you can mention www.successfactors.com
- Client Key: The OAuth2 client key (API Key of SuccessFactors), which was captured in Section 8.
- Token Service Url: API endpoint URL for the SuccessFactors instance, followed by /oauth/token. for example https://apisalesdemo2.successfactors.eu/oauth/token
- Target System Type: Currently it is only SuccessFactors.
- Company ID: Company ID of your SuccessFactors instance
- Additional Properties: The deploy dialog window already captures the additional properties required for the complete use case. Let the default values be as is.
10. Integration Flow Design
- In the Design space of your SAP Cloud Integration Web UI, create or choose a package of your choice. Create integration flow artifact.
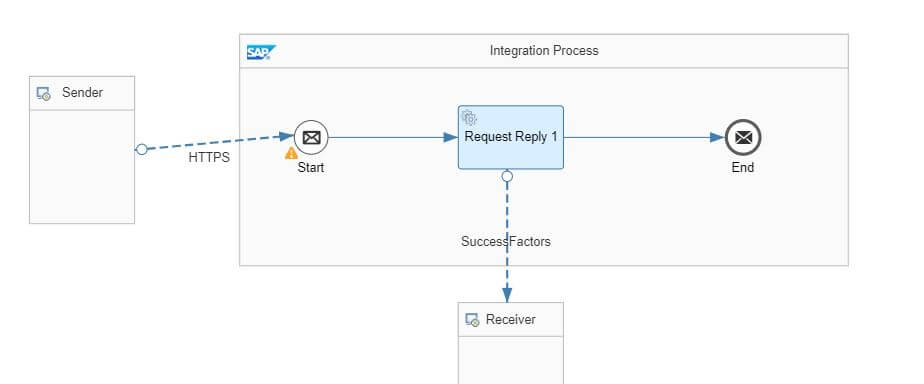
- In the above iflow Successfactors Odata V2 adapter is used.
- In the adapter configure all the mandatory parameters.
- In the Authentication select Oauth2 Saml Bearer Assertion and in the Credential Name enter the alias name of the Security material of type Oauth2SAMLBearer created in section 9
- Deploy the iflow and copy the HTTP endpoint. the endpoint will be used in the following section.
11. Executing the Scenario
- Copy the URL of the app router deployed in the subaccount in section 1.
- Open a browser and enter the URL and execute
- We should be redirected to the IDP login screen.
- Here enter the credentials of the principal that will be propagated to the Successfactors system.
- After the IDP authenticates the credentials will execute the web application and will print the JWT token as shown below.
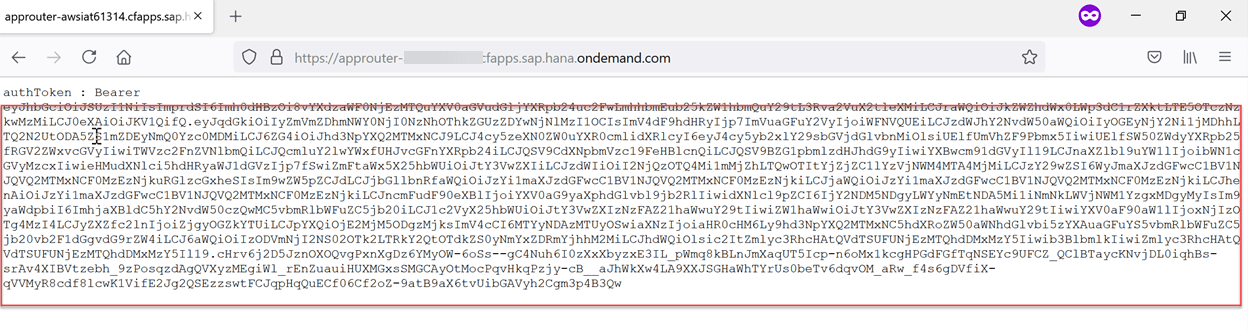
Warning: JWT token is highly confidential and should never be saved or printed. It is done here only for demonstration.
- Now copy the JWT token. Use this JWT token as a value for the assertion field as shown in the screenshot below.
- using this JWT token we have to do a token exchange with Destination service credentials. follow the below steps for token exchange.
- Open any of the rest clients like Postman and configure it as shown in the picture below, in the target url use the url that you get from the Destination Service key created in section 5 with the suffix /oauth/token . example https://example.authentication.sap.hana.ondemand.com/oauth/token
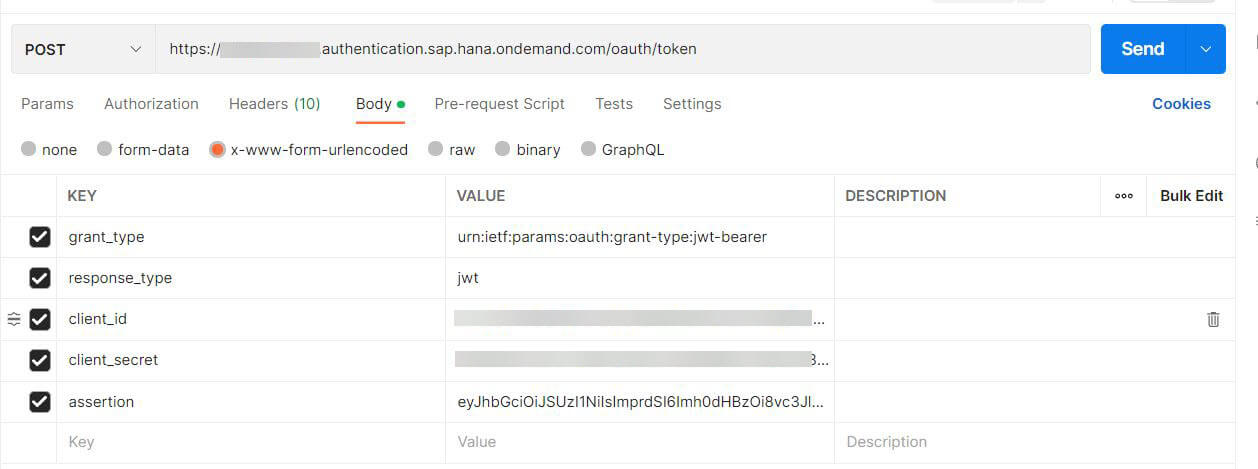
Values to be configured are given below
- grant_type : urn:ietf:params:oauth:grant-type:jwt-bearer
- response_type : jwt
- client_id : <Client id of Destination from section 5>
- client_secret : <Client Secret of Destination from section 5>
- assertion : JWT token from the previous step.
- Executing this request will return the access_token which now will be used in next step to call the destination that is created in section 7.
- To call the destination follow the below steps. create a new postman request and use the access_token from the previous step as the Authorization header.
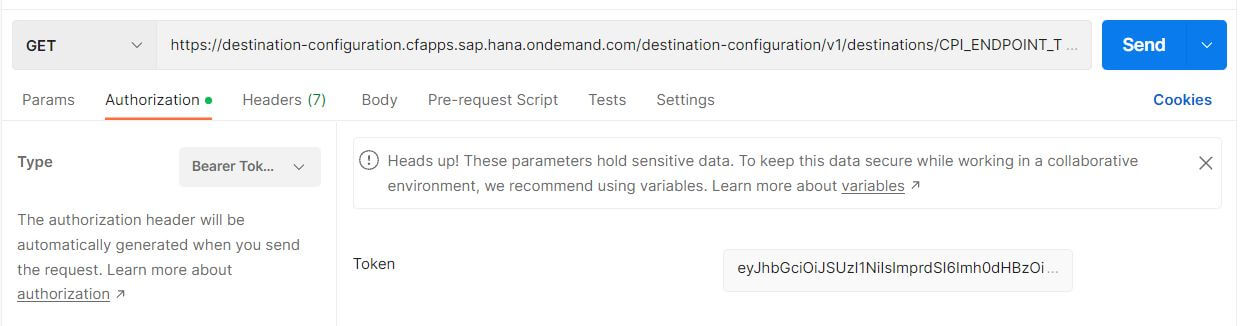
Values to be configured are given below
- Url: <Copy the value of uri from the Destination service key created in section 5> followed by the suffix /destination-configuration/v1/destinations/<Name of the Destination>. example https://destination-configuration.cfapps.sap.hana.ondemand.com/destination-configuration/v1/destinations/CPI_ENDPOINT_TEST
- Authorization: Bearer and in the token field use the access_token from the previous step.
- Executing the above request will now give you a JWT token that now will be used in next step to call the CPI endpoint that is configured in section 10.
Calling CPI endpoint
- Create another request in postman and configure the values as shown below
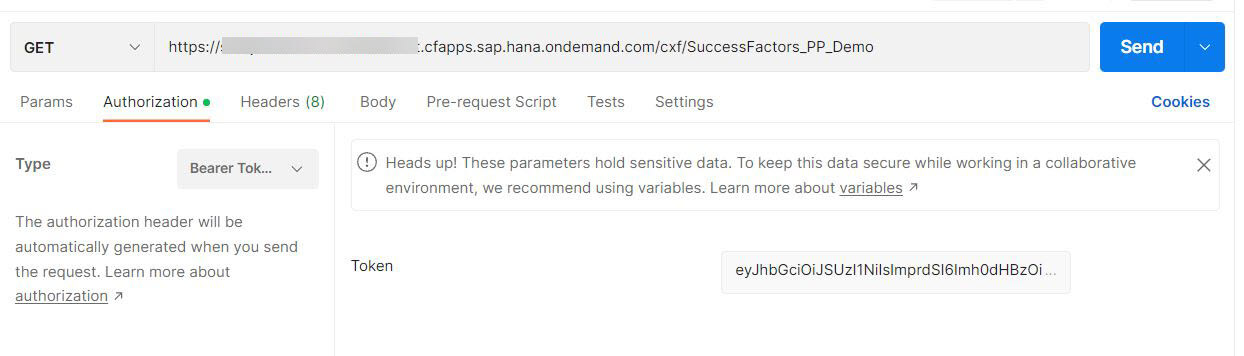
Values to be configured are given below
- address: CPI endpoint that is configured in section 10
- authorization: Bearer and in the Token field use the JWTtoken from the previous step
triggering the above request from the postman will call the CPI endpoint. the principal will be propagated to the endpoint via the JWT token, the iflow will then propagate the principal to the Successfactors system.


