The below blog focusses on the Output Management Configuration and execution of Account Statement forms.
Steps to be followed for configuration :
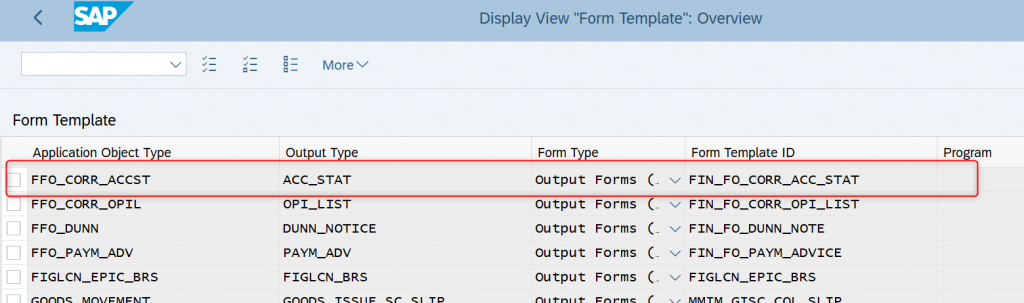
Form Name : FIN_FO_CORR_ACC_STAT
ODATA Service : FDP_FFO_CORR_ACC_STAT_SRV
Configure the below set of Views.
Note: This can be also done via SPRO.
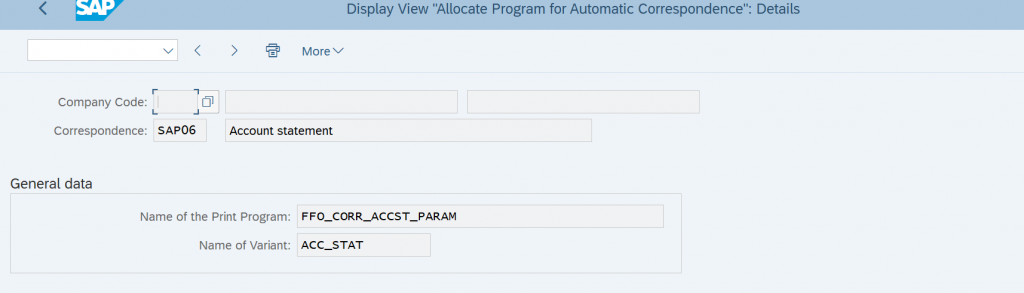
V_T048B : Allocate Program for Automatic Correspondence
![](https://i0.wp.com/www.erpqna.com/wp-content/uploads/2022/02/In1-1024x293.png?resize=730%2C209&ssl=1)
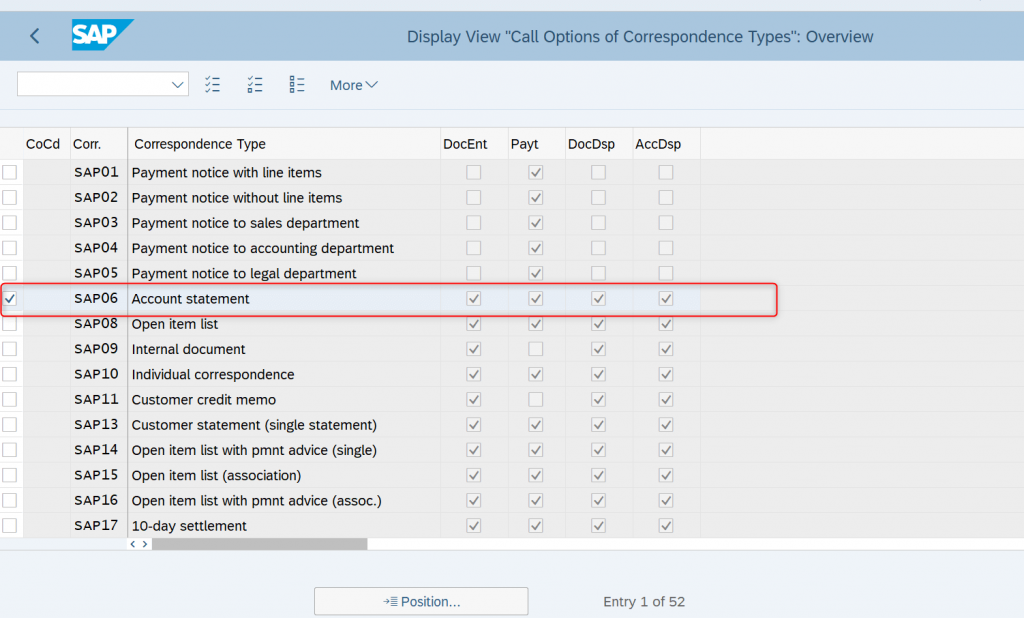
V_T048I : Call Options of Correspondence Types
![](https://i0.wp.com/www.erpqna.com/wp-content/uploads/2022/02/In2-1024x618.png?resize=730%2C441&ssl=1)
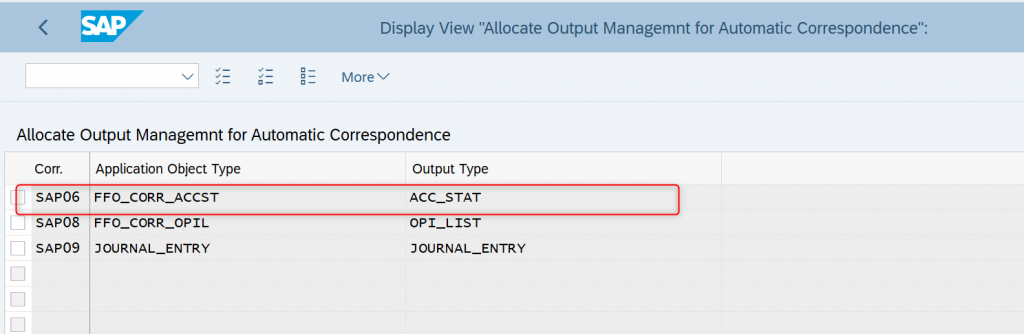
V_T048O : Allocate Output Management for Automatic Correspondence
![](https://i0.wp.com/www.erpqna.com/wp-content/uploads/2022/02/In3-1024x334.png?resize=730%2C238&ssl=1)
APOC_C_FORMV : Form Template
![](https://i0.wp.com/www.erpqna.com/wp-content/uploads/2022/02/In4-1024x303.png?resize=730%2C216&ssl=1)
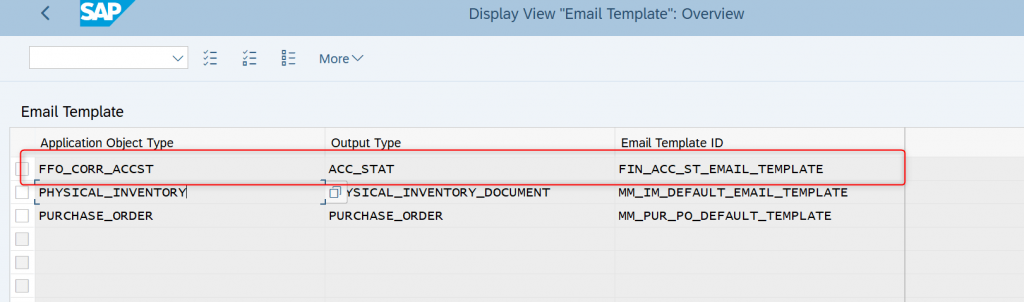
APOC_C_EMAILTV : Email Template
![](https://i0.wp.com/www.erpqna.com/wp-content/uploads/2022/02/In5-1024x302.png?resize=730%2C215&ssl=1)
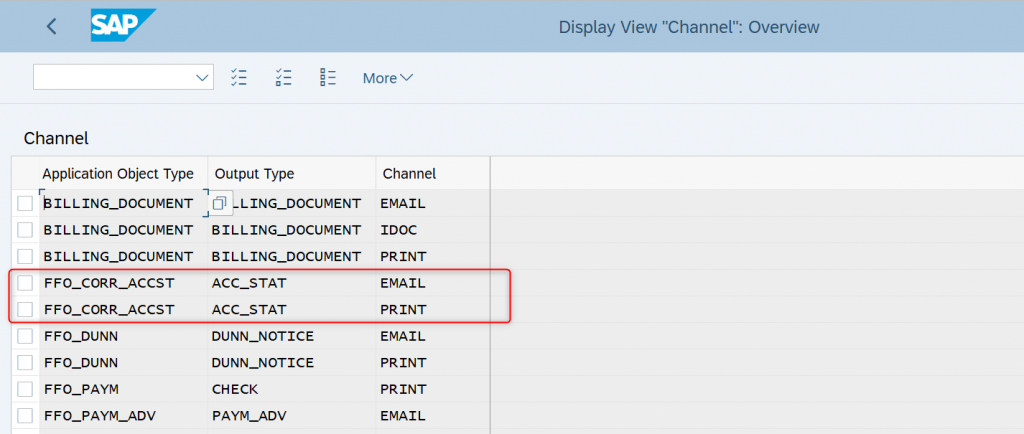
APOC_C_CHANNELV : Channel Print/Email
![](https://i0.wp.com/www.erpqna.com/wp-content/uploads/2022/02/In6-1024x434.png?resize=730%2C309&ssl=1)
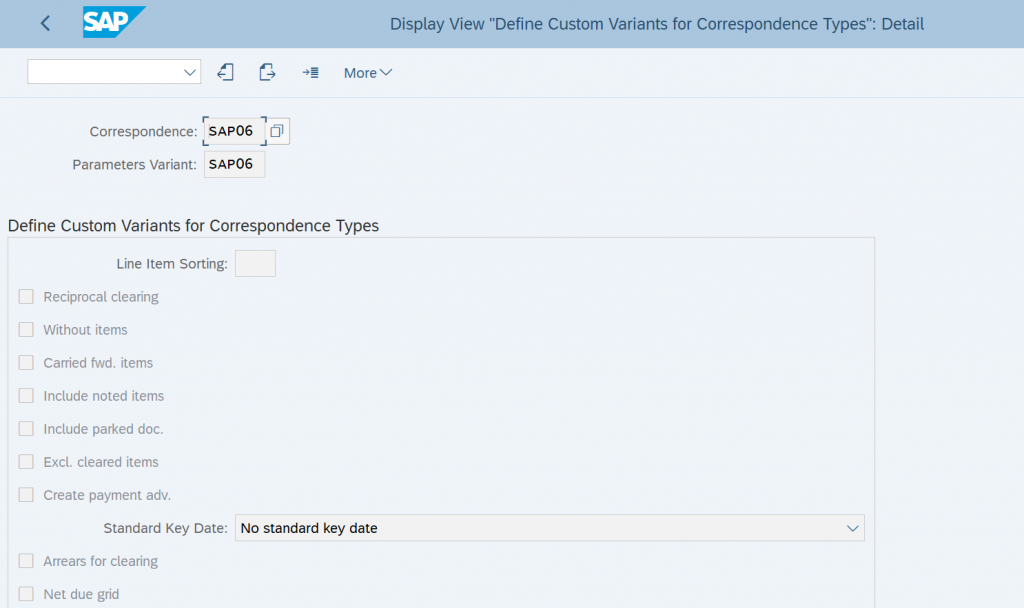
V_FIN_CORR_VRNT : Define Custom Variants for Correspondence Types
![](https://i0.wp.com/www.erpqna.com/wp-content/uploads/2022/02/In7-1024x608.png?resize=730%2C433&ssl=1)
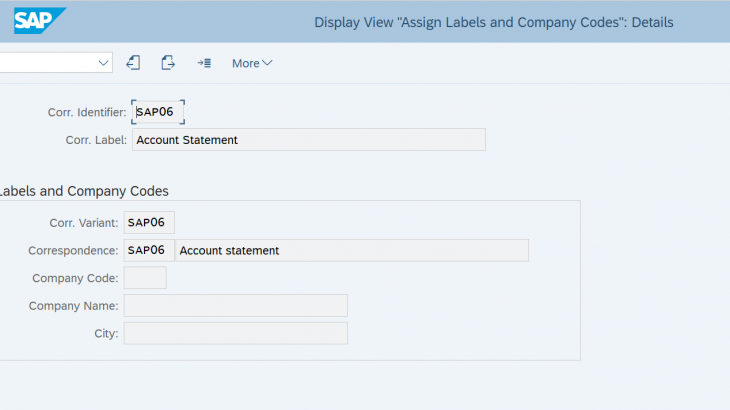
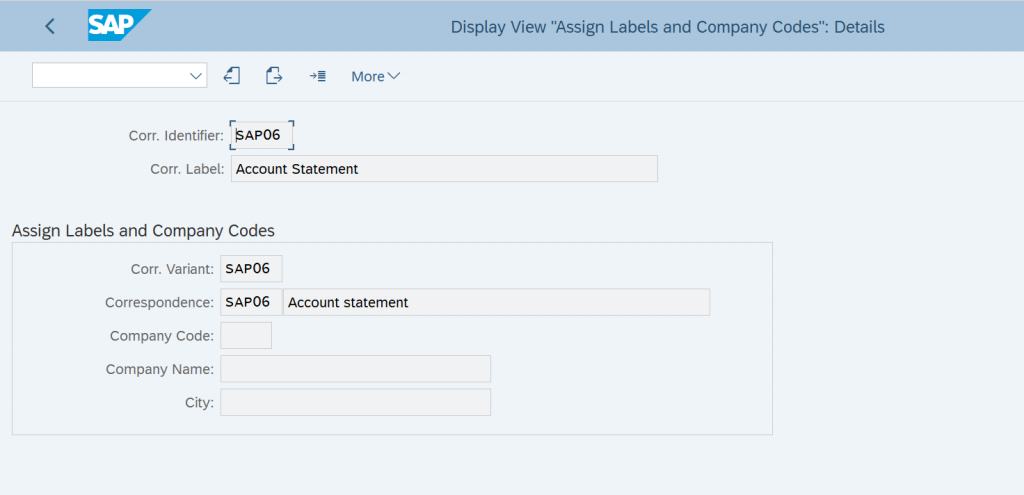
V_FIN_CORR_TYPE : Assign Labels and Company Codes
![](https://i0.wp.com/www.erpqna.com/wp-content/uploads/2022/02/In8-1024x495.png?resize=730%2C353&ssl=1)
Once the above configuration is completed the Form can be tested by the below two ways :
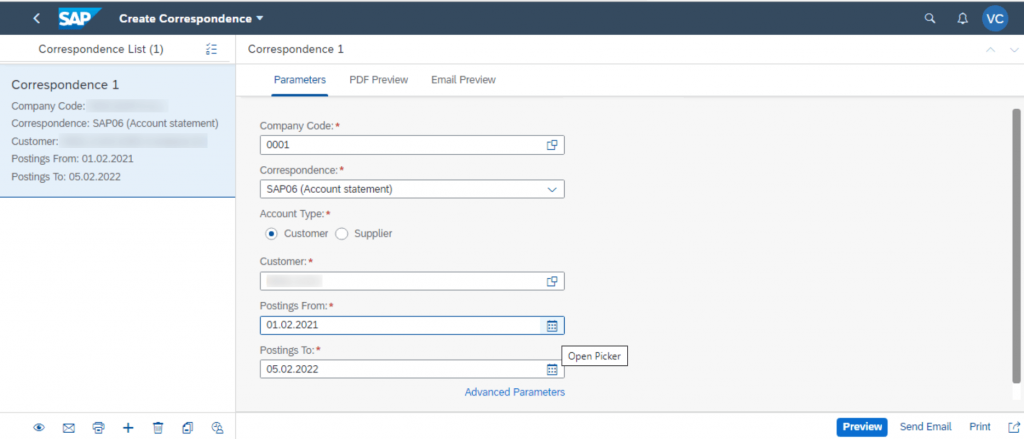
- In case of Fore ground processing or testing use the below Fiori application
Create Correspondence
https://fioriappslibrary.hana.ondemand.com/sap/fix/externalViewer/#/detail/Apps(‘F0744A’)/S21OP
![](https://i0.wp.com/www.erpqna.com/wp-content/uploads/2022/02/In9-1024x439.png?resize=730%2C313&ssl=1)
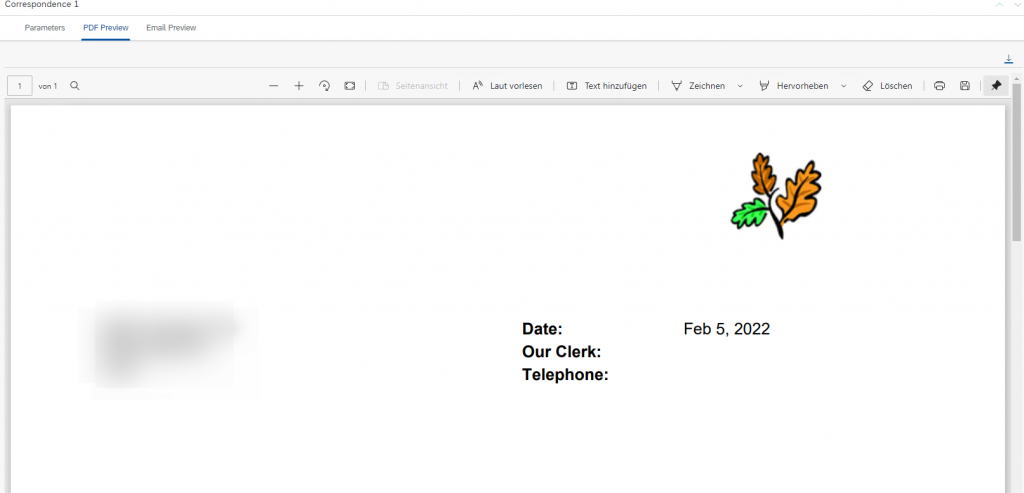
Now Click on the preview you can see the below Standard OM form in the output
![](https://i0.wp.com/www.erpqna.com/wp-content/uploads/2022/02/In10-1024x493.png?resize=730%2C351&ssl=1)
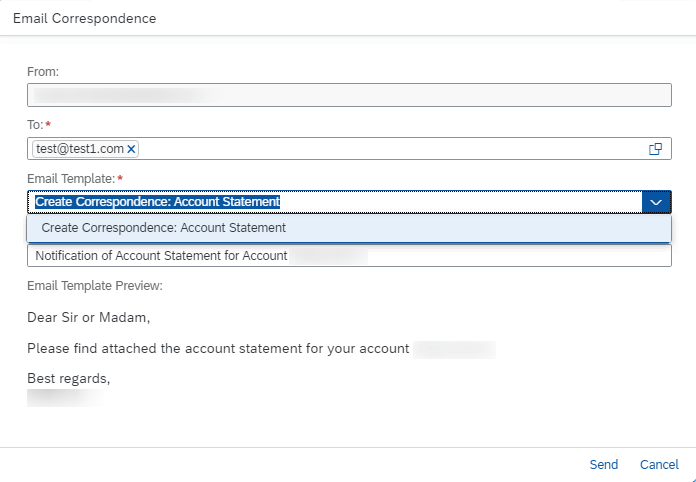
Email sending functionality is also possible using send email button :
![](https://i0.wp.com/www.erpqna.com/wp-content/uploads/2022/02/In11.png?resize=696%2C482&ssl=1)
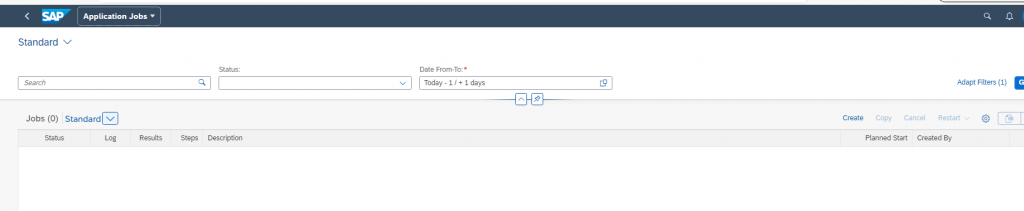
For the background processing use the below Job scheduling Fiori application Schedule Accounts Payable Jobs as shown below :
https://fioriappslibrary.hana.ondemand.com/sap/fix/externalViewer/#/detail/Apps(‘F2257’)/S21OP
Click on Create a new job
![](https://i0.wp.com/www.erpqna.com/wp-content/uploads/2022/02/In12-1024x211.png?resize=730%2C150&ssl=1)
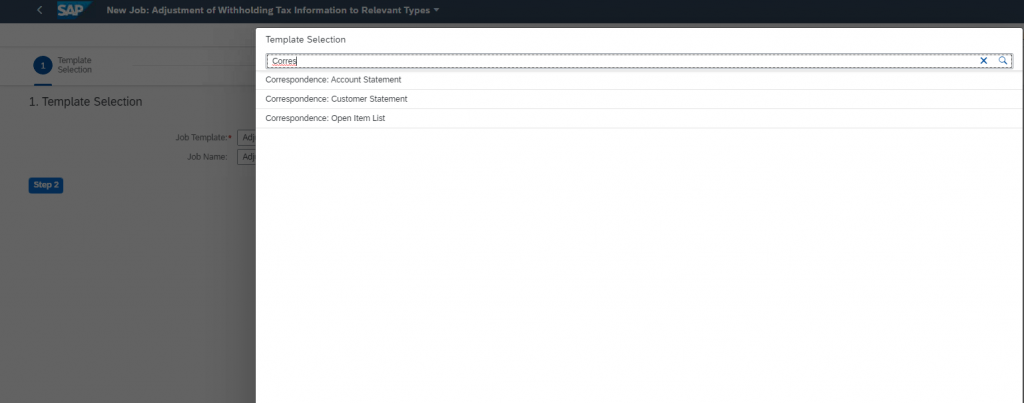
Select the template Correspondence : Account Statement
![](https://i0.wp.com/www.erpqna.com/wp-content/uploads/2022/02/In13-1024x403.png?resize=730%2C287&ssl=1)
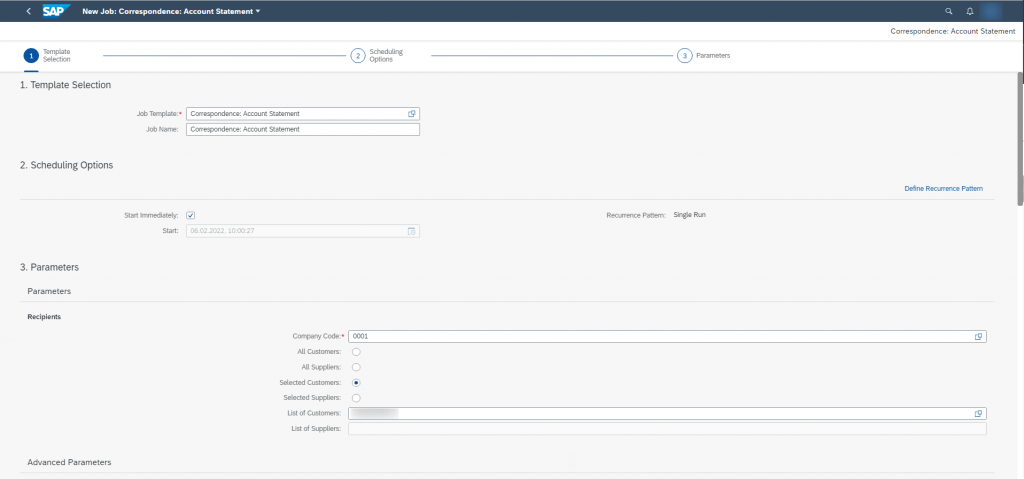
Set the parameters like company code and Customers
![](https://i0.wp.com/www.erpqna.com/wp-content/uploads/2022/02/In14-1024x479.png?resize=730%2C341&ssl=1)
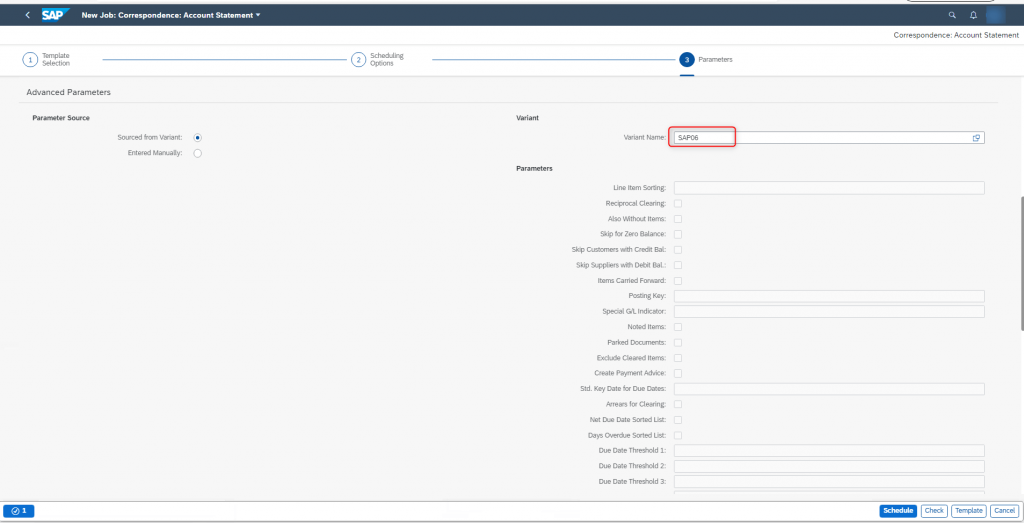
Also provide the variant name which is configured above
![](https://i0.wp.com/www.erpqna.com/wp-content/uploads/2022/02/In15-1024x523.png?resize=730%2C373&ssl=1)
If you want both print and email options use the below check boxes
![](https://i0.wp.com/www.erpqna.com/wp-content/uploads/2022/02/In16-1024x517.png?resize=730%2C369&ssl=1)
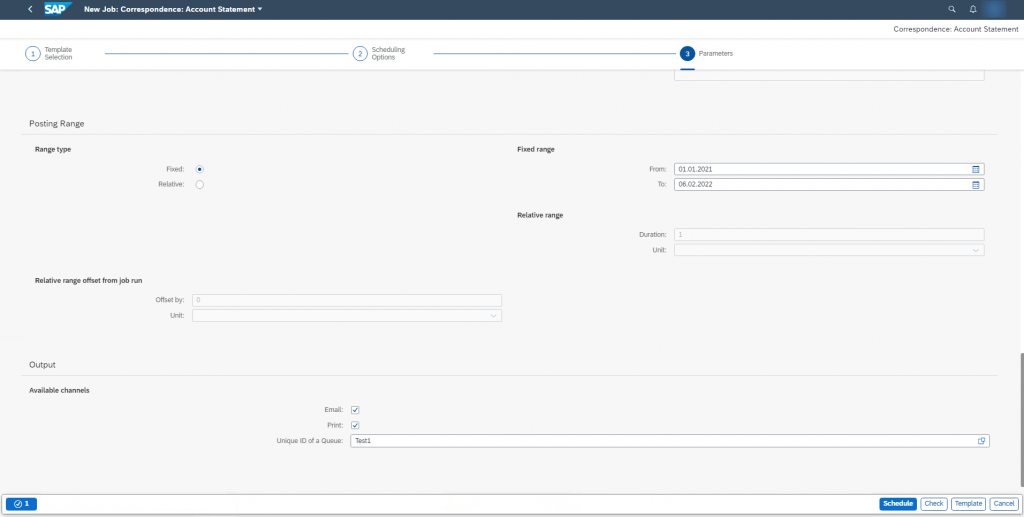
Once the job is scheduled you can find the logs in the below apps by clicking on the log or Results button
![](https://i0.wp.com/www.erpqna.com/wp-content/uploads/2022/02/In17-1024x198.png?resize=730%2C141&ssl=1)
In-App Extensions of the Forms and Email templates
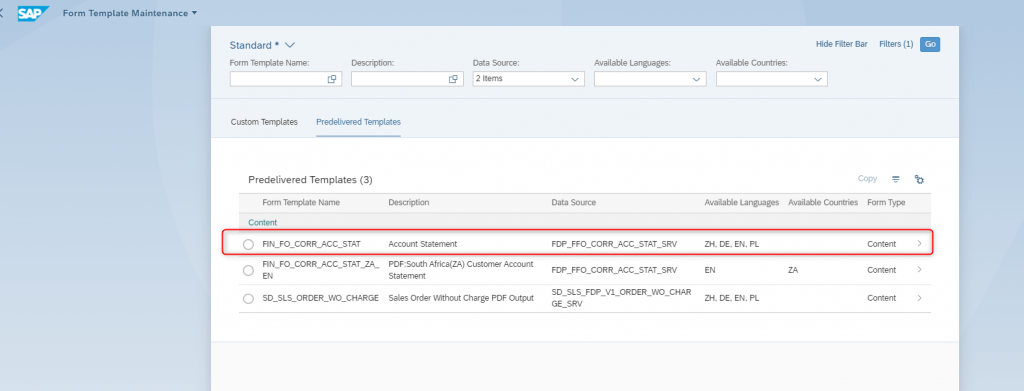
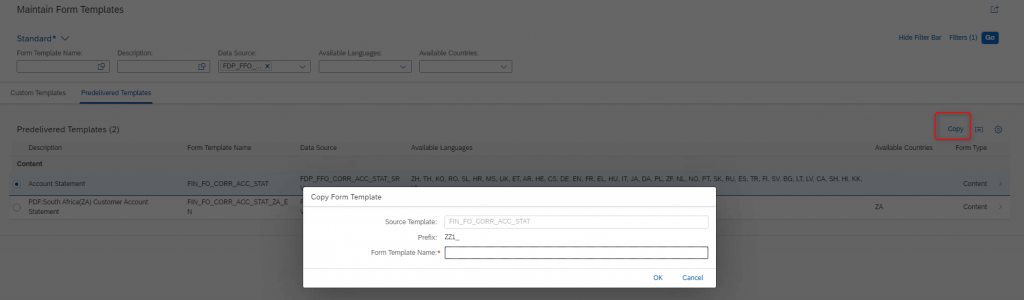
Open the Maintain Form Template Fiori application and select the Form template
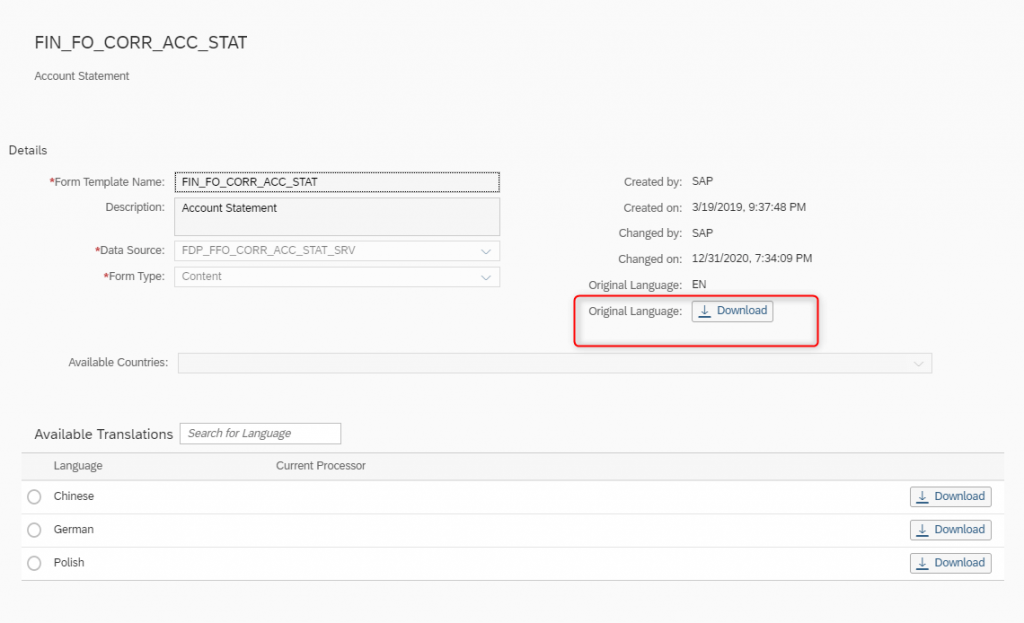
Download the Form Template :
![](https://i0.wp.com/www.erpqna.com/wp-content/uploads/2022/02/In18-1024x391.png?resize=730%2C279&ssl=1)
![](https://i0.wp.com/www.erpqna.com/wp-content/uploads/2022/02/In19-1024x623.png?resize=730%2C444&ssl=1)
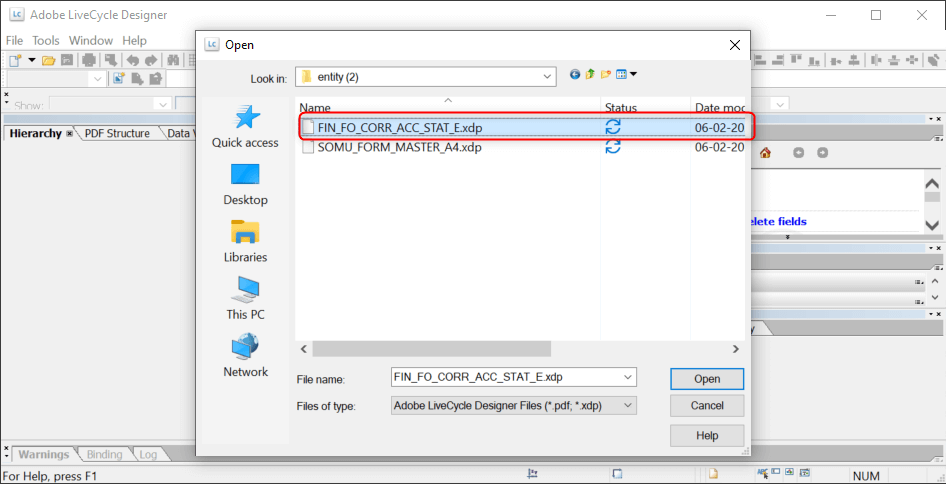
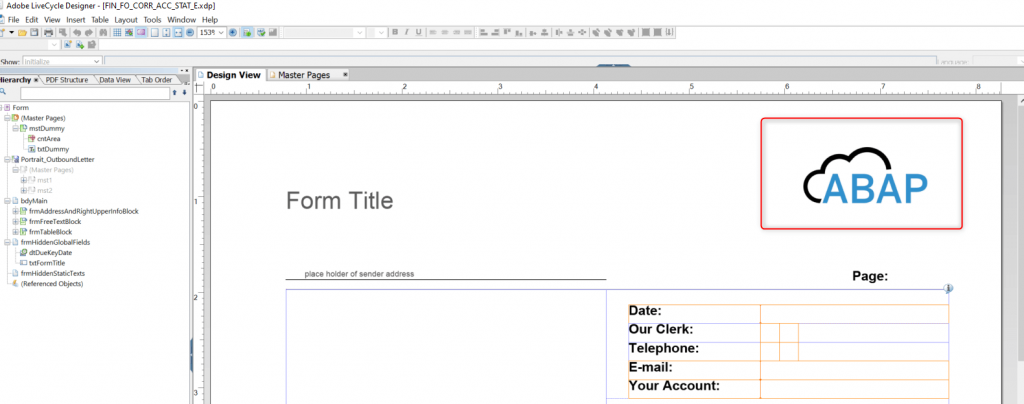
Now Open the Adobe Life cycle designer and open the XDP file as shown below and make small changes like changing logo or adding new fields or fragments
![](https://i0.wp.com/www.erpqna.com/wp-content/uploads/2022/02/In20.png?resize=730%2C373&ssl=1)
![](https://i0.wp.com/www.erpqna.com/wp-content/uploads/2022/02/In21-1024x404.png?resize=730%2C288&ssl=1)
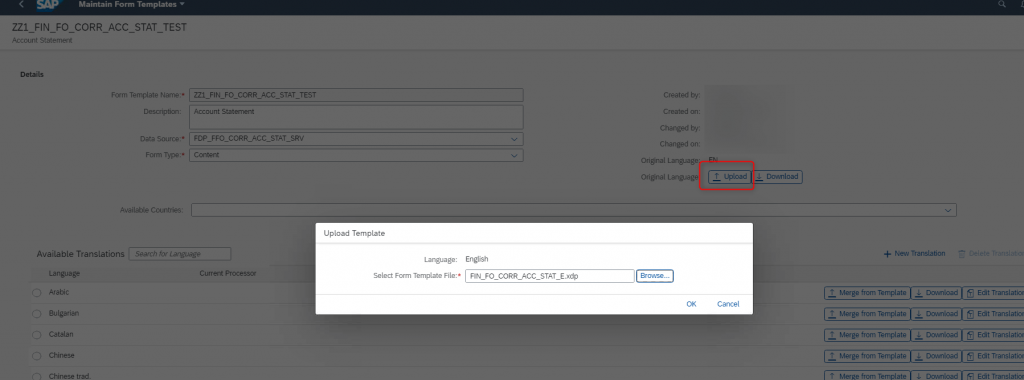
Upload the changed template to the custom form template and change the configuration with the custom form name and generate the print preview
![](https://i0.wp.com/www.erpqna.com/wp-content/uploads/2022/02/In22-1024x300.png?resize=730%2C214&ssl=1)
![](https://i0.wp.com/www.erpqna.com/wp-content/uploads/2022/02/In23-1024x380.png?resize=730%2C271&ssl=1)
![](https://i0.wp.com/www.erpqna.com/wp-content/uploads/2022/02/In24-1024x97.png?resize=730%2C69&ssl=1)
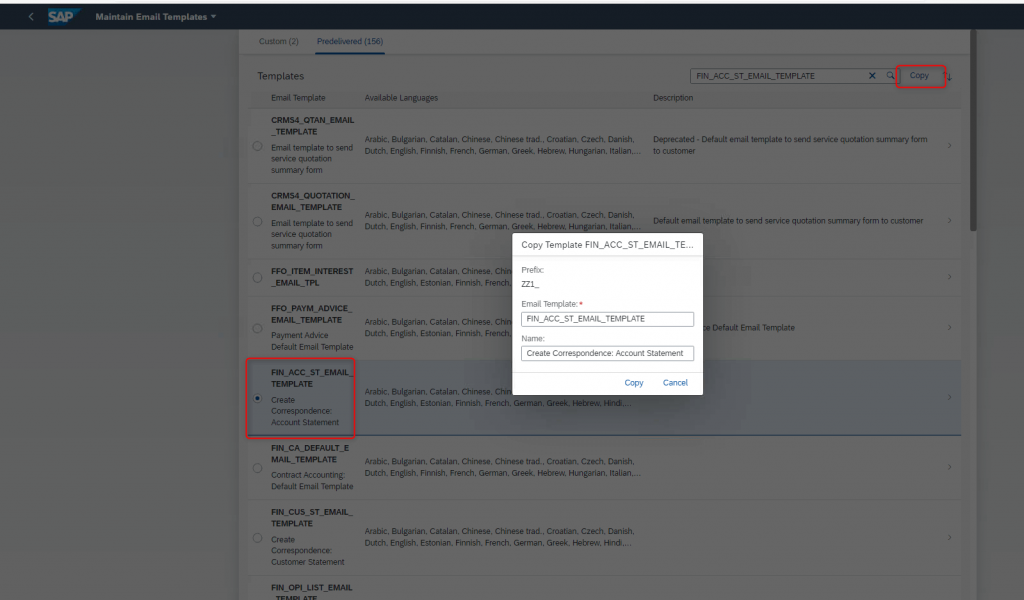
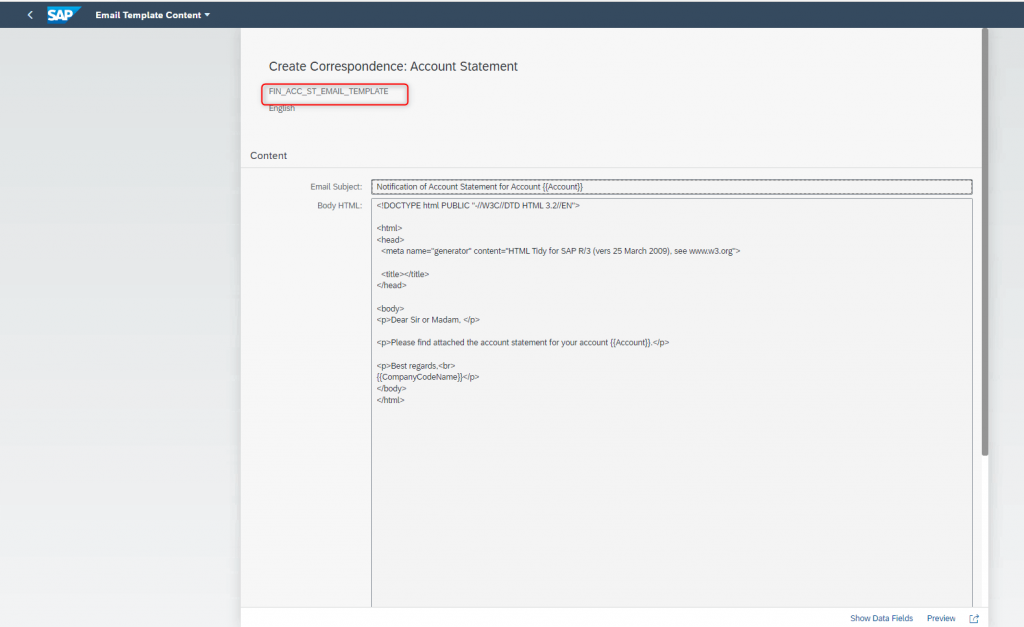
Similarly Use the In-App Extension to change the email templates as shown below :
Open the Custom Email template and copy the standard email template
![](https://i0.wp.com/www.erpqna.com/wp-content/uploads/2022/02/In25-1024x600.png?resize=730%2C428&ssl=1)
![](https://i0.wp.com/www.erpqna.com/wp-content/uploads/2022/02/In26-1024x627.png?resize=730%2C447&ssl=1)
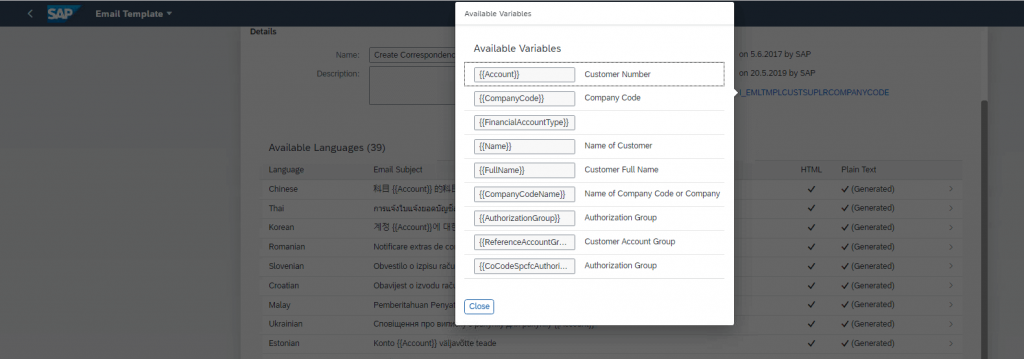
Dynamic variables shown in the above screenshot is available in the below CDS view and the view can be extended in case more variables are required for the same.
![](https://i0.wp.com/www.erpqna.com/wp-content/uploads/2022/02/In27-1024x359.png?resize=730%2C256&ssl=1)
![](https://i0.wp.com/www.erpqna.com/wp-content/uploads/2022/02/In28-1024x807.png?resize=730%2C575&ssl=1)
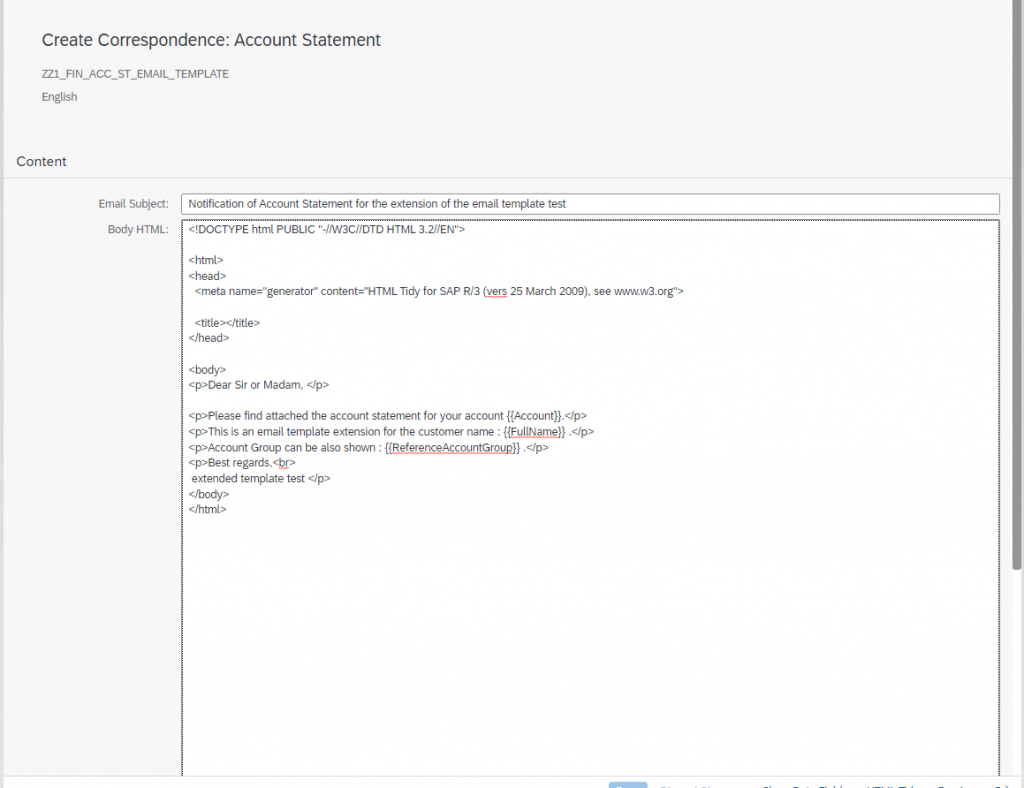
Now change the email template by changing the email subject adding additional variables in the email body, Configure the custom email template and test the same.
![](https://i0.wp.com/www.erpqna.com/wp-content/uploads/2022/02/In29-1024x788.png?resize=730%2C562&ssl=1)
![](https://i0.wp.com/www.erpqna.com/wp-content/uploads/2022/02/In30.png?resize=730%2C169&ssl=1)
![](https://i0.wp.com/www.erpqna.com/wp-content/uploads/2022/02/In31-1024x369.png?resize=730%2C263&ssl=1)
Thus we can change the form layout and also the email template to adapt the same to custom functionality