Context:
The Idea behind this blogpost is to create a Master Data Maintenance User Interface which can be used as the only place for Creating, Updating & Deleting attribute values & maintaining Hierarchies (Parent-Child) and commiting them in the master data of the dimension automatically, sidelining the need to achieve these from Model every time.
Prerequisites:
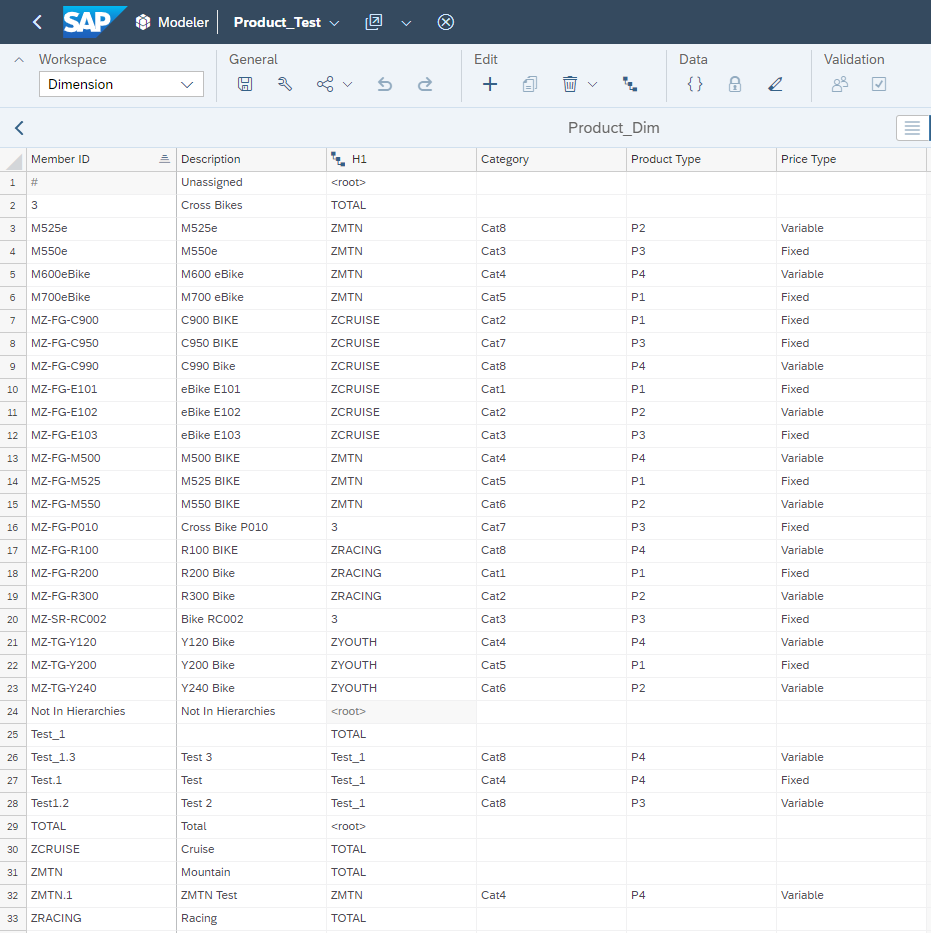
- A Planning Model with Generic Dimension with Attributes and Hierarchies
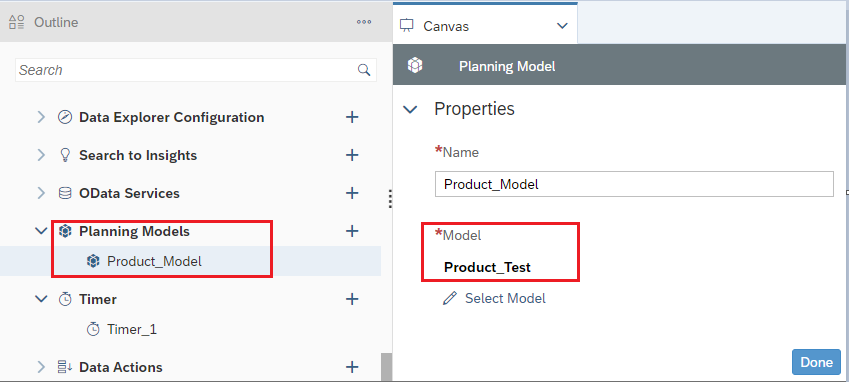
- Planning Model Object needs to be created under “Planning Models” section in Analytic Designer
- A Mandatory Global Script Variable of type “PlanningModelMember” needs to be created for capturing the values of all properties of the Dimension Member(s) and using as Parameter for Planning APIs – createMembers(), updateMembers(), deleteMembers()
- Here in this blog, g_properties & g_properties_1 are the variables of type PlanningModelMember which has been used in the scripts below.
Steps:
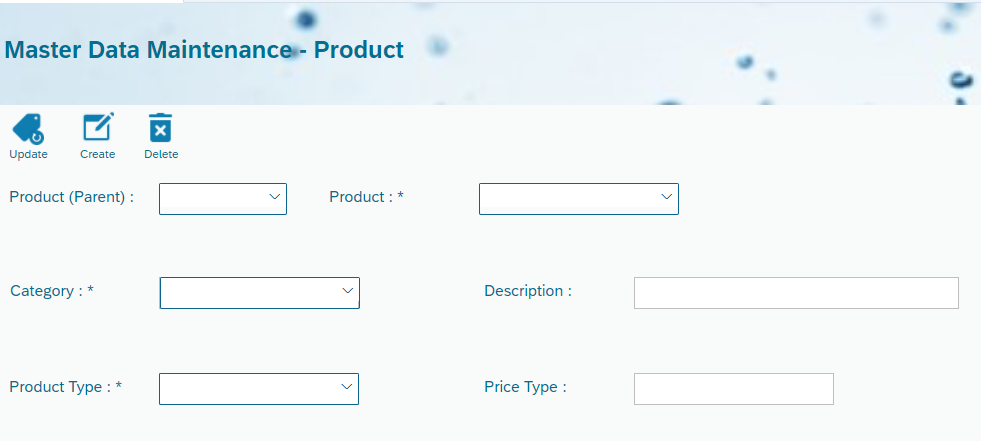
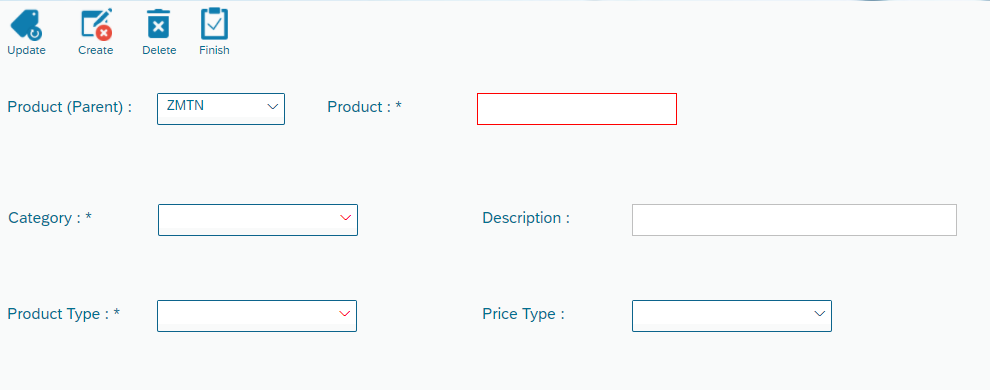
1 – Creating Layout
Here, Dropdowns and Input fields widget has been used for Parent Node, Child Node , Members and its attributes for all the CRUD activities.
2 – Script Functions
Create Script Functions to:
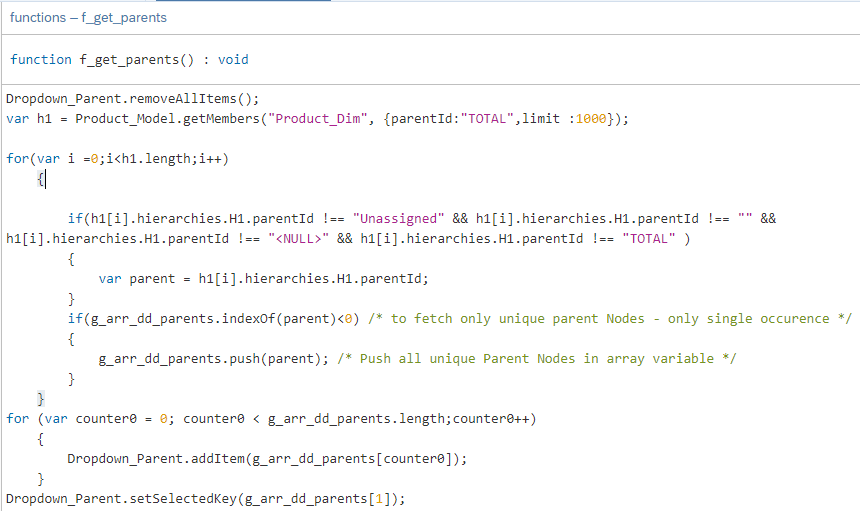
- Fetch All Unique Parents and populate them in respective Parent Node Dropdown & make one as default selection
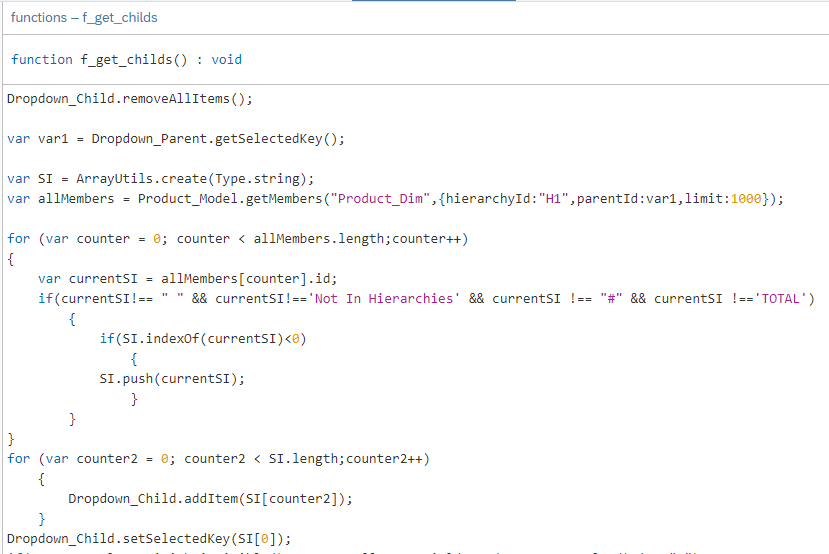
- Fetch all relevant Child Nodes only for selected Parent Node in the above Dropdown and populate them in the Child Node Dropdown
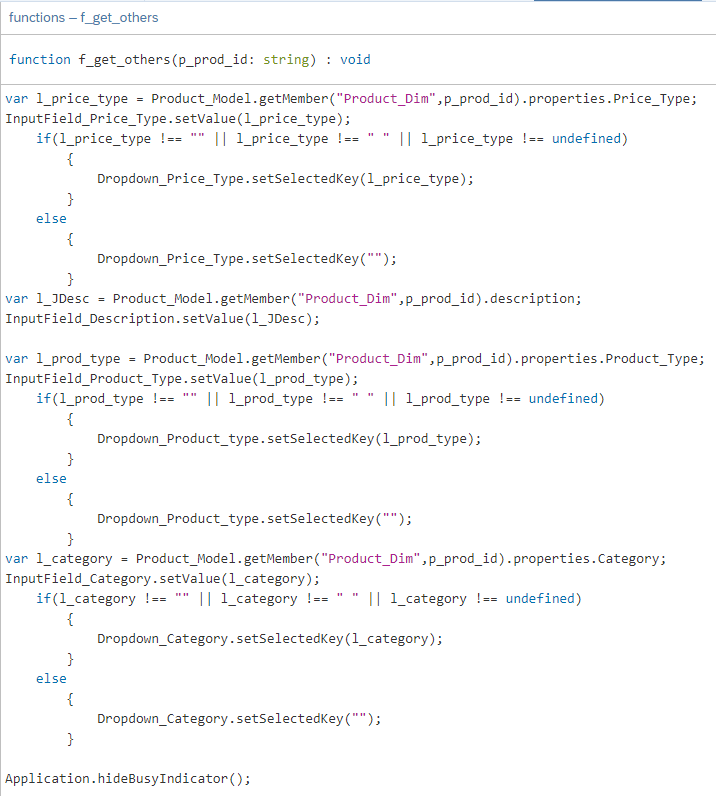
- Fetch all other attributes value for the selected Child Node Member ID and populate them in Input Field or set them as Dropdown selection (wherever Dropdown has been used for attributes)
Script snippet for getting Parents:
Script snippet for getting Child Node Members:
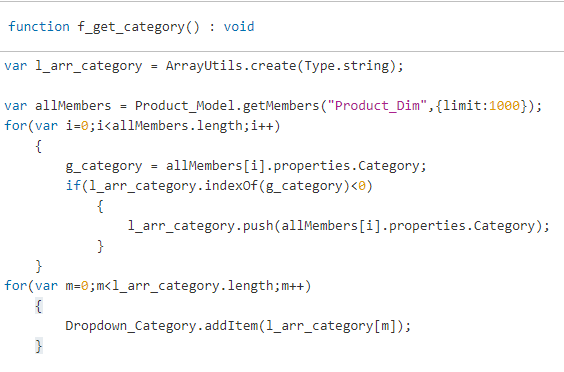
Since, Dropdown has been used for selection during “Update” Mode for few attributes of dimension, respective Dropdown needs to be populated with attribute values
Note – For performance optimization, Dropdown “Data Source Type” can be set as Script Variables and you can bind Dropdown to the script variable (or) Dropdown “Data Source Type” can be set as Manual Input and populate them via Scripts Manually as below:
Script snippet for getting other attributes value for selected Child Node Member ID
Attributes List:
- Price Type
- Product Type
- Category
- Description
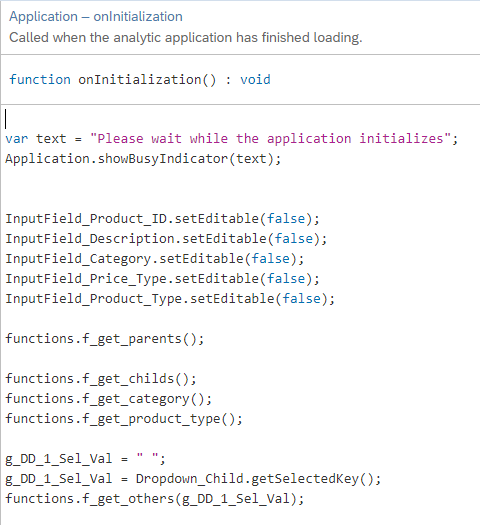
3 – Application onInitialization():
At the Application Initialization, write below script to populate and set the Member and Attribute Values
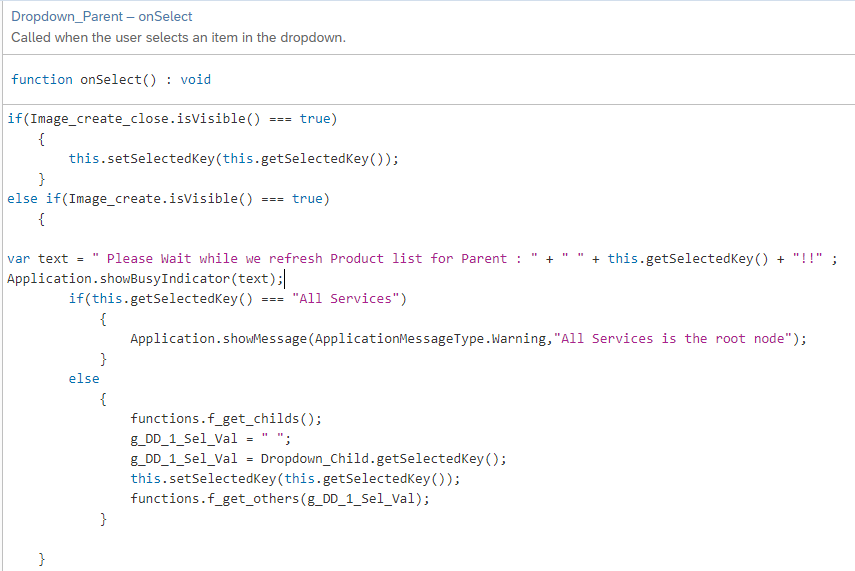
4 – onSelect() of Dropdown for Parent Node
Write the Script to call script functions to get Child Nodes for the selected Parent and then populate other attribute values by calling script functions for others
5 – onSelect() of Dropdown for Child Node
Write Script to call script function to populate other attribute values for selected Child Node

6 – onClick() of “Update” on the Toolbar
Write Scripts to enable Input Field widgets as Editable using InputField_X.setEditable(true) API & show Dropdowns for attributes wherever required for selection.
7 – onClick() of “Finish” for Update Mode
- Get the values for all attributes form Input fields and Dropdowns. Example below:
var l_price_type = Dropdown_Price_Type.getSelectedKey();
var l_Description = InputField_Description.getValue();- Capture attributes values in a PlanningModelMember variables created in the beginning:
g_properties =({id:l_gg_child, description:l_Description,hierarchies: {H1:{parentId:g_dd_parents_servID}}, properties:{Category:l_category,Price_Type:l_price_type,Product_Type:l_prod_type}});- Use updateMembers() API to update Planning Model Dimension as below:
var result = Product_Model.updateMembers("Product_Dim", g_properties);
if(result)
{
Application.refreshData();
Application.showMessage(ApplicationMessageType.Success,"Application" + " " + Application.getInfo().description + "has been successfully updated with new master Data" + " " + 			Application.getUserInfo().displayName);

}
8 – onClick of “Create” on the Toolbar
Write below script to open Popup_1 for selecting options either to create a “New Parent Node” or “Child Node” for existing Parent Node.
if(Image_update.isVisible() === true)
	{
if(Image_create.isVisible() === true)
	{
		Popup_1.open();
        }
else if(Image_Update_close.isVisible() === true)
	{
	Application.showMessage(ApplicationMessageType.Warning,"Update Mode On - Creating new master data is not allowed while in Update Mode !!");
	}
}
Popup_1 would provide the option to start by creating New Parent Node or Child Node for existing Parent Node:

- For Parent Member:
if(buttonId === "Button_Parent")
	{
		Popup_2.open();
		InputField_parent_pop.setCssClass("myifield");
		InputField_parent_pop.setValue("");
	}
Popup_2 would let you create a New Parent:
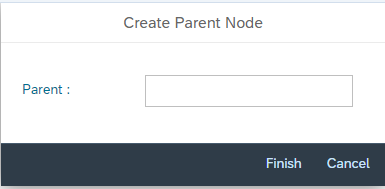
- onClick of Finish Button form Popup_2
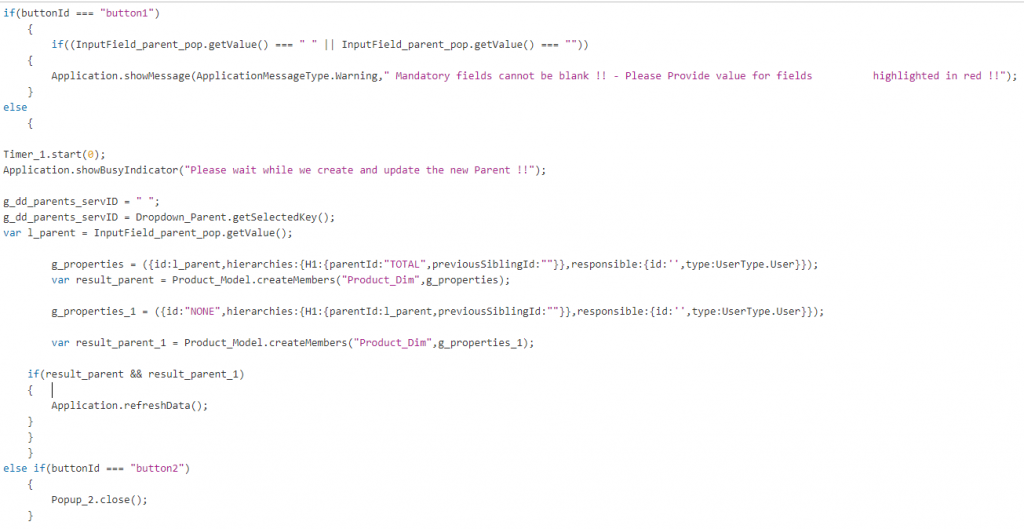
Note – At the initial, a New Parent Node would not have any Child Node. So While creating Parent Node , “None” flags that No Child is there against this newly created Parent
- For Child Member:
Write Scripts to Show Input Fields wherever applicable as per requirement and set them as Editable(true) and show Dropdowns as true wherever Selection is required from existing values.
Note: Mandatory Fields checks can also be implemented using CSS and scripts can be implemented to throw message when any mandatory fields are left blank upon committing
9 – onClick of “Finish” for Create Mode
- Get the values for all attributes from Input fields and Drop downs. Example below:
var l_price_type = Dropdown_Price_Type.getSelectedKey();
var l_Description = InputField_Description.getValue();- Capture attributes values in a PlanningModelMember Variables created in the beginning as below:
g_properties =({id:l_gg_child, description:l_Description,hierarchies: {H1:{parentId:g_dd_parents_servID}}, properties:{Category:l_category,Price_Type:l_price_type,Product_Type:l_prod_type}});- Use createMember() API to create a New Child Node Member ID with attribute values as below.
Note: If Child Member is being created for a newly created Parent Node, “NONE” Child Node which was created at the time of creating the New Parent Node, needs to be deleted.
var result = Product_Model.createMembers("Product_Dim",g_properties);
var result_1 = Product_Model.deleteMembers("Product_Dim","NONE");

if(result || result_1)
	{
	Application.refreshData();
	Application.showMessage(ApplicationMessageType.Success,"Application" + " " + Application.getInfo().description + "has been successfully updated with new master Data" + " " + Application.getUserInfo().displayName);
}- Write Scripts to call existing functions to fetch and populate Dropdowns with newly added Child and attribute values, Show and Hide Dropdowns as applicable, set Input Fields Editable as False, Set CSS for all widget as not defined / as was on initialization etc.
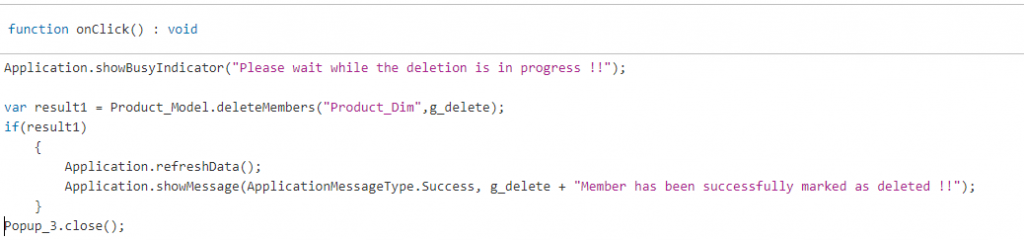
10 – onClick of “Delete” on Toolbar
To delete any selected Child Node Member ID , write the below script:

Popup_3 below is a warning popup before confirming deletion.
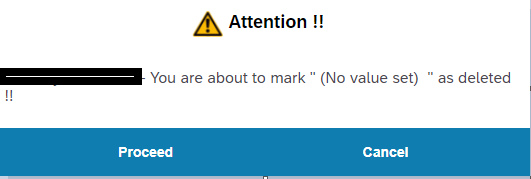
- onClick of Proceed Button: