Introduction
This blog post describes how to load transactional data to a planning enabled model using Live connection data source. We had to use this approach as an alternative since this data source cannot be loaded through Import connection.
Source System: S/4 HANA Cloud (MTE)
BeX Query: 2CCCSMATRIXRPT10Q (Group Reporting)
Issue
The above data source can be consumed only through live connection with S/4 Cloud (MTE) since it has not been exposed as an ODATA Service to be supported for consumption via Import Connection.
Upon failing on trying several alternatives to make this available in Import connection, this workaround solved the requirement.
The reason why this is required in Imported connection is due to the requirement of a custom level-based hierarchy of a dimension.
This hierarchy is unavailable in the source system and hence linking models is not a possible solution either. Customizing/building a hierarchy is not possible in a model based on live data source.
To meet this requirement, Actuals and Plan data are required in the same model.
Solution
Data Modelling:
1. Create a Model using Live connection with the data source (2CCCSMATRIXRPT10Q).
2. Create a Planning enabled model including with all required dimensions.
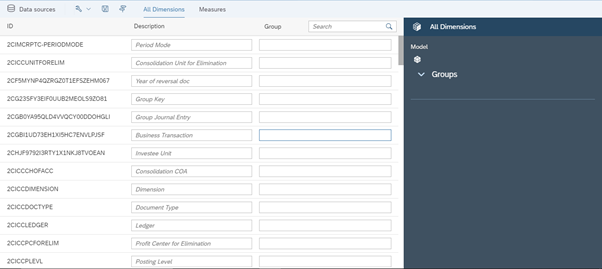
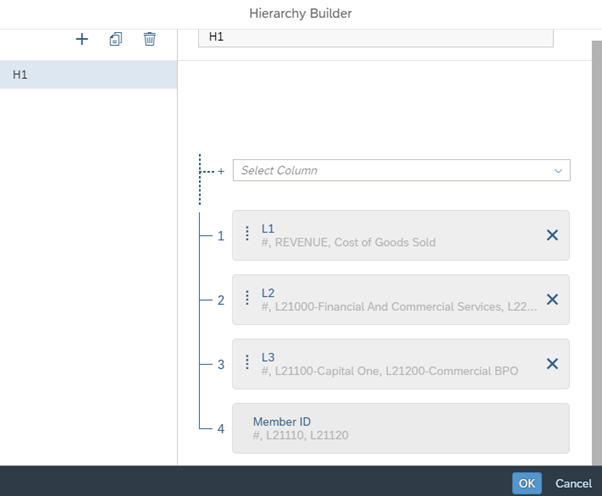
3. Design a level-based hierarchy with the node containing unique values in the ID and other levels as attributes. In this example, the unique ID is combined FSITEM and Profit Center which is also level 4. Hence FSITEM and Profit Center are added as properties and L4 is maintained as ID.
Analytic Application
1. Create 2 Tables in the Analytic application. One based on Live Data Model and another on Planning Enabled Model. These 2 tables will be reduced to the minimum size and hidden on initialization since they are only used to publish data from live data model to planning enabled model.
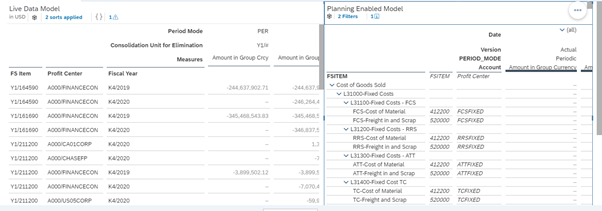

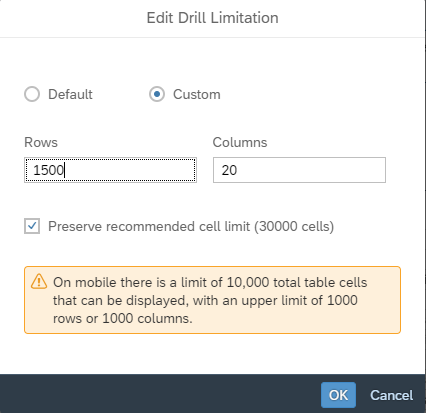
2. The Planning Enabled table is set with rows and Column dimensions drilled to the granular level on which the data to be loaded. By default, the maximum number of rows supported in Table is 500 but this can be customized. Need to make sure that all rows are pre-loaded by customizing the drill limitation.
3. Create a button to trigger the copy action. On clicking the button, the main program is executed.
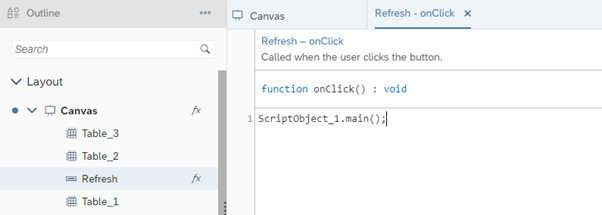
4. Now few things to be done with Scripting. This moves the data from the Live Model to Planning Enabled Model.
A Script Object is created with 4 functions.
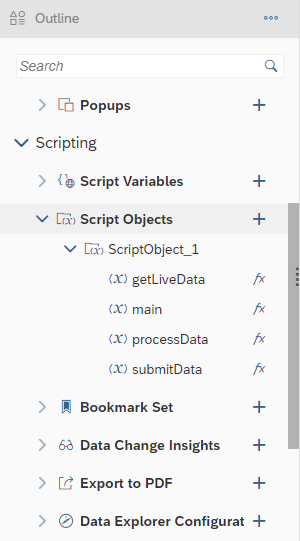
- Main:
This function executes the other required functions in sequence.
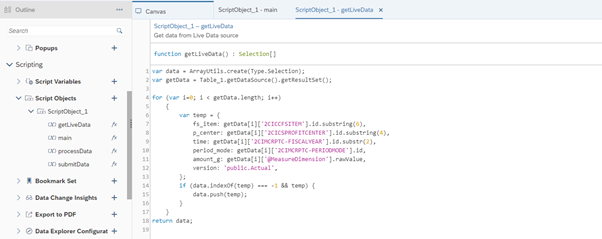
- getLiveData:
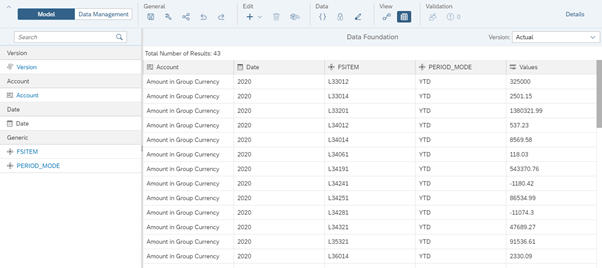
This function extracts the data from the Table_1 (Live Data model) and stored in an array of required selections.
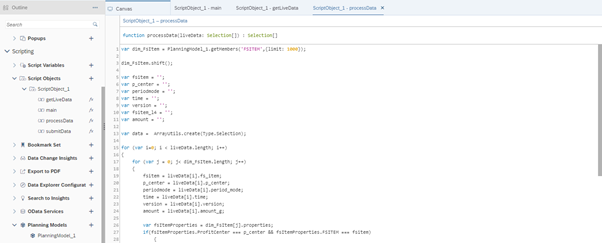
- processData
This function is defined to process the data and validate with the dimensions in the planning enabled model. This function returns a selection on which the data needs to be published with measure value.
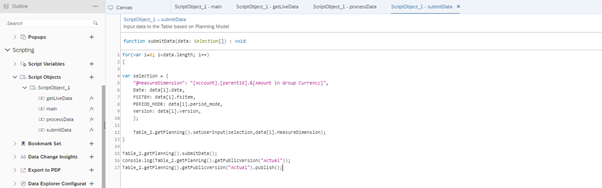
- Submitdata
This function submits and publishes the processed data to planning enabled model.
The above code can be downloaded from the document:
1. getLiveData()
var data = ArrayUtils.create(Type.Selection);
var getData = Table_1.getDataSource().getResultSet();
for (var i=0; i < getData.length; i++)
{
var temp = {
fs_item: getData[i]['2CICCFSITEM'].id.substring(6),
p_center: getData[i]['2CICSPROFITCENTER'].id.substring(4),
time: getData[i]['2CIMCRPTC-FISCALYEAR'].id.substr(2),
period_mode: getData[i]['2CIMCRPTC-PERIODMODE'].id,
amount_g: getData[i]['@MeasureDimension'].rawValue,
version: 'public.Actual',
};
if (data.indexOf(temp) === -1 && temp) {
data.push(temp);
}
}
return data;
2. processData()
var dim_FsItem = PlanningModel_1.getMembers('FSITEM',{limit: 1000});
dim_FsItem.shift();
var fsitem = '';
var p_center = '';
var periodmode = '';
var time = '';
var version = '';
var fsitem_l4 = '';
var amount = '';
var data = ArrayUtils.create(Type.Selection);
for (var i=0; i < liveData.length; i++)
{
for (var j = 0; j< dim_FsItem.length; j++)
{
fsitem = liveData[i].fs_item;
p_center = liveData[i].p_center;
periodmode = liveData[i].period_mode;
time = liveData[i].time;
version = liveData[i].version;
amount = liveData[i].amount_g;
var fsItemProperties = dim_FsItem[j].properties;
if(fsItemProperties.ProfitCenter === p_center && fsItemProperties.FSITEM === fsitem)
{
fsitem_l4 = dim_FsItem[j].id;
var input_temp = {
version: version,
date: "[Date].[YQM].&[" + time +"]",
fsitem: "[FSITEM].[H1].&[" + fsitem_l4 +"]",
period_mode: periodmode,
MeasureDimension: amount
};
if (data.indexOf(input_temp) === -1 && input_temp)
{
data.push(input_temp);
}
}
}
}
return data;
3. submitdata()
for(var i=0; i<data.length; i++)
{
var selection = {
"@MeasureDimension": "[Account].[parentId].&[Amount in Group Currency]",
Date: data[i].date,
FSITEM: data[i].fsitem,
PERIOD_MODE: data[i].period_mode,
Version: data[i].version,
};
Table_2.getPlanning().setUserInput(selection,data[i].MeasureDimension);
}
Table_2.getPlanning().submitData();
console.log(Table_2.getPlanning().getPublicVersion("Actual"));
Table_2.getPlanning().getPublicVersion("Actual").publish();
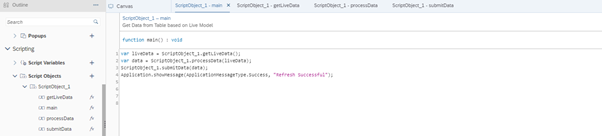
4. main()
var liveData = ScriptObject_1.getLiveData();
var data = ScriptObject_1.processData(liveData);
ScriptObject_1.submitData(data);
Application.showMessage(ApplicationMessageType.Success, "Refresh Successful");The code can be further enhanced by configuring Data locks to the actuals in the Planning enabled model and adjusting it on publishing the new data from live data model.


