In Part IV, we learnt how to make the elements visible as we need them and also learnt how to make the mandatory fields throw error message. Till now we dealt with the simple table output. In this part, we would see how we can display the same tabular output in ALV. For ALV display in Web Dnypro ABAP, we need to do “Component Usage“.
Another new term in Web Dynpro. The Web Dynpro framework provides us with a technique called ‘Component Usage’, with the help of which we can reuse the events, methods and context of one WD component into another WD component. In simple words, Component Usage means reuse of already developed existing Web Dynpro Components (standard and/or custom). Just like, we use standard “REUSE_ALV_GRID_DISPLAY” function module to display our ALV in normal ABAP, similarly we can use standard Web Dynpro Component “SALV_WD_TABLE“. Just like “REUSE_ALV_GRID_DISPLAY” has table “T_OUTTAB” where we can assign ANY type of internal table, similarly in WD “SALV_WD_TABLE” has a context node called “DATA” where we can bind context of ANY type.
We need to use:
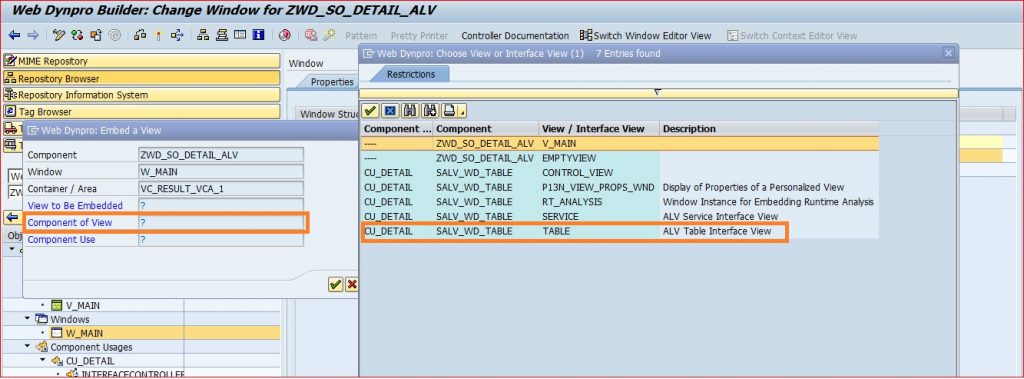
a) Interface View ‘TABLE’ of component SALV_WD_TABLE
b) Interface node ‘DATA’ of component SALV_WD_TABLE.
The other very oftenly used standard components are WDR_OVS (for Object Value Selector OVS) and WDR_SELECT_OPTIONS (for select options).
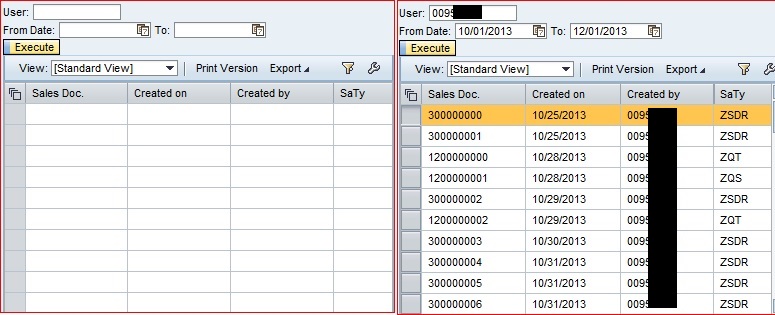
Let us use the same example we did in Part III. This time we are declaring global contexts in ComponentController (not necessary, just for demonstration).
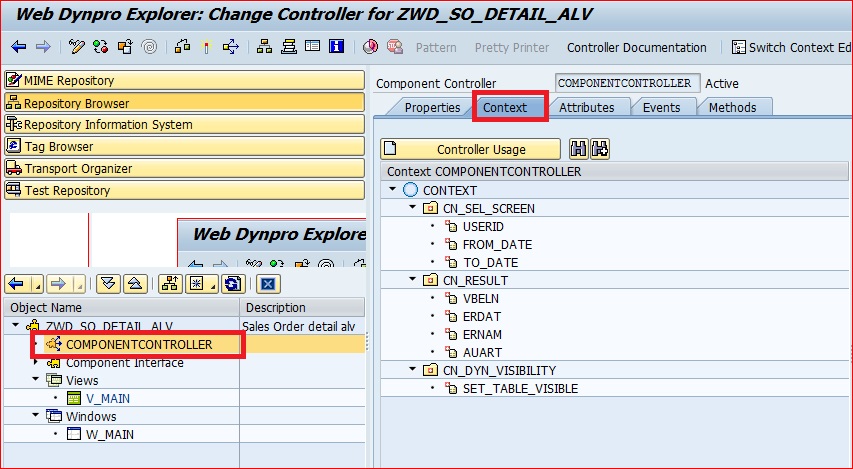
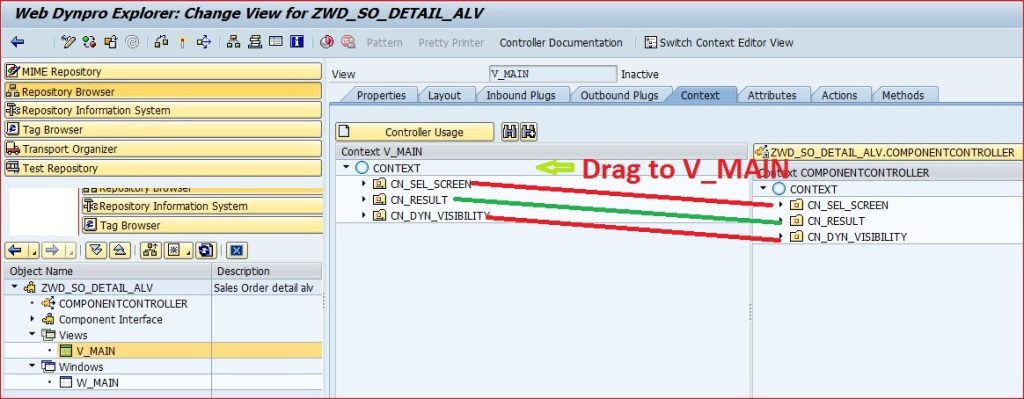
Drag these nodes in the main View and now they are available in the view (just like we pass variables as parameters in the Subroutine/Performs to make those variable available in the subroutines).
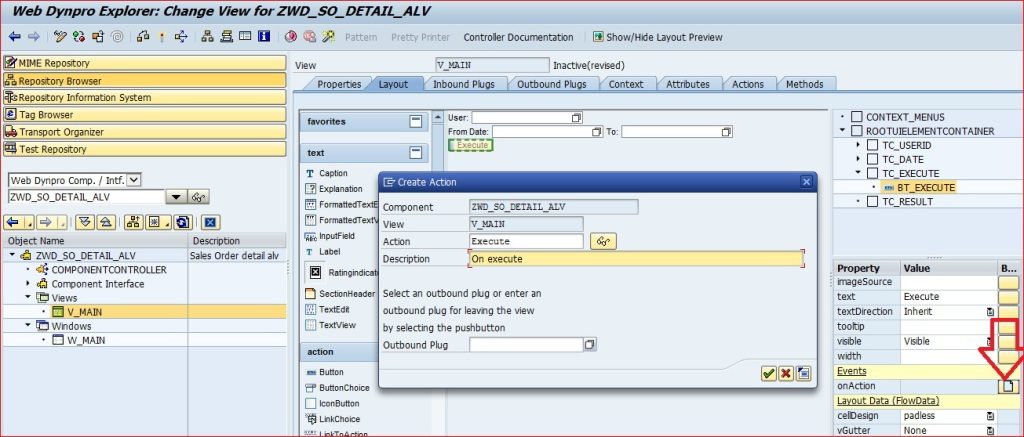
Hope, by now you know how to create button and link it to an actions (screen shot below in case you forgot).
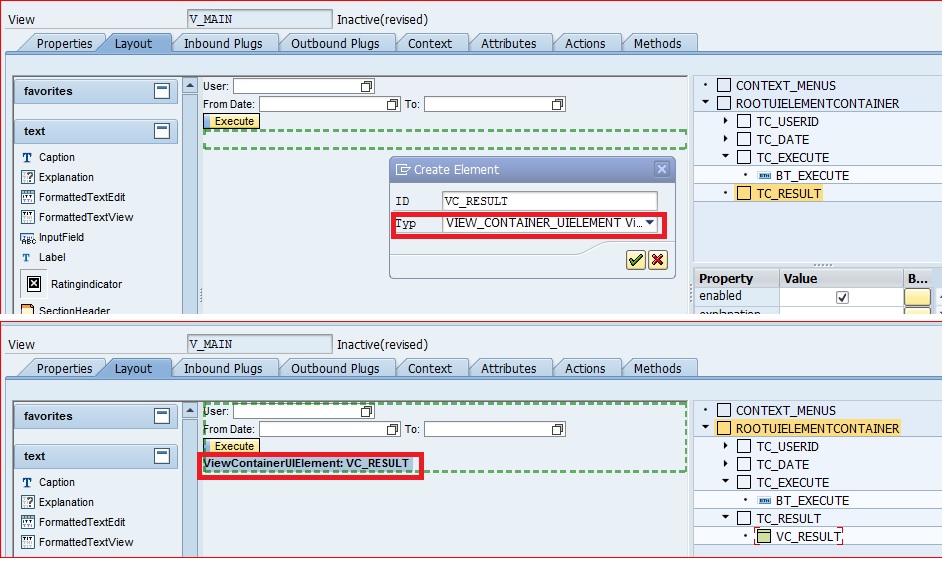
For displaying the ALV output, we can use View Container UI Element (figure above). The View Container UI Element need NOT be bound to any context here. We will show later how it is bound.
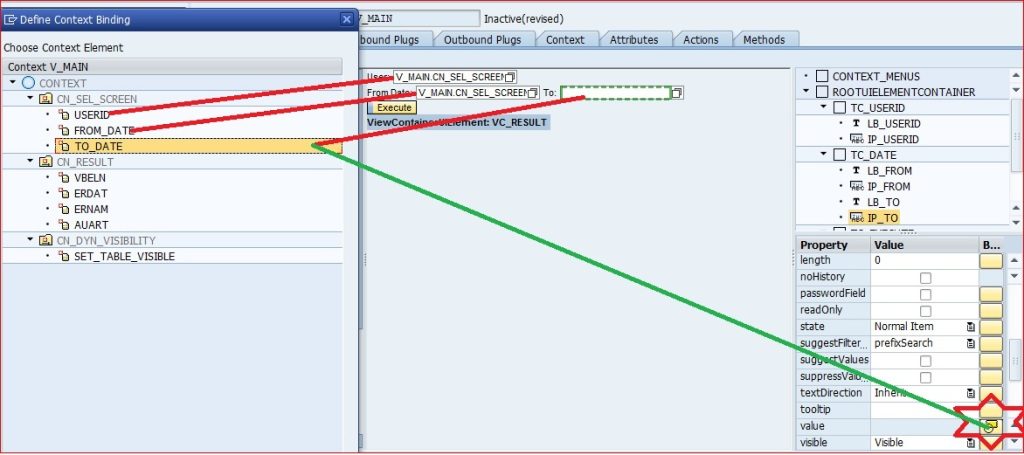
Hope you have bound all other screen elements.
On Execute button, we need to carry out three steps.
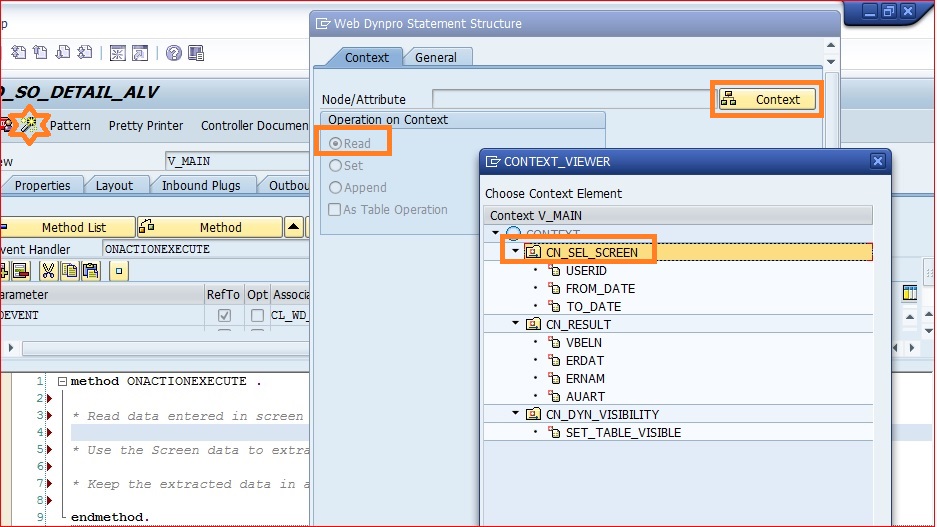
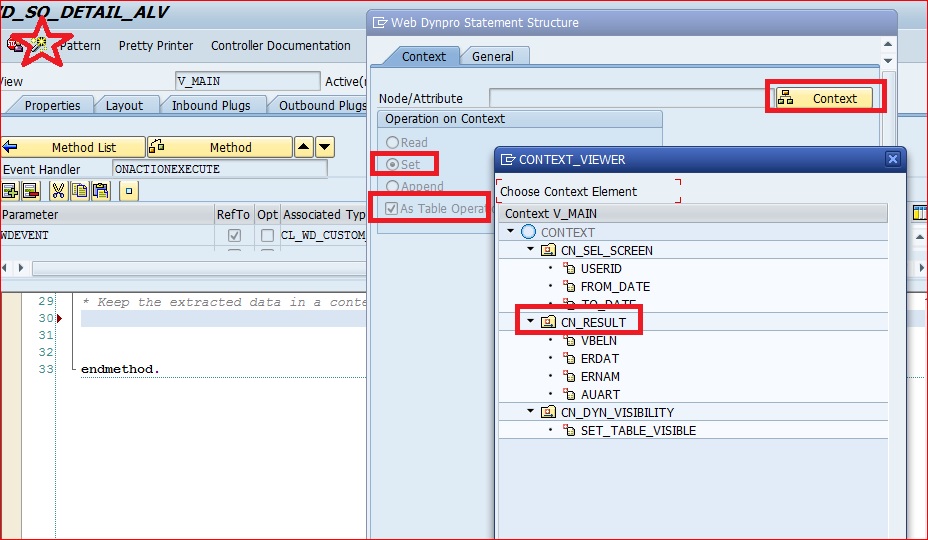
- Read data entered in the screen (fig below).
- Use the data entered in screen to extract data from database (in this example VBAK).
- Bind the extracted data to the output result context node (it would display the final output) (fig below).
Code Snippet
METHOD onactionexecute .
Read data entered in screen
DATA lo_nd_cn_sel_screen TYPE REF TO if_wd_context_node.
DATA lo_el_cn_sel_screen TYPE REF TO if_wd_context_element.
DATA ls_cn_sel_screen TYPE wd_this->element_cn_sel_screen.
DATA lo_nd_cn_result TYPE REF TO if_wd_context_node.
DATA lt_cn_result TYPE wd_this->elements_cn_result.
lo_nd_cn_sel_screen = wd_context->get_child_node( name = wd_this->wdctx_cn_sel_screen ).get element via lead selection
lo_el_cn_sel_screen = lo_nd_cn_sel_screen->get_element( ).
1. Read data entered in the screen.
lo_el_cn_sel_screen->get_static_attributes(
IMPORTING
static_attributes = ls_cn_sel_screen ).
2. Use the data entered in screen to extract data from database
Select from VBAK with the input screen fields
SELECT
vbeln ” Sales Document
erdat ” Date on Which Record Was Created
ernam ” Name of Person who Created the Object
auart ” Sales Document Type
FROM vbak
INTO TABLE lt_cn_result
WHERE ernam = ls_cn_sel_screen-userid
AND erdat GE ls_cn_sel_screen-from_date
AND erdat LE ls_cn_sel_screen-to_date.
IF lt_cn_result[] IS NOT INITIAL.
Keep the extracted data in a context node (table) bound to ALV
lo_nd_cn_result = wd_context->get_child_node( name = wd_this->wdctx_cn_result ).
3. Bind the extracted data to the output result context node
lo_nd_cn_result->bind_table( new_items = lt_cn_result set_initial_elements = abap_true ).
ENDIF.
ENDMETHOD.
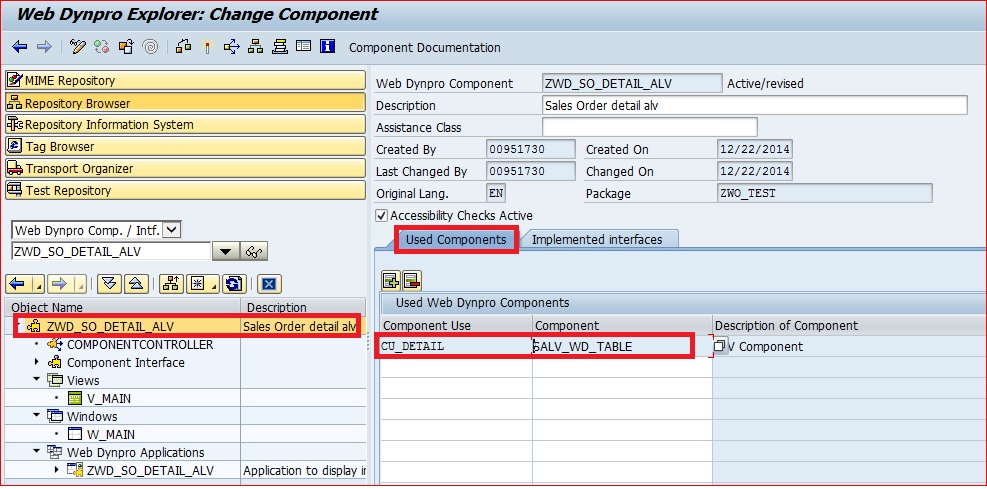
The View Container UI Element is still not bound to any context. So the final step is to link a context to the final output. For this we would leverage the already existing standard WD Component, SALV_WD_TABLE.
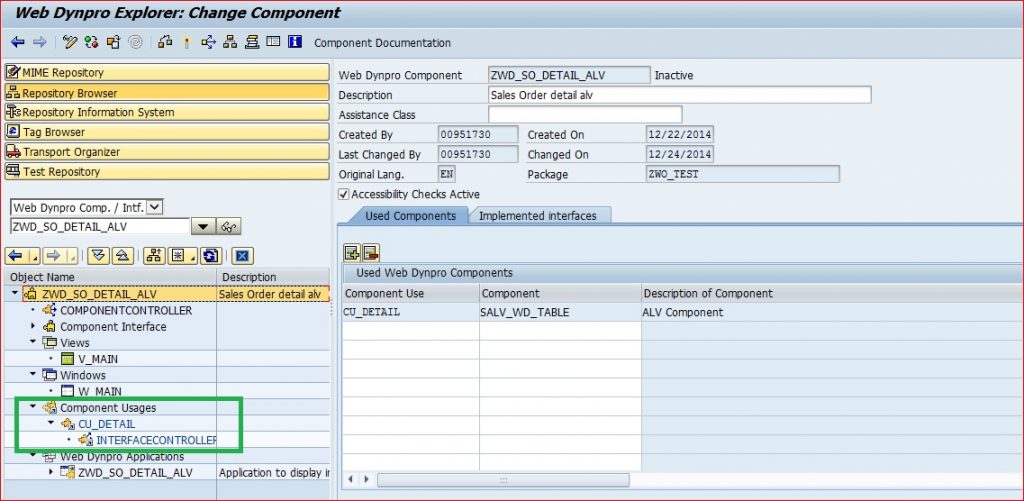
Create a component usage. In this example the name is CU_DETAIL of WD Component SALV_WD_TABLE. Naming convention CU_ for Component Usage. Please note in the left side panel new Component Usages attributes (CU_DETAIL) get created. Save/Activate the changes done till now.
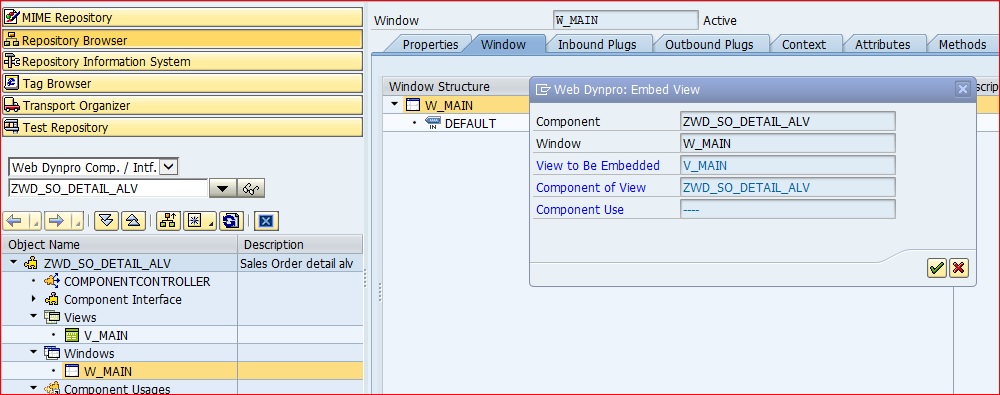
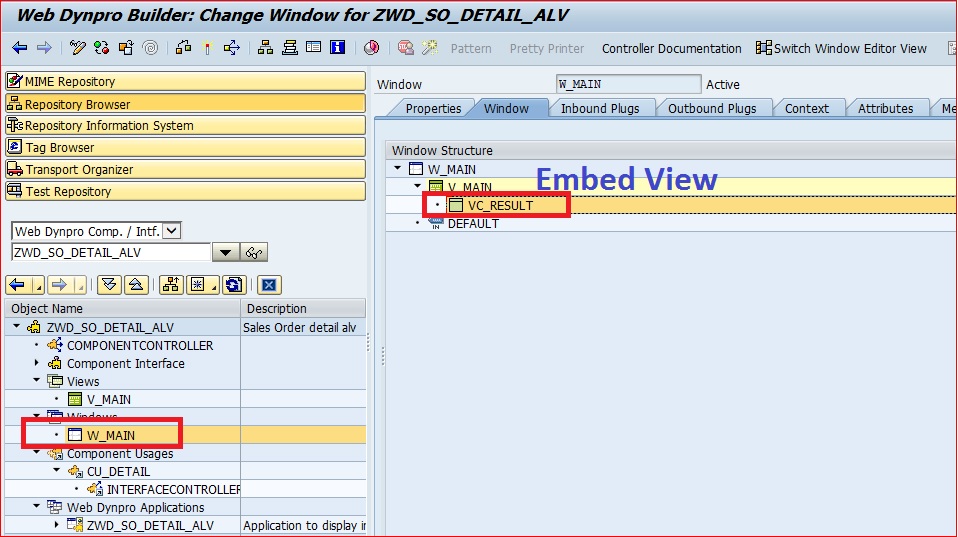
Go to the Window W_MAIN. On the right side, right click on the W_MAIN window and select EMBED View. Choose the view V_MAIN. View V_MAIN along with the View Container UI element is embedded in the Window. Now right click on the View Container VC_RESULT and chose EMBED View select Component Usage View TABLE. Your window is linked to standard component SALV_WD_TABLE’s TABLE view.

Now we need to bind the output data to the context of the SALV_WD_TABLE. The context we would be binding to is “DATA”. Click on the INTERFACECONTROLLER of the Component Usage CU_DETAIL. Check the icon under “DATA” in context has single arrow underlined. Now we need to let the SALV_WD_TABLE know, what data would be bound to the “DATA” context. In our example, CN_RESULT context has the final data, so, we drag CN_RESULT from right to the “DATA” context on the left.
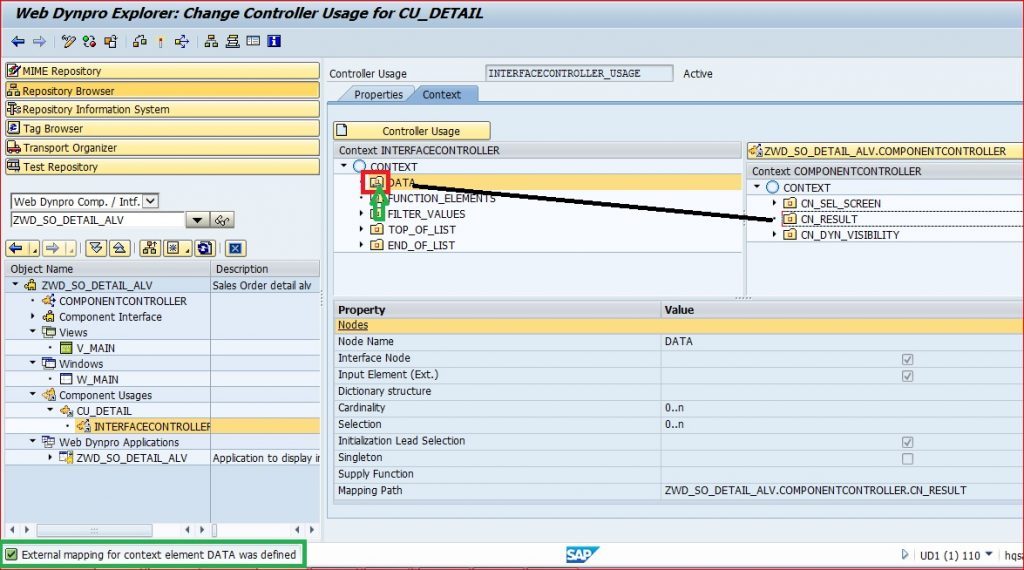
Check, the arrow is two way now and also you should get the message “External mapping for context element “DATA” was defined”.
Save and Activate your component. You are done.
Let us test out baby.