
In Part II, we created one input field, a button and one line of output. In this post, we would create more than one input fields, a button and a table with multiple lines as output.
Lets assume your functional specification documents says; We need a portal application which would report the number of orders created by particular users in a given date frame. Document name, Document type, creation date and user who created should be reported. Complex. In other words, create one input field for User Id, one range for Date field and display VBAK-VBELN, VBAK-AUART, VBAK-ERDAT and VBAK-ERNAM.. Easy ..
Lets plan our design as we did in Part II.
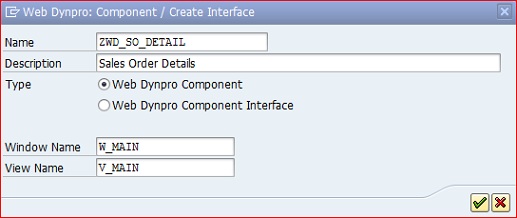
1) Create WD Component in SE80.
2) In this exercise, we will not create context in the component controller, but we will create in View Controller and use it locally.
3) Define the input screen context (one line structure type) and output result context (table type).
4) Design the layout and BIND your input fields and output fields.
5) In the execute button, create an Action and in the automatically created method, generate the code to read input fields, select data and display output fields.
Lets start..
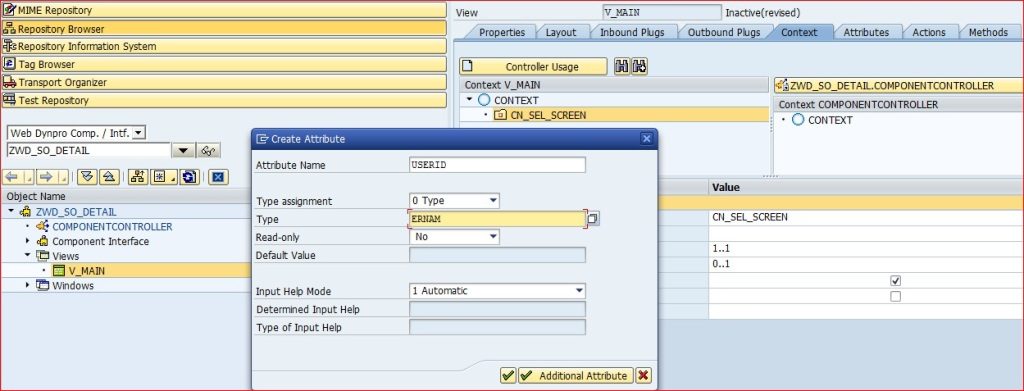
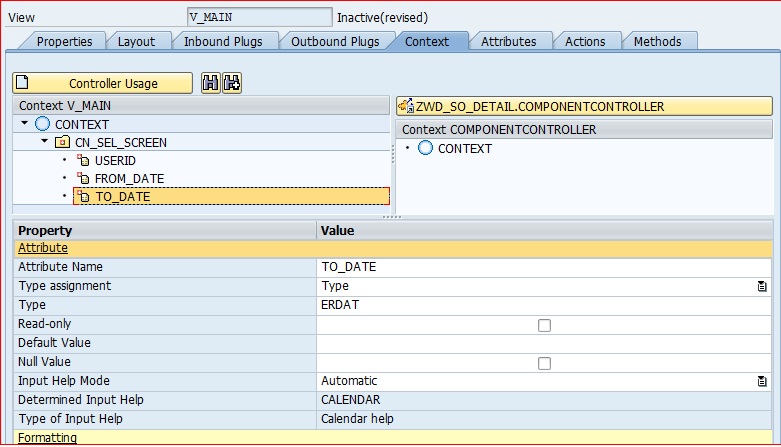
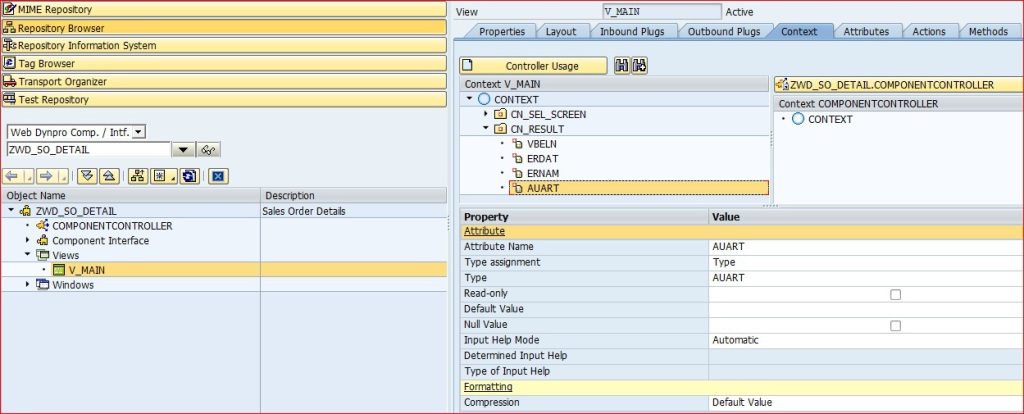
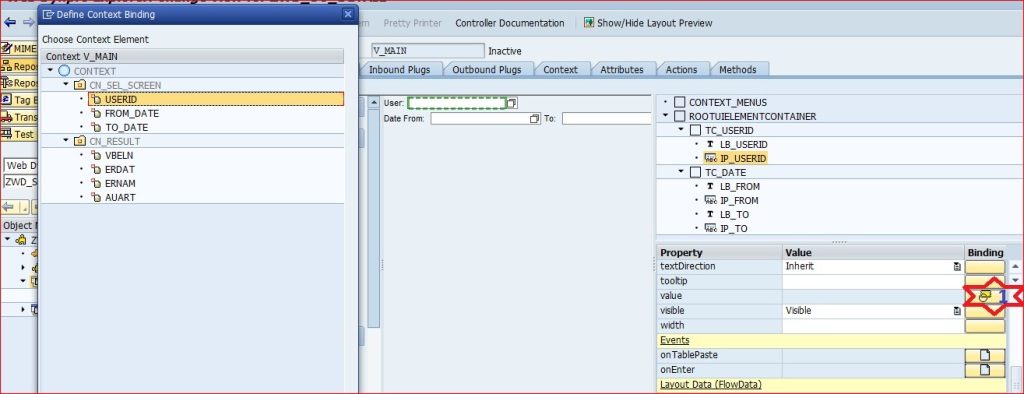
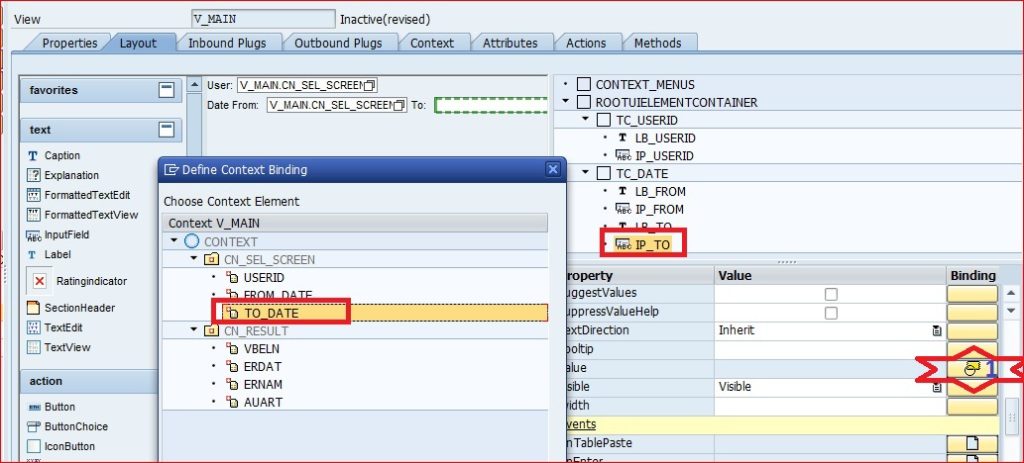
Step 1: Create your component in SE80. Go to View Context and define the selection screen context (CN_SEL_SCREEN). Three attributes/fields i.e. userid, from date and to date are defined. Similarly define output table context (CN_RESULT). As per requirement, four fields / attributes i.e. sales order, created date, createdy by and document type are defined.
Step 2: Go to View Layout and create input fields. Group them in transparent container. Do not forget to create Labels and align them. Remember to tag one label with one input field in the LabelFor property of Label.
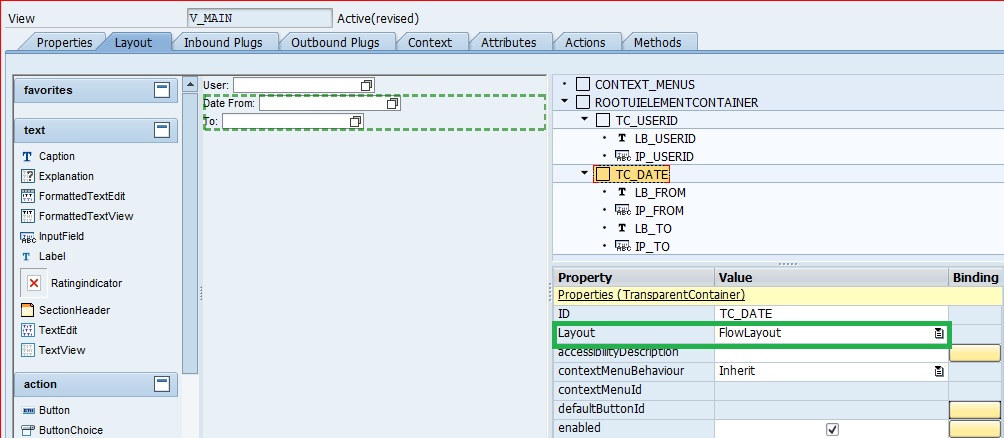
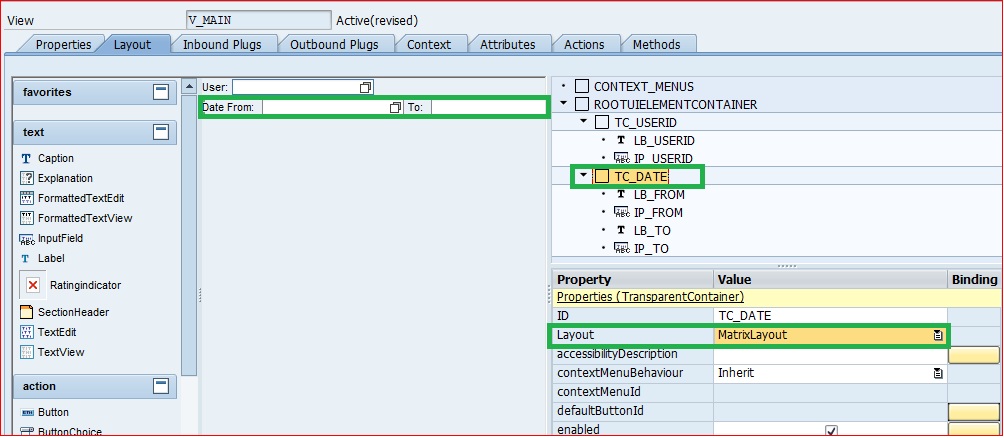
Did you bind the input fields to the context? By now, you should know that, context is your work area or variable or internal table. The UI element with which you tag/bind it, that context would hold your data.. Freeze it..
Step 3: Anxious to see how your screen looks like. Create an application for your component (right click and created), give a name and description and save it. Now right click the application and test or hit F8 to test your screen.
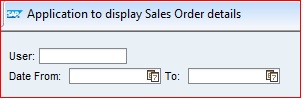
Congrats!! it does show up.
Tip: Please keep your input fields in different transparent containers. Check, we have different containers for different UI elements. You might not imagine its importance in simple developments. But for complex one with lots of UI elements, these transparent container would help in easy grouping and manipulation.
Step 4: Create another transparent container and pur TABLE UI element in it. This would be our final internal table. Bind it to the CN_RESULT context which we have already defined.
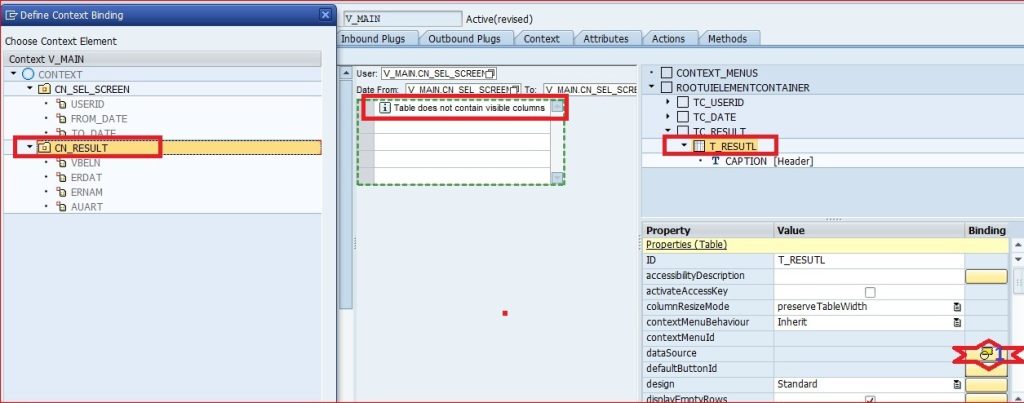
Still your table shows: Table does not contain visible columns.. What does it mean? You have one more step to do for Tables. Although you have bound the datasource with CN_RESULT, you still need to create a binding and define how it should look like.
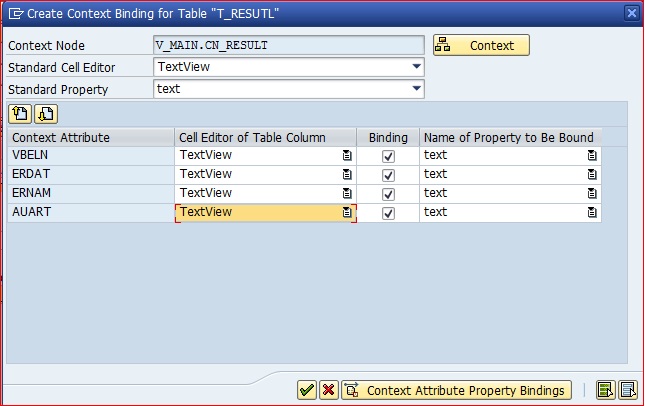
Right click on the Table UI element -> Create Binding and define the Cell editior for the table columns. We have shown it as text field. You can show it as button or input fields etc as per your requirement.
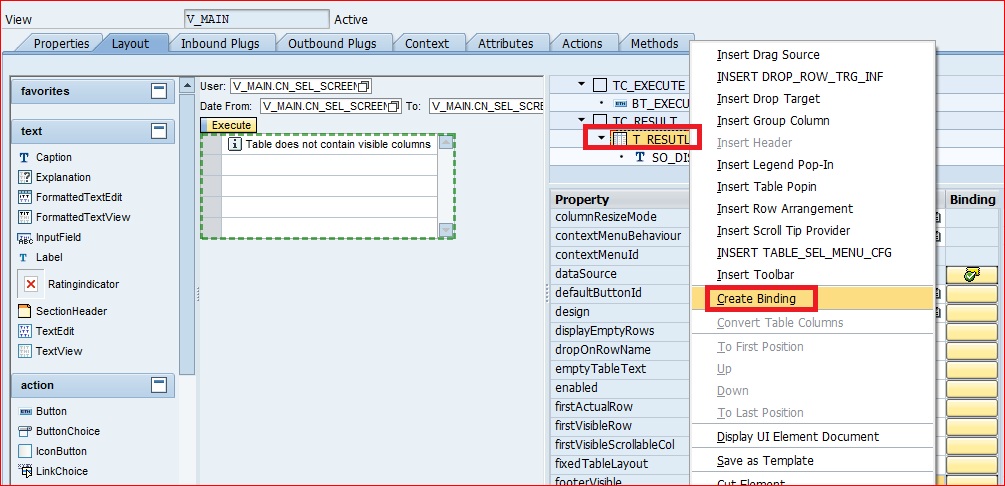
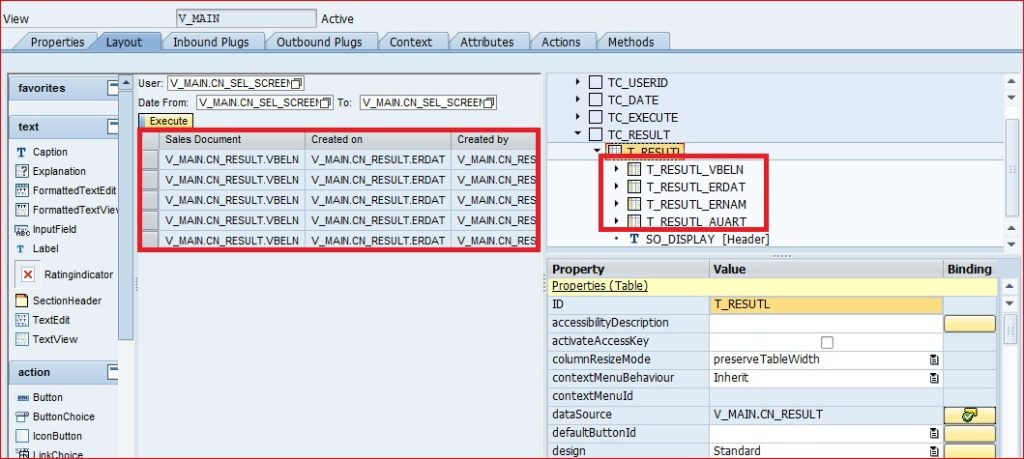
Magic.. your columns are visible now..
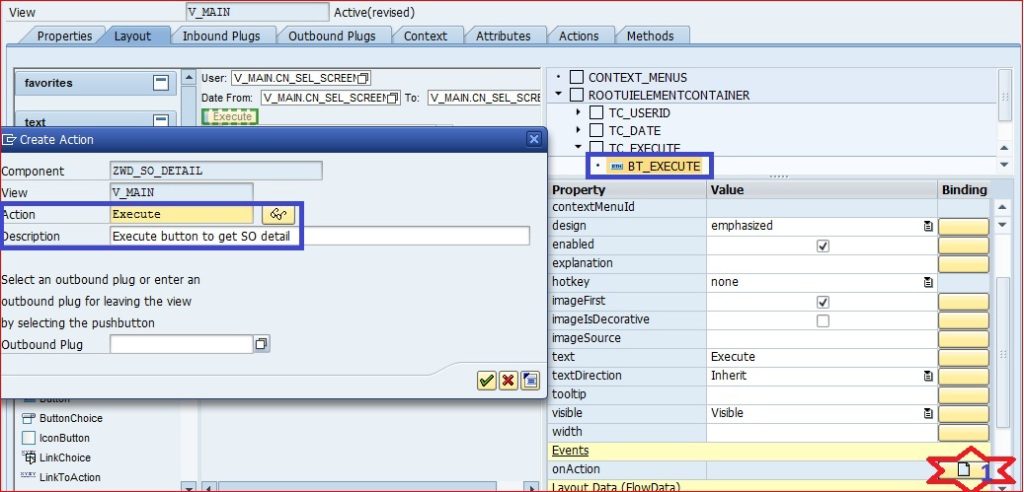
Step 5: Oops, we forgot to add the Execute button.
Create the button element and link onAction. Say your action name is Execute, check ONACTIONEXECUTE method is created.

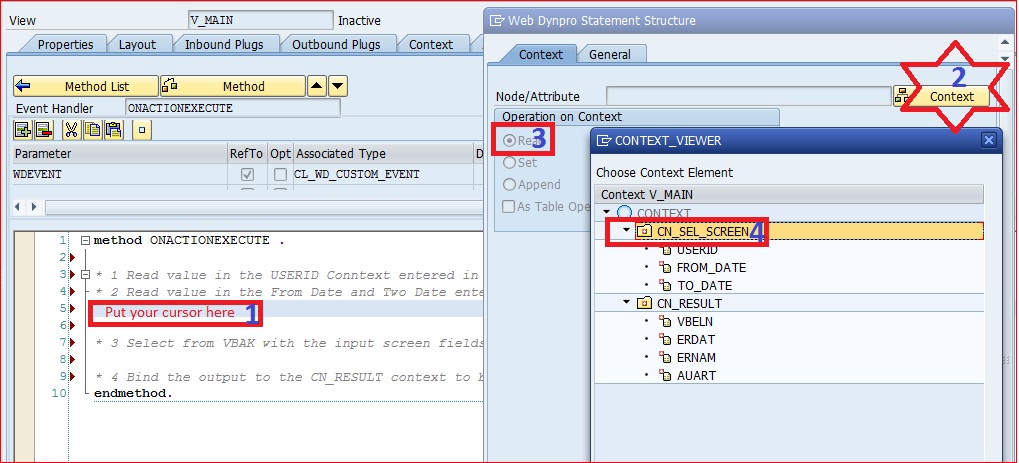
Step 6: The most important steps. We need to read screen input data, fetch data from database and display back in the screen.
- 1 Read value in the USERID Context entered in the screen
- 2 Read value in the From Date and Two Date Context entered in the screen
- 3 Select from VBAK table with respect to the input screen fields
- 4 Bind the output to the CN_RESULT context to be displayed in the screen

Lets READ screen data first.
Put the cursor at the right place, hit the wizzard icon (we call it MAGIC WAND), select READ Operation and then select the Selection Screen Context. Code is in place to read the screen data and kept in workarea/structure ls_cn_sel_screen. After deleting commented and unwanted auto-generated code, we are left with these codes.
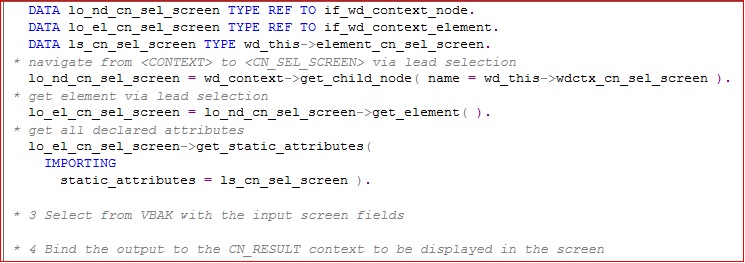
Please note, you could have used the wizard to read individual fields instead of whole structure. In that case, you would have three variable, one each for user id, from date and to date. Both the way would lead to your solution. But, second option would generate more lines of codes.
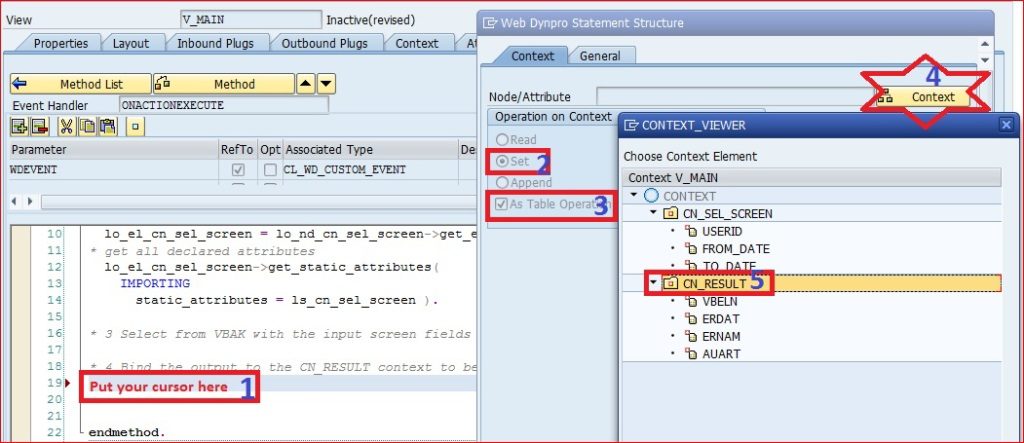
Now, lets SET final output data.
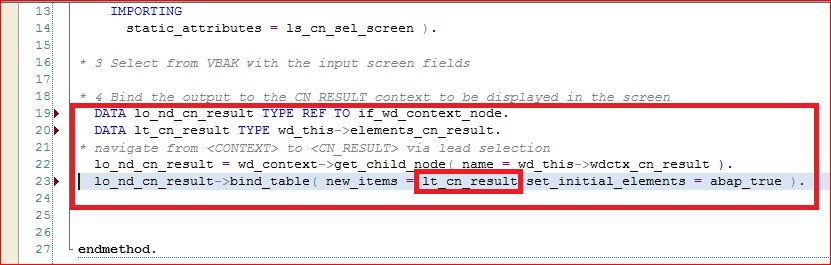
Put the cursor at desired place, hit the MAGIC WAND, make sure to select SET and As Table Operation (as the output would be displayed in multiple lines). Auto code are generated and after deleting commented line and unwanted code, below useful lines are left. LT_CN_RESULT is the final internal table which should be populated to display the result.
So, we have code to read screen data and display to screen data. But, what would we display!!!! We need to SELECT data from database and pass it to output context.
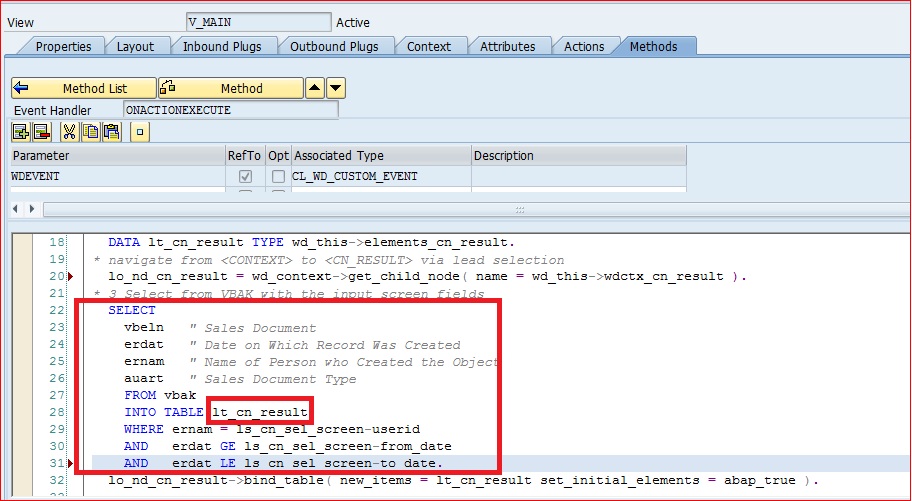
Before LT_CN_RESULT is been bound to screen, we should select the data and populate it. This is the only piece of code snippet a developer has to write by him/herself for this application. Isn’t this cool. Less code…
Step 7: Lets test.
Execute your application, give a valid user id and some date range. Bingo.. The output is displayed in the table.

This is a simple post to show output in table. We should handle the errors, also the output table skeleton should not be shown when we see the page first. Columns should be displayed once user hits the Execute button. Also, the date range should be handled so that, To date is not less than From date.


