Introduction:
Transaction Launcher is used to launch SAP GUI Transactions from SAP CRM Web UI.
In this document , we will see the steps required to launch the SAP CRM GUI transaction CRMD_ORDER from Web UI.
The detailed steps to launch the SAP CRM GUI transaction from Direct Link Group , From Work Center ( Not visible in Menu ) and from Work Center ( visible in menu ) has been discussed in this document.
Also, the steps necessary to find the Business Role , Work Center Details , Direct Link Details are also explained in this document.
Sample Transaction Launcher:
(a) Incase Logical Link ( of type Launch transaction ) is assigned to Direct Link Group, it appears as below in Web UI:

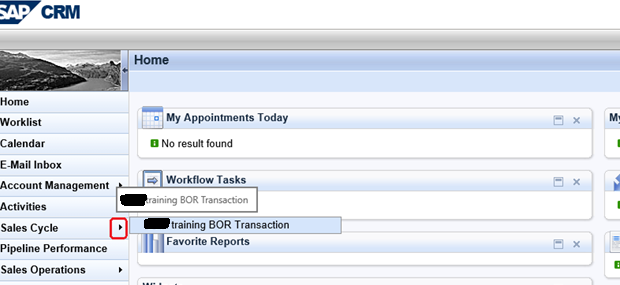
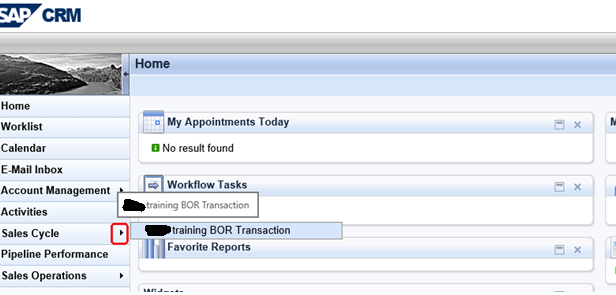
(b) Incase Logical link( of type Launch transaction ) is assigned to Work Center ( Not visible in menu ), it appears as below in Web UI:
(c) Incase Logical link( of type Launch transaction ) is assigned to Work Center ( visible in menu ), it appears as below in Web UI:
Below are the steps for Launching BOR transactions from SAP CRM Web UI:
- Create the BOR Object and set the status of the Object to Implemented
- Define the Transaction Launcher, Logical system and URLs (Prerequisite for this step is to get the details of PORT, Host Name from TCode SMICM and Logical system from TCode bd54).
- Configure the transaction Launcher (here the transaction Launcher is created) and make a note of the Transaction Launcher name.
- Create a Logical Link of Type ‘Launch transaction’
- Get the Business Role assigned to the Position
- Get the Navigation Bar profile assigned to the Business Role. Follow Step (7) (or) Step (10) depending on whether the Logical link must be assigned to a Direct Link Group (or) Work Center accordingly.
- Get the Direct link assigned to Navigation Bar profile accordingly and
- Assign the Logical Link to the Direct link
- Make the Logical Link visible
- Get the Work Center link assigned to Navigation Bar profile accordingly and
- Get the Work Center Link Group assigned to the Work Center
- Assign the Logical Link to the Work Center Link group
- Make the Logical Link Visible ( from Menu / Not from Menu accordingly )
- Launch SAP CRM Web UI, select the Role and the transaction can be launched now via the Transaction launcher.
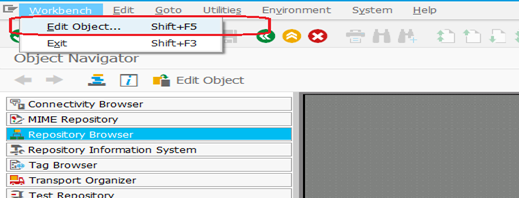
Step (1): Create the BOR Object and set the status of the Object to Implemented
TCode: se80
Click on Workbench -> Edit Object -> click on tab Business Engineering -> choose Business Object Type -> type TSTC -> click on the copy icon
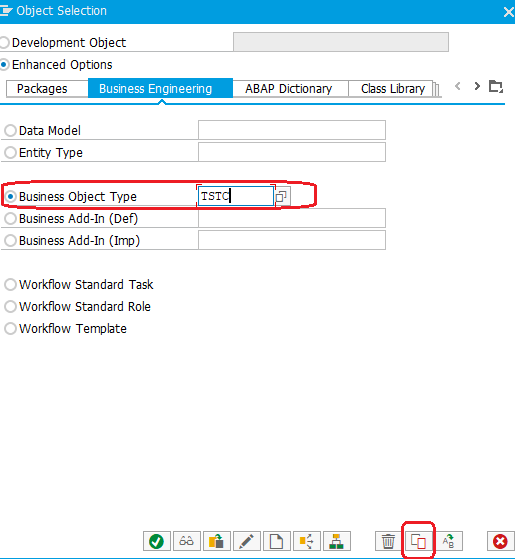
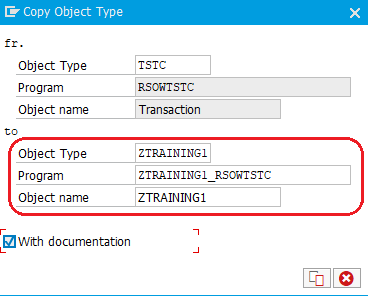
In the popup that appears, give the values of the Target Object Type, Program, Object Name and click on Copy button.
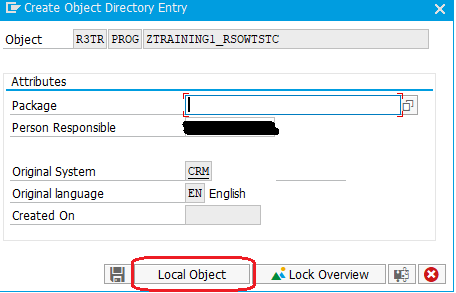
In the next PopUp give the Package ( or Local Object button ) accordingly and click on Save button.
Now we will set the status of the New Business Object ZTRAINING to Implemented. To do this go to TCode se80.
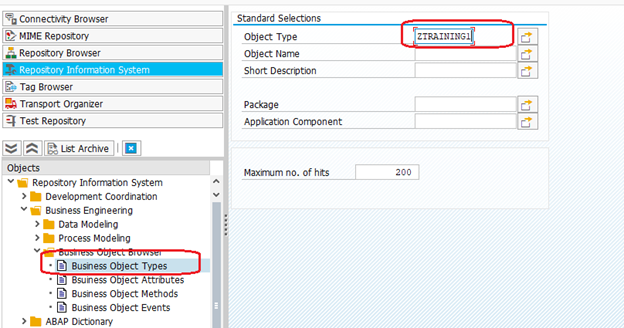
Execute transaction SE80 -> Click on Repository Information System -> Expand Business Engineering -> Expand Business Object Browser -> Double click on Business Object Types -> Type ZTRAINING1 (the newly created Object) in Object Type field -> Click on execute icon
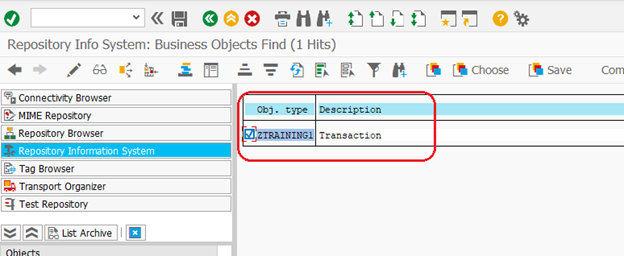
Now double click on the Obj. Type (ZTRAINING1 in above screenshot).
Expand Methods and Click on the Edit icon.

Double click on the Execute Method.
Click on the Synchronous Checkbox and click on Continue.

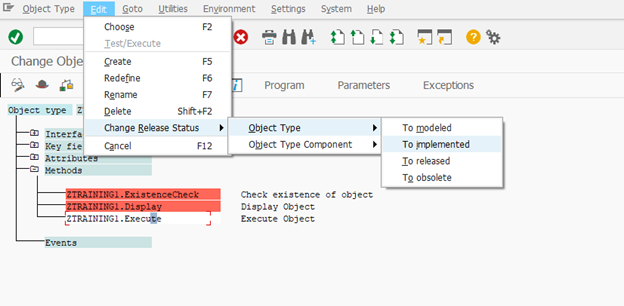
Now we to change the Release Status of the newly created Object. To do this Click on Edit -> Change Release Status -> Object Type -> To Implemented. When prompted to save Object Type click on Yes.
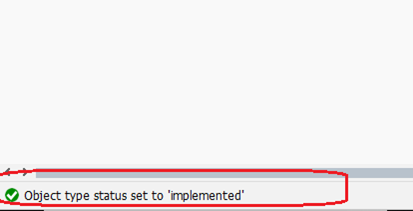
Once the status of the Object is changed to Implemented, you can see the below message at the bottom of the screen.
Step 2: Define the Transaction Launcher, Logical system and URLs (Prerequisite for this step is to get the details of Port, Host Name from TCode SMICM and Logical system from TCode bd54).
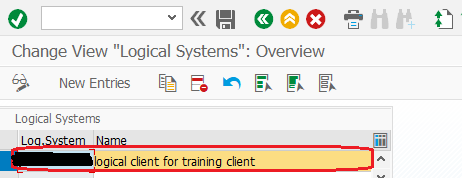
Prerequisite 1: Logical system Name (TCode bd54).
Prerequisite 2: Details of Port, Host Name (TCode SMICM):
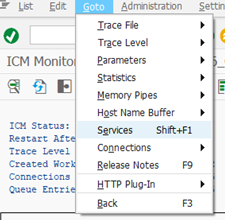
Go to TCode SMICM. From Top Menu choose Goto -> Services. Then choose the Protocol and get the corresponding Port, Host Name details.
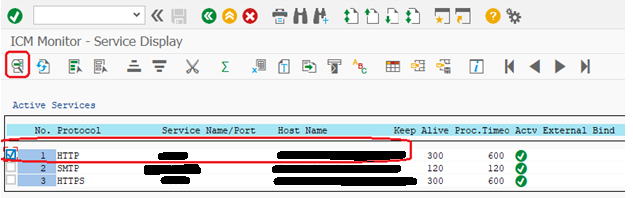
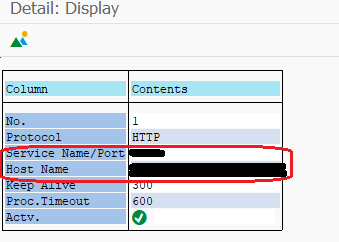
Host Name and port can be obtained from above screenshot.
Now we will define the Transaction Launcher, Logical system and URLs in TCode CRMS_IC_CROSS_SYS.

Logical System: Give the Logical system Name.
Local ITS: uncheck it.
ITS Client: Mention the client.
URL of ITS for launching the transaction from Web UI:
Structure of the URL is as below:
http://<icman-host>:<icman-port>/sap/bc/gui/sap/its/webgui ~transaction=IC_LTX&~okcode=ICEXECUTEIcman-host and Icman-port can be obtained from TCode SMICM as per screenshots above.
The part (/sap/bc/gui/sap/its/webgui) of URL is arrived from TCode SICF.
Transaction=IC_LTX if Transaction is present in same system. Hence in our case it is IC_LTX as we are launching Transaction CRMD_ORDER from CRM Web UI.
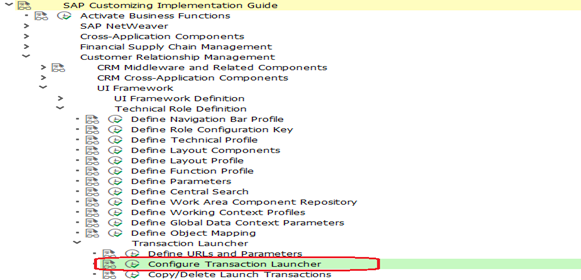
Step 3: Configure the transaction Launcher (here the transaction Launcher is created).
Now we will configure the transaction Launcher and create a new transaction.
To do this go to Transaction SPRO -> SAP Reference IMG –> Customer Relationship Management -> UI Framework Definition -> Technical Role Definition –> Transaction Launcher -> Configure Transaction Launcher.
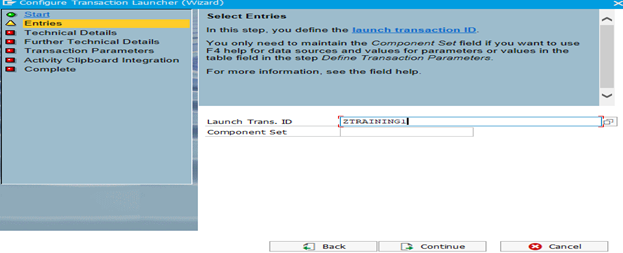
In the Wizard , give the Launch transaction id and Click Continue button.
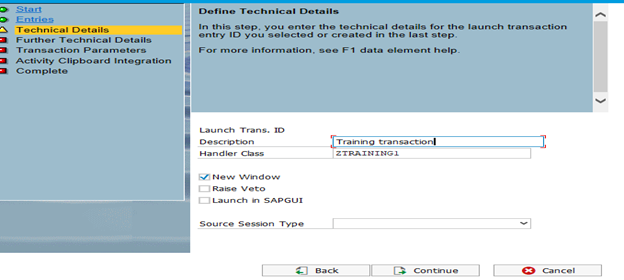
In the Next screen, give a Description, Handler class (Please Note that the Class must be a New Class that does not exist) and click on New Window (if you want the transaction to Launch in a New Window).
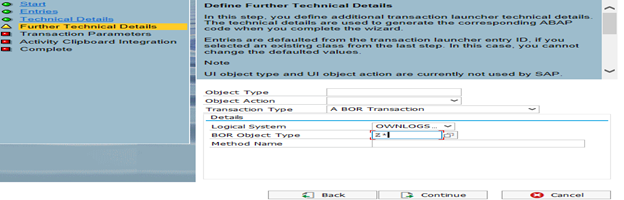
In the Next Popup, give the transaction Type as BOR transaction, Logical System.
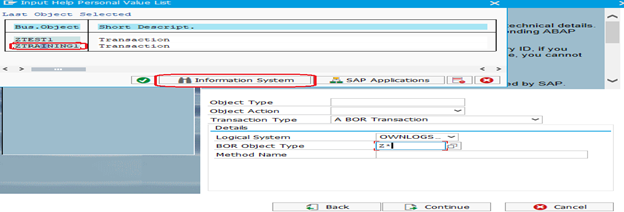
In BOR Object Type give the Object type as Z* and click on F4.
Choose the BOR Object type (ZTRAINING1 in our example) and click on Information System and uncheck the checkbox ‘Released’ and check the checkbox ‘Implemented’ and click Continue button.

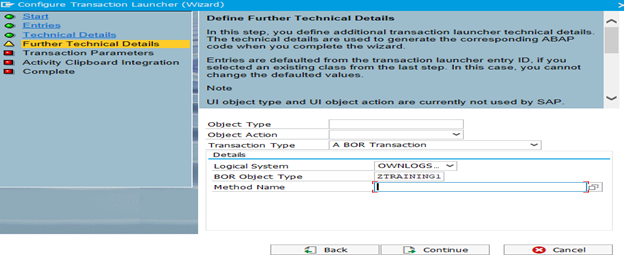
In the Next Pop Up select the BOR Object Type and click on Tick mark on the popup and the BOR Object type is populated as below:
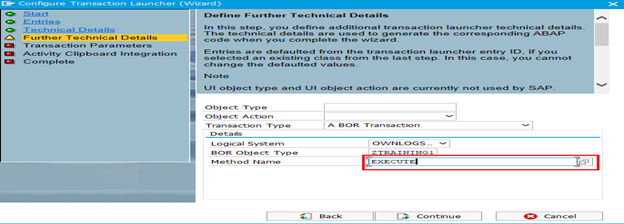
For Method name, click on the F4 Help and select Method Name as EXECUTE and click on Continue button.
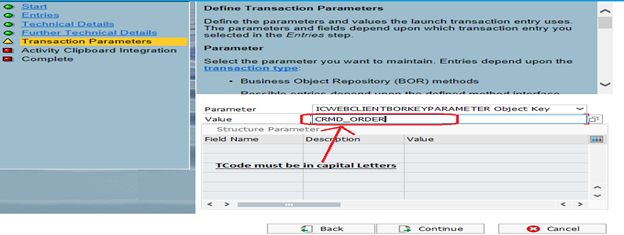
In the Next popup, give the Parameter as ICWEBCLIENTBORKEYPARAMETER and the value as the TCode we want to launch (In our case it is CRMD_ORDER) from Web UI.
Please Note:
Ensure the TCode (In our example CRMD_ORDER) is given in Capital Letters (CRMD_ORDER and NOT crmd_order).
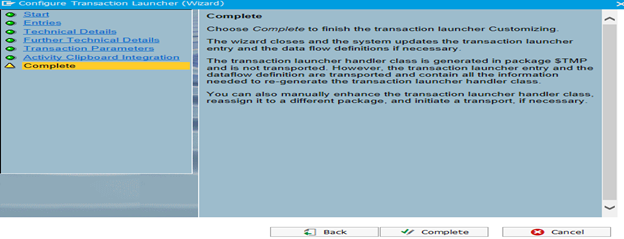
Click on Continue button twice and Complete the Transaction Launcher.
Give the TR details in the Pop Up.
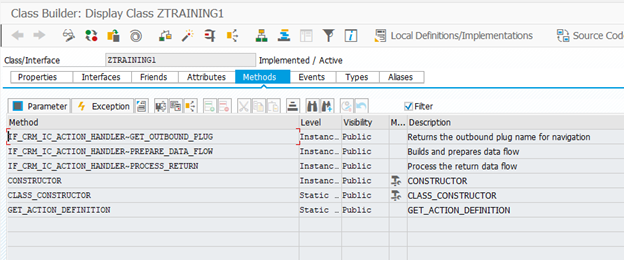
In TCode se24, we can see the Handler class created.
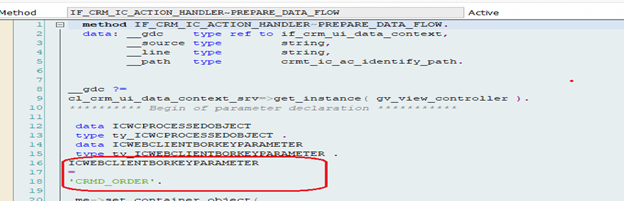
In method IF_CRM_IC_ACTION_HANDLER~PREPARE_DATA_FLOW, we can see the TCode given in the Wizard in above steps:
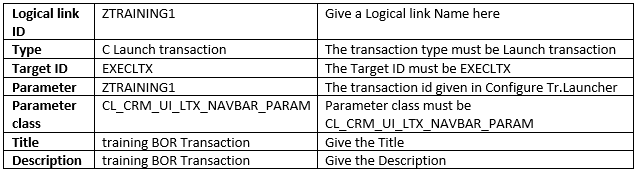
Step 4: Create a Logical Link of Type ‘Launch transaction’
To create a Logical Link for transaction Launcher go to TCode crmc_ui_nblinks and create a new Logical link of type ‘Launch transaction’.
Click on Define Logical links and click on New Entries:
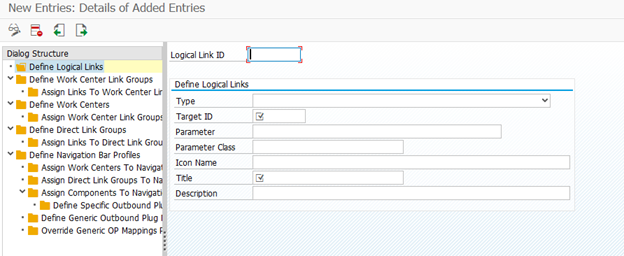
Give the values as below:
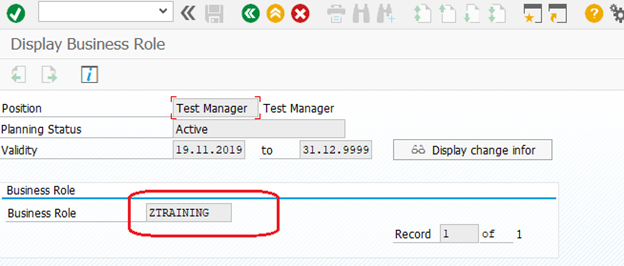
Step 5: Get the Business Role assigned to the Position
The Business role assigned to the position can be obtained from TCode ppoma_crm.
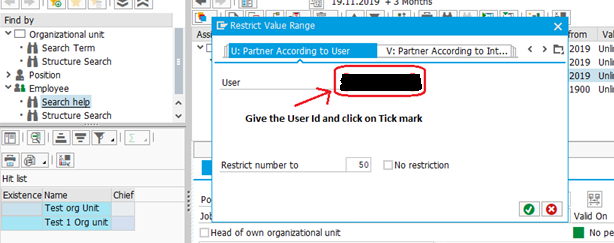
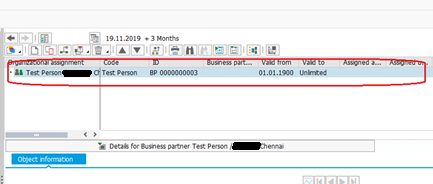
Select the record click on One Level Up.
Now select the position as per below screenshot.

Now click on Goto->Detail object->Enhanced object Description.
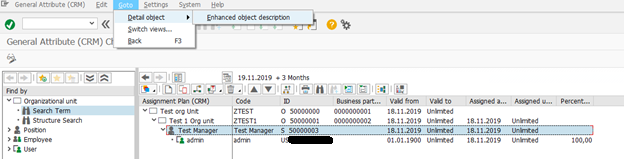
Now select the Business Role and click on display infotype.

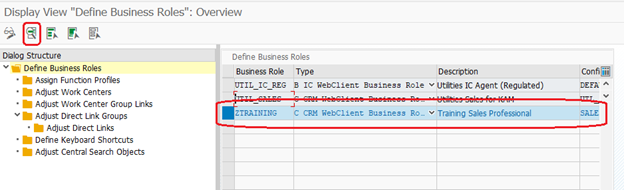
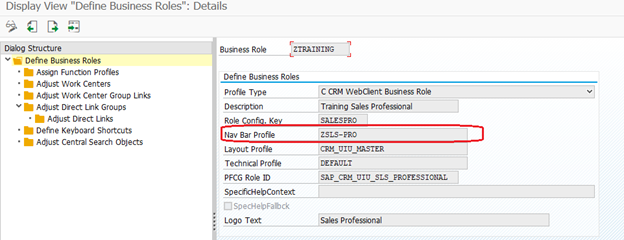
Step 6: Get the Navigation Bar profile assigned to the Business Role
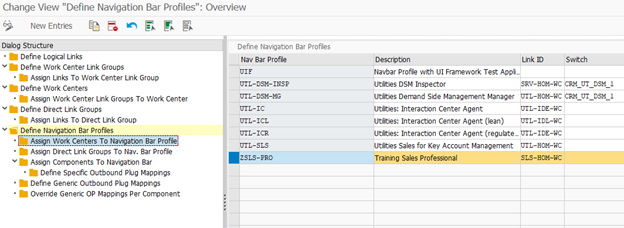
To get the Navigation Bar Profile assigned to the Business role, go to TCode crmc_ui_profile and search for the Business role and get the corresponding Navigation Bar profile.
Step 7: Get the Direct link / Work Center link assigned to Navigation Bar profile accordingly and
- Assign the Logical Link to the Direct link
- Make the Logical Link visible
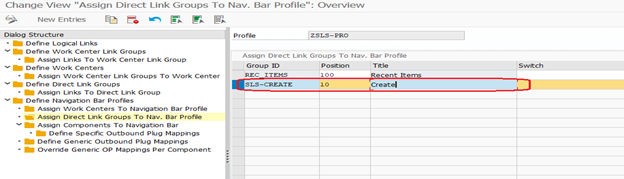
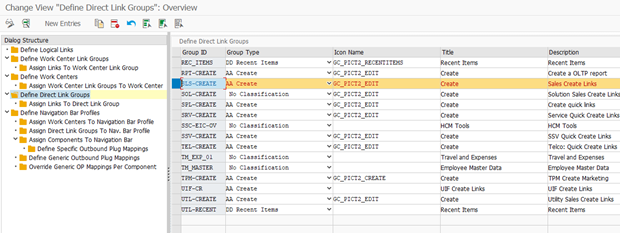
Get the Direct link Group assigned to the Navigation Bar Profile:
To get the Direct Link Group assigned to Navigation Bar profile, go to TCode crmv_ui_nblinks and select the Navigation Bar profile. Click on Assign Direct Link Groups To Nav. Bar Profile and make a note of the Group Id.
Assign the Logical Link to the Direct link:
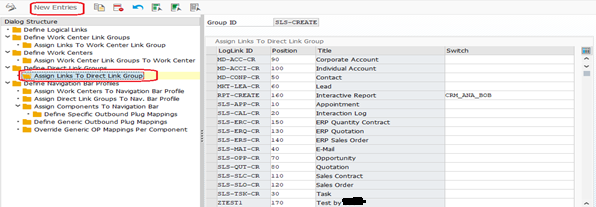
Now to go “Define Direct Link Groups” and search for the Group id (SLS-CREATE from above screenshot) and select the row.
Now click on “Assign Links To Direct Link Group” and click on New Entries.

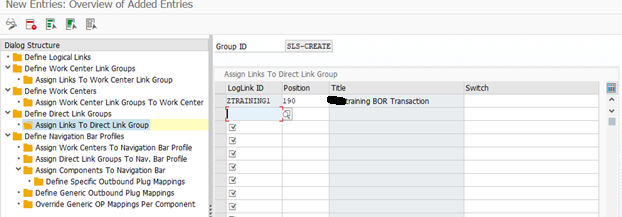
Give the Logical Link details, position and click Enter and save..
Position indicates the sequence of the logical link under the Direct Link group.
Make the Logical Link visible:
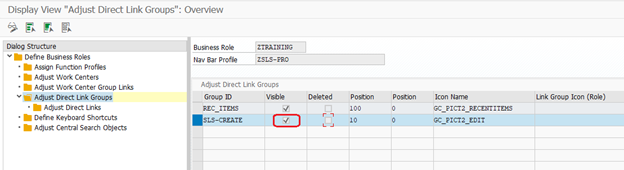
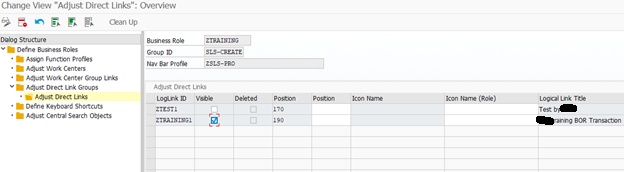
To make the Logical link visible go to TCode crmc_ui_profile and select the Business Role and click on Adjust Direct Link Groups and ensure that the visible checkbox is checked for the Group id ( SLS-CREATE in our example ).
Now click on Adjust Direct Links and select the logical Link id ( in our example ZTRAINING1 ) and select the checkbox visible and click on Save.
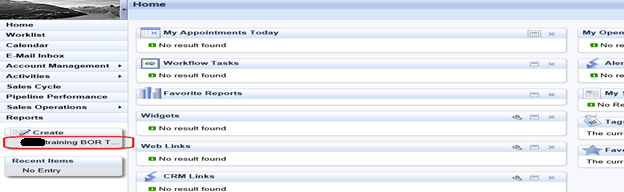
Now Launch Web UI and select the Business Role. We will be able to see the Logical link under the Direct link as per below screenshot:
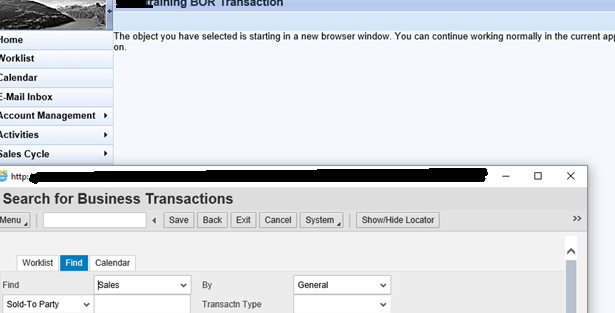
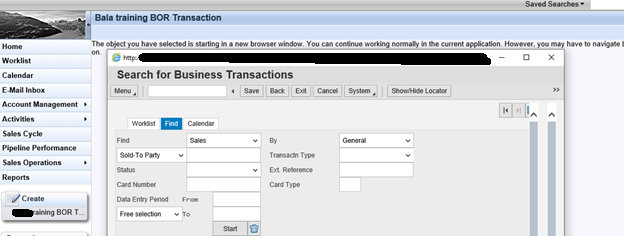
On clicking the logical Link, the Transaction CRMD_ORDER opens up in a New Window as per below screenshot
Step 8: Get the Work Center link assigned to Navigation Bar profile accordingly and
- Get the Work Center Link Group assigned to the Work Center
- Assign the Logical Link to the Work Center Link group
- Make the Logical Link Visible
Get the Work Center link assigned to Navigation Bar profile accordingly:
To get the Work Center Link assigned to the Navigation Bar, go to TCode CRMC_UI_NBLINKS and select the Navigation Bar profile and click on “Assign Work Centers To Navigation Bar Profile”.
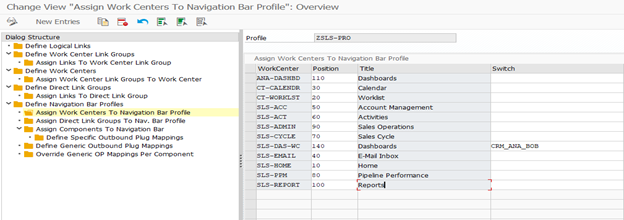
Now make a note of the Work Center.
The above Work Centers correspond in Web UI as below:
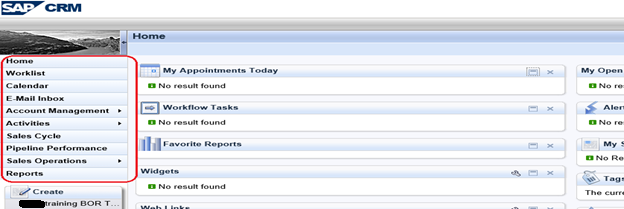
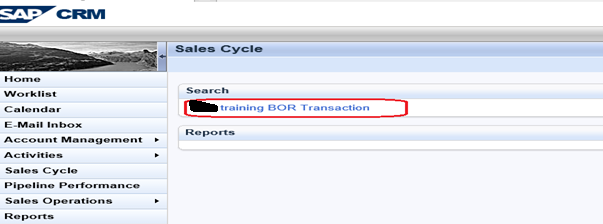
Let us add our Logical Link Under a Work Center Group Link under Sales Cycle in above screenshot.
So the Work Center ID is SLS-CYCLE.
Now go to Define Work Centers and search for the Work Center SLS-CYCLE.
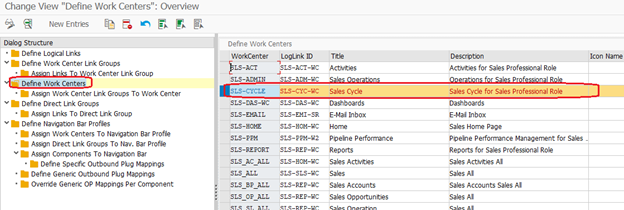
Now click on “Assign Work Center Link Groups To Work Center” and make a note of the Work Center Group Link under which you want to add the Logical link.
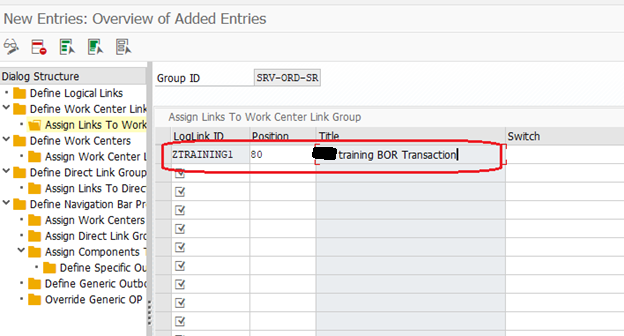
Let us add our Logical Link to the Work Center Group Link “SRV-ORD-SR”.
Now go to “Define Work Center Link Groups” and search for the Work Center Group Link SRV-ORD-SR.
Now select the Work Center Group Link and click on “Assign Links To Work Center Link Group”. and click on New Entries and give the Logical link Name and press Enter and click on Save button to assign the Logical Link.
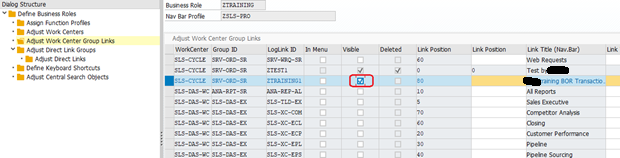
Make the Logical Link Visible (But not from Menu):
To do this go to TCode CRMC_UI_PROFILE, and go to Adjust Work Center Group Links and select the corresponding record and check the Visible Checkbox as per below screenshot and click on Save button.
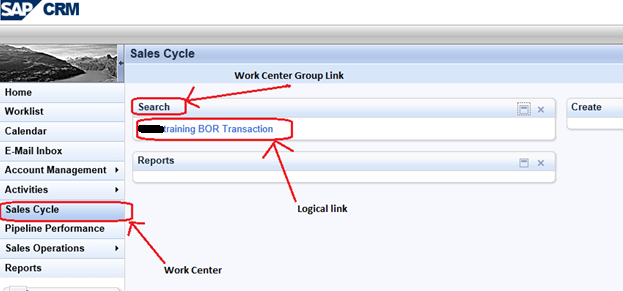
Now Launch Web UI and select the Business Role. You will be able to see the Logical link under the Work Center Group Link (Under Work Center) as per below screenshot:
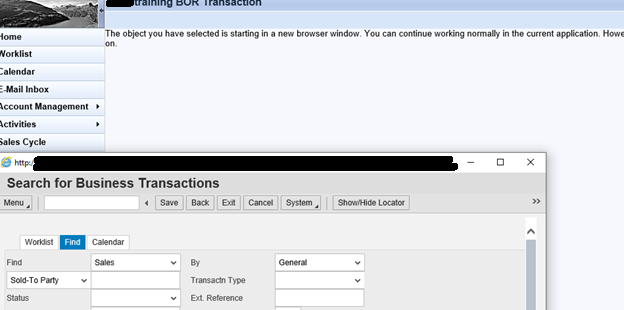
On Clicking the Logical Link, the TCode CRMD_ORDER opens in a new Window as per below screenshot:
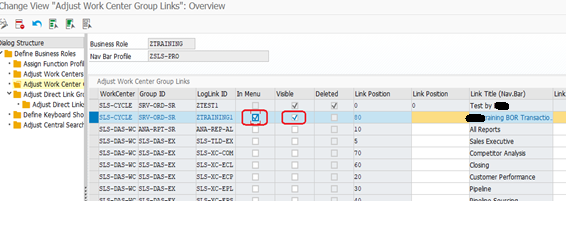
Make the Logical Link Visible ( From Menu):
To do this go to TCode CRMC_UI_PROFILE, and go to Adjust Work Center Group Links and select the corresponding record and check the Menu and Visible Checkbox as per below screenshot and click on Save button.
Now Launch Web UI and select the Business Role. You will be able to see the Logical link under the Work Center in the Menu as per below screenshot: